Every girl can play with her favorite dolls and toys for hours on end. Before, you could often meet your father in the garage, carefully building Dollhouse ik for my beloved daughter.
After all, such a gift was the ultimate dream of any little princess. It is worth noting that in those days it was much more difficult. On the shelves of shops there was no such abundance of cheap and available materials, from which one could easily build a palace for dolls.
Today we will present you 12 dollhouse projects for your little angel.
DIY projects of houses built from scratch
The first proposed DIY project from Ana White is just a dream for any child. It includes three floors with seven rooms, including a bathroom and a lavatory.
The whole design is made of natural and environmentally friendly materials, so nothing will harm the health of the child during the game.
There are also special rollers that will greatly facilitate the movement of the structure around the room. The height of the house is designed for a standard Barbie, so there will be no problems with choosing a suitable doll, and your girl will be satisfied!

Another idea from Ana White. Unlike the previous one, it is designed for smaller dolls. But this house is more detailed interior decoration and furniture. The idea of using family and children's photos as decorations is especially well applied here.

Here we see a slight modification of the first draft. A caring father decided to please his daughter with a chic Christmas present! If you make a house yourself, the number of floors and rooms is limited only by your imagination and possibilities. A huge advantage in its creation will be taking into account the wishes and preferences of the child.

This amazing project from Young House Love pleases with its simplicity and great design. Due to the open front panel, the house is very convenient to use. In order to fix and protect from falling, it can be easily attached to the wall.
The interior decoration of the rooms looks especially beautiful. The design uses a variety of colored paper and the most detailed furniture.

The next DIY project is similar in design to the previous one. However, the designers from Under the Sycamore decided to use vintage fabrics with colorful patterns as wallpaper.
Such a house can be a great gift for a daughter, granddaughter, younger sister or niece, and adding a few sentimental accents will make it even more meaningful and dear to the heart.

Give furniture a second life by turning it into a beautiful dollhouse
Naturally, not everyone has enough time and skills to create a complex DIY project from scratch. However, do not despair, you can find a way out of any situation!
To create a house, you can easily use old and unnecessary furniture, because having a ready-made frame, it is much easier to arrange and decorate it than to start everything from the very beginning.
Here we see an awesome bookshelf transformation idea from Simple as That. Everything looks very nice and neat. Several shelves can be made into miniature furniture and used for games, while others are useful for storing things and toys.

Do you want to please your daughter with a long-awaited toy without resorting to serious expenses? Then feel free to proceed with the design of the tower from CDs. All you need to do is build a roof, cut out some windows and add a couple of decorative pieces.
Then cover the structure with several layers of paint. Here is a wonderful Delightful dollhouse and ready!

Another design option for a similar tower. This time using natural wood. Such a house is perfect for playing in the garden or in the yard. You can also please your daughter with dolls and furniture. self made, unless of course you have certain carpentry skills.

The next idea was kindly presented by the designers from Neon Fresh. To do this, it was necessary to fasten two bedside tables, and using plywood sheets to create partitions for floors and interior walls there.
At the end, the interior and exterior of the future house are designed and the rooms are filled with furniture. All! An amazing DIY project is ready!

Out of the box thinking
Do you want to surprise your child with something unusual? Try to embody the idea from Hart and Sew. It is a portable house in a suitcase. This idea allows you to make an interesting and comfortable house for dolls, in which after the end of the game you can put all the toys away.
In addition, it is very convenient to move around the room. Such a functional house does not take up much space, you can store it even under the bed.

The next project is just for those who have absolutely no space for massive structures. To recreate the idea from Checkout Girls, you will need some sewing skills. The whole point is that the furniture is held on with Velcro, and it can be easily moved around the rooms. The panel is hung on the wall, which organizes space for games and creativity.

A grand solution for a dollhouse
This is a truly grandiose and magnificent project, which has no analogues. It took Mad's Mouse House designers 11 months to create the house. This is not just a toy, but a real work of art, one might say, a museum piece!
It hits everything: general design, created from an old log, and a huge number of floors and rooms. Look at the interiors and furniture! Everything looks so natural, as if the reduced copies are exactly the same as the originals.
Such a masterpiece will be the best gift for your daughter, and will become one of the most significant events in her life.

We hope you got enough ideas for creativity, met the inspiration that has come and already rush to the garage or workshop to please your girl with an amazing gift for the next holiday.
Remember the main thing: a little patience, and you will succeed! Approach the process creatively, with love. Then this house will give your child a lot of impressions and memories for life.
All girls play with dolls. The game will become even more interesting if, in addition to the main characters, the little hostess has a variety of accessories and furniture. The wooden doll house is very useful thing, which perfectly develops the thinking and creative abilities of the child. Where to buy a toy house and how to choose, or is it better to do it yourself?
Which one to buy?
In any modern toy store you can see such houses of various sizes and configurations. For Barbie dolls and their analogues, plastic products are most often offered. But wooden house puppet - the toy is more durable, environmentally friendly and convenient for interior decoration and all kinds of alterations. You can also find houses like this for sale. Usually they are offered to customers in a disassembled form and are a designer that can be assembled once and fixed, or assembled and disassembled many times. When buying a similar toy (from any material), carefully study the dimensions finished house, they are usually indicated on the packaging. Remember that houses of various sizes can be found on sale, each of which is suitable only for "tenants" of a certain height. In many regions of our country, you can also order the manufacture of a doll house and furniture for it from wood. A similar service is offered by many salons of handmade furniture and interior items.

From project to finished house
A variety of easy to do with your own hands. This will require a minimum building tools and simple skills of a home master. Start with a sketch - draw on a piece of paper the desired configuration of the future craft, mark the number of rooms and their location relative to each other. A wooden doll house can be made in the form of several boxes or have a more complex shape with a detailed facade, carved windows, internal stairs, beautiful roof and decorative cornices. It all depends on your skills and desires. When the project is ready, it is necessary to make paper templates for all necessary details real size. After that, you can start cutting them out of the selected material.
Choice of building materials
If you already have unwanted boards or plywood, you can use them for crafting. Otherwise, you should go to hardware store go shopping. The best option- dense MDF, plywood or similar. Try to calculate correctly required amount material. For bonding individual elements use small nails between each other. All joints can be additionally lubricated with sealant. Wooden doll house can be painted and wallpapered. Buy Special Decoration Materials does not make sense, they are sure to be found in any home.

decorative trim
When the house is assembled, you can proceed to its decor. External facades Can be left natural or painted over. If you are planning to wrap interior rooms wallpaper, do not be too lazy to apply a layer of primer. For decor "rooms" you can also use plastic and foam panels and any other materials left after the repair. Flooring it is also better to stick to the base, in this case it will not slip.
Windows can be made inside the house. If you haven't cut them out, just find the right pictures in a magazine, print them out, or draw and cut them out. Then stick them directly to the walls. You can add real textile curtains and curtains. Try using the appliqué technique to make also paintings, panels and any other items that decorate the walls.
Wooden dollhouse: photos of interiors and decoration
The final stage of arranging housing for dolls is the arrangement of furniture and the settlement of happy "residents". This important task can be entrusted personally to the child. A variety of finished furniture can be found in any toy store. Choose sets and individual items to your liking, correctly estimating the sizes. Do you want all the new things to fit in the existing wooden dollhouse?

You can also make furniture with your own hands. Use for this the remnants of plywood, thick cardboard. Manufacturing is a process similar to building a house. First you need to make patterns out of paper, after which you can start cutting out elements from dense material and assembling. From multi-colored shreds and pieces of fabric, it is not difficult to sew textiles for a playhouse. Do not forget to make bedding, rugs and other necessary little things. Arrange furniture in rooms, add small accessories - and you can celebrate housewarming. Now you know how to make a wooden doll house. You can be sure that your child will definitely appreciate this toy!
Every little girl has at least a dozen dolls different models and size, so sooner or later the question of buying a toy house for them is raised. You can find the required accessory in stores, but the price for it can be sky-high for the budget of the average family. Moreover, most toys are made of fragile plastic, which quickly becomes unusable. The best way out is to build a beautiful and durable doll house yourself from inexpensive materials. A little hostess can also take part in the design and layout of the rooms, who will surely like this activity.
Whatever material the dollhouse is made of, there are several rules that must be observed when building the product.

Requirements:
- Safety. The structure must not have sharp corners or protruding parts that could injure a child. It should be remembered that you can even cut yourself with a sheet of plain paper if it is glued in the wrong place.
- Reliability. All parts of the house must be firmly attached to each other, ensuring the strength of the entire structure. Children, especially those under three years old, can play too actively with the house, so it is better to strengthen the walls additionally.
Making a dollhouse for kids younger age, it is not recommended to use small pebbles, beads, sequins when decorating rooms, as a child can swallow them or insert them into the nose and ears.
You can make a house for dolls from cardboard (cardboard boxes), plywood, MDF, old bookcase, rack or chest of drawers. Textile houses, fully sheathed, are in separate demand. soft cloth. The downside is that they usually small size, but you can take them with you on trips and let kids under three years old play.
The cheapest cost is the construction of cardboard or thick cardboard boxes, for example, from under the TV or refrigerator. And if you beautifully decorate the house inside and out, then not every person will understand what material it is made of.
A house made of plywood, wood or MDF will serve its little mistress long time, because it will be made of durable materials that are resistant to stress.
Practical tips: how to make a doll house from a bookshelf or shelving unit
You can convert a rack or bookshelf into a dollhouse without spending a lot of time and money. For these purposes, also suitable small lockers from ikea, 1 - 1.2 meters high, with two or three shelves. The distance between the shelves should be about 30 cm, so that Barbie or Monster High dolls can easily fit there.

materials, which will be neededfor work:
- Boards or a sheet of plywood for the roof (the width must match the width of the cabinet);
- MDF or plywood from which the new back wall will be made;
- Several small photo frames that will act as trim for windows;
- Construction glue PVA or carpentry glue (you can use liquid nails);
- Putty;
- Paints (acrylic, watercolor, gouache);
- Pieces of wallpaper, colored paper (to decorate the walls);
- red or cardboard Brown from which the tiles are made.
You will also need brushes, a drill, a screwdriver or a screwdriver, wood screws, a jigsaw.
If the locker is used old, then it must first be cleaned and painted. Alteration begins with the installation of windows. To do this, marking is first made, and then rectangular openings are cut with a jigsaw and frames are installed. Next, a roof is assembled from two boards or pieces of plywood, screwing them to each other at a right angle. Tiles cut from rectangular pieces of cardboard are immediately glued onto it. The roof is screwed on from above, and then the rear panel, cut to size, is mounted. The next step is to install internal partitions. Next, you can start decorating the rooms. Furniture can also be made independently from scraps of plywood, or you can buy ready-made kits from IKEA.
Quick and Easy: How to Make a Doll Room Out of a Shoebox
For small dolls 5-12 centimeters high, you can build a beautiful and comfortable room in a matter of minutes from an ordinary shoe box. Inside the box is pasted over with the remnants of wallpaper (it is better to take with a small pattern or ornament). You can cover the walls with fabric or corrugated paper.

In order to have more space in the box, some furniture can simply be painted on the walls or pasted on pictures cut from magazines. That is, let the beds and chairs be real, and let the windows, bookshelves, fireplace, vases with flowers - painted.
What is needed for work:
- Box;
- Wallpaper, colored paper, pictures;
- PVA glue;
- Paints and brushes;
- Pieces of fabric;
- Scissors;
- stapler.
The bottom of the box is covered with a piece of carpet or linoleum.
Do-it-yourself horizontal house out of the box in half an hour
A children's dollhouse can be made not only in a vertical section, but also in a horizontal one. That is, the view of the rooms will be from above. This will require a large cardboard box, as well as a minimum set of tools and materials. You can make such a house in half an hour, with almost no effort. Even an 8-10 year old child can easily cope with this task. For girls and their mothers, making crafts will be a pleasant pastime.

What is necessary:
- Large cardboard box;
- Scissors and stationery knife;
- Multi-colored or any plain adhesive tape of a bright color;
- White marker.
The box is cut into two parts with a clerical knife so that the height of the sides at the bottom is 20 - 25 centimeters. Partitions are made from the remaining cardboard and glued with colored tape. The walls are painted with white marker. From scraps of cardboard you can make miniature chairs, sofas, tables, as well as other accessories.
The utility knife is very sharp, so you need to use it with extreme care.
Do-it-yourself textile toy house from improvised materials
A small textile house is mainly used as a bag for carrying dolls. It looks bright and spectacular, thanks to the use of colored fabrics and applications.

What you need to make a textile bag house:
- Fabrics for interior and exterior decoration;
- Sheets of cardboard or plastic for making a frame;
- Soft filler (batting/foam rubber/cotton wool/synthetic winterizer);
- Fasteners (buttons / elastic bands / Velcro);
- Scotch.
To prevent the house from being too heavy, it is recommended to use thick cardboard or mesh plastic for the frame.
Cut out first plastic bases, then they are wrapped in a soft substrate, which is fixed with adhesive tape. Further, all parts are sheathed with fabric and fastened together. The future bag is decorated inside and out and fasteners are sewn in the right places. It will be possible to put one or several dolls, a small book, dishes in a bag-house.
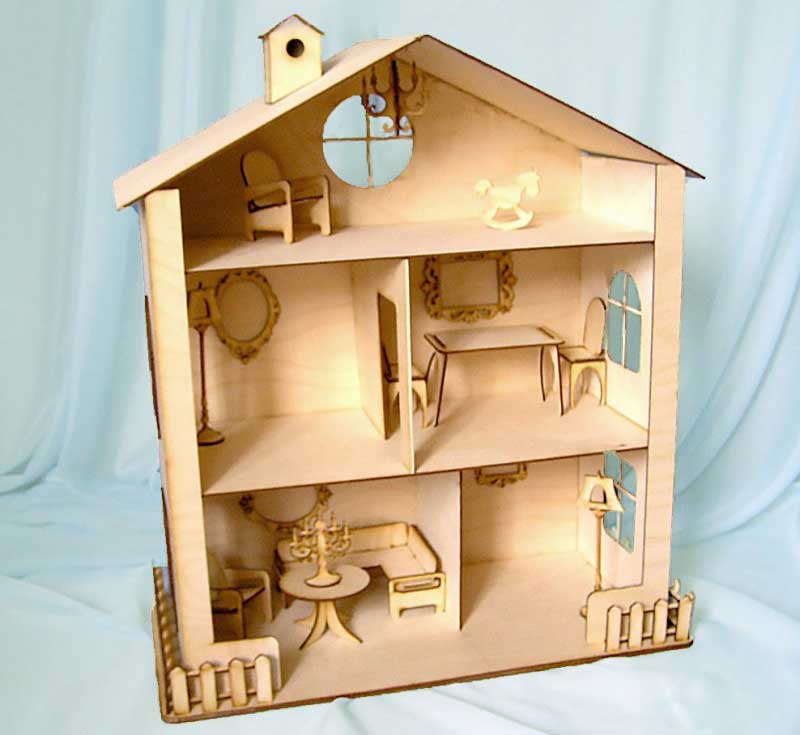
We make a dollhouse out of wood or plywood
The wooden house for dolls is considered the most durable and reliable. For its construction, take a board, solid wood or plywood sheets. First, the necessary drawings are made, according to which sheets of plywood or MDF are then cut. It is necessary to strictly observe all dimensions so that the house turns out to be beautiful and even.
If a wood-laminated board is used in the manufacture of the house, then the marking should be on it E0 (no or minimal formaldehyde content). The thickness of the material must be at least 10 mm.

Tools needed to make a wooden house:
- Electric or manual jigsaw;
- Screwdriver or screwdriver;
- Hacksaw;
- Sandpaper with fine abrasive;
- Hammer;
- A simple pencil and ruler.
All details are cut out and carefully sanded so that the child cannot get hurt. Then the structure is assembled: the walls are screwed with self-tapping screws or nailed with furniture nails, and the seams are glued with PVA building glue. Then each room is decorated with wallpaper scraps, fabrics, pictures, stickers. Stairs or an elevator can be installed between floors.
A simple master class: plywood dollhouse
The process of assembling the structure includes several stages that must be strictly followed, otherwise the house will not be durable and will quickly become unusable.

Walkthrough:
- Markup on plywood sheets details of the future dollhouse.
- Cutting out all structural elements.
- Sanding cuts with fine sandpaper.
- All parts of the structure are glued together with carpentry glue, while the joints are fixed with adhesive tape. The back wall is glued last.
- Barriers are being installed.
- A roof is glued on top and decorated with tiles made of cardboard, pieces of felt, shells, etc.
- The walls are painted.
- A self-adhesive film with a wood pattern is glued to the floor.
- Stairs are made from wooden rulers or planks and mounted.
- Pieces of furniture are placed.
A school is also built on the basis of the dollhouse, but the classes are made the same in size and desks are set in them.
Dollhouse (video instruction)
A dollhouse built with your own hands with the participation of a child will bring him a lot of joy. An overview of several designs made from different materials, showed that everyone can create an exclusive toy house for dolls, embodying their most bold ideas and with a little effort and imagination.
A dollhouse is every girl's dream. Here they are ready to selflessly play for hours, not suspecting that they are gradually preparing themselves for the future role of wife, mother, mistress of the house. And to deliver such joy to a girl is not difficult.
Alexander Zalivako from Moscow shares his experience.
Is it possible to compare the building children's house with real construction? The house is a toy. But, as practice has shown, the approach in both cases should be equally serious and competent in engineering, constructive and technical terms. As a material for making a house (Fig. 1), I used FC plywood. For the side walls, shelves (floors) and partitions, I chose plywood 8 mm thick, for the back wall - 3 mm thick.
Minimum set of tools
For parts and assembly do-it-yourself dollhouse you will need a jigsaw, a drill (preferably with a stand), a fine-toothed hacksaw, two clamps, a file, a soldering iron. The presence of a manual circular saw will greatly speed up the work. In addition, you will need a screwdriver, hammer, nails, screws and glue.
Materials for a toy house
Two sheets of plywood: 1,525 x 1,525 x 8 mm and 1,525 x 1,525 x 3 mm (for ease of transportation, plywood sheets are cut each into two parts: 950 x 1,525 x 8 mm and 575 x 1,525 x 8 mm; 1 000 x 1525 x 3 mm and 525 x 1525 x 3 mm).
Rails: round Ø 6x1000 mm, square 10x 10x 1500 mm.
Components for organizing lighting in a homemade dollhouse.
Super-bright LEDs (size 5050, light - warm white, 3,000 K); 34-core FRC flat cable; toggle switches MTS-102 A1; resistors; power supply PBS 5-0.5 with plug 2.5; power socket on the panel DS-026C 2.5. The value of the resistor R (Ohm) depends on the voltage drop across the LED Ud (V) and the current consumption I (A):
R = (Upit - Ud) / I In this case: Ugbn = 5 V; Ud = 3 V; I \u003d 0.035 A, then (5 - 3) / 0.035 \u003d 57 Ohm we select the resistor of the nearest rating: 56 Ohm. In the case of installing three LEDs in parallel, the current increases by 3 times - accordingly, the resistor value decreases to 18 ohms.

Rice. 1. Assembly diagram and main dimensions of the dollhouse.
Rice. Fig. 2. Dimensions and shape of the partitions of the house. Fig. 2. 3. Shelves (floor floors) and side walls are cut out of 8 mm plywood.
Making parts of a toy house
When marking out the details of the house, one must not only take into account their rational arrangement on the sheet, but also remember that FC construction plywood usually has one side that can be cleaner and neater than the other. So, at the shelves and the roof, the finishing side should be on top, and at the side walls - on the outside.
Eight partitions (Fig. 2) are made from rectangles measuring 247 x 200 x 8 mm, making the necessary cuts with a jigsaw, and then carefully processing the edges with a file.
Shelves (floor floors) are cut with a hacksaw (four rectangles measuring 247 x 894 x 8 mm and one - 222 x 894 x 8 mm). The width of the lower shelf (Fig. 3) is chosen in place (due to the presence of a plinth). In the upper shelves, cutouts for stairs are made with a jigsaw (some of them can be made with a hacksaw).
When cutting out the side walls, remember that their lower edges have a slight bevel. Cutouts for the plinth are determined in place. The windows in the side walls are cut with a jigsaw, having previously drilled holes for inserting the file. window openings cleaned with a file.
Not only appearance but also the strength and stability of the entire structure.

Rice. 4. The back wall and roof are cut out of 3 mm plywood. Fig. 4. 5. Details of interfloor stairs are cut out of 8 mm plywood using a simple fixture. Rice. 6. A device for cutting parts of the same width consists of a plywood base with a kerf and a guide and a rail to be cut pressed against it: 1 - jigsaw; 2 - cut rail; 3 - clamps; 4 - guide; 5 - workbench.
Photo 1. The skeleton of the house is assembled. The details are fitted. 2. The rear wall is attached to the house and connected with self-tapping screws. and roof
Building a toy house
When all the details are ready, proceed to assembly, starting with fastening the partitions to the shelves with self-tapping screws.
Each is screwed with three self-tapping screws, having previously drilled pilot holes, taking into account the location of some partitions one above the other.
After assembling the entire structure of the house from 3 mm plywood, the back wall is cut out in place (Fig. 4) and nailed with small shoe nails to the rear edges of the partitions and shelves, and the roof is fixed.
On a note:
At the assembly stage, some difficulties may arise due to the fact that the parts are slightly different from each other, and the raw plywood “leads” a little.
To solve the problem, you need to unscrew one of the lower partitions without disassembling the structure.
Due to this, it receives an additional degree of freedom, and the side wall is easily screwed. After that, the partition is adjusted in place (or a new one is made). Although its dimensions differ little from the dimensions of other partitions, the structure is already assembled without interference.
Assembly of stairs in the dollhouse
Stairs (Fig. 5) had to be made in typesetting. First, from long scraps of 8 mm plywood, I cut circular saw strips 20 mm wide, and then cut them into bowstrings and steps. A large number of I sawed identical steps with a jigsaw using a simple fixture (Fig. 6).
Assembled the ladder as follows. Having put one bowstring on a workbench, at some distance from the ends he put two steps as spacers on it, put a second bowstring on top of them, and then pulled such an assembly of stairs with a clamp. After that, he took the first (upper) step for the stairs and, having smeared its ends with glue, placed it between the bowstrings in the desired position, and fixed it with carnations. Having removed the clamp and taking out the spacers, I installed the lowest step, watching the parallelism of the bowstrings. In the area of the lower step, I again put the clamp and pulled the ladder. After that, he gradually installed all the steps - from the top to the bottom. When installing, setting the step, I used an extra step without glue as a spacer, since the distance between the steps is equal to the thickness of the step itself. Constantly monitored the angle of installation of the steps, so that by the end of the assembly of the stairs no error had accumulated.
Balcony fence in a toy house
The balcony railing consists of three sections of the same design (Fig. 7). For its manufacture, slats with a section of 10 x 10 mm and round sticks 0 6 mm for balusters were required. Having cut pairs of rails for sections and drilled blind holes in them for balusters, each section was first assembled dry for verification.
After that, glue was applied drop by drop into each hole of one rail and baluster sticks were inserted. Glue was also applied drop by drop into each hole of the second rail, and it was put on sticks inserted into the first rail. While the glue did not seize, I leveled the structure, put it between two flat sheets of plywood and pulled it together with a clamp to eliminate a possible helical distortion of the fence before the glue dries.
Advice
In the manufacture of balcony railings, the holes in the rails must be coaxial, it is advisable to drill with a drill fixed in the rack and with a wood drill. Some larger diameter holes compared to the diameter of the balusters will allow them to fit properly in case of misalignment of the holes. The depth of the holes should be sufficient so that the balusters do not rest against their bottom.

3. The moment of assembly of the interfloor stairs. The lower string is fixed on the workbench with a clamp.
4. Three interfloor stairs are ready for installation in the house.
5. The finished ladder is glued between the shelves ( interfloor ceilings) house. 6. Side wall house with installed lighting toggle switches. Toggle switches can be fixed from rotation with glue. 7. Lighting LED can also be glued to the ceiling.

8. The assembled balcony railing is glued to the top platform. 9. The house is furnished toy furniture and inhabited by inhabitants. In the dark room lighting The house looks very impressive.
Rice. 7. The balcony railing consists of three sections, which are assembled from rails with a section of 10 x 10 mm and round balusters 0 b x 40 mm.
Do-it-yourself dollhouse lighting
 Lighting is provided by 10 LEDs in the rooms and on the floors of the house. The LEDs are powered by a mains adapter with an output voltage of 5 V and a maximum current of 0.5 A. The total current consumption of all LEDs is 0.35 A.
The light is turned on with the help of toggle switches located on the right side wall of the house. From inside the house, the soldered contacts of the toggle switches are covered with a removable casing screwed on with self-tapping screws. The casing is a plywood plate 247 x 200 x 3 mm with two pieces 200 x 20 x 8 mm glued along the edges.
Soldered LEDs can be glued into holes drilled in the walls of rooms under the ceiling or glued directly to the ceiling. The wires are brought out through the holes in back wall to the corresponding switches.
I used cyanoacrylate glue to fix the LEDs and wires. Wires used in PVC insulation. The ends of the wires were marked with a tester and soldered accordingly (Fig. 8).
Buying almost anything now is not a problem. But the beauty of making a plywood dollhouse with your own hands is that a child can also be involved in this process. It is advisable to use plywood as the starting material - the durability of the structure, its wonderful appearance at relatively low costs are guaranteed. Yes, and cutting sheets, processing fragments will not cause difficulties; just a simple household tool is enough.
What is a dollhouse? The banal answer that this is a spacious box that stores your favorite toy and its outfits is unlikely to be correct. You can make with your own hands various options houses that differ in their configuration (vertical, horizontal), the complexity of the layout (several levels-floors, with many compartments-rooms). External design is generally a separate conversation. If you “turn on” the fantasy, then it will be quite possible to get by with what is at hand. In addition to glue and colored paper, in any home there is always something left after the next repair - pieces of wallpaper, film, fabric, and so on.

What plywood to use? The fact that making a dollhouse out of it is the best solution is partially said. It should only be noted that he is going for a child's toy. It is the strength of the structure itself and its "environmental cleanliness" that should be the main criteria that you need to focus on when choosing products.

One of the tasks that is solved in the process of making something with your own hands is reasonable savings. Consequently, there are practically no options for which plywood to give preference to - it is inexpensive, resistant to moisture and “environmentally friendly”. These criteria are fully met. By the way, they are often confused with FSF products, since it is difficult to distinguish these plywood outwardly even for a specialist.
- When choosing plywood, you need to pay attention to its marking. The safest product is the one with the letter E0 in the designation. There is a minimum of formaldehyde in such sheets, and they are the most suitable for making a dollhouse.
- The optimal plywood thickness is 5 mm. With this choice, light weight, structural strength and the convenience of strengthening it with carnations are well combined.

Variants of schemes with dimensions
The linear parameters of the house depend on which doll it is made for (and maybe for several) and where it will be installed. Therefore, it is more correct to familiarize yourself with the photos and drawings available, for example, on the Internet, and on the basis of this, inspired own ideas, draw up your own, original scheme, the most suitable for local conditions.


Features of making a dollhouse
Any dad can cut plywood into fragments of certain dimensions, configurations and connect them together according to the developed scheme. For this process, no step by step instructions not required. But there are a number of nuances in working with FC, which House master should know.
To avoid a "production" error (and errors are inevitable even during measurements), the same type of house parts should be made according to the following scheme. First, one part, and then make sure that it meets the required dimensions. And only then, using the workpiece as a template, cut and process the rest. Otherwise, after assembly, it will turn out (more than likely) that the house will turn out to be somewhat skewed, and something will have to be redone.
Cutting plywood to better produce electric jigsaw. WITH hand tool problems will arise - an uneven cut (not along a line, especially if it is curly), “ragged” ends of parts, partial peeling of veneer in the working area.
Considering the relatively small thickness of plywood, the joints practiced for solid wood blanks (saws, tenon-groove) are unacceptable. Therefore, only by gluing, followed by fixation at individual points with small carnations. In terms of safety for the health of the child, it is better to use the casein composition. Such joiner's adhesives are most often used in modeling, making furniture with your own hands, and it is quite simple to buy a dry mix and prepare a solution yourself. .

Both at the stage of assembling the dollhouse, and after its manufacture, it is necessary to carefully process all the edges of the parts. Even if no defects are found, it is worth once again go through the skin. Microscopic fractions, visually and invisible - potential splinters. Do not forget about the gentle children's palms!
Dads should take into account that girls (as well as all women) have their own secrets. Therefore, drawers or boxes with doors in which you can hide something should be provided at the bottom of the dollhouse or on the side. Mini-hinges are suitable for fastening the sashes (it’s easy to pick up the right sizes at any furniture store).

If the dimensions of the dollhouse are significant, then it is more expedient to first mount the frame from bars of a small section, and then sheathe it with pieces of plywood.
When drawing up a diagram, it is worth considering that it is planned to assemble not just a box for storing toys. Even to little house will need some internal filling. What it will be - a mini-table, a bed - is another matter. But already at the design stage it is necessary to provide possible options and choose the dimensions so that the rooms are spacious enough.

Advice. When deciding how to design a dollhouse, do not forget that here, when choosing materials, you should take them into account. component composition. Certain types of stains, oils, paints, varnishes contain toxic substances.

If you really get excited about the idea, carefully plan everything and prepare in advance, then you can make a dollhouse with your own hands in just a few hours. Even half a day off is enough for the child to enjoy the home for his toy for a long time.


