Agree, the idea of creating a couple of decorative niches in the house sounds tempting. But to make practical use of the space between the ledges and columns laid during the construction of an apartment or house is a much more interesting problem. And, oddly enough, it’s lighter.
We are talking about space reserves - in such structural niches you can place shelves or even compartments for storing things. On the other hand, you can “link” to such niches functional areas, if there are several of them in the room.
If you don’t find such protrusions in your house, but you like the idea, you can build niches during renovation - from brick or plasterboard. But in the latter case, it is worth informing the installers in advance about your plans so that they strengthen the structure in the intended locations for installing the shelves, especially if you are going to place something quite heavy on the shelves, including books.
Situations when it makes sense to highlight niches with color or decoration (for example, a different wallpaper pattern), i.e. add decorativeness:
if there are no more than 2-3 shelves in a niche from floor to ceiling;
if you plan to fill the shelves with no more than 30-40% of the volume (there may be more of them than in the previous situation);
if a niche is formed under the stairs.
In all other cases, you don’t have to worry about combining functionality with effectiveness; beauty can simply go unnoticed. But if the shelves in the niches do an excellent job with their practical role, this is no longer important.
shelves in niches in the living room interior:
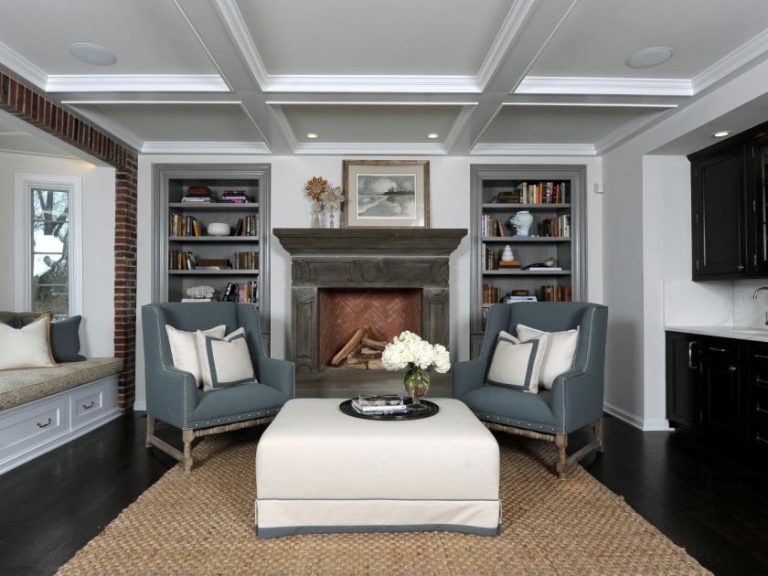
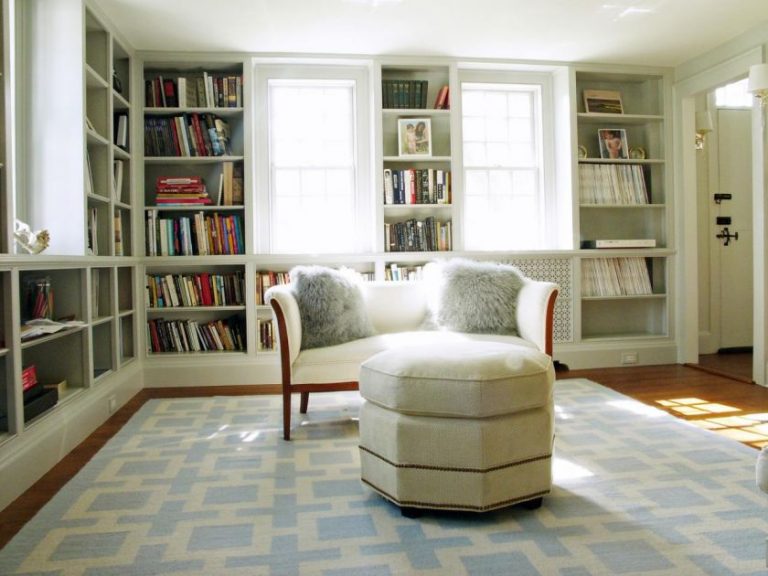
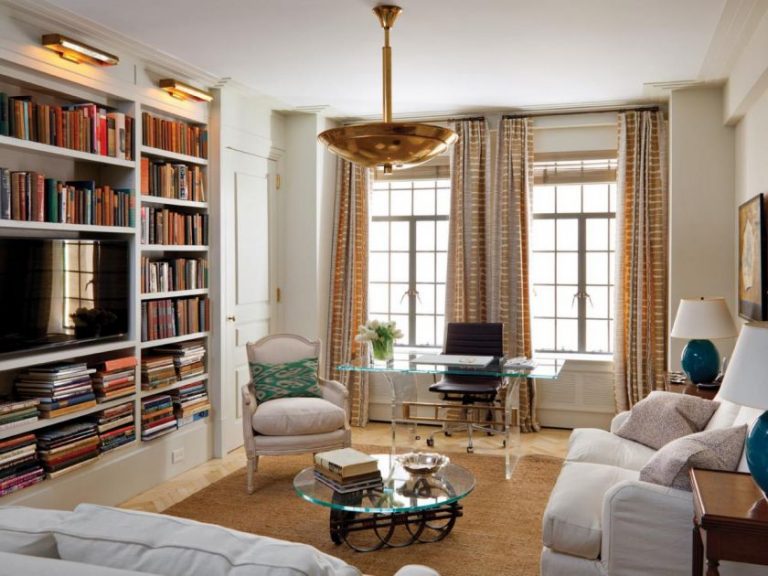
In the West, according to tradition, shelves most often appear on both sides of the fireplace, i.e. two symmetrical niches are used at once. In a reality closer to us, niches can be formed if you combine 2 rooms or remove part of the partition, after which they remain support columns or communication boxes (shafts).
On the shelves in the living room niches you can place everything that falls within the scope of your family interests: books or magazines, collections or pleasant trifles. If you want to find a place for a home office in the living room, place it in a niche (table or countertop + shelves). If the living room is combined with the dining room, you can place a chest of drawers in a niche, and shelves above it. And, of course, shelves can appear in the niche where the TV is located, but since this is usually the decorative center of the room, the functional use of this area can be very conditional.


shelves in niches in the bedroom interior:
Functional shelves in bedroom niches are usually created for one of two purposes: placing books or storing bed linen. However, you can use them to define a home office space (we talked about this in the living room section) or create an “inspiration corner” with little touches that please your heart.


shelves in niches for a children's room:
Two options for using the idea in a children's room: place it in a niche workplace child or create a compact place to store toys. In the first case, it is advisable to designate the niche with color or decoration (creating an “anchor” for study), in the second, this is not necessary, because a cluster of toys is already quite a bright sight.


shelves in niches for organizing a home office:


shelves in niches for the kitchen:
IN spacious kitchens Americans in constructive niches often set up “organizational corners” that allow them to take care of household finances or answer letters. Sometimes they move the home office there.
In other cases, shelves in niches can become a place to place dishes (if you don't mind open shelves in the kitchen) or any small items, including cookbooks.


shelves in bathroom niches:
Despite small sizes(compared to other rooms in the house), there are many ways to make practical use of niches in the bathroom by installing shelves in them.
For example, above the sink or on the side of it - for storing bath cosmetics. For towels and household chemicals you can use shelves in the niche above washing machine or above the toilet, as is customary among the Swedes. Unlike other rooms, in the bathroom it is easy to build shelves from plasterboard during renovation, and then cover them with the same tiles used for the walls, or contrasting ones.


Wall shelves 40mm with a side to prevent things from falling out with hidden fastening, veneered. Finishing with a spray gun in a spray booth using Renner materials (primer, tinting, matte varnish). Color according to RAL, NCS (in this case, wenge tinting. The wood texture is preserved). The price depends on the complexity.
L-shaped 40mm shelves with hidden fastening, veneered with beech veneer (1.5*0.15m) with built-in lighting. Finishing with a spray gun in a spray booth using Renner materials (primer, tinting, matte varnish). Color according to RAL, NCS (in this case, tinted with light walnut. The wood texture is preserved). The price depends on the complexity.
Wall shelf 30mm solid with a side with hidden fastening. Finishing with a spray gun in a spray booth using Renner materials (primer, tinting, matte varnish). Color according to RAL, NCS (in this case, walnut tinting. The pores are closed). Price depends on size.
Shelves 18mm of complex shape in a niche, veneered with oak veneer (0.45*0.25m). Finishing with a spray gun in a spray booth using Renner materials (primer, tinting, matte varnish). Color according to RAL, NCS (in this case, wenge tinting. The wood texture is preserved). The price depends on the complexity.
18mm niche shelves veneered with beech veneer (0.5*0.22m). Finishing with a spray gun in a spray booth using Renner materials (primer, tinting, matte varnish). Color according to RAL, NCS (in this case, mahogany tinting. The wood texture is preserved). The price depends on the volume.
Colored shelves
Colored shelves of complex shape with hidden fastening. Finishing with a spray gun in a spray booth using Renner materials (primer, enamel, varnish). Color according to RAL, NCS (in this case, Bordeaux color and glossy varnish). The price depends on the complexity.
Children's wardrobes to order
Built-in wardrobe in a niche for the children's room. Facades with patterns to match wallpaper patterns. Materials: laminated chipboard and painted facades in any color (20,000 shades). Finishing with a spray gun in a spray booth using Renner materials (primer, enamel, varnish). Color according to RAL, NCS. The price depends on the complexity. Price this option turnkey 31,000 rub.
Children's room the size of the opening for a child from 6 years old. Materials: laminated chipboard and painted facades in any color (20,000 shades). Finishing with a spray gun in a spray booth using Renner materials (primer, enamel, varnish). Color according to RAL, NCS. The price depends on the complexity. The cost of this turnkey option is 41,400 rubles.
Children's furniture in the size of the opening for a child up to 6 years old. Materials: laminated chipboard and painted facades in any color (20,000 shades). Finishing with a spray gun in a spray booth using Renner materials (primer, enamel, varnish). Color according to RAL, NCS. The price depends on the complexity. The cost of this turnkey option is 27,000 rubles.
Chest of drawers to order
Chest of drawers to order with the author's drawing. Materials: laminated chipboard and painted facades in any color (20,000 shades). Finishing with a spray gun in a spray booth using Renner materials (primer, enamel, varnish). Color according to RAL, NCS. The price depends on the complexity. The cost of this turnkey option is 25,000 rubles.
Custom-made wardrobe for balcony
From us you can order a balcony cabinet of any size and complexity.
Wardrobe storage room for the balcony. Materials: chipboard. Any sizes. The price depends on the complexity. The cost of this turnkey option is 18,000 rubles.
Cabinet under the countertop on the loggia. Materials: chipboard. Any sizes. The price depends on the complexity. The cost of this turnkey option is 6500 rubles.
Shoe racks
Built-in retractable shoe rack made of solid oak. Drawers Blum with closers. Finishing with a spray gun in a spray booth using Renner materials (primer, tinting, semi-matte varnish). Color according to RAL, NCS (in this case, mahogany tinting. The wood texture is preserved). Turnkey price 26,000 rub./sq.m. by façade area.
Shelves made of plasterboard now play a big role in the interior. They not only decorate it and make it unusual, but also allow you to significantly use everything possible options for organizing storage of things.
Shelves can replace some of the furniture. This will free up the space in the room and make it less cluttered.
So, what are the benefits of shelves in the interior:
- with them, the room design becomes more modern and original;
- replace furniture;
- allow you to change the layout of the house in some cases by replacing walls;
- increase the number of storage places;
- help keep things at hand without cluttering the space;
Shelf design
Using shelves you can create different room designs. They can be located as separate elements or be an integral part of built-in niches.
If there are ready-made niches in the room, it can be very difficult to play with them - they often become a dead zone in the interior. In this case, it is advantageous to place straight shelves made of plasterboard material in such a niche. In general, the shelves are made of modern drywall The good thing is that they can easily be embedded into any niche configuration.
Such shelves can be made as separate element in the interior. As wall hangings, they would be appropriate in the interior of a living room, bedroom, bath, or kitchen. Shelves made from regular plasterboard are especially relevant in children's rooms, whose design can be based on shelves. You can make them yourself along the entire perimeter, replacing cabinets with them.
Shelves can also be used as a zoning element. In this case, they separate one part of the room from another. They can separate the kitchen from the living room or differentiate the children's room into a sleeping and work area. In this case, the structures will not be wall-mounted - they will go from one wall to another. Such shelves made of durable plasterboard are often used in studios. They can have a straight or curved design. Curved designs will give the interior greater individuality.

What can shelves be used for?
Shelves of any configuration and thickness are made from plasterboard.

They can be used for:
- books;
- school supplies;
- storage of interior items and collections;
- dishes;
- storage of toys;
- installation of household appliances.
Important: you can safely install a TV on shelves made of thick plasterboard in the kitchen. In this case, it is necessary to provide a strong mount in the wall. In some cases, it is possible to glue several sheets of drywall together to make the shelves stronger.
Advantages and disadvantages
Why is it recommended to use drywall rather than wood as a material for making products with your own hands? The fact is that this material has a number of tangible advantages that make it indispensable for making shelves in niches and on the wall.
Advantages of drywall:
- drywall is easy to cut;
- it can be given any configuration;
- it is inexpensive;
- it can be painted with any paints or covered with finishing materials.
The material also has disadvantages - it is made of gypsum, therefore, it is not resistant to water. And although there is moisture-resistant drywall, the shelves will not survive long-term and constant exposure to moisture. In any case, it is advisable to carefully protect them with moisture-resistant materials. Only then can drywall be used for niches in the bathroom.

Corner shelves
Increasingly, corner shelf designs are being used in interiors. They are appropriate in children's rooms, kitchens, and bedrooms. Their main purpose is to use the corners of rooms, which, as a rule, disappear, for storing and displaying things.
Corner shelves are optimally made in small rooms, where every centimeter of space is important. For the manufacture of corner structures You will need to draw a template according to the measurements of the room. It is important to take accurate measurements so that the shelf fits neatly into the corner of the room.

Built-in shelves
Such shelves are built into niches - natural or made. In this case, the entire niche can also be made of plasterboard. Built-in shelves are appropriate in rooms of any purpose.
To make built-in shelves, it is necessary to measure the niche. After this, parts are cut from plasterboard according to the size of the niches. As a rule, built-in shelves have rectangular shapes.

What materials will you need?
If you decide to make a product with your own hands, you need to prepare everything necessary materials.
To make a shelf on a wall or niche made of plasterboard, you will need:
- sheet of drywall;
- galvanized profile;
- guides;
- fasteners - screws and dowels;
- mounting mesh;
- primer;
- dye.
For a curved shelf in a wall and a plasterboard niche, arched profiles are useful.

Required Tools
You can make a shelf with a set of the most common tools that are found in almost any home.
To work with your own hands you will need:
- screwdriver;
- ruler;
- level;
- hammer;
- pliers;
- hacksaw;
- Bulgarian.

Shelf drawing
Before you make your own products from plasterboard, including shelves, you need to make a drawing. Having thought about the design of the room and decided where the shelves will be, measurements are taken and the design of shelves for niches or walls is developed. After this, the dimensions of the shelves are determined and an accurate drawing is created.
After this, the drawing can be transferred to a sheet of drywall.
Shelf parts can only be cut from existing drywall after making sure that all dimensions are met.

DIY shelves
Plasterboard parts for niches and shelves can be cut with a hacksaw or a sharp shoe knife. Curved shelves are made from thinner plasterboard, and they are secured using arched profiles. IN as a last resort, if there are none, you can bend ordinary profiles.
You need to make a base for the shelf with your own hands so that it holds well. A profile is used for the base. As a rule, in standard cases, a profile measuring 50 by 25 mm is suitable.
After this, holes for the shelf are marked on the wall and drilled. A profile is hung on the walls, guides are installed and a plasterboard structure is attached.
Important: if shelves in a wall made of thick plasterboard are intended for heavy things, then you must use special fasteners– butterfly screws and fasten the profile more often than usual. You can strengthen the structure with traverses or a frame.
If the shelf consists of component parts, then it is covered with mounting mesh in order to hide traces of the joints. The corners of the shelves are reinforced with special corners made of plastic or aluminum. Thanks to this, the do-it-yourself design will not fray at the corners and will maintain its aesthetic appearance for a long time.
Finishing
Next comes finishing the shelf. It’s even more easy to do this with your own hands. Finishing may involve painting the product or covering it with wallpaper, self-adhesive film, tiles, mosaics. This finish will make the shelf look aesthetically pleasing. And at the same time it will protect the product from destruction, moisture, mechanical damage. It extends the service life of the entire structure. At the same time, if desired, you can change the design of the finish during the next renovation by replacing one finishing material another.
Before wallpapering or applying paint, drywall is primed. Acrylic and water-based paints are used for finishing.
One of the design trends is to paint the shelves in the niches the same color as the room itself. But you can choose a different combination - the shelves and niche are painted in a contrasting color. Thus, the niche will act as an additional decorative element in the interior of the room.

Important addition
If you are making shelves for the first time, then it is best to start with simple designs. First you need to master making straight shelves. And only after that start experimenting with making niches and various shelves of complex curved configurations.

Gallery: plasterboard shelves (20 photos)


![]()


A shelf in a living room is a familiar attribute, practical, convenient, and sometimes irreplaceable.
Such shelves are often used to store a home library, some small items, accessories and decorative elements. The shelf significantly transforms the appearance of the room.

Types of racks and shelves
There are so many types of shelves that sometimes it’s not easy to make a choice.

By design, shelves are often used to store small items, but this is a little wrong, because the shelf, oddly enough, transforms the space.
The shelf can be made by hand, with built-in seats, from a designer, with a mirror, open type, like a partition, floating.
There are actually a lot of varieties. There are also modular shelves, there are transforming shelves, hanging shelves to the living room - it's all on sale!

Of course, book attributes are the most in demand, and they are chosen according to personal preferences.

Corner shelf
For the living room, a so-called transforming shelf is often purchased, which changes its size and shape. Its disadvantage is that it can withstand little weight, but despite this, it is often attached to the wall.
Another popular variety is shelving, which will perfectly complement any design, especially if the room is in a country or high-tech style. This rack takes up minimal space.

Construction types:
- The cylinder rotates around an axis, and therefore it is easy to have access to all the objects that are placed there.
![]()
- Built-in shelves in the living room in a specially created niche make it possible to use every centimeter.
- Stepped rack - sections, shelves. For numerous books this is the most the best option, as well as for dishes, for decoration. Used for zoning a room.

- Lattice - a combination of shelves diagonally, vertically and horizontally. Such shelves for the living room on the wall look chic in a room decorated in modern style high tech.

Modular shelves
It is most appropriate to use shelves covered with glass in the living room. Such modern living room shelves allow you to store some luxurious items.
Interestingly, glass does not catch the eye at all, and therefore this option is applicable in small rooms, for example, in a living room in a Khrushchev-era building.
Open attributes are used near the window, because they can miraculously combine with a coffee table. Hanging shelves - space saving.

IN classic interior It is permissible to use objects made of wood correct form that are decorated with carvings and forging.

In country style, it is wise to use untreated, aged items. High-tech style uses glass or metal shelves. Their shape is most often irregular.


How to decorate a shelf with your own hands?
The apartment is most often decorated with your own hands, and shelves are no exception. To get the job done, you need to buy a regular shelf, no frills. Most often it is a piece of wood or plastic.

The decor is made using materials such as leather, additions from natural wood, forging, dyeing.

It’s not at all difficult to design a unique shelf; the main thing is to think through a work plan. It is best to make basic outlines on paper, and then design the product.

There are different options for how to design a shelf, and there are a lot of ideas on the Internet that are worth checking out. There are so many ideas that it’s not difficult to create beautiful ones even without designers. decorative shelves under the TV in the living room.

The furniture matches the style of the room, and is suitable in style, color, and material. It is best that some of the elements are selected to match the type of furniture.


When choosing, it is important to understand that the shelf must be stable, durable, reliable, and support the normal weight of objects.

Shelves in the interior of the living room are the main attribute, because they are used both as storage of small things and as decoration. The shelf does not take up much space, but at the same time it complements the interior.

If you have to choose a shelf, then you should make the choice according to its further purpose.

Of course, the appearance of the shelf is of no small importance, and therefore you can look through photos of shelves in the living room, see what varieties there are, maybe you will like something and make the choice easier.

Photos of ideas for placing shelves in the living room


![]()


![]()


![]()


Shelves and shelves play an important role in country interiors. In this article I will try to tell you about this. When I say “shelves and shelves,” I mean open (that is, without doors or glass) shelves that complement the main furniture in country-style rooms. Almost all country interiors are made up of fairly large pieces of furniture: cabinets, tables, closed shelves. Well, smaller shelves are present so that all the most beautiful things can be displayed on them.
Open shelves can be divided into several groups according to their inherent characteristics.
- floor
- mounted
- built into the wall
- desktop
Depending on the place of use:
- kitchen
- for bathroom and toilet
- for the hallway
- for living room
- for children's room
Let's look at a few examples of using open shelves to create a country-style interior.
Let's start with floor open shelves, which are made in the form of tables and cabinets. As I said in previous stories about country interiors, all ethnic styles are similar in that they are formed from objects made from natural materials. Therefore, all shelves must be made of wood (or imitation wood) or metal (forging). This cabinet shelf is universal and can be used in any room in the house.

Several more types of universal floor shelves. They will be indispensable in any room.


These shelves are universal because dishes, books, and pots with flowers look equally appropriate on them.

Of course, the randomness of the objects displayed on the shelves does not mean at all that anything can be laid out on them. Just as the impression that country style is simple and unpretentious is deceptive. In order for a room to acquire the features of a country style, you need to work hard.

Floor-mounted open shelves combined with cabinets with doors are suitable for decorating country-style living rooms. Country style has rustic roots. And the life of villagers was never pretentious, so ordinary items that were used every day were displayed on open shelves.

European peoples became accustomed to cupboards, in which open shelves were used to display beautiful porcelain plates, teapots, tea pairs and trays.

Such tables with open shelves can be used in country interior design. V kitchen, bathroom and even children's room. Natural wood color, simple and laconic design this table allows you to use it for interior decoration: , .


Country style is homey and cozy. Natural wood, wicker baskets, next to a ceramic jug. There are only terry sheets and towels missing, but they will appear on the open shelf of this table if you put it in the bathroom.
This open shelf with a rounded top and wavy edge will complement and enliven kitchen interior V.

Built-in shelves - This is a niche in the wall occupied by shelves.

Built-in open shelves best option equipment for niches in the walls. If there is a recess between two walls, then to create shelves, it is enough to attach shelf holders to two opposite beams and cut the shelves themselves to size. The back wall can be painted, wallpapered or plastered with structural plaster.

When decorating interiors in country style Special attention paid to the finishing of walls, ceilings and floors. After all, it is already clear that the same open shelves would be appropriate in the appropriate context.

When conducting modern renovation niches are constructed using sheets of plasterboard and metal profiles. But if you want the “spirit of country style” to reign in your apartment, you need external finishing make the appropriate one.

Now let's move on to hanging shelves. This wall cabinet has doors, but it can be left open if space allows. This way you can showcase the beautiful content you can fill it with. Such shelves are suitable for a Provencal style kitchen.

In some cases, when the kitchen area is small, do not clutter it with floor and wall cabinets. It’s better to attach open shelves to the walls, so the kitchen will become airier.

Open shelves free the kitchen from unnecessary and ugly things. After all, you can’t put old plastic cans of cereal or a broken enamel ladle on public display.

Open shelves look great in a white furniture set. Simple lines kitchen furniture, the same simple shelves, a minimum of decorations, and the interior turned out to be cozy.

Open shelves are also incomparable in other country interiors. For example, in a room where there may be many open shelves. Some of them, which are located under the tabletops, can be curtained with curtains made of thin cotton fabric.

The person who invented the shelves was probably no less brilliant than the one who invented the wheel. Take a look for yourself and you will see what we would do without shelves? Everything would be under our feet and we would not be able to find anything. But on the shelves it’s a completely different matter! There is order, beauty and everyone can see what a good housewife is in this house.

Open hanging shelves, and even in combination with hooks, are very convenient, because everything is always at hand.

The number of open shelves that you hang in the kitchen depends on the availability of free walls and your desire to equip the kitchen with them. No one can give such recommendations as to how many shelves there should be in a kitchen, everything is individual.

An open wooden wall shelf is a great opportunity to display your most beautiful dishes. It is worth paying attention to the fact that such shelves do not have to be purchased ready-made. They are easy to make at home. You only need to have the necessary materials and minimal skills in working with furniture.

Country style furniture (Provence, American, scandinavian styles) looks a bit rough. That’s why there are open shelves in the background self made won't look any worse. Look at the photo of these cabinet shelves and you will see that they are not difficult to make.

But this is why the country style, which incorporates many ethnic styles, is valuable because it gives you the opportunity to create with your own hands something that you sometimes cannot buy in a store. And this item can become the center of attraction of the entire interior. , with its such recognizable “scuffs”, it is not difficult to recreate it on some grandmother’s shelf, which has been gathering dust for many years in the attic of a country house.

Look, simple decorative elements made of wood will decorate a handmade kitchen shelf. But you can’t paint it too carefully, because “unpainted” and “scuffs” are not considered defects in finishing in country style, but quite the opposite.

In addition to wooden open shelves, you can use wrought iron shelves to create a country-style interior.

They can be made of metal with or without painting.

Forged shelves can be combined: a wooden shelf is attached to a forged frame.


There are even options for combining a forged base and glass shelves, as you see in the photo below. This wrought iron floor shelf is suitable for a living room or bedroom in a country style.
According to the method of placement in the interior, forged shelves can be: floor, table and hanging.


According to the place of use: forged shelves can be intended for the hallway, kitchen, living room or bedroom.


Open shelves, both hanging and floor-mounted, have not only advantages, but also disadvantages. Some of them:
- they should not be placed next to the stove, because the grease that settles on the shelves will be difficult to wash off
- You need to wipe dust more often than in closed cabinets
- keep the shelves tidy and don’t put everything on them
- they are less spacious than cabinets with doors

And such a corner wooden shelf, suspended and open, can be used in small-sized bathrooms or country-style kitchens.

Open shelves in the bathroom are more convenient than those with doors due to their accessibility. Bouquets of simple wildflowers look organic on country-style shelves.

Simple bottles made of transparent glass are suitable for colored salt, which is so nice to pour into the bath.

Attach this pink shelf with hooks and a hole for a metal glass in the bathroom and your daughter will surely like it.

A toilet room will be decorated with an openwork shelf that combines a holder for toilet paper and a shelf for magazines.

Above we looked at the options for floor, wall and built-in shelves. It's time to talk about table shelves. These are also wooden or forged metal shelves, but their main difference from other open shelves is that they are small in size. They are designed to be installed on a table and to place on them all sorts of little things that are always needed at arm's length.


This portable open shelf, made of wooden planks, can serve as a stand for pots with spicy plants. And then you need to move this shelf in order to install it on the window that illuminates the sun better.

Using metal fasteners, such as those shown below, you can make your own open shelves for any room in your apartment (or house). To do this, you need to attach to these fasteners wooden plate made of natural wood or plywood.

The board can be painted in the desired color or stained. Make sure that the fastenings are forged or made of high-quality metal, because the shelves must be designed to hold heavy dishes.


Except metal fastenings for shelves, wooden support strips can be used, which are made using a jigsaw, electric or conventional. A loop is attached to the support bar, on which the shelf will be attached to the wall. These strips are painted the same color as the shelves.

If you learn how to work with carpentry tools, you can make beautiful shelves for your apartment or cottage that are not sold in stores. And they can not only diversify the interior, but also transform it.

In order for open shelves to look attractive and fulfill their main purpose - to decorate the room with their presence, they should always be in order.

I wish you all success in arranging the external and inner world Your house.
In a new review, the author has collected examples of racks and shelves that you can make with your own hands. They must, of course, be used for their intended purpose. Having looked at the photographs collected here, you can easily make sure that there is nothing fundamentally complicated in the proposed option.
1. Circle shaped

An original round shelf, the edging of which is made of thin fiberboard, and the shelves themselves are made of ordinary boards painted in White color. Of course, such a design is not suitable for storing the entire home library, but it can accommodate several educational books, a small indoor plant and a couple of framed photographs.
2. Wall shelf

A charming hanging shelf that can be made from several unwanted books or notepads of the same size. Such a shelf is not only suitable for storing cosmetic accessories and small decorative items, but in itself will become a wonderful decoration for any wall.
3. Arrow

Stylish arrow-shaped bookshelf with backlight, made from leftover metal water pipes, will fit perfectly into the interior of a teenage boy’s room or a bachelor’s apartment.
4. Practical and unusual

An original and practical shelf that can be made from a small tray from an old cart and several wooden blocks. This shelf is reliable and spacious and is suitable for storing a wide variety of things.
5. Charming shelving

A stylish and original shelving unit made from a slightly modified door painted white. Filled with your favorite books, candles, family photos and small decorative elements, such a shelving unit will be a real highlight of any space.
6. Narrow slats

Old skis that have been collecting dust in the closet for many years can be used to create unusual shelves. Such shelves will fit perfectly into the interior of a nursery and are suitable for storing toys and books.
7. Stylish copper

Massive shelves made of wood covered with a stylish copper-colored film are perfect for placing house plants.
8. Old pallet

Old wooden pallet it's enough to just turn it into original shelf for storing magazines and family photos.
9. Industrial style

Stylish storage system that is relevant now industrial style, which can be made from wood or MDF boards painted in grey colour and interconnected by a structure of metal water pipes.
10. Bright honeycomb

Original shelves made from bright hexagonal gift boxes attached to mirrors of the same shape. Of course, this design is not suitable for storing large heavy objects, but it is suitable for storing little things dear to the heart and decorative items, and will also become unique decoration walls.
11. Stylish transformation

Drawers from an old discarded table can be used to create original shelves. Carefully painted and modified at your discretion, the drawers can be attached to the wall, both vertically and horizontally, and used to store a wide variety of things.
12. Rough design

Rough shelves made of untreated wood, exposed with varnish or paint, will fit perfectly into the interior of a room decorated in a rustic or country style.
13. Abundance of cells

A huge wall-length shelving unit made from many wooden boxes, painted in bright colors, can be a stylish and budget-friendly alternative to a massive store-bought wardrobe.
14. Wicker basket
MDF shelves.
Compact MDF shelves with fruit slices painted underneath them will become a bright and functional decoration of the kitchen wall.
17. Rustic style

A dense piece of bark or raw wood can be turned into a fantastic hanging shelf, which will become an original alternative to the standard bedside table.
Scattered toys are the most common occurrence in a children's room. Unfortunately, we only have one room for everyone, but there are also a lot of toys in it and they are also often scattered around the apartment. However, according to the early development method of Maria Montessori, teaching children to order begins from early childhood. You just need to help the baby. So we decided to make our own Montessori rack for storing children's toys, materials for creativity and activities.
Rack for toys :)
We took the popular IKEA shelving unit from the Expedit series as an example. We downloaded the instructions for assembling it on the IKEA website and looked at it in detail. Thanks to this, we saw how it works, what parts it consists of and how it is assembled.
Then we measured the space we planned to allocate for the homemade Ekpedit, and planned it out first in our minds and on paper. Then Kostya drew it in Corel Draw and 3Ds Max. Thus, we thought about the most convenient configuration for us with 12 small and 3 large sections.
Drawings for a homemade rack:

Shelf layout options

Drawing with dimensions


Cutting out the parts
According to the dimensions obtained in the lumber store and furniture fittings Kostya bought 1 sheet of MDF and fiberboard each and ordered the material to be cut into necessary details. In general, almost a rack came home :)
By the way, our rack became possible thanks to the advice and instructions of a professional furniture maker Nikita Maksimov, who lives and works in St. Petersburg. Thank you, Nikita!
So, how to make a rack with your own hands?
1. First of all, draw a template for marking the holes. This is done so as not to measure each mark separately n-number of times. We got 3 marks: 2 at the edges, 1 exactly in the middle. We will use them to drill holes for dowels and confirmations.
 Marking places for dowels
2. Using the marks, we drill 2 holes for confirmations in each corner of the structure. We screw in the confirmations.

Drilling holes for confirmations
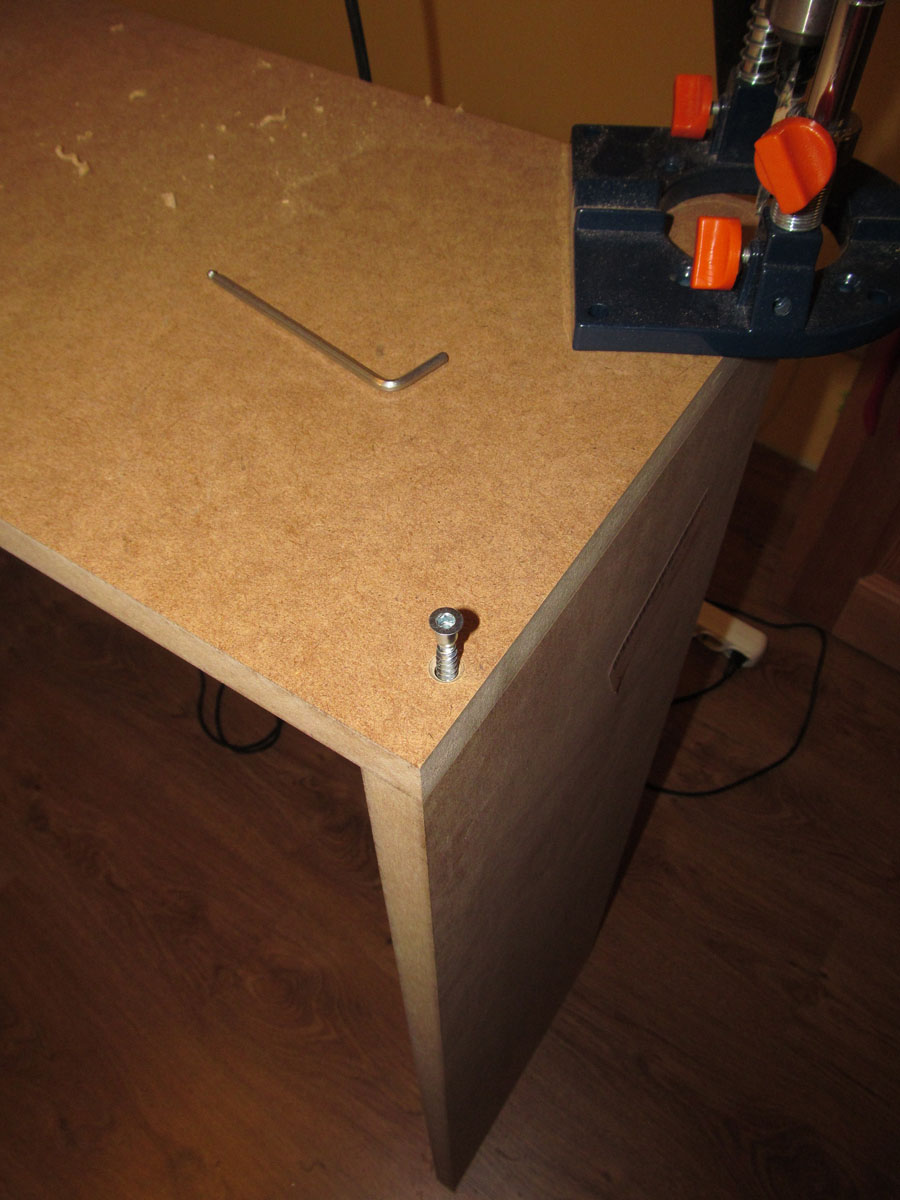
We tighten the confirmations
3. With corner clamps We fix the box of the 4 longest parts while installing the shelves. This is necessary so that the structure is rigid, does not fall apart, and maintains a right angle.

Fixed the main parts of the rack
4. We selected a drill according to the diameter of the dowels. Using a template, mark the locations for the holes. We make indentations with a core. We drill holes. The dowel has a length of 35 mm, so we make holes 25 mm deep at the ends of the parts, and 10 mm deep in the planes.

Selecting a drill the right size
Marking places for dowels

Apply a mark for drilling

Setting the drilling depth

Drilling holes for dowels
5. We insert markers for dowels into the holes obtained, not dowels. Using them we place marks on the second part. This is necessary so that the centers of the two holes (in which the dowel will be placed) coincide. Using the marks obtained, we drill holes for the dowels.

Insert markers for dowels into the holes

We use a shelf as a template

Apply marks by hitting the shelf from above
Marks are clearly visible in side light

We make indentations in the places of the marks

Drilling holes for dowels
6. Hammer the dowels. We insert the part into place. We do the entire first row using the same principle.

Hammering dowels into the holes

Putting the part in place

Bottom row is ready
7. For the second row we needed to drill holes with a depth of 46 mm, so the board for setting the drilling depth was slightly improved using a paper ruler. Sponsor of the refurbishment free lines from the construction supermarket Leroy Merlin :)

Gadget for measuring drilling depth :)
8. To connect the 3 parts, we used 2 dowels. To do this, in the upper part, as before, we drilled a hole 25 mm deep. And the 2 lower ones were drilled simultaneously (24 mm + 22 mm = 46 mm).

Sample connection of parts

Second row assembled
9. To assemble the last row, the top part, 2 m long, was removed. Based on the principle of the 1st row, we made all the holes for the dowels and inserted the dowels. Secure the top piece in place.
At each end of the rack, 4 holes were made (2 per shelf) for confirmations, and the confirmations were screwed on. This makes the entire structure stronger.

The rack is fully assembled
10. Getting ready for painting: lay down newspapers, place the part on the jars to make it easier to paint the ends and nothing sticks. All parts were painted acrylic paint(Komposit Emal Profi) and acrylic varnish(Sadolin Celco Aqua), they are non-toxic. We opened the windows as much as possible so that the paint would dry faster and the fumes would not linger in the room. All parts were covered with 2 layers of paint and 1 layer of varnish.

Preparing for painting

Acrylic paint and varnish

Paint with 1st layer

Drying in jars

All parts are painted
11. We reassemble the already painted parts together. We glue felt pads to the bottom.

Felt pads were glued to the bottom
12. Attach to a rack assembled with your own hands back wall. She will give it not only finished beautiful view, but also additional strength. To properly place the back wall, we raised it on both sides with identical small stands.

Rear wall stand

The back wall was fixed using a level

Screw with washer
13. We move the freshly assembled rack to its rightful place next to the one we recently redid.. Fill it with junk :)

One of the ways to decorate a room is to use shelves. But they are not only an object for decoration. Much more often they are functional. Shelves are hung on the wall, placed on the floor, some are hung from the ceiling or beams. But the best thing is that they are easy to make yourself, with your own hands.
Types of shelves in the house
Depending on the installation location, shelves can be wall-mounted, floor-mounted or hanging. If the floor shelf has a large height - from a meter and above, it is often called a rack. A few words about hanging ones: usually these are decorative structures that hang on a pipe or a specially driven bracket. This option is popular in rooms where heating pipes run under the ceiling: they just beg to have something hung on them. Shelves are hung on the pipe in the kitchen and bathroom: it’s convenient there.
They are made of wood, fiberboard, and have glass shelves. The same materials are used as stands, but they are also made from metal, plastic and other absolutely incredible things - for example, pipes or bottles.
IN living rooms It doesn’t really matter what material the shelf is made of. It is important that its design is in the same style as the interior. Even functionality is not always important: some play a purely decorative role. If they have anything on them, it’s only one or two items. Their role is to give the interior of the home a special style and flavor.
A laconic style of apartment design and the same laconic shelves in a contrasting color. In this interior they - main element The free space above the sofa is organically filled with shelves to match the walls
If we talk about shelves in technical rooms - the kitchen and bathroom, in particular, then in addition to aesthetic considerations, practicality requirements are almost universally added. Even decorative shelves in the kitchen should be washed well. For bathroom shelves, the requirements are generally high: periodically there is very high humidity and materials are required that can withstand it without any harm. There aren't many of them. It's plastic and stainless steel. They also make bathroom shelves from MDF, but they can be used normally if they are in good condition.
Shelves on the wall
In any room there are places on the wall where you just need to hang something. After all, the majority modern furniture occupies only the lower part - sofas, tables, couches. The upper part remains empty and dissonance arises: the lower part of the room is overloaded and the upper part is half empty or completely empty. These voids on the walls are organically filled with shelves.

The whole system, and the most “dead” space is used - the corner
Structurally, most shelves consist of the actual shelves and lintels. But these components are combined into so many options that it is impossible to count. Simple design This is good: you can make any shelves with your own hands. Moreover, these products may be the first self-made things. It's really simple.
How and what to attach it to
It’s not for nothing that we start with fasteners. The design of a wall shelf largely depends on the type of mounting. Or maybe it’s the other way around. It depends on what to dance from...
Traditional hinges

There is a traditional way - on loops. It is suitable for wood and fiberboard, any other material that is thick enough to attach. Screwed onto the sides with self-tapping screws. Then the distance between the centers of the loop holes is measured and marked on the wall (make sure it is horizontal). At the marked points, holes are drilled for the dowel, the dowel is inserted and a dowel-nail with a small head is screwed into it, which fits into a loop or bracket (a pin slightly bent upward). Then a shelf is hung on them.
Not all materials can be drilled. For example, glass shelves. You definitely can't screw anything into them. Fastenings for glass shelves are special: they consist of two parts, between which glass is inserted. Often elastic pads are installed between the holders. The bottom mount usually has a small clamping screw to secure it in place.
Fasteners for glass shelves
The most popular mount for glass shelves is called “pelican” - for its unique shape. It looks good on its own and is available in different colors. The thickness of glass that it can hold is from 8 to 34 mm. You can insert not only glass into it, but also any other material of such thickness. It just looks stylish with glass.
It’s easy to make glass shelves on the wall with it: you buy a mount, order pieces of glass with processed edges of the required size and shape from a glass workshop (or cut them yourself, if you know how). All that remains is the assembly itself:
- Attach the pelicans to the wall. Two dowels each. The case is collapsible - the decorative trim is removed, and there are two holes in the mounting plate. One is higher in the body, the second is lower. We secured it and put the decorative trim in place.
- Glass was installed.
- Tightened the screw. All.

There are other forms of similar fasteners. The photo below shows a few of them.

Decorative brackets
Another type of fastening is brackets. They are reliable, some are decorative, so much so that they themselves are decorations.

Concealed installation - shelves without support
And the most amazing device for hidden installation. It makes it possible to hide the fasteners. It is cut out at the end seat under the pin and body of the holder and the shelf is simply put on it.

As you can see, even simple board or a piece of glass on such mounts is already quite good. But there is still a sea of all sorts of ideas.
Bookshelves
There are strength requirements for bookshelves: they can hold significant weight. Therefore, the fastening, materials and design must be reliable. Traditionally, bookshelves are made of wood, laminated or veneered fiberboard. And then fiberboard with a long span (more than 90 cm) sag over the years.
When planning shelves for books on the walls according to your own dimensions, keep in mind that the distance between the supports should not be more than 90 cm. Then even when fully loaded it will not bend. There are two types and varieties of shelves: wall-mounted and floor-mounted. Both of them can be angular.
In the simplest case, it is a board secured in one of the following ways. Some options, especially when presented correctly, look very good.

And with imagination, several planks turn into very interesting thing, which can even be the main element of decor. Ideas for self-made collected in the photo gallery.
And this is a serious way to expand the space due to the angles between two windows. Nonlinearity - they are always interesting, and on such a shelf you can put books of different heights
Floor bookshelves can be loaded more seriously. Here the forms are different: there are racks to which shelves are attached. The highlight can be a broken or unusual line of shelves, as well as interesting racks.
This is more like a bookcase or even a cabinet, but the essence does not change - the original color and interesting small shelves in the central part and the structure looks interesting  A very interesting idea - non-linear shelves and lintels made of thick glass
On the manufacture of fountains (both small indoor ones and more substantial ones for country houses, gardens or garden plot) read.
Hanging
Not very numerous, but an original type. The most important thing is that it can be done easily: a few planks, four ropes or two belts and you can get to work.
This is a complex system of blocks...and the shelves can be located at any level. Two planks, four ropes and half an hour of time are all that is needed to make this shelf. How to make a hanging shelf - graphic step-by-step instructions
To the nursery
While the child is very small, I want functional shelves, but with children's drawings. But where can you get these? Do it yourself. Any shelf of the configuration you like can be covered with non-woven wallpaper or thick wrapping paper (glued with PVA). After drying, coat with varnish twice. water based. Such shelves can be washed, but what’s most interesting is that the shelf can change with the child. You tear it off old decor, glue a new one. The idea is simple, it works perfectly.

For children, the shelves are not very different in design. If we talk about floor or shelving, then they must be strong, taking into account the fact that older children will definitely want to climb on them. Therefore, often even those shelves that stand on the floor are additionally attached to the wall: so that they do not collapse and crush young climbers. Based on these considerations, they are not made tall: even if they fall, it’s not scary.
The shelves in the children's room also differ in color - they are brighter, can be made in the form of letters, and boxes for toys can be installed in them: this makes it easier to keep them in order. In general, functionality and security must be combined.
 System with drawers - cleaning will be quick Combination of open and closed shelves - convenient for preschoolers
Shelves and shelves for the kitchen
Say what you like, but in the kitchen the main thing is functionality. There is not much free space even on the walls: the cabinets take up a large area. Therefore, one of the tasks is to make the most of free space. There are interesting ideas for small or even very small gaps between the wall and the refrigerator or other household appliances. Strictly in size, you can make a pokka on wheels, which can be pulled out and completely hidden there. It is wide and narrow (see photo).

It’s easy to make such a retractable shelf-rack on wheels for different jars. Everything you need is at hand and out of the way
Is there some more interesting ideas about saving space. If the sink or station is located near the window, you can take the sides. There is an interesting hanging option- a grid on chains to which all utensils are attached. But such a shelf is possible if the desktop is not against the wall. Another option for saving space is if the kitchen-dining room is zoned with a counter, you can also make a shelf above it, which will be partially hanging. One part of it rests on the wall, the second on the counter or “hangs” on the ceiling.

Covering the entire wall above your desk with cabinets is not the best solution. They look heavy. The problem can be solved by using glass doors, but not everyone likes this. The solution is to make open shelves between the cabinets. They will add more lightness to the interior and work zone will not put so much pressure on the rest of the space.
Glass and open shelves will “lighten” the interior The style is different - the idea is the same Closed and open shelves in one system - convenient and non-standard
Decorative and original
Often, shelves on the wall play a purely decorative role. They are designed to attract attention and this goal is achieved unusual shape, contrasting with the walls, color. You can’t bet much on it: one or two things, but how interesting they are.
Another option for “square” shelves. Two identical sets arranged differently If traditional square shelves are decorated around the edges with curly frames, the style turns out to be completely different
Another one interesting topic- glass shelves. Just one glass is not very interesting. Its combination with wood and steel is more attractive. The effects are sometimes unexpected. Glass is assembled on guides: the material is fragile and heavy, and it needs to be held. Steel can do this.

In fact, these systems are designed to create store interiors, but also apartments in a modern style or look stylish.

Also suitable for vintage style
What are shelves made of? Even from pipes. Metal and plastic. Do you have any samples left from the renovation? Use it and get it designer item, interestingly, collected from trash.
This is an interesting variation of a bookshelf made of pipes


