Today we have to find out how practical plasterboard ceilings are for the kitchen. We will weigh the pros and cons of the solution, as well as get acquainted with the features of the construction of GKL structures in a humid room with a high probability of contamination of the ceiling and walls. So let's get started.
Grade
First of all, we need to decide how appropriate a plasterboard ceiling is in the kitchen.
pros
- The suspended structure allows you to hide the differences between the floor slabs, traces of flooding by neighbors and other ceiling defects. The size of the irregularities does not matter: they will all remain invisible to the viewer;

- Plasterboard ceiling in the kitchen does not require preparation of the base. At all. You do not need to clean old coatings and re-plaster the surface;
- , combined with stretch inserts or plaster ceilings;
- Plasterboard kitchen ceilings allow you to mount built-in lighting. At the same time, GKL, unlike plastic panels or PVC film, is not afraid of significant heating, which allows the use of lamps with inexpensive halogens or incandescent lamps of considerable power;

- The plasterboard ceiling in the kitchen allows you to hide the openly laid ventilation duct and other communications (air conditioning lines, local network, horizontal sections transferred water risers, etc.);

- Finally, its price attracts the GKL: a sheet of ceiling material 9.5 mm thick and 2.5x1.2 meters in size will cost the buyer about 200 rubles.
However: the costs do not end with the purchase of drywall. In addition to it, for the installation of the ceiling, you will need to purchase a profile, fasteners, putty and other auxiliary materials.
Minuses
They also exist:
- Plasterboard ceilings in the kitchen do not tolerate flooding. Meanwhile, the kitchen is one of the rooms where floods are most likely: a rag that plugs the outlet of a neighbor's sink or a clogged sewer can lead to flooding;

- GKL has a fairly high hygroscopicity (the ability to absorb water). Stably high humidity can lead to its swelling, deformation and loss of mechanical strength by the ceiling;
- Like any suspended ceiling in a plasterboard kitchen, it will make it lower;
However: the height of the room in the case of the simplest single-level ceiling will decrease by only 4 centimeters. The visual reduction in the volume of the kitchen can be compensated by increasing its illumination and using light colors in the fine finish.

- When frying in an open pan, splashes of fat can fly over long distances. Including hitting the ceiling. Washing them off a painted surface is a more than trivial task.
Expenses
When installing on a turnkey basis, a single-level plasterboard ceiling in the kitchen will cost the customer at least 800 rubles per square meter. Do-it-yourself installation will reduce costs to 300 r / m2.
For comparison:
- The price of a square stretch vinyl film for turnkey installation starts from 260 rubles;

- Construction from wall panels will cost a little more - 350-400 rubles per square;
- the most expensive on our list: materials for their assembly cost at least 650 rubles per square meter.
conclusions
Plasterboard ceilings in the kitchen are quite appropriate, but with several limitations:
- For the manufacture of crates or frames, you must use only and exclusively galvanized profile. A slightly cheaper bar is more likely to warp with seasonal and daily fluctuations in indoor humidity;

- The kitchen needs efficient supply and exhaust ventilation: in this case, the humidity in it will not be high around the clock. To do this, it is enough to install instead of a ventilation grill exhaust fan or mount exhaust hood over the stove;

- For mounting the ceiling, it is desirable to use moisture-resistant (green) drywall(cm. ) . It differs from the one intended for dry rooms (white) with antifungal additives in the composition of the gypsum core and a cardboard shell that is resistant to contact with moisture;

- For fine finish washable covers must be used(read - wet abrasion-resistant paints based on silicone and acrylic resins).

materials
What materials will be needed to assemble a ceiling in a drywall kitchen with your own hands?
Here is the minimum set required to make a single-level ceiling:
| Image | Description |
|
|
Ceiling plasterboard (9.5 mm thick) is purchased for the area of the room with a margin of 10-15%. The excess will go to waste when trimming the sheets. |
|
|
Profile PP 27x60 mm is used to assemble the crate. The length of the profile should be equal to or slightly exceed one of the dimensions of the kitchen. The number of PP is calculated for a crate step of 600 mm. |
|
|
The PNP profile 27x28 mm is needed as guides and is responsible for attaching the suspended ceiling to adjacent walls. The total length of the PNP should be equal to the perimeter of the kitchen. |
|
|
Straight hangers are responsible for fastening the crate to the ceiling. They are mounted along each rail in 60 cm increments. |
|
|
Wedge anchors attach hangers to the ceiling and rails to the walls. Unlike dowel nails, they will securely hold the ceiling structure even in case of fire, when plastic dowels can begin to melt. |
|
|
9 mm self-tapping screws are needed to connect PP and PNP profiles with each other and with suspensions. |
|
|
25 mm self-tapping screws will fasten the plasterboard to the crate. |
|
|
Finishing putty on a gypsum binder is needed for filling the ceiling after installing the GKL. |
|
|
Serpyanka (fiberglass mesh with an adhesive layer on one of the surfaces) is responsible for reinforcing the seams. Without reinforcement, fluctuations in humidity and temperature will lead to the appearance of cracks after one or two years of operation of the finish. |
|
|
An acrylic-based penetrating primer will prepare the ceiling for painting. |


Tools
Now let's prepare the tools.
What you need to mount the ceiling in the kitchen with your own hands from drywall:
- Perforator with a drill for drilling holes for fasteners;
- Metal scissors. With them we have to cut a galvanized profile in place;
An important point: it is highly undesirable to use a grinder for cutting. Abrasive cutting leads to strong heating of the metal; at the same time, a thin layer of low-melting zinc completely burns out in the cut area. In conditions of high humidity, a profile without an anti-corrosion coating begins to rust quickly.

- A screwdriver with a cross bit (preferably with a screw-in depth limiter) for assembling the crate and its plasterboard sheathing;

- Water or laser level and chalk line for marking;
- Hammer for mounting wedge anchors;
- A long metal ruler, tape measure, pencil and a sharp knife for cutting drywall;
- Cord or thread. They will serve as a guide for us when installing the ceiling crate;
- A bucket and a mixer or a drill with a whisk for making putty;
- Grater or grinder with abrasive meshes for sanding the ceiling;

- Brush, roller and paint tray for priming and painting.
Technology
So, how to mount a plasterboard ceiling with your own hands in the kitchen?
Assembly of the crate
Here's the step by step:
- Mark up by level. The line of the ceiling is beaten off on the walls with a chalk cord. If the ceiling should not hide the built-in lights, the markings should be 27 mm from the lower ceiling point - the thickness of the PP and PNP profiles;

- Fasten the PNP profile along the marking line. Mounting step - no more than half a meter. PNP is attached end-to-end, without overlaps;
- Mark the axes of the battens on the ceiling surface with a step of 600 mm and fix the hangers according to the marking with the same step;
- Insert the cut-to-size PP into the guides, and press them to the ceiling with curved hangers;
- Pull cords or threads between the guides perpendicular to the crate;
- Alternately lower the profiles of the crate to the level of the cords and pull the ears of the suspensions to their side walls, then bend the part of the ears protruding beyond the PP profile upwards;

- Connect the ends of the PP profiles with the guides with self-tapping screws. The ceiling frame is ready.

Sheathing
How to fix drywall to the ceiling in the kitchen?
Each sheet is aligned with an edge in the middle of the PP profile and screwed to all the elements of the crate overlapped by it with 25 mm self-tapping screws. Fastening step - up to 20 cm.
A few tips for this stage of installation:
- Work with a helper or using props, clamps, etc. GKL is a fragile material and easily breaks even under its own weight;

- Screw fasteners no closer than a couple of centimeters from the edge of the sheet. Otherwise, the edge will crumble;
- The fastener heads must be recessed relative to the surface of the drywall sheet without breaking through the cardboard shell. If you do not have bits with a depth limiter on hand, set the screwdriver's ratchet to actuate when the cap is immersed;

- When cutting GKL with a hacksaw or electric jigsaw a huge amount of dust rises into the air. In order not to breathe it and save yourself from having to do general cleaning throughout the house, drywall should not be sawn, but broken along cuts previously made with a knife;

- Do not be afraid to leave a gap of 1-2 centimeters between adjacent sheets. Putty will hide it.
Reinforcement and putty
Tool - two spatulas (width 10-12 and 30-35 cm).

The putty is mixed in a wide container with a volume of at least 8-10 liters. The volume of a single portion should allow you to work it out in 30-45 minutes: by this time, the gypsum begins to set and become unsuitable for puttying.
An important point: knead the gypsum only in a clean bowl, otherwise the seized lumps will interfere with you, falling under the spatula. The gypsum mixture is poured into water and after a pause of 3-5 minutes for swelling, it is mixed to a uniform consistency.

The seams between the sheets cut to size (read - with rectangular edges), before puttying, need to be jointed - chamfered. Jointing will fill the seam without cavities in it and reduce the likelihood of cracks.

Then the seam is glued with a sickle, after which it is densely filled with putty using cross-shaped movements of a narrow spatula.

The second layer is applied with longitudinal sliding movements of a wide spatula after the first layer has dried and hides the reinforcing material.

Continuous filling of the entire surface of the flow is only necessary if the reinforcement of the joints is distinguished by its thickness. The putty is applied in two layers perpendicular to each other "on a strip" or in one layer of millimeter thickness.

Sanding and priming
How to prepare plasterboard ceilings in the kitchen for painting?
Preparation is carried out in three stages:
- After the gypsum has completely dried, the seams or the entire surface of the ceiling are polished. For grinding, bright lighting is needed, falling on the surface at an oblique angle: it will highlight all the irregularities with shadows;

- Then the ceiling is vacuumed or dusted with a brush;
- The last stage of pre-finishing is the primer. The primer is applied with a roller or brush in one layer. Its task is to stick the remaining dust to the ceiling, reduce the absorption of paint and ensure its strong adhesion to the surface.

Painting
Between filling the joints and painting the ceiling, at least a couple of weeks must pass: otherwise, the joints due to the unfinished gypsum hydration processes will stand out with a shade. The paint is applied with a roller in 3-4 layers.
When painting the ceiling, you should follow a few simple rules:
- The first to be painted over with a brush are the adjunctions to the walls;

- The entire surface is painted in one layer in one step. Take a long pause - get a visible thickening of the coating on the border of the dried area;

- Each layer is applied at right angles to the previous one. So the stripes from the edges of the roller are less noticeable;
- The last layer is applied parallel to the prevailing light. The reason is the same.

Design Choice

There are several rules that should be followed when choosing a plasterboard ceiling design:
- Given the dimensions of the room, its height and layout, they decide what the shape and number of levels will be. In its manufacture of a false ceiling, fewer sheets, effort and time will be spent. If the area, and most importantly, the height of the room allows, then you can make a two-level ceiling. In spacious rooms, multi-level complex systems will visually make the space more compact;

- The finish affects the design - complex ceilings it is impossible to paste over wallpaper or tiles with high quality, this finish is ideal for flat surfaces, where it will add variety. complex system variegated or too embossed finish can visually weight. It can be combined - it is important to think through all the nuances;

- The design is affected appearance and the type of fixtures to be used. It is necessary to think in advance of their number and location. The latter largely depends on the arrangement of furniture and the location of functional areas.
Kitchen area and construction type - what is the connection?

It was previously noted that in many ways the area of \u200b\u200bthe room affects the type of suspension system, its color and complexity:
- Kitchen with low ceiling, can visually acquire additional volume due to a single-level light design with a sufficient number of built-in lamps;

- If the room is spacious, but the height does not allow you to install a multi-level system, then you can use several shades in the finish;

- As mentioned earlier, a room that is too spacious will look more comfortable when using a complex multi-tiered system;

- In an open-plan apartment or when combining a kitchen and a living room, multi-level systems are used for space zoning, highlighting the dining or working area.

Advice. You can visually divide the room into functional segments using built-in lights, the shape of a protruding volume, or the use of several colors and textures in the finish.
Conclusion
As you can see, even a novice can make a plasterboard ceiling in the kitchen. The attached video will introduce you to original designs suspended ceilings and describe in more detail the technology of their installation. Good luck!
Reading time ≈ 9 minutes
In order to beautifully decorate the renovation of the apartment and maintain the same style in all rooms, it is important to pay great attention to the technology of finishing the ceilings. In this article, we will take a closer look at how to make a false ceiling in a plasterboard kitchen on our own without the help of specialists.
If you want to save money, and at the same time learn how to collect, read this material very carefully.
Preparatory stage
The entire technology for creating false ceilings from plasterboard can be divided into several stages:
- We determine the height of your ceilings and beat off the levels in the space of the room.
- We expose special guides according to the created level.
- We insert the profile, screw the brackets, create a frame for the desired level.
- We place cotton wool in the space behind false ceiling, put jumpers and apply drywall.
What tools you should purchase before installing a plasterboard ceiling in the kitchen:
- Spirit level (a special tool for determining the level of horizontal placement of structures in the space of a room
- 2 meter level to determine the evenness of the installation
- Ordinary tape measure (5 meters)
- construction line
- Standard triangular construction ruler
- Drill with a set of nozzles
- conventional screwdriver
- Plane
- Special knife (construction) with a set of replaceable blades, as well as a hacksaw
- painter's pencil
- Sandpaper

Tools
To assemble the suspended ceiling structure in the kitchen, we need the following materials:

- Plasterboard sheets (GKL). On both sides they are covered with soft textured cardboard, which is firmly glued to the plaster. The length of the GCR is from 2000 to 3000 mm, and the width is 1200 mm. Such sheets are usually finished with gray cardboard.
- Fire-resistant plasterboard sheets (GKLO). Not used in residential areas, more often found in the industrial sector.
- Waterproof plasterboard sheets (GKLV). Suitable for kitchens and showers in cases where ventilation is installed, which removes some of the moisture. Finishing - green cardboard.
- Waterproof Gypsum boards of increased fire resistance (GKLVO). Aggregate functions and properties of absolutely all of the above types.
- Gypsum fiber sheet (GVL). This type is not subject to cardboard finishing. It is super hard and hyper resistant to fire.
- Waterproof Gypsum fiber sheet (GVLV).
Let's start creating a false ceiling
Stage of water level beating
You will need 1 assistant and a special tool - a water level. We draw on any of the walls at the level of your eyes with a pencil or chalk using a ruler a flat horizontal line parallel to the floor. Next, draw a vertical line in the same way to make a cross. Now this point is your assistant's place to catch the level. And you need to go through all the corners and draw lines.
In the water level, the water in both flasks should be exactly halfway. Also, do not forget to completely release the air from the water level, otherwise it will not work out exactly.
Your assistant should put one of the flasks to the drawn cross, and you need to do the same, putting the second one to the corner of the wall. The boundary of the water in the flask is caught by those who stand at the cross, while you stand motionless. The line is fixed with a pencil. Thus, marks are made around the perimeter of the entire kitchen.

Water level check
Where do you need tags?
- Choose the longest wall and put 2 marks there (the kitchen can be either rectangular or polygonal).
- On the remaining 3 walls, one mark will be enough.
If your future plasterboard ceiling will be illuminated in the kitchen, namely with built-in lights, then you should not subtract 5 cm, but, for example, 10 cm.

False ceiling lamp
Stage of correct setting of guides
Now we move all the marks along the perimeter of the kitchen up by the value that we received in the calculations in the previous step. It is necessary to measure the wall on which you have 2 marks (the most long wall kitchens). The guide must be cut to length.
The guide is nailed with dowels in the areas where the marks are drawn. Below you need to bring a 2-meter level and make sure that there is no gap left anywhere.
Advice to everyone who has at least one wall in the kitchen up to 3 meters long - buy guides from 4 meters and above in stores.
We also place guides around the entire inner perimeter of the kitchen, paying attention to all the marks on the walls, as well as to the guides themselves on adjacent walls.
Double-check the curvature several times so as not to spoil your future ceiling.

Exposed guides
Frame creation stage
We find the most even angle (by eye), which we will further focus on in order to set new marks already for profiles.
Every 60 centimeters we put designations on the walls (60, then 120, then 18, then 240). We repeat the same steps on the other side. Next, you need to measure the profile, cut it off and insert it into the guides at the points where there are marks.

We take measurements
Then we screw on the brackets so that the whole structure holds firmly. We proceed to the exposure of the frame itself. You will again need a second assistant: someone will maintain the level, and the other participant will carry out the bonding of profiles. This process is shown in detail in this video.
One participant will have to set the level from one end, and the second from the opposite. Then the level must be turned across and pressed one of the edges of the level to the guide of the other edge. (The holes for the dowels should be drilled at a distance of 35-40 cm). So, the main profiles are inserted into all guides. So, you can move on to the next step.

Profile fixing
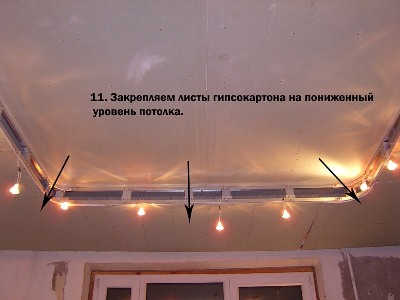
The stage of attaching drywall to the ceiling surface
To beautifully and correctly install a plasterboard suspended ceiling in the kitchen, you need to study the following photos from step by step instructions for fastening the structure to the surface of the ceiling itself.

We fasten the sheet to the ceiling with one edge on the fixed profile, and snap the second

Now the drywall sheet can be moved to the right or left

After fixing the sheet on the screws, the supporting profiles are removed and used for other sheets
To attach the gypsum board material to the created frame on the ceiling, we divide the technology into the following steps:
- We cut sheets with a hacksaw. The hacksaw must be selected with fine teeth to make it more convenient to cut (a clerical knife is also suitable). We cut the material 120 by 250 or 120 by 125 centimeters. Make sure all joints are even. You need to cut on the most even horizontal, it is best to choose big table or gender.

We cut with a hacksaw
- Processing with a planer. We use a planer to process the resulting edge. If you end up with edges that remain and protrude slightly, remove them with a sharp knife.

We process with a planer
- We cut holes for lamps or lamps, if necessary according to the plan. Here it is necessary to clearly measure everything in advance and place it first on the plan, and then mark the location on the drywall.

Cutting holes for lights
- Directly the surface finish itself with drywall sheets. There are two ways to attach the material to the ceiling: transversely or longitudinally. Transversely - we place the sheets strictly perpendicular to the metal profiles, longitudinally - we place them parallel to the supporting profiles. Self-tapping screws must be installed at a distance of 10 to 15 mm, retreating from the edge of the drywall sheets. The screws are screwed in such a way that they do not protrude on front side ceiling (watch the screwing depth). The screws must be screwed into the metal frame by 10 mm. The location and length of the screws will be determined by the total thickness of the entire ceiling sheathing. The distance at which the screws are located from each other is 150 mm. Make sure that the cardboard where the screws are attached is in good condition and not damaged. So the mount will be secure. If there is a gap between the ceiling and the walls, it is better to close it with a special corner instead of putty. Another important point: 2 days before the installation work, the material must lie in the room where it will be subsequently installed.

Fasten the sheets to the ceiling
- We putty the joints. Before puttying, you need to wait about 2 days. We carefully examine all the flaws and joints, eliminate them. We clean all surfaces from the remaining dust and unnecessary details, a reinforcing tape will help here. Putty must be carefully pressed with a spatula, in no case leaving air bubbles. We are waiting for the final drying and go through the necessary areas sandpaper. If necessary, apply a second layer of putty to level the surface, also wait until it dries completely and work with sandpaper.

Putty joints
How to install lamps on the ceiling, shown in this video.
Now you can easily build a false ceiling in the kitchen with your own hands, following our instructions in the article, step by step photo and video. You will need patience and care. After puttying, you can also, if you wish, paint your ceiling in the kitchen so that the whole apartment is sustained uniform style. But usually a suspended ceiling looks beautiful and elegant even without paint.
Did you know that the ceiling in the kitchen can be not only an element of decor, but also perform certain functions? This part of the room can be made useful and functional if you create it from drywall. How to do this, and how can the space under the ceiling structure do a good job in the kitchen?
Why is it worth installing a plasterboard ceiling in the kitchen?
Drywall is a building material that was invented in the United States in the 19th century. It was invented by Augustin Saket, the owner of a paper factory. Then this painting was called construction board and resembled a kind of cake made of plaster and paper. The material was improved by engineer Clarence Utsman, who created such drywall as we see it and use it now.

On a note! In the composition of one sheet of drywall, approximately 91% of the mass is gypsum dihydrate, the remaining 9% is cardboard, starch and surfactant organic matter.


Drywall came to the Soviet Union around the 50s of the twentieth century and has been used in construction and design ever since. The material is simple and easy to use, relatively cheap and not only allows you to finish (level) the walls, but is also suitable for manufacturing window slopes. It is not surprising that drywall began to be used to create ceiling structures, including multi-level and complex ones.


The material has a large number pluses and that is why it is ideal for making a ceiling in the kitchen.

But the plasterboard ceiling has its drawbacks.
Drywall prices
drywall
- The design "eats" at least 7 cm of the total height of the ceiling, which is very inconvenient for small kitchens.
- Plasterboard ceiling installation is not a matter of five minutes. You may have to spend more than one day to collect it completely.
- After the installation is completed, the ceiling will require finishing, and this is an additional time and financial cost. Depending on the type exterior finish, the design can become difficult to maintain.
- Such a ceiling does not like moisture and will not save the room in case of flooding by neighbors from above.
- With improper installation, as well as with prolonged use, in places where the seams lie between the sheets of drywall, the surface finish may crack.
Nevertheless, despite all the shortcomings, plasterboard ceilings are one of the most popular types of ceiling surface finishes. He has many more advantages.

Types of plasterboard ceilings
Drywall is such a “plastic” material that it allows you to create completely different shapes, including in the kitchen. In order to purchase required amount materials, the necessary tools and start installation work, you should decide how your ceiling will look like. There are several types of plasterboard ceiling structures.
Table. Types of plasterboard ceilings.
| Ceiling type | Description |
|---|---|
| The simplest version of the plasterboard ceiling. Represents flat surface without additional elements. Easy to install: the metal frame is simply sheathed with drywall sheets. Such a ceiling "eats" a minimum of the total height of the room, but at the same time allows you to hide the draft ceiling completely. |
| Medium in complexity type of plasterboard ceiling finish. The main "subtlety" is to correctly calculate the location of additional levels and create a more complex frame than in the case of a one-level ceiling. This makes installation more difficult and takes longer. But on the other hand, the levels can be interestingly beaten with the help of curved lines, as well as illuminated with the help of lamps or a luminous tape. It is worth remembering that a ceiling of several levels “steals” even more of the height of the room, so it is only suitable for spacious kitchens. |
| As a rule, such a ceiling will have a very complex structure and some volume decorative element its surface. For example, a flower may bloom in the center of the kitchen, or a butterfly may appear, or even some kind of abstract pattern. Such a ceiling is difficult to install for those who do not have experience with drywall. |


Let's take a closer look at ceiling structures consisting of several levels. The ceiling in the kitchen can be made frame, diagonal or zonal.
Frame ceiling- this is the easiest way to implement a multi-level ceiling. It is a surface with one or two steps along the perimeter of the kitchen walls.
On a note! By the way, a step around the perimeter of the kitchen - perfect place to organize additional illumination of the room. As a rule, the lamps look very organic there.

Diagonal ceiling- a design where the steps of the levels are located only on one side of the room and stretch from corner to corner. They are performed both perfectly smooth and wavy.

zone ceiling will clearly highlight the working or dining area. The main step will emphasize it. The rest of the ceiling space will be flat. As a rule, such a step is not large and massive.

Design Tips for Kitchens Small and Large
In order for the ceiling in the kitchen to please you for many years and not seem bulky, ugly, heavy, you should carefully consider its appearance.
When choosing the type of plasterboard ceiling structure and its finishes, it is important to consider several important factors:
- dimensions and height of the kitchen;
- general style of the interior;
- the need for additional lighting equipment;
- the need for decoration.
Why is it worth paying attention to these factors? The fact is that the plasterboard ceiling, with improper installation and finishing, will not just “press” - it will look very bad, and you definitely will not be satisfied with the repairs made.

Here are some tips, following which, you can very successfully work out the design of the ceiling and make it perfect.
- Use spotlights for zoning the room.
- Hide the corrugation and other kitchen communications under drywall.
- To finish the structure, use materials of light shades - beige, cream.
- In small rooms, it is better not to make ledges on the ceiling in the center of the kitchen.
- A game with color will also help to zone the room. Use different shades for this.
- IN large kitchens you can create a floating ceiling - in this case, it seems that part of the structure is simply hanging in the air (the mounts are not visible).
Attention! Remember that in a small kitchen, bulky multi-level structures will look very bad. It is best to make the ceiling in one level or work out a frame version of the plasterboard ceiling.
Ceiling installation
Once you have decided on the design of the plasterboard ceiling in the kitchen, you can proceed with the installation.
To do this, you will need the following tools, which you should take care of purchasing in advance:
- perforator;
- screwdriver;
- roulette;
- construction laser level;
- ladder;
- pencil for marking;
- putty knife.

Video - Drywall tool (basic set)
Materials that will be needed to create a drywall ceiling:
- drywall sheets;
- anchor wedges for the ceiling;
- metal profiles CD and UD;
- suspensions, traction;
- putty and primer, finishing material;
- sealing tape, separating tape, sickle;
- screws for metal and drywall;
- dowel;
- profile extensions, "crabs" for suspended structures, "fleas".

Also pre-purchase lighting in the required quantity and wires for their connection to the mains.
The procedure for performing work on the installation of a two-level ceiling.
Draw up a detailed plan for fixing all structural elements. It will facilitate the work and allow you to calculate the required number of fasteners and materials.
Prices for screwdrivers
screwdriver

Start work with markup. Using a tape measure, determine the lowest corner in the kitchen, from the base ceiling down, make a mark along the lower border of the first tier (this is about 10 cm). Make the same marks on the other corners. Determine the level on them using a laser level.


Connect the points indicated in the corners with one line around the perimeter of the kitchen. To do this, it is convenient to use the so-called chopping cord.

Fasten the UD guide profiles along the drawn line with dowels. Make holes for the profiles with a puncher. Remember to reinforce each profile at the edges at a distance of at least 10 cm from each end.

Attention! Before fixing the profiles, glue them with a sealing tape.

Transfer to the ceiling that part of your scheme where the main profiles are marked, fixed under the ceiling. The step between the parallel marking lines is approximately 40 cm. Make marks perpendicular to them in the places where the suspensions will be installed (the step is about 50 cm). In this case, install the extreme suspensions at a distance of 25 cm from the wall.
Start installing hangers. Screw anchors into the ceiling, fix the suspended structure and bend its ends so that it does not have free play.

Mounting suspensions (here - vibration suspensions for sound insulation)
Install the profiles on the prepared structure by screwing them to the hangers with self-tapping screws - first the edges, then the middle. In this case, fasten the profiles on one side of the ceiling, then on the other, step by step.

On a note! The length of the entire profile should be less than the length of the kitchen by about 2 cm. Short profiles can be connected using special connectors. Remember that the joints of several profiles in this case should not be at the same level.
Install jumpers between profiles using "crabs". Install jumpers in those places where there will be joints of drywall sheets.

Do all the electrical wiring, because after plasterboarding you will not be able to carry out this stage of work. Lay the wires for the fixtures and check the entire network for operability.


Advice! In order not to subsequently look for the place of installation of lamps, they can be marked in advance on sheets of drywall.
Start installing drywall. Before that, it must be processed - cut at a slight angle along the edge of each sheet. This is necessary to improve the results of puttying in the future. The glued ends of the sheets do not need to be trimmed.


Fasten the sheets, starting from the corners of the room, with self-tapping screws in increments of 20 cm. Make sure that the sheets are installed “in a run”.
Ceiling profile prices
ceiling profile


Attention! The heads of the self-tapping screws should not stick out, they should be sunk into the drywall sheet by a few millimeters.
After you have sheathed the entire ceiling, proceed to install the second level. Stretch two strands from corner to corner of the kitchen so that they intersect. This will find the center of the ceiling. It is from him that you begin to set aside equal distances in order to determine the boundaries of the junction of the ceiling levels. That is, now you are drawing a markup along which you will attach profiles for another tier.

Screw the guide profile along the marked perimeter. Repeat steps 2, 3, 4, focusing now on the second level.


Now cut the CD profile into segments of the length for which you plan to install the second level. This is the same length as the distance from the first level to the guide profiles of the second, fixed on the wall. Cut out special “tongues” on one side of the segments by cutting off the side parts of the profile.
Insert the segments into the UD profile fixed on the first tier at a distance of about 5-6 cm. Reinforce them with “flea” screws.

Put another guide profile on the hanging segments.


Prepare sections of CD profiles equal in length to the distance from the resulting mini-frame to the wall, and install them, securing them with “fleas”.
Sheathe the frame with drywall.

Advice! To save material, do not drywall that part of the first tier that will be hidden under the second.

Make holes for the lamps with a cutter of the desired diameter or a reinforced clerical knife. Install fixtures after finishing drywall.
putty prices
putty

Video - Two-level ceiling with rounded sides
Ceiling finish
Now you can start finishing the ceiling surface. To do this, carefully treat with a primer and putty all the joints, also use a sickle tape and then again coat all the irregularities, including the places where the screws are screwed.
All that's left is to finish the surface. How to cover drywall so that the ceiling in the kitchen looks harmonious, beautiful and lasts a long time?
- You can paint a drywall ceiling with acrylic, latex, water-based paint.
- You can paint, or you can combine these two types of finishes.
- Looks good and.
Attention! Glossy paints can only be used if the ceiling has been completely plastered. Otherwise, all the irregularities will be visible.

Master Class. How to make a figure of low height on a plasterboard ceiling
The figure is made at the original level of the plasterboard ceiling, made using the technology described above.


Now the most difficult and crucial part of the work is the installation of cornices. To do this, we need such a tool. This is a saw in a universal miter box. It can be tilted to almost any angle. The cut is even, precise and slightly rough, which will improve its adhesion to the glue.


Plasterboard ceiling in the kitchen is one of the best finishing options for this room. However, covering drywall better paint so that you can wash it regularly. Wallpaper and plaster do not like water, and the ceiling in the kitchen is often exposed to steam, and splashes of grease often fall on it. Therefore, choose the most practical finishing materials so as not to complicate your life.
Suspended and stretch ceiling are the most popular solutions for arranging kitchens, and if a stretch ceiling, as a rule, is a rather expensive and difficult solution, then it will be quite possible for any average owner to build a drywall ceiling in the kitchen with his own hands, while repairs will cost much cheaper.
Consider how you can implement the installation of a suspended plasterboard ceiling and what difficulties you should prepare for.
Beautiful multi-level plasterboard kitchen ceiling
Preparing for installation
Planning the design of a suspended plasterboard kitchen ceiling
It's no secret that a perfectly flat single-level ceiling is no longer the only demanded suspended ceiling option. modern ceilings from drywall - these are mainly multi-level structures (with 2-3 levels), which also have different, often intricate shapes.
Giving the ceiling almost any desired shape without much difficulty has become possible largely due to the practicality and flexibility from a constructive point of view of materials such as drywall and profile elements (see curly plasterboard ceilings).
It is precisely thanks to these materials that the direction of the design of domestic premises has made a significant step forward in recent decades.

Complex ceilings can be easily built using modern materials
So, the creation of various types of suspended ceiling has the following features:
- For single level ceiling from drywall in the kitchen, it is enough to create a simple profile-frame structure erected in a single plane, followed by fixing the sheathing to the ceiling in the drywall kitchen.
- Two- and three-level ceilings require the creation of an initially similar frame, followed by attaching a second-level frame to it, and then a third, if necessary. The outlines of the shape of the future ceiling should be traced even before plasterboard sheathing.
- Complex structures like "floating" ceilings are constructed in a similar way, the difference is only in the method of attaching the frame directly to the “floating” part to the ceiling or frame of the first level. Such structures are not attached around the perimeter to the supporting structure - in order to achieve the effect of "flight".

Appearance of the original "floating" ceiling
After it has been determined which ceiling will be erected in the kitchen, it is necessary to draw a clear ceiling plan on paper, and then apply markings to the base of the ceiling in accordance with the plan (see the design of plasterboard ceilings in the kitchen).
The choice of drywall and other materials
Usually, installation takes place using standard sheets of material 120 cm wide and 200-300 cm long. The thickness of drywall can be 8-9.5 mm. In order to reduce the weight of the suspended structure, it is necessary to use sheets of a minimum thickness.
Waterproof and fire-resistant drywall sheets are rarely used in kitchen ceiling repairs, since their weight and cost are higher than standard sheets, which is simply not practical.
Materials that will be needed for manufacturing:
- drywall sheets;
- ceiling guide profiles;
- suspensions;
- connecting and fastening elements.

Hangers for attaching the frame to the ceiling
From the tools you will need:
- building level;
- roulette;
- perforator or impact drill;
- square;
- screwdriver;
- construction hacksaw;
- stationery knife.
In addition to the above, it is also necessary to prepare materials and tools for puttying the ceiling, finishing, and, if necessary, funds for installing recessed ceiling lights.
Plasterboard kitchen ceiling installation
Frame construction

Plasterboard ceilings are mounted using a profile crate mounted according to the presented scheme.
The first step is to make a supporting frame.
Do it according to the following rules:

Fastening drywall to frame

An electric screwdriver makes installation easier and faster
Now consider the technology of ceiling cladding in the kitchen with drywall.
Sheathing instructions:
- Sheets of drywall are cut in such a way that all joints of the sheets fall on the axis of the frame profile strips.
As a rule, to facilitate installation and reduce the amount of drywall waste, the axial distance between the frame planks is 60 cm.
For cutting drywall sheet use a utility knife.
They make an incision in accordance with the markup, after which they put the sheet on the edge of a horizontal surface (for example, a table) and break the hanging part along the notch.
- Plasterboard ceilings provide for fastening the skin to the frame with flat head screws.
Self-tapping screws are screwed around the perimeter of a piece of drywall with an indent from the edge of about 1 cm and a step between fasteners of 15-20 cm.
- Before fixing drywall, holes are made in it under lighting fixtures, using a sharp knife for this.
In order to sheathe a figured plasterboard ceiling in a kitchen with two or three levels, you may need to bend the drywall to give it a rounded shape.
You can bend a piece of drywall as follows:

After drying, the segment will acquire desired shape and previous rigidity, after which it will be ready for installation.

Drywall Bending Methods
When the ceilings are sheathed, it remains only to putty the joints and attachment points of the screws, and after the primer is completed, the surface will be completely ready for finishing– wallpapering, painting, etc.
Since in most typical apartments the kitchen rooms do not differ in large area, it will not be difficult to make a plasterboard suspended ceiling in the kitchen. Feel free to get down to business on your own, and a beautiful ceiling in the kitchen will later be your pride!
source: //gipsokartonom.ru/potolky/montaj/potolok-iz-gipsokartona-na-kuhne-3
Thinking over repairs in the kitchen, pay attention to how to make the ceiling. It should be beautiful and blend perfectly with the entire interior of the room. In addition, it should be easy to clean, because even with good ventilation, soot and dirt still collect in the kitchen. Very good option for the ceilings in the kitchen there will be drywall.

The advantage of the ceiling drywall is that it is easy to clean, and easy to install.
Drywall is gypsum board lined with cardboard. Gypsum structures quite heavy and not very attractive looking. To visually lighten them and give them a more aesthetic appearance, cardboard is used. After installing drywall, it must be painted or pasted over with wallpaper. The appearance of plasterboard ceilings in the kitchen depends on the preferences of the owners. It is important to create not only beautiful design, and make it so that it harmonizes with all the elements of decor and pleases with its colors.
Plasterboard ceiling in the kitchen and its features
There are many options for how to make a ceiling in the kitchen with your own hands, decorating it with a drywall construction. All of them will look very nice. However, drywall deserved the title ideal option for the design of the kitchen ceiling, not only with its aesthetic parameters, but also due to the many positive qualities.
Firstly, with the help of drywall, all the irregularities on the ceiling are perfectly hidden, allowing you to hide, for example, all unattractive wiring under it. Secondly, such a ceiling can withstand different kinds impact, even fire.
Drywall structure: (1-gypsum, 2-cardboard).
In addition, it absorbs sounds very well. He is not afraid of water, he is easy to clean, without requiring much care. Another important advantage of plasterboard ceilings in the kitchen is the ability to make lighting with spotlights, illuminating or, conversely, darkening the necessary areas.
Such a ceiling in the kitchen can be made with your own hands in different ways: flat or with protrusions in two levels, or even more. With all the positive nuances of installing a plasterboard ceiling, do not forget about one of its drawbacks: it takes a few centimeters from the height of the premises, which is why it is undesirable to use it when repairing a small kitchen. Another disadvantage is the complexity of installation with your own hands. Drywall sheets are quite heavy, so if you mount ceiling on your own, you will need the help of at least one person.
Basic tools and materials
You will need these tools:
- roulette;
- pencil;
- screwdriver;
- perforator;
- laser level (do not be stingy and get it, it will help you a lot).
Tools for installing drywall.
According to the materials, first of all, it is worth mentioning the suspensions attached to the base. In order to firmly attach them, it is necessary to use special anchor wedges or metal dowel-nails. The main thing is that in no case should you fasten plastic hangers with plastic dowels - this is fraught with the fact that over time the fasteners will sag and the whole structure will break.
Further, guides (profiles) 7 cm wide are attached to the suspensions. Then drywall sheets are mounted directly. Their standard width is 12.5 mm, but sometimes you may be advised sheets with a width of 9.5 mm. There is a lot of controversy on this topic. But still, it is better to opt for a sheet with a thickness of 12.5 mm, since it will be stronger, it will also have more bending resistance, which, accordingly, reduces the likelihood of sagging. If necessary, you can pick up moisture-resistant and refractory drywall sheets.
Do-it-yourself single-level ceiling in the kitchen from GKL
If you decide to install such a ceiling yourself, study the information below. At the very beginning, you need to find the lowest point of the ceiling in your kitchen, make a mark at this level, and then measure the perimeter of the future ceiling from the plasterboard. Use for this building level and marker thread. On the marked line, you first need to fix the UD profile, and then embroider the entire ceiling profile CD (it is important to do this along and across). It is necessary that the distance between the plates is 50-60 cm. The CD profile is fixed to the ceiling with mounting plates and dowel-nails. The distance between them should be the same as between the profiles.
After these preparatory work, it remains only to fix the drywall sheets with your own hands. Use screws for this, leaving no more than 20 cm between them. To give the drywall the required size, use a knife or cutter. After sheathing the entire ceiling with drywall, seal all the seams with putty. The first layer of putty must be done at the seams, pasted over with a sickle bandage and putty again.
Consider that after that the plasterboard ceiling in the kitchen is ready. It remains the case for small things - to finish it with your own hands: paint it in the desired color or paste over with wallpaper.
source: //www.vashgipsokarton.ru/potolki/na-kuxne-svoimi-rukami.html
In the modern world, suspended ceiling structures are gaining more and more popularity. You can meet plasterboard ceilings for the kitchen more and more often. For people who know how to hold a screwdriver in their hands, it will not be difficult to do this with their own hands.

Suspended ceiling designs make it possible to realize any fantasies and ideas of the owners of apartments and houses.
The design project that creates a plasterboard ceiling in the kitchen is almost always individual. It is difficult to imagine two completely identical designs. People make plasterboard ceilings for the kitchen. And here, as in cooking - each cook will have the same dish will have a different taste.
Do-it-yourself repairs bring both aesthetic and moral satisfaction.
You will find a detailed description of how to make a plasterboard ceiling in the kitchen in this article.
Types of plasterboard ceilings
With the advent of design services, many interesting ideas for repair. People are trying to come up with and implement new, unknown solutions. There are several types of plasterboard ceiling in the kitchen:
Two-level stretch ceilings are usually installed in higher rooms.
- Single level. Has a flat smooth surface. Classic white or colored plasterboard ceiling.
- Duplex. From the name it is clear that this view has two levels. One level rises above the other.
- Multilevel. This view has several planes at different levels.
Regardless of which design you choose, an advantage that any plasterboard kitchen ceiling boasts is the ability to install spotlights that will brighten up all the dark corners of the room. But it is necessary to remember the main drawback of the plasterboard ceiling for the kitchen - its installation eats up several centimeters of the height of the room, so this design is not suitable for decorating low rooms.
Varieties of materials
Decorative finishing panels based on GKL gypsum board and LSU glass-magnesium sheet, coated with an acrylic layer, are perfect for finishing the ceiling of your kitchen.
When calculating the ceiling in the kitchen from drywall, you need to take into account that you need to take a little more material, because part of it will go to cutting. Drywall, used in places intended for eating and cooking, is an ideal material because it has many positive qualities:
- it makes it possible to hide communications under it, hides all the irregularities of the coating;
- such a ceiling is resistant to fire and perfectly absorbs sounds;
- moisture resistant material is not afraid of water.
Drywall is available in several types. The main ones are:
- wall - used in the manufacture interior partitions, niches, etc.;
- moisture resistant - in demand in rooms with high humidity;
- flame retardant - used in places where there is a risk of fire, for example, near fireplaces.
Another material that cannot be dispensed with when erecting a false ceiling is metallic profile. Repair in the kitchen will require two types of profile: PN and PP. Profile PN is used as a guide for transverse profiles PP.
Necessary tools and materials
To make a ceiling repair in a drywall kitchen with your own hands, you will need the following tools:
- screwdriver (more convenient to use on batteries);
- drill;
- water level;
- rules;
- long tape measure;
- sharp knife;
- metal scissors;
- marker.
With these tools, you can create any design of plasterboard ceilings in the kitchen. And the amount of material for the suspended structure is selected taking into account the size and its future appearance. To create a ceiling in a drywall kitchen, you will need:
Suspended ceiling installation diagram.
- drywall;
- metal profile PN;
- metal profile PP;
- profile hangers;
- self-tapping screws 25 mm;
- self-tapping screws for metal 4 mm;
- gypsum-based putty;
- reinforcing tape;
- dowel-nails.
Stages of work on the installation of a plasterboard ceiling
Before starting installation metal frame you need to determine the height of the ceiling from drywall for kitchen. A marker on the wall marks a control mark, which is transferred to all corners with the help of a level and a rule.
Suspended ceiling frame.
For ease of installation, an auxiliary line is drawn around the entire perimeter of the plasterboard ceiling for the kitchen.
Focusing on the line, using a drill and dowel-nails, a PN profile is attached at a distance of 40-50 cm.
The next stage, bringing the work closer to the final, is to draw transverse lines. They will serve as a guideline for the installation of suspensions, on which the PP profile will subsequently be attached.
Hangers for the profile are attached to the auxiliary transverse line using dowel-nails.
The size of the PP profile is calculated 5 mm less than the distance between opposite walls. Excess pieces are cut off with scissors for metal.
The cut PP profile is inserted into the PN profile and fastened to the hangers using self-tapping screws (4 mm).
Drywall sheets are screwed onto the finished metal structure. If the size of the sheets does not match the dimensions obtained from the measurement metal structure, then the excess part of the sheet must be cut with a sharp knife. Do not screw in the self-tapping screw (25 mm) too much. It is necessary to ensure that the hat does not break through the cardboard, but stops on the surface. The distance between the screws should not exceed 20 cm.
The joints of drywall sheets are sealed with gypsum-based putty. A reinforcing tape is glued on it and another layer of putty is applied.
The suspended ceiling is almost ready. It remains to arrange it, based on the chosen design.
Look beautiful plasterboard ceilings in the kitchen, covered with non-woven wallpaper for painting. If you have a two-level or multi-level view of the ceiling, then each level can be painted in different shades.
It is possible to make repairs in the kitchen with your own hands without resorting to the help of qualified specialists.
Functional and available ceilings from drywall (photos for the kitchen will inspire new ideas) - good decision for finishing. The material is resistant to moisture, practical, can be used in almost any design project. A nice bonus is the use of a plasterboard ceiling for zoning surfaces with the ability to create both simple and complex multi-level structures.
Advantages and disadvantages of systems
Plasterboard ceilings have many positive characteristics.
These include:
- the ability to mask communications and surface defects;
- the possibility of zoning the kitchen area;
- versatility - products will complement any interior;
- high heat and sound insulation properties;
- open opportunities for implementing ideas with a lighting system;
- long service life;
- simple care.
The designs also have some drawbacks that photographs for the most part are not able to convey:
- ceilings "steal" the height (from 7 cm and more);
- installation of complex multi-level structures is laborious, requiring experience and skills;
- prolonged use can lead to cracks in the joints.
Against the background of advantages, several disadvantages are insignificant. The main thing is to install a plasterboard ceiling in a kitchen with high ceilings, without trying to do the installation yourself without experience in such work and relevant skills.
As for the service life, a small amount will suffice from time to time. cosmetic repairs in order to keep the original appearance of the products unchanged.
Options and decorative component
Plasterboard systems (often called euro ceilings) allow you to implement different ideas design using additional decorative elements and building materials. The main condition for the implementation of projects is a sufficient level of ceiling height in the kitchen.
How less space and the lower the ceilings, the more limited the possibilities will be. The correct layout of the structure using several levels and the installation of lighting equipment will make the kitchen stylish and functional.
For additional effect, you can paint the plasterboard ceiling (use no more than two colors). In rooms with low ceilings would be appropriate bright hues visually expanding the space.
As auxiliary elements fit:
- mirrors;
- glass;
- rhinestones;
- stained glass;
- tree elements, etc.
The thoughtful design of plasterboard suspended ceilings will help to maintain the style of the room design with the necessary allocation and zoning of areas.
Suspended and hemmed structures - what are the features?
False ceiling is not so often included in the design of the kitchen, but in vain. A plasterboard construction of such a plan is ideal for masking surface flaws, looks modern and fashionable. Communications and ventilation are hidden behind the canvas. The system allows you to arrange profitable and functional lighting for zoning using it in the kitchen in the most profitable way.
The hemmed one differs from the suspended one by a pronounced solidity of the structure. It is able to withstand an order of magnitude more significant loads, practical, opens up more opportunities for implementing decor ideas.
Single-level - a simple and cost-effective solution
When planning a drywall ceiling in a small kitchen, it is worth exploring the features of simple single-level products. This option for finishing the rough base is considered the most affordable and economical, partly due to the low consumption of materials, and partly because of the possibility of installation without the participation of a master in the process.
A simple algorithm of actions and right choice colors will allow you to create real masterpieces at minimal cost. Additional surface painting will simplify the maintenance of the structure. Light equipment in single-level ceilings mounted either in the central part or around the perimeter.
Two-level systems - possible options
If the area of the room allows, you can arrange beautiful ceilings from drywall on the basis of several tiers. First - ceiling base, the second - a geometric figure in the central part, or the perimeter.
An interesting solution is combined figures, and a new fashion trend is an abstraction on the ceiling, visually changing the perception of the kitchen.
Multi-level ceilings - on the verge of fantasy
Among all the varieties of plasterboard structures for the kitchen, multi-level ceilings are one of the most unusual and promising in terms of implementation. bold ideas. Compared to trendy stretch fabrics, they unconditionally lead due to the absence of any restrictions regarding location, color palette, lighting installation.
Just like two-level ceilings, multi-level structures are practical and durable, and in addition they allow:
- use high-tech fixtures for zoning the room;
- mirror finish to visually expand the space;
- combine levels with harmonizing shades to create an individual atmosphere;
- use Additional materials for finishing in tone with furniture and kitchen textiles.
Multi-level structures - a really profitable solution for decoration kitchen interior. This is easy to verify by looking at the pictures of the ceilings of completed projects with an analysis of the reviews of real owners.
Combined ceiling - what is the difference?
Combined plasterboard ceilings - the choice of outstanding personalities, prone to experimentation. Designs can combine both several styles and several options for finishing materials. So, for example, drywall can be successfully combined with stretch PVC or fabric, adding tiers, thinking through the unusual placement of lighting equipment.
With the help of combined ceilings, you can not only zone the room, but also highlight individual zones. Such designs are practical, durable, do not need special care.
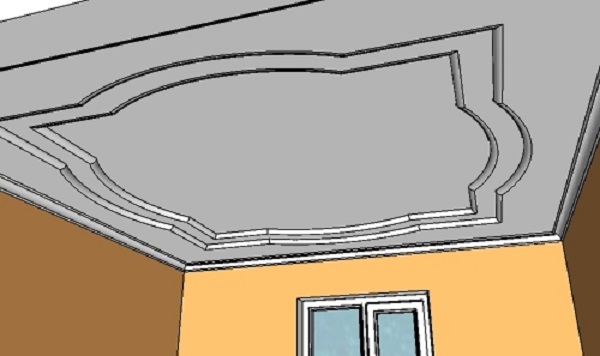
About figured ceilings in the kitchen - what you need to know?
A non-standard solution is figured plasterboard ceilings in the kitchen, which are considered a variation on the theme of suspended structures. The systems have both pluses and minuses, however, they are actively used by designers to design stylish interiors.
curly kitchen ceilings have the following advantages:
- mask the defects of the ceiling base;
- repairable without complete replacement;
- hide communications;
- zone the room;
- affordable;
- do not need special care;
- visually expand the room.
The disadvantages include a rather complicated installation. In addition, the design of plasterboard ceilings for a kitchen of this kind can only be realized in spacious rooms where the centimeters “eaten” by the structure are not so noticeable.
As for the figures that can be combined with the base, the options may be limited solely by the scarcity of imagination. You can experiment with the most simple elements, as well as complex ones. Most often, designers combine the base:
- with squares;
- with circles;
- with ovals;
- with rhombuses;
- with ellipses.
Looking through the sketches of the ceilings, you can see how easy it is to get graceful ornaments in the form of waves and weaves from simple combinations of figures. The author's drawing by hand will look especially bright. It is advisable to entrust such work to the artist.
Design lighting options
“Playing” with backlighting, you can make something exclusive and bright out of a simple even single-tier ceiling. The main thing is to think over the lighting system at the design stage of the structure, taking into account the layout and dimensions of the room.
Spot lighting is considered the most functional in the kitchen. Providing a sufficient level of light, the lamps do not hurt the eyes, creating the illusion of a flowing light flux.
IN spacious kitchen it is permissible to arrange a light cornice to illuminate a certain area, with its layout with spotlights placed randomly or according to certain contours.
A photo gallery of finished kitchens with plasterboard ceilings will help you decide on the choice of lighting option. It is enough to choose a photo of the room with the actual parameters and purpose.
Painting the surface of the ceiling - how, with what and for what?
To make the ceiling perfect and fashionable, drywall sheets (originally milky in color) are covered with a layer of water-based paint. To do this, use the usual paint brushes or roller.
IN water-based paint add concentrated dyes to obtain the desired tone. Paint only a clean, dry surface of the sheets, applying at least two layers.
You can install a two-level plasterboard ceiling or a multi-level structure only where the size of the room allows. Such a system will make a small kitchen even smaller, limiting functionality.
Really milestone- lighting design. It is necessary to think over the options for lamps, their location. It is believed that work areas should be most brightly lit, it is advisable to install soft and cozy light in recreation areas and the dining room.
Both the color and the design of the ceilings should be considered based on the stylistic direction used in the room. Surfaces must be in harmony with each other so that the overall picture is perfect. Help to set the right accents geometric figures from drywall. They also visually adjust the shape and size of the kitchen.
By creating classic design for the kitchen, it is worth taking a closer look at the ideas with frosted ceilings from drywall. Futuristic designs modern kitchens it is difficult to imagine without bold combinations and glossy surfaces in bright colors.


