Making kitchen facades with your own hands is good way save on your purchase kitchen set. Old furniture You can give it a different look by replacing the doors of cabinets and cabinets, installing doors that open upward, and adding fashionable details and beautiful fittings to the set. And even the furniture facades themselves can be made by hand from relatively cheap and affordable materials. 
Similar articles:
Replacing kitchen facades is a great way to update your kitchen set
The furniture facade is the face of the kitchen and the main component of its style. Decorating set homemade parts It should be done only when there is a strong desire to do the work efficiently and accurately, because incorrect assembly can ruin even the best materials.
To independently manufacture facades from solid wood or shaped bent doors, you will need skills in working with wood, MDF or chipboard, as well as the availability of special tools.
In more simple version Independent updating of a kitchen set with furniture facades is limited to taking measurements and installing updated doors and drawer panels in the intended places. Ready-made parts can be purchased and ordered in furniture stores. There is also a service for sawing and edging selected MDF or laminated chipboard panels. It is difficult to carefully cut laminated boards at home without a special tool.
But even buying or ordering panels in a store will cost less than purchasing ready-made cabinet furniture. Therefore, updating the kitchen by replacing facades is a common design technique.
Manufacturing options from different materials
Most often, do-it-yourself kitchen facades are made from wood. This is an easy-to-process, accessible and cheap raw material for the production of materials for the furniture industry. Kitchen facades must be resistant to exposure detergents, temperature and humidity, and wood and laminated panels meet these conditions.
It is easy to make facades with your own hands from the following materials:
- solid wood;
- plywood;
- pressed (chipboard, chipboard, MDF).
To work with the listed types of furniture raw materials, no sophisticated equipment is required; wood can be cut with a jigsaw or a hand saw.
Plywood facades resemble massive ones: upper layer Birch plywood has a distinct wood structure; some types of material have a moisture-resistant coating that gives smoothness and a slight shine. To make plywood facades, it is better to choose thick varieties (2-3 cm). This will install mortise hinges for furniture, and the doors will be durable. Close the edges of the facades special tape, matched to the wood of the front side.
If there is no thick plywood, make beautiful facades possible using paneled door technology. In this case, a board about 2 cm thick is used for the frame, and the inserts are made of plywood.
With the help of additional decor (molding, painting, patination or staining) you can achieve good result, having made updated facades with our own hands for kitchen furniture.
From MDF
The simplest option for making a facade from MDF is to take the dimensions of doors and panels and order products in furniture store. Having chosen panels with a coating of the desired color, the measurement results must be given to the master. Using professional equipment, the material will be cut and the edges will be glued. The customer will only have to pick up the facades prepared for installation and hang them with his own hands.
When cutting laminated MDF panels yourself, you will not be able to avoid chipping the coating along the cut line. Therefore, when cutting, you need to make an allowance of 2-3 mm around the entire perimeter of the facade. After sawing, process the edges sandpaper, cleaning the cuts.
To stick the edges with your own hands, it is better to use PVC tape of the desired shade. The material can be easily secured to the edges of the facade using a hot iron, ironing the tape through thick paper. If it is possible to use a router at home, you will be able to perform edging with a tenon tape.
The choice of materials for the kitchen must be approached responsibly: plastic covering does not protect against water, and in conditions high humidity such facades quickly lose their shape. When using this type of panel, it is necessary to perform high-quality edging, so it is better to entrust the work to a professional.
Chipboard facade
When choosing a cheap uncoated chipboard, you also need to buy a film for finishing the facade. You can cut a simple chipboard with a jigsaw, and cover the finished facades with film.
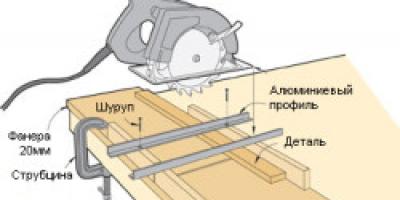
Laminated chipboard has a coating that resembles valuable wood or is painted in different colors. It is better to cut such material in a workshop, providing the master with the dimensions of the panels and the location of the hinges. When cutting facades yourself, proceed as follows:
- draw a contour line on front side laminated chipboard;
- Use a sharp knife to cut through the laminated layer of material along a ruler;
- cut the chipboard using a jigsaw along the cut line.
Edging a façade made of chipboard is carried out in the same way as processing MDF.
Glossy
Glossy facades belong to the MDF group. To cover such models use:
- PVC film, pasted on vacuum equipment on a panel with or without milling;
- acrylic plastic with PVC or aluminum edge;
- special technology of painting with enamel and varnish.
It is impossible to make such a coating at home. To make fashionable kitchen furniture glossy facade, need to purchase ready material. It is better to order cutting and gluing of the edges in a workshop, because when sanding with your own hands, the shiny layer will be damaged, and the facade will not look as elegant as in advertising photos.
When using glossy facades, careful attention to the products will be required. The slightest dirt or fingerprints are clearly visible on the shiny surface. The surface is easily damaged by minor mechanical impact, and the film coating is unstable and resistant to high temperatures.
Handles are not only a functional piece of furniture. They complement and decorate the facades. In styles with strict lines (minimalism, hi-tech), handles sometimes serve as an emphasizing element: large, shiny, but simple in outline fittings are used. Such handles resemble roof rails and are located both vertically and horizontally.
It is better not to weigh down the lightness of fashionable sets with glossy facades or made in the Art Nouveau style with additional fittings. For such kitchens, methods have been invented to open without the help of handles, when you press the door. But sometimes such cabinets are equipped with special fittings, disguising the handle as an aluminum edge.
For rustic and luxurious styles, it is customary to choose antique handles, with a coating that imitates old bronze or made of non-ferrous metal. These are elaborate cast products that should be combined with the decor of the facade.
The handles must be installed after hanging the facades on the cabinets. To ensure that the entire line of handles is placed at the same height above the floor, you can stretch the cord along the entire front of the lower tier. Along this line you need to make marks for installing the handle on each door. The same applies when installing handles on drawers or wall cabinets.
How to correctly install handles on the facades in each individual case is written in the instructions for these products. Holes for their installation can be made different ways: through in the plane, closed at the ends or in some other way. When purchasing handles, it is better to purchase several pieces for repairs during use, since these products may be discontinued, and it will be difficult to find a replacement if necessary.
What do you do with old furniture?
External panels of kitchen cabinets and tables, cabinet doors and wall shelves - everything that is the facade of the kitchen can be made independently. Of course, homemade furniture In some ways it is inferior to the factory one, but it always looks original and is cheaper. To make kitchen facades with your own hands, you will need skillful hands, carpentry skills and related tools.

The most common materials for making facades are:

At home, the easiest way is to make a facade from wood. Wooden facades There are two types - solid and paneled. Solid products are made from solid pine, oak, alder, cherry and other species. To make such a facade, you do not need a milling machine; a plane, circular saw or jigsaw is enough. Wooden surfaces They strongly absorb odors and require careful care, but they are not afraid of mechanical stress and last a long time.

A cheaper option is facades made of wood panels covered with veneer. This material looks very attractive, is light in weight, and easy to process, making it possible to assemble a façade unusual shape. It should be taken into account that wood boards quickly absorb water, swell and deteriorate, and thin veneer cannot withstand mechanical damage.

Plastic facades have a chipboard base on which they are attached decorative panels made of durable plastic. It is impossible to make panels at home, so for assembly they purchase ready-made ones, cut them according to measurements and glue them to the frame. Such products tolerate high humidity, temperature changes, mechanical stress and look great. Caring for them is quite simple: wipe the surface with a damp cloth and a small amount of detergent.

Glass facades can be assembled yourself, but this process is quite labor-intensive and requires maximum care and skills in working with glass. Not everyone can cut and drill glass correctly; a steady hand is required here. quality tools and a supply of material in case of damage. In addition, facades made of ordinary glass look completely different from factory models, which use impact-resistant glass with a relief surface.

Production of solid facades
Solid wood facade
To create a kitchen facade from solid wood you will need:
- edged pine boards with a section of 30x200 mm;
- jigsaw;
- jointer;
- self-tapping screws;
- drill;
- screwdriver;
- clamps;
- accessories;
- primer;
- wood varnish;
- glue;
- plane;
- sandpaper.
First, measurements are taken and a drawing of the kitchen furniture is drawn up. Based on the drawing, the number of front and side panels, drawers and shelves is calculated. The largest structures are manufactured first to minimize the amount of waste. To mark, the boards are laid out on a flat, wide table; transfer measurements from the drawing to the tree and mark cut lines with a pencil.
Easiest way to cut parts circular saw, firmly fixing the boards on the table. All cuts must be straight, otherwise it will not be possible to connect the parts tightly. When all the elements for the facade are ready, the wood is sanded with a special attachment, and the ends are cleaned with sandpaper. Then holes are drilled for fasteners and the workpieces are coated with an antiseptic primer.

Assembly begins: the ends of the blanks are covered with glue, the parts are connected, the corners are aligned, and then clamped with clamps and left to dry completely. Finally, hinges are attached to the doors, slats are screwed in with self-tapping screws for installing internal shelves, and fittings are hung. After this, the finished facade is treated with varnish or oil impregnations with wax.
Chipboard facade
If chipboard is used instead of solid wood, cutting is done in exactly the same way, but before assembly, the sections of the parts are covered with a special polyvinyl chloride tape. This process is called hemming; the film protects the ends from moisture penetration and fraying, making the appearance attractive and neat. In addition, the PVC edge prevents the evaporation of formaldehyde resins, which are used to impregnate chipboard and are harmful to health.
During the work you will need:
- roll of edge film;
- iron;
- a sheet of thick white paper;
- two clamps;
- guide rail;
- sharp knife.
The guide rail is attached to the work table using clamps. Instead of a slat, you can take any flat board, a piece of timber, the main thing is that it is convenient to support the chipboard workpiece. Take the facade part, lay it on the table and rest one edge against the guide so that the side cut protrudes 5-7 cm above the edge of the table. The edge is measured along the length of the cut and cut off. Apply the edge to the surface, leaving overhangs about 5-10 mm wide on both sides of the cut, and then lightly fix it at one end by touching the iron.
Next, cover the edge with a sheet of paper and use an iron to heat the surface with even, measured movements. If you iron the film without paper, the material may overheat and deformation may occur. The iron is pressed firmly against the cut so that the edge sticks over the entire surface. After this, the workpiece is turned over with the cut side down, pressed against the tabletop and held for several minutes. When the glue has hardened, carefully trim the protruding edges of the film with a sharp knife.
Excess glue is immediately wiped off with a clean rag, and the seams are sanded with fine-grained sandpaper. The ends of the remaining workpieces are processed in the same way. Next, the elements are connected to each other using glue and self-tapping screws, shelves are installed, hinges and locks are attached, and fittings are screwed on.


Loops - frogs


The main elements of paneled facades are frames and panels. A frame made of boards with longitudinal grooves; panel is inner panel with figured cutters around the perimeter. When assembling, the panels are inserted into the grooves of the strapping and secured with glue and self-tapping screws. This design avoids surface deformation during temperature fluctuations.

For the manufacture of paneled doors on Kitchen Cabinet required:

Step 1. Calculation of workpiece parameters
Measure the cabinet opening vertically and horizontally and draw up a drawing. Subtract 3 mm from the height and width of the opening - these are the dimensions of the door frame. The width of the racks and horizontal crossbars depends on the width of the board. The parameters of the panel are calculated as follows: subtract the total width of the crossbars from the height of the frame and add 2 cm; The width of the panel corresponds to the length of the crossbars. For one door you should get 5 elements - 1 panel, 2 crossbars and 2 vertical posts.

Step 2. Cutting out the parts
Using a jigsaw pine board cut into racks and crossbars according to the drawing. On a milling machine, a groove 6 mm wide and 10 mm deep is cut into the side cut of each part. Then, 10x6 mm longitudinal spikes are formed at the ends of the crossbars. Make marks on a sheet of plywood with a pencil and cut out a panel. The edges of each element are treated with sandpaper, and the surface of the boards is sanded.
Step 3. Assembling the product

Into the grooves vertical racks insert the edges of the panel, put the bottom crossbar on the plywood and connect the crossbar tenons to the sidewalls. The next one is fastened top bar. If all the elements fit smoothly, without gaps or distortions, and quite tightly, then everything is done correctly. Now the door is disassembled, the grooves, tenons and edges of the panel are coated with glue, everything is put back together again and the joints are pressed tightly. Exposed glue is immediately wiped off with a damp, clean cloth. It is recommended to use clamps for fixation, then the product will not deform during the drying process.

Step 4: Finishing
When the glue dries, the joints are carefully sanded, and then the door is treated with an antiseptic compound. The next layer is paint or varnish; you can also use stain, special oil impregnations, or self-adhesive film. Curly carving is often used as decoration for a frame, but not everyone can do it without the appropriate skills. Plywood can be completely replaced by a thin board, glass, shaped forged lattice, colored polycarbonate or plastic panel.

Hinges and fittings are attached after completion finishing works. First, determine the location of the loops on the walls of the box; Mark the fastening points on the facade frame and drill holes. Screw the hinges to the frame, insert the door into the frame and fix the hinges on the cabinet wall. Check the movement of the hinges by closing and opening the door. When closed, there should be no gaps or irregularities around the perimeter of the façade. Other elements of the kitchen façade are performed in a similar manner. With absence milling machine you should choose options with the least number of shelves and panels, since cutting grooves by hand is quite difficult.
Also read the article - how to assemble a kitchen with your own hands.
Video - DIY kitchen facades
In order to save money and time on finding the right model, users with construction or carpentry skills can make furniture with their own hands.
What should you take care of before making furniture?
When assembling furniture with your own hands, you need to think in advance about the appearance of the object and decide in which part of the apartment it will be placed. This data will allow you to determine the most suitable materials and accessories. Drawings are another important component of the process. After creating sketches with parameters and purchasing tools and building materials, you can begin the actual installation. It is better to strictly adhere to the original idea and pay attention to all calculations, otherwise furniture made by yourself may turn out to be sloppy.
The most important thing in furniture making is the drawing.
Step 1 – tools for furniture assembly
You don’t need a special room or expensive equipment for the work, but before assembling furniture with your own hands, you should still stock up on tools that may be useful during work. Recommended minimum for beginners:
- electric screwdriver;
- drill for hinges with a diameter of 2.6 cm;
- nozzle or key, as well as a special drill for confirmations;
- drills with diameters of 4.5, 7.5 and 10 mm;
- awl, tape measure, ruler, pencil;
- rubber or wooden mallet;
- sandpaper (fine-grained).


For those who have extensive experience in making furniture with their own hands, it would be useful to purchase electric drill, electric jigsaw, construction hairdryer and iron, professional router, a stationery knife, a jamb knife and a Forstner drill with a diameter of 15 mm for drilling holes for minifixes.
Step 2 – selection of materials for the future furniture design
Today the market offers a wide range of products, including various price categories. Natural solid wood is now considered an expensive luxury material; it has given way to modern slabs consisting only partly of wood. There are several most popular options for.
Furniture made from laminated chipboard
 Laminated chipboards have taken a leading position as the main material for making cabinet furniture with your own hands. They are a relatively cheap composite material obtained by hot pressing of wood chips. Standard thickness such slabs are 16 mm, but you can find 1 and 22 mm. Decorative elements and main parts of cabinets and bookshelves where high flexural strength is required.
Processing of chipboard boards is usually carried out on special machines. You can resort to a jigsaw and try to cut them at home, yourself, but you won’t be able to do it smoothly: unevenness and chips will be visible on the parts. Such defects will subsequently be very noticeable and will have to be masked. For this reason, it is better to entrust the production of parts to professionals.
Fiberboard furniture
 Fiberboards are a lower quality and aesthetically attractive material compared to laminated chipboards. IN furniture production it is used to finish the back walls and as a bottom drawers. The thickness of these sheets ranges from 3–5 mm. The slab has two surfaces: smooth and rough. One of the rules for making furniture with your own hands: the smooth side of the sheet faces the inside of the drawer/cabinet. The color should be as close as possible to the shade of the main furniture material (chipboard).
It is not recommended to attach fiberboard sheets on a furniture stapler, since such a structure will turn out to be unstable and will become loose over time. The bottom of furniture drawers can be mounted in a groove prepared with a milling cutter if all dimensions match down to the millimeter. The most popular fastening method is self-tapping screws or nails.
MDF furniture
A slab consisting of fine chips pressed under high pressure and temperature. Pliable material, easy to process with a milling cutter, often used as a furniture facade (external part). Basic characteristics:

- high density;
- good moisture resistance;
- flexibility;
- ability to withstand temperature changes;
- immunity to damage by microorganisms.
The thickness of MDF boards varies from 3 to 38 mm.
Assembly of furniture from natural wood- not the best practical idea, since solid wood costs several times more than the above price categories. It is better to entrust work with this material to specialists.
Furniture fittings

Fittings are small but important elements, without which the furniture will not be able to perform its functions. You should not save on this part, since the service life and overall level of performance of the future structure, assembled with your own hands, depend on the quality of the purchased fittings.
Furniture handles are attached with screws. Guides (roller and telescopic, or ball) play important role when assembling drawers, since they are given the correct direction of movement.
To soften the impact when closing and reduce the noise level, silicone dampers are installed on the inside of furniture doors (or the end). Legs are an optional detail, but in some cases they can greatly extend the life of furniture and adjust its optimal position on an uneven floor.
Hinges affect the degree to which drawer doors open. The standard is 180° for opening and 90° for closing. If the manufacturer has not made additives (cutouts for hinges), then they can be added in any furniture workshop. For glass doors you need to purchase special loops, capable of holding it without drilling holes.
Furniture fasteners
Fasteners and their types require special attention. This hardware, which ultimately are of decisive importance for furniture, since it is they who ensure its strength, geometric correctness and stability.

Wooden dowels
They are used for preliminary and intermediate fixation and to increase the shear load. Dowels are inserted into drilled holes in both fastened furniture parts. Later, the parts are attached using a more reliable method.

Iron corners
A slightly outdated mounting system that fully justifies its cheapness by being unattractive appearance, bulkiness and loosening after some time.

Confirmat, or furniture screw
Modern fastening element, which has replaced conventional self-tapping screws due to its large thread: because of this, the screws hold tighter in the chipboard. The main disadvantages of this type are the need to use a special drill with different diameters for threading, the head and neck of the Euroscrew, as well as the heads that remain visible. The master will have to select plastic plugs to match the color of the furniture body.

One of the most popular fastening methods today. The main advantage of eccentric couplers is that they leave drilling marks only on the inside of the product. For this fastening you will need the aforementioned Forstner drill. The method is labor-intensive and perfect for sliding furniture doors. In other cases, it is worth focusing on simpler and less expensive options.

Selection of edges and furniture fronts
These elements perform an aesthetic function, so you need to choose them wisely. Making beautiful cabinet furniture that will look expensive is not difficult if you carefully select decorative parts.
Edge
The protection of the cuts of the body slabs, and, consequently, the strength of the furniture depends on the correct choice of this part. If you do not take care of high-quality insulation, moisture can easily penetrate the furniture structure and destroy it from the inside.
There are several options, one of the best for making furniture with your own hands is PVC edging. This finishing does not require special skills or professional equipment. Standard sizes: 0.4 and 2 mm. To save money, a thin edge is glued to the ends that are inaccessible to the eye, and a 2 mm edge is glued to the outer edges, which will be subject to heavy loads and friction.
Other advantages of this type of furniture finishing:

- Melamine edging: cheap but impractical option. Glued using a regular iron.
- ABS is similar to PVC, but made from an environmentally friendly material.
- The overlay U-profile is glued to liquid nails. Impractical due to the accumulation of dirt at the joint, but helps hide the defects of a bad cut.
- Mortise T-profile - rarely used, inserted into a groove made by a milling cutter.
Front part of furniture
Kitchen fronts and drawer doors are the “face” of the furniture, so they should look much more presentable than other details that are not so striking. Making this element yourself means saving time, since such things are usually made to order, and the wait can take several months.

Concerning technical subtleties, then the facade part is standardly made 2 mm smaller on each side of the main body. So, for furniture with a width of 600 mm, a façade whose width is 596 mm is suitable. The raw materials of the decorative part are different from those of the main body.
Among the cheapest facades are laminated MDF panels with a short service life. Mostly wood finishes are found. Softforming, which is gaining popularity, is similar to MDF, but differs in a two-color layout and relief on both sides of the panel. Such furniture is suitable exclusively for dry rooms (bedroom, living room). You can often see non-standard facades with curly stained glass cutouts. Glass is usually mounted on a cover plate with inside doors.
This is the implementation of high-quality, durable decor. It is distinguished by the severity of its forms and is performed without aesthetic frills. The basis is MDF or chipboards, which are covered with thin, seamless plastic. Plastic facade- another expensive, but extremely practical option.
 Characteristics:
- smooth surface (glossy, matte);
- laconic design;
- ABS edge or aluminum profile.
At the peak of popularity now are super-glossy acrylic panels for making furniture with your own hands.
Wood and veneer
Expensive, but natural materials. There is an opinion that from an environmental point of view, the option loses, since it contains a lot of varnish and impregnations. Painted facades “like enamel” are becoming increasingly rare. The rich color, which was so valued before, has also appeared in competitors, for example, acrylic. A significant disadvantage of such furniture is that it is not resistant to deformation and scratches.

Aluminum-glass facades
The optimal method for making furniture with your own hands in high-tech style.

Preparation of drawings for furniture manufacturing
Assembly drawings are a personal guide during the work process. If you pay due attention to this part at the preparatory stage, then the master will not have to frantically make calculations and be afraid of attaching something in the wrong place. You can make the assembly task easier for yourself by sketching everything out on simple sheet paper by hand or using .
It should be remembered that the drawing must be clear and readable at least for the person who will be assembling the furniture.

Calculation and detailing

It is impossible to make cabinet furniture with your own hands without taking into account the consumption of materials. This stage requires drawing up detailed list what material each part will be made of, indicating its parameters. The sheet is sent to the nearest accessible workshop, where all elements will be sawn and initially processed (edge).
The list should include Consumables on the body, fittings, fasteners. This way you can easily calculate the final cost of the furniture, taking into account the services of the workshop. The price of an item made with your own hands at home is 30–35% less than the retail price in stores.
Furniture assembly technology
You should start constructing any furniture with your own hands from the main frame, that is, from the very large parts, gradually adding small ones. An example of assembling a bookcase:

- After preparatory stage The side, top and bottom walls of the frame are connected and the diagonal is aligned.
- Then the fiberboard back is attached using self-tapping screws.
- The third stage is fastening the shelves. Confirmats guarantee a stronger connection.
- Places on the side walls on the outside that have been damaged by hardware can be decorated with matching color-matched plugs.
- Now it’s the turn of additional internal parts, for example, shelves may have drawers (additional partitions).
- The last to be installed are the decorative parts (linings, façade, etc.).
According to the same scheme, beds, kitchen cabinets, wardrobes and other home furniture. When using hazardous electrical equipment, generally accepted safety precautions are observed.
In order to make furniture yourself, you need to have the desire, a little care, time and basic knowledge in the field of construction. If everything is done correctly, the end result will be an exclusive and functional piece of decor that will last for many years and will fit perfectly into the interior of the apartment.
The price of finished kitchen furniture consists of the price of materials, facades and furniture fittings. Almost half of the total cost of building a kitchen is the cost of its production. And if the kitchen is non-standard, has more than four walls or they are not located at an angle of 90 degrees, then you will have to pay extra for the development of a special project.
Obviously, it will be very profitable to make the kitchen yourself. The advantages of this solution are obvious: significant savings in the cost of workers’ services and the opportunity to choose the style and design of the kitchen project yourself and create an interior for a room of any size and shape according to your taste.
Chipboard is one of the most common and affordable materials; it is perfect for your future kitchen.
A kitchen made with your own hands from chipboard will not only allow you to take into account the wishes of all family members when planning it, but will also not put a big dent in your pocket.
Kitchen project
The start of any work is preceded by a project, which includes drawings of the future kitchen with the specified dimensions. In the photo below you can see one of the kitchen projects made from chipboard.


Furniture facades have their own standard sizes. They are presented in the table below (the cross at the intersection of the values means the standard size).

Step-by-step instruction
When assembling furniture with your own hands, you must follow a certain procedure:
- Order a tabletop, glass facades, a slab with cutting.
- Purchase accessories.
- Pick up glass facades and other parts.
- Edge the ends of the parts.
- Attach the guides to the sides of those cabinets that will have drawers.
- Attach hinges to doors.
- According to the drawings, assemble the boxes using confirmations.
- Hang doors, assemble and insert drawers.
- Arrange the lower cabinets, install the tabletop and attach it to the cabinets using 4*30 screws; the cut corner must be processed with a tabletop edge.
- For the upper cabinets, a mounting rail is attached, calculating so that the bottom of the cabinet is at a distance of 140-150 cm from the floor.
- Hanging cabinets are tied together with sectional ties.
- Cut holes for work surface and sink, install them.
- Cut and install the wall profile to the tabletop using 3*25 screws.
- Adjust the gaps in the doors.
- Install the plinth.
In addition to the general kitchen plan, you will need diagrams with the dimensions of each individual element. Below is an example of cutting out a kitchen cabinet.

Before starting work, pay attention to the points that should be taken into account:
- 4 cm of free space should be left behind the cabinets (for communications and as protection from crooked walls).
- The front cabinets are attached in one line.
- Buy supports only with a clip, and make the base removable.
- It is better to install the guides for the drawers before assembling the cabinet.
- It is recommended to install the mounting rail without breaks along its entire length.
- The wall profile is sealed with silicone.
Everyday experience shows that making cabinet furniture with your own hands is a completely feasible task for a person who has the skills to handle tools and has a developed spatial imagination.
Even the most complex facades can be made yourself if desired.
Despite the fact that in construction stores today they offer wide choose various panels and components, making a kitchen yourself will not be a problem for such a person. Let's find out how manufacturing is done.
Self-production of kitchen furniture

Making a kitchen begins with creating a design for future furniture. This project must take into account several factors.
- Dimensions and configuration of the kitchen space.
- Placement of drainage system and water supply.
- Electrical diagram and placement of sockets in the kitchen.
- The material from which it is planned to construct kitchen furniture will depend on labor costs.
- The predominant colors in the kitchen, based on which the color scheme of the facades will be selected.
- The cost of all components should take into account the financial capabilities of the furniture manufacturer.
 Do the math, the main thing is that the cost of a homemade facade is not too expensive, otherwise the meaning is lost
The price of future kitchen furniture is formed from several main items. From experience, fifty percent of the cost of a kitchen is the facades. The most expensive are facades made of solid wood. Making facades from cheaper materials will significantly reduce the percentage of the total cost.
A large share of the price is occupied by fittings. When choosing it, you need to maintain a balance between price and quality. Components that are too cheap will most likely not last long. With the choice of materials that is available today, you can always choose high-quality and relatively inexpensive fittings.
The countertop can be expensive. Therefore, you need to be careful about her choice. It should be quite durable and easy to use.
The cost of the structure also depends on the material of the panels. Making furniture with your own hands from chipboard will be cheaper than assembling furniture from MDF with your own hands.
To ensure furniture assembly goes smoothly, you need to prepare drawings of each table and cabinet. Determine the places where the side walls and shelves are attached, the order of installation and fastening of the facades and countertops.
IN rear walls and in the countertop, if necessary, it is necessary to determine the placement of sockets. If sockets are already installed on the walls, then the rear, bottom and top panels should not interfere with the inclusion of devices in them.
 Decide in advance where the outlets will be located.
The kitchen is assembled with your own hands in compliance with placement standards. Thus, the sink should not be placed in close proximity to the stove or heating devices.
The accepted standard dimensions of kitchen furniture parts should be taken into account. For example, the generally accepted width of the tabletop is 600 mm. The length of tables and cabinets along the facade can vary from 500 to 800 mm. It is necessary to adhere to these dimensions because the panels and facade blanks sold are manufactured to such standards.
The technology for making furniture from chipboard with your own hands involves working in several stages.

- For the manufacture of wall panels, as well as shelves of tables and cabinets, laminated chipboard is used. If possible, then you need to buy ready-made panels that correspond the right sizes. If this is not possible, purchase a large sheet laminated chipboard size 1830×2440 mm. In terms of thickness, it is customary to use sheets of 16 mm.
- The purchased material is checked by size, if necessary, outlined and sawed using a jigsaw. You can also order cutting in a store, but quality is not always guaranteed there.
- The sides of sawn panels need to be sealed so that the chipboard does not fall apart. This is called edging. For this you can use plain film PVC. The film is placed on the glue using an iron through a sheet of paper. For edging, you can use special plastic decorative overlays.
- Assembling furniture from chipboard with your own hands is done using clamps, which secure panels of structures to maintain the shape and required angles.
- After the cabinet or table is assembled, before installing the fronts, they are installed in place and the compatibility of the entire kitchen is checked.
- The facade for kitchen furniture is installed last, after fixing the countertop.
 When assembling the headset, remember, the facades come last.
Materials
You can make a kitchen facade with your own hands using materials of different quality and texture. This piece, made of solid wood, will last a long time. However, it has such a disadvantage as the high price of the product. In addition, making kitchen facades with your own hands from solid wood is a long process and requires sufficient skills in handling wood and carpentry tools.
Do-it-yourself furniture facades can be made faster and cheaper from other materials, such as MDF or laminated chipboard.
MDF

The material MDF is a wood-fiber board. Simply put, it is highly compressed wood. This type of board differs from solid wood in strength and durability, but in these same qualities it significantly outperforms particle board.
The advantages of MDF are:
- increased resistance to deformation due to the density of the slab, thanks to which the shape of the facade can be changed;
- the material is resistant to moisture, so it is very suitable for kitchen furniture;
- MDF boards can be painted and also veneered different materials, be it veneer or plastic.
Manufacturing from MDF is made easier by the fact that there is a large selection of blanks of various sizes, shapes and colors on sale.
 Changed the design - repainted the facade
MDF facades are also convenient because during the operation of the kitchen they can be repainted due to the changed design.
Making furniture facades with your own hands can be simple if you use laminated chipboard blanks for this.
The facade for furniture made of particle board is the most economical option. This is the main advantage of laminated chipboard.
The main disadvantage of this material is that the edge of the slab is not resistant to moisture. Over time, such facades, under the influence of moist air and fumes, swell and become unusable.

However, with proper edging, they have a service life of at least five years. And if you regularly take care of the furniture, then such furniture can last ten years or more.
Chipboard boards for lamination are usually covered with kitchen paper or plastic. At the same time, plastic is the more preferable material for coating kitchen facades. It's easier to care for. This facade can be wiped with a damp cloth or even washed.
Considering that chipboard is made of pressed chips, care must be taken when installing fittings. If for fastening you have to unscrew and tighten the screw several times, then chips may scatter in this hole and the fastening may become loose.
A kitchen with a chipboard facade is the most economical option, in conditions where the budget for furniture installation is not large enough.
 Laminated board looks very presentable in the kitchen
MDF - postforming
Postforming is a processing technology finishing material in the manufacture of such parts,
The technology lies in the fact that when heated, such plastic takes the shape of the product on which it is applied.
For MDF facades, this treatment is carried out by covering a slab with a complex pattern and rounded edges with plastic on both sides.
Most often, postforming is used for coating chipboard sheets with rounded edges with a radius of 8 or 10 mm. In this case, such slabs become more durable and resistant to moisture.
WATCH THE VIDEO
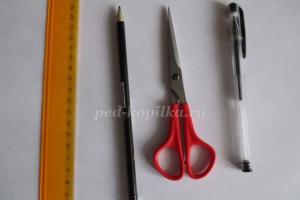
Tool
Making kitchen facades yourself involves serious preparation for this process. In addition to materials and accessories, you need to prepare the necessary tools.
For this work you may need: