In the process of creating a pond on own dacha many questions arise general recommendations not enough. Let's consider these questions.
How to make a natural pond?
First, let's define what is meant by this phrase:

How to choose a place and what to provide:
- distance from trees, tall shrubs. Water should not clog leaves, branches;
- good lighting, direct rays of the sun throughout the daylight hours are unacceptable;
- properly positioned at the bottom to rainwater did not spill over the territory, but flowed into the pond;
- the site is chosen flat, with a slight slope.
What to consider so that the reservoir is “alive” and does not rot:

Making a pond
A properly made pond occupies at least a 10th part of the site. Deep - weakly warms up and simply dangerous, shallow - blooms. On the forums of gardeners recommend optimal size reservoir 2.5 - 3 m in diameter, 1.5 depth. The pit is dug by hand or with the help of machinery. Next is waterproofing.
Ecopond - involves natural waterproofing, called clay castle. Only this natural material contributes to the life of a living ecological system. This good way make a pond without a film:

How to make a small pond?
There are a few simple ways arrangement of miniature reservoirs on the site. 

Since the shape is a wave-like configuration, transitions are taken into account during instillation. Special steps are made, one wider than the other. After installation, the voids are filled with earth.
The form is set slightly above ground level, a layer of sand of about 20-30 cm is poured under it, but first they make markings on the ground. Then you can start digging a pit. How to do this is clearly visible in the figures below.

How to make a big pond
- At first mark the contours. For irregular shape a regular rope will do; for a rectangle, square - pegs are hammered, a twine is pulled between them.
- Digging a pit with an excavator. You can calculate its dimensions using the formula for calculating the volume of a truncated cone. This can easily be done on a site like fxyz.ru. It is only necessary to substitute the numbers in the desired line.
- Further - align the walls of the dug bowl and make them flat. Provide terraces around the perimeter of the reservoir. They do not allow the earth to crumble, serve as convenient steps when laying waterproofing. In the future, they will be useful in the design of the pond.
Important! In the bowl of the pit, three zones are provided: deep, 1.8-2.0 meters, (below the freezing level of the earth). She is prepared so that she successfully winters. Medium - for plants. Small - in summer such places warm up well, fry, living creatures accumulate here, microflora multiplies.
If you are digging a swimming pond, you do not need to deepen the bottom, it is made even.
Next you need:
- remove stones, snags from the bottom;
- prepare waterproofing material.
The company "Landscape Constructions" recommends that you first fill the bottom with sand, lay it on top geotextile. 
Among existing options waterproof coatings, usually choose butyl rubber film. The main argument is durability. She serves up to 20 years.
Laying out the film

How else can you waterproof a pond?

For your information! In specialized stores you can buy ready-made plastic mold for a reservoir of 1000 liters or more.
How to build a dam?
A pit is not required for a pond, it is enough to make a dam using a stream or a catchment area where water flows. Running water fills the reservoir constantly. Block it in the narrowest place. First, a ditch is dug, the bottom is laid out with greasy clay, and it is rammed. Then they build a wall of clay, deepen into the bottom and edges of the ravine. The crest of the dam is raised a meter above the future water level, the rapids are made steep. 
Dams are built from natural materials: stone, gravel, logs, sometimes they are concreted. The base is supposed to be wide so that the structure can withstand water pressure.
When building such structures, remember about floods, consider water drainage in extreme situations.
The embankment is covered with a width of half a meter to 4, with a height of at least 0.5 m. The dam is filled only after the dam has settled.
Concrete dam. It is reinforced with rods, a corner, a steel mesh. For concreting use waterproof cement, add liquid glass, PVA glue. 
If there is a ravine
The ravine next to the site, along the bottom of which a stream flows and overflows in high water, can be turned from a potential enemy into a friend and helper. The ravine is blocked from coast to coast by an embankment. In front of it, rain, spring, or river water gradually accumulates, a water surface is formed.
Here is a similar positive experience step by step:
- Dig a bypass, temporarily direct a stream into it so as not to interfere with work.
- Make shields from boards, cover them with a film, on top - roofing material.
- Make gaps in the ravine, insert shields into them, lay out a dam from stones.
- The bottom of the proposed pond cover with clay, compact, lay a layer of sand on top, level. At the end of the pond lay out with a film, the walls - with a stone.
- In order to keep the water at a certain level, set overflow pipe. Excess water goes further along the diversion channel, into the ravine. To avoid silting, a sump is dug just above the course of a natural stream.
Such a water oasis practically does not require costs, it will avert the threat of flooding, decorate the place of rest. 
How to make sure that the pond does not freeze in winter?
In autumn, especially tender and valuable plants are removed from the pond, and ornamental fish are moved to the aquarium. The pond will freeze at low temperatures, it is impossible to counteract nature, but it is possible to facilitate the wintering of fish in the reservoir, to ensure the flow of oxygen. 
- Reeds, cattail placed vertically. Oxygen through the hollow stems penetrates into the water.
- Styrofoam, bundles of straw on water will slow down freezing.
- Do products, pouring boiling water over ice.
- In severe frosts cover insulation (straw, burlap, roofing material). Such flooring cannot be kept for a long time, natural light is needed. A wooden or foam box is placed above the hole, an incandescent lamp is hung, the hole does not freeze.
Used here floating aerator, however, its action is effective only at low sub-zero temperatures. 
Pond from a quarry
Such reservoirs are called quarry ponds or gravel pits. Usually these are old neglected quarries in which peat or stone was mined. The water in them stagnates, fish is found, mainly, a trifle. Used for breeding fish when it is possible to provide constant inflow water. Specialized farms on quarry ponds produce up to 2 centners of fish per hectare. Such reservoirs are of interest to entrepreneurs. 
If there is a well
The easiest way is to feed the reservoir from the well. Here is such a scheme, with the help of which a good idea was realized, the owner of such a pond shared at the dacha forum. Water performs a cycle, its consumption is small.
- Water from the pond flows to the filter. In this case, it performs the function of a skimmer.
- The water cleared of debris falls into the waterfall that oxygenates the water. The pump in the well turns on only when there is a need to raise the water level.
- The relay works, turns on the pump in the well, water enters the pond, fills it up to the required level. Next comes the filter's turn. All mechanisms enter in turn. Such a scheme automatically maintains the water level necessary for the operation of the filter and waterfall.
How to make a flowing pond

The bridge as a decoration of the reservoir
Straight, curved, hanging over the water surface - the bridge can be anything. Wood, concrete, stone, metal and their combinations are suitable for structures. Even the smallest bridge will enliven the site, become a continuation of the path, add an unusual line to the landscape. 

A simple bridge is easy to make:

pond filter
Alexander Pizanets tells how to make a filter for a pond in the video below.
A good decoration for a summer house or garden is a pond. Many are trying to bring the landscape of their land closer to the natural. Water has magical properties and always attracts the eyes and thoughts of people to itself. Almost always the concept of rest is combined with the concept of rest by the water.
But in many suburban areas there are no streams or lakes. Very often they are not even nearby, and so you want a good outdoor recreation. But there is a way out.
Own pond in the country - it's real
A small, do-it-yourself pond will become a favorite vacation spot. This man-made miracle can make your dreams come true ornamental pond in the garden or in the country and even become a platform for aquatic floriculture.

With the help of a film hydroprotective coating, it is possible to make a reservoir of any shape and a different area: from the smallest to reservoirs of a fairly large area. It all depends on the size of the site and the design of the landscape.
Applying various decorative materials and decorations, you can give the pond the appearance of a natural mountain reservoir or, conversely, a well-maintained pool. With the help of a pump, you can make a waterfall or a fountain, create an imitation of a mountain stream. You can run fish into the pond, plant water plants. In combination with decorative elements, all this looks spectacular and creates a favorable atmosphere.
You can make a small mini pond in the country with your own hands in almost any area, with any soil, and this does not require any equipment or complex devices.
For this you will need the following materials:
- special film for creating reservoirs;
- geotextile;
- sand;
- decorative stones;
- hose for supplying water to the pool;
- scissors;
- shovel;
- level.
As a waterproofing film for ponds, PVC film or butyl rubber is used.

It is better to purchase a special film in the appropriate store. For small pools, you can safely use PVC film. But if you are seriously interested in landscape design and want to make an original pond using decorative forms and plants, it is better to use butyl rubber. This material is very flexible, elastic, durable (service life is more than 30 years). In addition, if any changes have suddenly occurred and you decide to change the shape of the pond, you can reuse this film.
The device of the pond in the photo
You need to start by deciding on the location and shape of the pond. You also need to decide what this reservoir will be used for. If fish will be bred in it in the future, then the depth of the deepest part of the pond should be at least 1.5-2.0, and for the northern regions and more, meters. This is necessary so that the reservoir does not freeze in winter and the fish would have a place to spend the winter. The deepest place itself should not be very large, and even in small reservoirs fish can be found.

The minimum depth of the reservoir is usually made at least 50-80 cm. At a shallower depth, the water will overheat in summer and this will lead to the development of unfavorable flora in the reservoir. And in winter, accordingly, such a pond will freeze and the plants and microorganisms that inhabited it will not survive in it.

The bottom of the pond is most often made with ledges. The relief of the bottom of the reservoir has several zones:
- coastal;
- shallow water;
- deep zone.
The coastal zone is usually a small strip along the coast. Its depth is about 15-20 cm. The shallow area can be decorated with small stones or tiles. Shallow water is considered to be a depth of up to 50 cm. Plants are bred here. This is a place for decorative compositions, which can be made from groups of large stones using decorative ornaments.

The deep zone in ordinary ornamental ponds is most often 80-120 cm. Here, too, you can plant plants that grow at a depth. Most often, water lilies (nymphs) are planted there.

There are many varieties that tolerate winter well and are adapted for cold winters. They bloom for almost six months, starting from the end of April and right up to mid-October. It turns out a very beautiful flowering pond.
If the pond is made only for plant breeding, then it does not have to be deep. A depth of 60-90 cm is quite enough. It is at this depth that it is recommended to plant nymphs in the regions of the middle and northern strip. It is better to make the mirror of the reservoir itself as large as possible, so that they have room to grow, because. one plant can occupy a fairly large area on the surface of the water.
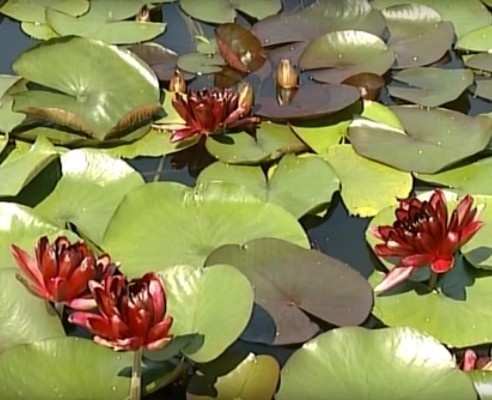
For good flowering, nymphs (they are also lilies and water lilies) need a lot of light. This must be taken into account when choosing a place for a pond. There are more shade-loving lilies, but they also need lighting for 4-5 hours a day. Available a large number of varieties of nymphs and a variety of colors: from white and white-pink to red and dark purple.

Pontederia and nymphs in the pond
For framing the pond and the shallow water zone, it is also better to choose plants that grow well in this climatic region. The pond then looks natural and does not require much maintenance. It is best to use traditional plants: sedge, reed, reed, cattail. Of the flowering ones, you can plant an arrowhead, pontederia, loosestrife (plakun-grass), lungwort.

Loosestrife
The willow-leaved loosestrife has not only decorative qualities, it is also medicinal plant. Marsh iris looks very nice. But in the coastal zone of the reservoir, both on the shore and in shallow water, decorative irises also grow well, because. they are very fond of water and blend perfectly with herbaceous coastal plants.

Step-by-step instruction
How to make a decorative pond in the country or in the garden with your own hands? Consider step by step instructions with photo.
Step 1. Marking and layout of the site. The contour of the pond is drawn on the selected area. The projections of all depth contours are also applied.

Marking can be done by laying a rope or hose on the surface. You can draw contour lines with sand.

Before you start digging a pit, you need to make a vertical layout of the site on which the pond will be located. In order to prevent water from flowing out through one of the low edges of the reservoir, it is necessary to check the horizontal level along the entire planned edge of the reservoir. The plane of the entire edge must be horizontal, at the same level.

This can be checked with a long stick and a level. Or, having hammered pegs on opposite edges of the pool, pull a rope over them and then attach a level to it. If in some places the surface of the earth is below the required mark, then it is necessary to add soil there.

Step 2. Pit. After leveling the site, we proceed to tearing off the pit. It should be done 5-10 cm deeper than the design depth of the pond.
The bottom is thoroughly cleaned from the remnants of vegetation, roots and stones. It is important to do this carefully, because. stones and other objects can subsequently damage the waterproofing film. Sand is poured at the bottom with a layer of 5 cm and tamped into the ground.

Around the contour of the pond, at a small distance from it - about 20 cm, a small trench is being dug. The approximate width and depth of the trench are 15-20 cm. The edge of the film will be fixed in it.
Step 3. Determining the dimensions of the waterproofing film. To determine the overall dimensions of the film, it is necessary to measure the length and width of the bottom of the pit at the widest points. This is conveniently done with the help of cords that are laid out along the bottom. To the resulting length, you need to add 50 cm on each side, which are needed to equip the coastline.

Step 4. We cover the bottom with geotextiles and a waterproofing film. First, the bottom is lined with a layer of geotextile. This protects the waterproofing film from possible damage.

The film itself is applied on top, carefully filling all the curves of the relief. If the project provides for the future supply of water through a hose that is laid on the bottom, then it can be hidden in the folds of the film.

We press the film well to the ground and temporarily fix it with stones so that it does not move. The film should also be brought into the groove that was dug around the pool. The film is pressed with something heavy for temporary fixation. But they don’t fall asleep yet, because. while filling the pool with water, the film may still move.

Step 5. Arrangement of the deep zone. If the project provides for planting plants in the deep zone, then now is the time to install them there.

Plants are planted in special containers. The container is filled with substrate. Containers are installed in the right place on the bottom of the pool. Stones are also laid out at the bottom, if they are provided for by the project. Large stones look beautiful at the bottom.

Step 6. Filling the pond with water. After laying the film, you can fill the deep zone of the pond with water. Water must be poured with a small pressure so that the pool is filled gradually. Thus, water, squeezing air out from under the film, will smoothly occupy the required space and form the bottom. At the same time, the film may move slightly until it takes correct position under water pressure.

If you pour water quickly, then there may be unnecessary tension in the film or air voids under it, which in the future may lead to tearing of the film.

Step 7. Planting plants in shallow water and coastal zone. In the shallow and coastal zone of the pond, containers with appropriate plants are installed. Crushed stone is poured around the containers. They also lay out larger stones that can protrude from the water, creating islands. In the coastal zone, the bottom is usually covered with small pebbles. After installing the flowerpots, the reservoir is filled with water to the brim.

Step6. Fixing the edges of the film. Building an earthen castle. After the pond is completely filled with water and the film has completely fallen into place, you can proceed to the device of an earthen lock, which will finally fix the film in the desired position. And it will also serve as a barrier between the aquatic environment and the soil, so that these media do not mix, and the reservoir has a clear line.

The edges of the film lead into this trench, which was dug around the pond. Crushed stone is poured on top of the film. It will serve as a fixing weight to hold the film. Next, the trench is covered with earth and a small earthen roller is made along the contour of the pond.

Unnecessary edges of the film are cut off.
Step 7. Arrangement of the coastline. The next stage is the arrangement of the framing of the pond. Depending on the design, stone or tile paving can be made on the shore.

If the pond was created in the form of an imitation of a natural reservoir, then it is enough to lay out several large stones. Paths are made along the line of the pond; a bridge can be made across the pond itself. Here you can give free rein to your imagination and create a pond completely with your own hands as your heart desires.
How to make a pond with your own hands video
We also recommend you:
Even in a small area, you can equip a quite decent artificial reservoir, while sacrificing only a few beds. It'll be cheap. In order to create a pond in the country with your own hands, you only need geotextiles, PVC film or polyethylene and a few days of free time.
Choosing a place for an artificial reservoir
When choosing a location for a pond, it is of great importance illumination. Since for aquatic plants it takes enough sunlight, it shouldn't be too shaded. But too much overheating of the water is also undesirable, as this can lead to flowering of the surface.The most suitable site for placing an artificial reservoir is a place near the fence in the corner of the garden, which is illuminated in the morning, but is in partial shade at noon. Do not place a pond near large trees: Proliferating roots can damage the excavation cover. And during leaf fall, you will have to clean the pond from leaves almost daily.
An artificial pond is best placed in partial shade
Pit preparation
The size of an artificial reservoir can be anything - it all depends on the desire of the owner and the free space on the site. But it should be noted that too big pond will require more care.1. With the help of driven stakes and a rope, markings are made according to the shape of the pond at the selected place.

2. Sod is removed along the perimeter of the marking.
3. A small pit can be dug with an ordinary shovel. So that the walls of the pit do not crumble, its walls must have slight slope. There is no need to make an artificial reservoir too deep. Minimum depth bowls - 60 cm (plus 30-40 cm for backfilling drainage from crushed stone and sand).
4. If it is planned to launch fish into the pond, its depth should be lower soil freezing level in this climatic region. Otherwise, the water at the bottom will freeze and the fish will die. In the central part of Russia, the soil freezes to a depth of about 1.4-1.5 m.
5. For planting aquatic plants, it is better if the edges of the pit are stepped. The size of each of these steps is 10-15 cm.

Stepped pond pit
6. All large stones and branches are removed from the bottom of the pit, which can damage a not too strong film.
7. At the bottom of the pit falls asleep drainage: crushed stone, and then sand each with a layer of 20 cm and compacted.
8. To protect against soil erosion, a layer of geotextile. It can be replaced with any durable fabric: old carpets, blankets, old oilcloth or roofing material. Laying such a protective layer is carried out with an overlap on the edges of the pit of about 50 cm.

Roofing material laying
9. Next, you can lay on the bottom of the reservoir polyethylene film(shelf life is about 3 years), pvc film(it will last longer, about 15 years) or durable butyl rubber. To prevent damage to the film during filling with water, it must be laid without tension.

A film is laid at the bottom of the pit
10. Do not cut off excess geotextiles and films immediately. the desired shape they will accept only after filling the pond with water. It is better to dig along the perimeter of the pit shallow trench, in which it will be possible to lay the edges of the fabric and film and lightly cover with earth.
11. After filling the artificial reservoir with water, stones are laid along its edges, which will not only hold the material lining the bottom of the pond, but also serve as decoration. The edges of such an artificial reservoir can be decorate And decorative tiles, slate, sandstone or other suitable size stones or bricks.

Stones are laid along the edges of the reservoir
12. The area adjacent to the reservoir can be backfilled with gravel or marble chips.

Decoration of the edge of the reservoir
13. In the center or at the edge of the pond, you can install a small artificial fountain.
14. Along the edges of the reservoir, you can install several small lamps on solar panels.
Advice. If there is too little space on the site, a small artificial reservoir can be made from an old wheel or bath, buried in the ground and finished with stones along the edge (see photo).

A small artificial pond made from an old bathtub

Pond from an old wheel
Pond cleaning
To clean a large pond, you can use the simplest system filtration: small pumping station with sand filter. Two pipes are drawn into the pond: one serves to take water, from the second, purified water will again flow into the pool. Additional purification can be provided by a small stream filled with sand, through which the filtered water will pass before re-entering the pool. It can flow into the pond through a small waterfall.
Pond filter
It is enough to clean a small pond only once a season by hand. To do this, completely pump out water from it using submersible pump and remove accumulated dirt from the bottom. To clean the pond, you can also use a special vacuum cleaner equipped with a filter, with which you can collect dirt from the bottom.

Pond vacuum cleaner
Advice. If you put a vessel filled with charcoal at the bottom of the pond, the water in it will not bloom for a long time.
Fallen leaves can be collected from the surface of the pond using a net. In autumn, during a strong leaf fall, the reservoir can be covered with a special net. In order to avoid the ingress of dirt for the winter period, the pond is covered with any covering material.
Advice. So that the film does not crack in frost, it is better not to drain the water for the winter. To compensate for the pressure created by the expansion of the ice, several wooden planks or plastic bottles filled with water.
Planting aquatic plants
Aquatic plants serve not only original decoration pond. Bogwort, hornwort, elodea and other plants that can saturate the reservoir with oxygen will help protect the water surface from greening.Naturally, only those plants that can develop well in a given climatic region should be planted. To decorate the pond, you can use traditional plants: reed, sedge, reeds. Large plants (lilies, water lilies) will be able to cover the water surface from the bright scorching sun and reduce water heating. TO flowering plants Those who prefer to settle near water bodies include arrowhead, kupena, plakun-grass, fern, bergenia, lungwort, water iris, etc.
Advice. For planting plants, you can use special containers that are placed along the bottom of the pit. In this case, it will be much easier to take care of the plants.

Planting aquatic plants
Video: Do-it-yourself pond in the country
Whether you like to swim or just relax near the water, relaxing on the shore of a reservoir is one of the great pleasures of summer. But not every summer resident has the opportunity to build a cottage near the water. Therefore, sooner or later, each of us thinks about how difficult it is to make a pond on the site with our own hands. Ideally, we see a pond in the country not only as decorative element landscape design, but also as a small reservoir in which you can enjoy swimming on a hot day.
 Let's start with the basics - what makes a pond fundamentally different from a pool is the self-regulation system.
Bathing pond with their own hands.
We will tell you the process of creating a pond step by step, and you can make a garden pond with your own hands - by building a cool oasis in the middle of the heat right on your summer cottage, where our everyday worries disappear with every light breath of fresh breeze. 
A garden pond is a living organism.
The pond in the country house mimics the process that nature uses to keep the lake clean. Everything - from the size and shape of the pond, plant species and water circulation are designed to maintain the pond in a stable natural state. 
The problems that the pond owner faces is maintaining the balance between plants and water - the plants either die or take over the entire surface of the pond. Only a pond that is a balanced ecosystem ensures optimal water clarity and quality, and maximum enjoyment of swimming in the pond. 
The water in the pond must circulate among the roots of the plants in order to be purified. Plants enrich the water with oxygen, which supports the vital activity of beneficial bacteria that utilize pollution and potentially harmful organisms, and also create a habitat for dragonflies, frogs and other aquatic life. The result is a stable, ecologically diverse system. Nature has revealed its technology to us and we must carefully use it.
How to make a pond yourself. The principles of the pond.
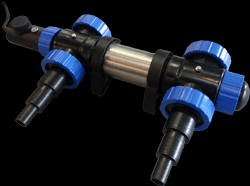
Water is a living biologically active component and all purification occurs due to the work of plants and beneficial microbes. To do this, the pond provides a bathing area and a filtration area for plants. The filtration zone is actually the swamp part of our water zone, and just like in nature, it is this one that guarantees the purity of the entire reservoir. This zone should occupy at least 50 percent of the total area of the water surface of the pond.  If you have noticed, then in nature there are almost no tiny reservoirs with a consistently clean surface of water - they quickly overgrow or silt. Natural stable biological balance can be achieved in ponds from 100 sq.m. Smaller ponds require more of our attention as they their biological balance is precarious. Therefore, these ponds include a skimmer and UV sterilizer to keep them clean, but still offer a chemical-free bathing area and support aquatic plant growth.
It is useful to add a small waterfall, stream or fountain to the pond for regular enrichment of water with oxygen. Although, for the same purpose, you can use an aerator.
How is pond water purified?
 You can see that the process of filtering water in a pond is not complicated:
1. Water from the swimming area flows into the regeneration area.
2. Water circulates back to the bathing area.
Through drainage pipes under the plant roots in the regeneration area or/and after the skimmer, the water is pumped through the UV sterilizer to the waterfall, stream or to the bottom of the swimming area. The pipe that goes to the bottom of the swimming area is slightly raised above the bottom so that the flow of water prevents the formation of silt at the bottom.
What should be the shape of the pond.
The bowl of the pond looks more like a soup bowl with large rims than a bathtub. The height difference should be about 30 cm for each meter of depth. It is this shape of the pond bowl that ensures the stability of the walls. The figure shows a cross section of a pond with a plant and bathing area:

After compaction of the surface layer of soil in the pit, geotextiles and a hermetic liner are laid on the bottom of the pond. In the plant zone - drainage pipes and gravel. In order to separate the swimming zone from the plant zone, a small hillock is formed - its top is 3 cm lower from the water surface. It can be made from sandbags or gravel. The mound allows water from the swimming area to pass into the plant area, where the water is filtered by the plant roots, and at the same time protects the plants from fluctuations in the water of the swimming area. 
This design of the pond will allow you to conveniently clean the swimming area without affecting the plant area. In addition to purifying the water, the shallow water warms up quickly and serves as a habitat for frogs and other invertebrates, you will appreciate their benefits when they start eating mosquito larvae.  In order to mimic the natural contours of a pond, use a combination of different profiles for its shore. If you have plants on pond terraces, it is better to do this in pots so that they can be easily removed when cleaning the pond.
What size pond is suitable for our site?
The optimal size of the pond is 1/10 of the area of \u200b\u200byour site.
How about mosquitoes?
One of the first questions that arises at the word “pond with your own hands” is mosquitoes? Mosquitoes breed only in stagnant water, while the water in the pond will never be static, so mosquitoes will find it unattractive for their habitat. Even if at some point they appear, the frog pond ecosystem will reduce their population to a minimum. 
Why make a pond in the country?
Do-it-yourself pond people make this decision because they want to see their pond as a beautiful part of the landscape design and still have a clean, inviting place to swim on a hot day.
Can I keep fish in the swimming pond?
Unfortunately, fish, on the one hand, eats beneficial microflora with pleasure, on the other hand, it is a carrier of pathogenic bacteria, so there should not be fish in the baths. 
Is it possible to make a sandy beach on a pond?
The best solution for entering the pond is walkways or stairs. For a beach entrance to the water, you need enough space, because. the angle of entry into the water is small. In addition, the sand quickly silts up - those beaches that we see are often simply trampled down to the sand, most of the banks of the pond are usually densely overgrown with plants. 
Should I swim with frogs?
Yes, frogs are full-fledged and important inhabitants of the pond. Additionally, to purify the water in the pond, it is good to have double-winged toothless shells or barley, which filter water up to 40 liters per day. You can also get snails (coils, livebearers) - they eat dead plants and clean the pond well. 
Which the best place for the pond?
It is better to place the pond away from the trees, because. falling, the leaves will rot in the pond. Moreover, growing roots can damage the waterproofing film or tilt the finished container. The illumination of the site should be about 5 hours in the morning, and the rest of the time it should be in partial shade. The pond does not need large illumination. leads to increased formation of algae and overheating of water in the reservoir. 
What to do with the pond in winter?
In winter, the pond, like natural reservoirs, freezes. You don't need to drain it. For the winter it is necessary to remove all equipment from the pond (pumps, filters, skimmers).
Does the type of soil affect the creation of a pond?
No, the composition of the soil does not affect. There is a misconception that it is good when the groundwater level is high. In fact, ground water at the level of freezing, rather a problem. Freezing, the ice can bulge the bottom of the pond. It is especially problematic if the pond is made on the basis of a rigid finished form. 
Do-it-yourself pond from a film.
The main question when creating a pond: how to make it waterproof. There are several types of pond waterproofing - film, clay castle, concrete and rigid installation.
Installing a rigid mold is a simple and durable method, but they usually come in small size up to 3.5 sq. meters. Their service life is 10-50 years.
Waterproofing with concrete is the most expensive, in addition, it needs additional treatment with a frost-resistant agent and liquid glass to protect it from frost.
A clay castle is the cheapest in terms of materials, but the most labor-intensive. In order to waterproof the pit with clay, the compacted soil is covered wood ash or soot. Then a 15 cm layer of clay dough is applied to the walls, compacted. When the layer dries, a second 30 cm is applied. When the layer is almost dry, crushed stone is poured on it, slightly pressing into the layer.
The optimal solution for the construction of ponds with an area of more than 5-6 sq.m. - film waterproofing. 
How much film is needed for the pond:
Film length= pond length + 2 pond depth + 50 cm margin for fasteners.
Film width= width of the pond + 2 depth of the pond + 50 cm margin for fasteners.
The film is produced in widths from 2 to 10 m, length 10-50 m. Knowing your needs, you can choose the optimal roll. The film is bought before digging the pit, this will allow you to cover it immediately when the pit is ready, preventing its edges from shedding.
What kind of film to choose for the pond.
PVC film for the pond is cheaper, but eventually destroyed by ultraviolet radiation, its service life is 8-10 years.
Butyl rubber sheeting is more expensive, but has both UV and cold protection. The service life of such a film is 50 years.
Do-it-yourself pond construction photo.
Do-it-yourself pond begins with marking the pit. The curved shape can be marked with a hose. We remove the sod along the coastline and take out the soil on the bayonet - this will be the line of the swamp zone, then the next level of the earth is taken out inside the resulting border, and so on. As a result, our terraces will be 50 cm wide with slopes of 20 cm. When the pond pit is ready, all hard objects that can damage the film: stones, roots, etc. , remove. We level and ram the walls and bottom of the pit.  Before work, the film is laid for several hours in a sunny place so that it warms up and becomes more elastic. Laying the film is done in warm weather. Overlapped geotextile or felt sheets are laid on the compacted pit, they are needed to protect the waterproofing film from protruding roots and stones over time.
A waterproofing film is spread on top of the geotextile with a margin of 50 cm along the edges of the pit. The edges are temporarily fixed with stones. The film is allowed to sag a little, smoothing and leveling it according to the shape of the pit. 
The foil inside the swimming area can be protected with dry stacked stones. 
Gravel or sand bags can be used instead of stones. But keep in mind that it is more convenient to take care of a pond with film walls. - it is easier to clean it from silt and mud. 
In portions, the pit is poured with water, removing air bubbles from under the film. 
When the pond is completely filled with water, the ends of the film are securely fixed in a trench, which is made at a distance of 15 cm from the edge of the pit. In a trench 20 cm deep, the edges of the film are wrapped in a roll and covered with stones and pebbles.
We make a pond with our own hands. Shore decoration.
After you have made a pond with your own hands, before you start decorating the shore, you need to pour plenty of water on it and wait 2-3 days, because. shrinkage is possible. In addition, during this time, the water in the pond will settle.
We mask the film on the shore with rubble, stones, snags. We plant plants in shallow water. The pond needs plants that saturate the water with oxygen. There are many suitable plants - reeds, meadowsweet, iris, bathing suit, marigold, arrowhead. Any plant that grows on the shore of a natural pond will work for your pond. Don't forget about algae, like hornwort, which just floats in the water. Deciduous ornamental shrubs it is better to plant for marsh grasses, which are planted directly on the shore. 
Additional charm is added to the pond backlight. 
Floating flower beds look seductive on the surface of the pond. 
Pond safety.
If there are very young children in the family, then perhaps the construction of the pond should be postponed until they are older. It is necessary to consider visiting the pond by the elderly and children school age. Make a convenient ladder for entering the pond, don't forget to clean it so it doesn't get slippery! All other sides of the pond, except for the entrance, are best covered with plants. 
Pond care.
The new pond will take on its natural form throughout the year - while it will form its ecosystem. The small world of your pond is very vulnerable. The pond may quickly heat up or freeze, the water may evaporate, or the pond may overflow after rain. This puts a strain on aquatic life that cannot instantly transition to a safer, more stable environment. 
Therefore, your pond, like any living organism, requires care. On a hot day, you need to add water, collect garbage that floats on the surface with a net, check whether the plants have grown or perhaps something has not taken root and must be annoyed. However, a surprising number of life forms will colonize your new pond, they will quickly explore new waters and stay if conditions suit them. 
The quiet splash of water is the most enchanting melody of a hot summer, water bewitches, attracts and seduces us with a playful play of light, transparent depth and life-giving coolness. A handmade pond will give your cottage a special charm.
Decoration suburban area ornamental pond - good decision. Particularly pleased with the cool water in summer heat. Even a small pond in the country can be equipped with a fountain or a waterfall, plants and flowers can be planted, ennobled with stones and placed next to chairs or benches. Get a great seating area. Any summer resident can make this beauty with his own hands in 1-2 days without significant financial costs.
What can you make a decorative pond from?
There are many materials for the manufacture of garden ponds. You can choose more expensive ones and build an impressive deep lake, or you can find improvised materials for free and make a small decorative pond.
From a tire
Old used tires from heavy construction vehicles or tractors can be bought for a penny or found for free. According to its properties, the rubber from which they are made perfectly withstands seasonal temperature changes from frost to heat and does not let water through. This material has long term operation and finished perfectly round shape. You can find this material at tire shops or car dealerships.
From tires you can make a multi-level pond with a small "waterfall"
From an old bath
A well-used bathtub made of cast iron, steel or acrylic has an oval or angular shape and a shallow depth, just right for a country pond. If the color of the enamel does not suit you, you can paint the bath in a blue tint for an effect. clean water or brown to match the color of the soil.
If you surround the bath with stones, no one will guess what the pond is made of.
From a plastic container
Special ready-made plastic containers are sold for creating reservoirs of various sizes and depths. These bowls can be of very different configurations with steps and separate areas of shallow water and deepening. Durable material will withstand all loads and last for many years. A wide range of colors allows you to choose a bowl for every taste. For the winter, it is not required to drain the water and dismantle the pond.
Blue and blue containers look more positive than black
PVC film
Flexible roll waterproofing materials and membranes for swimming pools are excellent for creating a reservoir of complex multi-stage shape, due to their flexibility and softness. PVC film is the most affordable of all produced. Only polyethylene is cheaper, but it quickly collapses under the influence of ultraviolet radiation, it will have to be laid in 2-3 layers. Polyethylene film is recommended to be used in this capacity only for temporary structures.
From PVC film, you can make a spring of any shape and any size.
Other
Butyl rubber pool membrane costs a lot, but it is specially designed for waterproofing, does not freeze, does not rot. The service life of this film is 50 years, it is capable of tenfold stretching under significant loads without the risk of tearing.
A monolithic concrete bowl is considered the strongest and most durable, you can walk freely on it if you need to clean the bottom or transplant pond plants. To create such a pool, it will take more time due to the time of solidification and curing of the material. Additional costs for reinforcement and drainage will pay off with interest, especially in the case of a large reservoir.
A pond from a monolithic concrete bowl is more practical and effective than others
Choosing a place for a reservoir in a summer cottage
In the process of designing and design ideas, it is important to determine a good place to place the future pond and the adjacent recreation area. Small volumes of water quickly heat up in the sun, they are best placed in the shade. Sun rays should not be exposed to the surface for more than 6 hours a day. In the shade, the water will not overheat, and biological pollution will occur more slowly. On hot summer days, evaporation from the surface of a small pond can reach 5 cm, which is dangerous for animals and plants.
Leaves and fruits that have fallen from trees pollute the surface of the water, and the growing root system can damage the waterproofing layer. Therefore, it is better to place the bowl away from hardwood and fruit trees and shrubs.
Choosing plants for a pond in the garden
A bare pond without plants does not look aesthetically pleasing, it does not look like a real natural reservoir. You should choose suitable plants, which in nature live near ponds and lakes, in swamps. They are divided into three groups:
- floating in the water;
- immersed in water;
- coastal.
The first group includes free-floating plants that are not fixed by the root system in the bottom soil. The depth of the water is not important to them. The following plants are popular in this group:
- eichornia (water hyacinth) - perennial, with large blue flowers and leaves immersed in water;
- pistia (water rose) - has light green rosettes of leaves, similar to roses;
- vodokras is recommended to breed in small ponds, this plant with small white flowers and round leaves floats in the water, and in autumn its foliage dies off.
A healthy microclimate is formed in water protected from overheating by large floating leaves.
Submerged in water and growing at the bottom in the ground, in a special container or pot, cultures are included in the second group. The following plants are popular:
- water lily is one of the most beautiful and popular aquatic plants. planted water lily in pots that are placed at the bottom of the pond. Water lily flowers are white, pink and yellow;
- the hornwort is an oxygen generator, it floats in the water column and contributes to the natural preservation of the purity of the pond and oxygenation;
- The arrowhead got its name from the shape of the leaves; it is planted to a depth of about 10 cm.
Coastal plants are planted around the reservoir, they grow well in waterlogged soil, decorate and shade the coastal zone. Popular plants:
- calamus is a tall grass with sharp arrow-shaped leaves, an excellent companion for flowering crops;
- marsh marigold - unpretentious bushes with a scattering of small yellow flowers;
- marsh iris looks like garden varieties, It has yellow flowers, grows along the banks of rivers and lakes in large bushes.
Swamp iris can become the main focus in the composition of a country pond
How to build an artificial pond in the country with your own hands
This garden decoration is easy to make yourself, and you do not need to spend a lot of money on it. If you strictly follow the technology and find the necessary materials at hand, prepare the tool, then in a couple of days you will be able to admire your creation - a beautiful pond. The large deep pool will be ready in 2 weeks due to more thorough ground preparation.
From a plastic container
Polypropylene, polyethylene or fiberglass bowls are available in various depths and shapes. The most popular is an irregularly rounded configuration that mimics a natural body of water. To install the tank you will need the following materials and tools:
- tape measure, pegs and string for marking;
- shovel;
- level;
- sand and gravel, water, cement;
- fittings.
The design of the object includes a sketch on the site plan, a drawing with the placement of boulders, plants, technical communications. There are ready-made schemes and design options for a country pond.
Installation of a bowl for a decorative pond
Depending on the planned purpose of the pond, you can buy a container of the required dimensions. If the reservoir will perform a purely decorative function, then it is recommended to make it multi-stage, shallow and small. For breeding decorative types fish and amphibians, you should choose a bowl with a central area deeper than the freezing point so that the living creatures can overwinter.
A small fountain will decorate any country pond
Before installing a small plastic bowl in the chosen place, it is necessary to prepare the base by making a sand cushion. For this you need:

If a container of impressive size is purchased, then a sand cushion is not enough, it will be required concrete base. For this you need:
- Mark the outlines of the sides of the bowl, sprinkling the contour with sand. At a distance of 15 cm from the sand line, drive in pegs to mark the edge of the pit.
- Clear the surface of grass, turf and stones.
- Dig a hole 30 cm deeper than the height of the reservoir.
- Level and compact the bottom and fill it with 5 cm of sand.
- Pour a 10 cm layer of crushed stone of medium fraction on top, lay a reinforcing mesh and pour concrete mortar 5–7 cm thick. Pillow curing time is approximately 2 weeks.
The bottom of the future pond should be flat
Installing the bowl on the base takes several steps:
- Pour water into 1/3 of the volume, fill in the gaps between the bowl and the walls of the pit with wet sand, compact it.
- Gradually add water and pour sand into the pit until the entire container is dug into the ground.
- After 2 days, the sand will settle, and the form will firmly fall into place.
Now you can mount the technical part: fountains, additional equipment, pipes, filters. An excellent option for a country pond would be a floating fountain, which simultaneously acts as a filter and saturates the water with oxygen. Such a model will not only decorate the pond, but also clean it, ensure the health of fish and coastal plants. Installation is done like this:

After doing technical work you can start decorating and planting plants:

PVC film
The best choice for price and durability roll material to create a pond is PVC film. For installation you will need:
- PVC film with a margin of 50 cm width on each side;
- roulette, level;
- shovel, rake;
- a machine for welding a film or a building hair dryer with a nozzle;
- sand, water.
When designing film structures, you can show more imagination and come up with a complex shape. Flexible and soft membrane will allow you to embody the design idea. The stepped structure will allow you to plant plants or enter the water for swimming. To get started, do precise drawing to scale and a sketch with design and decor options.
A waterfall will fit well into the design of the pond
The base should be as level as possible, clean and without sharp stones and clods of earth. A sand cushion device is enough.
Stages of work:

Now you can lay tiles or stone that can be fastened together cement mortar, decorate the pond with boulders and coastal plants, which are displayed in pots on underwater steps near the surface of the water or in the ground in the coastal zone around the boulders. Floating oxygenator crops saturate the water with oxygen, water lilies and lotuses decorate the surface with magnificent flowers.
Light shades of the film will allow you to see fish and plants better, while dark ones will create a complete imitation of real bottom soil.
You can decorate a pond with a dark base with plants and decorative figures.
Floating filters and UV flashlights help keep the water clean longer. Snails will clean the walls from plaque, frogs and fish will reduce the number of mosquitoes and other harmful insects.
From a tire
Having available material at hand, for example, old tires, you can equip a pond absolutely free of charge in one day. The round shape is predetermined. An interesting option This design consists of three tires of different diameters, which are installed at different heights. It turns out a natural cascading three-stage waterfall.
To work with rubber, you need to prepare:
- shovel;
- level;
- waterproofing film;
- knife with a metal blade;
- sealant;
- sand and gravel;
- stones and plants for decoration.
When designing, it should be taken into account that the tire can be dug into the ground completely or only up to half the height, or it can be completely placed on the surface. The frost resistance and durability of rubber will allow you to leave the pond for the winter in its place. The largest diameter of 3 m and a height of 1 m are tires of the Belarus tractor or tires from BelAZ equipment. You can even swim in this pond.
Several individual ponds can not be combined - the composition will turn out to be harmonious from several tires of different sizes
Foundation preparation:
- Mark out the site by laying and circling the tire around. Remove the sod and remove the plants.
- Dig a pit, expanding it by 15 cm from the dimensions of the tire and deepening it to the height of the tire plus 15–20 cm.
- Remove stones, clods of earth and debris, level the bottom of the site according to the level, tamp. A layer of geotextile can be laid to stabilize the soil and prevent the growth of weeds and tree roots.
- Pour a layer of 10 cm of crushed stone and 5 cm of sand, spill with water and tamp, check the level.
- This item is performed if it is decided to make a concrete platform for the reservoir. A reinforcement grid or reinforcing mesh is laid on top of the sand cushion and poured with a 7 cm thick concrete solution. Cover polyethylene film and wait for the screed to dry after about 2 weeks.
The base is ready, and now you can start installing and decorating the country pond. The work includes the following steps:

A wonderful ensemble with a pond will turn out if you equip a small one next to it. alpine slide. Pour a hill of soil, compact it a little and give it the desired shape, then lay it out picturesquely with stones. You can use driftwood, old ceramic pots and vases. Plant unpretentious, creeping plants in the soil between the stones, and moisture-loving crops closer to the water. Over time, the plants will grow, and the hill will take on a wild natural look.
Video: do-it-yourself small pond with a fountain
Arrangement ideas
The style of the reservoir should be in harmony with the general style direction of the entire summer cottage, garden. On a small estate, a pond can be made a central decoration and a recreation area for the whole family can be arranged around it. There are many landscape design ideas - everyone will choose the perfect option for themselves.
By following simple care rules and paying attention to animals and plants, you can create a wonderful corner of freshness and coolness, which will become a favorite vacation spot for the whole family. Construction does not require a lot of time and money, and the result will be impressive.


