Specialization: facade finishing, interior decoration, construction of cottages, garages. Experience of an amateur gardener and gardener. We also have experience in repairing cars and motorcycles. Hobbies: playing the guitar and many other things that I don’t have time for :)
A set of measures to insulate a house necessarily includes thermal insulation of the ceiling, especially if the attic is cold. The fact is that heat rises, so up to 25 percent of the heat can escape through the ceiling and roof of the house. Therefore, I want to tell you how and how to effectively insulate the floor.
As you know, there are two types of attic flooring:
- Beam;
- Slab.
The insulation technology depends on the type of floor. Therefore, we will consider both options further.
Insulation of beam floors
The process of insulating a beam floor includes several steps:

Step 1: preparing materials
First of all, you need to decide on the choice of insulation. In principle, in a private house in the attic you can use absolutely any thermal insulation material. The main thing is that it is environmentally friendly.
Let's look at the most common thermal insulation materials and their features:
- Mineral wool. This is one of the most common insulation materials. It does not burn, rodents and insects do not grow in it, and it is vapor permeable. The only serious disadvantage of mineral wool is its hydrophobicity.

Concerning thermal insulation properties material, the thermal conductivity coefficient ranges from 0.077 to 0.12 W/m *K. In general, insulating floors with mineral wool is a reasonable solution. The only thing is to ensure high-quality vapor/waterproofing;

- Styrofoam. Is lightweight and cheap material, but not without some shortcomings. And the main ones can be highlighted that it, as a rule, burns well and “does not breathe”; in addition, rodents can grow in the foam. The thermal conductivity of this insulation is 0.037-0.043 W/m*K;
- Extruded polystyrene foam. This heat insulator is an improved version of polystyrene foam. As a rule, it contains a fire retardant and has higher strength and moisture resistance.

The thermal conductivity of this insulation is lower than that of expanded polystyrene - 0.036 - 0.040 W/m*K, but it costs several times more;

- Cellulose wool. Another name for this bulk material is ecowool, since it is made of cellulose and is one of the most environmentally friendly insulation materials. Thanks to special treatments ecowool does not burn and is resistant to various biological negative influences. The thermal conductivity of cellulose wool is in the range of 0.032-0.041 W/m*K;

- Expanded clay. This is another one bulk insulation, which is granules of foamed baked clay. The advantages of expanded clay include environmental friendliness and fire safety. However, it has a fairly high thermal conductivity - 0.1 - 0.18 W/(m*K).
Therefore, expanded clay must be laid in a layer at least 25 cm thick, otherwise good result can't achieve it.
To save money you can use natural insulation– sawdust or reeds. The only thing is that they will have to be treated with a fire retardant and antiseptic.
In addition to insulation, you will need the following materials:
- Vapor barrier film;
- Superdiffuse membrane;
- Protective impregnation for wood.
Step 2: Preparing the Beams
Preparation involves doing the following:
| Illustrations | Actions |
 |
Installation of a rough ceiling. To perform insulation from the attic side, the floor must have at least a rough ceiling on which vapor barrier and insulation can be laid. To do this, you need to secure boards or sheet material to the beams from below. |
 |
Beam processing. Cover the surface of the beams with an antiseptic. |
Now you can start thermal insulation.

Step 3: insulation
Insulation instructions look like this:
| Illustrations | Actions |
 |
Vapor barrier:
|
 |
Laying insulation:
|
 |
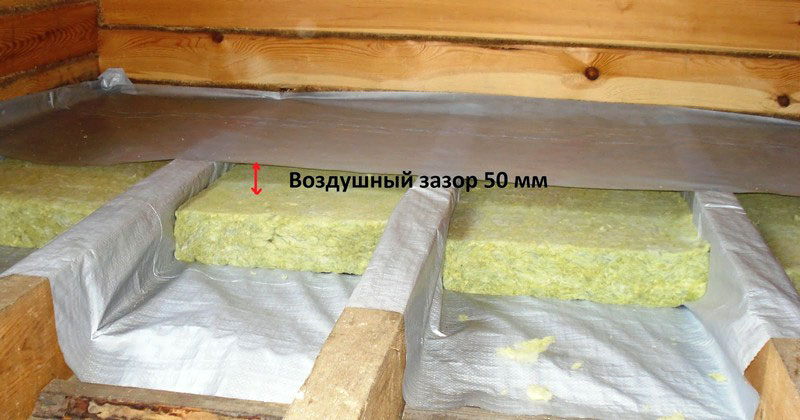
Waterproofing. Place a waterproofing film over the thermal insulation and beams. As with laying vapor barriers, the joints must be taped. |
At this point the work is completed, all that remains is to complete the attic floor - lay boards or other material on top of the waterproofing.
It must be said that it is possible to insulate the floor from below. In this case, a slab heat insulator is used, which is placed in the same way in the space between the beams. In this case, a fishing line or nylon cord is pulled to fix the plates.
Insulation of slab floors
Insulation of a slab concrete floor also includes three steps:
- Preparation of materials;
- Floor preparation;
- Insulation.
Step 1: preparing materials
Since the insulation will perform a load-bearing function, it must be durable. It is best to use extruded polystyrene foam or polystyrene foam with a density of at least 25 kg/m3. Can also use stone wool in slabs with a density of at least 150 kg/m3 or expanded clay.
In addition to insulation, you will need the following materials:
- Roll waterproofing;
- Materials for screeding.
Step 2: preparing the base
The floor preparation is carried out as follows:
| Illustrations | Actions |
 |
Surface cleaning. Remove any debris that is on the surface of the stove. |
 |
Elimination of defects. If there are serious potholes or cracks on the surface, they must be covered with cement mortar. |

Step 3: insulation
Thermal insulation is quite simple:
| Illustrations | Actions |
 |
Waterproofing the floor.
|
 |
Laying insulation. Lay the slabs on the floor close to each other so that there are no gaps. |
 |
Filling the screed. The screed is poured over the insulation in the standard way. You can get acquainted with the technology of pouring screed from other articles on our portal.
|
It should be noted that sometimes it becomes necessary to insulate the ceiling from the inside, for example, in apartment building. In this case, the thermal insulation boards are glued to the concrete. special glue and additionally fixed with dowels.
For comfortable operation of the building, it is necessary that the attic floor be well insulated to prevent the temperature of the ceiling surface from dropping below the dew point. Otherwise, moisture spots will certainly appear on the ceiling and walls, which will only worsen appearance rooms, but will also cause mold growth and the development of fungi, which are difficult to get rid of. Therefore, increased demands are placed on the thermal protection of the attic floor.
In accordance with the standards, the heat transfer resistance for the attic floor must be no less than next value: Ro = 4.15 m 2 °C/W. Attic floor country house insulated with slabs of mineral (basalt) or glass wool. Insulation boards must be laid in the spaces between ceiling beams or on floor slabs. Mineral wool is laid on a vapor barrier layer or on a plastic film.
Foil thermal insulation material is laid with the shiny side down. The space between the beams is filled with a layer of heat-insulating material. To reduce heat loss through cold bridges, another layer of thermal insulation is laid on top of the beams.
To reduce heat loss from lightweight fiber insulation due to drafts, it is protected with vapor-permeable windproof material. The use of such material allows you to increase the thermal protection of the attic floor and protect the insulation from getting wet if drops of moisture get on it (in case of damage to the roof or leaks).
The insulation layer from the eaves should also be protected from the wind by slabs mineral wool high density or boards that are installed on the edge.
An attic or attic space divided into compartments by partitions can be insulated in different ways.
- The first method: if the attic is non-residential, then only the floors – the ceiling of the building – should be insulated.
- The second method: if the attic has an attic, then you need to insulate the roof, in addition to the floors.

To insulate the roof of the attic and rooms, the following are usually used:
- Construction felt.
- Mineral wool in various designs.
- Styrofoam.
- Polyurethane foam.
- Basalt, glass wool, ecowool.
Floors in the attic can be insulated with the following materials:
- Construction felt, mineral wool, glass wool.
- Foam silicate slabs.
- Expanded clay, slag, ash, sawdust, straw, reeds.
Before insulating the attic, the joints of the floor and roof are checked, the cracks are sealed with tow soaked in lime mortar. You can also use polyurethane foam, silicone adhesives and sealants.
Before carrying out work, all wooden structures are coated with antiseptic and fire retardant compounds.
When insulating a roof from asbestos cement sheets should be given Special attention gaps that are formed by waves of asbestos cement sheets. If there are cracks, they are filled with tow in lime mortar.
Availability is checked protective covers, collars and aprons in places where asbestos-cement sheets adjoin parapets, pipes and walls. The covering elements should be extended onto the protective ceilings by at least 15 cm.
Insulating the attic with various materials
To insulate attic spaces and the attic in a private house, different insulation materials are used:
- expanded polystyrene
- polyurethane foam
- expanded clay
- felt, etc.
The insulation process is the same for all materials, so let’s look at attic insulation using mineral wool as an example.
Before you begin insulating the attic, it is necessary to waterproof the roof. Mineral wool is versatile and easy to use, has low thermal conductivity and density, withstands high temperatures well and is insensitive to aggressive environments. Mineral wool is also an excellent sound insulator.
Attic slopes can be insulated with slabs and mats made of mineral wool. The slabs are more rigid, and the mats are more elastic; this property helps to lay them better and more densely. Mineral wool mats with foil coating are also used for vapor barrier.
Since the thickness of mineral wool is usually greater than the thickness of the rafters, overlays are made on them to increase the thickness. Also, the rafter system is pre-impregnated with an antiseptic solution.
Mineral wool is laid in the spaces between the rafters on the sheathing and covered with a vapor barrier film. The vapor barrier film is overlapped on the rafter system. The width of the overlap of the canvas is visible on the film - a line is drawn along the edge of the canvas. The joints of the film are insulated with special glue and adhesive tape.
Floor insulation with expanded clay
Expanded clay should be laid on the attic floor on roofing felt. The thickness of the expanded clay layer is determined by the thermal conductivity of the floor, but in any case, the thickness of the expanded clay should be at least 15 cm, and better - 20-25 cm.
It is known that up to 15% of the heat from a house can escape through the ceiling. Therefore, to reduce heat losses, the ceiling is insulated with expanded clay and other materials. Expanded clay not only retains heat, but also increases sound insulation.
Expanded clay is usually used to insulate concrete floors. To do this, it is covered with a layer of 200-250 mm, and a cement screed up to 50 mm thick is poured on top. The screed will serve as the floor.
The cement-sand mortar for the screed must be of a dense consistency so that it does not flow into the expanded clay backfill.
Insulation with mineral wool
- Mineral wool should be laid from the farthest point of the attic.
- The insulation must be cut on a hard surface.
- Beams, pipes, ventilation shafts, etc. should be covered with insulation.
- Mineral wool should be laid in a layer of at least 25 cm.
When working with mineral wool, personal protective equipment is required. These include safety glasses, rubber gloves, a respirator and long sleeves. Do not work near open food or drinking water. Contact of mineral wool on the skin causes irritation and itching.
Insulation with polyurethane foam
The attic is insulated with polyurethane foam by spraying onto the partitions, roof, gables and attic floors, so the thermal insulation layer is obtained without seams or joints, that is, a monolithic vapor-tight layer is obtained.
Polyurethane foam has a low thermal conductivity coefficient, so the thickness of the polyurethane foam layer is several times smaller than the layer of mineral wool or polystyrene foam.
The use of polyurethane foam increases the usable area of the attic space.
An attic insulated by spraying a layer of polyurethane foam is not affected by humidity, condensation does not form on the walls, because the polyurethane foam retains warm air inside. Moisture does not pass through polyurethane foam and cannot settle on a cold roof.
Floor insulation with sawdust is used only in non-residential attics, since when walking, the sawdust will gradually become compacted, which will lead to the appearance of cracks in the concrete screed. The most common recipe for a solution using sawdust for insulating an attic floor:
- Ten small buckets sawdust.
- One bucket of cement, grade no less than 300.
- One bucket of fluff lime.
- Ten liters of water with antiseptic. It could be boric acid, copper sulfate, laundry soap.

The volume of water varies depending on the moisture content of the sawdust. The finished sawdust solution is laid in layers 20-25 cm thick and compacted. All building materials used in the walls of the house must be vapor permeable. That is, you cannot use roofing felt, polyethylene, roofing felt and other materials that do not allow moisture to pass through.
When insulating, the layer of sawdust on top is covered with panels made of plywood, fiberboard or boards. The thickness of the sawdust layer on the walls should be at least 15 cm, on the ceilings and on the floor - at least 25 cm. When insulating the floor, sawdust is placed on top cement strainer 5-10 cm thick.
I decided to dedicate this article to those people who want to insulate the attic of their house on their own without large financial costs. Next, we will get acquainted with thermal insulation materials suitable for these purposes and the nuances of their installation.
Stages of work
We will conditionally divide the insulation of an attic in a private house into:

Floor insulation
Floor insulation can also be divided into several steps:

Preparation of materials
First you need to decide on the choice of thermal insulation material. There are quite a lot of options. However, our task is to insulate the ceiling with minimal financial costs.
- sawdust – thermal conductivity is 0.07 – 0.095 W/mºC. The main advantage of sawdust is that if there are wood processing plants nearby, they can be purchased very cheaply or even free.

The only thing, keep in mind that before using the sawdust it is necessary to dry it and also treat it with an antiseptic composition. Also, to protect sawdust from biological influences, you can use slaked lime, mixed with carbide.
If sawdust has traces of fungal infection, it cannot be used for insulation;

- Reed is another natural material that can be obtained for free. The thermal conductivity of reeds does not exceed 0.042 W/(m.K).
Reeds for thermal insulation are prepared late autumn with the onset of the first frosts, when the stems remain almost completely without foliage. Moreover, only mature plants can be used. Such stems are easily identified by their light yellow tint.

- penoizol is a modified polystyrene foam that is applied to the surface in the form of foam. The foam hardens within a few days.
Penoizol has a lower thermal conductivity than all the materials described above - 0.028 - 0.040 W/(m*K). In addition, penoizol is not susceptible to biological influences, does not burn and is not afraid of moisture.
The disadvantage of this material is that insulating the attic with foam insulation requires certain equipment. Accordingly, it will not be possible to cope with the work on your own. The cost of the material with the work of specialists is 1450-1500 rubles per cubic meter.
True, you can use dry penoizol in bags, but in this case its price will increase to 2000-2300 rubles per cubic meter;

- Expanded clay is an environmentally friendly and fireproof natural material that is sold in the form of durable granules. The cost starts on average from 1000 rubles per cubic meter, which allows it to be classified as a budget insulation material.
The disadvantage of expanded clay is its higher thermal conductivity 0.1 – 0.18 W/(m*K). That's why For high-quality thermal insulation of the ceiling, expanded clay must be poured in a layer of at least 20 cm.

- mineral wool is also an environmentally friendly and fireproof material with low thermal conductivity (0.038 to 0.055 W/m*K). Typically, mineral wool is sold in the form of mats or rolls. Its main disadvantage is the rather high cost - from 2300-2500 rubles per cube of basalt mats.
True, you can use stone wool in rolls, the cost of which starts from 1,500 rubles per cubic meter. But, this material is less environmentally friendly than basalt wool.
IN Lately Cellulose-based insulation – ecowool – has become widespread. This material is treated with an antiseptic and fire retardant, therefore it is fireproof and not susceptible to biological influences. The cost of ecowool is 1200-1500 rubles per cubic meter.
Everyone must choose the best way to insulate an attic in a private home, depending on the needs and availability of a particular heat insulator.

In addition to thermal insulation, you will need other materials:
- vapor barrier membrane;
- boards, OSB sheets or other material that can be laid on floor beams;
- antiseptic impregnation for wood.

Floor preparation
You can begin insulating the attic floor only after completing the following preparatory work:
- if there is a flooring on the floor beams, it must be dismantled;
- then the wooden beams must be treated with antiseptic impregnation. Instructions for the use of such compositions are available on the packaging;
- if there is no bevel (lining) of the ceiling, it needs to be done. To do this, you can nail boards to the beams with inside, i.e. from the side of the room.
This completes the preparation.

Floor insulation
Insulation of the attic floor is carried out as follows:
- A vapor barrier membrane needs to be laid on the joists and eaves. The stripes must overlap each other. For reliability, the joints should be taped;
- Now the thermal insulation is being installed. Mineral mats must be positioned so that they fit tightly to the floor beams and to each other. The same applies to rolled material;

- lay another layer of vapor barrier on top of the floor beams and thermal insulation with your own hands and glue it with tape;
- then boards or other material are laid on the floor beams. If the attic will be used as a living space, you can install joists to level the surface and lay a subfloor on top.
If the house has a concrete floor, the attic must be laid on a slab to insulate it mineral mats or extruded polystyrene foam, and fill the screed. In this case, the insulation on both sides must be covered with a waterproofing film, especially if mineral mats are used.
It must be said that the ceiling can be insulated not only from the outside, but also from the side of the room. True, in this case the choice of insulation is limited, since using bulk materials will not work.

As an example, let's look at how to insulate a ceiling in a private house with isover, i.e. mineral mats:
- First of all, it is necessary to dismantle the roll. In this case, it is advisable to lay boards on top of the beams and secure them;
- a vapor barrier membrane is then attached to the beams and boards. To fix it, you can use a stapler;
- Now mineral mats should be laid in the space between the beams. To fix them, you can use slats located across the beams. Also, nails are often nailed to the beams, and threads are pulled between them;

- after this you need to attach another layer of vapor barrier to the beams;
- To complete the work, you need to roll up, after which you can start arranging the ceiling.
Roof insulation
In most cases, roof insulation is not required. But, if you are going to use the attic space as a living space, then you cannot do without this procedure.
Do-it-yourself roof insulation in a private house can also be divided into several stages:

Preparation of materials
Since it is inconvenient to use bulk materials for roof insulation, you can use mineral mats. To save even more, you can make mats from reeds.
In addition to insulation, you will need the following set of materials:
- vapor barrier;
- nails and threads;
- wooden slats;
- antiseptic impregnation.

Roof preparation
Before you start insulating the roof, you need to do some preparatory work:
- First of all, inspect the rafter system for its integrity. If any parts are cracked or rotten, they must be replaced or repaired;
- if the thickness of the insulation exceeds the thickness of the joists, they must be increased. To do this, nail beams or boards of sufficient thickness to them;
- then everything wooden structures must be treated with an antiseptic composition to protect them from biological influences.

Roof insulation
Do-it-yourself roof insulation in a private house is carried out as follows:
- The vapor barrier membrane should not touch the roof waterproofing. To provide space between these materials, you need to nail nails to the rafters and stretch the threads between them in a zigzag pattern;

- Next, secure the vapor barrier membrane to the rafters with a stapler or small nails. Let me remind you that the smooth side of the vapor barrier should be facing the insulation. Tape the joints of the film with tape;
![]()
- Now you need to lay the insulation in the space between the rafters. To avoid cold bridges in the thermal insulation, place the mats close to the rafters and to each other . If gaps do form, they need to be filled with scraps of insulation..
To fix the thermal insulation between the rafters, you can also nail nails and stretch threads between them; - after laying the insulation, you need to attach another layer of vapor barrier to the rafters;

- to complete the work, you need to perform the sheathing using slats or boards about 2 cm thick, to which finishing materials can be attached.
Insulation of gables
Now all that remains is to insulate the gables, if, of course, they exist. It must be said that it is more expedient to insulate them from the outside in parallel with the insulation of the entire facade. However, if the facade will not be insulated, then thermal insulation must be done from the inside.
For this we will need the same materials as for finishing. The only thing besides them is to prepare beams or boards. Their width should correspond to the width of the insulation.
The insulation work is similar to the thermal insulation of ordinary walls:
- in order to provide ventilation space between the walls and the insulation, the slats must be secured to the gables in a horizontal position. The vertical step should be about half a meter, and the horizontal step should be several centimeters.

Keep in mind that the slats must form an even vertical plane. Therefore, if the gables are uneven, the slats must be leveled during installation;
- then a vapor barrier membrane is attached to the slats. During installation, make sure that the film does not sag;
- then installed vertical racks(bars or boards). To fix them, you can use self-tapping screws and metal corners. Make the distance between the posts a couple of centimeters less than the width of the mats;
![]()
- Now the space between the racks must be filled with insulation. If the racks are installed correctly, the mats will fit tightly and no additional fixation will be required;
- then attach a vapor barrier to the racks;

- At the end of the work, install the sheathing.
Now all that remains is to complete the finishing. Choice finishing materials depends on the purpose of the home and the attic itself. If the house is used for permanent residence, and the attic will be heated, you can cover it with plasterboard and use any finishing materials.
Finishing a cold attic should be done with materials that are not afraid of low temperatures. Therefore, from using wallpaper and plastic panels It's better to refuse.
Conclusion
Insulating an attic yourself, as you can see, is not at all difficult. Therefore, you can safely get to work, the only thing I recommend is that you first watch the video in this article. If any nuances are not clear to you, contact me with questions in the comments, and I will be happy to answer you.
The under-roof space is one of the risk zones, therefore insulating the attic is a mandatory process and necessary for preserving comfortable temperature in the premises of the house, saving energy spent on heating, and extending the life of the entire residential building.
Through cold attic, according to statistics, up to 20% of the heat can escape from the lower space, and this is 1/5 of the family budget. It is all the more important to insulate the attic space since the bulk of the hot air always rushes upward, which means that all joints, cracks, and surfaces must be carefully insulated. A natural problem arises of how to do this so that insulating a cold attic in a private house does not become an empty undertaking and a waste of money. Insulation with mineral wool
Which insulation technology, method or technique is the most popular and cheapest, we will consider in the article below, based on the use of environmentally friendly and natural building materials.
Types of attic structures
When starting to insulate an attic in a private home, you need to choose one of three directions for using this space, the implementation of which will help maintain the desired temperature and humidity:
- An unheated attic, where the temperature in winter should be maintained (due to properly carried out thermal insulation measures) within 5-10 0 C.
- Comfortable temperature is ensured by the flow of hot air through ventilation ducts from the living quarters of the house. Such an attic (warm, but without an attic) is typical for low- and high-rise buildings.
- Heated attic space in the attic: works like a regular living space with heating, like the rest of the rooms in the building. To insulate such a room, you need fewer layers of insulation without laying a vapor barrier layer, but the sealing of joints and crevices of structural connections must be complete.
How to choose the optimal insulation material
Before deciding how best to insulate the attic of a private house, it is necessary to outline the range of proposed insulation operations. Some refer to insulation as the need to insulate only the ceiling and roofing slabs to reduce heat loss without insulating the under-roof space. A group of owners has also been identified who believe that it would be more correct to insulate the attic of a private house only from the inside along the roof slopes, and leave the ceilings partially insulated, for example, by laying a layer of clay. But construction trends are increasingly leaning towards insulating the entire attic so that it can be lived in, and here the choice of materials is much wider than in the previous two options. But let's start with how to insulate a cold attic inexpensively. This can be done using materials such as:
- Expanded clay and blocks made from it.
- Waste from the wood processing industry (chips, sawdust, shavings).
- Mineral wool in various designs - glass wool, basalt or stone wool (rolls, slabs, mats).
- Foamed polymers: extruded polystyrene foam, polystyrene foam, NPE, etc.

Which of these warm insulating materials the best and what can be successfully used for sloping attic surfaces? We’ll discard the expanded clay right away (it’s only suitable for horizontal surfaces), so what remains, first of all, slab insulation(foam plastic and polystyrene foam). These are fairly cheap materials, but due to their flammability, they will have to be protected with other layers that prevent the main insulation from igniting.
According to the flammability group, it is best to choose mineral wool, although it must be covered with a layer of durable rough or decorative materials. In addition, mineral wool absorbs moisture faster, so a layer of vapor or waterproofing is simply necessary to preserve the main insulation.
Glass wool - not really optimal material, it should not be chosen for attic insulation, if only because glass microparticles quickly get into the air and harm people.
Sawdust or shavings must be laid in such a way that they can be replaced - over time, the layer of such insulation is compressed, losing its insulating qualities. 
Stages of insulation
The process of insulating an attic in a private house can be divided into several stages:
- Laying thermal insulation materials on floor surfaces.
- Internal roof insulation.
- Insulation of roof gables, installation of insulation and finishing. In this case, the insulation can immediately fulfill the role decorative surface, for example, sandwich panels.
Preparation of materials for insulation
Briefly about what materials can be used for insulation, based on their characteristics:
- Wood shavings or sawdust have a thermal conductivity of 0.05-0.095 W/m 0 C if they are laid in a layer no thinner than 20 cm.
- The popular method of insulation is reeds, its thermal conductivity is 0.042 W/m 0 C.
- Penoizol – liquid insulation, excellent for any surface, has a thermal conductivity in the range of 0.028-0.040 W/m 0 C. In practice, installation is done by spraying.
- Expanded clay is the most common of environmentally friendly and fireproof insulating materials, thermal conductivity is 0.1-0.18 W/m 0 C. The expanded clay layer for good insulation should be ≥ 0.2 m, but it can only be used to insulate the floor surface.
- Mineral wool has a thermal conductivity in the range of 0.038-0.055 W/m 0 C.
- Most modern material– ecowool. It does not rot, does not burn, does not attract rodents and insects, but the ecowool top needs to be protected from mechanical damage.
Auxiliary materials for insulation:
- Membrane for vapor barrier.
- Sheet material for flooring - boards, chipboard, fibreboard, OSB, etc.
- Antiseptic for wood impregnation.
 Mineral wool insulation scheme
 Preparing the floor surface
- The old flooring must be removed.
- Impregnate the beams with antiseptic.
- Assemble the floor slab - the boards are nailed to the beams from the side of the house, that is, from below.
Floor insulation
- Before insulating the ceiling in a private house, a layer of vapor barrier with an overlap of 10-15 cm is laid on the beams and planks.
- Thermal insulation is laid on the vapor barrier layer, for example, a mineral wool slab or EPS polystyrene foam sheets. Plates, sheets, rolls or mats are placed close to each other.
- The next layer of vapor barrier is laid on top using the same technology as in the first case.
- On the logs there is a roll-up made of boards or any sheet material, on which the attic subfloor will be equipped.
In the attic with concrete floor insulation is carried out using mats of mineral thermal insulation material or EPS, and on top they are made concrete screed layer 5-10 cm.
The thermal insulation layer on both sides is covered with waterproofing, especially if mineral insulation, which can absorb moisture faster than other materials.

Overlapping from concrete slabs and wooden beams are recommended to be insulated on both sides - from the outside and from the inside, but not all materials are suitable for such multiple purposes - expanded clay and other bulk materials cannot be used, since they can only be used to insulate the attic along the floor.
To make the process clearer, let’s look at the installation of Isover mineral mats:
- The existing bevel from the boards is removed.
- A layer of vapor barrier is attached to the beams. The membrane film must be secured, and the easiest way to do this is with a stapler and 14-16 mm staples.
- Mineral mats are placed in the space between the beams and secured with transverse wooden slats with a cross-section of 2 x 5 cm.
- Another layer of membrane vapor barrier is attached to the slats.
- A plank deck is installed on top, after which the ceiling is arranged.

Roof insulation in a private house
Before insulating an attic in a private house, it is prepared:
- Check integrity rafter system, if necessary, repair or change parts and elements.
- If the insulation is thicker than the joists, they are increased to the required size with bars or slats. This way, all the space between the rafters will be filled.
- All wooden elements are impregnated with an antiseptic. Such work will extend the service life of materials and structures.
Do-it-yourself roof insulation in a private house is carried out approximately as follows:
- The vapor barrier membrane in rooms located in the attic space should not come into contact with roofing waterproofing. To maintain an air gap between these layers, nails are driven into the rafter legs, and thick synthetic threads are pulled between them.
- The vapor barrier membrane is attached to the rafters using a stapler, while smooth surface the material is laid on the insulation, and the connections of its strips are fastened with construction tape.
- Thermal insulation fits tightly into the space between the rafters. To prevent the formation of “cold bridges”, mineral mats must be laid close to rafter legs and to each other. When gaps appear between the layers, they are clogged with the same material. This layer of insulation is fixed again by thick threads stretched between the rafters.
- A vapor barrier layer is applied on top of the laid insulation, which is secured with tape.
- On top of all layers of the pie is made wooden sheathing from strips or bars with a cross-section of 2 x 5 cm. Decorative finishing materials will be attached to the sheathing on one side.
 Laying vapor barrier
 conclusions
In practice, the number of new and traditional materials and there are many more technologies for insulating the floor and walls of the attic, but those described above in the article are easiest to implement with your own hands. Today, mineral wool and polystyrene foam are the most popular and affordable insulation materials.
Are you insulating your house for winter but don’t know how to insulate it? attic floor on wooden load-bearing beams? Having gained experience in this matter, I will definitely convey technical points thermal insulation, and I will also describe step by step the procedure for carrying out the work.
Why insulate an attic?
We must not forget that a significant part of heat loss occurs through the roof. Therefore, when constructing buildings with cold attics, it is very important to pay attention to proper thermal insulation of the ceiling between the heated room and the attic.

Below I will try to explain in an accessible language how attic insulation affects the internal microclimate and overall heat loss in the house:
- Purpose of the attic. Any unused attic under a sloping roof is, in fact, a buffer technical floor between the street and the living space. Its purpose is to smooth out significant changes in air temperature inside the house and outside;
- Temperature conditions. At any time of the year, during the day the air temperature inside the attic will be several degrees higher than outside. Thus, in winter there will almost always be negative temperatures, and on sunny summer days there will be intense heat;
- Heat losses in winter. When the temperature of any substance increases, its density always decreases. Therefore, in heated rooms, heated air from household heating appliances always rises up to the ceiling. If the ceiling has insufficient thermal insulation, then during the cold season, all the heat from the room will go outside through the attic;

- Excess heat in summer. On hot summer days this process will occur in reverse. The air in the attic will become very hot from the hot roof in the sun, and then transfer its heat through the uninsulated ceiling into the apartment.
- Reverse air circulation. After touching an uninsulated ceiling, the heated air quickly cools down, and due to the increase in density, it sharply sinks down. Indoors, this leads to excessive reverse air circulation and the constant formation of drafts, which have an adverse effect on the health of residents;
- High humidity. When heated, humid air comes into contact with a cold, uninsulated ceiling, small drops of condensation may form under the ceiling. This will lead to an increase in air humidity in the house, and will also contribute to the appearance and development of mold on the walls and ceiling;

- Economic factor. Confirmed heat loss through an uninsulated roof is at least 20-30%. This means that proper insulation of attic floors using wooden beams will save up to 30% of fuel during each heating season. Air conditioning in summer will also require lower costs;
- Damage from a “warm” attic. Among other things, penetration warm air to an uninhabited attic, from time to time, can lead to unpleasant consequences:
- As warm and cold air mixes, condensation will begin to form in the attic. Drops of water will settle on all surfaces, which will lead to rotting and destruction of the wooden supporting structures of the roof;
- From the warmth of the attic, snow masses the roof slopes will begin to gradually thaw. Thawed water will freeze as it flows down. This can lead to the formation of large icicles along the edges of the roof, as well as freezing of rain gutters and downspouts.

All the factors described are typical not only for residential buildings. They should be taken into account when designing and constructing any outbuildings on the site in which the heating system will be used (for example, a garage, bathhouse, barn, etc.).
Stage 1: Selecting insulation
When choosing materials for ceiling insulation, you should be guided by several criteria. In addition to low thermal conductivity, attic insulation must have the following qualities:
- Moisture resistance and mechanical strength. The material should not be deformed or destroyed under the influence of mechanical load, and should not change its properties in the event of direct contact with water;
- Heat resistance. The insulation must be absolutely non-flammable and should not be destroyed under the influence of high or low temperatures;

- Light weight. In order not to create additional load on the load-bearing structures of the building, the thermal insulation of the attic floor should be quite light, so you need to choose insulation with a low specific gravity;
- Vapor permeability. To ensure normal temperature and humidity conditions in residential premises, all finishing and Construction Materials must allow air and water vapor to pass freely;
- Environmental Safety. Insulation for residential buildings must be hypoallergenic and chemically neutral. It should not contain harmful volatile compounds or toxic substances;
- Lack of organic matter. I recommend using exclusively mineral or polymer based materials. They do not contain organic substances, therefore they are not susceptible to mold, and are not suitable for food for small rodents and pests.

Taking into account all these factors, several types of thermal insulation materials can be used to insulate attic floors:
- Mineral wool. Produced in the form of rolls or rigid mats, from intertwined frozen fibers of molten sedimentary rocks. Mineral basalt wool is characterized by all of the above qualities, so it can be considered the most suitable material. Below I will give some recommendations for its use:
- Basalt wool itself is very soft. To prevent it from being pressed or dented while walking, plank flooring should be laid on top of it in the attic;
- When choosing insulation, I advise you to give preference to rigid slabs that are covered on one side with aluminum foil;
- They need to be mounted with aluminum foil inside the room. It simultaneously reflects heat and acts as a vapor barrier layer.

- Glass wool. It has a similar manufacturing technology, only molten glass is used as the raw material for its production. I do not recommend using this material for insulating residential buildings for the following reasons:
- Glass fibers are more fragile, so they can break under load;
- The price of glass wool is much lower, but after creasing or getting wet, it partially loses its heat-insulating properties;
- Small particles of glass penetrate deeply into a person's skin and cause severe irritation.

- Expanded clay. This bulk insulation is produced in the form of small round pellets of light brown or red color. Expanded clay balls are formed as a result of sintering special varieties of red clay under conditions high temperature.
Expanded clay has the following characteristic qualities:
- The internal structure of the material has many closed pores, so it has low thermal conductivity;
- Each pellet is covered on the outside with a dense glassy layer of baked clay, so moisture practically does not penetrate inside it;
- Small crumbly expanded clay pellets freely fill the entire volume, so they are convenient to use for insulating hidden cavities and hard to reach places in building structures;
- Thanks to its mineral base, this material does not burn at all and does not emit harmful substances, is not susceptible to mold, and is not suitable for rodent food.

- Styrofoam. This polymer thermal insulation material is made by hot molding from small round granules of polystyrene foam. It is usually produced in sheets measuring 1000x1000 mm, which can be from 10 to 150 mm thick. The following features are characteristic of polystyrene foam:
- Of all existing species insulation, it has the lowest thermal conductivity;
- The foam contains no organic substances, so it is absolutely not afraid of water, does not rot and does not contribute to the formation of mold;
- By itself, polystyrene foam does not burn and does not support combustion, however, when exposed to high temperatures, it can emit toxic gases and acrid thick smoke;
- Due to the polymer base and closed porous structure, foam sheets do not allow air and water vapor to pass through. For this reason, it is not very good to use for insulation. living rooms and premises with high humidity air.

- Extruded polystyrene foam Abbreviated as EPPS. It has the same composition as polystyrene foam, but is made by hot extrusion from a molten mass of polystyrene foam. Specifications These two materials are also very similar, however, EPS still has some differences:
- Expanded polystyrene has a porous, uniform structure and a higher specific density;
- Due to this, it has higher thermal conductivity, but at the same time is more durable, and therefore is able to bear higher weight loads;
- For this reason, I recommend using it for insulating unheated attics that will be used for storing seasonal items or household equipment.

- Foil polyethylene foam. It is also called “Penofol” in another way. This roll material consists of thick foam polyethylene film, which is covered on one or both sides with a thin layer of aluminum foil. I recommend using it in combination with other types of insulation, because by itself it has specific properties:
- The porous structure of polyethylene foam provides a low heat transfer coefficient, so it functions as an additional insulation;
- Polyethylene film does not allow air, drops of moisture and water vapor to pass through at all, so Penofol can be used as waterproofing;
- Mirror aluminium foil Well reflects infrared waves of thermal radiation. In other words, it does not allow radiant heat to pass through itself, and returns it back to the room.

- Wood sawdust. This one is cheap and available material, is still often used to insulate ceilings in bathhouses, heated barns or small country houses. It is applied to the wooden floor from the attic side, in the form of a homogeneous thick mixture of sawdust with a liquid clay solution. Despite the seeming primitiveness of this method, it has its advantages and disadvantages:
- Sawdust or small shavings can be bought inexpensively, or even taken for free, at almost any large sawmill;
- There can be no problems with clay either, so such insulation is easy to prepare with your own hands in the required quantity at any time;
- A mixture of sawdust and clay has a small specific gravity, and after hardening it becomes quite hard. Therefore, it does not place a significant load on the load-bearing beams, and allows you to walk on it with your feet;
- Due to the mineral components, such a coating is permeable to air and steam, however, due to sawdust, mold may form on it, or mice may chew on it.

All mineral-based thermal insulation materials, to one degree or another, are capable of allowing water vapor and air to pass through. To protect such insulation from the formation of condensation or moisture penetration from the outside, they must be installed using a vapor-permeable waterproof membrane.
Stage 2: Preparation of materials and tools
In addition to insulation, for the work you will need lumber, waterproofing, as well as the usual set of carpentry and carpentry tools:
- Two hammers: one medium, weighing 200-300 grams, and one heavy, weighing 800-1200 grams;
- Longitudinal and transverse hacksaw for wood. Instead of a cross saw, it is more convenient to use an electric cutting machine;
- Joiner's plane, large wooden mallet and a set of chisels;
- As for electric tools, you need to have an ordinary household drill, and it is advisable to have cordless screwdriver with a set of replaceable nozzles;

- For fastening rolled materials (waterproofing, vapor barrier), I recommend using construction or furniture stapler with a set of metal brackets;
- You will also need a straight metal ruler, a tape measure 3-5 meters long, building level and a simple rope plumb line;
- To work near the ceiling, it is most convenient to use a folding stepladder. If it is not there, you can adapt a high strong table or homemade goats from scraps of boards;
- Lumber will be needed wooden blocks section 62x62 mm, and planed edged boards thickness 25-30 mm;

- As a waterproofing layer, you can use a film of foamed polyethylene and a vapor-permeable waterproof membrane;
- To seal the joints of the panels, you will need metallized aluminum tape, which is usually used in ventilation systems;
- Materials for finishing ceiling, each homeowner chooses at his own discretion. This could be lining board, drywall, laminated OSB or plywood, or other finishing materials;

If you plan to use mineral or glass wool for insulation, then I recommend purchasing a special protective suit that is designed to work with these materials. Otherwise, from small fibers of glass, on open areas severe skin irritation may occur.
Stage 3: Filing the rough ceiling
During construction attic floor or erecting a sloping roof, you can do without expensive and heavy concrete floor slabs. Instead, the entire load from the roof is carried by wooden load-bearing beams made of logs or timber, with a cross-section of at least 120x120 mm. They are usually laid on top of two main exterior walls, perpendicular to the long side of the house.
Such beams serve as a supporting structure for the ceiling of the top floor and for the floor of the attic. The same beams will be used for installing insulation between residential building and the attic. This type of ceiling is called hemmed, because both the rough and the finished ceiling are hemmed from below to the load-bearing beams.
Before insulating the attic floor, you need to mount the rough ceiling:
| Illustration | Description of work |
 |
Installation of a rough ceiling. To hem the rough ceiling, you should use dry edged boards 25 mm thick, or plywood sheets 10 mm thick or more. |
 |
Hemming boards. They must be secured to the lower plane of the supporting beams and beams around the perimeter of the room. Hemming boards must be fastened without gaps or cracks, close to each other. For fastening, use galvanized self-tapping screws 5-6 mm. |
 |
Waterproofing. When the entire rough ceiling is hemmed to the load-bearing beams, panels of foiled polyethylene foam need to be secured to it from below. This can be done using a stapler. "Penofol" will perform the functions of heat and waterproofing. It should always be placed with a foil layer towards the warm room. |
 |
Sealing joints. To prevent moist air from the room from entering the insulation, the ends of the polyethylene film must be wrapped on the walls by 150-200 mm. The joints between the panels must be glued with metallized tape on an aluminum base. |
 |
Attaching the sheathing. From below, across the entire area of the rough ceiling, nail a counter batten made of wooden slats thickness 15-22 mm. It is needed in order to provide a ventilation air gap between Penofol and the finished ceiling. The distance between the slats should be about 400-600 mm. In the future, a finishing ceiling covering will be attached to them from below. |
Before starting work, everything wooden elements structures must be treated with antiseptic and fire-retardant impregnations. Antiseptics are needed to protect wood from rotting and mold development. Fire retardants give dry wood fire retardant properties.
Stage 4: Installation of thermal insulation
After filing the rough ceiling, the transverse load-bearing beams will be on the side of the attic. Insulation will be laid in between them.
Depending on the thermal insulation materials used, further installation technology may have some differences. Therefore, below I will briefly discuss the use of the most common types of insulation.
- Laying mineral wool. Mineral insulation materials, when wet, partially lose their properties. To prevent condensation from forming in the mineral wool, the entire thermal insulation layer of the cold attic floor must be permeable to air and water vapor:
| Illustration | Description of work |
 |
Vapor barrier. First, you need to lay a vapor-permeable waterproofing membrane on top of the rough ceiling. Its peculiarity is that it freely allows water vapor molecules to pass through, but does not allow bound liquid water molecules to pass through. The membrane panels must overlap each other by at least 150 mm; |
 |
Installation of insulation. In between wooden beams lay sheets or rolls of mineral wool. If it is very soft, then it does not need to be squeezed or squeezed much. Lay another layer of vapor-permeable membrane on top of the mineral wool. To prevent it from moving over time, it must be stapled to the beams and walls, throughout the entire area and along the perimeter of the attic. |
- Installation of foam plastic. Polymer-based insulation does not have breathable properties, so it does not allow air and moisture to pass through. There is no point in using a waterproof membrane in this case:
| Illustration | Description of work |
 |
Laying foam. Panels of foam or extruded polystyrene foam can be laid between cross beams, right on top of the rough ceiling boards. I advise laying them in two layers, so that the joints of the sheets are located in different places, and did not intersect with each other. |
 |
Polyurethane foam. To prevent the insulation sheets from moving to the sides, they can be glued to the sub-ceiling using a special glue for polystyrene foam or polyurethane foam. Thus, it is necessary to fill the entire area of the attic floor with insulation. If there are gaps and cracks between the sheets of foam plastic, then they must also be blown out from a balloon with polyurethane foam. |
- Clay with wood shavings. Insulating the attic floor with a sawdust-clay mixture does not require any additional materials, and is also quite simple:
| Illustration | Description of work |
 |
Preparation of the solution. To make the sawdust-clay solution plastic, the clay must be soaked in water 2-3 days before starting work. To prepare the solution, you need to take 3-4 volume parts of sawdust, and 1-2 parts of dry red clay without large solid particles and foreign impurities. Mix the soaked clay with water until a liquid, flowing solution is obtained; Add sawdust to the resulting mixture and mix thoroughly until smooth. To protect against mold formation, a small amount of copper sulfate can be added to the prepared solution. |
 |
Laying sawdust-clay mixture. Lightly moisten the supporting beams and boards of the rough ceiling with liquid clay milk. After this, fill all the gaps between the beams with sawdust-clay mortar and leave for several days until completely dry. |
- Expanded clay backfill. I want to say right away that expanded clay does not have very good heat-insulating properties, so individual construction, such floor insulation is rarely used. At the same time, it is considered inexpensive, unpretentious and the easiest to install:
| Illustration | Description of work |
 |
Preparatory work. Expanded clay pellets do not absorb moisture, and therefore are not afraid of water ingress or condensation. Therefore, they can be used both with and without a waterproof membrane. To prevent condensation from seeping through the ceiling into the house, I still recommend laying a waterproofing membrane under the pellets; |
 |
Filling of pellets. Expanded clay pellets should be poured on top of the rough ceiling boards and evenly distributed in a thick layer over the entire area of the attic. No covering material is required on top of expanded clay. |
To prevent expanded clay pellets from bunching up and spreading throughout the attic, a retaining plastic geogrid is used. It needs to be stretched in the spaces between the load-bearing beams, and then expanded clay should be poured into its cells.
Stage 5: Arrangement of the floor in the attic
Many residents use the cold attic in their private home as a storage room for storing long items, seasonal items and all sorts of unnecessary rubbish. In order for a person to safely walk on the insulated floor, a durable subfloor must be installed in the attic.
The choice of material for installing the floor in the attic will depend on the type of insulation used:
| Illustration | Features of application |
 |
Mineral wool and polystyrene foam. These materials themselves are very soft. To prevent them from being destroyed or wrinkled while walking, the top floor covering must be sufficiently rigid. In such cases, the load-bearing beams should be laid OSB sheets or plywood with a thickness of at least 18 mm. You can also use unplaned edged boards with a thickness of 25 or 30 mm. |
 |
Extruded polystyrene. It has higher rigidity, so it can withstand significant loads. To prevent it from being pressed when walking, it is enough to put a light flooring of thin boards or plywood 5-9 mm thick on top of it. |
 |
Under the weight of a person, they will crawl in different directions. To prevent this from happening, you need to lay 10 mm thick plywood sheets or light wooden ladders made of boards on top of the beam floor. |
 |
Sawdust-clay insulation. After the solution hardens, it becomes hard like cement. A person can move freely on its surface, even without installing additional flooring. |
When installing rough flooring in the attic, between boards or sheets of plywood, you should always leave gaps 15-20 mm wide. This is done so that moisture and condensation can freely evaporate from the insulation.
Conclusion
Using this algorithm of work, you can easily insulate the ceiling in the attic in own home. More visual information on each method of insulation can be viewed in the attached video in this article, and I suggest leaving all your comments and questions in the comment form.