I started this section, in order to avoid repetition in different articles. I veneer miscellaneous products quite often, and instead of describing the veneering process in each master class, I will simply give a link to this article. The section will be updated and supplemented as photos (and later maybe video) of the material become available. And of course, as you use other methods of veneer and work with veneer.
Veneer is sawn and peeled. Sawn veneer, as a rule, has a thickness of 3 mm. Rotary cut veneer - less than 1 mm. I'll talk about peeled veneer for a while, partly because I use it more often, and peeled veneer veneer is more common. I will return to the conversation about sawn veneer a little later, when there is enough material for publication and work experience.
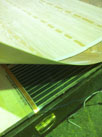
Usually, natural peeled veneer is not very wide - only 100-140 mm, with rare exceptions, a little wider. The length of the knoli (pack) of veneer can be different. From one and a half to three meters.
I'll start my story with simple operations - veneering a workpiece (plane) with natural peeled veneer 0.6 mm thick.
In order to veneer (paste) a workpiece of a greater width with such veneer, the veneer strips must be “tied into a shirt” (connected to each other). Since the strips themselves do not have a perfect edge when purchased, you first need to trim this edge. Otherwise, after a set (connection) of the strips to each other, there will be a gap between them. There are many ways to level the edge of a veneer, one of which is edge jointing.
Edge jointing.
 To begin with, I usually make two sticks of needles. The bars must be even in all planes and have an angle of 90 degrees. Between these blocks, I crimp the strips of veneer using lever clamps, if the width of the strips of veneer allows them to be installed. In the case of planing wide strips, you can use a beam with a strong curvature, turn it so as to increase pressure on the middle.

 Then I joint the strips of veneer, along with the bars. If you look at the surface during the jointing process, you will see that the edge of the veneer is aligned with other, tightly pressed sheets.
You need to strive for almost complete surface uniformity. At the same time, it is important not to overdo it, because if we joint for too long, we can “fill up” the corner, which will again lead to unnecessary cracks, or disrupt the intended pattern.

 Next, lay out the veneer, turning the strips over and combining the “native” sides. We check the quality of the edges by folding and pulling the strips together. The way to set a veneer shirt can be absolutely anything. Traditionally, veneer is typed with a “book”, that is, they combine the “native” sides of the strips - mirror.
Another way to process the edge of the veneer before setting it into a “shirt” is cutting with a razor.
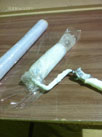
Cutting veneer with a razor.

 Cutting is done very simple fixture. In fact, this is a homemade cutter for cutting veneer. A simple razor crimped with two pieces of any board material, or tree. In my case, these are two pieces of MDF 16 or 19 mm. The cutting edge of the razor protrudes slightly, literally by 1mm. , that is, it does not significantly exceed the thickness of the veneer used in the work.As for the razor itself, it can be any simple razor, the only thing that I liked more than domestic-made razors. "Sputnik" or "Neva". Imported razors, in my opinion, are a little thinner, last less time and the cut itself is not always good. Before assembling the two halves of the body of our veneer cutter, it is better to fix the razor on one of the halves with a simple masking tape. This will greatly simplify the further cutting process.
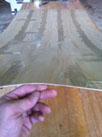
 First, I cut the veneer to the required length. Usually, I make the "shirt" longer and wider than the workpiece by about 10 mm. (5 mm on each side). "Overhangs" (protruding veneer) larger than 5 mm will be difficult to cleanly remove. Cutting off "overhangs" and a device for working with an edge after veneering, I described in more detail in the articleAs a work surface, I usually use an MDF strip. On it, if there are a lot of blanks, I make markings and cut the veneer into right size. Many of my colleagues also like to use plywood - the razor will be less dull. At the same time, I use a piece of MDF having an angle of 90 degrees as a stop for the cutter. The cut is made on both sides so as not to damage the veneer at the exit. Pressing the stop tightly against the surface of the veneer, I cut on one side, and then, turning the cutter over, I cut through the entire strip. For this operation, you can use a simple clerical cutter. If there are quite a lot of blanks of the same length, you can compress many strips of veneer at once between two sheets of slab material and trim them off using miter saw or manual cutter.

 Next, using the same MDF as a base, we put a second strip of MDF on top, fixing it with clamps at the end. We make the markup of the proposed cut. In the future, placing a strip of veneer between strips of MDF - use the top strip as a stop. Pressing it with one hand, we cut the veneer along the entire length. If the veneer strip "walks" a little and shifts during cutting, you can stick it on the top strip with inside abrasive pieces. In rare cases, when it is necessary, I glue the abrasive on double-sided tape - it's easier to remove it later. The abrasive tightly fixes the veneer strip, does not allow it to move, and the seam between the strips when the veneer is set into a “shirt” is flawless.
It is important that the MDF strip used as a stop is wide and even. Otherwise, two strips of veneer will be difficult to join, three - extremely difficult, and further set will require subsequent trimming of the outer curved edges.
When cutting through the veneer, the razor leaves a cut on the base (bottom strip) and becomes a little dull. The subsequent cut goes exactly along the “knurled track” and does not cause serious changes in the razor blade. The razor dulls rather quickly and just about the veneer, because as soon as the cut becomes not ideal and the hand begins to feel how the razor cuts the fibers of the veneer texture, it is turned over. Thus, each razor can be turned over 4 times.
A set of shirts for Gumirka.
 One of the ways to glue veneer in the “set of shirts” is to use gummed tape (“Gumirka”). It is usually sold in the same stores as veneer. For work, we also need a sponge (or a piece of foam rubber), slightly moistened with water and plastic card. A credit card or a discount card will do quite well ... unless of course you don’t feel sorry for her. I cut the tape into small pieces, about 40-50 mm long, although it’s more convenient for anyone.


 Pieces of gumirka are dipped in a sponge with water and laid out side by side on the table to dry. Humirka moistened with water has adhesive properties - it sticks. Next, we put the drying gumirka on the seam, pulling up the edges and rubbing it with plastic. It is important to apply Gumirka at the very moment when it is still sticky, but not very wet, otherwise it sticks worse and wets the veneer with water a little more, which is also not very good. It is not very difficult, it is easy to master, choosing empirically.
 Well, that's all, our "shirt" is typed. There is an opinion that when dried, Gumirka slightly tightens the veneer strips to each other and the seam becomes better. But either I’m so unlucky, or I come across some kind of gumirka that’s not so ... In a word, no matter how hard I tried, I didn’t notice such an effect. Humirka is excellent and almost indispensable when it comes to marquetry. Thanks to the reverse effect (it can be slightly moistened and gently removed from the surface), marketers create amazing works. But if your set is a simple "shirt" in one direction, then it will be easier for you to work with masking tape.
A set of shirts on tape.
You can splice strips of veneer not only using gummed tape.

 You can use special adhesive tape or simple masking tape to splice veneer. In one of the workshops where I was lucky enough to work, I came across a similar method. Scotch tape is a blue or light brown tape, not very sticky, but it is enough for gluing veneer. The principle of the sticker is exactly the same as when using gumirka. Apply it in small sections to the seam, pulling the strips of veneer with your other hand. Some lightly “grab” the strips with rare pieces of adhesive tape, then glue the entire seam. Some do not glue the seam. I usually stick tape with a slight overlap on the previous piece. So after veneering it’s easier for me to remove the adhesive tape from the workpiece.

 The use of tape, of course, allows you to increase the speed of the set of shirts, but this technique has one significant drawback. I was strongly advised not to try to sand the adhesive tape with a sander after veneering, explaining that traces of adhesive tape (glue) could remain and come through after varnishing.
The adhesive tape must be removed, while the glue peels off along with the tape, leaving almost no marks on the workpiece. I tried using simple masking tape for the same purposes, it seemed to me more sticky. When removing it from the workpiece, he strives to tear out the villi of the veneer from the place where the strips join. In the case of colored tape, this effect was also present, but in a much less pronounced form.
 Thus, the process of putting veneer into a shirt took me approximately the same time as when using gumirka, only I glued the gumirka longer, and when using adhesive tape, I spent time removing it. A simple iron will help not to spend a lot of time removing the adhesive tape. If you heat it up to a temperature warm, but not hot - when the hand does not burn, I put it directly on the veneered blank and, moving it, remove the adhesive tape. At the same time, you can pick it up with a cycle or a blunt chisel and pull it. With stronger heating, one cycle can be dispensed with, but stronger heating is not desirable for the workpiece, besides, you can overheat the adhesive tape, then the effect will be the opposite.
Splicing veneer with a manual machine.
There is another way to splice veneer when “setting into a shirt” - use a manual veneer splicer. We resort to it, with a larger volume of blanks or when the operation needs to be done quickly. Separately, I note that I still like working with gumirka or adhesive tape more and it turns out better. The machine, of course, great speed, at the same time, if you fill your hand, I think the quality will not differ much.

 So, the machine is a coil of special threads smeared with glue (it is a consumable), planted on top of a non-tricky mains-operated structure. The thread is passed through the heating element, and becomes sticky. The heating “proboscis”, through which the thread is passed, when the machine moves, makes zigzag movements, applying the thread to the surface of the veneer. And the roller, which is also one of the wheels of the machine, tightly rolls the heated thread, pressing it to the surface.


 The principle of operation is the same as with Gumirka. Firmly pressing the edges of the veneer with one hand, carefully drive the machine along the seam with the other.Working with the machine, as it seemed to me, is not very difficult, but still it will require a certain skill. In addition, the cost of the machine and, most importantly - consumable you may find it inhumane. The shirt is sealed with glue thread down.
There is also a great variety of machines for splicing veneer strips, the purchase of which can make sense with a large amount of veneer. I don’t have much experience with such equipment, and even with a manual veneer splicer, and in general, I don’t have a desire to acquire them. For my tasks, the “shirt set” for masking tape is most suitable for me so far.
Gluing the workpiece with clamps.
Since not every workshop has a heavy press, I will describe one of the gluing methods - veneering with clamps. A pre-prepared timber (45x140x600mm.), in the amount of 4-5 pieces, is placed on the desktop, on which a sheet of slab material is placed, in our case it is a chipboard sheet (40x620x1800mm.) Bars (45x70x600mm.) Are prepared in the amount of 10-12 pieces. By chipboard sheet I usually forgive newspaper or other paper. I try to avoid a lot of paper, one or two layers are enough. Paper is needed so that excess glue does not get on the surface of our impromptu press and does not stick the workpiece to it. The paper also absorbs excess moisture and allows the blanks to be sealed a little faster than in the case of linoleum or film.
 So, we evenly apply glue (in our case it is ordinary PVA) on the surface of the workpiece, with a roller. It is not necessary to pour a lot of glue, this can adversely affect the quality of gluing or, if the glue is too thin, just “pierce the veneer” - the glue can come out on the front sides of the veneer surface, penetrating through the pores of the wood. The workpiece, if it is lined on both sides, can be placed on a special fixture. This will allow glue to be applied to both sides of the workpiece before it is placed in the press. It is important that the time between applying the adhesive and placing the workpiece under pressure is as short as possible. Otherwise, if glue is used on water based, it becomes weathered and loses its adhesive properties.

 Next, on a pre-spread layer of paper, we lay out the “shirt” with Gumirka or threads in the opposite direction to the one being glued. That is, outside. Thus, Adhesive thread or Gummed tape are on the front sides of the product. We put our blank smeared with glue on the veneer, cover it with another “shirt”, spread a layer of paper and put another sheet of slab material on top. Next, we crimp both sheets, with the nested workpiece with bars and quick-clamping clamps. In this case, the bars play the role of distributing compression over the entire surface of the sheet, and not just along the edges. The remaining free space between the bars can be compressed with everything that is at hand, but there is no special need for this.
The workpiece is usually under pressure for at least 25 minutes, and usually left for 30-40 minutes. In the case of using an industrial press, the drying time can be significantly reduced. This method is quite cheap, but very long. It will suit you only if you need to veneer several blanks, and if it is not possible to use a vacuum, pneumatic or hydraulic press.
Veneering in the press.

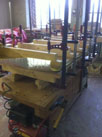
 It happens in exactly the same way as when veneering with clamps, only much faster and with less labor. In the workshop where fate brought it is a cold, self-made pneumatic press. I described the press in detail in the article - Linoleum is spread on the surface of the press, then polyethylene - so as not to spoil the linoleum and not spend a lot of time cleaning it from glue. In case of use polyurethane adhesives- polyethylene is required, it is extremely difficult to remove drops of glue from linoleum. Next, the blanks are covered with another sheet of polyethylene and linoleum.
The holding time in the billet press can be reduced if a heating film is used. I can’t say for sure the heating temperature, I haven’t measured it ... warm, but not hot. The film helped out a lot when the low temperature in the workshop did not allow veneering at all. Glue warmed up warm air and used this film for veneer.
 For veneer I usually use kleiberit 303.0 and usually d3. If you didn’t have time to veneer all the blanks, and part of the work was left for tomorrow, and you are too lazy to dry the roller in the morning, you can simply wrap it in a stretch. Thus, the glue will not dry overnight and the roller will not be harmed. In addition, 300-400 grams of glue always disappears on the roller, which is also not very pleasant.
Cladding the surface of the workpiece "Deck"
As promised, I will continue to edit and supplement the section.
I often come across the fact that facing the surface of a product with a “Deck” (solid strips, more than 2-3 mm thick.) Is often equated with working with veneer. Experienced craftsmen, joiners, often correct me when I call a material 2-3 mm thick “deck”. and insist that it is just a thick veneer. I won't argue, but I'm so used to it. And in this article, and in other articles on this Internet resource, I call a deck a strip of thick veneer from 2.5 mm, usually sawn veneer.
Material selection.
I consider the main advantage of “deck” cladding to be the ability to select exactly the material that the craftsman considers appropriate for his product. That is, this method provides more opportunities, but one cannot ignore the fact that labor costs, the amount of material, and hence the cost of the product will be significantly higher than when working with thin (peeled) veneer.
The second significant advantage is the finish of the product. When tinted, thin, peeled veneer and solid wood give different shades. With a “deaf” color with enamel, this does not matter, but in the work with stains or tinting, the difference is quite noticeable, and can greatly spoil the appearance of the product.
Another weighty argument in favor of a deck or thick veneer is wear resistance and the possibility of further restoration. The deck is often used on stair treads, chair seats, countertops, window sill surfaces and shelves. In general, wherever the surface may experience heavy loads or wear.
To count the material before sampling, you need to determine the width of the strips. I was guided by my abilities. The maximum possible drink of my circular saw, with disc, available — 60mm. That is, if you cut in two passes, with the workpiece turned over - approximately 118-120mm. Thus, I took the width of the tabletop - 500mm., With a small allowance - 520mm. and divided by 120mm. It turns out 4.3 bands, that is, five. But since the workpiece has two sides (and I wanted to be sure that after pressing the workpiece would remain flat and not warp), I decided to veneer both sides with a deck of the same thickness - 10 strips.
I decided to play it safe, in case I couldn’t match the color perfectly and use stripes with a width that is a multiple of the width of the countertop. Otherwise, if the difference in color shows through after sanding, stripes of different widths on the tabletop will not look nice. That is, the width of our bands, after all calculations, will be 110mm. (520mm. divide by 5 = 104mm. and give a small allowance for jointing.
And so, we get the most convenient deck width for this product - 110mm. From one piece of board, on average, I get 4-5 deck strips. I do not like to depend on the case, and again I calmly give a margin in quantity, and saw 3 pieces of the board. This is approximately 12-15 deck strips. The stock makes it possible to select more beautiful bands and avoid accidents during further processing. Given the length of the tabletop - 1000 mm, I had to use more than one board, because with a finishing size of 1000 mm, I need a deck about 1150 mm long. In further processing (thickness), I will need a margin for cutting. My thicknessing machine makes a "step" at the entrance and exit of the workpiece.


 Board 30mm thick. for the chest of drawers, I chose for a long time. There was quite a lot of material and it was an unedged board, with knots, sapwood and wane.It is rather difficult to find a decent board and understand that this particular board will fit - on a dirty board, the fibers are almost invisible and the color is incomprehensible. In order to select one board, I had to take several, namely 4 boards. The first selection is not made by chance. Large grain, very strong curvature of the board, large knots are rejected at the initial stage, the rest can be rejected after jointing.
Making a "deck"
 After sawing and jointing on both sides, it becomes clear whether the board is suitable for this product or not. At this stage, you can cull by color. If a job may require more than one board, it may be important that all the stripes are similar in color. I sawed off the wane at the boards and sapwood.At the same time, the selected board was sawn to a size of approximately 120 mm. After jointing, I selected the best board, the rest of the boards were set aside for other elements and products. So, after cleaning the board and rejecting, we are left with three pieces of board, approximately 28x120x1150 mm in size, which we joint from all four sides and sawn to a size of 110 mm.


Further, the prepared bars are “bloomed” into strips. If the final thickness of our “deck”, for example, is 3 mm, then the thickness of the strips that we saw should be approximately 3.5-4 mm.I make a cut to the middle of the workpiece, turn it over, and saw it again. The same is true on the other side of our workpiece. Thus, we get two sawn strips of 3.5-4 mm. and the remainder, which is re-fugued. If we want to get 5 stripes from a 30mm board. it is necessary to joint only partially and the thickness of the strips at the exit from saw machine 3-3.5 mm.
The operation is quite traumatic-dangerous. It is necessary to work carefully, using the "pusher" and goggles. If you do not have initial experience with power tools and circular machine, this way can easily make you disabled. In work, the workpiece must be limited from all sides by stops, combs and clamps.


 For further work, I used a simple fixture. A piece of board material, in my case, plywood. A bar on the front side is needed so that the device does not drag into the machine along with the workpiece. This device is necessary in order to be able to process workpieces of a smaller thickness than the design provides. thicknesser machine.
Our strips are processed in a thicknessing machine on both sides. I paid attention to how I fed the workpiece into the machine and tried to feed “along the fibers” and not “against the fibers”, so that there were fewer chips. If chips cannot be completely avoided, strips with large chips are rejected, and the remaining chips are eliminated by grinding and puttying.
The angle of sharpening knives of a thicknessing machine has a great effect on the quality of gouging. The sharper the sharpening angle, the more explosions and chips will be. This is purely my observation, many may not agree with it.
At the exit from the thicknessing machine, a “step” remains on the workpieces, approximately 60-65mm. from the edge of the workpiece. This is from poor adjustment of the pressure rollers of the machine. I just make blanks longer by 150-160mm. and cut off this “tail” by trimming.


 The strips are crimped with bars and jointed in a “package” until complete uniformity is obtained. After the entire stack is turned over, the second edge of the strips is again crimped and jointed. In the work, it must be taken into account that the bars lose a little correct angle 90 degrees and they need to be corrected. Also pay Special attention on the position of the clamps, otherwise both the clamps and the knives of the planer may be damaged.

 A shirt deck set is similar to a shirt set using plain (peeled) veneer. Only if earlier, in our work, we used masking tape or gumirka, now, when working with the “deck”, we use simple adhesive tape. The strips are tightly pressed against each other, pulled together with adhesive tape, with a slight stretch. The adhesive tape tightly draws the strips together, eliminating not much curvature, if any. Next, I glue the entire seam lengthwise. Adhesive tape is best removed immediately after pressing. I heard that many carpenters glue the strips together. I don’t do it, it seems that everything is not bad so far.
Pressing the workpiece "deck"
 For pressing, you can use clamps or a press, if possible. But in any case, it must be taken into account that facing the workpiece with a “deck” will require significantly more pressure than veneer.More recently, I have had experience with a vacuum press, and find this option the most convenient for beginners.

 After pressing, the excess deck (overhangs) protruding beyond the workpiece is removed by a cutter with a bearing or sawn off. It is better to remove the adhesive tape immediately, then it will be more difficult to remove it. Glue and tape residues are removed by scraping and sanding.
It is possible to make a deck on your own, but it must be borne in mind that it is very long, much longer than it is done in production conditions. This only makes sense if the amount of work is not large. If you need to make a countertop for a dresser, table or stool seat. For a large amount of work, sawing the deck on your own is not profitable and for a very long time, of course, I would prefer to purchase a ready-made one.
To clarify the above, we removed small video about the veneering process. "Set of shirts" and gluing blanks in a vacuum press. Just a little about how best to remove masking tape after veneering.
OK it's all over Now. The section will be supplemented and updated with new photo and video material. Thank you for your attention. I hope it was interesting.
The emergence of design and a variety of materials gave impetus to the development of new technologies in the production of doors. Previously, the appearance of the paintings was limited to a few colors, they had to be painted. When painting, the texture was not visible. Over time, veneer was invented, which solved these problems. On the photo you can see how it looks.
Veneer is a type of finishing material. It is made of wood as a result of cutting a thin layer. The structure of the tree is preserved during the production process. A sheet cut across the grain is of greater value than a sheet cut along the grain.


Do-it-yourself veneer saves money expensive views trees, which include:
- nut;
- wenge;
- cherry.
To veneer a door, you will need materials:
- glue;
- veneer;
- ruler;
- tracing paper or paper;
- wooden block (iron);
- craft knife or scissors;
- syringe or pipette.
How to venee doors with your own hands?
The process is fun and interesting. To veneer doors, you need to prepare a frame - a canvas made from inexpensive wood, such as coniferous, or old door. The blank can be purchased at the market. The base should be cleaned and get rid of irregularities with sandpaper or a planer (for large irregularities). Before veneering, it is better to putty the cracks or fill them with syndeticone glue. When the base dries, you should walk again sandpaper to achieve a smooth surface.
Cut the veneer to fit the door. The pattern is cut out with a craft knife or scissors. Then veneer sheets are attached to the canvas with wood glue, which is applied to the door and to the material. You should wait until the base is dry. This procedure must be done carefully so that wrinkles do not form, as in the video.
You can smooth the veneer with a bar of wood or an iron heated to 50 degrees. If, nevertheless, bubbles have formed under the sheet, then it is necessary to cut the material in these places and remove the air. After that, the door must be left for two hours to dry thoroughly. Anyone can veneer doors at home if they follow these rules.
How to choose the right veneer?


When choosing a product, it is imperative to study the composition, since its substitutes can be made of plastic. Such material is not environmentally friendly and not durable. There is also an eco-veneer made from wood waste and adhesives. It is environmentally friendly, but has an artificial origin.
In order for the resulting door to serve for a long time and look beautiful, it should be coated with a special varnish.
A door made at home by veneering is in no way inferior to expensive elite canvases. She looks presentable and rich, as in the photo.
If the material is chosen correctly, then you can veneer the doors with pleasure.
Advantages of veneered doors:
- profitability;
- environmental friendliness;
- reliability and durability;
- variety of patterns and colors.
Veneering is a simple procedure that allows you to restore the door, increases its service life, makes it individual.
From this article you will learn:
Despite the fact that the appearance of furniture is of great importance, its quality, durability, comfort and functionality are no less important. And for these characteristics, various components and devices are responsible. In this article, we will talk about the types furniture fittings exist and what you should pay attention to when choosing it.
Door handles as the main type of furniture fittings
There are three main types of door handles:
- stationary;
- with a pressure mechanism;
- rotary.
To date stationary handles used infrequently. They do not have a lock, they only allow you to pull or push the doors, and therefore are most often used for decorative purposes.

For handles with a pressure mechanism, the presence of a latch is characteristic, which is triggered at the moment the handle is pressed. This allows you to open or close the door.
Wheels - no less significant types of furniture fittings
There is a large amount of mobile furniture. It is equipped with special wheels that allow you to easily move it around the apartment. These devices differ from each other in various parameters, including the method of attachment, the possibility of adjustment, etc.
The choice of wheels for furniture should be influenced by such characteristics as quality, attractiveness, execution in a style that suits not only certain furniture, but also the interior as a whole. When choosing mobile furnishings, be sure to check furniture wheels and rollers.

This type of furniture fittings differs among themselves in numerous parameters, including the rotating base. Therefore, first of all, it is worth deciding what type of fastening of the structure and the method of rotation of the wheels you need.
Based on the type of construction, the wheels can be divided into:
- swivel, which will give you the opportunity to easily and almost effortlessly move furniture around the apartment;
- non-rotatable, which are securely attached to furniture, are able to withstand heavy loads, but do not have maneuverability, and therefore objects equipped with such wheels will not be very convenient to move from place to place.
Other types of furniture fittings that play an important role
legs
Many pieces of furniture are equipped with furniture supports or legs. They are of particular importance for chairs, tables, camping furniture. Since the entire weight of the structure falls on this type of fittings, they must be sufficiently reliable. In addition, furniture legs play a role in terms of design. It can be distinguished as adjustable and non-adjustable supports. The simplest type, the so-called thrust bearing, protects the bottom of the furniture from abrasion and possible moisture ingress.
Furniture legs themselves are divided into three main types:
- Ordinary, which are not adjustable in height. In most cases, such supports have a concise appearance and low cost.

- Legs to adjust the height of the furniture. They have not only aesthetic appeal, but also high functionality.

- Decorative legs serve to decorate furniture. They can be curly, non-standard shapes, with an attractive coating and various artificial decorations. For example, carved furniture supports can be considered as an independent design element of a room.

Metal legs have an attractive appearance, besides they are strong and durable. For their manufacture, metals such as aluminum or chromium are used.
Chrome is not only heavier than aluminum, but also more durable. Such furniture fittings are in demand among owners modern interiors who appreciate the durability and strength of furniture. Chromed legs will look harmonious in a high-tech interior with a lot of glass and metal.

Legs made of solid wood, suitable for wooden furniture. In the production of good furniture fittings, expensive wood species are used. Such legs will serve for a long time without losing their quality and visual appeal. In the manufacture of accessories from cheaper wood, metal supports are used for greater strength.

The legs made of plastic, although not very attractive in appearance, have a wide range of sizes and are quite functional.

loops
Furniture hinges are a connecting type of furniture fittings used for opening and closing door leaves. In addition, they are used in transformer models.
Hinges are semi-mechanical devices that are important for the durability of furniture. For their production, high-strength metal is used.

For different types of facades and different configurations of kitchen cabinets, different types of hinges are produced, the opening angle of which varies from 30° to 270°. Depending on the type of furniture fittings, hinges can be additionally equipped with closers that allow you to close the doors smoothly and silently.
- Laid on loop.
This type of furniture fittings is used for conventional hinged facades. Such hinges allow you to open the doors by 110 °.

- Half loop.
Semi-overlay (middle) hinges are used for cabinets in which the doors are mounted on one side and swing open in different directions. You can open the door equipped with this type of furniture fittings by 110 °.

- Internal loop.
Such hinges are used for facades located between two sidewalls, allowing doors to be opened at an angle of 100 °.
- Angle loop.
Used for corner drawers, allowing them to be opened at an angle of 90°.

- Shtolnaya (deaf, straight) loop.
It is attached to overhead strips located on the same level with the furniture facade. Such hinges make it possible to open the doors at an angle of 90 °.

- Complex (medium, carousel) loop.
Used in the manufacture of corner boxes with a box L-shaped. With its help, two facades are fastened in the middle, which allows them to open synchronously.

- Transformer loop.
This type of furniture fittings is used simultaneously with complex hinges. Such a device holds the weight of both facades, allows you to open them at a large angle. The hinge is also suitable if a drawer is installed inside the cabinet.

Locks
The lock performs one of the main functions of the door - it provides the ability to close it and hold it in this position. There are three main types of locks:
- latch;
- lock with key;
- bathroom locks.

Latch not designed to lock the door, suitable for rooms where you just need to reduce the noise level from other rooms. Latches are mainly used on doors with lever handles.
The lock on the door with a key makes it possible to close the room from strangers.

Most often used in bathrooms revolving locks which are easily closed from the inside of the room. When choosing such a device, pay attention to the presence of reverse side a special groove that will allow you to open the door from the outside if necessary.

In addition, furniture locks differ depending on the features of the mechanism and installation methods.
Mortise furniture locks are reliable, do not spoil the appearance of furniture, allow you to get quick access to the contents of the cabinet. Such devices, depending on the type of mechanism, can be cruciform, cylinder, lever.

At the core cruciform structures lies a cylindrical mechanism. Such locks are equipped with several row-by-row combination pins. The keyhole has a cruciform shape.
This type of furniture lock is not very reliable. Modern cylindrical movements may have finger, telescopic or serpentine cuts. The case of such devices is resistant to almost any damage. Level locks consist of several plates that move in a groove.
Overhead furniture lock very easy to install that even a beginner can handle.

They can be installed on doors and drawers made of laminated chipboard, glass, as well as on double doors. Depending on the mechanism, they are divided into:
- retractable, used for tables, chests of drawers and drawers;
- castles with swivel mechanism suitable for nightstands with multiple drawers;
- rack and pinion mechanisms that are worn on gear bars;
- harpoon-like mechanisms are used in cabinets with sliding doors;
- keyless locks with built-in latch button.
Hooks
The choice of hooks for clothes should be approached carefully and responsibly. Since these devices must withstand a sufficiently large load, hard metals are used for their manufacture. Hooks are different functional features, size, style, shape and design.
There are several types of hooks that differ in strength, appearance and the materials used for their production.
The following types of this furniture accessories are in the greatest demand - single-horn, two-horn and three-horn hooks. Their names are fully consistent with the structure and capabilities of the devices. Furniture hooks can be attached independently anywhere in the apartment, whether it is a wall in the hallway, bathroom or dressing room, or be part of the furniture structure.
Depending on the structure of the hooks, a number of recommendations can be made regarding their use.
Single-horn hooks are used when it is planned to hang something large in volume or weight on the device, and also in cases where you know in advance that there will be no need to hang a large number of objects on it. Such hooks have high strength, and due to the uniform distribution of the weight of hanging objects, they are able to withstand very significant loads.

One of the most common types of furniture fittings is two-arm hook, because it combines qualities such as practicality and strength in an optimal way. You can hang one large and heavy object on it, as well as several small ones.

Three-horn the hook is used somewhat less frequently than the first two types. It consists of one large horn and two smaller ones. Since improper distribution of the weight of things can lead to breakage of the fixture, it is best to use it for small, light items.

Furniture hooks are designed for convenient storage different things, mostly clothes. Such fixtures in the hallway, bedroom, dressing room, utility room, bathroom help to efficiently and quickly arrange outerwear, umbrellas, bags, cleaning equipment, bathrobes and towels.
When choosing furniture hooks for the hallway, give preference only to high-quality fittings, the manufacturers of which have long established themselves on the market, since this type of furniture fittings is often located in visible places, and, moreover, is used daily.
By applying this approach to the choice of fittings, you will be able to operate the furniture efficiently and for a long time, without exposing it to premature wear, abrasion of the coating, deformation or breakage of the fittings.
Retractable and lifting types of furniture fittings
- Ball (telescopic) guides.
The principle of their operation is to move the sled with the help of miniature balls inside the metal case. This type of furniture fittings allows you to smoothly and completely pull out the drawers, as well as install closers on the doors. Telescopic rails are used to equip innovative tandem boxes and some functional baskets.

- Roller guides.
This type of furniture fittings is more economical option the previous guides, which allow you to pull out the drawers by about 2/3 (a third of the internal space will remain closed). Roller sleds are used to make low-cost retractable grids used to make optimal use of the interior space of the kitchen and metaboxes ( drawers with metal sides).

- Gas damper.
One facade is equipped with two shock absorbers together with hinges. This type of furniture fittings works on the principle of a piston mechanism.
Gas shock absorbers may vary depending on the lifting force, which is calculated based on overall dimensions facade and the material from which it is made.

- Lifting mechanism (elevator) with closer for opening the facade vertically.
This type of furniture fittings allows you to smoothly open the cabinet door upwards, providing full access to its contents. The disadvantage of such a lifting mechanism is that the distance from the roof of the box must exceed the height of the door.

- Folding mechanism with closer for simultaneous opening of two horizontal facades at once.
With the help of this type of furniture fittings, cabinet doors fold horizontally like a screen. This option is ideal for people of short stature.

- The lifting mechanism that allows you to "call in" furniture facade on the roof of the hanging box.
When using this type of furniture fittings, the doors lie on top of the cabinets. This mechanism is suitable for high top cabinets located close to the ceiling. This type of lifting mechanism is equipped with closers.

- Accessories for kitchen corner cabinets.
by the most hard to reach place in the kitchen is the inner space corner cabinets. And although such cabinets are quite roomy, they are usually not used to the fullest, since it is problematic to get things placed in the depths of such a cabinet.
In order to optimize the space of corner cabinets as much as possible, we use:
Retractable baskets with complex mechanisms that, when the facade is opened, pull out the shelves attached to it;

Carousels with shelves rotating around their axis, which are used to store large dishes and other large items;

Guides for corner drawers and much more.
Types of furniture fittings for decoration
In addition to the types of furniture fittings listed above, there are also facial accessories that are used to decorate furniture and are often made using glass. Glass parts are also used for cabinet furniture (table fittings).
With the help of the front finish of the furniture, they give a vintage look with antique imitation. This type of furniture fittings is used for the production of exclusive items.

In addition, modern manufacturers offer another group of furniture fittings - overhead moldings, which have a certain volume and are used to decorate structural furniture parts.

A variety of materials can be used for their production, such as wood, plastic, metal, glass, braid, ceramics, etc.
Strip parts can be either straight or curved. You can also select flat, ornamental and profile strip parts. They are mainly used for contouring doors, cabinet walls, seat bases, table tops, etc.

Details of the type of plaque can be given a variety of shapes. Previously, disks, sockets, medallions, stylized images of people, plants and animals, etc. were in demand.

This type of furniture fittings, such as cords (in most cases, thread), is used to finish the seats and backs. upholstered furniture, less often - for its lateral parts.

Types of furniture fittings for assembly
Some time ago for assembly constituent parts furniture used wooden dowels, and the installation itself was carried out using screws or nails. To date, the number of fittings designed to connect individual pieces of furniture has increased significantly.
Modern fastening and connecting accessories are divided into a number of categories, which include both highly specialized and universal products. Consider the most common groups of connecting and fixing devices for furniture, let's figure out what the features of their installation and operation are.
Threaded furniture fasteners
It is a classic connection of two parts (screws and nuts), sometimes supplemented with washers to reduce the specific load. Screws with pan or decorative heads and bolts with a fixing mustache or square heads are most often used to connect individual elements of frame furniture.
The fixing mustache or square head of the bolt (screw) allows it to be fixed in the hole of the chipboard, which prevents its further turning. This design feature makes it possible to tighten the nut without additional fixation of the screw.

Universal screws with a countersunk or semi-countersunk head are equipped with slots of various shapes (phillips, with an internal hexagon, a straight slot, and others) and are used to fasten individual assembly parts inside furniture structures. They are used for:
Installation of facades, rear walls;
Fixing drawer guides;
Installation of mounting angles;
Fastening any furniture fittings, from roller supports to locks and drawer handles;
Production of combined parts, for example, countertops from two sheets of MDF board.

Universal screws are driven using a screwdriver with interchangeable bits or screwdriver sets with interchangeable tips.
Confirmate
This is a screw fastener, the thread of which is similar to screws or self-tapping screws, which makes it possible to significantly speed up the assembly process. Confirmates (Euroscrews) - the most popular type of fastening and fixing devices used by manufacturers modern furniture. They are used for fastening any parts made of particle boards or MDF panels.

Before screwing the euro screws, holes must first be drilled in the parts using a special confirmation drill. The diameter of the drill is selected depending on the diameter of the euroscrew used. Screwing this type of furniture fittings is carried out using a screwdriver with special bits or a screwdriver with interchangeable nozzles. The choice of bit or nozzle is influenced by the type of splines.
Eccentric couplers
This type of furniture fittings is used to ensure that individual fasteners are not visible. With the help of eccentrics, it is possible to connect and pull panels that are located at right angles to each other.

Although this type of furniture fittings has undeniable advantages, it also has some disadvantages:
Additional milling of furniture panels is required to install individual fastener parts;
Relatively high price;
High marking accuracy and complexity of installing individual fasteners.
It may take three to install individual minifix parts. different kind woodworking tools - one end mill and two drills of different diameters.
Dowels and corners
Traditional, long used for connecting individual furniture panels dowels And corners and are currently in high demand.
For the manufacture of modern furniture dowels, wood, plastic or metal is used. Their main advantages include low cost and ease of connecting furniture parts to each other. For a higher reliability of the connection, the surface of the dowels has a corrugation.

Furniture corners are reliable and easy-to-install elements. Today they are made of metal or special high-strength plastic. In the production of cabinet furniture, color plastic corners matched to her color.

One of the most important points, which you should pay attention to - no matter how complex the furniture fasteners are, the choice of fittings and its manufacturer must be approached very carefully, since the choice of fasteners directly affects the further operation of the furniture.
It is worth paying attention to the fact that the cost of fittings is 10-15% of the cost of all cabinet furniture. IN kitchen sets this figure can reach up to 25%. Upholstered furniture with frame transformation mechanisms has the highest rate - 30-40%.
How to choose one or another type of furniture fittings
Each piece of furniture performs its function, which means that it must correspond to the loads that fall on it. A guarantee of a long service life of cabinet furniture is high-quality fittings.
Of course, when choosing the type of furniture fittings, its compliance with the type and functional purpose of the furniture will be of paramount importance. But, besides this, there are a number of requirements and nuances that you should pay attention to when choosing it:
- Fasteners must match the material from which the furniture is made, whether it be solid natural wood, chipboard, fiberboard, plywood, glass, metal.
- Dimensions must be selected with maximum accuracy, otherwise distortions, rubbing of moving parts are possible, which will lead to rapid wear of the furniture.
- Furniture fittings must be made of reliable, non-brittle alloys.
- When buying wooden fittings (for example, handles), make sure that they are carefully processed and carefully painted.
- The guides must be perfectly even, otherwise the boxes will get stuck.
- Buy ergonomic handles that match the weight of the doors.
- Hooks should be massive enough to support the weight of the intended items (depending on whether it will be heavy outerwear, light accessories, etc.).
In addition, types of furniture fittings intended for use in the kitchen or bathroom must be with an anti-corrosion coating. It will also be relevant for rooms with high humidity, temperature changes - industrial premises, public spaces.
The aesthetic component also plays a role. Choose concise, as inconspicuous fasteners as possible. And the front furniture fittings (handles, legs, consoles) must comply general style interior.
Where to buy high-quality types of furniture fittings
You can purchase various types of furniture fittings in our company. The Raduga joint-stock company has been operating since 1991 (former Tsentrmebelkomplekt, Decor-1). The organization was established in order to supply raw materials to enterprises that are part of CJSC "Centromebel".
Today, the company's permanent business partners are not only Russian manufacturers, but also leading firms in Germany, Austria, France, Italy, Switzerland, Finland, Poland, Sweden. Our office is located in the center of Moscow, as well as our own warehouse complex with an exhibition hall of 200 m².
In our warehouses, located in the near suburbs of Moscow, there is always a large selection of raw materials, materials and components for the production of furniture and joinery. The assortment includes more than 300 types of varnishes and 400 types of dyes, the emphasis is on the sale of varnishes and dyes with a dry residue.
At the request of customers, our team produces in one or two days polyurethane enamels almost all colors. We offer adhesives from five leading European manufacturers, natural veneer and lumber - more than 60 types of common, exotic and exclusive species. Front and mounting accessories are constantly available - more than 4000 items from manufacturers from Europe: Austria, Poland, Germany, etc.
Every month we process requests from more than 1800 clients. These include both large furniture factories and private entrepreneurs.
Deliveries of goods are carried out throughout Russia. Our company delivers goods in Moscow free of charge. Products are shipped by car in all regions of Russia.
Our firm takes the training of its own specialists seriously. Managers systematically undergo internships in companies engaged in the production of finishing materials in Germany, Italy, Austria, and Finland. Employees of our company provide technical assistance to customers.
We invite you to cooperate on mutually beneficial terms! We value our customers and try to find individual approach to every buyer.
It's time to talk about veneer furniture, which allows you to create beautiful examples of homemade furniture furniture, even if its parts are not made of natural wood, but of non-natural wood. laminated chipboard or plywood. The popularity of veneer finishing material is an indisputable proof that it has high quality and reliability. Veneer is used as decorative element, to give original look your furniture due to its naturalness and simple wood structure. In addition, the skills of working with veneer will come in handy during repair and restoration old furniture, which is dear to you as a memory and you want to recreate something antique and rare. The use of natural veneer in the decoration will help you realize all your most daring and ambitious projects of creating your own, and most importantly, unique furniture.
 Some samples of veneer
Veneer trims flat furniture parts: coverings, walls and doors. In the terminology of furniture makers, the wider surface of the part is called the face, and the narrow parts of the part are called edges. For getting beautiful view details are covered with veneer. Finishing furniture with veneer involves the following sequence of actions:
- selection of veneer for plasty;
- marking and cutting veneer for furniture parts;
- lining of furniture parts.
The main task at selection of veneer for plasty - get a beautiful drawing on outer surface details that are always in the most visible, having selected the most expressive veneer in terms of structure. A simple and proven way to get a beautiful pattern is a set in growth, which involves the use of sheets of veneer with the same texture, taken from the same pack, which are placed alternately one side or the other side out, while every two adjacent sheets look like a mirror image of each other. This gives an original symmetrical pattern inherent in veneer only from a taken pack. Set to height can be done both along and across the face. In this case, one obligatory rule must be observed - in any direction of the set, it is necessary that the direction of the veneer fibers does not coincide with the direction of the wood fibers on the surface to be coated. To comply with this rule, it is necessary to glue a lining layer with a longitudinal arrangement of fibers on the edges. Failure to comply with this rule can lead to the fact that over time, the glued veneer may crack due to the drying of the wood. It is advisable to keep this in mind when manufacturing the part, if you decide to glue the veneer always vertically. The decision on the direction of the stack of veneer can be influenced by its length. If this length is less than the length of the part to be lined, then it is advisable to arrange the sheets in the transverse direction so as not to make joints along the length, since such joints, unlike joints along the width, cannot be hidden. They are always visible. Life is life, and therefore, with small veneer sizes, it is impossible to do without joints along the length. In such cases, you can expand the pattern in two directions: both in width and length of the part.
 Short veneer laying patterns
 Interesting patterns are obtained by using a set of contrasting stripes or framing (frieze) from veneer of other species, which differs both in texture and tone. If only veneer with an unimpressive texture is available, a good effect can be achieved by using a herringbone set, at an angle of 45 ° to the edges of the part. And finally, if there is a bunch of veneer scraps, you can make a checkered set. To do this, arrange the cut squares in a checkerboard pattern with fibers along and across the plate. In this case, we severely violate the basic rule, but in this situation this is permissible, since the squares have small size. Your invention will help you come up with your own drawings.
 Veneer cutting
 a - cutting along the fibers, b - cutting across the fibers, c - cutting along a curve
The main task at marking and cutting veneer - prepare a set of blanks for facing the face and edges of the part. Each blank for the plate should have a small allowance (3 - 5 mm) so that you can adjust the joint and cope with possible distortions and shifts in the process of gluing the veneer. Strips for pasting the edge are cut to its size, increased by the thickness of the veneer, which is pasted on the plate. It is necessary to cut the veneer with a cutter slowly for 4-5 passes, gradually increasing the pressure so as not to damage the veneer. You need to cut the veneer along the fibers, but in the direction of the annual layers. When cutting veneer across the fibers or at an angle at the end of the cutting line, it is necessary to make a counter cut 15–20 mm long with scissors so that the veneer does not break under the pressure of the cutter. To cut the veneer along a curved line marked with a pencil using the part itself as a template, scissors must be used. Lay out the prepared set of blanks on dry land in order to check the set of drawings and the accuracy of joining. In order not to confuse the blanks when gluing, number them on the back side and the corresponding sections on the plate. Draw on it with a pencil and the lines of joining the blanks.
The main task at lining of furniture parts - stick the prepared veneer blanks on the part in the places provided for this on its face and edges. For greater clarity, the cladding process is shown in the simplest detail- the side wall of the nightstand. On it, it is necessary to glue the front face of the veneer and the front edge with the lining layer from the veneer. Where to start is a matter of taste, what do you like more - to see the end of the veneer on the edge or on the board.

a - face facing; b - edge facing
In our case, you should start with the lining layer of the edge, then paste over the face and finish with pasting the edges. On both walls, the cladding pattern must be matched the same. Take the width of the strip for the lining layer of the edge equal to the thickness of the edge, and for the front layer - 1 mm more to close the edge of the veneer on the plate. Prepare glue, a brush for applying glue, an iron for lapping (preferably heated on fire), a rag and paper strips for gluing the seams of glued blanks, Fix the part in a vice with the processed edge up, apply glue to it and rub the veneer strip prepared for the lining layer with an iron . When this strip is glued, it is necessary to carefully clean its edges with a file to fit the edge. After that, put the part on the table and you can start facing the plate. Start with a docking line that is closer to the center of the part. First, glue one sheet of veneer on one side of it, being careful not to skew. After that, glue the second sheet with an overlap, cut it with a knife, carefully remove the veneer trimmings, lap in an even joint and glue the resulting seam with a paper strip. Due to the fact that the sheets of veneer blanks were cut with allowances, and also due to their expansion across the fibers from the resulting moisture, they will protrude beyond the face. Now you can return to the edge, again securing the part to be veneered in a vertical position, finally veneer the edge, starting with middle lane, and then glue the side. Be careful and careful when lapping the facing edge so as not to tear the veneer, because in the face layer, the edges of the veneer are located across the edge. After the glue has dried, clean the edges of the facing on the edge and wash off all paper strips from the part with a damp cloth. Protruding edges must be trimmed immediately. To do this, turn the part over with the face down and cut off the protruding veneer with a knife along each edge, as if using a ruler. Be sure to clean the cut edges with a file. If you were careful and attentive, the seams should be completely invisible. Cladding completed.
- DIY furniture. Joiner's connections. Part1 (2)
Furniture in the house is always a functional and necessary attribute of any home interior. In order to assemble with your own hands […]
Those who make repairs with their own hands should take a closer look at such material as veneer. It is a thin layer of wood, that is, a completely natural material.
It is classified into the following types:
- standard: made from walnut, oak, cherry and other tree species,
- special: varieties of rare and valuable tree species are used for production,
- root cuts unsuitable for furniture production tree species, but with an interesting pattern and texture (for example, eucalyptus or myrtle),
- exclusive: characterized by a non-standard texture or size.
The material can be peeled, sawn and planed. The latter has more value and practicality, and it is he who is used most often in the furniture industry.
Most often glued on MDF veneer, for example, on wall or facade panels. Doors made of natural veneer also look stylish.
This material has an aesthetically attractive appearance, it can be glued to any wooden surfaces. At the same time, the price of the material is quite affordable, therefore, without any special financial costs, you can transform the interior of an apartment or a country house.
Veneer benefits include:
- durability,
- moisture resistance,
- environmental friendliness,
- strength.
It should be noted affordable price this material with high aesthetic qualities and practicality. That is why it is chosen for finishing furniture, doors and other interior items at home.
Let's figure out how to properly glue the veneer so that it lasts you a long time, and the surface acquires a new beautiful color.
RELATED VIDEO
When working with veneer, it is important to carefully prepare the surface. If it is coniferous material, remove the resin with a knife and work off the area with acetone.
It is also necessary to remove any knots and bumps, get rid of greasy spots, chips and cracks. To obtain a smooth surface, it is ground and primed.
 Many are interested how to glue veneer on chipboard or plywood. Easiest to work with flat surfaces, for example, a coffee table without ledges and other curly elements.
To finish it with veneer, you will need:
- sheet of white paper,
- iron,
- thin cutter,
- sandpaper,
- glue,
- wooden block.
Pick up several sheets of plywood in width and length, preferably with a small margin. The veneer can be simple and figured. In the first case, the fibers are arranged in parallel, in the second, the pattern is more diverse, and you can experiment with it.
Apply a thin, even layer of glue to the tabletop and veneer sheets.
Put the sheet of material in the right place and smooth it with a heated iron. In order not to burn through the veneer, use a white sheet of paper as an interlayer between the material and the iron.
Iron the heated place with a wooden bar.
Lay the next sheet slightly overlapped and repeat the procedure. Excess material is carefully cut off.
It is important not to overexpose the glue while it dries, as it quickly loses its properties.
After finishing gluing, make sure there are no air bubbles by tapping the surface. If they remain, cut them with a thin cutter, if necessary, pour in a little glue and heat again with an iron.
VIDEO
- the color of veneer sheets should be matched to the color of wallpaper, furniture and other interior elements,
- veneer sheets joined together look original different breeds trees,
- if you decide to pre-paint the sheets, wash them after painting running water and dry in a warm place, but not near heating appliances.
Thus following simple algorithm, you can quickly, easily and inexpensively give a second life to many things in the house, as well as realize your design ideas.


