It is perhaps difficult to meet a child who does not dream of his own small house. It can be anything - a textile tent, a wooden hut, a plastic house, and even a hut or wigwam. And it doesn’t matter where such structures are installed - on a summer cottage, or in an ordinary apartment - it is important that this is a personal place for the baby to play and spend free time. This kind of space is very necessary for children, anyone will tell you about it child psychologist, especially if the house does not have a separate children's room. This article will talk about how to make a children's house with your own hands.
It is important to satisfy the need for a personal “corner”, because only this will lead to the full development of the growing personality. Here the child should feel like a master, he himself arranges the furniture or brings toys, cleans the inside, makes it clean and beautiful. This helps teach responsibility and also makes the baby feel safe. Moreover, it is also perfect place for educational games.
Children's house photo

That is, as experts assure, any child needs a secluded place where he could feel confident, protected, could play, or engage in creativity, or simply relax from everything and everyone. Of course, today manufacturers of children's toys offer a wide variety of different variants children's playhouses or tents. But it’s so nice to make a house yourself, especially since you can involve the future owner of this property in this work.
All that remains is to create a project children's house and choose the materials from which the idea will be realized.
Variety of children's playhouses
Wooden children's houses
- Today the choice of materials is very large. Of course, wood comes first. This is a natural product, environmentally friendly and easily accessible. To work with wood, simple tools are enough - a hammer, a saw, screws and nails.
- Of course, if you want to build a real masterpiece, you will need a more serious set of equipment, but in principle there is nothing complicated here and you can always do it yourself. This category also includes products such as MDF, fiberboard, plywood, lining and other wood-based materials. They can be combined with each other or used independently. It all depends on where the structure is planned to be installed and how it will be used.
House made of cardboard or cardboard box
- It's easy and simple to build a house out of cardboard or cardboard box, even children can do this. The basis can be packaging from household appliances, for example, from a refrigerator, washing machine, TV, etc. It is advisable to take thick and dense cardboard, then its strength will be higher. All structural elements- doors, windows and others are easily cut out with an ordinary stationery knife and scissors. To perform this procedure more accurately, it is advisable to first draw the boundaries.

- The roof is made from glued pieces of cardboard or one large one, depending on the design of the house. You can glue the parts together with PVA glue or tape (it is especially important to strengthen the joints in this way so that the product does not quickly become unusable). After the structure is assembled, it should be brightly and beautifully decorated. This is easy to do armed with regular gouache and a brush. If there are pieces of wallpaper left in the house, then you can beautifully cover the walls and roof with this material.
- It is recommended to entrust the decoration of the interior and exterior to the child so that he feels like a master here. True, such a structure will not differ in durability. Therefore, it is best to keep such a house indoors (in an apartment or house), and if used outside, then only in dry, windless weather. This rule also applies to the next category of materials - textiles.
Children's house made of fabric
- You can build children's houses of various shapes from fabric. Most simple view is a hut or tent. To create them, just come up with a base (frame) and cover it with a piece of fabric, an old bedspread or sheet. This structure can be either stationary or collapsible, it all depends on the imagination of the master.
- Plastic pipes (PVC), which are used for plumbing, or thin blocks of wood are ideal for the frame. It is quite easy to purchase these products at hardware store, their price is low. In cases of creation wooden frame, all parts should be sanded and painted. This procedure will prevent splinters and scratches from appearing in the child.

- It won’t take much effort to make a hut; just tie 3-5 guides together at the tops (from one end), and use the free end to place the structure on a solid support, straightening the guides in different directions. Then attach the fabric to them to form walls. Since there is no floor in the design, it is necessary to lay a thick carpet so that children do not catch a cold while playing on the cold floor. In the summer, such a children's house can be taken out into the garden. This is a fairly mobile design that the child can move at his own discretion.
- Another option to simply build a hut is to use a gymnastic hoop as a basis or build a wire frame. Such a product should be secured to the ceiling, or, if possible outside, to a tree branch. Here it is important to cut the material correctly; with the right approach, it is easy to make windows and doors from separate pieces of fabric. If you can’t build a frame, then you can take an ordinary table as a basis and cover it with fabric, like a cover, leave space for the entrance, that is, make a folding canopy and the playhouse is ready. Children will be happy to spend time in such a place, especially if the table is large and there is room to turn around.
Children's house made of plasterboard
- Another material that is successfully used in the construction of structures of varying complexity is plasterboard. Such a house can become a decoration for any apartment; the main thing is to create a project so that it fits well into the interior. They are used as a frame aluminum profiles, so wooden blocks. Screw plasterboard sheets should be approached to the base using self-tapping screws and a screwdriver; it is important to ensure that the sharp ends of the hardware do not protrude inside the structure, otherwise the child may accidentally injure himself.

- If the house has a second floor and a staircase, then the floors need to be made as strong as possible, and the steps are best made from boards, since drywall breaks easily under the weight. A children's house made of plasterboard will already look like a whole room; real furniture can be placed here and even light can be installed. But it’s better not to use such a design on the street. Especially if the drywall is not moisture resistant and is not additionally treated with anything. Otherwise, all the beauty will disappear literally in one season and the next one will have to build a new one. cozy house, and this is a waste of effort, time and money.
- These materials are the most common for building children's playhouses, but this does not mean that this is the only possible options. Some craftsmen manage to create structures from any available means, for example, from plastic bottles or build a house out of sandbags. In general, if there is a desire, there will be opportunities.
DIY wooden children's house
Since wooden structures are the most durable, long-lasting and safe, it is worth considering in more detail the stages of constructing wooden houses and learning about the necessary set of materials and tools.
Choosing a place to build a children's house
- So, first of all, you should decide on the location for the future building. This is especially important if you are planning a permanent house that will be located on one site for a long time. Every child's dream is to have a tree house, but if it is not possible to completely secure this option, then it is better to avoid such a construction. Children cannot sit still, they need to move, and outdoor games at high altitudes can lead to injuries, which is why it is recommended to stay in a hut built on the ground. Moreover, this particular option can easily be supplemented with a wide variety of designs, including a sandbox, swings and even a slide.

- On personal plot the location of the future house should be indicated. It is best if it is a calm place where there is light shade from the midday sun. It is also important to keep in mind that additional territory must be allocated around for games. Such a place should not be occupied by garden beds or other household needs, but should be completely given over to children for play. This must be taken into account, first of all, not for the children themselves, but for the peace of mind of the parents, because noisy games can lead to the fact that precious plantings are simply destroyed.
Preparing the foundation and floor
- The dimensions of the building are chosen arbitrarily; for a small children's house, a length and width of 140-160 cm, and a height of about 1-1.5 meters are sufficient. The first thing you have to do is prepare the foundation. The base can be a platform covered with crushed stone, or well-compacted sand or even ordinary earth.
- There are several installation options floor boards. Can be removed upper layer turf, fill the resulting area with crushed stone, level and lay the support beams on the prepared site. Another option assumes that only the corners of the building will be on special support blocks, for example, made of cellular concrete. Such supports are laid on prepared sand cushions. That is, by marking the corners future construction, in each of them a depression of 30-50 cm is dug. All the earth is pulled out of the holes, and sand is poured into the free space, which is carefully compacted. To mark the corners as accurately as possible, you can pre-knit the main frame of the floor.

- Blocks are placed on the prepared sand layers at the same level. Horizontalness should be measured using a level and a floor frame timber. Next, it is important to take care of the waterproofing layer, this will help the house to stand intact for more than one season. Roofing felt or roofing felt, as well as more expensive materials, including various mastics, are used as an insulator. In addition, you can use an option in which there is free space under the floor to ventilate the boards.
- The next step is to install the frame. Planks of the required length are laid on foundation blocks, or on support beams (if the option with a compacted platform was chosen), and connected into a rectangular box using corners and self-tapping screws. Metal corners will make the structure strong, but for greater reliability, additional cross bars should be installed. If you are planning a large house, then there will be 3-5 such spacers; if the building is of a modest size, then one more board in the middle is enough.

- Next, the floor is laid on the frame prepared in this way. You can use separate boards for the floor, wooden boards or chipboard sheets, MDF or HDF. The main thing is that they can easily withstand the weight of not only a child, but also an adult. Recommended use floorboard with parameters: length 6 m, width 13.5 cm and thickness 28 mm. As a rule, 4 boards are enough to install the floor.
- Another rule when building any structures made of wood is to protect the surface of the wood from moisture, as well as from damage by insects. And the children's house will not be an exception here. It is advisable to impregnate the boards on both sides with a special composition, which contains both moisture-repellent components and antiseptics.
Installation of walls and roof
- Once the floor is sorted out, you can start creating the walls. To mount this element, you need to create a frame of beams, which will later be covered with clapboard or panels. The main thing is not to forget about doors and windows. First of all, timber is installed in each corner of the future children's house. For these purposes, you can choose products with a cross-section of 60x40 mm, a length of 3 m is sufficient. Each element is cut into three parts, 1 m high, or into two parts 1.5 m each. Next, the beams are installed under the windows and doors.

- To secure the main beam, you should attach it with nails to the floor, but in such a way that in the future these nails can be easily pulled out. This is due to the fact that the most durable fastening of building parts can only be done with special mounting angles, which are installed a little later. Between the rafters (approximately half the height) it is necessary to install additional spacers, which will also serve as a fastening system. Don’t forget that the beams are connected on top by a frame, which will be the basis for the roof. When the base for the walls is ready, the nails are pulled out one by one and metal corners are mounted in their place. It is important to secure all corners and joint elements with corner fasteners, only then will the house really be strong.
- The bars, which are installed horizontally, mark the windows and doors. It is necessary to calculate their height in advance. The calculation is based on the width of the cladding boards; parameters should be set so that when cladding you do not have to cut the board to its width or cover the floor of the window. That is, we calculate how many full boards will fit into the remaining opening from above and below and at such a height and fix the horizontal spacers.
- The last thing you need to do to complete the frame is to install the beams for the roof. To do this, we knock two bars together at an angle (in the form of an incomplete triangle, the base of which will be one of the walls), and we strengthen the free ends on the upper bars of the walls. There can be from 2 to 4 such triangles. Without fail, one at a time is installed on opposite walls of the house, opposite each other, and one or two can be installed between them, it all depends on the size of the structure. Also, these bars must be secured with corners.

Drawing of a children's house

Covering a children's playhouse and its design
- Now you should start covering the building. To create walls, you can use lining, boards or boards. The option with lining involves faster cladding, since the elements do not have to be adjusted, and they are quite easily connected to each other. The roof is closing edged boards and roofing felt, tiles or ondulin can be laid on top, here everything depends on the capabilities of the builders.
- Since we have a children’s house in front of us, it is advisable to decorate it in bright colors. This can be done together with children. In addition, windows can additionally be decorated with carved platbands, which are commercially available, or you can make them yourself. It is recommended to install benches and a table inside the building, but, of course, this is far from the only option for decorating the interior. A porch is often built in front of the house, which was either originally included in the plan, or can easily be completed separately.
- It is important that the house for children is completely safe. This concerns its stability and reliability of connecting elements to each other. Also, to prevent children from getting hurt or scratched while playing, all boards must be jointed and well protected with a layer of paint, varnish or stain. Metal corners, screws and nails must be properly sealed so that they do not protrude or stick out.
Today, choosing an option for building a playhouse for children is not difficult, because there are a lot of photos and videos on this topic on the Internet. The approximate cost of the building is 5,000-15,000 rubles, this cost includes the purchase of boards, hardware, paints and other materials. But often, many parents can build a playhouse for their child with their own hands completely free of charge, using only available materials.
Children's playhouse video
You should not deny your child such pleasure as small house. This will help the child develop fully and feel happier. If it is not possible to arrange a place to play outside, then this can always be done right in the apartment. Don't forget to please your children, and they will definitely please you with their successes.
“Chick-chirk, I’m in the house,” is the kids’ favorite saying when they are playing tag. It turns out that each of them dreams of their own premises, so caring parents are ready to build a house for their child with their own hands in an apartment, in the yard or on a summer cottage.
Having separate apartments that you can furnish yourself with personal belongings is a truly worthy desire for a child. Here he will be able to spend his leisure time usefully, dream about a wonderful future, “fly in the clouds” and prepare for adulthood. This makes it easier for parents to do important household chores without worrying about their child.
 Currently, many versions of such play structures are produced. They can easily be purchased in the children's section of any supermarket. But if the budget does not allow you to give such a gift to your baby, this is not a reason to leave him without his own “abode”. Wise parents remember school labor lessons and find suitable materials, tools and get down to business.
According to most psychologists, play buildings develop useful skills in children that will be useful to them in adulthood.
DIY child's house in an apartment: purpose and importance
 A miniature house, built with your own hands on the territory of the apartment, plays important role in the development of the baby as a person. Here he feels like a rightful owner. Responsible for its execution. Maintains order and spends his leisure time. As a result, the child develops the following qualities:
- thrift;
- responsibility;
- love of home;
- careful handling of valuables;
- independence.
But the most basic function of a house for children is a useful pastime. On the one hand, here he has the most convenient playing area, on the other hand, it is unique. Child psychologists say that such “buildings” are one of the most common dreams of children. They imagine themselves as masters;
- a fairy-tale house on chicken legs;
- Indian wigwam;
- a decorated royal tent;
- forest wooden hut.
 The benefit of such dreams about a children's house is the development of the psychological state of a small inhabitant of the earth. Parents often notice how their child huddles in a corner, hides in a closet, under a table, or secludes himself in his room or on the balcony. And this does not mean that he is planning to do some kind of prank (cut the dog’s hair or test the “taste” of his mother’s lipstick). Probably, the time is already coming when he wants to create a personal space away from the “caring” eyes of his parents. Now is the time to design a house for a child in an apartment with your own hands to meet his needs.
A tool for proper development
 For a child, such a structure becomes the real center of the Universe. Here he keeps his “jewels”, personal belongings, toys dear to his heart. When guests come to him, he receives them on his territory, so he decides what to entertain and treat them with. He tries to care for him 24 hours a day, for which he is responsible to his parents.
In such a developmental house for children it is easy to retire to:
- read your favorite fairy tale;
- create masterpieces from plasticine;
- paint pictures;
- prepare lunch for the doll and feed it;
- wait patiently for your prince.
What little kids dream about when they retire to their amazing dream oasis.
Parents should not forget that the child feels safe in such houses. Therefore, they need to fully support their endeavors.
 With the help of a homemade house for a child in an apartment, parents help develop self-esteem. Over time, they will become self-confident, ready for new difficulties. The lack of such a play area often leads to the following factors:
- growing up, the child does not want to equip his nest;
- he has complete indifference to his place of residence;
- increased desire to have a personal home.
Although the latter factor seems noble, it often leads to family discord. The unbridled desire to create your own little world at any cost causes a lot of suffering to people dear to your heart. Therefore, sensible parents try to take a balanced approach to parenting issues, using expert advice. But how to make a house for a child in an apartment in order to develop positive traits? Let's consider wise advice specialists.
Types of designs
 No matter the size of the children's room, the child still wants to have his own personal space. In it he will be able to hide from others, relax and do his own things. important matters. Manufacturers offer many different types of playhouses for children. To an apartment or to a dacha, to a playground or to a private house. Having become acquainted with the options, everyone is free to make their own choice, the main thing is to please the kids.
There are designs different sizes, therefore it is necessary to take into account the living area of the room. Compact houses suitable for apartments, spacious for country houses.
 Often, children's houses for apartments are made from the following materials:
- natural wood;
- plastic;
- textile;
- cardboard;
- plywood.
The main selection criteria are the design shape, material and purpose.
Wood products
 Playhouses made from this material often resemble a real home. Therefore, they are installed not only on the street, but also in the apartment. The design looks good in a child’s play area and requires special care. It must be frequently ventilated, and the parts must be treated with anti-fungal agents.
You can make a children's house in an apartment with your own hands from plywood. This will be a wonderful analogue of a structure made of natural wood. If you decorate it beautifully, it will also resemble a real residential building.
Plastic structures
 A modern alternative to wooden houses is plastic products. Such designs are preferred by those parents who are not able to make a house on their own.
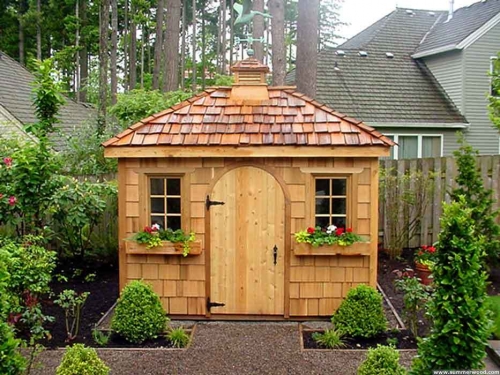
Often prefabricated houses for children are made from plastic. Original red roof, stable “stone” foundation, carved windows, a chimney, a canopy protruding above the porch. In just a few minutes, your baby can become the owner of this exquisite masterpiece. He will arrange the interior of the building: he will put a chair, throw a rug on the floor, and cover the windows with curtains. Indeed, houses for children made of plastic are a cozy abode for dreams!
In addition, they resemble a construction set that can be assembled and disassembled at will. And how convenient it is to care for them! Each part is thoroughly washed in soapy solution once a year, which helps keep the structure clean. Exist different kinds design of such “toys”:
- designs Pink colour with turrets for young princesses;
- dark fortresses for boys;
- multi-deck boat for kids.
All of them are made of high-quality material that is odorless and durable.
Inflatable structures for strong one-year-olds
 Most best option- an inflatable house for a child in the room where he spends his leisure time. Since it is considered the safest “structure”, it is used for active games with children. They are made from PVC fabric. They do not have sharp corners, but children really enjoy jumping on the slightly undulating surface. The design is convenient to fold and move around the house.
Under the canopy of a colorful tent
 A bright house tent for children in an apartment is a great opportunity to give your child a real fairy tale. It’s easy to imagine yourself as a treasure hunter, a brave traveler, and even an Indian. The house can be purchased at finished form or make it yourself. In any case, the child will love such a colorful play structure.
 To raise productive members of society, moms and dads make great sacrifices to achieve this goal. They communicate with them, educate them, teach them and, of course, play with them. Create a house for children in an apartment with your own hands through joint efforts - Right way touch their young hearts. To do this, just follow these steps:
- set a goal;
- design a building;
- choose a place in the room;
- purchase materials;
- prepare tools;
- consult with family;
- allocate time;
- act.
When your heart is full of enthusiasm, all you have to do is figure out how to make it yourself little house ik for your beloved baby. Useful tips masters will help young parents cope with this task.
Fabric tent
 To build a spacious playhouse, you will need a large area, so this option is suitable for those who have large apartments. If you don’t have that luxury, it doesn’t matter. Even in a small room, you can create a house for children with your own hands - a tent from multi-colored fabrics. To do this you will need to make a frame from a suitable material:
- wooden slats;
- aluminum tubes;
- plastic structures.
The master himself chooses what he likes best. Some use parts old furniture. You can even take a regular table as a base and cover it with a piece of fabric. Of course, initially they measure the parameters of the table, calculate the size of the canvas and sew a kind of cover. Ready product pulled onto the prepared table.
 When creating a house for children in an apartment with your own hands, it is not necessary to purchase new fabric. Tents made from old bedspreads or remnants of thick curtain fabric look original. Windows made from polyethylene will help give the house a special look. A secure lock in the form of a regular zipper is installed at the entrance. In this case, the structures are made from a mattress or a thick blanket. Here the child will be comfortable, warm and pleasant to spend his leisure time.
The fastest option for a playhouse is an Indian wigwam. Several supports, a fabric sheet and the structure is ready. It is easy to move around the room, which is especially popular with kids.
Play tunnel for developing motor skills
 Caring parents carefully monitor the physical development of their child. An invaluable help in this matter is a fabric tunnel for children. How to sew such an original device with your own hands? Luckily, it's quite simple. For construction you will need:
- thick fabric;
- several metal or plastic hoops;
- strong threads;
- sewing machine.
The first step is to calculate the structure. The next step is to cut out necessary details. They are sewn together in the form of a long bag, inside of which several hoops are installed. With the help of such a device, the child will be able to actively and cheerfully spend his leisure time in the apartment.
Construction for children made of cardboard
 Original version a playhouse for busy parents - make it from scrap materials. Often this can be thick cardboard. It is better to use standard sheets that are easy to cut and then join into a structure.
When cutting the material, accidental creases or cuts should not be allowed. Otherwise, the appearance of the structure will suffer.
 More affordable way make a house for children out of cardboard with your own hands - using packaging boxes from large household appliances. First, mark the openings (windows, doors). Next, using a sharp utility knife, cut these holes on the box. Together they begin to decorate the playhouse. Children can paint it to their liking, and parents can add decorative items.
If you plan to make a house for a girl in the apartment, you should also think about interior.  The “room” should have enough space for all the necessary things. This includes a crib for a doll, a stroller, a “closet” for clothes, a toy kitchen, and a hospital. Young housewives will undoubtedly be grateful to their parents for such participation in their lives.
Made from cardboard, they are intended for dry rooms because they are resistant to moisture. They are also easy to destroy. Therefore, such designs are suitable for calm, rather than dynamic kids.
Playhouse made of cardboard - video
The owners in Golitsyno made this small and budget-friendly, but very solid house with their own hands for their little daughter. The structure was erected not by professional builders, but by amateurs, but it turned out to be stylish and very durable: this mini-house has been standing like new for two years now.
The maximum budget materials were used for construction - the total cost of the building, including decor, was about 35-40 thousand rubles. All wooden elements the house was pre-impregnated.
As the foundation of this house, we used a base made of 10x10 cm timber, and 18 mm thick plywood was chosen for the floor. At the same time, the foundation was raised above the ground on foam blocks, since in the spring country cottage area sometimes it floods. Note that the foam blocks do not just stand on the ground, but are dug into it and additionally cemented.

The frame of the walls was made of 5x10 cm and 5x5 cm timber. The outside of the house was sheathed with 18 mm thick plywood. The basis of the roof was also a 5x5 cm beam, it was sheathed with 1.5x10 cm boards. For the roof, the creators of the mini-house chose ondulin (aka Euro slate), since this material is one of the most budget-friendly, and it also turned out to be very simple and quick to install. The windows and door for the building were purchased at a regular hardware store.
(18
ratings, average: 4,28
out of 5)
 It's no secret that kids don't need much to be happy. The flight of their children's imagination makes it possible to turn any household item into spaceship or a car, so it’s easy to imagine the delight of a child who has at his disposal a wooden playhouse built in his country house.
The optimal choice would be a children's house specially designed for a boy or a girl. Owning such a home of his own, a child with great desire will leave the city limits, knowing that a cozy corner awaits him at the dacha. In addition, this will help parents take care of their dacha farming without being distracted by the intolerable behavior of a bored child.
These days you can easily purchase a ready-made house by contacting a company that builds compact houses. wooden houses. Specialists will be happy not only to select a design, but also to deliver and assemble the house. Such products usually differ good quality, but the cost of work sometimes scares off buyers.
On the other side, wooden house It will cost much less if you build it yourself. What is needed to build a children's house in the country? In this case, a purchase will be required Supplies And necessary tool. After spending two days off, it’s quite possible to build a small house for your beloved offspring with your own hands.
DIY house for children: advantages of wooden houses

The procedure for building a children's house at the dacha with your own hands
First of all, you need to clarify what plan will be future house, decide on it appearance . For this purpose, a schematic drawing is first sketched out to determine the type of building.
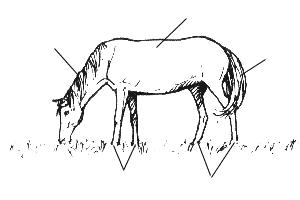
Characteristics of children's country house, which must be determined before starting construction work:

Development of a plan for a children's playhouse made of wood
Initially, a detailed construction plan must be drawn up, as well as sketches and drawings. It is important to take into account the specifics of the future structure:
- The distance between the floor and ceiling should be at least one and a half meters. However, it is not advisable to make the room too high.
- Will the right decision install at least two windows. Firstly, such a measure will provide sufficient lighting in the room of the house. Secondly, you need to remember about the safety of children, who need constant supervision. Children can be monitored through windows.
- It is recommended to make the door up to the ceiling level. This way, the child will definitely not get a bump on his forehead, and besides, it is possible that adults will someday have to stop by to visit the baby.
- To avoid unnecessary injury, all walls on the inside and outside must be smooth.
- It is better to make the roof sloping, since a flat one can attract children, and sooner or later they will perch on the roof, which will create a traumatic situation.
Tools and materials for construction
Before you start building a small country house for children, you need purchase the following tools:

List of materials that will be required for the construction process:
- Wooden beam for frame house. Builders recommend using timber with a cross-section of 50X50.
- Cladding lumber. You should choose plywood whose thickness does not exceed 10 mm. Oriented strand boards are also used. They are cheaper than plywood, but more wear-resistant. Everything is at the discretion of the owners.
- Roofing material.
- Bricks.
- Glass for window frames. It must be taken into account that glass is unsafe for a child, therefore, if you want to increase the access of light to the house, it is better to install plastic windows.
How to make a children's house: construction technology
Foundation and floor
 Similar to construction big houses, children's playhouses start building by laying the foundation. You can use earth, gravel, cement or crushed stone as the base.
There are different options that are suitable for installation wooden planks. Some people remove the top layer of soil, cover it with crushed stone, level the area, and then lay support bars on the site. You can do it differently: each corner of the building should be paved with a special concrete block, and the supports are placed on a sand cushion. Thus, the corners of the building will be placed at a depth of up to half a meter. The soil from the recesses should be removed, and a mixture of sand and gravel should be poured into them. Then the holes are carefully compacted.
Blocks are installed on the prepared places, which must be on the same level. To prevent the frame from being crooked, you should use a building level.
Without a waterproofing layer, the house will not be able to stand for many years. Most often, the insulator is roofing felt or modern bitumen-polymer mastic. Some people prefer natural ventilation. In this case, a small house is built on metal rods or brick pillars no more than 20 cm high.
Walls
 Having dealt with the foundation and floor, you can move on to installing the walls. To make walls, it is necessary to construct a frame of beams, which in the next stages is connected to thin cladding boards or panels. We must not forget about doors and windows. The first step should be to install timber in each corner, the cross-section of which is usually 50X50, and length - three meters. The product is cut into three equal parts or in half. Then the beams are attached under the door and window frames.
To fix the main beam, it is nailed to the floor using nails. The main thing is that these nails can be easily pulled out later. This measure is explained by the fact that ensuring a strong connection of building units is possible only with the help of special fastening angles, which are installed later.
Between the rafters, auxiliary spacers must be installed to act as fasteners. Keep in mind that the beams are connected on top by a frame that serves as the basis for roofing. After the base for the walls has been prepared, the nails are pulled out and replaced install metal corners. Playhouse will stand firmly and will not fall apart only when all corners and joints are fastened with corner fasteners.
The bars installed in a horizontal plane mark window openings and the door. Their height is calculated in advance. Calculations are based on the width of the cladding board. The dimensions should be such that during cladding work there is no need to cut the boards according to their width or hide half of the frame. In short, you need to estimate how many solid boards can fit into the remaining lower and upper openings. Horizontal struts should be secured at this level.
Roof
The roof of a small playhouse made with your own hands can be high and flat. The design of the roof depends on personal preference. Classic performance requires the following algorithm of actions:

Sheathing and decoration of the house
 The final stage of construction includes cladding and decoration of the structure. To create walls, lining, panels or wooden boards are used. The lining will allow reduce the time of cladding work, since there is no need to adjust elements that fit together without problems. Since the task was to make a children's house, it would not be superfluous to decorate it with multi-colored drawings. You can involve the children themselves in the creative process. Windows can be decorated carved platbands, which are purchased separately, or made with your own hands.
Inside small house they make a bench and a table, but, of course, these are not the only interior items that can decorate the room. A small porch will give the house a more noble look.
The main thing is that the constructed play structure does not pose a danger to the child’s health. We are talking about proper fastening of elements wooden structure. It is important that children do not get hurt or scratched during outdoor games. The boards need to be carefully planed, and apply a protective layer of some paint and varnish substance.
Self-tapping screws, nails and metal staples should not protrude or stick out; they are covered with special plugs.
To organize a child’s leisure time, parents have to rack their brains in search of a suitable solution. In fact, the answer is quite simple: in order for a child to spend the day in active games, it is necessary to organize his personal space. The way out of this situation would be a do-it-yourself children's house. In any yard you can allocate a small area for the construction of a playhouse. All that remains is to select a diagram, materials, tools and get to work. You can find detailed instructions in our article.
Common types
In order to make a children's house, you can use the most various materials, which remained after construction or repair, if there are none, purchase them at a hardware store. Undoubtedly, the most popular lumber is:
- bars;
- plywood;
- boards.
Let's look at common options.
Plywood

The construction of a plywood playhouse begins with design, that is, they create a drawing or layout, which can then be used to calculate required amount material and make blanks. At this stage, the places allocated for the door and windows are marked. To build the simplest summer hut, a couple of sheets of the selected material will be enough, but in general, the consumption will completely depend on the dimensions of the structure. Consider a few more important points:
- windows are located from the floor at a height of 60 cm;
- the doorway should be 15–20 cm higher than the child’s height;
- the dimensions of the future house should allow the child to feel comfortable;
- the roof is arranged at an angle of 45°;
- sheets of plywood can be cut with a regular saw and fastened with nails;
- All corners must be sanded sandpaper so that the child does not get injured during the game;
- When choosing paints and varnishes, it is best to give preference to safe and non-toxic types.

Note! The location of the house should be advantageous for parents: it should be as visible as possible from the windows or from the porch of the house in order to constantly monitor the child.
Wooden boards

If you want to equip a durable and reliable house at your dacha in which your child can play all year round, then you should choose wooden boards. This material has a clear advantage - wood correct processing practically not subject to wear. The following points are taken into account:
- for the frame choose beams with a cross section of 5 cm;
- to enhance strength, the frame is covered with planks 2 cm thick;
- the finished house is covered with deck varnish;
- approach the coloring stage from a creative side, choosing bright colors and drawing your child’s favorite cartoon characters.
Note! As with any building, it is necessary to provide waterproofing for the roof in a wooden playhouse.
Hut on legs

To make not a simple house, but a fancy place for playing games, it is best to choose a fairy-tale hut on legs. An important stage is precisely the initial one. Having a drawing that is correct and calculated to the smallest detail, you can count on getting a practical and good-quality house. Choosing material to create your own interesting element– legs, you can stop at:
- wooden blocks;
- metal pipes;
- stones.
A variety of combinations are suitable for decoration. In addition, you need to pay attention to the following points:
- The height of the legs should not exceed 70 cm.
- The base of the legs is poured with concrete for stability.
- For convenience and comfort, there should be a low staircase or open steps.
- The entire house is assembled from wooden boards: first, the frame is knocked down, which is then sheathed with boards.
Note! Since the house is a place for active games, the legs should not be high. The structure must be safe and stable.
Step-by-step construction instructions

To make a simple children's house made of wood, you will need to allocate a little of your time, collect the material with the tools and get to work.
Materials
Any construction must begin with planning. Only a clear diagram will allow you to calculate the required amount of material and make a purchase. For the described playhouse you will need the following materials:
- Board panels (180×240 cm) – 6 pcs.
- Treated timber (with a cross-section of 10×10 cm, length 180 cm) – 4 pcs.
- Treated timber (with a section of 5×10 cm, length 240 cm) – 6 pcs.
- Treated timber (section 5×7.5 cm, length 240 cm) – 2 pcs.
- Ruberoid – 1 roll.
- Screws (30 mm) – 2 packs. 500 g each
- Screws (75 mm) – 1 pack.
- Tar paper nails.
- Wood stain – 10 l.
- Thin planks.
The racks are formed from timber with a cross-section of 5×7.5 cm and a length of 240 cm. It is from these that the base for the board panels is made.

Note! When choosing a stain, you should choose two colors: 7 l - “light cedar” and 3 l - dark green.
Tools
From construction tools you will need:
- shovel;
- tamping;
- level;
- hammer;
- drill-driver;
- Circular Saw;
- beat;
- tassels;
- stationery knife.

Note! Make cuts circular saw necessary with inside panels so that chips do not form on the outside.
Completing of the work
Before you do beautiful house To play games with your own hands, just familiarize yourself with the following algorithm of actions.
Floor and walls
- A site for the future house is selected, leveled and compacted. If desired and available funds, it is recommended to dig trenches and fill a layer of crushed stone for support beams with a cross-section of 10x10 cm.
- The length of the support beams is equal to the distance between the two outer posts of the board panels, that is, 140 cm. For convenience, you can take a beam with a cross-section of 5x7.5 cm and a length of 240 cm, attach it to one panel, and mark the locations on it. Thanks to the existing markings, you can install the logs without much difficulty.
- The soil is leveled, focusing on the lowest point. First, the first support beam is installed, which will be the front, after which it comes to the rear. They check the evenness and horizontality, and then you can install the two central ones.
- To fasten the supports together, use 2 beams with a cross-section of 5x10 cm and a length of 240 cm. They must pass between the posts of the plank panel that will be the floor. They are fixed with screws. The resulting voids must be filled with soil, leaving an air gap of about 3 cm, which is necessary for normal air circulation.
- The plank panels are cut to the required sizes and the smoothest one is selected for the floor. It must be laid so that it does not come into contact with the ground anywhere. To achieve this, you can additionally use timber trim. The edges must completely coincide with the support bars.
- To cut the side panels correctly, first mark the height of the side panels, that is, 150 cm. You also need to leave a margin of 5.5 cm. Cut only from the inside.
Note! Don't forget to leave a little extra width for the back and front panels. Thanks to this, they will be able to cover the side pillars. To ensure overlap, it is necessary to measure another 2 cm from the outer edges of the posts.


Roof
- Since the roof is the most complex element design, you will have to concentrate and give all your attention. Labor intensity also lies in the need to unscrew all the rear panel posts in order to reattach them later. On the front panel, measure the distance from the top center point to the side point located below. This will allow you to decide where to place the roof panel racks.
- Please note that the post that runs along the ridge must be placed exactly 5 cm from the center line. In this case, during installation, both racks will not overlap each other.
- It is best to use beams with a cross section of 5x7.5 cm as additional racks (if any are needed). During installation, you should constantly check their perpendicularity to the top of the roof. If necessary, they are aligned along the bottom edge.
- All irregularities on the tops are successfully masked by the ridge.
Note! Only remove and reposition the posts one at a time to maintain rigidity and strength.


Final stages
- For a doorway, dimensions of 60x120 cm will be quite sufficient. This size will fit perfectly into the span between the racks. But if necessary, you can choose other sizes.
- First of all, cut out the window(s), and then move on to the door. Please note that you need to be careful and attentive with the door; do not cut it completely, as the panel is not yet fully secured and the structure will lose its rigidity.
- All elements are covered with stain and varnish. Apply paints and varnishes should be done both from the inside and outside to form a protective layer.
- Using 75 mm screws, all elements are fixed to each other and to the support bars. Once the frame is secured, you can completely cut out the doorway and install the roof.
- The door and shutters are made, the porch is assembled and fixed.
The very last touch is the interior decoration of the house, making furniture, for example, a table and chairs.
Note! It is not necessary to insert glass into window openings; you can do without them altogether. Plexiglas, which is safe, will also work.
Don't forget that interior design also plays a big role, especially when it comes to little princesses who imitate adults during play. Regardless of what material and design was chosen to create the play space, your baby will be happy. It is in the house that he will be able to spend hours of active recreation every day with pleasure, developing his imagination.
Video
Look what a beautiful house can be made from boards, timber and siding:
And here it is shown how to build a house from OSB: