Julia Friday
Wood burning - old new art
More recently, wood burning - pyrography - has gained a second life. Perhaps this is due to the emergence of new professional devices for work. Or maybe people began to pay more attention to hand-decorated products. In any case, the wood burning technique is simple enough that even a beginner can master it!
Wood burning: materials
Every woodworker is faced with the problem of choosing wood for the background. Be guided by several parameters to choose best option background blank.
Color
The lighter your background, the better the picture will contrast with it. You can use more if you wish. dark varieties. But when the work is varnished, the image will become less distinct.
Texture
Many masters prefer to work on the background with the least texture. Smooth surface without veins and protrusions makes it possible to easily perform any pattern.
But if you show your imagination and apply texture in your work, the result will exceed all your expectations. For example, you can use texture stripes as ripples on water.
Hardness
Wood burning directly depends on the power of the device used. The more powerful the device, the more solid background you can process.
And yet it is better to give preference to soft woods that are easy to work with with any burner.
Form
The shape of the background blank must be selected depending on what you want to do with the work in the future. If the blank will hang in a frame, choose blanks of the correct geometric shape. These can be found among building boards and unnecessary pieces of old furniture.
Sometimes original saw cuts appear in specialized stores irregular shape. The bark framing them can be an excellent frame.
The best varieties for woodburning are linden, beech, aspen, cedar, cherry, cypress and maple. All trees have fairly light wood, smooth or fine-grained cut without veins.
Wood burning: tools
The main device of the master working on wood is a specialized pyrographic device with a pen-pencil for burning. There are 2 main types of such devices:
- pencils with hard nibs;
- pencils with wire nibs.
Devices with hard feathers, as a rule, have a constant heating temperature. Although they come with extra nibs, they do a better job of background burn-in due to the width of the bait.

Wire nibs are more comfortable - thanks to their thinness and temperature control, you will be able to perform different types works: from thin and imperceptible to wide contrast strokes.

Both solid and wire nibs come in 3 basic shapes:
- oblique pen;
- writing pen;
- retouching pen.
The oblique pen has a beveled straight surface. With its help, thin, clear lines are drawn. The stylus is rounded at the end and is also suitable for drawing lines and words, such as writing poems on wood. Unlike the first two, the retouching pen has a flat, wide surface and is designed to burn out backgrounds or wide elements.
Execution techniques
Wood burning is not limited to one technique. If you look at at least a few high-quality works, you will find that each of them is distinguished by the use of some special artistic technique!
Below you will see a list of the main wood burning methods.
Standard
This base method, from which the development of pyrography by beginners begins. A drawing is applied to a wooden base using a graphite pencil or carbon paper. After that, the master begins to burn the image along the contour, giving it a contrast with respect to the background.
Negative
The negative method of pyrography is based on the selection of a pattern light color by contrast burning the background. This method can be done with two techniques: by adding a background and by adding a picture.

At the first, the background is burned out around the prepared drawing. The second method involves the complete burning of the background, after which the master cuts out a drawing on it, forming light areas.
You can combine these techniques to give your piece extra volume.
Pre-thread
Masters use this method so that, as in the case of the negative, the drawing becomes embossed. To do this, the image is cut out on the basis of a previously transferred sketch and only then cauterized in certain places.
In addition to these methods, there is also wood burning with hot metal and sunlight through a prism. But due to the complexity of implementation, few people use such techniques.
Master class for beginners
If this is your first time with wood burning, try a simple drawing. To do this, select a simple stencil in the form of an image outline without small parts and complex patterns.
- The surface of the background workpiece should be cleaned with sanding or a blade.
- Draw a freehand drawing with a graphite pencil or redraw the finished sketch through carbon paper.

- Start burning the image along the path. If you can't get the job done in one sitting, the finished outline will tell you where to retouch.
- After the contour, start finishing the background - darken it evenly with a retouching pen or in a gradient using different types of feathers.
- Wait for the drawing to cool down. When you're done, wipe off the excess and wipe off the remaining pencil with an eraser.
Cover the finished product with a clear varnish to fix the result and slow down the aging process. After mastering the basic techniques, try woodburning a more difficult pattern, as in the master class in this video.
When working on a drawing, do not forget about safety precautions. Try to work for a limited time to avoid overheating the burner. And do not touch the heating elements - this is fraught with burns.
show more
What can be made from seashells? It turns out that different interesting ideas- a great many. Handicraft masters even make whole panels and paintings, as well as decorations, vases, candlesticks, bouquets, decorate interior items with sea gifts. If you want to try it, our master classes will help you.
Wood burning is a special kind of art. Masters create amazing beauty drawings - landscapes, portraits, geometric compositions. It all depends on the mood, flight of fancy. The surface after burning the pattern is covered with a special solution. Drawings can be left in their original form or painted.
A country house is a cozy, comfortable accommodation and a great place to relax. His appearance can tell a lot about the owners. Construction wooden houses is under different technologies, V different styles and everyone chooses their own. Two-story mansion in a classic style belongs to respectable people, for which quality is a priority, which means reliability and durability. The chalet-style house was probably built by people who follow fashion, but at the same time think about comfort. These are romantics who like to relax in a rocking chair by the fireplace. IN log house, decorated with carved shutters or decorative elements with scorched drawings, creative people with a well-developed artistic taste probably live. Wood burning is a special kind of art. Masters create drawings of amazing beauty - landscapes, portraits, geometric compositions. It all depends on the mood, flight of fancy. The surface after burning the pattern is covered with a special solution. Drawings can be left in their original form or painted.
How to learn to burn? It's easy to do. The most popular method is burning with a soldering iron. A drawing is applied to the prepared surface with a simple pencil and burned out with soldering irons of various sizes. The surface must be free from knots, resin. It is necessary to decide on the type of tree. For burning, soft wood is best suited - linden, alder, poplar. In addition, this wood is light, has the same structure. With the help of various stains, varnishes, you can give the wood certain shades. You can also burn with a non-electric soldering iron, which heats up from the plate, knitting needles, nails. These simple tools will allow you to create interesting, original drawings. Knitting needles - ordinary, knitting - have different size which is very convenient. They are heated over the burner, holding with pliers. As for the nails, they can be selected according to the diameter of the hats. The shape of the hats can be changed, for example, cut triangular or square. In this way, you can create a large number of stamps, which will help in creating the desired pattern. Of course, when working, you need to remember safety precautions. Workplace must be equipped so that there are no flammable objects nearby. It is necessary to prepare a substrate made of tin. A baking sheet can also serve as a substrate. The room must be well ventilated. The most acceptable option for the location of the workplace is in the kitchen near the open window.
How to quickly master the technique of wood burning
Wood burning can be done with hot clichés, acid, a lathe, over an open fire. These methods require the help of a professional and extreme caution when working. A more accessible technique for beginners will be pyrography - drawing on wood with a tool that resembles an ordinary pen.
Procedure.
Choose a board to burn on. The surface of the wood should be flat, smooth, with a uniform color. If you are just starting to get acquainted with this decorative technique, try your hand at plywood - it is cheaper, but the quality is suitable for training.
Prepare the base. If possible, cycle the wood. Clean it with fine sandpaper and varnish it for wood.
Draw a sketch of the pattern or plot that you will burn on paper. It should be quite simple, without small details. Despite the fact that the finished boards are sometimes additionally painted with paints, the meaning of the picture should also be guessed from the contour that will be burned out. Finished drawings can be found in pyrography kits, tutorials, and websites dedicated to this technique.
Using carbon paper, transfer the silhouette to the board. Heat the electric burner so that its pin turns burgundy. Take the tool's handle like a pencil. Apply the drawing, starting with the outer contours. Draw straight lines fast lungs movement without pressure. To increase the thickness of the stroke, decrease the speed of the tool. When you need to draw dots or curved lines, hold the burner perpendicular to the surface of the board.
Do not draw multiple lines at once. The wood will get very hot, and the gaps between the strokes may burn through. After completing one element of the drawing, take care of the distant part of the board so that this one has time to cool.
You can change the color of the lines in the drawing. It will get darker as the burner heats up. Change the shape of the strokes by experimenting with the tilt of the pen and the pressure on it. You can also purchase a burner with interchangeable curly feathers.
Process the finished drawing again with small sandpaper. Then it can be painted or immediately coated with a glossy or matte varnish.
Remember!
To prevent the burner from overheating, turn it off every 3-5 minutes.
Finally
During operation, make sure that your hair or clothes do not get under the pin of the tool.
Adviсe
Painting scorched paintings
The surface of wood with a scorched pattern can be left in its natural form, but it can be painted (colored) with watercolors or oil paints.
The painting, as a kind of decorative technique, significantly complements the scorched drawing, making it elegant and pleasing to the eye. The warmth of the wood tone and the brown burn of the pattern, combined with a well-chosen color, give the pattern a special artistic meaning, revealing new decorative possibilities of wood.
For painting, it is necessary to prepare the wood as best as possible. First of all, the surface of the board is carefully cleaned with glass paper to avoid scratches, which become especially noticeable when wet. The final stripping should be carried out with fine-grained glass paper only along the grain of the wood. After that, the surface of the board is etched with a solution of alum, which makes it possible to apply the paint in an even layer, without spots.
For decorative painting, you need to use only finely grated high-quality dyes, have a sufficient set of soft round and flat brushes, several glass and metal saucers. On sale, watercolor paints can be dry, pressed, placed in special boxes, or semi-liquid in tubes. Oil paints, like semi-liquid watercolors, are in tubes.
Watercolor technique. To dilute the dye on a saucer, squeeze out a small amount of paint from a tube or pick up paint from a dry tile with a wet brush and dilute the dye with water so that the paint dissolved in water after being applied to the wood surface is transparent.
What can get in the way?
Color, gloss, surface structure are very important when artistic processing wood.
The color of wood is the main means of decorative expressiveness, and the property by which one wood is distinguished from another. Coloring, resinous, tannins give the wood color. Experienced carvers determine the color of wood by eye.
Reasons for the different colors of wood. One reason is the growth conditions of the tree. Pale colored rocks grow in temperate climates; brightly colored - in the southern and tropical climates.
Wood of even the same species has different shades in different climatic conditions. Light, air, storage conditions also affect the color of wood. Wood has a grayish tint if it is varnished. The required shades of wood can be obtained Depending on storage conditions. Dark brown or even oak wood has a black color that has lain in water for a long time.Wood disease also affects the color and changes it beyond recognition. special treatment- dye, pickle, steam - you can also change its color.
The gloss of wood - the ability to reflect the light flux, is determined by: the density of tissues, core rays, the type of cut. The longitudinal section reflects light, the transverse scatters.
Degrees of reflection - a glossy surface reflects the light flux falling on them. Glossy surfaces are very difficult to obtain. Matte surface - diffuses the luminous flux, has evenly spaced irregularities.
The treated surface of wood before coating it with a varnish film has an unexpressed luster. Depending on the thickness and quality, the lacquer film has a wide range of reflective properties: from matte with a uniform silky sheen to glossy with a mirror finish.
Untreated wood of aspen, linden has a matte surface. The wood of white acacia, oak, maple has pronounced core rays, which; have a special brilliance" The brilliance is more pronounced if the core rays are large and located close to each other" When developing the composition of an artistic product, light overflows are taken into account. In some rocks, overflows appear on the radial section, in others on the tangential section, in others on all sections.
Humidity - the ratio of the mass of all moisture in wood to the mass of absolutely dry wood:
wet wood - humidity over 100%, which has been in water for a long time;
freshly cut - humidity from 50% to 100%;
air-dry - humidity 15-20%, stored in the air for a long time;
room-dry - humidity 8-12%;
absolutely dry - humidity can increase or decrease.
The reason for the warping of wood is the uneven distribution of moisture in the thickness of the wood. When working with a jigsaw, the fact that wetter material is cut easier is taken into account, but the quality suffers. High quality can be achieved by working with dry material.
Shrinkage is a decrease in the volume of wood when moisture evaporates. Uneven shrinkage leads to warping and cracking of the wood. The same phenomena are observed when wood swells. Ready product protect from moisture and artwork with a jigsaw, seasoned and dried wood is used.
Strength - the resistance of wood to destruction under mechanical stress. The strength of wood depends on the direction of the fibers. Longitudinal grained wood is bending resistant, less chipping resistant.
Rules of work: thin and narrow parts of the product that are prone to fracture should have a longitudinal arrangement of fibers, and parts with a risk of chipping should be made at a certain inclination (angle) to the fibers in order to increase the chipping area.
Hardness - the resistance of wood to the penetration of solid bodies into it. For working with a jigsaw, this is an important property that depends on humidity, wood species, and the cut plane. Have the highest hardness tree species with a cross section, the smallest radial sawing.
Texture. The beauty of the texture depends on the defects of the wood. Most often, the defects are located in the butt of the wood, they affect the texture and color. The texture pattern of Karelian walnut - birch, pear, birch is the most valuable and depends on the cut plane. The best is a tangential cut. The following defects favorably affect the texture: spotting and marble rot, false heartwood, crooked layer, curl, curl, internal sapwood.
Characteristics
Pyrograph - a device for burning
In the second half of the 20th century, thanks to the invention of an electric pyrograph - a device for burning (hot engraving) - pyrography was developed as independent technique not only in DPI, but also in art graphics. At the same time, pyrography on wood is one of the most popular (along with embroidery and modeling) types of children's and amateur art in many countries of the world.
In addition, there is the Novosibirsk tone pyrography, when working in this technique, instead of a red-hot needle, a special device is used, invented by scientists from the Novosibirsk academic campus. This device is a wind burner, which allowed burning with fire, like with a brush.
Pyrography can also be performed using a converging lens. This is done on a sunny day. A wooden board, plywood, plastic or other similar material is taken as the surface to be treated. For burning out, the lens is positioned so that the sun's rays are focused on the surface to be treated. The lens is then moved so that the bright spot moves across the surface, leaving lines. The required lens size depends on the cloudiness and the height of the Sun above the horizon - the larger the lens, the more it burns out. Usually a lens with a diameter of 5 centimeters or more is suitable. But too large is inconvenient, because it can lead to surface fire.
Wood burning and its features
The wood burning technique is simple and an exciting activity among artistic crafts, which is closely connected with the traditions of Russian folk art. Currently, there are several ways of burning: pyrography (hot drawing), pyrotype (hot printing), burning in hot sand or on fire, with a magnifying glass in the sun, burning with acid and friction on a lathe.
Linden, alder, poplar or chestnut is best suited for burning out. They have a light and uniform wood structure. It should be dry and free of knots. Be sure to cycle and clean the surface with sandpaper before burning; then grind with chalk powder and water; then cover the wood with furniture varnish and sand again. This will remove all fluff and burrs from the surface.
To avoid surface contamination during work, it is necessary to stick a sheet of transparent paper with a pattern on the prepared board. Now you can get started. The paper will peel off as the design is burned out. (This is how the dirt will be removed along with the paper). The hand holding the burning tool should rest on the table.
Having finished the work on burning out, it is necessary to carefully and carefully clean the entire surface with fine sandpaper.
The finished drawing can be painted with paints (watercolor, acrylic or oil) - this is a wonderful decorative technique that will wonderfully complement the burnt drawing, making it even more elegant and bright.
To give a matte silky sheen and to preserve the natural color of the wood, a wax finish is used, the so-called. waxing.
You can also burn on soft material such as leather.
DIY
If we talk about the technique of burning, as an art, then it is very ancient, and the first crafts of burning were found in Peru. Previously, people did not know how to work with a wood burning machine, so they used ordinary pieces of metal wire heated on fire. Accordingly, the drawings of burning in ancient times were very simple and even schematic, while now you can see real works of art, portraits of burning, which are sometimes difficult to distinguish from photographs.
Which burning device is better to buy?
Choose one that has several interchangeable nozzles. It is also important to adjust the heating temperature of the nozzle. simple crafts burning out will be performed at any temperature of the core, while to portray something more complicated - portraits of people using the burning out technique, or landscapes, you will need an average tip glow temperature, or even a very minimal one, since you will have to work slowly and carefully.
You can buy a device for burning any brand and change its handle, and you can also make nozzles with your own hands from nichrome wire. Then they can be changed. But this is with regard to narrow burners, more standard. For burning wide stripes on a tree, it is convenient to work, for example, with the Steyer device, or Stayer, which looks very similar to a soldering iron. The nozzles of this burner are interchangeable.
What is the best tree to burn?
The main rule for all wood for burning: a uniform texture. You can use pear, birch, aspen, linden or alder. Do not burn on a tree such as ash or oak.
How to burn on a tree?
Before starting burning wooden surface should be well polished. Start by sketching with a simple pencil. If the drawing did not work out, then just transfer any drawing you like through carbon paper. After that, we turn on the device for burning out and go through the outer contour of the future drawing. When drawing a picture with a burner, keep an eye on the level of pressure, because with too much effort there is a risk of burning the tree and thus ruining it.
When the main contour is outlined, you can proceed to darken the background. Change the burner nozzle to a wider one and apply strokes parallel to each other. You need to darken the pattern smoothly so as not to overdo it. Follow the gradations from dark to light.
Another thing you need to remember when starting to burn is how to apply patterns. In the first case, a darker pattern appears on a light background, and in the second, a light pattern appears on a dark background. Burning, or as it is also called pyrography, is very beautiful view needlework. By burning, you can decorate any wood crafts: hairpins, combs, wooden spoons, furniture, photo and picture frames, jewelry boxes and much more.
Prices / Order
Burner *QIDDYCOME*
The original game set for creativity "Pyrography device" allows children to create amazing drawings and even real engravings on a wooden surface. Also, the device can be used for soldering and as a hot knife for plastics.
The set includes: soldering iron nozzle, 4 creative nozzles, nozzle-knife for cutting plastic.
The game set for creativity "Device for burning out" can be an exciting leisure option for your child. Recommended for children over 12 years old.
630 rub
Firms
Stationery in Togliatti and Samara in the OfficeCom company
Our company has been represented on the Togliatti stationery market for 10 years. In 2009, we expanded our business and are now known as the wholesale and retail company OfficeCom. The company is engaged in the complex supply of organizations in any field of activity with everything necessary for the smooth operation of modern offices, as well as wholesale and retail trade in stationery and office supplies.
A wide range of stationery for school and office
The main product groups and services offered by us:
Cut paper for office equipment
Paper wholesale, services for cutting cardboard, drawing paper, paper according to the client's size. We offer a good range of paper products. OfficeCom supplies paper of various formats and purposes from leading domestic and foreign manufacturers.
Stationery for school and office
We offer a wide range of products from well-known manufacturers of stationery. Always up-to-date stationery for the office at affordable prices.
Receipt tape and thermal label
Always in the presence of a large selection of check tapes for payment terminals, ATMs and cash registers of any windings and sizes. Tape can be clean or coated. Any parties from a warehouse or under the order. Accepts production orders various kinds tapes of non-standard sizes. Sale of cash tape wholesale and retail in Samara and Togliatti is one of our main directions.
In addition, we offer our customers rolls for plotters, technical and perforated paper, household chemicals, Consumables for office equipment, office furniture, various household goods, food, packaging.
Benefits of working with our stationery store
Since the establishment of the company, the economic situation in the country has changed more than once. The needs and demands of customers in the stationery market have changed. Many stationery stores have changed their pricing policy. But our approach to doing business has always remained the same.
We monitor the situation on the stationery market in Samara and Togliatti and strive to ensure that our prices reflect the real situation. For many major commodity items, we work directly. For example, with paper manufacturers. This allows you to refuse additional markups and offer attractive prices to customers.
We do not use the stamped wording “We have the lowest prices” in principle. We say that they are among the best in the region in terms of price-quality ratio.
The main aspects of our company:
reasonable pricing and flexible pricing policy;
comprehensive service;
availability of own warehouse stocks;
own logistics service;
competent specialists, qualified consultations;
the necessary range, high quality products;
online stationery store - an opportunity to buy stationery in Togliatti and Samara online.
online paper store - the ability to order Togliatti stationery online. http://ofiskom.com/
Wood burning, also known as pyrography, is gaining more and more popularity among people of all groups and ages. And this is understandable, because pyrography is not only an exciting activity, during which fantasy and skill develop, but also lovely gift family and friends in handmade style. Wood burning is available not only to enlightened wood burning gurus, but also to beginners. We will tell you more below how to burn wood correctly with your own hands for beginners.
How to choose the right burning tool for beginners
The first step in mastering the art of burning is to purchase a burning device, ideally if such a device will be powered by electricity. You also need small boards or pieces of plywood, sawn desired shape. It is not necessary to cut them yourself, it is enough to purchase several options in specialized stores. By the way, they also sell wooden figurines of various sizes and shapes, ready-made boards in frames, with sketches from the most elementary to incredibly complex images applied to them.

When choosing burning apparatus, many are wondering if it is possible to burn wood with a soldering iron? Our answer is, of course you can! This is the easiest way to burn wood patterns at home, available to everyone. The only difficulty in the work of burning with a soldering iron is that you need to use soldering irons of different diameters. But if you decide to purchase a specialized wood burning machine, and not a soldering iron, remember that for beginner burners, a pen-shaped burner with which you will simply draw according to a template is ideal. Such a tool is usually accompanied by staples and pins, which are placed at the base of the burner handle, they then form lines of patterns of various thickness and color.
The wood burner immediately before work should be heated to the maximum, this will be evidenced by the tip, heated to a dark red color. Carrying out wood burning comes down to a constant change in the slope and glow, and sometimes the size of the pen, which allows you to achieve different depths of the burnt line, which means that it will differ in color. Shades of different depths of the line range from light brown to rich dark brown.
How to burn wood for beginners with a job description
We choose a wooden base and sketches for the first works:- At first, it is better to choose boards from soft, light, homogeneous wood, which is necessarily polished for a perfectly even and smooth state. Birch, linden, alder, poplar trees are rich in such wood. On such blanks it is easier to burn out and there is no need to adapt to the structure of the tree. Usually beginner burners use plywood, which is easier to process, commercially available and fairly budget material. After you get your hands on and learn how to work with wood, you can proceed to wood with a heterogeneous structure, which will help to focus on some details such as clouds, water, trees, or, for example, stripes on the skin of a zebra and tiger.
- A drawing for burning can be drawn by hand with a simple pencil or transferred to a board using carbon paper. The disadvantage of this method is that the lines drawn with carbon paper blur when heated and are difficult to erase if necessary. The ideal option for transferring designs to the board is black graphite paper for light woods and white graphite paper for drawing a design on very dark or pre-burned wood. In addition, you can stick tissue paper with a pattern on wood and burn an image on it, while the surface of the board will not get dirty, and the paper will melt when heated. With the help of a burning device, you can burn out various pictures, inscriptions, patterns, logos.
- Beginners should not choose at first complex drawings and patterns, first it is better to get their hands on simple medium-sized images, made up of a miniature number of lines and strokes. The photo below shows several options for sketches for beginner wood burners.
We offer you to get acquainted with three world-famous pyrographists who are fluent in the art of wood burning.
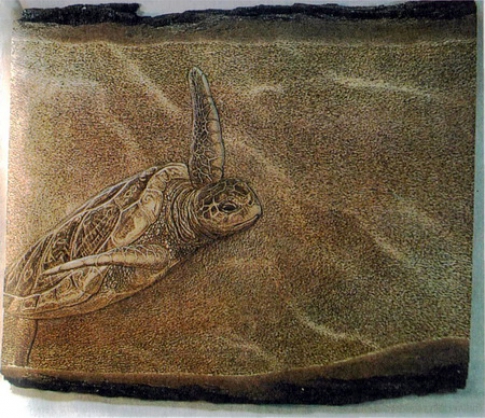
Consider pyrography by Julie Bender in sepia

With the help of wood burning art, Julie renders the smallest touches of animals in such an unrealistic way that it seems that you are immersed in a variety of tones and midtones. Every detail of her scorched paintings is done with microscopic ultrafine shading and the play of light rays. To create one such picture, it takes her more than one day, the master requires not only talent, perseverance and experience of several years, but also love for such art as pyrography.
First, Julie observes animals for a long time, absorbing their every line and shadow on the skin as she moves, and then, inspired, sketches on a carefully polished wooden board maple or thick paper for watercolor with a simple pencil. Maple has a creamy tint and a slight graininess, which allows you to give the future picture a sepia tone. Then, with the help of burner tips of various sizes and shapes, it scrupulously works out every glare of light, every shadow and stroke of the animal's fur. The work of one of her paintings the size of a notebook sheet sometimes takes up to several months of work! This is what it means to love your work and receive a well-deserved reward for it, the cost of one of its fiery works can reach 4 thousand dollars.
Learning beautiful wood burning from LeRoc

A well-known South African artist, using fire and improvised tools, can burn out portraits of people, animals, equipment, trees. He uses a soldering iron as the main tool, previously the flame of a lighter, nails and pliers were a favorite method of burning. The pyrograph devotes all his works to connoisseurs of nature and graffiti, because, in his opinion, they are components of each other.
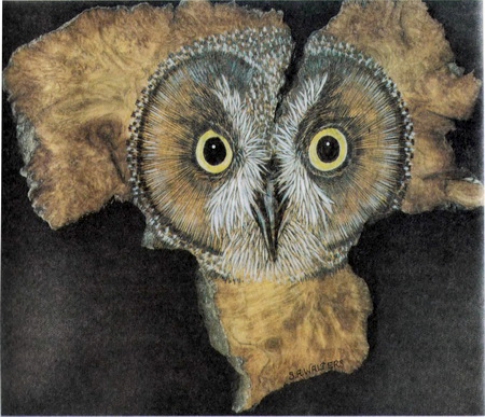
Exploring Surfboard Pyrography by Peter Walker

Peter Walker is a renowned Australian pyrographer who burns his work onto surfboards. Hollow timber planks are cut from fast growing trees, each plank is handcrafted, sometimes with other designers involved. Burning Peter performs using laser technology.
Video on the topic of the article
We bring to your attention several video clips that will clearly show how to learn how to burn a variety of paintings and ornaments at home.
- " onclick="window.open(this.href," win2 return false >Print
Woodburning

Among the many artistic crafts associated with woodworking, a special place is occupied by decorative burning. One of the most popular crafts, deeply connected with the traditions of Russian folk art, burning developed in parallel with carving, turning, mosaics and woodworking, often complementing these art forms or performing independently.
 In the old days, metal rods were used for burning, the ends of which were red-hot on fire, or they used metal stamps with a relief pattern engraved based on folk carvings.
Nowadays, many methods of burning are used: pyrotype (hot printing), pyrography (hot drawing), burning in hot sand or on an open flame, in the sun with a magnifying glass, burning with acids, friction on a lathe.

Burnout - this is one of the types decorative finishes wood surface. It is used in the manufacture of souvenirs, furniture and various small wood products. best material for burning out - plywood, blanks from linden and alder.
Before burning, the surface is polished with sandpaper.
The drawing is transferred to the detail through carbon paper.

Burn the drawing out with electric burner(see fig.).
It consists of step-down (up to 6-12 volts) transformer, power cord and handle with a pin, the tip of which is made of nichrome wire.
 Its working part is feather
or pin
(bent wire, heated electric shock) - fixed in a plastic handle. A wire pin allows you to burn the most complex plots, to achieve a wide variety in the technical execution of the drawing.
Its working part is feather
or pin
(bent wire, heated electric shock) - fixed in a plastic handle. A wire pin allows you to burn the most complex plots, to achieve a wide variety in the technical execution of the drawing.
Wire pins of various shapes are made of nichrome and wehral wire.

It is very simple to make them: cut the wire into pieces and give the desired shape with pliers.

The surface that comes into contact with the wood is carefully polished sandpaper.

The pins are attached to the handle in different ways, depending on the design - with small bolts, a clamping screw and in other ways. In all cases, the pin must be fixed stably and firmly.
Before burning, the surface is cycled and cleaned with an emery cloth, then polished with chalk powder and water. After sanding, the wood is covered with light furniture varnish and sanded again. To protect the work from contamination, you need to stick a sheet of tissue paper with a pattern printed on it on the surface of the board. Then you can start burning. As the individual parts of the drawing are burned out, the glued paper is removed. In this way, dirt is removed along with the paper.

A pen with a heating pen is taken in the right hand like a pencil. The device is included in electrical network and the switch (see Fig.) set the required degree of incandescence of the pen. They begin to work when the pen warms up to a dark red color.
When burning, you need to sit straight, right hand must lie firmly on the table (see fig.). After 10 - 15 minutes of operation, the electric burner is turned off for 2 - 3 minutes to cool down.
You can only burn dry wood.

On the printed drawing, dots are first put, then lines are drawn. To get a thin line, the pen of the electric burner should be moved quickly.
A thick line is obtained by moving the pen slowly. At the end of the line, the pen must be quickly torn off the drawing. Lead the pen should be without pressure.
The drawing is first burned out along the outer contour, and then they move on to internal lines and dots.

By changing the incandescence of the pin, giving it a different slope, you can achieve deeply saturated lines and barely noticeable strokes, while changing the color intensity of the line from dark brown to light yellowish brown tones.
You can not advance the pin with a special effort or uncertainly slow down its course along the pattern.

If the edges of the burnt grooves are charred, then, apparently, the movement of the pin was too slow or the pin was overheated excessively.
You can cool the tip of the pin by touching it to the marble tile or by holding the pin for a while in an upright position.
Burning is carried out immediately in different parts drawing. Temporarily leave some section, move on to another, and then return to the first again.

This is necessary in order to avoid intermediate burns arising from strong heating of nearby parts of the tree. Therefore, you should not immediately burn out several almost touching lines or strokes, before you burn a new stroke, you need to let the neighboring one cool down.
When burning curved lines or dots, the pin is held perpendicular to the surface of the board, and when burning straight lines, it is oblique, like a pencil when drawing.
If it is needed set on fire (shade) relatively large area, first burned circuit (outline), and then inside it is harnessed with the wide side of the pin. When processing the background, you can use various techniques: apply vertical wide lines and strokes, dots of various sizes, or, using curly tips, cover the surface with squares, triangles and other shapes.
Having finished burning the pattern, the surface is carefully cleaned with the finest sandpaper. Sanding should be done carefully, but carefully so as not to damage small strokes and lines and not to round the edges of the protrusions.
The scorched drawing paint watercolors or oils. painting , as a kind of decorative technique, complements the burnt product, makes it bright and elegant.
For painting on wood, you will need high-quality watercolors or oil paints and a sufficient set of soft round and flat brushes.
The best finish of scorched and then painted works must be recognized waxing .
The wax finish gives the pattern a matte silky sheen and retains natural color wood, waxing does not affect the paint layer at all, the laid color retains its tone and saturation.
You can turn on the electric burner only with the permission of the teacher.
When working, do not press hard on the pen. At the end of the line, the pen must be sharply torn off from the drawing.
Do not lean close to the burning site. Protect your hands and clothing from the touch of a hot feather.
After the end of work, the electric burner must be disconnected from the electrical network.
Good day, brain artisans! Today I will share my experience in the field of wood burning or pyrography, using which you can do it yourself create a real masterpiece!
Burn tool


You can pick up any tool for pyrography: from cheap to expensive. My first burner was from a supermarket, it came with 5 different nozzles and, in principle, it did its job perfectly. But over time, I began to use it only for filling the background, because when working with it for many hours, it slowly starts to “fry” my fingers, and the sting heats up so that accuracy is lost.
That's why I bought a professional brain tool pyrograph, with the ability to adjust the glow of the tip, which is very convenient when using different types of wood and creating different blackouts. And of course, a big plus is that you do not need to wait for the burner sting to cool down in order to change it to another one.
Material for pyrography


To begin with, I note that it is necessary to have a hood or fan when burning out, but do not direct the air flow to the burner so that it does not cool.
- MDF: Not the best beautiful material but I had it in in large numbers. The material is hard, so it requires more heat; there is no graininess, which allows you to perform the drawing more clearly and without errors; when done with a gradient, it gives a nice golden sheen, but sometimes a lifeless grayish. Important! Since MDF is a formaldehyde-based compressed-glued wood dust, an exhaust hood is required!
- pine: cheap and widely available material, soft, easily burned. The granularity makes you play with the temperature of the heat and pressure on the sting, the resins give the craft a lacquer shine.
- cedar: soft material, graininess is not a problem, the lines appear well, but the gradient is hardly noticeable.
- cherry: smells great when working 🙂! I've only used it once, but the quality is excellent.
Another note - never burn out on surfaces that have been treated with anything (lacquer, paint, etc.)! This will result in fire or poisoning.
Drawing contours


For my first homemade I applied the contours painstakingly, by hand, believing that tracing paper or templates were not acceptable, that this was a kind of deception. But when I realized that the customers do not appreciate this, that for them this is a little exciting moment, I began to apply the drawing through black tracing paper. It is black, blue that gives a lot of unpleasant troubles.
The trick: some pyrographers apply the design with thermal transfer paper by printing the design on a printer and “translating” it with a warm iron. But this method can cause overheating of the material even with volumetric homemade the proportions of the picture may be lost, distortion may appear. But there is such a way.
Contour burning


For the contours, I use a spear point with a heat of 7/10 for MDF and 5/10 for pine. A sharp sting is harder to keep smooth lines, besides, it leaves a decent furrow, but I like it. The ball tip does not penetrate deep into the wood and allows you to burn lines in various directions.
Trick: Try to burn out the contours with one brainstroke, in one fell swoop, but drive the sting slowly, as you can scratch the tree, and not burn it. With long lines, you can move not only the hand with the burner, but also the material itself.
fill


Filling surfaces is easier than creating a gradient, but it also looks good. For larger volumes, I recommend a flat tip with medium to high temperatures. For small areas I use a calligraphic pen, which also gives high quality.
Trick: Don't try to fill surfaces quickly and at excessively high temperatures, as you will ruin homemade, leaving deep black scars-furrows on the tree. Work within medium temperatures in gentle circular motions.
Golden Trick: The first time you touch the tree, blow on the tip of the sting, so the black starting point will not be visible during circular movements, and the beginning will be smooth.
Gradient


To create a gradient, you need less heat, more patience and precision in hand movements. For a gradient effect, I use a flat tip with a 4-5/10 glow.
The gradient itself is applied in a circular motion on small area, no changes are visible during the first pass, but passing through part of the area a second time, this area becomes darker.
Important: for large grain/fibrillation brain material handle coarser fibers at a higher temperature than when applying the entire gradient.
Hatching


Hatching and crosshatching give excellent results and are sometimes even better than the gradient, for example, when the material is very fibrous.
For shading, I use the same tips as when applying simple lines, for example, a spear-shaped sting. Start hatching in one direction, always from the edges, so the edges will be darker than inner part. To make hatching crafts darker in some places, apply cross hatching.
Textures


Various textures are good when burning out, I will talk about some:
Head hair: For crazy 80s style hair (see Kiss) or just a little messy (see AC/DC), use a high heat flat tip. At the same time, do not try to make the lines smooth and smooth, so you will achieve hair volume. Shades vary the degree of pressing the burner, or leave unburnt areas as highlights.
- fur: with a thin tip, sharp or round, you can create an amazing fur effect. In dark areas of the fur, use a larger brain heating and pressure, and light quick strokes in bright places. If the fur is too angular and defined, go over it with a flat tip and refine this texture.
scales and skin: use sharp and broken lines to create this texture. This will give the effect of cracking, and with a flat tip create blackouts to add volume. For this texture, do not apply hatching, otherwise you will get a fur dragon 🙂
Background


After burning the main drawing, it is necessary to supplement homemade background, this is especially true when working with cheap and low-quality wood. My following tricks will help you with this:
- rust: the easiest way to apply rust is to "scrape" the rust from old bolts and pieces of iron with an ordinary brainskin, and then apply the resulting brown powder to a homemade product. I do this with my finger, but the cotton swab option works too.
I often apply this effect on MDF in order to remove excessive shine and add realism to it.
- fan: using a conventional movable fan that smoothly directs the flow into various angles rooms, you can create an amazing vignette effect. Just point it at the homemade product and start gently burning out the lines of the drawing, the effect will not appear immediately, but you will definitely see it. The bottom line is that the flow from the fan periodically cools the sting, thus the same line has a different blackness along its length.
Be careful when working closely with brainfan! I somehow forgot and got a decent burn when the fan ran into the burner.
- darkening: when the drawing requires a completely black background, or when you have patience, or the amount of darkening is not large, then you can apply a flat tip at high temperatures or use a gradient technique. But at the same time, be sure of the final result, otherwise everything will end in a waste of time and material.
- pointing or "dot": this is an old technique used in many medieval works of art. The bottom line is the simple heating of an iron template, for example, a bolt and repeated “branding” homemade. Now a sick round tip is suitable for this, which needs to be heated enough and periodically cleaned of carbon deposits. When working with soft wood, this technique allows you to create a contrasting pattern and textural background.
If you like my craft, then get a burner and feel free to dive into the world of art called pyrography.
good luck brain masterpieces!


