Keys tend to get lost. This small object performs a big function - it closes and opens our house. Therefore, it is better not to lose them, as thieves can use them. It will be convenient if the keys in the house or apartment have their own place. Such an interior item aswill provide a place where they can always be found without difficulty. Also, this piece of furniture is a great option for a gift.. What's more, you can make it yourself.. This does not require special skills and abilities. There are many options for manufacturing such an interior item, such aswith your own hands. All of them have simple technique execution.
Key holder made of wood using a board

- In order to make it easier to work, it is necessary to make a drawing of the future housekeeper. To do this, you first need to decide what size it will have. A drawing of a key holder made of wood will be a kind of design project, according to which the work on its manufacture will take place. Here you can specify which decorative elements will have a future
- Next, you should prepare the tools and materials that will be used in the work. For this project you will need a wooden board, 6-8 keys, self-tapping screws, a drill and wire cutters.
- Unnecessary keys will serve as hooks. Therefore, with the help of wire cutters, it is necessary to bend their lower part so that a hook is obtained. This procedure must be done with all elements of future hooks.
- Then you need to take wooden board and mark the saw lines on it in accordance with the dimensions that were indicated earlier on the drawing. Using a saw, make a board for the key holder of the desired size.
- Next, depending on the idea, you should decorate the board. I must say that there are a lot of design ideas. Alternatively, you can leave it as it is. The tree itself is a very warm and cozy material, so without any finishing it looks good at home.
- After the board is ready, we fasten the bent keys to it with self-tapping screws. In the future, they will be hooks. The distance at which these elements are attached should be chosen based on your preferences. Can attach keysat the same distance from each otherand can be grouped.
- Next, on the back of the board, we make a hole with a drill, which will be needed in order to attach the key holder to the wall. Holes should be non-through, their number depends on the length of the board, usually two or three holes are enough.

When the key holder, made of wood with your own hands, is ready, you can use it for its intended purpose. The above is one of the most simple ways making a key holder out of wood. But he's not the only one.
Key holder using decoupage technique
There is another easy wayhow to make such an interior item as housekeeper made of wood using For this option, you will need the following materials.

- Wooden frame. The size of the frame depends on the size of the key holder. It is better to buy a frame that has special rings on back wall for wall mounting.
- For decoupage, you will need a napkin with a pattern or a picture or a special decoupage card.
- Special decoupage set, which includes glue, brush, primer, varnish.
- Hooks. They can be made from anything. For example, from buttons, pens, rings and more.
- T You will also need a knife, pencil, ruler, drill and self-tapping screws.
Manufacturing work this subject interior mcan be divided into two stages. First you need to do decoupage, and then assemble the key holder.
How to make decoupage
In fact, decoupage is quite easy to do. To do this, you need to disassemble the frame, take its base and prime it, leave it for a while to dry. You can use a hair dryer to speed up the drying process. Next, a decoupage pattern is glued and left for a certain time to dry. Then the drawing must be varnished and also allowed to dry.

Assembling the key holder
The next stage of work on the manufacture of the key holder is its assembly. To do this, first collect all the details of the photo frame. Then you need to mark the places on wooden frame where the hooks will be attached. They are attached with self-tapping screws.
It should be said thathave many manufacturing options. For example, instead of decoupage, you can use embroidery. And instead of a frame, take an opening box. You can also approach the process of making a key holder with humor and focus on the hobby or hobbies of the owner of the apartment.
In search of what is most often a person before leaving the house? This may be a mobile phone that you have to call from another or home. Glasses that are always hiding somewhere. Well, the most important thing is the keys. It is their loss that causes the greatest stress when only a few minutes remain before the meeting. So that all these things are always in sight, it is important to know how to make a housekeeper with your own hands.
What can she be
The key holder is a small device, the design of which is limited only by the creative abilities of a particular person. She may be:
- Wall. It is usually located closer to the exit at eye level, so that it is always accessible to the eye. It may have hooks in its design, or a more creative way of attaching the bundle can be used.
- Pocket. It is a small wallet in which the keys are hidden. Such a product is useful in that it allows you to eliminate the appearance of scratches on any gadgets, as well as prevent the appearance of holes in pockets and bags.
- Desktop. In this case, it can be made in the form of a small box with attractive patterns. In order not to forget to put the keys in it, a special keychain is put on them.
- Placed on the cabinet door. Many have a dressing table near the exit. Why not use inner surface more useful doors.

This item does not have to be only the habitat of the keys. Additionally, it can be adapted for business or other notes. A special mount will be useful for glasses or mobile phone. In addition, additional shelves will allow you not to forget where the brush and shoe polish were left last time. Also here you can store portable drives (flash drives), well, or covers from them, which certainly tend to be lost somewhere. If wall key holders are located close to the door, then it is better to provide additional levels of protection so that no one, sticking their hand in, can take possession of the bunch.
There is a huge amount ready-made options. They are designed according to the place where they will be used. For office or other companies do hardware which have a built-in lock. Hotels can boast of solutions that are created for a specific interior. Warehouses are not distinguished by sophistication, but are designed to fulfill their main function, and not please the eye. But repairing a house or apartment is a reflection inner peace its inhabitants. Therefore, it requires an individual approach.
Wall key holder options

In the hands of a creative person, any little thing can become an element of design or decor. For the manufacture of simple option will need:
- branch of intricate shape;
- metal hooks;
- self-tapping screws;
- dowel.

As the first element, a knot from oak, larch or other tree, the wood of which is highly durable, would be a good solution. But this is not important, you can take what you like the most.
- The wood is sanded with sandpaper. If possible, the bark is cleaned off. This must be done, because unpleasant neighbors can start in it, which will undermine the wood.
- Several holes are drilled with a drill. Everything will depend on how many keychains there are in the family. The diameter should be slightly less than the thread diameter of the hook. Two more additional will be required for mounting to the wall.
- To give the desired tone, the product can be covered with stain. After complete drying, it is worth walking over the surface with fine sandpaper to remove the risen fibers.
- The next step is for varnish. It will give the pendant a finished look. You can use both matte and glossy, everything will depend on what is best suited to the interior.
- The element is applied to the wall, and marks are made for mounting fasteners.
- Holes are prepared with a puncher, dowels are inserted and the key holder is screwed into place.
- Self-tapping screw caps are recessed. You can decorate them with overlays or putty on wood.
- The final touch will be screwing in hooks and hanging keychains.
This option will great solution for baths, log houses or log houses. Well suited to interiors where wood was used in the decoration. Additionally, each hook can be marked with some symbol. Their application is carried out by an electric burner or in another way.

Most houses have photo frames. Some of them may have been gathering dust on the shelves for a long time, because there is nowhere to put them. There is an advantage to breathe into them new life. For this you will also need:
- glue;
- a small piece of plywood or fiberboard;
- decorative hooks.
If the look of the frame is not to your liking, then it can be sanded down and painted in whatever color suits best. The plywood or fiberboard is sized to fit on the protruding sides of the frame. Additionally, this element can be covered with any fabric. In this case, you will need to make a gap of several millimeters on each side. The cover is fixed with glue. They also attach hooks to the surface. The final touch will be wall mounting.
Alternatively, sheeting may not be used to cover the frame. It is enough, after processing it, to twist the hooks into the inner upper end and additionally decorate them.
If you have the skills to work with a jigsaw hand saw or an electric one, then you can implement another unique project. For him you will need:
- a piece of plywood measuring 25 × 15 cm;
- stain or paint.

Before starting manufacturing, you should think about the shape of what you would like to see key rings. It can be a figurine of a boy and a girl, circles of various diameters, figurines of objects that include keys. Then you can find a suitable simple drawing on the Internet or draw it yourself. After that:
- The ends of the plank are processed. The chamfer is removed and the corners are rounded. This can be done manually with sandpaper or with a grinder.
- The drawn or printed picture is applied to the plane. This must be done so that its lower part coincides with the lower edge of the workpiece.
- The image is transferred with a pen or pencil. It can simply be crushed with a suitable metal object.
- The lines are drawn so that they can be clearly seen.
- Manual or electric jigsaw, in which a nail file with small tooth, cuts are made along the intended contour.
- The figurines are set aside.
- The main sheet is cut by 5 mm from the bottom end. This is necessary so that the key rings protrude a little.
- The surface of the cut products is polished to remove all chips. Holes for rings are drilled.
- If desired, the surface can be treated with varnish, paint, stain, or some pattern can be made using a burner or cutting knives.
- The product is screwed to the wall.

Such a housekeeper can be customized for each member of the family. For example, larger trinkets are made for mom and dad, and smaller ones for children. Each of them will have its place and will not be lost again.
Another interesting solution there will be a key holder from a small bar. For work you will need:
- bar 25 × 8 × 3 cm;
- end circular saw or jigsaw;
- vise or stand, which can withstand an angle of 45 °;
- metal or wooden blanks.
Wood is well processed with a grinder or other device. The corners can be slightly rounded, but you should not overdo it, because. the product will lose its appearance. Then, every 5–7 cm, transverse marks are made with lines. These marks are used for cutting at 45°. They must be up to the middle, otherwise the structure will simply lose its strength. The bar is fixed to the wall in such a way that the slot goes down. For each bunch of keys, a small metal or wooden keychain is made. It can be anything in shape, but its thickness must match the width of the cut. When the keys are no longer needed, the key fob is simply inserted into the slot.

You can opt out of key rings. Then the slots can be made of such a size that one of the keys crawls through them. It will be enough to insert it into place and you're done. The slots do not have to be at an angle. It is possible to arrange them completely horizontally.
Another interesting option would be to use small furniture locks. They can be purchased at any specialized store. Their number should correspond to the number of family members. Additionally you will need:
- wooden block;
- pen drills;
- screwdriver;
- sandpaper or grinder.

The beam must be of such thickness that inner part the castle could completely fit in it and not look out. Feather drills will be needed in two sizes. The first must correspond to the diameter of the core, and the second to the diameter of the clamping nut. The wood is processed as desired, so that the shape and configuration of the final product fit the already existing elements in the house. The markup is in progress. In this case, the width of the facing ring must be taken into account. Fountain drill a smaller diameter hole is drilled from the front side. The castle is being tried on. Using a tape measure, the length of the thread for the nut is measured. WITH reverse side to a depth slightly less than the length of the thread, a hole is drilled with a large drill. It's necessary to drown fastener. The design is fixed on the wall. Each keyhole is signed or highlighted in a specific color.
The original solution may be the use of decoupage technique. At its core, it is a process of decorating various surfaces your favorite pattern or picture. For the entire operation you will need:
- any wooden blank;
- a napkin or rice card with a pattern you like;
- PVA glue;
- acrylic lacquer;
- acrylic white paint.

The surface is well cleaned and polished. Next, prepare the background for applying the desired image. For this front side dyed with white. After the first layer has dried, another one must be applied. Thus, it will be possible to hide all the flaws. The necessary section breaks out of a napkin or rice card. Or the edges are simply cut off so that they are not evenly cut, because it will not look so attractive. The drawing is placed in the middle of the prepared surface. PVA glue is applied with a large brush. Start from the middle and move towards the edges. It is in this case that it will be possible to smooth the paper well, as well as to remove all air bubbles. Glue needs to grab and dry. If the edges are left empty, then they can be decorated. The coloring composition is selected to match the overall picture. A small piece of foam rubber is cut off and clamped into a clothespin. The device is dipped into the pigment, the excess is removed and dipped in the gaps where there is no lining. The final touch will be a protective varnish. It is applied in two layers. To make it easier to see the bald spots, just turn the plane towards the light. After drying, you will need to walk with fine sandpaper to even out the flaws. Hooks are optional.
In addition to open options, you can make it secret, which will be hidden behind a picture or other decorative element. To work, you need a small wooden box. You can take any of the cigars, creams, and an old box that is no longer used for its intended purpose is also suitable. A frame with some kind of beautiful picture. A recess is made in the wall. If it is drywall, then it will be enough to cut it to the required size. In case of concrete wall will have to fiddle around a bit. The contour is cut out with a grinder with a diamond wheel, and the rest is knocked down with a perforator. The main compartment is placed in the middle and fixed with screws and dowels to the wall or expansion mechanisms to drywall and crate. For the main cover, you will have to pick up hinges that would allow it to open along with the picture frame. Hooks are made inside. If you do not show it to anyone, it will be difficult to guess that something is hidden behind the drawing or photo.
If there are children in the house who love to play with Lego, then some of its parts can be used to fix keys. A single bar or a small module is perfect for this. It must be glued or screwed to the wall. A small brick will be used as a keychain. There are ready-made elements in which holes are already made. In their absence, they can be easily drilled or melted with a hot awl or nail. When you want to leave the keys, you need to attach a part to the board.

A variation on the Lego theme will be the use of little men from this constructor. You should proceed as described above, but it is better to glue the figures to the bar. Hands will also have to be rigidly fixed. The ring is inserted into the palm or simply hung on the forearm. It looks nice - it looks like the designer asks not to forget the keys to the house.
A convenient and unobtrusive option would be a unique design that allows you to hang the keys without even looking. To implement the idea, you need a metal magnetic plate. Usually these are used for knives in the kitchen. It's easy enough to choose comfortable spot near the exit, screw it to the wall and use it. The more keys that are not made of non-ferrous metals, the more reliable the bunch will hold.

Do not limit yourself in terms of the materials used. For example, do not buy ready-made hooks. If no one has left the keys to the old castle or apartment in the house, then the holes in them are perfect for fastening with a self-tapping screw to the surface, and the bent ends will be for hanging. Forks can be used for the same purposes. In aluminum products, the teeth are bent in such a way that a greeting gesture with two fingers raised or branches of climbing plants is obtained. Small wooden knots glued to the base will also act as holders.
A beautiful solution that will suit almost any interior is the use of beads or wooden balls. To complete the work you will need:
- balls of various sizes according to the number of bundles;
- a small wooden block;
- strong thread or chain.

Through holes are made in the balls. A rope or chain is threaded through the holes. One of its ends is fixed with a smaller bead or a beautiful knot. The second part is attached to the ring. Transverse slots are made in the processed bar and it is fixed to the wall. In order to hang the product, it is enough just to thread the thread into the slot, the balls will not allow the ligaments to fall out.

You can add any key holder with a small drawer that will serve as an organizer. You can buy it in a store that sells household utensils. Often their purpose is to store clothespins. It is also easily assembled from small plywood strips. Such a product will be an excellent fit for a mobile phone or glasses.
It is much more convenient to carry things with you when they are neatly packed. A pocket key holder is not only a functional accessory, but also a part of its owner's image. It can be made with any pattern or be with a family coat of arms and initials. All this is really do it yourself. For one of the common options you will need:
- skin flap measuring 16×10.5 cm;
- rivets to match the color of the skin;
- riveter;
- blank for a key holder with carabiners;
- scissors;
- punch.

The key holder will look prettier if its edges are rounded. For marking, you can use a bottle cap, an intercom key, or something suitable. The next steps are in this order:
- A blank with carabiners is attached to the intended installation site.
- Marks from the holes are transferred to the skin.
- A bunch of keys is placed inside and the edges are wrapped. This will allow you to try on where you need to install rivets in order for the product to close. An appropriate note is made.
- The space under the keys is lined with the same leather. This will strengthen the back wall and prevent wear.
- Holes are made according to the marks made with a punch.
- The workpiece is fixed with rivets, and then the rivets are attached to the lapels.
An additional highlight will be a line of contrasting thread, which can be done with a slight indent from the edge.
Another option can be done according to the principle of a multitool. In order to determine which particular piece of leather is needed, it is necessary to collect all the keys in one press and fasten them with something. You will need to attach them to the material and make width marks with a margin of several millimeters. Next, folds are made and marks are applied. One of the sides remains open, and the strap serves as a latch. The bottom line is that the keys will be in a case, and you can take them out according to the principle of a penknife. Of the additional components, you will need eyelets and furniture fasteners. The latter is usually used to fasten adjacent cabinets. It is a threaded bolt that fits into the tube. Their hats are the same.
- A hole is made in the places where the keys will be fixed.
- The elements are put in place, small leather pads are placed between them so that they do not rub or ring.
- Furniture fasteners are inserted.
- Rivets are fixed in the strap and on one of the sides.
- An eyelet is installed at the bottom, to which it will be possible to fasten a keychain or something else.
Someone prefers a key holder in the form of a wallet. For this, a piece of skin is selected, a zipper is sewn into it. The ends are sewn up. A small band with a ring or a carabiner is attached inside. A bunch of keys is hung on it.
Table key holder

The table key holder is very often located on the dressing table. It is installed in the most visible place, so that when you enter the apartment, without looking, throw the keys and go about your business. In her role, you can use any small saucer or jewelry packaging. Exist turnkey solutions in the form of shell-shaped products or small cabinets.
As you can see, wooden or metal key holders are an affordable solution. You can make them yourself, using what is at hand. Many of these solutions can be used as a basis for your own research. We are interested in what ideas you have. Share them in the comments to the article.
Video
How to make a beautiful Japanese-style wooden key holder:
Master class on making a pocket key holder:
Photo


It is great if in your house each item has its own place. This is especially true for small things, and striving for something to collapse and get lost. First of all, this applies to keys. They are not always easy to find if they are thrown in an unusual place, even if it is in plain sight.
The solution to this problem is the key holder - a special item in which the keys are stored. It may look like a locker or a small wall shelf with hooks.

Types of housekeepers
All varieties of home key holders are wall-mounted, since it is quite convenient if they are located at eye level. This makes them much easier to use. Key holders can be wooden, metal, leather, plastic or glass.


The most common key holders are made of wood. This model is distinguished environmental Safety and originality. They can be made of valuable wood and decorated with intricate carvings. Made by hand, wooden key holders can look like real works of applied art.

Metal products are usually not intended for home use. They are most appropriate in schools, offices and various offices, i.e. in those places where there is a need to store a lot of keys.

Royal key guards, made of metal alloys, can add solidity to your home. They will fit perfectly into the environment, decorated in such styles as hi-tech, techno and loft.

Do you want to give your hallway a special charm? Stop your choice on a leather key holder. Its main difference is its small size. Therefore, owners of small hallways usually prefer to purchase such a model.

Photos of wall key holders clearly show that they are divided into open and closed. The closed key holder is a small cabinet with hooks for keys, and the open one looks like a shelf.


Today, manufacturers offer multifunctional key guards, the design of which may include a shelf for correspondence, a chalk board, etc. In addition to dividing by type of construction, key storage products are divided depending on their purpose - into home and office.

In our country, wooden key holders are the most popular. They can be purchased ready-made in most souvenir shops or made by hand. It is possible to make a housekeeper with your own hands from pieces of a board, pieces of plywood or from branches.

Finished products delight the eye with an amazing variety of design solutions. Collage key holders decorated with appliqué look amazing.

Variations made by hand from noble woods are considered especially valuable. It can be oak, walnut or teak wood. Such models will be appropriate for a hallway designed both in modern style and in a classic style.


Key holders with leather inserts look no less decorative. As an additional decoration, chrome-plated metal elements can be used for them. Eventually similar products features an elegant and stylish look.

What is better - open or closed key holder? The advantage of the first is ease of operation (no need to open anything in order to hang or remove the key). The advantages of the second are a more favorable appearance and the ability to disguise individual unaesthetic details of the hallway (meters, doorbell mounts, etc.). Therefore, when choosing such items, it is better to focus on your taste and interior style.

The keeper of the keys in the form of a regular quadrangle with a glass door will add solidity to the setting. And the product, decorated using the decoupage technique, will always look great. It is sure to please all family members. The motifs of vintage or fairy tales can act as the subject of the picture.

Some housekeepers immediately stand out in the interior due to their brightness and beautiful appearance. Others are difficult to spot at first glance - they can hide in other details of the situation, i.e. be secret.


An example of the latter is the key holder built into the watch. This extraordinary design idea will appeal to all those who like to receive guests and those who prefer not to keep the keys in plain sight.


Where is the best place to place the key keeper
Everyone knows that the housekeeper's place is in the hallway. But where exactly should it be hung? There are no hard and fast guidelines here. For its location, any free and convenient place is suitable.

It would be optimal to place the key holder closer to front door or coat racks. Gathered, put on a jacket or coat, grabbed a bunch of keys - and out. Or vice versa, they returned, closed the door behind them, removed the key. This location of the key house minimizes the risks of leaving them in another place and forgetting about it.


Instructions for making a key holder-planter
You will need:
- board from fiberboard (base);
- old planter;
- putty;
- putty knife;
- a set of acrylic or gouache paints;
- aerosol varnish;
- glue;
- subtle matter;
- hooks;
- decor (beads, glass beads, ribbons, feathers, braid, lace, decorative figurines).

In order to make a key holder, you need:
- Take the base and apply a little putty on it.
- Until it dries, draw a markup stylized as brickwork.
- Cover the base with paint, and then with a protective layer of varnish.
- Soak the fabric in PVA glue.
- Pull the fabric over the pots, forming beautiful folds.
- Paint the resulting blank in dark colors. After the paint has dried, apply gold or silver patterns.
- Engage in decorating.
- Glue the pots to the base, decorate the surface with additional accessories. Place the finished housekeeper in the frame and attach the hooks.
- Put live or artificial flowers, dried herbs, leaves, or beautiful feathers in a pot. The key holder is ready.

The key holder is a great solution for keeping order in the hallway. In addition to its intended purpose, it can play the role of one of the key interior details, without which it is impossible to create a cozy atmosphere. A well-chosen key holder will bring the necessary zest to the hallway and add charm to it.

Photo of a wall key holder


Key holder - convenient and original way key storage is ok. There are two types of key holders - wall and pocket. We offer you to get acquainted with the original ideas for making wall key holders with your own hands.
Do-it-yourself wall key holder - varieties and characteristics
The design features of key holders changed in relation to the type of keys used. With the great popularity of spring and lever type locks, the size of the key holder was large and very original. Key holders had various forms; forging, woodcarving, painting, etc. were used to decorate them. Home key holders were made in the form of overlays on the walls, in order to avoid damage to the finish with a metal key.

One of the most popular options is the manufacture of a plank key holder, which easily fits into any type of interior, takes up little space and has a simple design.
Key holders in the form of small shelves are also distinguished by their compact size and ease of use. To make the simplest key holder, it is enough to use wood or plywood. You can also store other small items, such as glasses, on such a key holder.
If the house has a large number of lockable premises, sheds, outbuildings, etc., then the installation of a key holder will be relevant large sizes. Most often, it has the form of a board, each of the fragments of which has a certain type of key. The location of such a housekeeper is usually near the kitchen or in utility room. For the standard set of keys used to lock the front door, a small key holder is installed, usually located in the entrance room.
When restricting access to the key holder, it is necessary to install the option of a lockable cabinet. Such key holders are located in secluded places, some of their options are additionally locked with a key or a special code, which is even more convenient.

The most popular version of the key holder is the key holder-board. Their widespread use is due to their simple design, ease of operation, and ease of self-manufacturing. It is quite possible to make such a housekeeper from ordinary cutting boards. However, it is recommended to choose for the manufacture of key holders such boards that have oblique grooves. Next, install the fasteners for the keys. Most often, these are nails or screws. If necessary, the key holder is painted in relation to the individual characteristics of the room and installed on the wall.
The key holder in the form of wooden block. All fasteners for keys are located on it firmly, without the possibility of deformation.
Another option for making a key holder is a frame. It goes well with the wall, makes the interior unusual and original. It is enough to build a frame from wood or other materials, attach key hooks to it and hang it on the wall. In the presence of a durable finish, it acts as a highlighted image on the wall. To fix the frame on the wall, use glue or additional fasteners. The installation method is determined individually depending on the material from which the walls are made.
To combine multiple useful properties housekeeper, we recommend that you take a closer look at the housekeeper organizer. On such a capacious shelf there is a place not only for keys, but also for various papers, notes, reminders.

If there is a need to install secret locks or store not only keys, but also additional documentation, we recommend stopping at a cabinet key holder. Sometimes the front door of such a key holder additionally performs the function of a clock.
Another subspecies of a key holder in the form of a cabinet is a house key holder. For its manufacture, wood is most often used. The front door of the housekeeper is decorated with carvings, original drawings or even decoupage. The size of the key holder of the house is smaller than that of the closet, it is more compact and roomy.
Do-it-yourself wall key holder - master class
If there is an unusual, original box in the house, you can also build a key holder from it. In this case, fittings are attached to the back wall of the box to hold the keys, and it is fixed on the wall with self-tapping screws. Please note that the box in this case must be made of wood.
The same key holder can be made from an old wooden box, additionally completing its decoration. For additional strength, the wood is covered with moisture-resistant compounds.
Quite often, key holders are made from the remnants of plywood. With the help of a special tool, it is possible to create incredible works of art in the form of small key holders. For additional protection plywood, it is varnished, after sanding. Artistic sawing on plywood allows you to make key holders in the shape of a horse, heart, star, animal and plant.
In production, this process is carried out using laser systems. However, it is quite possible to make such a version of the key holder at home. For these purposes, follow the instructions below:
- draw or print on the printer the picture you want to receive;
- prepare a manual jigsaw;
- if you have a vibrating jigsaw, use it for cutting especially thin elements;
- using a manual cut, the workpiece is made, in order to hide small irregularities, the surface is additionally processed using an electric wood burner;
- to make such a device, you will need an old soldering mechanism and a power supply unit.
We offer a variant of making a key holder in the form of a plywood key. To make it, prepare a sketch of the shape you like. Such a key holder for children is especially interesting, as it has an extraordinary shape and resembles the “Golden Key”.
Do-it-yourself wall key holders photo:

To make original wall key holders with your own hands, it is enough to use simple tools at hand. The first option - fixing branches from knots on a wooden plank allows you to get a completely original key holder. Do not choose too small branches that can break under the weight of the key. Do not forget to additionally treat the wood with antiseptic compounds.
The second way is to use a previously dried boletus mushroom. These items are highly durable and long term operation. From old tableware in the form of forks and spoons, you can also build original key holders. By bending the plug in a certain position, you get the original key hanger.
If you have experience with various techniques for decorating key holders, you can create whole masterpieces in the form of wall key holders. From polymer clay, you can make a key holder of various shapes and colors. Most importantly, this element must be in harmony with common style interior design. After drying polymer clay acquires special strength and has a long service life. Additionally, fittings of a suitable size are fixed on the key holder.
An oven is used to bake the finished part. Only after complete cooling, the part is ready for operation and further opening with varnish.
The prepared surface of the housekeeper is also decorated using decoupage technique. To fix this removal, a varnish on a matte or glossy base is used. There are two ways of decoupage - direct and reverse action. The first involves pre-coating the surface with a primer, applying glue and gluing the picture.
In the second method, transfer-type pictures are used that are installed on the surface. DIY wall key holder decoupage - different original and unusual appearance. Particular attention should be paid to the absence of wrinkles on the decoupageable surface. It is possible to decorate the housekeeper with 3D decoupage. However, for this you need to have experience in carrying out this kind of work.
How to arrange and make a wall key holder with your own hands
The process of designing a wall key holder should be given special attention. After all, it is on the quality of this process that both the aesthetic appeal of the resulting product and the duration of its operation will depend.
Most often, wooden key holders can be stained, varnished or artificially aged. For painting wooden products We recommend using acrylic based paints. The duration of their drying reaches five hours. They differ in wide colors, the presence of simple and glossy brilliant shades. With their help, you can imitate wooden, metal, nickel, chrome surfaces.
After applying paint to a wooden wall key holder with your own hands, you can get a thin, durable and elastic coating. Thus, it is possible to achieve the effect of an aged surface. For these purposes, an abrasive sponge is used, which is used to treat the surface after painting.

As additional elements to decorate the surface of the key holder, we select the following means:
- varnishes - these compositions allow you to get a glossy, matte, textured or smooth surface;
- varnishes with 3D effect - allow you to create a fairly thick protective covering, which has individual optical components and makes the image convex;
- textured pastes - after drying, they allow you to create an image in the form of an aging, cracking texture.
The technique of decorating the crackle housekeeper is to obtain a cracked surface. At the same time, there are many varieties of this technique and Various types compositions for the formation of cracks.

How to make a wall key holder with your own hands photo
Particular attention should be paid to the key holder, with a secret mechanism. This version of the key holder has the shape of a regular picture, which opens with the help of a special lock. By clicking on the secret bar, it is possible to open the key holder. The secret bar, in this case, is equipped with special bevels that allow it to open and close with one touch.
To make such a key holder, you need to have special experience and knowledge. First of all, you should draw up drawings and determine the mechanism for opening the picture. Next, you should build its frame part.
Inside the picture there should be hooks for the location of the keys. Additionally, the mechanism is equipped with spring mechanisms and clamps. We recommend that you purchase such a key holder in a specialized store, since it will take a lot of time and effort to make it.
Another option for a hidden key holder is a key holder in the form of a shelf with hidden lock. To open it, a special magnetic locking mechanism is used. Therefore, to open such a key holder, you will need a special key.

Do-it-yourself wall key holder made of wood
In the process of working on the key holder, you will need to have:
- scraps of plywood or fiberboard sheet;
- acrylic paints;
- varnish for processing wooden surfaces;
- napkins;
- brushes;
- glue;
- fittings and fasteners.
To make such a key holder from wood or plywood, make a rectangle or square. In order to give the surface maximum smoothness, sand it additionally. After stripping, cover the workpiece with spray paint. Next, the workpiece is varnished in several layers with complete drying of each. Further steps for surface decoration are determined individually and are described above.

To fix any decor, a moisture-resistant varnish is used, which will protect the key holder from destruction. Additionally fix fittings for keys on it. Hang the finished product on the wall using self-tapping screws.
Making a wall key holder with your own hands is a completely individual process, the procedure for which is described in the drawings and depends on the preferences of the master doing the work.
Comfort in the house is "gathered" from the little things. Exactly small parts give the house originality and cosiness, make living much more pleasant and comfortable. One of these small things is a wall key holder. If there is nowhere to put the keys, then you have to look for them for a long time. It spoils the nerves, makes you nervous. The key holder is far from complicated thing, it is easy to do it yourself. By the way, a homemade key holder can be a great gift.
A little about the boring: types of housekeepers
As you probably understand, there is no strict or official classification. But the whole variety of key holders can be divided into several categories or types. According to the location or method of application, there are wall and pocket key holders.
Pocket are a case made of leather, fabric or other similar materials. This case has loops (metal or strong cord) to which the keys cling. Pocket key holders are needed more for the convenience and safety of pockets or bags: it is easy to tear thin lining fabric with metal keys. The second function is to have all the keys in one place. They are easier to find even in a women's bag.
Key holders for pockets and bags - one of the most profitable and necessary gifts
Wall hangers for keys can be open or closed. Closed - small drawers with a hinged door with hooks stuffed inside. Doors can also be hinged or lifting. Closed key holders are suitable for those keys that are rarely used. Constantly opening and closing the door is not very convenient.

Wall key holder closed type can be of different shapes ... at least make a round one if you want))
Wall-mounted open key holders are more common and can have a very diverse look. The most famous and simple is a plank with small hooks. Any hooks: furniture, nails or screws, pieces of thick copper wire, wooden knots. You can use old forks, furniture handles, and the same old keys bent in the form of a hook. In general, fantasy is not limited, you can fix everything that the key ring fits on. And it doesn't have to be all the same. The combination can be very interesting.

Much easier ... but there is a gloss
Wall-mounted key holders are also made from various, sometimes unexpected things or materials, but the most common are wooden or sheet material plywood type, etc. Especially often, wood is used to make do-it-yourself key holders. It is easier to work with wood or plywood and the result is more or less guaranteed, even if you are doing something yourself for the first time. Making a wall key holder with your own hands is a good experience for beginners.
Open type wall key holder: ideas and options
If you decide to make a housekeeper, it's best to start with something that isn't too complicated. First, decide on the place where you plan to hang the product. This will make it easier and faster to choose a model - long and narrow or closer to a square, circle, etc. in shape. Next is a matter of technology. Most of the models are quite simple, even if you are doing something with your own hands for the first time.

From wooden planks
As we have already said, wall-mounted wooden key holders are one of the most common options for do-it-yourselfers. Now you will understand why... Probably, it is not a problem for anyone to find a few tablets. Boards of any size and thickness will do. You can use long thin strips - 20-30 mm wide, medium - 40-70 mm or even wide. They can be connected to each other, folding into the shape you need / like. Three examples are pictured below. When you decide on the form, you can start processing.

Processing wood is also not a problem. Can be used different ways. If you want to have something classic and strict, we take sandpaper or grinder and sand the surface until smooth. Further - you can cover with paint, oil, stain with or without varnish. All this gives different types surface, respectively, and looks different.

If you need a more informal look - a loft or something like that, you can take metal brush(you can - a nozzle on a drill), remove a certain amount of soft fibers. A clear wood grain will appear. It's quick and easy to do this with pine. You just need to find a board with an interesting pattern. Next - you can again go through oil for wood, stain, varnish on water based with coloring pigment. All of them give a different effect, but the protruding parts stain worse, the wood shines through. The soft part is darker. As a result, the wood pattern appears more clearly.
Approximately the same effect, but more "hard" gives processing with a blowtorch. Soft fibers burn, the structure is more clearly manifested. But here you have to be careful not to overheat. It's impossible to restore...
In combination with a shelf
Wall key holder just for keys - not very practical. We don't usually have many bundles to fill a dozen hooks with. Therefore, combined models often appear - with a small shelf for small things, which also have a place near the door.

Sizes and formats, as you can see, are different. Difficulty level too. Choose at your discretion. You can make an L- or T-shaped design, attach hooks to the top or bottom.
There are very interesting idea- key holder on magnets without hooks (on the left in the photo above). At the bottom of the shelf, small magnets are glued in, which attract the keys. It is convenient to use - no need to "aim", everything happens very quickly. Magnets - if they are the same and look "civilized", you can stick them on the front surface, if the sizes are different, it is better to make recesses in shape. The magnet itself should protrude slightly above the surface - by 1-2 mm. This is enough to find it by touch (if necessary).
From plywood
In a sense, plywood is easier to work with than wood. The surface is already processed, all that is needed is to cut out the shape, walk sandpaper on the edge. Then paint, and you can proceed to the final - attach the hooks.

The good thing about plywood key holders is that you can cut out any shape. Any shape, style. For housekeepers, images of keys are often used, but it can also be a dog, a bird, a mouse ... whatever.
From picture frames
If you have a picture frame or can make one, it will also make a very good wall key holder. On the reverse side, you need to fix some kind of base, for example, a piece of fiberboard or hardboard silt. It is more convenient to fasten with staples from a construction stapler. As a last resort, use an all-purpose adhesive.

Inside the frame, you can paint the surface, stick a picture, plain paper, a piece of wallpaper ... Whatever you want or think of. Hooks can be attached to the frame or to the inside - this is again as you wish. The point is their type and the load that is planned.
wooden and without hooks
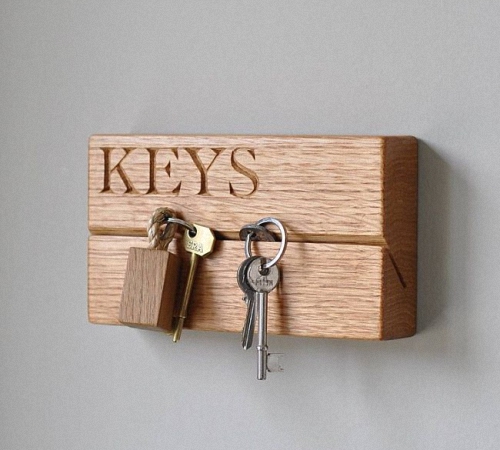
You will not believe, but there is a wall key holder without hooks and magnets. It is usually made from natural wood, since in this material the idea is most easily implemented. After all, you can not hang the keys by the ring, but stick them into something. For example, in a slot. It remains only to make such cracks, and this is not at all difficult.

Moreover, as you can see, cuts can be both horizontal and at an angle. You can make them using, for example, a milling machine. This is the most accurate and safe way. You can also use circular saw. Even ordinary saw. It is only important to stop in time and then process the cut well.
Dashboards of various devices are also in business
If old non-working appliances have been preserved in the pantry, in which there are panels with sockets into which plugs were once inserted, you have a chance to make an exclusive key holder. Carefully cut out this panel, insert plugs with key rings into the sockets. All is ready. Can be hung on the wall.

No worse is obtained using the headstock from a guitar / violin / cello or any other stringed instrument. You can use pegs, you can add hooks. By the way, no one bothers to make an imitation if it is a pity to spoil the instrument. That might make it even more interesting.
Hooks for key holder
Hooks can be made from a variety of materials. For classics, you can start with a trip to the store selling furniture fittings. There is plenty to choose from. There are hooks furniture, overhead, which are attached to the surface.

Hooks can also be attached to plywood, but for this they must be glued. The main thing is to find a suitable glue, with good adhesion to wood and plastic or metal, from which the selected hooks are made.

There are different kinds/types of self-tapping screws/screws with hooks at the ends. They need to be screwed into the board, so this is not an option for plywood.
There are also picture hooks (pictured below). They are made of plastic, in the case they have several metal pins. These pins are clogged with a hammer, and they even enter concrete without problems. The only downside to this option is the price. And so, they look good, and hold up well.

These are just standard hook options. In general, it can be made from knots, old keys, forks, wire ... everything that has a small thickness and a suitable shape, or which can be given this shape.
How to make a wall key holder with your own hands: photo report
For the manufacture of a wall key holder, the following materials were needed:
- Frame for a photo of a suitable format. A door is made from it.
- Bars wooden 20*40 mm.
- Hooks, loops, doorknob.
From the tool - saw, jigsaw, construction stapler with staples, drill and screwdriver. Well, and a tape measure with a pencil. This is the first thing they did with their own hands, so there are enough mistakes.

Making a frame
First of all, the bars were sawn to the size of the frame. Connected with staples from a stapler. It turned out the frame of the part that is hung on the wall. A piece of fiberboard was cut to size and also attached to the frame with staples.

There are two best solutions. The first is to make the connection of the bars by sawing them at 45 °. It looks much better, although it is more difficult to perform. If you are unsure that the sawing will turn out smoothly, you can do it as in the photo. But it is better to fasten the bars with self-tapping screws. And this is clear. Let there be no heavy load on the key holder, and fiberboard gives rigidity to the frame, but it is more secure to fix the bars with self-tapping screws.
If the connection is as in the photo, self-tapping screws - two pieces for each joint - are twisted from above, perpendicular to the top board. To make the screw go easier, pre-drill holes. The diameter of the drill is 1-2 mm smaller than the diameter of the self-tapping screw.
Install hook rails
From the same bars we saw off two segments - according to internal size boxes. We put them in the case, fix them on the back side with brackets. We take furniture hinges, mark their position on the case, mark the holes for fasteners. We make holes with a drill, fasten the hinges and put a furniture magnet to fix the door in the closed state.

Here, too, there is something to do “more correctly”. It is better to fix the strips through the walls of the frame with the same self-tapping screws. So that they do not move, they can just be fixed with brackets, but then it is better to screw in two self-tapping screws on each side. So that the caps do not stick out, pick up a drill that is slightly larger in diameter than the diameter of the self-tapping cap. Make a hole for the self-tapping screw (the drill is 1 mm smaller than the diameter of the screw), then large diameter small indentations - to hide the hat.
We assemble the door and install the hinges
Next, we make the door. From the same fiberboard we cut out a piece of a suitable size and fasten it with staples. Drill on one side through hole, install the handle. On the other, we mark where the loops need to be fixed, unscrew them, attaching the counterparts, mark the place for installing the fasteners. After making holes, put the hinges in place, connecting the two parts.

As usual, the description the best option. As you can see, there is a decent gap between the door and the case. With such an installation of loops, this is inevitable. To avoid it, the loop is circled around the perimeter with a sharp pencil (it is better to scratch it with a knife blade), then with the help of a chisel, a certain amount of wood is taken out - to the thickness of the loop plate. Its surface should be flush with the frame. A similar operation is done with the counterpart. The hinge installed in this way will not give a gap, although more work is required.

In general, for the first experience is not bad. But in order for the wall key holder to look more presentable, it is desirable to finish it. Finishing- this is a matter of taste, but you need to at least polish it. If not, this can be done with sandpaper fixed on a bar. To begin with, take the average grain, then smaller and smaller.

Non-standard homemade key holders on the wall
It is not at all necessary that the manufacture of a wall key holder should be long and stubborn. And no one said that you can not use non-standard materials. As always, everything is possible in needlework, sometimes even what is forbidden. A few ideas that can please you with simplicity and unusualness.
The first number is the use of connectors and suitable plugs. We make key rings from the plugs, and fasten the “waste” connectors near the front door. All in all, twenty minutes.

Connectors and plugs - and almost nothing needs to be done
An ordinary stick can also be turned into a housekeeper. Make hooks from aluminum wiring, wrap them around a stick, decorate it with colored twine, and paint it with paints. Mounting on the wall is also not a problem - the rope is tied at both ends, clings to a carnation or hook.

Throwing away wine corks— unheard of waste. They make a very interesting keychain. The corks are glued together, and then screws with hooks are screwed into them. Stylish and unusual, minimum time and cost.

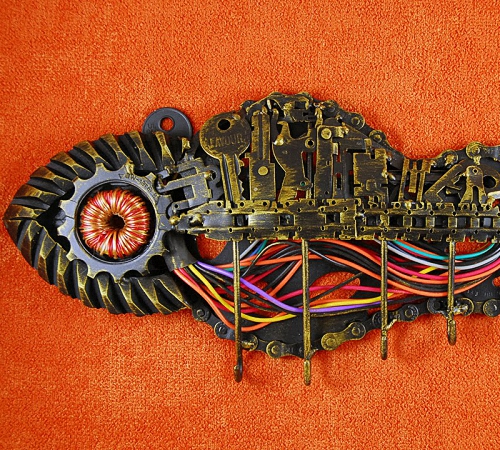
If there is just a piece of good wood, it can be polished, covered in several layers with wood oil with pigment. It's already turning out beautifully. Finding or making hooks in a small format is not a problem, but the board itself can be decorated with something.

The photo above is a stylized key, but it can be anything. Something interesting that resonates with the interior or reflects your hobbies. Yes, at least glue a couple of magnets brought from travels. It is no longer fashionable to hang them on refrigerators, but here they will be just right.

If the tennis ball is cut about half way, it will hold small objects perfectly. From several of these "holders" you can make a key holder in a sports house. The second option is in the picture on the right. If you can fix the balls on the rod (with glue, for example), inserting small hooks is not a problem. The problem is that they are likely to spin. And to prevent this from happening, you can pour a composition inside the ball, which, after drying / polymerization, will become rigid. The first thing that comes to mind is tile adhesive. It just needs to be poured carefully. If it gets on the surface of the ball and hardens, you can’t wash it off.
Ideas for inspiration

If there are a lot of keys, you can make a "multi-page". This option is suitable for hotels, holiday homes


If the keys are more valuable than money ... there are key holders with a combination lock


With a separate "embedded" key fob for each family member

The main thing is not to confuse with a regular outlet

If you master the technique of inlay, even rot in wood can be turned into virtues. In fact, everything is simple - put stones / pieces of ceramics on the cleaned voids and fill everything with epoxy glue


