The low cost of chipboard, high performance, versatility of use have made them a very popular material. The most common areas of application are furniture production and construction. The main enemy of these plates is water - the chips increase in volume, the plate swells, warps and crumbles.
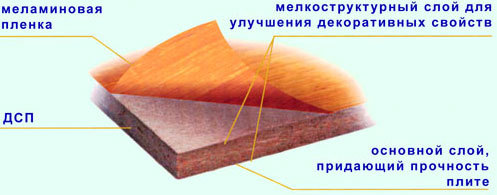
Even at the very beginning of manufacturing, sawdust and shavings after drying are impregnated with formaldehyde resins. After pressing, the surface of the plates is laminated, sometimes even varnished.
But the surface protection does not save the ends from the penetration of moisture through which it enters. Accumulating inside, water gradually begins to penetrate into the wood fibers, which leads to the destruction of the plate. Therefore, the ends must be saved from liquid penetration during operation. If they are tightly sealed, the service life of the plates will increase significantly.
Why exactly the ends are the launching pad for destruction? Yes, because the production of plates is necessary standard sizes, as well as the preparation of different-sized pieces of material, requires cutting. In this case, the integrity of the wood fibers is violated.
Thus, the protection of chipboard from moisture is carried out in three directions:
- impregnation of wood fibers with resins;
- special surface treatment;
- end sealing.
The first step towards moisture resistance
Already at the beginning of chipboard production, a process is carried out to protect them from water penetration - the so-called chip gumming. Thanks to this operation, two goals are achieved - the saturation of the fibers with resins and their bonding. For most of the manufactured boards, formaldehyde resins are used, which by definition are already a hydrophobic component of the product.

In cases where even greater moisture resistance is required from the plates, another binder is used, that is, formaldehyde resin is replaced with urea-melamine. It glues the chips together much stronger, thereby being a stronger barrier to moisture. With the additional introduction of molten paraffin or its emulsion into the particle carpet, the moisture resistance of chipboard increases even more.
Plate surface treatment
The front and back surfaces of the plate, as the largest areas of contact, without any protection, can pass through themselves and absorb, respectively, the largest amount of liquid. It will not be superfluous to cover these planes with something moisture-proof. Some of the methods of such coating are possible only in the factory, some - and at home.
One of the main methods of protection is lamination. With it, on a polished chipboard with high pressure and a high temperature, a melamine film is laid. The essence of this process is not in pressing, but in the fact that under these conditions the film polymerizes the surface of the plate, becoming one with it.
There is another method performed in the factory - this is caching. Pressure and heat are also applied here, but more sparingly. The already hardened film is pressed against the adhesive-coated plate. If lamination is a chemical process, then lamination is a mechanical one.
At home, unlaminated chipboard is often coated with several layers of paint for protection. Pre-treat the surface before painting:
- dust is carefully swept away and erased from the surface;
- for the first time, the plate is smeared with hot drying oil;
- then this is done with cold drying oil until the outer crust is formed;
- the top is painted. With any painting method, it must be remembered that each subsequent layer of paint is applied to the already dried previous one.
There are several other ways to protect against getting wet. For example, a surface that will not be subjected to mechanical stress can be protected as follows: rub with stearin, then heat with a hairdryer. Let cool and repeat this a couple more times. Or: one part of bituminous varnish is mixed with five parts of drying oil. Coverage is carried out twice.
Seam and edge processing
Water is always looking for the lowest place, the depression. And what, if not a recess, are the joints on horizontal planes? There are especially many such joints in cabinet furniture, which is made just from chipboard. Kitchen furniture is in general, as on the front line: there is plenty of water and enough fumes. The most exposed to moisture is the sink, drying cabinet, countertop, furniture near and above cooker.
Faucets all start leaking at some point. So in the sink, the most promising dangerous place is where the mixer crashes into the countertop. This is the point of contact between metal and wood. It is possible not only for the tap to leak, but also for water to condense at the point of contact. Therefore, this place is cleaned, dried with a hairdryer. Next, a layer of PVA glue is applied, after which it dries - silicone. You can build a sealant, this is also a silicone mass, it even prevents leakage window frames seal.

In the cupboard, you should check the presence or absence of a pallet: if it is not there, then the liquid, draining to the bottom of the cabinet, will ruin it. For all kitchen furniture where it is possible to get wet, you must make it a rule: degrease this place and then do not spare the sealant.
To seal the seams, it is better to use sanitary silicone of a suitable shade: dark mold spots will not appear on the surface.
The non-laminated edges of the tabletop are closed with connecting or end strips. They are metal or plastic. The protection is not so hot, so the end of the countertop should first be treated with silicone. Another way to protect is to apply furniture varnish or PVA glue to the place of the cut. Self-adhesive films or adhesive tape offered by the construction market reliable protection cannot be named.
Sealing chipboard joints on the floor
The difficulty lies in the fact that on the floor the plates are constantly subjected to significant physical stress, they "play" relative to each other. For this reason, the putty does not want to stick. There are several folk ways sealing such seams.
The seams are covered with epoxy mixed with sawdust. Sawdust is pre-sifted finely. The composition seizes very quickly, so you should not prepare a large volume of such putty at once. Such protection serves for a long time and reliably. But the price of epoxy is high, and grouting is expensive.
You can replace the epoxy with hot wood glue. It is necessary to knead sawdust in it and go through the seams.
The effect is even greater than with epoxy, as hot glue penetrates deep inside. This method also saves from moisture, and the joint stops “playing”. True, it is advisable not to walk on such a floor for several days, since carpentry glue dries for a long time.
This method is much cheaper. And if the floor is still covered with linoleum on top, then you can generally forget about damage to chipboard.
Chipboard is an excellent structural material, but not very attractive compared to wood, and is also particularly susceptible to environmental factors. Chipboard products receive a certain protection during the manufacturing process. For this, various impregnations and additives are used. However, under intensive operating conditions, such factory measures are not enough, so it is recommended to additionally protect the material. About how to protect chipboard, as well as process it finishing materials will be discussed below.
Plate surface treatment
Facial and inner part slabs have the largest areas, so if they are not protected, they absorb the most moisture. Simultaneously with protection, you can decorate the material. Below are a few of these methods.
lamination
The lamination process is the finishing of chipboard with paper-resin films. Facing is carried out at high temperature (150-200 degrees) and high pressure (25-30 MPa). The protective and decorative layer arises due to the spreading of hot resin over the surface. Next, the resin polymerizes, forming a solid uniform coating.

If observed technological process, between chipboard and resin there is a reliable adhesion. During lamination, a certain surface texture is created - usually it is gloss or. Laminated surfaces are resistant to mechanical stress, moisture, ultraviolet radiation and high temperatures.
Laminating
During lamination, chipboard is covered with an adhesive layer, on which hard paper-resin unvarnished films are then placed. The difference between laminating and laminating is that during laminating, the decorative coating is glued onto the board in ready-made. For example, wood grain embossing is done in advance. Such films are called "finish".

As in the case of lamination, the laminating process also uses increased pressure and heat. However, the parameters in this case are more gentle: temperature - from 20 to 150 degrees, pressure - from 5 to 7 MPa.
The disadvantage of lamination is the instability of the coating to mechanical stress and moisture. Such a surface is easily scratched and swollen. Laminating is used mainly in the manufacture of inexpensive furniture, as well as for the production of parts that are not subject to aggressive effects. environment(for example, the back walls of the cabinet).
Paint coating
Unlaminated chipboard sheet can be covered with several layers paintwork material. The sequence of work is presented below:
- remove dust and dirt from the sheet;
- coat the chipboard sheet with heated drying oil;
- coat the sheet again, but this time with cold drying oil (a thin crust should appear);
- apply the first coat of paint;
- after the first layer has dried, apply the second.

Laminated finish
Laminate is a polymer in which there are niches for the filler. As a filler, fabric, paper, veneer and other materials are used. At the heart of the manufacture of paper-layered filler is paper. It acts as a reinforcing layer, and also gives plasticity, strength and visual appeal to the layered polymer.
Finishing begins with cutting sheets of chipboard of the desired dimension. With the help of compressed air and brushes, dirt and dust are removed from the sheets. If dirt is not removed before painting, high-quality adhesion will not work.
sticking facing material is carried out by direct pressing of a paper-laminated polymer, on which glue and chipboard are preliminarily applied. Pressing can be done hot (carbamide or PVA-based adhesives are used) or cold (PVA-dispersion contact adhesives are used). In practice, cold pressing is not used as often, because the process requires large areas, and productivity is relatively low.

Finishing is completed with postforming. The task is to give the plastic bends and other irregular shapes. The process is carried out on special equipment at elevated temperatures.
Pasting with polymer films
The process of applying polymer films is similar to decorative cladding plastics. The difference lies in the materials used. In this case, we are talking about a thermoplastic film applied by pressing on a chipboard treated with an adhesive composition.
For chipboard finishes PVC films are used. Occasionally, polystyrene and acrylic films are used.
Finishing with polymer films is carried out on the same technological equipment on which such finishing materials as veneer or paper-laminated polymers are applied. The cladding process can be either hot or cold.
The advantage of cladding with a polymer method is the possibility of processing profile parts. However, the use of polymer films has a limited potential, since the coating does not have high physical and mechanical properties, and is also unstable to temperature effects.
vacuum pressing

Vacuum (or as it is called otherwise - membrane) pressing is a technological process during which furniture is covered decorative film. The main advantage of the method is the ability to cover parts of complex shape.
For example, using membrane pressing, you can veneer furniture self made with all kinds of recesses, cutouts, miniature details, etc. The part is placed in a vacuum press, where it is densely, repeating the surface relief, covered with a heated PVC film.
Veneering
The correct name for the process is veneer. However, in everyday life the term "veneering" is often used. Natural veneer can be finished with both chipboard and furniture board. Veneered furniture is of a higher quality than laminated furniture. However, it is quite difficult to maintain the safety of veneered furniture, since veneer is not as durable as laminate.

Tabletop made of chipboard or MDF
For decoration chipboard sheet or MDF will need plastic (laminated paper, polycarbonate, polystyrene).
Work progress:
- Cut out the right details from chipboard, we connect them with a stapler.
- The joints between the parts of the chipboard base must be the same. If this is not the case, smooth them out with sandpaper.
- We make lining for ends.
- We cut the facing part with the help of a grinder.
- We glue the finishing material and fix it with light blows of a rubber hammer.
- Install the end cap flush with the bottom edge of the countertop.
- At the same time, glue the base and apron with glue.
- When installing a laminate, we use separators. After installing the sheet, remove the separators.
- Smoothen the surface with a roller.
- Using a router, cut a hole under the sink.
- When the structure is assembled, we grind all the edges.
Seam and edge protection
Any liquid always seeks and finds the lowest place on the surface. The joints are recesses, therefore vulnerable to water ingress. A considerable number of joints are available in cabinet furniture, where the main structural material is chipboard.
Because of high humidity and frequent contact with liquids, kitchen furniture is particularly vulnerable. The sink, countertop, furniture next to the stove are the most frequently wetted pieces of furniture in the house. An example is the part of the countertop that is in contact with the faucet. The faucet leaks sooner or later, which means that unprotected chipboard will inevitably get wet and collapse.
To protect the joints, we first clean these places and dry them with a hairdryer. Then we apply PVA glue to the joints, and when it dries, we treat the surface to be protected with silicone or, as an option, building sealant.

If there is no tray in the cupboard, then sooner or later the liquid flowing from the wet dishes will destroy the chipboard. Therefore, the material must be degreased, and then treated with a sealant.
We seal the seams with sanitary silicone of the corresponding furniture color. This will prevent the appearance of mold on the furniture.
In those places of the edge of the tabletop where there is no lamination, we install end or connecting strips. These elements can be made of metal or plastic. Planks are not perfect protection, so the edges still need to be pre-treated with sealant. Another common method of protecting chipboard is applying PVA glue or furniture varnish to the edges.
Floor joint protection
The main difficulty in protecting joints on the floor is that such plates are subject to increased mechanical loads and constantly shift slightly under loads. Because of this, the putty does not adhere well to chipboard.

To ensure the protection of the joints on the floor, the seams are processed epoxy resin mixed with sawdust. Moreover, sawdust should be very small - they must be sieved in advance.
Note! Epoxy-sawdust composition seizes extremely quickly. Based on this, you should not knead too much putty at once.
A mixture of epoxy and sawdust will reliably protect the joints, but the cost of such a solution is quite high. Epoxy resin can be replaced with wood glue. You need to add sawdust to the hot glue, and then process the seams with the resulting composition. If everything is done correctly, the effect will be even better than with epoxy, since the glue penetrates deeper.
After processing the seams, the chipboard joints will become more resistant to moisture and, no less important, they will stop “playing” with each other. If you trim the chipboard with linoleum, you can no longer worry about the safety of the plates.
After processing the seams, it will take several days for the putty to dry. At this time, it is impossible to walk on the slabs, so as not to break the joints.
Coating chipboard with protective and finishing materials in many cases requires certain experience and qualifications, and sometimes the availability of special equipment. If there is no confidence in own forces better to entrust the work to specialists.
Chipboard is one of the most affordable building materials, so many are interested in the question of how to impregnate given material from moisture? And if in summertime moisture on the floor is unlikely, then in winter it forms in any case. In this article, we will give good advice about how and with what to impregnate chipboard from moisture?
Oil varnish or drying oil
In Soviet times the best way was, and now - special impregnating substances. Naturally, this does not mean that drying oil cannot continue to be used as a protective agent against moisture. It is allowed to use it, but to achieve high level protection is almost impossible. Yes and necessary a large number of mixture, while the working procedure will have to be done several times.
Polyurethane Blend
One of the most popular means for processing chipboard is a polyurethane mixture, which is similar in composition to a primer. The impregnation is based on organic solvents and polymers, which, during processing, penetrate deep into the pores of the material. At the same time, the strength level building material increases significantly.
Nitrocellulose varnish
There is another way to protect chipboard from moisture - nitrocellulose varnish. Its protective action is similar polyurethane varnish: it forms something protective covering on the surface of the product, preventing the penetration of moisture, while the resistance to damage is equivalent to the maximum rate. A significant advantage of nitrocellulose varnish over its predecessor is the application of the substance without pre-training workplace, but to achieve best results we strongly recommend to carry out a chipboard primer.
In order to significantly protect products from chipboard, you need to use a combined method of protection. It is best if it not only consists of a deep penetration impregnation step, but also includes the application of additional paints and varnishes.
The low cost of chipboard, high performance, versatility of use have made them a very popular material. The most common areas of application are furniture production and construction. The main enemy of these plates is water - the chips increase in volume, the plate swells, warps and crumbles.
Even at the very beginning of manufacturing, sawdust and shavings after drying are impregnated with formaldehyde resins. After pressing, the surface of the plates is laminated, sometimes even varnished.
But the surface protection does not save the ends from the penetration of moisture through which it enters. Accumulating inside, water gradually begins to penetrate into the wood fibers, which leads to the destruction of the plate. Therefore, the ends must be saved from liquid penetration during operation.
If they are tightly sealed, the service life of the plates will increase significantly.
In the photo - the effects of water on a chipboard countertop
Why exactly the ends are the launching pad for destruction? Yes, because the production of plates of the required standard sizes, as well as the preparation of pieces of material of different sizes, requires cutting. In this case, the integrity of the wood fibers is violated.
Thus, the protection of chipboard from moisture is carried out in three directions:
- impregnation of wood fibers with resins;
- special surface treatment;
- end sealing.
The first step towards moisture resistance
Already at the beginning of chipboard production, a process is carried out to protect them from water penetration - the so-called chip gumming. Thanks to this operation, two goals are achieved - the saturation of the fibers with resins and their bonding. For most of the manufactured boards, formaldehyde resins are used, which by definition are already a hydrophobic component of the product.

Green blotches in chipboard - special water-repellent components
In cases where even greater moisture resistance is required from the plates, another binder is used, that is, formaldehyde resin is replaced with urea-melamine. It glues the chips together much stronger, thereby being a stronger barrier to moisture. With the additional introduction of molten paraffin or its emulsion into the particle carpet, the moisture resistance of chipboard increases even more.
Plate surface treatment
The front and back surfaces of the plate, as the largest areas of contact, without any protection, can pass through themselves and absorb, respectively, the largest amount of liquid. It will not be superfluous to cover these planes with something moisture-proof. Some of the methods of such coating are possible only in the factory, some - and at home.
One of the main methods of protection is lamination. With it, a melamine film is laid on a polished chipboard at high pressure and high temperature. The essence of this process is not in pressing, but in the fact that under these conditions the film polymerizes the surface of the plate, becoming one with it.
There is another method performed in the factory - this is caching. Pressure and heat are also applied here, but more sparingly. The already hardened film is pressed against the adhesive-coated plate. If lamination is a chemical process, then lamination is a mechanical one.
Components of laminated chipboard
At home, unlaminated chipboard is often coated with several layers of paint for protection. Pre-treat the surface before painting:
- dust is carefully swept away and erased from the surface;
- for the first time, the plate is smeared with hot drying oil;
- then this is done with cold drying oil until the outer crust is formed;
- the top is painted. With any painting method, it must be remembered that each subsequent layer of paint is applied to the already dried previous one.
There are several other ways to protect against getting wet. For example, a surface that will not be subjected to mechanical stress can be protected as follows: rub with stearin, then heat with a hairdryer. Let cool and repeat this a couple more times. Or: one part of bituminous varnish is mixed with five parts of drying oil. Coverage is carried out twice.
Seam and edge processing
Water is always looking for the lowest place, the depression.
And what, if not a recess, are the joints on horizontal planes? There are especially many such joints in cabinet furniture, which is made just from chipboard. Kitchen furniture is in general, as on the front line: there is plenty of water and enough fumes.
How to treat plywood, chipboard and wood to protect it from moisture?
The sink, drying cabinet, countertop, furniture near and above the stove are most susceptible to moisture.
Faucets all start leaking at some point. So in the sink, the most promising dangerous place is where the mixer crashes into the countertop. This is the point of contact between metal and wood. It is possible not only for the tap to leak, but also for water to condense at the point of contact. Therefore, this place is cleaned, dried with a hairdryer. Next, a layer of PVA glue is applied, after which it dries - silicone. You can use building sealant, this is also a silicone mass, even window frames are sealed from leakage.
The edge not only protects the chipboard from moisture, but also reduces emissions harmful substances
In the cupboard, you should check the presence or absence of a pallet: if it is not there, then the liquid, draining to the bottom of the cabinet, will ruin it. For all kitchen furniture where it is possible to get wet, you must make it a rule: degrease this place and then do not spare the sealant.
To seal the seams, it is better to use sanitary silicone of a suitable shade: dark mold spots will not appear on the surface.
The non-laminated edges of the tabletop are closed with connecting or end strips. They are metal or plastic. The protection is not so hot, so the end of the countertop should first be treated with silicone. Another way to protect is to apply furniture varnish or PVA glue to the place of the cut. The self-adhesive films or adhesive tape offered by the construction market cannot be called reliable protection.
Sealing chipboard joints on the floor
The difficulty lies in the fact that on the floor the plates are constantly subjected to significant physical stress, they "play" relative to each other. For this reason, the putty does not want to stick. There are several folk ways to seal such seams.
The seams are covered with epoxy mixed with sawdust. Sawdust is pre-sifted finely. The composition seizes very quickly, so you should not prepare a large volume of such putty at once. Such protection serves for a long time and reliably. But the price of epoxy is high, and grouting is expensive.
You can replace the epoxy with hot wood glue. It is necessary to knead sawdust in it and go through the seams.
The effect is even greater than with epoxy, as hot glue penetrates deep inside. This method also saves from moisture, and the joint stops “playing”. True, it is advisable not to walk on such a floor for several days, since carpentry glue dries for a long time.
This method is much cheaper. And if the floor is still covered with linoleum on top, then you can generally forget about damage to chipboard.
You might be interested to know
How to protect chipboard panels from moisture
Until now, chipboard has been widely used in repairs. After all, these plates are universal. They are suitable for leveling walls, ceilings, laying dry screed, creating interior partitions and so on. But, if chipboard is planned to be installed in the kitchen or in the bathroom, certain measures should be taken to protect it from moisture. What methods are available in this case? The main approaches will be discussed below.
1. Treatment of chipboard with drying oil
Of the most simple methods should be called the application of drying oil on a chipboard. Most often, this method is used when the chipboard is planned to be laid on the floor when creating a rough screed. Drying oil is applied to the main part of the plates in two layers. On the ends of chipboard boards, drying oil should be applied at least three times, since in these areas it will be especially intensively absorbed.
To increase the moisture resistance of chipboard panels, you can add a little bituminous varnish to the drying oil. Enough 1 part of varnish for 5 parts of drying oil.
2. Painting chipboard boards with PVA glue
It will be possible to increase the waterproof performance of a particle board if it is coated with PVA glue. This method is used in almost any situation. That is, a plate treated in this way can be used to level surfaces and install partitions. But you can start work only after the glue is completely dry.
It is desirable that the panels are also processed at least twice. Besides, adhesive composition can play the role of a primer, so in the future it will be easier to apply plaster, putty or paint.
Chipboard impregnation - odor protection
Pasting chipboard with a protective film
Another in a good way protecting chipboard from moisture becomes a special gluing protective film. It not only protects the material from contact with moisture, but further improves it. appearance. That is, the self-adhesive film also performs a decorative function. It remains for the owner to choose a suitable sample and stick it correctly. To do this, the panel should be cleaned of dirt and dust, remove the protective layer from the film and glue it. Special decorative corners with waterproof qualities are installed on the ends.
Each method has its own advantages. And the owner, who manages to do the job correctly, will receive chipboard panels that are reliably protected from moisture. Then finished material it will be possible to use it when working even in those rooms that are not distinguished by the most favorable operating conditions.
To process the countertop, or rather, I drank it under the hob, you can wash it with the help of metal tape. The effect is just class, the countertop will probably grow old faster.
How to protect the legs of cabinets from chipboard from moisture?
BUT, as always, there is a BUT. The material is easily vulnerable, and rather (carefully-attentively) labor-intensive, maybe for this reason we don’t particularly like the assemblers, or maybe someone doesn’t know. As they say, the eyes are afraid, but the hands are doing it.
P.S. the base of the adhesive tape is aluminum foil.
—————————————————————————————
Drying oils are paint-and-lacquer film-forming materials based on processed vegetable oils. Part natural drying oils includes exclusively drying vegetable oils(linseed, hemp, sunflower oil is sometimes added) and desiccants. Desiccants are manganese, cobalt, lead salts of carboxylic acids, which accelerate the drying process. Organic solvents are added to the composition of semi-natural drying oils - white spirit, ski *****, solovent oil. Oxidized drying oils are obtained by heating linseed or hemp oil to 150-160 degrees with stirring and passing desiccants through them. Such drying oils have a higher viscosity, increased durability, gloss, more dark color than natural ones. Compacted drying oils, unlike natural ones, are obtained with a longer heat treatment at a temperature of about 300 degrees.
Fungus develops over time on silicone coatings.
Dear visitor! You are in the archive of the old mastergrad.com forum
How to protect chipboard from water?
| Paul July 21, 2004 16:35:58 |
Good afternoon there was a problem - the chipboard frame of the kitchen swelled from leakage. The edges were laminated, but this did not help - I think it was broken technology, or chipboard bad. The kitchen manufacturer changed the frame, but in order to avoid a problem, I want to pre-treat the edges. The question is, what? Yesterday I tried to cover up liquid nails cut chipboard and place the processed end in a bowl of water - it swelled overnight ...: (((Advise which tool is better to use to seal the edges? Good luck Paul |
| Shadow (Moscow) July 21, 2004 18:06:44 |
2 Paul: Rub exposed areas silicone sealant |
| Shadow (Moscow) July 21, 2004 18:10:32 |
2 Paul: Sorry - under open areas understand non-laminated areas of the frame. In addition - nothing prevents you from smearing the laminated edges with that sealant - the silicone film will certainly not let water through. |
| Paul July 21, 2004 20:10:49 |
2Shandow: I rubbed the countertops with silicone sealant on the chipboard (the cutout for the sink) - it doesn’t hold well: ((. I think it will be even worse on a laminated surface ... Something penetrating is needed here, I’ll try parquet varnish. I’ll let you know about the results. Good luck Paul |
| Serg (Samara, Russia) July 22, 2004 01:31:38 |
2Paul: Soak with drying oil several times. Best regards, Sergei |
| Paul July 22, 2004 08:31:15 |
The varnish did not help - the sample left in the water swelled overnight: (( 2 Serg: Today I'll try drying oil... Good luck Paul |
| shrek (Tomsk) July 22, 2004 10:15:46 |
IMHO, if you leave chipboard in water overnight, then at least soak it with something - it will swell. |
| Serg (Samara, Russia) July 23, 2004 00:18:13 |
2Paul: You can apply heated in a water bath - it will be better absorbed. Best regards, Sergei |
| TriX (SPb) July 23, 2004 11:33:23 |
Yeah. And under pressure. Then the whole class. But it still won't help much. Chipboard is poorly impregnated. The binder prevents the impregnation from going deep. And water is such a chchchchch that it crawls into all the cracks, pores, etc. and delaminates the materials. You can look for hydrophobic mixtures such as liquid silicone. It won't swell underneath. But this is not suitable for furniture. |
| shrek (Tomsk) July 23, 2004 12:45:21 |
What else do you think :) What can be coated with chipboard for water resistance?If there was such a tool, then the manufacturers of chipboard kitchens would already use it :). IMHO, flawless good remedy search. Only impregnation with drying oil and do not fill with water :). |
| Serg (Samara, Russia) July 24, 2004 00:50:45 |
2TriX: Applying drying oil heated in a water bath is a standard technique. > Chipboard is poorly impregnated. From the side of the cut, the plate is impregnated quite well. There is this tool - immediately mark all technological holes and then stick melamine - and on back wall Same. The front, rolled end raises no questions for anyone - here you need to do the same with the back. Best regards, Sergei Best regards, Sergei |
Due to the ease of processing and excellent consumer qualities, today it is one of the most widely used in furniture production. Modern technological processes make it possible to obtain a sufficiently high-quality and easy-to-use material from chips and composite resin.
However, chipboard also has its own specifics of use, which dictates some conditions for its processing. For example, this board can crumble and split under strong physical impact, and, moreover, to a much greater extent than ordinary wood. The fact is that the wood fibers present in the array of natural solid wood are, as it were, a connecting element that gives additional strength to the entire board.
In chipboard, these fibers are destroyed, so such a board requires slightly different conditions for use and handling.
How to cut chipboard
If there is no power tool at hand, almost any saw will do for sawing chipboard. The only thing that should be observed when sawing is to try to keep the saw almost flat in relation to the surface of the plate. So the plate will crumble less when sawing, and the cut will be more accurate.
Circular saw or electric jigsaw, of course, will prove to be more productive tools in this matter. The only wish in this case is to drive the tool not too fast, only slightly pressing. However, the rotation speed circular saw and the course of the jigsaw is better to keep at a high level. Best suited for sawing such material saw blade or canvas with small tooth, so you can avoid coloring the material and the appearance of an uneven edge.
It is clear that the sharper the mil, the cleaner the cut is. You can additionally protect the edge from coloring if you use masking tape glued to the cut line. This is especially true when sawing chipboard with a decorative coating.
At chipboard processing with a decorative (for example, laminated) coating, you should also not rush, it is better to cut slowly, avoiding chips. Another way to protect the coating from chipping is to pre-cut it with a sharp knife.
Drilling, planing and rasping
With drilling and planing chipboard, everything is exactly the same as with sawing - a blunt or slow moving tool will split and crumble the material. So, a dull drill will chip off the edges of the hole, in order to get even, high-quality holes, you should approach the choice of a drilling tool with all responsibility. You need to feed the drill during work smoothly and not too fast, so you can improve the quality of drilling.
Small irregularities resulting from sawing on the cut of the slab can be eliminated with a planer or rasp. The tool is blown along the edge smoothly and carefully, taking care not to chip or tear the material.
If the chipboard you are processing has a coating in the form of a film, it is better to cut its edge with a planer. If you do not have the skills to work with this tool, you can use a file.
We process the surface of chipboard
During this operation, two methods can be used - facing the surface with some kind of decorative material or varnishing. It must be said that due to the specifics and texture of this chipboard material quite rarely varnished, it is very difficult to achieve any impressive results in terms of beauty. Therefore, most often this is done in order to protect the outer layer of the plate from moisture.
Before proceeding with varnishing the surface of the plate, it should be carefully leveled with putty and sanded. The fact is that a layer of varnish will show everything, the smallest surface irregularities, which will greatly spoil the impression of the result of your work.
Putty must be applied with a spatula, it must be allowed to dry well, and then treat the surface sandpaper. Such preparation will help to get a completely even and smooth surface ready for varnishing.
If you have thoroughly puttyed and sanded the surface of the slab, most likely you will need to apply only one layer of varnish. If, however, flaws and irregularities were found during varnishing, you can repeat the procedure - before re-applying varnish, dry the first layer thoroughly and walk a little over it with fine sandpaper.
As for drawing decorative coating, then for this purpose it is better to choose a decorative self-adhesive film- it is convenient to work with it, and a wide selection of colors and textures will allow you to choose exactly what you need. Such a film has an adhesive layer, which facilitates and speeds up its application; before applying such a film, the plate must also be carefully sanded - the fact is that the thickness of the film is small, so all the irregularities of the plate will show through it. With due diligence, you will get a beautiful and even surface.
Alternatively, instead of a film, sheet plastic can be used - it is more durable and provides better protection for the plate surface. To apply it, you will need a special glue, which is applied to the surface and ensures a strong adhesion of the plastic to the chipboard.
How to protect the surface and edges of chipboard
We have already mentioned above that chipboard furniture has some storage and use features - for example, it does not tolerate excessive moisture very well (strictly speaking, no furniture tolerates dampness well, but this is best seen on chipboard furniture).
Therefore, if you have made any piece of furniture from this material, it will be useful to protect the edges and surface of the slab. In addition to protecting against moisture, such a measure will also help reduce the release of harmful substances that may be contained in chipboard.
An excellent measure in this regard is the application of additional layers of varnish - this will help to avoid the release of formaldehyde. The layer of lacquer coating should be thick enough, it is necessary to lacquer the furniture at least twice.
You can also protect chipboard surface using laminated plastic or self-adhesive film, we already wrote above how this is done. The only thing that can be added here is that the joints protective material should be as tight as possible to prevent moisture from penetrating.
You can also protect the surface of chipboard with plywood, the only point here is that the plywood itself can be made using formaldehyde. If you know or suspect that your plywood may contain formaldehyde, varnish the plywood to reduce its release.
Matter or wallpaper is not too good for this purpose - the porous structure of these materials will not be able to reduce the amount of formaldehyde emitted from plywood, although as decorative material they fit just fine. A separate topic is the edges of chipboard boards.
Their protection is no less important than for the surface of the plate, with prolonged exposure to moisture, the edge swells greatly and loses strength and integrity. Requires an edge and protection against mechanical impact, with strong blow she can crumble. In addition, the chipboard cut is not very aesthetic, so furniture manufacturers tend to further decorate it.
For this purpose, many manufacturers produce special edges for cutting chipboard; a huge number of the most diverse products are on the market today, differing in thickness, material, color and texture.
Using this material is quite easy - usually such a strip already has a layer of glue applied to it, with the help of a not very hot iron or hair dryer, the glue is heated and the strip is applied to the edge. After that, in order to fix the edge in place, you can iron it again with an iron.
If the edges of your chipboard are subjected to high loads, it makes sense to protect them with thin wooden planks - such a lining will not only protect them from impacts, but will also be in perfect harmony with the color of the surface itself. It is better to plant such planks on glue, but if there are no other options, you can use small carnations, only it is better to bite off their hats so as not to spoil the appearance.
After the wooden plank is in place, it is cleaned and, together with the surface of the plate, is covered with a layer of varnish or other protective composition.


