Making household items, tools and electrical appliances with your own hands is not always associated with a desire to save money. The spirit of invention lives in almost everyone who has ever held in their hands wrench or a screwdriver. For those who are not able to throw in the trash a single gram copper wire and even an old unnecessary razor blade, it will be useful to find out how a workable boiler can be made from such improvised items.
A do-it-yourself boiler can be made different ways but not all options self assembly this device allows you to use it for a long time. The article describes the main, time-tested options self-manufacturing boiler.
How to make a boiler with your own hands - the best of proven methods
Most often, in artisanal conditions, boilers are made from:
- Razor blade. Blades Satellite.
- Nails.
- TENA for a teapot.

TEN from an old kettle
TEN from an old kettle
You can also make at home workable devices for heating water from nichrome wire which is mounted on a ceramic insulator.
The main task that must be performed when designing heating elements independently is to minimize the possibility of a short circuit and damage. electric shock. When using low-voltage homemade products, electric shock is practically not worth fearing, but devices powered by 220 V can cause accidents and fires.
Blade boiler
It is not difficult to make a boiler from razor blades. To perform the work, it is necessary to prepare the following components:
- 2 blades of the "Satellite" type.
- 2 matches.
- Twin wire with plug.
- Threads.

Scheme of an electric boiler made of blades
Assembly process homemade boiler as follows:
- A copper strand of electrical wire is tied to each blade.
- 2 matches are placed between the blades, which will serve as spacers to protect against short circuits.
- The blades are threaded to the matches in such a way as to prevent the free movement of metal parts.

Homemade hot water device assembly
A homemade blade boiler is completely ready for use!

Testing a homemade device
Now it remains only to pick up a tank in which it will be possible to boil water. The container to be used with a boiler of this design must not be made of conductive material. You should also exercise extreme caution when turning the device on and off. Before you turn on a home-made electrical device in a 220 V network, you must first lower the device into the water. During water heating, it is strictly forbidden to touch electrical device or water containers.
In addition to the necessary safety measures, it must also be remembered that heating water in this way is possible only if it contains conductive metal salts. Distilled water with a blade boiler will not heat up, due to the lack of a conductive medium between the two metal planes.
In addition, the use of the electrolytic method of heating water negatively affects its palatability, That's why this option heating is most suitable for technical fluids.
Boiler from heating element
Making a boiler at home from a heating element is no more difficult than using razor blades. Such a variant of a homemade device with proper manufacture is safer to operate.
The heating element is not difficult to "get" from, the malfunction of which is not related to the heating element.
In addition to having a working heating element, you will also need to prepare a two-wire wire with a plug, which can also be borrowed from a faulty kettle. Also, for attaching wires to the heating element, it is recommended to purchase terminal blocks, the use of which will greatly simplify and speed up the process of self-manufacturing the device. In this case, the assembly process is carried out in the following sequence:
- The ends of the wire are stripped of insulation using a knife or a special device.
- The wires are brought into the terminals and then fixed on the terminals of the heating element with built-in screws.
- Using a multimeter, the resistance of the heating element is checked, as well as possible leakage to the product case.

Water heating device from a heating element from a kettle
With a successful diagnosis homemade device can successfully compete with factory products, and the quality of the connection between the main wire and the heating element can even be better than that of store-bought household appliances. The absence of soldered connections will allow this device to last much longer, but if there are no terminal blocks available, then the above-described boiler manufacturing option can be made by soldering wires to the contacts of the heating element.
This version of a homemade boiler can be used without any restrictions. The quality of boiled water prepared in this way allows you to brew tea, coffee or any other drinks without losing taste.
From nails
The electric nail appliance is a variation of the blade boiler, but with a more "civilized" design. To make this water heater, you need to prepare:
- 6 nails 80 mm.
- Two-wire copper wire with a plug.
- Electric drill and drill 3 mm.
- Line segment wooden board 100x100 mm, at least 25 mm thick.

Nails for a homemade water heater
The process of making a boiler from nails is carried out in the following sequence:
- In the middle of the wooden plate, 6 holes with a diameter of 3 mm are made with a distance of 3-5 mm between them.
- A steel nail is inserted into each hole in the wooden plate.
- From a cable with a plug, each contact is connected to 3 nails.
- A wooden plate is installed above the tank and is connected to a 220 volt network.
When carrying out these actions, it is necessary to strictly ensure that the wires are pressed as tightly as possible to the metal surface nails. To ensure reliable contact of the wires with the electrodes, it is recommended to insert 1/3 of the copper strands of the wire into each hole, before installing the nails in wooden plate. If all the steps were done correctly, then when checking the resistance between the contacts of the plug, the multimeter should show a zero value.
Use this device for heating water in the following sequence:
- Pour water into a non-metallic mug, which should not be distilled.
- Place a wooden plate on the mug with the electrodes facing down.
- Connect the device to the 220 V network.
- After the liquid boils, the homemade boiler should be disconnected from electricity.
As in the case of using a product made from razor blades, the quality of the boiled liquid leaves much to be desired, so this method of preparing boiling water is also best used for technical needs.
The most powerful homemade boiler

Nichrome spiral
In order to boil a large volume of water, you can make a powerful portable device from improvised means. For the manufacture of the device you will need the following parts:
- Nichrome spiral with a wire diameter of at least 1 mm.
- Industrial fuse series PN 2.
- Two-core cable from a wire with a cross section of at least 4 mm 2.
- Screwdriver and wood screws 20 mm.
- Collapsible type plug.

Fuse PN-2
The manufacture of a powerful device for heating water is carried out in the following sequence.
- The PN-2 fuse is disassembled to remove the ceramic body of the product.
- 8 self-tapping screws, which were formed during the disassembly of the device, are screwed into the holes in the body of the ceramic insulator.
- The end of a nichrome spiral clings to one of the 8 screwed screws.
- Then, inside the body of the electrical insulator, the spiral is pushed to the opposite end of the round insulator and again fixed around the screw.
- The spiral unfolds in reverse side, but is already fixed to another screw screwed into the insulator.
- In the same way, the spiral and self-tapping screws are connected at 5 more points, after which stripped copper wires are connected to the first and last self-tapping screws and the self-tapping screws are completely screwed into the ceramic insulator. Given the significant power of such a home-made boiler, the cross section of the connected copper wire must be at least 4 mm 2. A plug is installed on the other end of the wire.

Checking a powerful homemade water heater
The boiler may only be operated in a suspended state. The heating element must be completely lowered into the water and must not touch the walls and bottom of the tank. When using a homemade one, it is strictly forbidden to touch the container and the body of the device while heating the water.
Conclusion
A boiler from improvised means can be made with your own hands at no financial cost. All without exception homemade products should be operated in such a way that the human body does not come into contact with the heated liquid or with the uninsulated part of the current-carrying elements. It is forbidden to leave the boiler, made by yourself, unattended, as well as in places where children can access the turned on device.
The second heater that burned out in a year in a home water heater suggested the search for causes frequent breakdowns. After draining the water and dismantling the electrical circuit, I unscrewed the clamping flange nuts. With difficulty, he pulled out the block of heating elements covered with scale. After cleaning the copper tubes of the heating coils, I found longitudinal crack on the heating element low power. I checked the main - it works. It was the same a year ago: a lot of scale, a torn copper pipe and a trip to the store for a new one.
The apparent root cause is hard water from a well. Installing a softener filter from calcium salts last year did not help. The presence of a magnesium electrode also did not increase the service life.
The second reason is poor-quality electric heater coils. After interviewing neighbors and acquaintances, it turned out that replaceable heating elements from the manufacturer of the most common water heaters in our country seem to be specially made for quick breakdown, because if the factory one works for 3 years, then after replacement - only 6-8 months. I assumed that too close the location of the two coils, two thermal sensors and a magnesium electrode accelerates overheating and failure.
Third and main reason- not taken into account in the design of water heaters domestic realities. Let foreign manufacturers not be offended: imported water heaters are 90% unsuitable for the hard mineralized water of the Russian outback. Apparently, Mendeleev came up with a table of chemical elements while studying drinking water in Tobolsk.
When examining the internal 30-liter tank, I found that it consists of two cylindrical tanks of 15 liters, connected by welded 20-mm tubes.
From the first tank through mounting hole TENA I managed to wash the lumps of scale. And in the second half, everything remained the same. I had to pour four packs citric acid and, stirring, wait for the complete dissolution of the accumulated stalactites. To give 1,200 rubles for a new standard heating element in the conditions of the economic crisis and the fall in wages, the hand did not rise. Therefore, I found free way restoration - I simply cut off the tubes of the burnt spiral and drowned out the holes formed with bronze bolts with rubber gaskets.
As a result, the water heater is already working. For a 30-liter storage electrotitanium, 1.5 kW is enough. This is how the goal of the repair was achieved with a positive economic effect.
And I also wrote a plan for preventive acid flushes for myself, posted a mode of use hot water with turning off at night and ... put the piggy bank on the supply clean water from the city network.
Repair of the heating element with both hands - progress of work
1. Dismantle the heating element. The reason for the failure is visible to the naked eye: a thick layer of scale caused the element to overheat.
2. After cleaning, it became clear that the small heating element burned out, but the more powerful one did not suffer.
3. I had to cut off the burnt element and plug the holes left after it with bronze bolts.
4. Now more free space has formed between the heating element and the temperature sensors - and scale will not accumulate between them.
5. Bronze bolts with rubber gaskets are installed as plugs in place of the heating element.
6. The heating element is ready for work again. For a 30-liter tank, its power of 1.5 kW is enough.
How to repair a water heater heater with your own hands - photo
REPAIR OF THE WATER HEATER WITH YOUR HANDS - REPLACEMENT OF THE CORD
When my colleague was moving, someone cut the power cord from a practically new flow heater water. There are suspicions that this is the work of her ex-husband. But whoever did it, plugging the heater into the outlet will no longer work. Gotta do it.
In the workshop, only 2,000 rubles were asked for the installation of a new wire. But the amount to my colleague seemed overpriced. I took over the repairs. Everything you need was found at the nearest radio market. After a thorough study of the interior of the heater, it turned out that the screws that fix the wire at the exit from the housing have a tricky head. You can’t unscrew them with a simple screwdriver - you need a “horned” bit. This was found in the stall where I bought the wire. You can start repairing.
Here's what I needed to fix.
The body of the heater opens easily, the lid is fastened with two plastic latches.
Here's a piece sticking out of the hull. I have to say, it helped me a lot. “Sawed off” a piece from him, I went to choose a new wire. It’s very convenient when you have a sample: you definitely can’t go wrong when buying!
Before installing a new wire, it is better to take a picture of the wiring, for example, on a smartphone, so as not to confuse where to connect which wire.
We unscrew the screws in the connecting block to remove the piece of the old wire.
We take out the ends.
We unscrew the screws that fix the wire at the output.
Remove the old wire.
Using a regular clerical knife, we clean the ends of the new wire.
We insert the stripped wires into the block and fix them by tightening the screws.
We insert a new wire and fix it at the output.
The new wire is connected.
We put the case on the wire.
We clean the ends of the wire.
We connect the wires.
To do this, unscrew and tighten three screws. We also fix the wire with a bar with two screws.
Now the case has sat down with an interference fit - you can no longer pull the wire out of the plug.
The wire is connected - you can install the heater in its place.


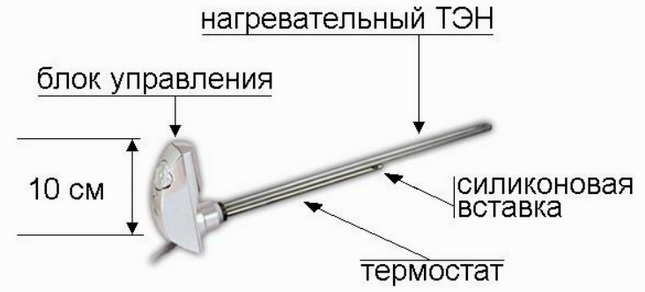
TEN - an electric liquid heater in the form of a metal tube, inside of which there is a spiral. Lots of designs and variety. Heaters are manufactured for both large and small industries.
These heaters are mass-installed, for example, in electric boilers and electric boilers, therefore they are also produced by well-known manufacturers.
But in any market you can find heating elements intended for installation in heating radiators. These devices are made more often in Poland, Ukraine, China. They can be equipped with built-in thermal sensors, i.e. operate in semi-automatic mode, monitoring the degree of heating.
Based on such electric heaters, you can easily create a heater with your own hands. This is what home masters use, designing the simplest heating and “saving” at the same time, as they think, a fair amount of money.
But is it profitable to use heating elements?
Where usually, in what situations, these electric water heaters are used? How to install and use heating elements ...
How big is the benefit from heating elements
If there is an old battery, then why not turn it into a heating system with a heating element for a small utility room, - chicken coop, workshop, garage ...
There are even myths that it is profitable to heat with shadows. But "dreams are shattered by harsh reality" - heating with electricity is the most expensive thing. Since the most expensive energy source is used.
It does not matter whether there is a proprietary programmable electric boiler, or a barrel with a heating element lowered into it on a wire is installed - the efficiency of such electric heaters is about 97%. And then we pay according to the meter ...
Get warm at night
But there is a loophole - a cheap overnight electricity rate. You can find out exactly about the current tariffs and the possibility of connecting the night, in the local power grid.
True, nighttime electricity cannot be called cheap, but in combination with the “Comfort” indicator, nighttime heating becomes very attractive to the user.
But the price of the heating system itself with electric heating can vary significantly.

Heaters in batteries
When in apartments with central heating cold, then they are heated additionally with electricity, as well as gas cooker or column.
This is where a couple of heavy cast iron batteries with heating elements. Compared to branded electric convectors, they have a much higher heat capacity, so they can be turned off for a longer time and not monitor their work. But the heating is correspondingly longer.
Craftsmen install such radiators mainly in garages, where they like to spend time. Or, for example, for heating animals in cold weather on small farms.

Heating systems equipment
It happens that in a dacha, in a garage, etc. there are remnants of the former heating system, for example, a couple of radiators with steel pipes. The easiest way to bring the system back to life is by inserting electric heaters into it ....
But heating elements can also create auxiliary heating in home system heating. Electric heating perfectly complements the solid fuel boiler. Especially at night, with a cheap fare. And here " homemade production” is also in demand.
If big enough metal pipe fix a couple of heating elements of 2 kW each, you get a 4-kilowatt electric boiler. The nuance is that at night it can be connected to a low-power 220 V network, since other consumers are “sleeping”, except for the refrigerator, for example.
Such a “creation”, in practice, can become the main heating during the season in an insulated house, if, of course, a buffer tank is used - a heat accumulator.

What power will be needed
In the heating system of the whole house, it is better to use 2-kilowatt samples of electric heaters.
But in individual radiators of home-made registers, cuttings of heating in garages ... it is impossible to use too powerful heating elements.
Therefore, the power of the ten should not be more than thermal power given by the device at +70 degrees. This is approximately 75% of the nameplate power of the radiator.
One section and cast iron and aluminum radiators(500 mm between pipes) has a heat transfer capacity of 170 W at 90 degrees of liquid and 20 degrees of air. At +70 deg. heating - one section - 140 W, 7 sections - 1080 W, 10 sections. - 1400 W.
Thus, for a radiator of 7 sections, the power of the heating element should not be more than 1 kW. And for a radiator of 10 sections - no more than 1.4 kW.
The situation is more difficult with self-made registers - their heat transfer is unknown. It remains only to start using the least powerful heaters.
What shades for the radiator to choose
Heating elements for radiators are made on the basis of a plug (base) with a standard thread diameter of 40 mm. It remains to unscrew the bottom plug from the radiator, screw the heater in its place.
The selection of these heaters in terms of power for radiators was mentioned above. Do not take more powerful devices, in order to avoid emergencies. No need to overheat the radiator, achieving greater heat transfer.
But these heaters also differ in length. For a free-standing radiator, without fluid movement, longer shadows are preferable. Then the heating will be more uniform.

In a flow electric boiler, another selection priority is lower hydraulic resistance. Minimizing the effect of heaters through the successful supply of tubes and the configuration of their location is not a problem for the home craftsman.
The manufacturer - the "Chinese", as before, is scolded the most, the best heating elements are considered to be local spills - Russian-Ukrainian.
How to apply
Heating elements can turn on room thermostat. Then they are controlled by the set air temperature.
But in most cases, heaters with built-in temperature relays are used - heating according to the temperature of the coolant.
Liquid expands when heated. You can not separate radiators, and others closed systems heating, fill with liquid completely. In heating systems, an expansion tank is used to compensate for expansion.
In the case of a separate radiator, it is enough to leave at least 10% of the internal volume unfilled - fill the radiator up to the top plug.
The installation of the heating element is as follows. The system is drained, the radiator cap is unscrewed, the ten is screwed in. In this case, flax with lubrication is usually used as a sealant (metal-to-metal).
The heater is connected to the mains in accordance with the PUE, with the appropriate insulation of the contacts.
Oil not allowed
You can come across recommendations to fill the radiator with oil - supposedly it will turn out to be an analogue of an “oil heater”. Before following such advice, it is recommended to study the experience of the "pyrotechnician" who poured oil on cardboard, set it on fire, and then tried to extinguish it.
Oil-filled industrial generating sets (e.g. high-voltage oil disconnectors) are operated with special measures fire safety.
If the system freezes, it is necessary to use non-freezing liquids; for one radiator, you can use the same automobile Antifreeze. Flammable liquids are not allowed.

There are also other violations.
Do-it-yourself construction - profitable?
Self-construction of electric heaters is not welcome for safety reasons.
Much better to buy ready-made electric heater for rooms, for example, an electric convector that meets the requirements ... The manufacturer is responsible for its performance.
Economic feasibility in heating elements may arise, as was said, when there is an “abandoned” and “free” shell for it.
But security issues are actually much more important than the benefits obtained in this way.
Now this is understood more often, because heating elements are less and less interested.
Craft instantaneous water heater with your own hands - great idea if you suffer from a lack hot water in the summer or want to organize a shower in the country. You can make a protochnik yourself, because it is quite simply arranged. What you need to work and what steps to go through, you will learn in the article.
We wrote in detail about how the boiler works in the article "".
We list the main nodes and consider the principle of operation. The body of the device is equipped with a flow heating element, which is placed in a protective flask, so it is practically not subject to scale. Water passes through the heater, reaching optimal temperature. The advantage of such work is that you can get hot water at any time.
To create an electric water heater, the most important thing is to purchase a heating element. You have two options:
- Simple - buy a new item in the shop. It is important to choose the right power: a conventional network will not withstand more than 5 kW, and for summer cottages it is better to take 3-4 kW.
- Make a homemade heating element.

What you need to make a heater:
- Spiral (TEN).
- Copper tube for the manufacture of a protective housing.
- Two ½ threaded steel tubes.
- Steel sheet 3 mm thick.
- Nichrome wire.
- Heat resistant adhesive.
- Anti-corrosion paint.
- Gas-burner.
- Apparatus for welding.
- Bulgarian.
- Drill.
- Metal brush.
- Sharp core.
- Electrodes.
- Hammer.
How to make a heating element yourself:
- Twist a spiral of copper tubing. Make at least three turns at a distance from each other.
Twisting the tube can cause it to buckle at the bends. To avoid this, we recommend filling the cavity with sand and closing the edges with plugs.
- Wind the wire tightly around the tube so that there are no gaps between the turns. Secure the ends with heat resistant glue.
- To obtain more power, the spirals are powered in parallel. With series power, heating will be worse.
- The element is then placed in copper tube and soldered.

To accurately manufacture an electrical device, you need to calculate the materials.
Calculation for the manufacture of direct-flow heating elements
It is necessary to calculate the dimensions of the future heater, how much wire and copper pipes are required.
How much wire do you need? To take a shower with normal pressure and hot water, the power must be at least 5 kW. From the calculations below you can see the current strength:
P=IxU; I=P/U=5000W/220V=23A
Therefore, take care of the normal wiring in the room in advance. It is better to use thick cable. Now calculate the indicators using the following formula:
R (maximum resistance is 1.1 ohm x mm²/m) = p (wire resistance) x L/S (sectional area).
How to find the cross-sectional area? Calculation method only:
S \u003d πr² \u003d 3.14x0.5² \u003d 0.8 mm²
Wire length:
L= 8.8/1.4=6.2 m
Divide this number by the number of turns of the heater.
Let's say the dimensions of the tube are 10 mm, and the thickness is 1 mm. With parallel winding of the wire, the distance between the turns should be 2 mm.
How to assemble a flow heater yourself
Before you start assembling, prepare all the parts. The metal must be cleaned of rust, for this a drill with a brush head is used. Keep in mind that the diameter of the sheet must exceed the dimensions of the heating element bulb.

Mark the places on the sheet where the spiral will be located. Use a drill with a bit larger than the heater foot. Make holes for mounting bolts. Make holes on the end of the product with a core. They should be located strictly in the middle.

Make two sketches with a grinder. Follow the diagram and markup. On the second option, holes are not needed. The result will be the lower and upper parts of the device. Then proceed like this:
- Connect the part with the holes and the flask of the heating element. Make sure that all connections are tight, then weld the parts to each other.
- Make sure that the length of the flask does not exceed the size of the spiral by more than 1.5 cm. Otherwise, you need to shorten it.
- Make two holes in the pipe for water supply, top and bottom.
- Weld the pieces of pipe so that the non-threaded side faces the bulb.
For mechanical heating to work, you need to regulate the temperature. Therefore, install a thermostat next to the heating element. It is better to install the start button on the surface of the tank.
- Weld two bodies that were cut from the sheet.
- Install a ground bolt inside the chamber.
- Connect the device to water and run to test.
- Inspect how tightly the parts are soldered, if there are any leaks.
- If everything is in order, you should turn off the device, prime and paint the surface with anti-corrosion paint.

If desired, you can organize gas or wood heating of water. But then it is better to make a storage-flow case.
Simple homemade device is not safe, so you need to constantly monitor its work, control the flow of water so that the heating element does not work in vain. After all, this technique does not have protective sensors.
Anyone can assemble an electric boiler with their own hands - in terms of performance, prefabricated units are not much inferior to factory products. With a responsible approach, a handicraft boiler can turn out to be even more reliable and durable than a factory-made machine.
This also applies to electric boilers for heating a private house, known for their efficiency and high performance. Parts for assembling such equipment are widely available, and the manufacturing process itself can be cheaper than buying a finished device.
Classification of homemade boilers
There are three types of electric boilers. The first option - working on heating elements. They are equipped with a tubular electric heater, which is heated by the action of electricity and transfers heat to the liquid. The heater is insulated so that the coolant is not energized.
Second option - induction action. It is equipped with a winding transformer, with the heating pipe acting as an induction coil. Heating of the coolant occurs due to eddy currents that occur on the winding.

Finally, the third option, electrode - liquid is not only a coolant, but is also integral part electrical system. It is quite simple to assemble an electrode boiler with your own hands, but high requirements are placed on the electrical safety of this equipment.
Design
In fact, a home-made electric boiler is a piece of pipe with built-in electrical fittings. This is very convenient, especially if you make the unit removable: then the care and maintenance of equipment will be greatly simplified.

If the unit is placed not in a pipe, but in a separate housing, then additional sensors can be installed that will automate the operation of the heating system, increase efficiency and reduce energy consumption. In addition, when it is necessary to replace the boiler with another, it will be possible to do this without violating the integrity of the system circuit.
Difficulties of operation
The disadvantage of any electric heater is the danger of exceeding the limit for connecting electrical equipment in a private house. Thus, the total power of all electrical appliances used in a dwelling should not be more than 15 kW.

To service a private house with an area of about 100 m2, a unit with a capacity of at least 10 kW is required.
Therefore, by connecting an electric boiler with your own hands, you allocate only 5 kW of energy to the use of other devices. To increase the consumption limit, you need to obtain a special permit.
To make a homemade electric heating boiler with a tubular electric heater, you will need the following set of materials:
- steel sheet with a thickness of more than 2 mm;
- line segment steel pipe(length and diameter depend on the performance of the unit);
- three-phase heating elements (it is not recommended to use heaters with a built-in relay, as they wear out quickly).

First, the future bottom of the boiler must be cut out of the steel sheet. The dimensions of the bottom must correspond to the diameter of the pipe. Then, from the same metal, it is required to make a flange - a ring whose inner diameter is equal to the outer or inner diameter of the pipe, depending on how the part is planned to be fixed to the body. The width of the ring is usually 30 mm.

Next, a cover with a diameter corresponding to the outer diameter of the flange is made from a steel sheet. The cover and flange are connected using 6 bolts, holes are pre-drilled at the mounting points of the fasteners. A few more holes are drilled in the lid - their size must correspond to the dimensions of the heating elements planned for installation.
The bottom must be welded to the boiler body first, the flange next. The cover is mounted only after the tubular heaters are firmly fixed on it. A sealing gasket made of a material resistant to water is inserted between the heating elements and the cover.

Between the cover and the flange is another gasket made from an automotive chamber. This gasket must be an exact copy of the flange, including holes for bolts in it.
Installation of nozzles
Before closing the boiler with a lid, pipes for connecting pipes of the heating system are mounted in its body, having previously cut out suitable holes. It is important that there are threads at the ends of the pipes: this is required to install inlet valves that will allow you to shut off the circulation of the coolant in the circuit if the electric boiler needs to be repaired. The pipe for the removal of hot liquid is located in the upper part of the unit, it is advisable to build it directly into the cover. The cooled coolant is fed through the pipe from below.

When the pipes are mounted, the boiler is completely assembled and connected to the network. Sometimes its design can change: for example, not only the cover, but also the bottom is mounted on the flange. The device is versatile and can be easily adapted to technical parameters home heating systems.
Electric installation work
During electrical work the contacts of all heating elements of the boiler are connected to the block, the neutral wire is also connected to it. Sometimes the heating elements are immediately shorted to this wire without using a block.
The cross section of the wire core must correspond to the load that the heating elements create: then the home-made electrical unit will work without failures.
A phase wire passed through a circuit breaker is connected to the contact of each heater. The cable section is selected based on the load created by all the included heating elements at the same time.

All wires must be insulated, Special attention care must be taken to ensure that their bare parts do not come into contact with the metal cover of the boiler.
To make an induction boiler you will need:
- a piece of plastic pipe with thick walls;
- copper wire with a diameter of 7 mm;
- 15 A welding inverter.

TO plastic pipe two pipes are fixed, having previously made the corresponding holes. Its internal space is completely filled with wire scraps 40-50 mm long.
Then an induction coil is created: the wire is carefully wrapped around the pipe, the total number of turns is about 90. The coil is connected to the inverter. The resulting home-made heating boiler is mounted directly into the pipeline, cutting out a section of the pipe.
Assembly of the electrode boiler
Just make an electrode heater. To do this, the master will need:
- iron pipe with a diameter of 57 mm or more with thick walls;
- a sheet of iron with a thickness of more than 2 mm;
- internal electrode with a diameter of 25 mm;
- gaskets made of paronite or rubber and connecting terminals.
As in previous cases, you need to start by attaching pipe fittings to the future boiler body. From one end, the pipes are welded to the unit, from the other they are threaded.
When making an electrode boiler with your own hands, a hole for a plug is drilled in the body. An electrode is attached to the latter, it is installed inside the boiler. At the final stage makeshift case brew by installing a lid and bottom cut from an iron sheet.
After cleaning the welds, it is necessary to check them for permeability. For this, the welding spots are covered with soapy foam, and pressure is applied inside the housing with an air press. Where bubbles appear, the boiler will leak. When all identified faults have been eliminated, the case can be treated with enamel paint.

The boiler will work properly if the water in the heating system of the house contains soda. The latter is added in order to increase the current strength: this indicator can be calculated by dividing the power of the unit by 220.


