An integral part of any room is the doorway, and each owner designs it differently. Someone installs a standard, decorative, or even metal door, some prefer, although the latter option is fraught with certain difficulties. IN Lately models called “accordions” have appeared on the market, they are also swing doors, the installation of which we will consider
Door Features

Regardless of the design, everything accordion doors have the required identical components: guides, stoppers, rollers. Their installation is not difficult, so it is also accessible to non-professionals.
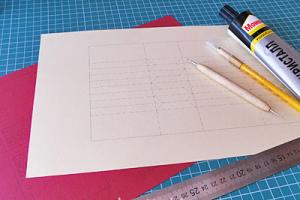
Before purchasing the product, you need to measure the opening. It should be noted that if its width is within 1 m, then only the upper guide will be needed. When purchasing, you need to look at the package. Some manufacturers do not include extensions and trim, so they are purchased separately.

Standard kit (option):
- guides (1 or 2);
- connecting loops and carriage rollers (2 or 4 pcs.);
- panels;
- additional accessories and adjustment wrench.
It is necessary to pay attention to the number of panels and their width. Together they should completely cover the doorway. In addition, the names and numbers of fasteners correspond to each other. Otherwise, the installation will take a long time.
Stages of installing an accordion
Assembling the door plates into one whole, for which they are laid out on the floor next to each other. The method of fastening together may vary slightly (depending on the manufacturer), but the principle is simple. The result should be a solid canvas.
Side bars. They are installed vertically (checked with a level) and rigidly fixed in the opening.
Installation of guides. If their length is longer, then aluminum (plastic) can be easily cut with a hacksaw.
You need to pay attention to the holes in the guides for fastening to the opening. When shortening them, the part where the holes are located is cut off. You need to prepare the bar so that they are at its ends about 2 - 3 cm from the edge. Then the guide will be securely fixed. Along the entire length between the holes, 25 cm is enough, for the top - no more than 15, since the entire load falls on it.
Fastening the guides. After marking, holes are drilled and sleeves are installed for fasteners.
Even before starting work, it is necessary to check the “geometry” of the opening. The main thing here is strict horizontality, especially if there are 2 guides (top and bottom). Therefore you need to use building level. Practice shows that when removing and dismantling the box, the opening that opens is not a perfect rectangle. And parallelism of the top and bottom, as well as the sides, when installing the “accordion” is required.

You need to navigate according to the circumstances. Either leave the box and level the wood, sand it, or remove everything, but ensure horizontality by laying an additional layer of mortar. But at the same time, the fasteners must be longer so that they reach the material of the opening.
There is one nuance here - at first the guide is attached to only one self-tapping screw, and it is not screwed tightly.
After this, the door is hung on the guide (the runners are inserted into the groove), and the “assembly” is attached to the top of the opening according to the previously made markings. Next is the fastening of the rear half-panel with the installed vertical strip.
A magnetic latch is installed on the “front” half-panel (lock panel). Lastly, the door handle is installed.
- It is advisable to lightly lubricate the “runners” with technical petroleum jelly - this way they will glide better;
- It is desirable that the “accordion” itself be slightly wider than the opening.
Please note that this is only general technology works, since different models have their own design differences (for example, in the method of connecting the lamellas, in their material). In each specific case, you must follow the Manufacturer's instructions.
Residents small apartments It can be useful step-by-step instruction on installing an accordion door yourself, since this particular piece of furniture will harmoniously fit into the interior and save space. Folding canvases have become an alternative to the well-known hinged ones, allowing you to conveniently place the rest of the furniture in the room, as well as get rid of “dead zones”. The design, fittings and installation features of the accordion door (or book) have their own nuances.
If there are several (more than two) panel sections 10-15 cm wide (otherwise called lamellas), connected to each other by an end hinge or a hinge profile, we have an accordion door. It is connected only to the upper guide, and moves along it using rollers. The outer lamella is fixed to inside opening, the subsequent ones are folded side by side, visually resembling an accordion.
A book door, as a rule, has only two panels (movable doors), but for particularly spacious openings a larger number is possible. In addition to the upper guide, a rail from below is often used to move the sashes. It acts as a support for a more massive structure, the component parts of which are connected by hinges.
Door materials
Most books and accordions are made of MDF or PVC. Externally, both materials are attractive, but plastic is much lighter. In the manufacture of modern PVC slats, special stiffening ribs are used to strengthen the structure, so the door becomes stronger and stiffer than it might seem. In addition, the material is not subject to contamination or damage, and plastic panels last a very long time.
MDF panels are more bulky, which is why they require reliable fastening to the base. They have greater sound insulation than plastic ones and are more stable; The only downsides worth noting are the difficulty during installation (due to the weight of the panels) and slight noise during operation.
The installation principle for both types of doors is similar, but in the case of an accordion there are some nuances. The following are instructions for its installation.
Accordion door complete set. Required Tools
You can make and purchase all the components yourself, but it is better to purchase them ready-made. It must include:
- a certain number of lamellas (panels);
- appropriate fasteners;
- rollers;
- stops;
- short top guide;
- two long side guides.
For work you will need the following tools:
- roulette;
- hammer drill;
- wood hacksaw;
- construction corner;
- level;
- perforator;
- miter box;
- wooden blocks;
- polyurethane foam;
- pencil.

Complete set for installing an accordion door
Preparing the doorway
Initially, the old doors are dismantled. It is advisable to knock down the solution under the box to the base so that it does not interfere. Next, the width and height of the opening are measured. If the doors have already been purchased, you need to estimate its dimensions. This will make it obvious whether the width of the opening needs to be increased or decreased.
The new door frame is made using previously taken additions. Top bar is fixed on their upper edge and secured with self-tapping screws (supplied in the kit). After assembly, the box is inserted into the opening. Wooden wedges are useful here for temporary stability of the structure. The extensions are attached to anchor bolts (usually two on top and three on the edges). Next, the box is fixed in the opening using mounting foam. When the latter has dried, you can begin the key stage of work.

Folding door installation
One of the components is a profile called a guide. For accuracy of work, installation begins with them. First, the length of the profile along the opening is measured and the excess is removed. It’s better to do this with a miter box - then the cut will be even. A similar action is performed with the profile that serves as fastening for the blind part of the door leaf. It is applied, its position is visually assessed, and adjustments are made. Holes for self-tapping screws are drilled in the profile. On the top guide every 5-7 cm, on the side rails - every 10-15 cm.
Now the assembly and installation of the accordion door with your own hands begins. The plates are removed from the kit (if the piece of furniture was purchased not assembled) and connected using rods. After assembling the lamellas into a single whole, a locking panel is made on the right, and a fixing side panel is made on the left. Both are installed with slats secured to stoppers. Then the runners are installed. The fastenings alternate through one panel, starting from the lock panel. After completing the work, a magnetic lock is placed on it.

Complete set for mounting a folding door
Some kits with MDF panels are assembled differently. They have a long axis through which the slats are connected. It is threaded through special holes in each panel.
The frame is prepared, the panels are connected; Now all that remains is to place them inside the opening. Rollers are inserted into the grooves of the guides. The folded door is placed in the opening (this is how it will be convenient to perform further operations). If the guide is not yet connected to the opening, this must be done using self-tapping screws. As you fix the fasteners, you need to check how easily the door opens and its fit to the profile from the handle side.
If the door moves freely in both directions, it means that all points have been completed correctly.
Next, trims are placed around the perimeter of the door frame, using a hacksaw and miter box, unnecessary parts are removed and 45-degree angles are cut out. They are fixed with liquid nails, ordinary furniture nails or other reliable and inconspicuous fasteners.

After this, all that remains is to attach the necessary fittings to the doors. The installation of the accordion door is now complete. In order to extend the service life of the new product, it is recommended to regularly lubricate the hinges as the slats become difficult to move.
Proper installation of an accordion door is not a very difficult task if you follow the steps described above without any rush. A product assembled with your own hands will serve faithfully for many years, and there will be much more free space inside the room.
City apartments don't have much space. This is especially true for houses built during the USSR. These apartments have hinged interior doors. The disadvantage is that they require some space to open. It’s good when there is a lot of space, but what to do when everyone square meter on account? Installing an accordion door will help solve the problem of lack of space. This modern solution, which will significantly save space in the apartment.
It is worth noting that this is not just an interior door. Many models look so impressive that they become the main components of the design. These structures are made from the most different materials. Manufacturers complete these solutions with a set of fasteners and everything needed to install an accordion door.
Characteristic
This design is a system consisting of several vertically installed lamellas. The latter are connected into a single piece using loops. Visually, this door resembles corrugated blinds.
When the door is open, its constituent elements (slats) fold together like bellows on an accordion. To ensure that the movement of the lamellas and the door leaf is as smooth as possible, and that all elements are parallel, the design uses special synchronizer parts. To ensure that the mechanism is fixed in a certain position, the system is equipped with special locking flags.
As for design, installing an accordion door is not suitable for every interior. But if you choose the right model, the room can acquire unique features.
What will be needed for installation? Materials
Most manufacturers complete their products with a set of necessary fasteners and components. Better and more expensive solutions have several spare guides, with the help of which it becomes possible to install an accordion door in wide openings.

Concerning necessary materials, then you need to purchase what you will need in the process of preparing the opening. These are any additions, as well as platbands that are suitable. It is important that the material has a thickness of at least 15 millimeters. It can easily withstand the weight of the door structure and all operational loads.
Tools
For installation work You need an impact drill or hammer drill, measuring tools, a plumb line with a level, a hacksaw, a corner, a miter box, and polyurethane foam. The latter will require several cylinders. It is desirable that it be of proper quality.
Preparing the doorway
Installation of interior accordion doors is quite possible in an existing opening directly inside the door frame. But this will reduce its width. It is much better to dismantle old door completely and remove the solution under the box to the base. Next, measurements are taken and checked with the nominal dimensions of the doors and the number of elements in them. This list must be included in the installation instructions. When checking sizes, it is important to remember the width of the extensions.

This way you can find out whether it is necessary to expand the opening or, conversely, reduce its size with the help of foam and additions. The latter are cut in such a way that the result is a box without a threshold. The upper part is secured with the end parts to the upper edge on vertical extensions. Then the structure is fastened with self-tapping screws.
After making the box, the element is inserted into the opening and secured using wooden blocks, as well as wedges and various substrates. To install the box more securely, select several bars, the width of which is equal to the opening. These spacers are installed at the top, in the central part of the box, and at the bottom. This is done to prevent deformation of the extensions during installation. To fasten the extension to the base of the wall, long-length anchor bolts are used. Install three on each side and two at the top.
When the anchors are installed, they begin to foam the gap between the wall and the box. After the foam has dried, you can proceed to installing the accordion door. It is quite possible to do this with your own hands.
Installation of guide rails
In order to calculate everything correctly, you should begin work by installing the guide elements of the structure and other fasteners. The door system kit necessarily includes a profile, which serves as a guide. As indicated in the instructions, you should first measure desired length profile - the excess part is cut off. It is best to use a miter box for this. Then the cut will be as smooth as possible.
They also cut a guide for mounting the blind element of the door and the counter part on the handle side. Next, all measurements are checked again, but they do this by attaching the profile - it’s too early to attach it. Holes for self-tapping screws are pre-drilled in the guide. Holes are made in the top rail every 5-7 millimeters. On the side elements - every 15-20 centimeters.

If the guide is mounted using special fasteners-clips, then immediately begin installing them around the perimeter of the opening. Often the same elements are used for the top and profile. On the side where the groove and lock will be located, smaller clips are used.
The top rail is mounted in such a way that the fastening elements are located no further than 5-7 centimeters from each other. On the side parts, 4 or 5 clips are enough evenly in height.
Assembly of the canvas, installation of rollers
Each strip that will make up the canvas is cut so that they are equal to each other and similar in height to the opening. The accordion door installation instructions recommend taking into account the reserve for the roller system, which is inserted into the upper guide. The lower part must have a ventilation gap of no more than 10 millimeters.

In simple cases, strips of plastic are connected using grooves or spacers. The two parts are offset and joined at the edges, and then one element is pulled along the other. In doors made of MDF, strips of canvas are connected to each other by means of an axis, which is threaded in turn through special eyes on each element of the canvas.
After the canvas is assembled, you need to install fittings and rollers on the product. Everything must be done strictly according to the manufacturer’s recommendations.
Final assembly process, fastening
All that remains is to install the folding one interior door accordion Do-it-yourself installation involves threading the rollers into the profile rail. When everything is inserted into place, the structure is folded and placed in the central part of the profile. This makes it easier to install fasteners in the door opening.
If clips are used for fastening, then the rail simply snaps onto them. If necessary, use a hammer to secure it completely.

If there are no clips included, then self-tapping screws should be used. They first attach the profile along the edges, and then along its entire length.
Next, the side profiles of the structure are installed and secured. Then the blind part of the canvas is secured to the profile. At this point, it is recommended to check how easily the door moves and how tightly it fits against the counter element.
If the blade moves smoothly and fits well, then you can proceed to installing the handle. When the door is closed, the step-by-step instructions for installing accordion doors recommend marking the point where the lock's response element is located. A latch with a magnet is then screwed into it.
Testamentary stage
When everything is securely fastened and checks have shown that everything works, we begin installing platbands around the perimeter door frame. They need to be installed on both sides. The excess is cut with a hacksaw, thereby limiting the length. These products are attached to liquid or furniture nails.

This completes the installation. Now you can feel all the benefits that come from installing accordion doors. The price of the structure is low (from 2200 rubles), and the effect of the installation is noticeable. You can immediately see how such a door saves precious free space.
So, we found out how to independently install an accordion-type door.
Choosing accordion doors for your apartment or country house, it is necessary to take into account that doors of this type and standard sliding doors, This different designs. They are united by only one factor - the ability to save space in the room.
The design principle of accordion doors is very simple: two or three panels move along a guide - a profile that is fixed in the opening at the top or bottom. Name door designs obtained by analogy with musical instrument(in many European countries they are called “accordion doors”).
Materials and design
The design of this type is so simple that many apartment owners install accordion doors themselves, with their own hands. Standard height products can be 2.05 m, 2.5 m and 3.0 m, and the width can be arbitrary from 0.6 meters. For the manufacture of accordion-type door products, MDF and plastic are used; wood is considered too heavy a material for such doors. To ensure spatial rigidity, the panels are fixed in a frame made of steel or aluminum profiles. The canvases are made according to taste - blank, with inserts, stained glass. Independent arrangement designs has big advantage– you can always install them to your liking.
There are two ways to equip doors with your own hands - by purchasing a set of elements and additional elements, or by making everything yourself.
Installation using a ready-made kit

Installation in a doorway
A set of accordion products consists of an upper guide profile (there are models with a lower profile), flaps with hinges for fastening to each other, roller-type sliders, adjusting keys and other accessories and fittings. Elements such as extensions and platbands, as a rule, have to be purchased separately.
Installation steps
Installing accordion doors yourself, with your own hands, is step by step process. To correctly follow all assembly operations, you can use the video (there are many on the Internet) or the instructions that come with the kit.
First of all, you need to take measurements doorway, thus, the consumer will be able to calculate the required number of panels before purchasing the kit. After purchasing all the necessary elements and materials, you can begin installation.
The first to attach is the guide profile element with a pre-installed latch on it (if its width is greater than the opening, it is cut off and holes intended for screws are drilled, maintaining a distance between them of 25 to 30 cm). The latch is attached on the side opposite to opening (for example, when opening from right to left, on the right side), after which the axial element of the end sash is inserted into it, and the carriage slider is inserted into the guide element.
The next step in installing an accordion door with your own hands is to attach metal axial rods to the end door in the designated holes (at the top and bottom). If the holes were not provided at the factory, they need to be drilled using the video as a guide.
Important!
- When performing this operation, you need to ensure that the depth of the holes does not exceed the length of the axial rod, since it should protrude slightly (all dimensions are given in the instructions for the kit). In the future, in order not to search every time all over the Internet for how to install an accordion door, it is better to find it once good video, and constantly check your actions against it.
- The position of the axes after their fastening must correspond to each other in the horizontal and vertical directions.
Related article: Liquid wallpaper for the kitchen
The next step is to install the receiving plate. It is mounted at the bottom of the doorway, in the corner, having previously determined its location relative to the latch already attached to the guide element. To attach the runner at the top end of the sash, you need to drill a hole. The slider is used to adjust the accordion door after installing it yourself.
Assembly of the canvas

The most scrupulous operation is considered to be the assembly of the canvas into a single structure, using the recommendations for installing an accordion door in the video. To do this, first mark the hinge attachment points on the panels. To do this, it is necessary to place all the panels intended for assembly side by side in the order in which they will be assembled.
Important!
- Be careful not to mix up the starting and finishing panels.
- When marking, place 3 loops between all elements (except the 2 outer ones).
- Place it in such a way that all loops are strictly on the same horizontal line, and the distance between 3 loops in the vertical direction is the same. Otherwise, the panels may become distorted, which will lead to cracks.
- When connecting panels, you need to ensure that the distance between them is 3 mm in the open position (see video).
After installing the sash, a groove is drilled on the finishing panel for the location of the door handle. It is recommended to fasten the handle closer to the hinges, which differs from the standard fastening of handles on classic doors.
Installation in design position

When the structure is assembled, they begin to hang it on the fastenings, which are installed in advance.
First of all, the sashes need to be folded and the fixed metal axial rods inserted into the plates. After this, it is necessary to ensure rigid fixation of the axis of the carriage runner on the plate, which is located on the end panel.
The key included in the kit is used for finishing adjustments and smoothness control, correct position panels. With its help, you can loosen or tighten the nuts at the ends of the carriage or on the axial fasteners, and set up a convenient opening/closing mode for each user.
Important!
- When installing accordion doors with your own hands, using panels made of heavy materials (wood), or blocking a large opening, the number of runners needs to be increased.
- In these same cases, the doors are attached to the lower guide element, which is masked with a threshold after final installation.
To protect a room, or divide it into zones, they are often used modern designs, one of which is the accordion door. It is especially convenient when it is difficult to fit a standard swing structure. The article suggests getting to know what types of accordion doors there are and how to install them yourself.
Accordion folding doors are more of a rigid curtain. Such products, having a number of advantages, have a large number of disadvantages.
The main design features are summarized in the table:
Types of accordion doors
Products may differ in material of manufacture and some design features.
They are:
- Deaf. For their manufacture, a solid array of any opaque material is used.

- With glass inserts. Such accordion doors have a more aesthetic appearance, but also less strength, which reduces their service life.

- Made of plastic. Most often, these are not very durable products. In addition to the canvas itself, which is made of plastic, many fittings are made from the same material, which also does not have a long service life.

- Made of wood. These are more durable designs. They do not have plastic parts, and the most wearing parts are made of metal.

Tip: When choosing a design for installation with your own hands, preference should be given wooden options. They are more attractive appearance, and durable structural elements. In addition, wood is less susceptible to temperature changes than plastic.
Accordion doors can have a different number of folding fragments, which depends on the dimensions of the opening.
Accordion door design

Installing an accordion door with your own hands begins with becoming familiar with its design.
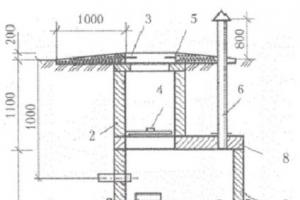
The diagram shows that the product consists of:
- Top guide – pos. 1st century
- Two side guides: left – pos. 1a and right – pos. 1b.
- Two half-panels: right and left – pos. 3.
- Main panels – pos. 5.
- Connecting joint – pos. 4.
- Docking rail – pos. 2.
- Panels with lock – pos. 6.
- Runners - pos. 7, designed to move the door leaf.
- Stoppers - pos. 8, for fixing the door leaf.
- Self-tapping screws - pos. 11, for fastening the guide rail.
- Handles – pos. 9, to close the door.
- Latches - pos. 10.
Design selection

To avoid problems when installing the accordion door, and for it to fit harmoniously into the opening and into the interior of the room, it is necessary to choose the right model.
To do this, you should follow some recommendations:
- You need to purchase an accordion door in accordance with the interior of the room, taking into account technical features adjacent rooms.
- You should not install an accordion door in an opening 0.5 meters wide. In the open position it will be difficult to move from one room to another.
- You need to correctly calculate the number of canvases needed for a specific interior opening.
- You should not save when buying a product, who does not know that the stingy pays twice. In cheap models, low-quality plastic and fragile fittings are used in production, which cannot withstand heavy and frequent loads.
Tip: When purchasing a kit for an accordion door, you need to take the panels with a reserve in case of unexpected damage to the elements of the panel. This will allow you to quickly replace the damaged panel if necessary. Production is constantly updated, old models are discontinued, and availability additional element will allow you to avoid a situation where a part needs to be replaced, but it is not on sale.
Installation of an accordion door
Tools and materials for door installation
Typically, a set of doors of this design contains everything you need, including fasteners and some spare parts. In addition, many manufacturers add additional slats to the kit, which allow you to independently increase the size of the accordion door leaf, which is especially important if you have a wide door opening.

In addition to the kit, to install the accordion door you will also need Additional materials. Their list is determined during the preparation and subsequent finishing of the doorway.

In any case, you need to purchase:
- . At the same time, their thickness is chosen to be more than 15 mm, which will allow the door to be securely held during operation.
- Perforator to increase door openings.
- Building level.
- Plumb.
- Impact electric drill.
- Angle 90°.
- Hacksaw.
- Miter box.
- Roulette.
- Polyurethane foam.
- Wooden bowls or bars.
Installation location
Sliding products - an accordion can be installed almost anywhere.

Doors in the hallway
- Hallway.
- Bedrooms;
- Children's room.
- Living room.
- Accordion for a wardrobe on a balcony.

Doors on the balcony

Lightweight sliding doors
- Studio apartment.
- Lightweight plastic products - accordions - allow you to divide the room into certain zones.
- Vertical accordion doors help create a women's boudoir or a separate dressing room, which will look like a luxurious screen and add great elegance and originality to the interior.
- Wardrobe door decorated with bright patterns.
When making an interior “accordion” without, the structure can be mounted to the entire height of the room. The accordion door mechanism is installed in small apartments and in country houses, where this structure will become an additional exit leading to the garden, as in the photo.

Entrance sliding door
The new entrance is installed quickly enough, while saving cash. Where accordion doors can be installed, everyone decides for themselves, taking into account the ease of use and safety for all family members.
Preparing the opening
Assembly instructions for the accordion door do not require dismantling old box. But in this case, the width of the opening is significantly reduced.
Tip: Before installing the accordion door, so as not to reduce the door opening, you should remove the frame of the old door, and then knock down the peeling plaster until concrete slab or brickwork.

After that:
- Measurements of the opening are taken.

- Purchase the model you like.

- The need is determined. They may be needed to reduce or increase the doorway.
- After final assembly boxes along with accessories, it is carefully inserted inside the opening. Fixed in the desired position wooden blocks and wedges.

Tip: For installation with the greatest accuracy, it is necessary to install maximum amount wedges, and choose their length approximately equal to the width of the doorway. This will prevent deformation of the box when fastening it with anchors, dowels or blowing with foam.
- Holes are drilled inside the box through which it is secured inside the opening with long anchor bolts or dowels. The optimal number of such fastenings on each side is 5 anchors.
- The cavities between the wall and the extensions are foamed.

- After the foam has hardened, excess material is trimmed off.
Assembling the door leaf

The photo shows the technology for assembling the leaf for an accordion door:
- Based on the dimensions of the resulting box, panels for the manufacture of sashes are marked.
- When using wood or lumber, the ends of the elements are processed with fine sandpaper.
- Surfaces are wiped free of dust.
- The edge is glued.
- The installation locations of the fittings are marked.
- In the designated places of the outer panel, holes are drilled for metal axes at the top and bottom.
- The axles are attached.
- On last panel a roller runner is installed.
- The canvases are laid on the table or floor in the order in which they are connected.
- There are three hinges between the panels. To avoid distortion, and then the formation of cracks in the canvases, loops of the same level must be placed at the same height.
- The canvases are fastened so that after the door opening is fully opened, a gap of three millimeters remains between the elements.
Installation of the structure

After preparing the opening and assembling the door leaf, the work is performed in the following sequence:
- According to a given size, corresponding to the width of the door opening, reduced by 4 mm, the rail is cut with a hacksaw.
- Holes for fastening are drilled into the parts in increments of 30 centimeters.
- The guide is fixed with one screw at either end so that it remains movable.
- The latch is mounted: the axis of the end panel is inserted into it, and the carriage slider is inserted.

- Installed and suspended door leaf. To do this, a guide fixed to one self-tapping screw is moved to the side and support plates are inserted into it.
- The assembled panels are folded like an accordion and lifted up by carriages.
- The panels are inserted into the groove of the guide profile.

- The guide is put in place and finally screwed to the door leaf with self-tapping screws.
- The operation of the moving mechanisms and the smooth movement of the panels are checked.
The entire process of assembling the structure is shown in detail in the video in this article.
Attaching the handle and lock
The final stage of installing the structure is attaching the handle to the accordion door and the lock. Usually the lock chosen is magnetic, but if desired, you can use other types of locking products.

Sequence of operations:
- Markings are made to place door hardware. In this case, the handle needs to be slightly shifted from the edge of the accordion door. Otherwise, it may prevent the canvas from tightly adhering to the wall when closing the opening.
- On the outer panel of the door, on the side where the lock is installed, holes are drilled to fix the lock and handle.
- All fittings are installed.
- The smooth running of the blade is checked, the absence of cracks and distortions.
- After installation, the doors can be decorated with decorative trims on both sides around the interior portal.
The general technology of how to install accordion doors is almost the same, but different models differ in their design features. For example, according to the material and method of connecting the lamellas. Therefore, in each specific case, you should only follow the manufacturer’s instructions for this design.