Insulation of the ceiling and walls is an important component of home improvement. Every owner of a private home faces this question. Most of heat escapes through the ceiling, so insulating it is very important. Modern market building materials Today it presents a large selection of different insulation materials. But, first of all, you need to decide how to carry out thermal insulation.
There are two methods, indoors or outdoors. Both bring good result. You should choose the one that is more convenient in a particular situation. If we talk about differences, they differ in technology and materials.
Selecting a thermal insulator
To insulate the ceiling in a private home, it is important which material to choose. Vapor-permeable heat insulator produce insulation from the inside. Vapor-tight insulation is perfect for working outside.
When purchasing material for insulation, you need to pay attention to the following qualities:
- Environmental friendliness and safety;
- Flexibility, the ability of insulation to restore its shape;
- Susceptibility to external influences or compressive strength;
- The density or weight of the insulator allows you to calculate the load on the attic floor;
- Fire resistance. There are 4 flammability classes in total, the least flammable materials are class G1.
One more nuance when choosing insulation. It is worth considering what the floors in the house are made of. Almost any insulation material is suitable for wood with planks. But for concrete slabs they mainly use heavy bulk materials or slabs with good density. Thick thermal insulators in rolls and mats are also suitable. All this is important to know before you start insulating the ceiling.
How to insulate a ceiling in a private house
 What insulation is better for the ceiling? It depends on many factors. Their choice today is wide. It is worth dwelling on their qualities in more detail.
Expanded clay is lightweight bulk material. It is made from special clay. As a result of processing, porous granules are obtained. Suitable for external insulation. He non-flammable, retains heat well and does not absorb moisture. It also does not harbor rodents. Therefore, when the question arises of how to insulate the ceiling in a private house, many prefer expanded clay.
Fiberglass-based insulation is light in weight. They have all the properties necessary for thermal insulation. But they need a special coating that repels moisture. They are less resistant to its effects than others.
Mineral wool is not flammable, but its moisture resistance is average. This is fiber insulation. Available in rolls or slabs. It has good thermal insulation qualities. In addition, it has excellent wear resistance. Suitable for insulating the ceiling in a private house from the inside. Its advantages also include:

However, mineral wool can cake and lose its properties. Glass wool is also classified as fiber insulation. It is quite strong and elastic, but is subject to shrinkage.
Such modern heat insulators as polyurethane foam, polystyrene foam, penofol are not inferior traditional materials. They are made from foamed polymer. They can be produced with foil. This is additional protection against water. Foil also increases the thermal insulation qualities of the material. When insulating the ceiling, the material may be good choice.
 Insulation materials made from extruded polystyrene foam are also lightweight and have low thermal conductivity. They have good mechanical strength and are affordable. They can warm the attic, which is planned to be used. Disadvantages include low vapor permeability. Therefore, when using them, you will have to take care of ventilation. They are not suitable for ceilings with complex configurations.
Penoizol is another polymer material. It is durable. Has an almost unlimited service life.
Polystyrene foam is fireproof, weighs little and does not place a large load on the floors. Good thermal insulator. It does not absorb moisture, but does not allow air to pass through. Additional ventilation will be required. Available in slab form. It keeps its shape well. It can be combined with mineral wool.
This combination for ceiling insulation has its pros and cons. The properties of both insulation materials prevent warm air from escaping outside. However, the disadvantages include low level fire safety polystyrene foam and the fact that rodents can live in it.
There are natural cork insulation materials. These materials are made from compressed cork chips and resin. They allow air to pass through well, but are flammable.
Ecowool is considered harmless to health and has low thermal conductivity. It is made from cellulose. To reduce flammability she's being processed boric acid or fire retardants. When using it, a layer of waterproofing is not needed, because ecowool absorbs moisture. Suitable for all types of floors.
How to insulate ceilings in a private house from the outside
In a private house, insulation of the ceiling from the outside, that is, from the attic side, is done by laying a heat insulator on the ceiling or in its voids. This eliminates the need to disassemble the ceiling and do the repairs again. Maybe, best option for a new or recently renovated home.
How to insulate ceilings from the outside, insulating the ceiling with sheets of polystyrene foam or polystyrene. It is better to choose thick foam, about 40 mm.
First, the attic must be cleared of debris. Then measurements are taken. Sheets of insulation are laid on the floor of the attic. They are fastened together polyurethane foam. If you plan to use the room as an attic, for example, then you need a concrete screed. A reinforcing mesh made of metal is placed on the insulation, and the screed solution is already poured onto it.
Insulation with mineral wool
 Mineral wool is also used for external insulation. After all the necessary measurements, the floor joists are installed. Then vapor barrier layer. You can also use glassine. The insulation is laid loosely, but without gaps between the joists. The next stage is flooring.
Expanded clay is also suitable for external insulation. If the floors are made of concrete, then the insulation process comes down to the following:
- A layer of waterproofing is laid on the slabs. Expanded clay is poured on top. The layer should be about 10 cm;
- They lay on it reinforcing mesh. Plywood is laid on top as protection;
- Next, a screed is poured onto the reinforcing mesh;
- When the screed is completely dry, you can install the finishing coating.
It is important to take expanded clay of different fractions. This will prevent the insulation from shrinking.
Insulation with expanded clay wooden house done in the space between the beams. A layer of waterproofing is placed between the load-bearing beams. Typically, it is made of polyethylene. It needs to be secured. In between Expanded clay is poured between the beams. It is lightly compacted. Fiberboard is placed on top of it. Now it's time for the finishing coat.
To work with polystyrene foam you also need a vapor barrier. Foam boards are laid tightly. It is important here that the heat insulator elements are hermetically connected at the joints. For this purpose, polyurethane foam is used.
 The combined option of insulation with polystyrene foam and expanded clay gives a good result. Polystyrene foam is placed underneath, and the slabs are covered with expanded clay on top. I combine polystyrene foam with mineral wool. In this case, it is placed on foam boards.
A very old and proven method is insulating the attic with sawdust. But they are flammable. Therefore, they are often mixed with cement.
Penoplex is a modern insulation material. Durable and quite suitable for insulation concrete floors in a private house. First, the surface of the ceiling is leveled and a layer of vapor barrier is laid. Penoplex is attached to the surface with dowels. The joints are sealed with polyurethane foam.
Insulation from the inside
Internal ceiling insulation in a private house is usually carried out with mineral heat insulators. For example, basalt wool. From the inside, the insulation is hidden behind suspended plasterboard ceilings.
- First, a metal frame is attached to the ceiling;
- Insulation is glued between the profiles;
- Sheets of plasterboard are sewn onto the frame. Then the final finishing of the ceiling is done.
If mineral wool is chosen as insulation, then it is better to use tile adhesive. Mineral wool cannot be compressed; this causes it to lose its properties. When insulating with mineral wool in suspended ceiling no vapor barrier needed. This can lead to fungus.
The ceiling is insulated from the inside of the house using polystyrene foam. It is important to consider the density of the material here. For internal insulation Density 15 kg/sq. is suitable. m. or 25 kg/sq. m. Sheets of foam plastic are attached to the ceiling with glue. They can be coated with plaster.
We insulate the walls from the inside
 It is also important to insulate walls in a private house. In principle, the heat insulators used are almost the same as for the ceiling.
- Foiled polyethylene foam;
- Polyplex;
- Mineral wool;
- Expanded polystyrene;
- Polyurethane foam.
Polyurethane foam is considered the most environmentally friendly thermal insulator. Therefore, quite often they insulate walls from the inside. But it is not suitable for do-it-yourself insulation. This requires special equipment.
Basalt wool and fiberglass are also used.
Wall insulation technology
In addition to insulation, you will also need materials such as timber. If you plan to use mineral wool. Necessary and slats for fastening material. Can be used as a vapor barrier plastic film or membrane. We also need material for finishing walls
The walls must be dry before work. It wouldn't hurt to treat it with an antiseptic to avoid fungus.
 Insulation with mineral wool requires the presence of a frame. Its elements are installed vertically. Insulation boards fit tightly, leaving no gaps. You can secure them with special dowels to the surface. A waterproofing material is pulled over the insulation. It can be taped at the joints. Next comes already fine finishing walls
Expanded polystyrene requires leveling work surface. After priming, it is treated with an antiseptic. When the walls are dry, you can install insulation. It is installed frameless way, attached with glue. They insulate with polystyrene foam in the same way. After the heat insulator is glued, small seams are sealed with foam. Wider cracks are insulated with strips of material. Then the finishing coat is applied.
Insulation is very important not only for saving energy resources. This procedure will make your home comfortable and cozy.
The need to independently insulate the ceiling of a private house often arises both for those who have already erected a building and for those who are still planning construction. Contrary to the belief that it is difficult to carry out such work on your own, insulating the ceiling is not difficult without the involvement of third-party workers - the owner himself can do this, having some skills and choosing the insulation for the ceiling (which is best suited for the given building).
The need to insulate the ceiling is by no means due only to the low temperature in the building in question. Sometimes humidity becomes more important, increasing as a result of temperature differences on the floors. The amount that has to be spent on additional heating to compensate for heat loss.
How to insulate the ceiling in a house with your own hands will be described in detail below.
Before attributing low temperature problems in the house to the ceiling, it is worth deciding whether insulation is really necessary.
It is necessary to insulate the ceiling in several cases:
- You are just starting to build a house, and the ceiling separating the living space and the unheated attic will consist only of ceiling beams. Then it is reasonable to lay thermal insulation material between them, and then “sew up” them.
- The house has already begun to be inhabited, that is, the ceiling has been ready for a long time, but in winter it turned out that it was necessary to insulate it, since in cold weather it is cold inside the house.
- No one lives on the top floor, so the temperature there is significantly lower than the temperature in the lower inhabited rooms. Thus, a heated room loses heat to an unheated room.
When considering how to insulate the ceiling in a private house, it is worth assessing all these factors.
It is not necessary to insulate the ceiling when:
- Boards with holes were used that were not sufficiently insulated. With this option, it is worth insulating the walls.
- Both the upper and lower floors are inhabited. Such floors can only be soundproofed (that is, make a ceiling lining and lay the floor).
General requirements for ceiling insulation
When deciding how to insulate a ceiling, you need to consider several rules:
- It is worth choosing the most environmentally friendly material.
- The insulation must be fireproof
- Due to the insulation material, heat loss should be reduced, and not the steam circulation occurring in the house.
- Moisture should not get on the insulation.
How to insulate the ceiling?
When choosing insulation for the ceiling (which one is best), pay attention to the variety of materials, usually divided into 4 types: bulk, sheet, fibrous and liquid.
Among them are:
- Expanded clay is a loose, lightweight clay-based insulation material. It does not burn, is environmentally friendly, is not afraid of moisture and has good thermal insulation. Rodents and pests are not interested in it, and they do not grow in this material.
- Sawdust is a natural material, cheap, easy to use, but very attractive to rodents and a fire hazard. It can be used only after first thinking through the processing methods.
- Mineral wool is a very commonly used insulation option, with excellent thermal insulation characteristics, but quite high hygroscopicity, so this insulation must be protected from moisture.
- Ecowool based on cellulose. Eco-friendly and well-insulating material.
- Polystyrene foam is easy to use and ideal for DIY installation. Non-hygroscopic and highly fireproof.
- Penoizol is a polymer material that is an innovation in the range of insulation materials. Penoizol is filled into cavities, where it then hardens. The material is reliable, does not retain moisture and is safe against possible fires.

Penoizol - innovative insulation for ceilings
Types of buildings for ceiling insulation
You can decide how to properly insulate the ceiling, taking into account the type of building to be worked on. There are several of them:
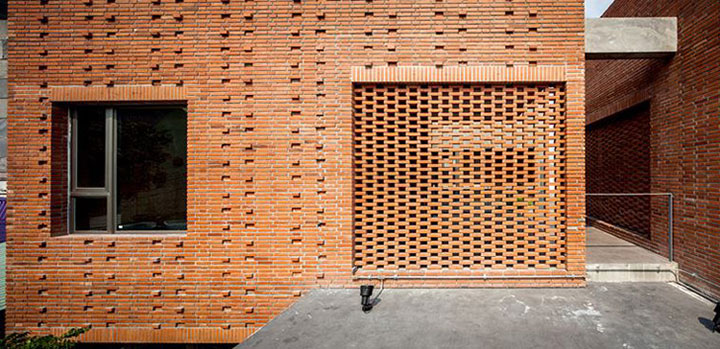
- brick buildings;
- wooden buildings;
- houses made of foam blocks.
The design and material of the floors will be of great importance when planning the insulation of both the ceiling and walls. Therefore, only by finding the optimal method of insulation can you safely and as simply as possible reduce heat loss.
Insulation installation options
You can decide how to insulate the ceiling in a house by evaluating all methods of installing materials.
There are 2 ways:
- From the inside - a costly option in terms of time, effort, and money;
- From above - that is, insulation of the attic. Less complex, less expensive.
It is worth insulating the ceiling from the inside at the stage of building a house, since you are unlikely to want to violate the integrity of the already created finish. Sometimes such serious work will not be required - it will be enough to sound and heat insulate the floor on the upper attic floor. This will be simple if you do not intend to make this floor residential and generally use it significantly (which means you will not trample down the insulation for the ceiling). In order to occasionally visit the attic without harm to the material, lay several ladders from boards.
Sawdust is an inexpensive way to enhance the insulation of your home. Having chosen this material, when deciding how best to insulate the ceiling, you need to pay utmost attention to its negative properties - the success of the entire work depends on how much you can level them out. The method of insulating attics in this way is quite well established - 20 years ago, sawdust or other porous available material was simply poured onto the floor of the attic, since it was not easy to find a worthy replacement. Sawdust is a proven material for insulation There are only 2 disadvantages of sawdust, but they are significant and obvious: In addition, such insulation for the ceiling of a wooden house or other structure will make the attic inaccessible for use, because they are very fragile and susceptible to destruction when trampled. To overcome the negative characteristics of this otherwise attractive material, care must be taken to properly treat it with means that prevent fire and animal reproduction. The simplest of these substances are lime and gypsum, with which sawdust is mixed before adding binders to coat the elements - cement and clay. The general technology for insulating a house is as follows: Liquid foam is a very convenient way to insulate the ceiling Analyzing insulation for the ceiling of a house, you understand that polystyrene foam is one of the best options that are inexpensive and available for independent use. Its advantages are very significant, although some details of its installation require strict adherence. Modern materials (spray foam, for example) make working with this insulation much easier - they allow you to maintain the tightness of the joints. In combination with mineral wool, polystyrene foam becomes an even more effective insulation material, allowing you to create an ideal “barrier” for warm air. Polystyrene foam has many positive qualities. Among them: All the advantages of polystyrene foam cannot cover several of its disadvantages, namely: Sheet foam is an affordable and convenient material for thermal insulation The technology for insulating the ceiling with polystyrene foam is relatively simple; such work is carried out in two ways: When evaluating insulation for the ceiling in a house (which is better or worse), we focus on affordability and ease of use. Mineral wool is an ideal material for these indicators, but even more effective, as already mentioned, is the combination with foam sheets.
Insulation works with different types of materials
Insulation with sawdust
Insulation - foam plastic

Insulation with mineral wool
Insulating the ceiling in a private home is a procedure that is often neglected by owners, focusing on the walls. And in vain - a lot of heat is consumed through the roof. After all warm air lighter, and therefore rises. If the ceiling is not insulated, then the heat does not meet any obstacles and freely comes out. By understanding how to properly insulate the ceiling, you can significantly reduce heat loss - the house will not have to be heated for a long time using expensive energy sources.
Methods
Ceiling insulation in a private house can be done in three ways. The first option is to insulate the ceiling from inside the room. It is possible if the architectural features of the building do not allow for external (attic) thermal insulation.
Therefore, the second method is to insulate the ceiling in the attic, from the outside. This is the most popular method of thermal insulation, which is not only easier and faster to implement, but also the cheapest. The third method is combined, which involves insulation, both external and internal. Basically, it is used for large heat losses in the room.
Materials
To insulate the ceiling you will need the following materials:

- insulation material (mineral wool and polystyrene foam);
- waterproofing material (glassine);
- edged board, nails and wooden slats;
- mounting foam for sealing.
To cut the slats to the required size, you will need a hacksaw and electric jigsaw. Foam boards can be cut with a knife.

Insulation of the ceiling from the inside can be done with your own hands using tiled mineral and non-bulk polymer materials, which include expanded polystyrene, polystyrene foam, and mineral wool. For external thermal insulation Expanded clay, sawdust, and insulating bulk components based on polymer mixtures are suitable.
Roof work
Before insulating the ceiling in a private house, you should insulate the roof. Most residential buildings are equipped gable roof and they are insulated from the inside after construction is completed. One of the insulation options:

- the entire roof cladding is covered with a layer of waterproofing;
- mounted wooden sheathing for installing insulation;
- insulation boards are laid between the sheathing slats;
- all gaps and cracks are filled with polyurethane foam;
- boards are nailed down to secure the insulation boards.
It is important that there is space for ventilation between the waterproofing film and the insulation - the air will pick up water vapor and carry it out of the room. If there is no ventilation, the humidity will rise and condensation will appear.
Mineral wool
In private houses, the ceiling is insulated from the attic side. This makes it easier to install yourself and does not reduce living space. Let's look at how to insulate a ceiling with mineral wool. First of all, it is necessary to prepare the attic floor area for insulation according to the following scheme:

- the attic floor is covered with a vapor-proof film;
- wooden slats are fastened at such a distance that blocks of mineral wool can fit between them;
- if heat loss is significant, the insulation is laid in several layers;
- the last layer of insulation must cover the beams, otherwise the tree may become a “bridge of cold;
- the remaining voids are filled with pieces of foam plastic or blown with construction foam;
- a second layer of vapor barrier film is installed.
Increased attention to moisture insulation is due to the fact that mineral wool, when exposed to a humid environment, loses thermal insulation characteristics.
It is better to spread film for moisture insulation with a reserve. The edges of the film are attached to the walls or side beams using a stapler. After insulation, you can arrange living or utility rooms in the attic.

If you plan to frequently use the attic space, then it is worth laying a floor made of boards on top of the thermal insulation. If the attic will not be used, it is enough to nail a few boards to move along them as if on paths.
Expanded clay
If mineral wool is not suitable as insulation, you can insulate the ceiling with expanded clay. Expanded clay has many advantages:
- it is not damaged by rodents;
- expanded clay – bulk insulation, so they can fill any space;
- thermal insulation using expanded clay will last a long time

But you need to remember that expanded clay has relatively poor thermal insulation characteristics, so you may need a lot of insulation. This will increase the pressure on the floors of the house. As a conclusion: expanded clay is used to insulate the ceiling in case of insignificant heat loss, when you can get by with a small amount of this material. Expanded clay does not react to a humid environment, so it does not need to be protected with waterproofing materials.
Working with foam plastic
Polystyrene foam is a very popular insulation material. It is produced in the form of slabs. To insulate rooms, you can also purchase bulk foam. When deciding on choosing insulation, many people choose polystyrene foam. And for good reason – it has very advantageous characteristics:

- polystyrene foam is a lightweight material, so the pressure on the supporting structures will be minimal;
- installation of slabs can be done independently;
- foam boards can always be trimmed with a knife so that they fit inside the sheathing;
- modern polystyrene foam is not afraid of fire and has a low cost.
Installation stages
Ceiling insulation with foam plastic consists of the following procedures:
- the ceiling is covered with waterproofing (glassine) - the glassine is cut into strips so that the material fits between the beams;
- 5 cm of material is left on the side of the beams, and then the glassine is attached wooden slats to the ends of the beams;
- foam slabs are cut with a knife so that they fit between the ceiling beams;
- all cracks are filled with polyurethane foam;
- a second layer of glassine is laid on top of the structure.
The amount of insulation is calculated based on the heat loss of the building. Sometimes you have to put several layers of mineral wool on top of the foam layer. The insulating structure is mounted so that the upper edges of the floor beams are covered with insulation.

Even when insulating the ceiling with your own hands, it is worth seeking advice from a specialist in order to know for sure the required amount of material and choose the right insulation.
September 6, 2016Specialization: master in construction plasterboard structures, finishing works and styling floor coverings. Installation of door and window units, finishing of facades, installation of electrical, plumbing and heating - I can give detailed advice on all types of work.
Insulating the ceiling is a fairly simple process, but thanks to it you can significantly reduce heat loss through this part of the structure. The advantage of this type of work is that almost all insulation options can be carried out on your own without the use of special equipment. I'll tell you about the right technology each of the options, and you carefully read all the solutions and choose the best one for your home.
Insulation methods
Of all the options that I will talk about, only one cannot be installed efficiently without special equipment; the rest can be done with your own hands without any problems. Different solutions require different costs, this factor also should not be overlooked, because in some cases the costs may be minimal, and in others you will have to shell out a large sum.
An important note: those methods that require large expenses are much more effective than budget methods, this is a well-known truth, and you must remember it.
Basically, all options involve external insulation, that is, work in the attic. This is much more convenient from the point of view of the simplicity of the process, in addition, you can work without littering inside. Of course, in some situations it will be necessary to carry out work from the inside; I will also touch on them in the appropriate sections.
Option No. 1 - polystyrene foam or extruded polystyrene foam
This is a fairly popular solution, foam is cheaper, and extruded options are much stronger. But in the attic, strength is not particularly important, so there is no point in spending extra money. Let's figure out what you need for work:

| Styrofoam | For work, it is best to use sheets with a thickness of 100 mm; the density can be as low as 15 kg per cubic meter. You can lay the material in two layers, then the joints between the sheets should not coincide, the top row is laid offset, this ensures greater reliability. The quantity is calculated based on the area to be covered, everything is quite simple, remember that one cubic meter is enough for 10 square meters with a layer of 10 cm |
| Polyurethane foam | With its help, all cracks at joints and junctions will be sealed. It is impossible to fit the foam perfectly precisely, so you need to fill all the voids, and polyurethane foam is perfect for these purposes, perfect option– buy a professional gun, since it makes it much more convenient to apply the composition, and this can be done even in narrow crevices, which is very important in our case |
| Vapor barrier membrane or glassine | Personally, I think that you can do without these materials, since wood does not need additional insulation. But if you still want to cover the surface, then use membrane options, but under no circumstances use film, as condensation will form under it and rotting processes may begin in the wood. If the attic is residential, then insulation can be laid on top, it is attached directly to the beams |
As for technology, do-it-yourself ceiling insulation is done according to the following algorithm:

- First of all, the surface is cleared of all objects and cleared of debris if any.. The space between the beams must be dry and clean so that nothing interferes with the tightest fit of the heat-insulating material;
- Next, foam sheets are prepared; if you need to trim them, keep in mind that the width of the element should be 10 mm greater than the distance between the frame, this will ensure a tight arrangement of the material in the structure. For this work, I advise you to purchase a special hacksaw; with its help you will quickly and efficiently cut the material;

- If you lay a vapor barrier, do it with overlaps on vertical surfaces. The easiest way to fix the material is with construction stapler, this is the most quick way carrying out work;
- The sheets are placed as tightly as possible into the frame, try to measure accurately required sizes and cut them straight. If insulation is carried out in two layers, then the top one is placed offset by half a sheet relative to the bottom one, this eliminates through gaps through which heat will be lost. Remember that the material is fragile and will break under great force;

- After laying the material, the stage of sealing all cracks and joints begins; the work is simple: with the help of polyurethane foam, all visible voids are filled. After the composition has dried, the excess can be cut off if it protrudes beyond the surface and creates interference.

Further work depends on how the attic will be used; you can lay a floor on it, or you can leave it as is - the material does not need additional protection and will perform its functions perfectly.
In this section you need to figure out how to insulate the ceiling on a balcony with your own hands, here the work is done exclusively from the inside, and for it it is best to use extruded polystyrene foam due to its strength and durability.
The loggia is insulated as follows:
- The surface is cleaned of contaminants; if there are irregularities on it, they should be eliminated;
- Then the extruded material is taken, if necessary cut to the size of the ceiling and secured to it with dowels for thermal insulation. For this purpose in concrete slab holes are drilled using a hammer drill, after which fasteners are inserted and the elements are securely fixed to the surface;

- Then all the cracks and joints are sealed with polyurethane foam, the excess of which is cut off after hardening;
- Further work depends on the finishing method; if you plaster the surface, then a reinforcing mesh is attached to it and a special adhesive composition. If you nail the lining or other finishing material, that is, it makes sense to fix penofol on the outside - this is a thin insulation with a reflective layer that allows you to retain even more heat on your balcony.

Insulation of the ceiling on the balcony can also be done using polystyrene foam; in this case, I recommend using the option with a density of 25 kg per cubic meter, it is much stronger and harder.
Option No. 2 - granulated polystyrene

For some reason, ceiling insulation is very rarely done using this option, but I really like it due to the simplicity and quality of the material, the granules do not burn, which ensures proper fire safety, and the ease of use is absolutely excellent, judge for yourself:
- First of all, you need to prepare the surface - due to the small size of the insulation, it is important to seal all the cracks so that granules do not penetrate into them. The rough filing should be quite dense, so it must be done carefully;
- Next, the surface is covered with either a vapor barrier membrane or glassine (paper impregnated with bitumen), these materials perform two functions at once: they protect the structure from moisture and prevent the insulation from waking up. Fastening is done using a stapler; the insulating material must extend onto vertical surfaces by at least 10 centimeters;
- The insulation work is very simple: you pour granulated polystyrene onto the surface and distribute it in an even layer, no need to compact it. The recommended layer is 15-20 cm, do not worry about the load on the structure, the material is very light;
- Lastly, you need to cover the surface with a vapor-permeable membrane or any material that allows air to pass through, this is necessary so that the polystyrene does not swell, because it is very light and even a slight breeze can blow the granules apart.

I would like to note that the price cubic meter granulated polystyrene is about 5,500 rubles, if the layer is 20 cm, then this is enough for 5 square meters of area.
Option No. 3 - penoizol
This is a new generation material, which is a composition that is applied in liquid form and, after hardening, forms a monolithic structure with good thermal insulation properties without cracks and voids. The advantage of this solution is its effectiveness and service life of about 30 years, the disadvantage is that its application requires special equipment and cannot be done without the involvement of specialists.

As for how to implement this option, everything is simple due to the fact that the work will be carried out mainly by external specialists. You are required to prepare the surface:
- Clear the space of dust and debris; it is important to remove all objects that will interfere with work and free all surfaces that will be insulated;
- After this, you need to lay a vapor barrier membrane; it will protect the wood from moisture released when applying penoizol and create a barrier that will release fumes to the outside, but prevent moisture from getting inside;
- Then the specialists get to work. They apply the material in the required layer over the entire area, the work happens quite quickly, and within a few hours the process will be completely completed. It will take some time for the surface to dry, after which the material will acquire all its properties.

There is no need to place anything on top of the material. insulating materials, which is also important if in some places the material has risen higher the required level, then you can cut it with a regular construction knife.
Let's look at the cost, a cubic meter of penoizol will cost you an average of 1500-1800 rubles, this is a fairly reasonable price, considering that you will have a minimum of worries, and you will get an excellent result.
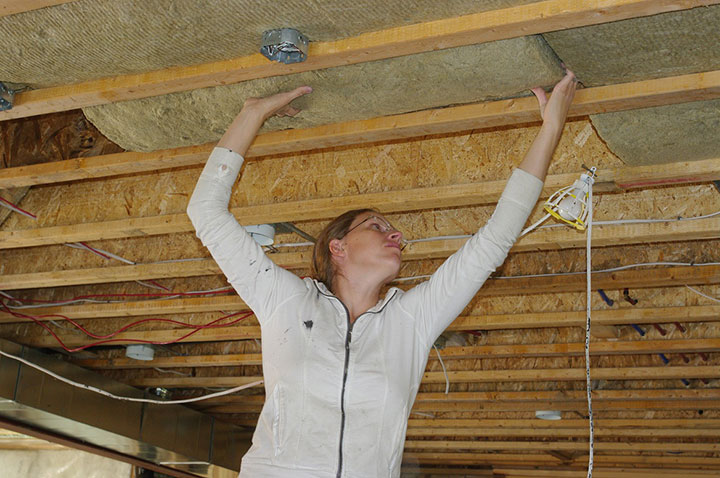
Option No. 4 – mineral wool
I will not be mistaken if I say that this is the most popular material for thermal insulation of ceiling structures. Ceiling insulation is carried out in the following sequence:
- As in all other options, the work begins with cleaning the surface and freeing the attic from unnecessary objects that interfere with the work;
- Then you need to lay a vapor-permeable waterproofing material, the choice of options is very large, you need to purchase a product from a well-known manufacturer with a good reputation among buyers and specialists. The waterproofing is attached using a stapler; for reliability, overlaps of 10-15 cm are made; they can be further strengthened by gluing them with ordinary tape;

- Then mineral wool is laid in the space between the beams; both roll and slab versions can be used. In the first case, the material is cut into pieces of the required width and placed tightly on the surface; in the second, the elements are placed on the surface as tightly as possible; it is important to eliminate gaps in the places where the materials join and abut;

- The advantage of rigid slabs is that they do not require a continuous sheathing; the main thing is to waterproof the surface, after which the elements can be laid. The minimum thickness of the material is 100 mm, but in areas with harsh winters the layer can be much larger.

Remember that when working with mineral wool, you must use protective equipment - gloves and a respirator. In the future, the material will not pose a danger, but when laying and cutting it, small particles may enter the air, which can irritate the mucous membranes, and the skin of the hands will itch.
This material is ideal for insulating an attic from the inside with your own hands; in this case, the work is carried out in the following sequence:
- First of all, the surface is covered with a windproof membrane, which will also protect from moisture from the outside and ensure evaporation excess moisture from the inside. The fastening is standard - using a stapler, all joints must be reliable, it is better to additionally glue them with a special tape;
- Next, the space between the rafters is filled with mineral wool, the layer should be as large as possible, the optimal option is 20 cm. It is important to lay the material as densely as possible, so the width of the elements should be 3-4 cm greater than the distance between the frame;
![]()
- To keep the sheets in place, they need to be secured., there are two main ways. The first involves stuffing slats on top of the thermal insulation layer, and the second involves using twine, which is stretched on the surface and holds the mineral wool, an example is shown in the photo below.

- A vapor barrier material is attached on top of the insulation, after which it is possible to carry out exterior finishing, it can be anything: from lining to drywall or plywood.
Option No. 5 – sawdust
If you don’t know how to insulate a ceiling in a dacha on a budget and with high quality, then this section will tell you one of the simplest and most effective solutions. To complete the work you will need the following materials:
- Dry sawdust, the material can be purchased at the nearest sawmill for pennies;
- Lime, it is added to protect sawdust from mold and pests, it must be added in a ratio of 1:10. Finely ground fluffed lime is used;
- To strengthen the composition, I advise adding cement, one part of it should be to 10 parts of sawdust;
- Copper sulfate - added as an additional antiseptic, you need 2-3 spoons of it per bucket of water.
The workflow looks like this:
- In a container of suitable size, mix 10 parts of sawdust, 1 part of lime and 1 part of cement; it is important to achieve uniformity of the composition;
- Next, water is added to the resulting mass, in which 3 tablespoons are diluted copper sulfate for 10 liters. It must be added carefully, the mass should be moist, but not soggy and wet;

- The surface of the ceiling is covered with a layer of glassine, it is laid with an overlap on vertical surfaces, make a margin of 10-15 cm at the joints. This material serves as a waterproofing agent and does not allow moisture to penetrate the wood. It needs to be secured around the perimeter either with small slats or construction stapler, the second option is much simpler and faster
- Insulation of the ceiling occurs by uniformly distributing the finished mass over the surface; its layer should be 10 cm or more. There is no need to compact the sawdust, just lay it out on a plane and carefully level it;
![]()
- It takes about two weeks for the composition to dry; during this period it is advisable to ensure good ventilation attic space. It is not recommended to walk on the material in the future, so if the attic will be used for some purpose, then the insulation should be covered with a flooring made of boards or.

Option No. 6 – clay
More precisely, it will not be exactly clay, but a mixture of clay and sawdust; such a mass has good thermal insulation properties and is completely environmentally friendly, which is also important advantage Nowadays. What you need for work:
- Clay, which you can dig up yourself at the nearest mining site;
- Sawdust, it is important to find a dry option without traces of mold;
- Cement - a tenth of it is needed to the volume of the solution to increase its strength later.
The insulation mass is prepared as follows:
- Several buckets of clay are poured into a concrete mixer, after which water is added, the amount should be such that after mixing a liquid mass is obtained. To make the process faster, clay should be added in the form of small pieces;
- Next, sawdust is added until the mass becomes relatively dense; the moisture content of the composition should be low so that when laying it, water does not flow onto the structure; this is very important. At the end of mixing, cement is added, which also dries the mass and, after it hardens, gives additional strength;
Instead of sawdust, you can use straw, then you will get adobe, the thermal insulation properties of which have been well known to people for many centuries. In this case, water is added to the clay until a wet mass is obtained, after which wet straw is added, mixing is done with hands or even feet if the volumes are large.

- The surface between the beams must be covered with a waterproofing, vapor-permeable material; this is necessary so that moisture from the mass does not penetrate into the material and cause mold to form in it;
- The composition is laid out on the surface in a layer of approximately 10 cm, the surface is leveled manually or using a level lath. You can also use a rule; with its help, the work will go much faster, and the result will be much better;

- After laying, the mixture will dry for about a month; during this period, it is necessary to ensure high-quality attic ventilation. If during the drying process there appear on the surface small cracks, then they can be carefully wiped away.
Option No. 7 – expanded clay
This lightweight fireproof material has good thermal insulation properties and is lightweight, which is important when insulating ceiling structures. I would like to immediately note that for effective thermal insulation the layer of material should be about 20 cm, take this into account and use it when building beams of the appropriate height.

Ceiling insulation with expanded clay is carried out using a fairly simple technology:
- The surface is cleared of all excess, after which a vapor-permeable membrane is laid on it. The easiest way is to lay the material completely so that it covers both the surface and the beams; it is fastened with a stapler; it is fast, convenient and very reliable;
- Expanded clay is poured over the entire area and evenly distributed over the surface; the process is very simple and takes little time. The main thing is that someone brings the bags, and someone scatters them and levels them out.

A cubic meter of expanded clay costs about one and a half thousand rubles, this is for your information so that you can calculate the approximate costs when using this option.
Option No. 8 – ecowool
This is a relatively new insulation, which consists of cellulose with the addition of antiseptics and fire retardants, this ensures the safety of the material and its non-flammability. The capillary structure allows moisture to evaporate from the surface, and the presence of special additives prevents the formation of mold, so when asked what is the best way to insulate the ceiling, many experts answer that the optimal solution today is ecowool.

But I want to immediately warn you against independent work– the composition must be applied by specialists using special equipment; a manually poured mass retains heat much worse, such savings will cost more for you.
Let's figure out how to properly insulate a ceiling with this material; the instructions for carrying out the work are very simple:
- The material does not require any special preparation, since cellulose interacts well with wood. You need to clean the surface of debris and unnecessary objects. There should be nothing in the attic, since during operation particles fly in all directions and land on all objects around;
- Ceiling insulation can be done in two ways - dry and wet. In the first case, the composition is applied dry under pressure to the surface, work continues until a layer of the required thickness is formed on the surface. The second option involves supplying a wet mass, which, after drying, reliably adheres to the surface; its main advantages are strong attachment to the surface and high sound insulation characteristics;

Of course, there are other technologies that can be used to insulate the ceiling; I have touched only on those that are most common today and have proven themselves well among developers. From this list you can choose the best option for any structure, carefully weigh all the criteria to find the optimal solution.
Conclusion
Insulating the ceiling is a responsible process, because up to 25% of the heat from the house can be lost through this part of the structure. It is important to carry out the work efficiently and thoroughly, and the video in this article will help you deal with some important nuances better. If you don’t understand certain points or want to get additional information, then write in the comments under the review.
Ceiling insulation in a private house depends on the type of ceiling: basement or basement, interfloor, attic and roof. Let's consider all types of ceilings in a private house and ways to insulate ceilings in a private house.
When designing the construction of a private house or carrying out reconstruction, they make up diagram of thermal insulation locations for blocking structures. Then the area, the thickness of the insulation for each of the insulation sections, the amount of materials for thermal insulation of the ceiling of the house and other floors: roof, basement, veranda, walls are calculated.
Methods for insulating the ceiling of a private house selected based on the following factors:
- Insulation sides: outside or inside;
- Structural features of the floor (concrete slab, wooden panels floors);
- Ease of installation;
- The cost of insulation for the ceiling of the house and insulation work;
The diagram shows premises for various purposes: entrance veranda, living part of the house and attic, utility part located in a heated basement, basement part, which can be located under the veranda. This diagram of ceiling insulation in a house from the inside and outside shows where the rooms need to be insulated.
- 1. Insulation of the ceiling in a house with an attic from the inside.
- 1a. Insulation along the attic floor beams from the outside.
- 1m. Insulation of the ceiling of a house from the side of an unheated attic.
- 1l. Attic hatch insulation.
- 1st century Insulation of the ceiling in a private house from the outside (veranda).
- 1c. Thermal insulation of floor slabs of a basement or unheated basement.
- 1 year Waterproofing a heated basement.
- 2. Insulation of the roof part of the attic.
- 3-17. Thermal insulation of walls inside and outside, windows, doors.
Whenever possible, ceiling insulation in private houses is carried out outside, but this is not always possible; sometimes they are isolated from the inside of the room.
Insulating the ceiling from inside the house
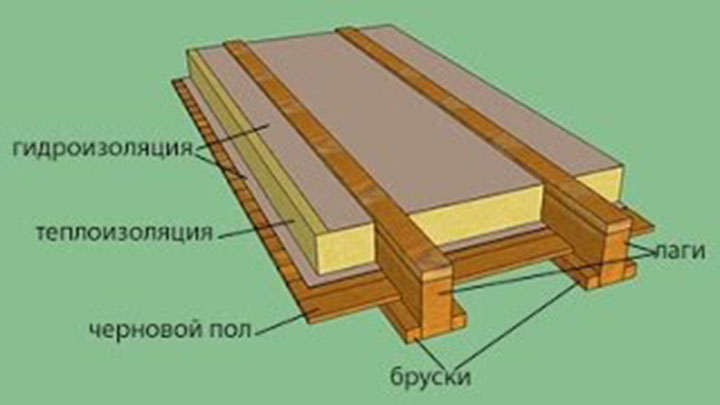
The traditional way to insulate the ceiling of a private house is thermal insulation of wooden floors along joists. Let's look at a fragment of the diagram - insulating the attic ceiling in a private house from the inside of the attic.

- The ceiling (1) - gypsum plasterboard or OSB sheets - is attached to the floor beams (2).
- Ceiling insulation for the house (3) is laid between the beams; if people live in the attic all year round, then a vapor barrier is not laid. The insulation (3) performs the function of sound insulation.
- The floor (4) is laid on damper pads To prevent the floor sheets from sagging when walking, additional transverse joists are attached between the beams.
- (5) GKL.
- (6) – vapor barrier.
- (7) – lattice strip 20 x 50 mm.
- (8) – thermal insulation; Insulation of the ceiling with stone wool in a private house is carried out from the inside of the living space. The material is environmentally friendly and fire safe.
- (9) - rafter board 50 x 150 or 50 x 200 mm, the wider, the thicker the insulation layer, which also plays the role of a noise absorber.
- (10) – counter-lattice to create a ventilation gap.
- (11) – vapor barrier membrane.
- (12) – Metal tiles or other roofing material.
Using the example of a veranda, let's see how to insulate the ceiling of a house from the outside when above it unheated room. It is better to carry out thermal insulation when building a veranda, when access to the ceiling is free. The scheme is approximately the same as the previous one, but here the insulation is located between the waterproofing and vapor barrier films.

- (1) – ceiling made of tongue and groove boards.
- (2) – floor beam, board 50 x 200 mm.
- (3) – waterproofing.
- (4) – thermal insulation with basalt wool.
- (5) – vapor barrier.
- (6) – floor of the ceiling. You can leave only the vapor barrier, the floor is not needed, because this space is not used. The top will be covered with a pitched roof.
Advice. To insulate floors, use natural materials that are easily available in your area and literally lying under your feet: sawdust, moss, straw, clay, reeds, reeds, shavings. They are usually mixed with clay.
Ceiling insulation with reeds found application in a private home, where this raw material is abundant. Reed is an excellent environmentally friendly material, and most importantly, it is free. It is prepared like reed: dried under a canopy, then tied into mats with thin wire, and laid on the waterproofing film of the veranda ceiling.
The disadvantage of this method is fire danger insulation. Thermal insulation of the ceiling of the house is better done non-flammable materials: basalt wool, expanded clay, extruded styrofoam.
How to insulate a ceiling with expanded clay in a private house
Best use expanded clay– thermal insulation of the ceiling of the basement, basement, unheated attic space. Ceiling insulation with expanded clay in a private house is shown in the picture.

A vapor barrier film is laid on the tongue and groove board of the veranda "Izospan", then fill in a layer of expanded clay 15-20 cm and there is no need to lay anything else down, everything will be under the roof.
Insulation of the ceiling on the veranda of a private house with ecowool is carried out if it is impossible to insulate it from the outside. Eco-wool is laid between the floor beams, then a vapor barrier film is attached to the beams with a stapler, a 20x50 mm counter batten is nailed to the beams for a ventilation gap, and then the ceiling is sewn with gypsum plasterboard or other material, as in the insulation diagram discussed above, where instead of (1) there are gypsum plasterboard sheets , and instead of (4) – stone wool lay ecowool.
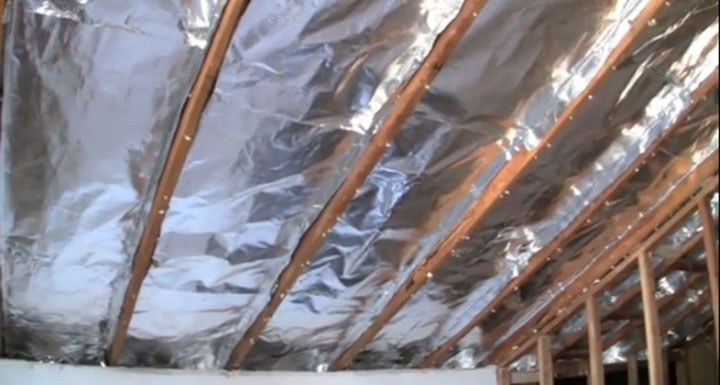
Do-it-yourself ceiling insulation in a private house
Thermal insulation attic floor On the attic side, customers often do it themselves. Knowing insulation technology, this work is not difficult to complete. Especially on the finished floor.
If attic floor are not used for housing, then insulation of the ceiling in a house made of aerated concrete is carried out as shown in the picture.

How to insulate a ceiling in a private house with your own hands
- Measure the area of the space where the waterproofing will be laid.
- They purchase film, adhesive tape, polyurethane foam, roll insulation 100 mm thick.
- Foam the gaps between the beams and the floor.
- Lay the film between the floor beams.
- The joints of the film are taped.
- Insulation on the ceiling in a private house is laid between the beams, the distance between them is 57-59 cm.
The insulation is covered with roofing felt on top, ladders are made for walking, or OSB sheets are nailed to the beams, equipping the attic for storage.
What is the best way to insulate the ceiling of a private house?
Market thermal insulation materials presented by roll and sheet (in the form of mats) insulation materials of domestic and imported manufacturers. For each of the floors, thermal insulation is selected according to the following criteria:
- Environmental safety, for indoor floors.
- Fire safety, for all floors.
- Low thermal conductivity is expressed as W/m K.
- Durability.
- Cost of material and installation.
Insulating the ceiling in a house with expensive materials does not at all guarantee the quality of the insulation.
Advice. It is important to follow the technology of ceiling insulation in a private home. Thermal insulation is a barrier to the escape of heat from the house. Proper insulation of the ceiling in a private home does not mean that it is necessary to retain heat. The room should not be sealed tightly to prevent accumulation of harmful substances: carbon dioxide or radon. Therefore, ventilation in the house is also needed.
How to insulate a ceiling from the inside in a private house with your own hands
It’s quite possible to do it thermal insulation of the basement or basement floor ourselves. How to insulate a ceiling in a house wooden floor shown in the picture.

Extruded polystyrene foam insulation (2) “BATEPLEX” with a thickness of 50 mm is cut to fit the size between the beams. The joints and places adjacent to the beams are foamed with a sealant. Then the second layer is laid in a checkerboard pattern. All joints and cracks are sealed with polyurethane foam; GCR is sewn along the beams. Insulation of the ceiling in a private house from the inside with polystyrene foam is done in the same way. Advantages of insulation with BATEPLEX slabs:
- The boards are lightweight, attached to wood and concrete pavement liquid nails.
- The structure of the plates is steam and waterproof.
- Low thermal conductivity.
- A fire-retardant layer of plaster can be applied to the surface of the slabs.
- Environmental friendliness and durability.
How to insulate a ceiling in a private house from the inside
When it comes to thermal insulation from inside the building, then you need to understand that interfloor ceilings are often not insulated, but made sound insulation. Only those rooms that cannot be insulated from above are insulated from the inside. This usually happens when cold penetrates from the basement or basement. Then from within basements insulate the ceiling as shown above.
How do you insulate the ceiling of the house, which is located under unheated attic? Just like in the last picture, only additionally attached to the beams vapor barrier film. Then a counter batten and then a gypsum board are additionally nailed onto the beams. If the floor is concrete, then glue the BATEPLEX slabs to the concrete slab, seal the joints with polyurethane foam, and then decorate suspended ceiling.
How to properly insulate the ceiling in a private house so that moisture does not accumulate in the insulation. For this there are waterproofing and vapor barrier materials. These are not only various films, but also a number of materials that have been used for a long time. Familiar to everyone roofing felt, excellent vapor barrier material, thick glassine, various bitumen-based mastics.
Task proper insulation – prevent condensation from forming in the insulation, that temperature difference at which wet steam condenses in the form of fog or dew drops. Moisture should not penetrate into the insulation, and if a small amount does penetrate, then this moisture must be allowed to evaporate.
Advice. Correct installation film, helps remove moisture from the insulation. Ventilation gaps serve to quickly evaporate moisture from the insulation. When purchasing film, ask for installation instructions.
What is the best way to insulate a ceiling? private house. The owner's desire is for it to be warm and beautiful. Regardless of how to insulate the ceiling in a private house from the outside or from the inside, these conditions must be met, plus sound insulation. These issues are being resolved suspended ceiling systems. They decorate communications and defects in the main ceiling.
How can you insulate the ceiling in a private house under a suspended ceiling? This need arises when premises are being renovated and communications are being laid along with thermal insulation.
The ceiling is insulated using the joist method or attaching insulation to the ceiling. Methods for insulating the ceiling in a private house are described above. To these you can also add options for ceiling insulation in a private house for cold ceilings - thermal insulation using natural materials and expanded clay- concrete screed, as well as thermal insulation with bulk and coating materials (a mixture of clay with sawdust, shavings).
Thermal insulation materials Our northern neighbors the Scandinavians have been using it for a long time. The concept of thermal insulation is the use of materials with low thermal conductivity, the use of vapor and waterproofing, control systems temperature regime And chemical composition air.


