We will send the material to you by e-mail
Are you building new design or remodel the roof additional rooms, you need to take care of how to make high-quality insulation. If the roof is already covered, all work from the inside is carried out taking into account the geometry of the roof and the climatic characteristics of the region. In this material we have collected all necessary information O possible ways insulation and we will provide you with practical recommendations from professionals.
A well-insulated attic can serve as a bedroom or even a children's room
Useful information and video on how to insulate an attic for winter living
A lot depends on the quality insulation of the attic roof. If you plan to use this room during the winter, you need to think carefully about what materials to use for thermal insulation. Another important aspect– roof structure.
The peculiarity of the under-roof space is not only in geometry; in winter it is colder here than in other rooms, and in summer it is hotter. To support optimal temperature, roofers recommend forming under roofing covering multi-layer “pie” of waterproofing, and.
Important point! When there is a large heat loss through the roof in winter, the snow on it begins to melt and forms an ice crust. And water, as you know, looks for any, even the most minimal, loophole. So an icy roof is bad, there is a high chance that you will get a leak.
About the need for waterproofing work
All fiber insulators, one way or another, absorb moisture. It can form due to flaws in the roof covering or the formation of condensation indoors due to temperature differences. Moisture that gets into the insulation adversely affects its condition. To prevent this from happening is the task of the waterproofing layer.
Technologies modern construction involve the use of membrane materials. They prevent the formation of condensation and at the same time do not allow external moisture to pass through.
Internal insulation of an attic is one of the most difficult construction tasks. And all because the result is important here: how the roofing pie will behave in winter, whether there will be any leaks, whether there will be a smell of dampness, and whether it will all have to be dismantled later. Why such difficulties? The fact is that no matter how carefully the budget for building a house is planned, as a rule, it is still not enough for everything. To the point that even the owners of the future family home decide to buy laminate flooring cheaper - just to finish the repairs and just start living. And the most popular expense item, which is immediately cut as soon as the lack of funds becomes clear, is attic insulation. “Later, in the future,” the owners promise themselves, especially since insulating the attic from the inside is not a problem at all, and you can start it at any time, even in winter.
In fact, there are a lot of subtleties and nuances here, and therefore, if you have already taken up this matter, carefully study this article. And everything will work out!
Why do problems arise?
There are statistics: up to 30% of attics have to be remodeled after the first winter. The roof covering, interior trim and films are removed, and the insulation is dried. In this case, a lot of materials have to be thrown away, and this is another unplanned expense. Even if you hired a professional team of builders, this is not a guarantee of the well-being of the future attic, especially if the roofing cake is thought out without taking into account the peculiarities of the local climate.
Why is this happening? So, in Russia there is dampness, cold and 24-hour negative temperatures- Not unusual. And the lower the ambient temperature, the greater the volume of steam that penetrates through the vapor barrier - all due to an increase in the partial pressure difference. And at the same time, the migration of moisture through the cold membrane slows down significantly, although it does not stop. Bottom line: the situation is even worse than under standard tested conditions. And therefore, you cannot test the vapor permeability of a roofing pie in European conditions and expect the same good result in the Siberian regions.
Here's a simple illustration to help you understand what we're talking about here:
Note that the maximum water vapor pressure on the roofing pie is in the residential attic. And it’s not even that there are people in such a room much more often than in an ordinary cold attic - it’s just that the pressure of warm air is additionally added to the steam pressure. Moreover, these processes are so obvious that they can be observed in the form of real leaks!
The fact is that wet insulation loses its properties very quickly. And the more humid the air that reaches it, the faster the thermal insulation decreases. For example, basalt insulation with a humidity of only 5% already loses its heat by 20% than dry insulation.
For example, just one cubic meter airspace, if it relative humidity is 100%, at a temperature of 20C contains 17.3 grams of water - simply in the form of steam. And the lower the temperature, the more difficult it is for air to hold water in a bound state. And when the temperature drops to 16C, there will be only 13.6 grams of water vapor in the same air, and the rest will settle as water in the insulation. Let us conclude: moisture in the insulation appears due to the condensation of excess water vapor from the air as the temperature decreases. And it must be actively fought. And this is far from the only problem - now we will deal with them all.
Let's start insulation - work technology
Let's start with the first problem - insufficient thickness of the joists if you insulate the attic after the construction of the entire house and installation of the roofing. Why is that? Let's take a closer look at this issue.
Thus, attic insulation can be divided into basic and additional. Basic is insulation, which is carried out during the construction of the roof of the house and involves the use of lightweight insulation directly into the rafter structure. And here additional insulation is already turning an uninhabited attic into a full-fledged attic.
With basic insulation the main task– to minimize the heat loss of the house through the roof, and such basic insulation may well replace additional internal insulation, if only you choose the insulation wisely, do not skimp on its thickness and think it through carefully rafter system. That's what those builders often do own home who understand that 20 rooms may not be enough in the future, and additional space for a billiard room, library or sauna cannot be a problem. And therefore, it is better to initially build it completely residential, and not finish something later.
But, if during the construction of your house you decided to make do with basic thermal insulation and now you have enthusiastically taken up the task of arranging your living and cozy attic, then your only option is additionally internal insulation with all its nuances, the main one of which is the insufficient thickness of the rafters, which were not originally designed for dense internal insulation. But the problem is completely solvable, to prove which we have prepared a detailed master class for you:


Now let’s move on to more insidious aspects that are no less important: proper vapor barrier and waterproofing, which you may have to redo.
No - dampness and smudges!
For any insulation, it is extremely important to create the right conditions, otherwise the material will quickly become damp and, instead of a source of heat, become a source of dampness, mold and cold. What are these conditions? Let's take a closer look!
What is dew point?
The first and most important quality of any insulation is low thermal conductivity. Thanks to it, the insulating layer rigidly separates warm air inside from the cold outside. It would seem that they inserted insulation into the rafters, secured it - and that’s all that else is needed? Not so!
Firstly, from the outside, the whole thing must be carefully waterproofed from rain and damp air, because... In this regard, such a roofing pie is a real sponge. Secondly, any insulation also has a second quality - vapor permeability, i.e. "breathes". Now let’s remember physics: the warm, humid air inside the room under the roof (always humid!), without finding an obstacle, easily passes inside the insulation and collides with its colder part, the one that is closer to the roofing pie. And there this air condenses, settling in the form of droplets, which is called the dew point. What's the point of external waterproofing then? Mineral wool insulation is especially susceptible to this phenomenon, note.
Therefore, our first task is to ensure that as little steam as possible passes through the insulation, because even super-diffuse membranes in the cold do a poor job of removing water vapor, due to a significant slowdown in moisture transfer processes. And this is a question of proper vapor barrier of the attic insulation.
Here clear example, to which unpleasant consequences leads to ignoring the concept of dew point:
Vapor barrier: warm European winters and Russian frosts
In fact, in Western Europe, where winters have always been mild, there is no need for vapor barriers with special properties - simple packaging films are quite suitable. So they sometimes end up in Russia, although their vapor barrier properties are not high. These are LDPE roll films, which stands for “low density polyethylene”. In such films, uneven thickness and microdefects are noticeable. Their main purpose is product packaging.
Little better are reinforced materials, which are made by hot pressing a film onto a mesh of twisted thread. In production, such films are injured by mesh nodes, and as a result, the low vapor barrier properties are further reduced. Although the film itself turns out to be much stronger than usual, of course.
More reliable are bag fabrics made from polypropylene threads and spunbonds. The former are additionally laminated with molten PEPN, but a uniform and continuous film is still not obtained, although the strength is pleasing. And the latter are made from non-woven polypropylene fiber, but its vapor permeability is still in the range of 15-25 g/m2 per day, and this is a very low figure.
And it boasts the best vapor barrier properties aluminium foil, which is suitable even for arranging steam rooms in which the pressure and volume of water vapor are the highest. The only point: such a vapor barrier additionally creates the effect of a thermos in the attic, simultaneously reflecting invisible heat rays back into the room. That’s why it’s better not to insulate a small attic room this way, but for a spacious one it’s just the same.
Therefore, if you want to save heat as much as possible, or you are planning to make a good sauna in the attic, then you need the following vapor barrier:

Or immediately purchase insulation with an aluminum side:

We close access to water vapor
But remember that it is still important to properly lay and waterproof a good vapor barrier film, otherwise water vapor will still find its way in.
The joints of vapor barrier sheets are usually sealed with a special adhesive tape made of butyl rubber, but even in this case complete tightness cannot be guaranteed. The thing is that over time, the adhesion of the sticky layer decreases, and with additional load the canvases come unglued. That's why when installing exterior finishing, when it is possible to attach the same drywall directly to a vapor barrier, many people install additional sheathing. Its task is not so much to ensure that the finish is fixed more evenly (which is also important), but rather to press the tape or sealant with the slats.
In addition, this lathing (usually with slats up to 3 cm thick) additionally allows for installation electrical wires directly under the sheathing, and not through the insulation, as many do and which can hardly be called a technically competent solution.

But the places where the vapor barrier adjoins the passing pipes and brick walls must be insulated with special sealants or tapes.
Another important point: never tighten the vapor barrier - fasten it with a small margin. The point is that everything wooden structures, which is what the rafter system is, naturally dry out and become slightly smaller in size. The frame itself becomes mobile, and there is a risk of ruptures under the roof outside and under the sheathing inside. And then - surprise!
Does external waterproofing “breathe”?
So, with warm inside Insulation we install a vapor barrier, which does not allow moist air to enter from the room. And on the outer, colder side we are already attaching waterproofing, which will protect the insulation under the roofing pie from external accidental leaks of melt water or rain.
And the further development of events depends on how “breathable” the top waterproofing film turns out to be. So, if you purchased the most ordinary roll of inexpensive waterproofing, things are bad, the moisture from the roofing cake will evaporate for a long time and with difficulty, as a result - dampness and gradual destruction of the insulation. But modern vapor-permeable membranes are called “smart” for a reason: they do not let moisture in, but remove water vapor out. It's all about their unusual, well-thought-out structure. This is why it turns out that when using cheap barrier films, even expensive insulation does not last long, and repairs are not far off.
Please note that the diffuse membrane should fit as tightly as possible to the insulation, without any gap, like with a regular film. Otherwise, the membrane material will cool more strongly, and the temperature will become lower than the steam migrating through the insulation. You will see the result in the form of ice directly on the membrane, which will cause it to lose its vapor-permeable properties even more.
When do you have to dismantle the roof?
Quite often during the construction process, roofing material or reinforced films are installed as roof waterproofing. And a couple of years later, when the attic turned out to be very necessary and everyone at home enthusiastically began to repair it, it turns out that without full analysis the roof won't work anymore.
What's the matter? The fact is that such waterproofing does not “breathe” at all, and any insulation under it will completely bend. That’s why, if the roof of your house is still under construction, but you are thinking about putting off insulating the attic for the future, immediately use a good super-diffuse membrane as waterproofing.
But how can something get into the insulation if we have already installed a vapor barrier? The fact is that not a single film in the world is capable of retaining water vapor 100% - they are very small. And no matter how hard manufacturers try, there is no absolute barrier. And even more: modern vapor barrier films actually don’t even do their job halfway, and only the highest quality ones are capable of retaining steam by 75-80%. Everything else, unfortunately, penetrates inside the roofing pie.
Let's sum it up ogi. You should end up with a roofing pie with two films that have absolutely opposite properties: the inner one does not let steam into the insulation, and the second one saves it from a small amount that accidentally gets there.
Insulation of complex structural elements
If you have decided on insulation and insulation materials, congratulations! Prepare everything carefully, calculate everything you need and feel free to proceed. Main, installation work Exercise only in a well-ventilated area. And finally, when working with modern insulation materials, many manufacturers advise using a vacuum cleaner before insulating the attic roof from the inside, and after it is finished.
It is not difficult to insulate pitched and straight attic walls, and the first difficulty you will encounter is windows and other complex elements designs. It is also important to properly insulate them, leaving no chance for moisture or water vapor to leak through. Do you know what are usually the most problematic places in attic rooms that cause mold and smudges? So take this issue seriously:


Here is another tricky moment when the attic ceiling is not made of logs, but a solid slab. You need to insulate it like this:

And finally, after insulating the attic, make sure that snow does not accumulate later in the drains and on the ridge - the entrance and exit of the movement of under-roof air. To do this, it is more rational to install ventilation pipes along the entire roof ridge, and make the ridge itself unventilated. That's all the difficulties!
Properly executed attic roof insulation is the key to a comfortable atmosphere in this room and long service life interior decoration attic room. To keep you warm and cozy in winter, and in summer you are not disturbed by the heat and stuffy air, it is very important not only to choose the right thermal insulation materials, but also to install them in compliance with the technology. Today we will tell you how to insulate mansard roof with your own hands, which insulation materials are best suited for this purpose, and most importantly, how to avoid common installation mistakes that reduce all efforts to almost zero results. You will learn all the most important things about insulating an attic roof - the video clips attached to the article will clearly demonstrate all the intricacies of this work.
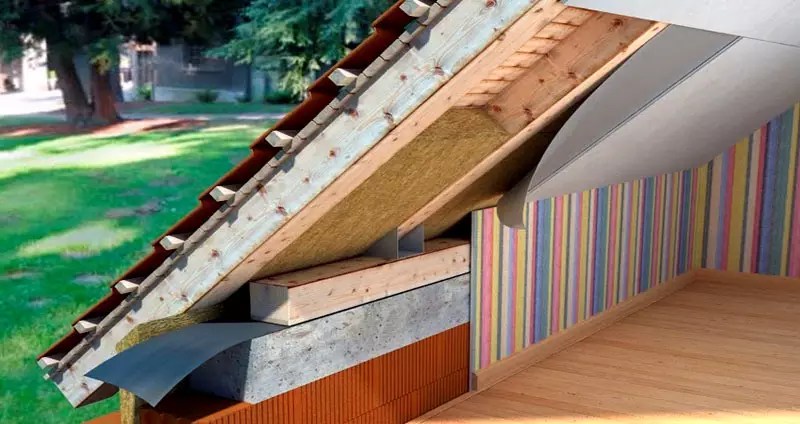
The insulation of an attic roof has its own characteristics, due to the fact that the walls of the living space are directly adjacent to the roof, or rather, they actually form a single whole with it. That is why it is customary to pay the closest attention to insulating the attic roof from the inside, which allows for a normal microclimate in the room. Before we start talking about how to insulate an attic roof from the inside, let's figure out what layers the so-called “roofing pie” consists of, and why it is so important to place these layers in the right sequence:
The diagram shows the correct order of arrangement of elements of the attic roof thermal insulation system
What is the reason for this particular arrangement of layers? Elementary laws of physics. Let's imagine that in winter a decent layer of snow fell, which, by the way, is a natural heat insulator. As a result of the life activities of people living in attic house, warm air will rise from the inside to the roof surface. The snow covering it will melt. And as soon as the temperature outside drops below zero, a crust of ice forms, which no longer has any heat-insulating properties. The essence proper insulation The purpose of the attic roof is to prevent snow from melting in winter and scorching heat from penetrating in summer.

Diagram of air movement in the under-roof space, and the operation of the vapor barrier when insulating the attic roof
More details about the structure of the “roofing pie” and its principles proper operation You will learn all its components from this educational video:
The best way to insulate an attic roof: choosing insulation
There are four most important criteria based on which it is necessary to choose high-quality insulation for an attic roof:
- Thermal conductivity;
- Moisture resistance;
- Fire safety;
- Ecological cleanliness.
The first parameter can be called decisive, since its thickness, number of layers, and most importantly, efficiency depend on how low the thermal conductivity of the material you choose is.
Important: Insulation for an attic roof with a thermal conductivity coefficient of no higher than 0.05 W/m*K can be considered sufficiently high quality and reliable.
The second indicator is also important, especially for an attic rafter system made of wood. The resistance of the insulation to moisture will allow you to worry less about the possibility of damage and rotting of the wood. Why fire safety of insulating materials is important is probably unnecessary to say. And finally, the environmental friendliness of the insulation in the case of attic rooms is also of great importance, especially if it is a bedroom or a children's room in the attic.

Comparative table of construction and finishing materials indicating their thermal conductivity coefficient
As follows from the figure above, insulating the attic roof with ecowool is an excellent solution, since this mineral insulation meets all four material selection criteria. However, it cannot be called the most affordable, so many craftsmen refuse to use ecowool in favor of cheaper, but no less effective insulation materials. For example, insulating an attic roof with polyurethane foam allows you to achieve the same excellent effect, while saving money. Among the effective mineral and polymer insulation materials one can also name:
- Basalt wool;
- Glass wool;
- Extruded polystyrene foam;
- Styrofoam.
By the way, it is the insulation of the attic roof with polystyrene foam that can be called the most economical and simple method. But it is worth remembering that foam does not allow steam to pass through, and besides, rodents often live in it. Expanded polystyrene can be called a more modern and technically advanced alternative to conventional foam. Choose best option This video will help you with insulation for attic roofing:
How to properly insulate an attic roof with your own hands
Insulating an attic roof with your own hands is not at all difficult; for this you do not need to have the skills of a professional builder. The specifics of the work on installing thermal insulation entirely depend on the type you choose insulating material. If the attic roof is insulated using mineral wool or glass wool, the process will take slightly longer than in the case of polystyrene foam or polystyrene. The fact is that to achieve a good effect, cotton wool is laid in several layers, and requires additional vapor barrier, because it strongly absorbs moisture.

Technology of insulating an attic roof from the inside with mineral wool using the example of a broken two pitched roof
The thickness of the attic roof insulation is directly proportional to the value of its thermal conductivity, that is, the denser and more reliable material, the less it will be needed. Usually, during the installation of thermal insulation, an additional layer is made of cotton wool to cover the rafters. But many owners residential attics this is absolutely not acceptable, since the rafter beams can act as an important decorative element future interior of the attic room. If you consider yourself one of these owners, extruded polystyrene foam is preferable for you, a small layer of which is laid between the rafters.
Advice: Before starting roof insulation work, consider future design attic room, and select the type and installation method of insulation that best suits your interior design.
For everyone who wants to learn in detail how to insulate an attic roof, see the video below. This short film talks about insulating the roof of a wooden country house made of laminated veneer lumber with a gable roof using the most modern and high-quality thermal insulation material - extruded polystyrene foam.
1.Methodology for calculating the distance between rafters
2. Rafter structure for corrugated sheets
3. Rafter structure for ceramic tiles
4. Rafter structure for metal tiles
5. Rafter structure for ondulin
6. Rafter structure for slate covering
7. Rafters for single-pitched and gable roofs
The roof frame must be reliable and durable.
But without proper calculations this is difficult to achieve. In the process of carrying out calculations, they determine at what distance to place the rafters on the roof.
What can result from an incorrect or inaccurate calculation of the loads to which the truss structure will be subjected? To the most negative consequences, ranging from deformation rafter legs and damage to the roof covering and ending with the collapse of the base of the roof frame. Therefore, when designing buildings, the list of mandatory calculations contains data on what the distance between the roof rafters should be.
There is a certain technique that allows you to calculate this value.
Method for calculating the distance between rafters
The distance between the rafters on the roof is called the rafter pitch. As a rule, the pitch of the rafter legs in a roof structure usually exceeds one meter, and the minimum gap ranges between 60 centimeters.
Calculation required quantity rafters for a roof of a certain length and the pitch of the rafters are made as follows:
- before calculating the length of the rafters, measure the length of the slope along the eaves of the roof;
- the resulting value is divided by the selected distance between the rafters.
For example, the step is one meter, which means you need to divide by one, and if it is 60 centimeters, then the divisor will be equal to 0.6;
- then one is added to the result, and the result is rounded up.

Thus, through simple calculations, the number of rafters that need to be installed to construct one roof slope is determined.
After this, the length of the slope is divided by the resulting number of rafters, resulting in the value of the interaxial gap between the rafters, called the pitch.
For example, with a roof slope length of 25.5 meters and a step length of 0.6 meters, the calculation is performed as follows:
25.5: 0.6 = 42.5 + 1= 43.5, after rounding to the nearest whole number the result will be 44 - this is the number of rafters required for the roof slope.
This simple technique, which allows you to determine at what distance the rafters for the roof are placed, does not take into account the characteristics of the roofing material used.
Rafter structure for corrugated sheets
The pitch of the rafter system when creating a roof from this material should be at least 600 millimeters, and the maximum pitch of rafters under corrugated sheeting should be no more than 900 millimeters.
When the gap is larger, then it is necessary to install cross-section boards with a large cross-section. In this case, the cross-section of the rafters themselves is selected in size
50x100 millimeters or 50x150 millimeters (read: “Installation and dimensions of roof rafters”).

To lay corrugated sheeting, a sheathing of boards 30x100 millimeters is required; it is installed in 500-mm increments or more, depending on the thickness of the roofing material and the height of the trapezoid.
When creating a sheathing for corrugated board, the board facing the cornice should be 10-15 millimeters thicker than the rest. The design of the sheathing must provide the possibility of passage for fastening such vertical elements as ventilation pipes, chimney, etc.
Rafter structure for ceramic tiles
The design features of rafters for laying ceramic tiles are due to the fact that the raw material for its production is clay - the material is quite heavy, its weight is 10 times greater than that of metal tiles.
Thus, the load on the load-bearing roof system per square meter of area is from 40 to 60 kilograms.
Rafters for this frame system must be made from well-dried wood, the moisture content of which does not exceed 15%. For their production, timber with a cross section of 50x150 millimeters or 60x180 millimeters (for reliability) is used.
In this case, the pitch of the rafter system is 80 – 130 centimeters, depending on the steepness of the roof slope. So, at an angle of inclination equal to 15 degrees, the distance between the rafters is 80 centimeters, and at 75 degrees – 130 centimeters.
When calculating the pitch between rafters, experts take into account their length.
If the length of the elements is maximum, the minimum distance between them must be maintained when performing work. With short rafters it should be as large as possible.
Safe movement on a roof with a slope of less than 45 degrees can be done if the rafter pitch does not exceed 80-85 centimeters.
 When arranging a ceramic roof, there is one more feature - this is a certain size of the sheathing step with which it is placed on the rafters. It depends on the type of shingles purchased.
Most in a simple way You can calculate the pitch of the sheathing if you take into account that most tiles have a length of 400 millimeters, and the overlap when laying is from 55 to 90 millimeters.
Therefore, in this case, the pitch of the sheathing is equal to the length of the tile minus the amount of overlap, which is 310-345 millimeters (read: “Roof sheathing for metal tiles: installation and fastening”).
When the roof has several slopes as in the photo, the pitch of the sheathing and the number of rows of tiles are calculated for each pitch of the rafters separately.
Insulating an attic roof: video instructions
The rows are marked using a cord attached to a counter-lattice, which is located on opposite sides of the roof slope (read also the article: “Lathing step under corrugated sheeting”).
Rafter structure for metal tiles
When constructing suburban private real estate, metal tile roofing can be found most often.
This roofing material similar to flooring made of clay tiles, but compared to it it has a number of advantages. Sheet metal tiles are easy to install, so you can build a roof in a shorter time; the rafter system for metal tiles is also not complicated.
Metal tiles are lighter than ceramic products; the difference in weight sometimes reaches 35 kilograms per square meter, depending on the thickness of the products (read also: “Design of a rafter system for metal tiles - design options, rafter spacing”).
Thanks to a significant reduction in the weight of the roof deck, it becomes possible to reduce the thickness of the elements of the rafter structure and the cross-sectional dimensions of the sheathing bars, and to increase the installation pitch of the rafters.
Under the metal tile covering, rafter legs are mounted at a distance of 600 to 950 millimeters, while the cross-section of the construction material is 150 by 50 millimeters.
According to experts, in this case, if you place insulation 150 millimeters thick between the rafters, then such thermal insulation will create comfortable conditions for staying in the attic room. At the same time, for greater reliability, it is advisable to choose 200 mm insulation.

When installing rafters, to ensure ventilation of the space filled with insulation, holes with a diameter of 10-12 millimeters are drilled in the rafters near the upper roof.
The technology for creating a rafter system for metal tiles does not differ significantly from designs for other types of roofing materials.
The only peculiarity is that the upper support of the rafters is mounted on the ridge girder from above, and not on the side of the ridge beam. The presence of a free zone between the rafters ensures air circulation under the roof deck, and this, due to the use of metal material, reduces the risk of condensation.
When installing the roof in wooden house, when it is planned to replace the Mauerlat with the upper crown, if you incorrectly calculate at what distance the rafters are placed, it will be difficult to correct the error (read also: “How to calculate the rafters for the roof”).
Rafter structure for ondulin
When creating a roof from ondulin, the pitch of the rafter system should be at least 600 millimeters, and the maximum distance between the rafters should be no more than 900 millimeters.
For the rafter system, boards of 50x200 millimeters are selected and thereby provide an insignificant margin of safety, taking into account the rafter purlins.
On top of the counter-lattice and rafter structure, a lathing made of 40x50 millimeters of timber and an interaxial spacing of 60 centimeters is laid (read the article: “Ondulin or metal tiles - which is better”).
Rafter structure for slate covering
Slate is one of the most popular roofing materials. For its installation, choose rafters with a cross section of 50x100 or 50x150 millimeters. When deciding at what distance to install the rafters, you must proceed from the fact that the minimum value cannot be less than 600 millimeters, and the maximum - 800 millimeters (for more details: “How to install rafters on a house”).

For the manufacture of lathing they use wooden beam with a section of 50x50 millimeters or a board 25x100 millimeters.
The sheathing pitch is selected depending on the slope angle of the roof slope. If it is insignificant, then it is enough for the sheet of material to rest on 4 bars with a pitch of 45 centimeters, and with a large slope, 3 bars with a pitch of 630 to 650 millimeters will be enough.
How to install a roof from corrugated sheets with your own hands, detailed video instructions:
Rafters for single-pitched and double-pitched roofs
When creating a rafter structure, you should remember the need to provide the system with an additional margin of safety, taking into account the pitch of the rafters.
Distance between rafters pitched roof are chosen depending on the thickness of the wood and the roofing material - it can range from 60 to 140 centimeters. The thickness of the wood elements depends on the area and load on the roof (read: “Rafter system of a pitched roof, main advantages and characteristics”).
Distance between rafters gable roof made taking into account the size of the heat insulator that is placed between them. The approximate step between the rafter legs is 1-1.2 meters (read: “Rafter system of a gable roof and its components”). Rafters regulate the amount of roof overhang.
Insulating the attic from the inside if the roof is already covered
The desire of many owners of country houses to make maximum use of the space of the house forces them to pay attention to the attic. It often happens that it is easier to equip an attic than to expand the house by adding a residential building to it. Since the attic is part of the roof of the house, it is with the thermal insulation of the roof that the arrangement should begin attic floor. Let's look at how to properly insulate an attic with mineral wool and show you detailed video instructions on the topic.
You should insulate the attic with mineral wool and equip the attic for a room if the roof of the house allows the ceiling in this room to be of sufficient height and can be strengthened interfloor ceilings to walk safely in the attic.
If these two conditions are met, then you can safely begin to independently insulate the attic with basalt mineral wool for living in the winter.
The best way to insulate an attic
First, let's consider the most important question - what is better to insulate the attic with foam plastic or mineral wool. Let's determine which thermal insulation material is suitable for proper insulation of the roof of the attic floor.
To do this, the following parameters should be taken into account: thermal conductivity coefficient, resistance to high temperatures and moisture, fire safety, environmental friendliness and light weight.
Most of the listed requirements are met by fiberglass or mineral wool. Unlike basalt insulation, Technoplex polystyrene foam does not withstand high temperatures and is a highly flammable material.
Knauf glass wool and Rocklight basalt wool are fire-resistant and fireproof materials, and with high-quality vapor barrier, mineral wool will not be affected by moisture.

Comparison of building materials by thermal conductivity
Mineral wool is made from natural material– basalt. The material has a density from 18 to 45 kg/m³ and has good heat-insulating and sound-absorbing properties.
Insulation of attic roofs from the inside, instructions and video
We reviewed various brands of mineral wool, their purpose and characteristics in the section “Inorganic Thermal Insulation”. Therefore, we will not dwell on this topic separately.
Methods for insulating the attic of a house with mineral wool
The attic is insulated in two ways: under the rafters and between them. The simplest way is to place mineral wool between the rafters. This method is used to insulate the roof even at the stage of building a house, but you can use the technology even after construction is completed.
You can carry out the work on thermal insulation of the attic yourself, if you have sufficient competence.
In addition to this method, there is also a technology for placing basalt insulation under the rafters.
This technology involves the construction of an additional frame for the installation of mineral wool, which entails an increase in costs. However, this method has important advantage– the absence of cold bridges between the insulation and the rafters, which will protect the wood from possible wetting and rotting.
Insulating the attic with thermal insulation located under the rafters will be easier and more correct, but this will result in loss of room area.
In both cases, the use of a vapor barrier to cut off moist air warm room, from penetration into basalt fiber and its moistening. You should also take care of the ventilation in the attic of the space between the roof and the insulation.
We insulate the attic with mineral wool with our own hands
1. Construction of the frame of the attic room
The mineral wool should be located oppositely between the frame guides; for this, the timber is installed at a width 1-1.5 cm smaller than the width of the insulation.
The thickness of the timber should be equal to or greater than the thickness of the thermal insulation in the attic. To do this, you should use a heat engineering calculator to calculate the thickness of mineral fiber insulation for the roof and attic of a private house.
Condensation often forms on a metal roof, so treating wood with an antiseptic is necessary to protect it from moisture.
2.
Laying mineral wool in the frame
Rocklite mineral wool or another brand is placed in the frame; the slabs should be spaced apart, without gaps. It is better to lay the slabs in two rows so that the second layer of mineral wool covers the joints of the first row. Don’t forget that when working with mineral wool, you should protect yourself from mineral wool microparticles floating in the air by wearing gloves, a respirator and other personal protective equipment.

Insulating the attic with mineral wool from the inside and outside
3.
Installation of a vapor barrier membrane
To protect glass wool or mineral wool from moisture, the entire structure should be covered with a superdiffuse membrane. The material is able to allow air to pass through, preventing the penetration of moisture particles and wetting of the mineral wool.
To do this, you should find out which side to lay the vapor barrier against the insulation, otherwise you may encounter serious problems when operating the attic.
4. Sheathing the frame with plasterboard
Before covering the frame, you should fill wooden slats with a thickness of 20-30 mm to create a gap between the false wall and the vapor barrier film.
This air will allow moisture to evaporate more efficiently from the surface of the film. Many people use foil penofol instead of vapor barrier; the material provides additional insulation, reflects heat and protects the mineral wool from moisture.

Photo. Do-it-yourself attic plasterboard cladding
5. Finishing plasterboard walls
The seams between the sheets of drywall are taped with masking tape and puttied.
After the rough layer has dried, the putty is sanded and the entire surface of the wall is primed. On last stage All walls in the attic are covered with finishing putty, covered with wallpaper or painted. Watch the video at the end of the article for all the stages of insulating an attic with mineral wool from the inside.
6. Laying the floor on the attic floor
After insulating the ceiling and walls, you should begin laying finishing coating floor. A laminate underlay is spread on the subfloor or parquet board, and the flooring is laid on top.
Independent insulation of the attic with mineral wool is not a very difficult task, and if you have experience in working with construction tool, then the work can be done on your own.
not uncommon today. Increase due to the attic useful square meters- The easiest way. But in order for it to last throughout the year, the roof will have to be insulated. Therefore, in this article we will look at how to insulate an attic from the inside if the roof is already covered with roofing material. Let's figure out what thermal insulation materials can be used for this and what technologies to use for this.
And although many people believe that the attic is a type of attic, in fact, it is a completely different room, which differs in size from the first. And the main one is height. It must be at least 2.5 m.
In all other respects, this is an attic space, enclosed by a rafter system with a roof laid on it. If the roof is gable, then the attic is enclosed on both sides by gables - vertical walls supporting the rafter structure. It is in them that doors with access to the adjacent balcony are made. But the main walls of the room are the roof of the house with a certain slope of the slopes.
The technology for assembling the rafter system and roofing material is that it is necessary to lay between them, protecting wooden structures from unexpected leaks from the side of the roofing. This is a kind of safety net. Mainly used on roofs waterproofing material roll type, which is laid in strips from the eaves to the ridge with an overlap of 20-30 cm and attached to the rafter legs. The film is laid with a slight slack in case of thermal tension or expansion, plus the edges of adjacent strips must be secured with tape or self-adhesive tape.
Then they are stuffed along the rafters wooden slats, which are called counter-lattice, and transverse slats, called lathing, are mounted on them. The roofing material with fastening is laid on the latter.
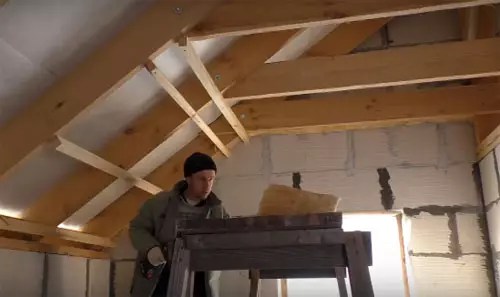
The view from the inside of the attic shows rafters covered with a waterproofing layer on top. This is the design that will be needed. The question of how to properly insulate an attic from the inside with your own hands, we emphasize - with your own hands - requires first of all the determination of the insulation, or rather, its selection. Because not all modern thermal insulation materials can be used independently. But we will deal with them all, and we will definitely identify the best one.

Insulation for attic roofs
It should be noted that the slope of the slopes that define the walls of the attic is a cellular structure formed by rafter legs. It is between them that the thermal insulation material will need to be laid. Therefore, the main requirement for the latter is to be dense with clear shapes. This means that to insulate the attic roof of a private house, you will have to choose slab material. Such insulation materials include mineral wool in mats and polystyrene foam boards, also known as high-density foam.
But, as mentioned above, today the market offers completely unique insulation technologies that do not use dense materials. One of them, which has shown itself on the most positive side, is liquid polyurethane foam. Let's start in order and consider each insulation separately.
Mineral wool
The definition of mineral wool includes several varieties of this building material: glass wool, slag wool, stone variety. When the conversation turns to attic insulation, we should talk specifically about the basalt variety, as the best today. It was her specifications and we will consider it.

Basically, basalt wool is divided by density. There are four positions here:
- P-75– used for insulation of pipes and horizontal surfaces;
- P-125– this is exactly the same material that is used to insulate attic walls from the inside with your own hands;
- PZh-175– for thermal insulation of metal and structures;
- PPZh-200– a very dense material used for thermal insulation of rigid load-bearing structures.
Expanded polystyrene boards
This material is often called polystyrene foam, which is true. It’s just that polystyrene foam boards differ in density from the type that is used for packaging. Therefore, the material itself is very hard and durable, resistant to mechanical stress and humidity.
Let us immediately make a reservation that such material is not recommended for insulation due to its high flammability and love of rodents. But if you still intend to use it, then to insulate the attic roof it is better to take polystyrene foam boards with a density of at least 25 kg/m³.

Polyurethane foam (PPU)
This is a two-component thermal insulation material consisting of a polyol and a polyisocyanate. The two components are supplied separately in different containers, but during the application process they are mixed in one container and applied under pressure to the insulation areas through a hose and sprayer. In fact, polyurethane foam is a liquid substance that quickly hardens in air, turning into a hard and fairly durable coating.
The quality of insulation is based on the thermal conductivity characteristic. Comparing the three types, it can be noted that the weakest among them is mineral wool, the most ideal is polyurethane foam.

But this does not mean that everyone should use PPU. This material is not the cheapest and requires special equipment to apply it. However, it should be noted that equipment manufacturers today offer mini-stations that weigh only 30 kg. It contains two containers with components, hoses and a nozzle. The compressor will need to be purchased separately, but it is better to rent it from friends or rent.
And a few more varieties thermal insulation materials, which are used less frequently in do-it-yourself roof insulation from the inside.
Glass wool

Ecowool

Penofol

How to insulate an attic for winter living - video and nuances of the process
So, we’ve decided on thermal insulation materials. Now let's look at how to properly insulate an attic roof.
Attention! When insulating an attic, it is necessary to adhere to two main nuances: the thickness of the layer being laid should be equal to the width of the rafter legs, the width of the insulation should be equal to slightly greater than the distance between the rafters.
Do-it-yourself insulation of the attic with mineral wool from the inside: video and photo instructions
| Photo | Description of work |
 | The mineral wool is laid out on the attic floor. The required width is measured, which corresponds to the distance between the rafters, plus 2-3 cm. This is done so that the insulation fits tightly between the elements of the rafter system without leaving. |
 | Now a piece of insulation cut to the required dimensions must be laid between the rafter legs. If the slope of the roof slope is sufficiently flat, then the heat-insulating material under its own weight may fall out of the cell. |
 | Therefore, transverse slats are placed along the rafters from the inside, which are temporarily attached to the rafter legs. |
 | Instead of slats, you can use a strong thread, which is pulled over nails driven in a checkerboard pattern along the inner planes of the rafter legs. |
 | Insulation is laid under the padded slats. |
 | All that remains is to cover the thermal insulation cake with waterproofing film. Its purpose is to keep moist air vapors from penetrating the thermal insulation layer. Because mineral wool is a hygroscopic material, and under the influence of humidity it begins to lose its properties. |
 | The waterproofing membrane is nailed with nails or metal staples to the rafter legs. Laying is carried out in overlapping stripes, starting from bottom to top. |
Attention! If one layer of mineral wool for insulating the attic roof from the inside with your own hands is not enough to cover the width of the rafter legs, then a two-layer installation is performed. In this case, the slabs of material must be laid offset relative to each other. The joints between slabs in one layer should not be allowed to coincide with the joints in the second layer.
Insulating the attic with foam plastic
As mentioned above, it is not recommended to use polystyrene foam boards to insulate the attic. One of their main advantages is low, almost zero, water absorption. Therefore, there is no need to install protective layers for this insulation. That is, if during the construction of the roof a hydro- or vapor barrier membrane was not used under the roofing material, then PP slabs are the cheapest option for thermal insulation.
| Photo | Description of work |
 | As in the case of mineral wool, polystyrene foam boards are cut to fit the distance between the rafters. |
 | The slabs, cut to size, are laid in the rafter system. It is necessary to indicate that there should be a space between the insulation and the roofing material, which will be used in the future as a means of removing not only moist air vapors, but also some harmful components of the heat-insulating material itself. Without forming this gap, PP cannot be laid. |
 | Another layer is laid on top of the rafters. Its main task is to cover the entire surface and prevent cold air from passing between the first layer and the rafters, because it is very difficult to lay PP boards tightly to the rafter structure. The second layer is attached to the rafters using self-tapping screws with a wide metal washer. |

Insulation of roofs of different geometries
The methods of thermal insulation of a pitched roof, in which the slope is one plane, were described above. But attics are also formed under sloping roofs, so the question of insulating a sloping roof from the inside is no less relevant today. In principle, there are no serious differences in the technology itself, especially when it comes to the use of polyurethane foam. It is simply sprayed in one layer, without joints.
U sloping roof there is a junction between two types of rafters, which form a hall. It is this area that is the most dangerous in terms of the penetration of cold air from the outside. Therefore, in the area where the two systems are connected, it is necessary to lay insulation materials without butts. This works best if mineral wool is used. It is flexible, so it can be shaped into a bend, that is, a transition from one slope to another.
With a sloping roof, the attic space is rarely left without a ceiling. It is built precisely at the transition level. Therefore, two slopes located in the same transitional plane are insulated, and then the ceiling itself is necessarily insulated. In some cases, if it is difficult to carry out thermal insulation of the upper slope or the goal is to save money, then the thermal insulation of the upper slope is not carried out, limiting itself to insulating the ceiling.

What mistakes can occur when insulating an attic from the inside?
When answering the question of how to properly insulate the roof of a house from the inside of an attic space with your own hands, you need to understand that this process itself is not complicated (not counting the use of polyurethane foam). But in order for the final result to correspond to a high degree of quality, it is necessary to take into account all the nuances of the technology and strictly follow the recommendations of specialists and manufacturers of thermal insulation materials. So, what to pay attention to:
- Mineral wool should only be laid if there is a vapor barrier underneath the roofing material. Its main purpose is to remove air vapors that are located in the insulation itself.
- There must be a gap between the thermal insulation cake and the roofing covering, which is used for ventilation of the roof. Therefore, the roofing material is laid on the sheathing, which is mounted on the counter-lattice.
- If the angle of inclination of the slopes is less than 13°, then under such a roof better attic don't organize. at this angle it comes off weakly, so there is a high probability of leaks.
- If roof slopes are installed skylights, then you need to take care of their sealed installation. It’s better not to do this yourself; call specialists.
- If the thickness of the purchased insulation is greater than the width of the rafter legs, then slats can be punched along the lower edges of the latter.

So, we looked at how to properly insulate the roof of a private house from the attic side. If you have any questions, you can leave them in the comments. The editors of our site will definitely answer them.
Today, insulation of the attic roof is very popular in construction.
The construction of houses with mansard roofs is very popular in the countryside and is widespread.
Attic houses are not only very presentable in appearance, but also provide the opportunity to increase the usable area from the inside.
Their only drawback is the scheme of complete contact of the walls and ceiling of the attic with the street, which creates certain problems with thermal insulation.
This can cause about 30% heat loss and create condensation from the inside.
This is explained by the fact that warm air, rising, will collide with cold roof, which will subsequently lead to the appearance of fungi, mold, and possibly rot.
Therefore, if you do not want to have all these problems, then it is better to take care of thermal insulation in advance. The article describes how to insulate an attic roof correctly.
Types of insulation
- Minvata ( comfortable material, which is slightly compressed during installation, after which it straightens itself and fits exactly into the socket);
- Polyurethane foam (sprayed directly onto the surface);
- Ecowool (the antiseptic content in the composition prevents damage to the insulation and wood);
- Foam plastic (light material that does not weigh down the roof).
Polystyrene foam is one of the most popular. Uses polystyrene foam to insulate pitched and flat roof and most importantly, it is ideal for attic floors.

Foam insulation can be carried out both on an open roof and after laying the roofing.
Why foam plastic?
The material has undeniable advantages, thanks to which it occupies one of the leading positions on the market.
Here are the main ones:
- Polystyrene foam has low absorbency, so moisture simply flows down it without getting inside the material;
- It is light in weight, which significantly reduces the internal load on the roof structure;
- Fairly easy to install;
- Has low cost;
- Meets accepted thermal conductivity standard.
If you decide to use polystyrene foam, then you should not forget about two main disadvantages, such as vapor impermeability and high flammability.
You can avoid them if you do good ventilation attic space and adhere to established fire safety standards.
Preparing the premises
Before you buy materials and start insulating the house, you need to study and prepare the room from the inside as best as possible, especially if you plan to do all the work yourself.

To do this you need:
If you plan to insulate the roof of your house with your own hands, then when choosing sheets with foam plastic, do not forget about some important points:
- It is necessary to select the correct size of the sheets so that during the installation of the elements, their joints are as small as possible;
- Proper insulation of the house is carried out with polystyrene foam along a broken line, the thickness of which is at least 10 mm;
- The higher the density of the material, the greater its strength under mechanical stress and the better the thermal insulation;
- Read the specifications indicated on the packaging. Buy only high-quality material.
Remember: foam plastic has good sound conductivity and it is better to additionally buy a layer of special sound insulation (at least 5 cm thick) and install it from the inside of the decorative cladding.

At correct device If you install it yourself, all external sounds will be absorbed by the soundproofing layer and will not disturb the peace and quiet in your home.
Installation technology
Insulating an attic roof from the inside is quite simple and its diagram is quite suitable for correctly installing the material yourself.
First you need to lay the waterproofing film.
That's right, use a special roofing film (Izospan is most often used), with a broken membrane structure that releases steam only in one direction, from inside the room to the outside.
The film is laid crosswise over the rafters, without stretching it along the entire length of the roof (do-it-yourself installation assumes possible slight sagging).
Make sure that the smooth, water-vapor-proof layer is on the outside. The next strip of film is laid with an overlap of at least 10cm, and special tape is used to seal the joints.
When installing it yourself, remember that you must leave an air gap between the layer of films and the sheathing.
To do this, five-centimeter bars are nailed to the rafters on top of the film, sheathing boards are installed on the bars, and only after that the roof covering is laid.
Sheets of foam plastic are laid between the rafters, ensuring that no gaps are left. You can cut them with a stationery or regular long knife, using a metal ruler.
Sheets with insulation are attached to the rafters using auxiliary slats or polystyrene glue.
If the rafters have a round cross-section, then fastening with glue is not enough.
Proper fastening is done with a sheet of boards, which will hold the foam layer in several places.

After installation, voids may remain along the broken line; they can be filled with construction foam.
Helpful advice: to increase the service life of sheets with foam, experts recommend using, in addition to glue, mounting screws and dowels.
This fastening extends the shelf life and reliability of the structure.
If you do not remove the space along the broken line, then it will penetrate cold air and condensation will accumulate from the inside, causing leaks and rotting processes.
To exclude this, you can lay sheets of foam in 2 layers, also along a broken line, top layer covering the bottom joints. The top and bottom layers are secured with glue.
For additional soundproofing of the space, soundproofing mats made of fibrous material are used.

It should be remembered that the fiber absorbs moisture well, so it must be covered with a vapor barrier anti-condensation film.
The film is laid overlapping along a broken line, gluing the joints and securing it to the rafters (binding) using a construction or furniture stapler.
The sheathing is attached using wooden blocks or profiles that serve as guides.

When choosing their thickness, remember that it is necessary to leave a space for ventilation of at least 3-5 cm. For cladding, natural materials are mainly used, on which condensation cannot form.