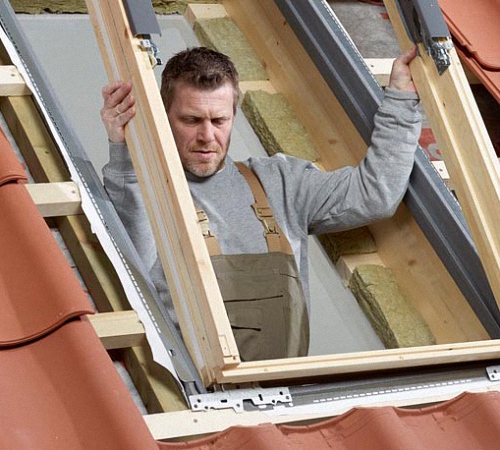
An exploitable attic is a great way to expand the living space of a house without taking away precious extra meters from the site. It is easier and cheaper to equip an attic than to build a second floor. It is only necessary to immediately design a sufficient ceiling height and provide windows. Windows are the most technically difficult part of the attic: they must provide sufficient illumination, while holding firmly and not leaking. Consider the installation of skylights on the example of the products of the popular manufacturer Velux.
Features of windows of the Velux trademark
The windows of this company are made of glued pine timber. The density of this wood is quite high, which guarantees the strength of the structure.

The beam is impregnated with a fungicidal (antifungal) composition and covered with two layers of water-repellent varnish. In the model line there are designs with a polyurethane coating.
Brand advantages:
- durability;
- comfortable trouble-free fittings;
- thoughtful ventilation system, the presence of filters from insects and dust;
- excellent heat / sound insulation properties, thickened double-glazed windows, three-level sealing contour;
- high-tech mount that simplifies installation;
- full set. The kit even includes wedges for adjusting the frame during installation;
- large model line;
- a wide range of accessories.
Window designs of this brand:
- Windows with central opening.
- Windows with combined opening.
- Additional bottom and top elements.
- Window-balcony and terrace.
- Antiaircraft windows.
- Light tunnel.
- Roof exits.

The range includes models with energy-saving glasses, anti-shock, anti-condensation, self-cleaning. The energy-saving package is made using the “warm perimeter” technology, the filler is argon. The window withstands frosts down to -55.
There are models with remote control. In addition to the window itself, you can buy Velux blinds, curtains, roller shutters, mosquito nets and accessories for them.

Roof window installation scheme
Windows in the attic are auditory (installed vertically) and actually attic - cut into the slope with the same slope as the slope itself. The difficulty is the installation of inclined windows. Vertical install in much the same way as the windows in the residential part of the house.

The first stage (preferably at the design stage, but you can cut a window into the finished roof) is the choice of location and calculation of the glazing area.
By existing norms the total area of the glass should be one tenth of the area of \u200b\u200bthe attic itself. The best option is to install a window in the span between the rafter legs.

If you cut out the rafters, then additional strengthening measures will be required.
Based on the pitch of the rafters, the width of the window and, consequently, the number of windows are determined. The side planks of the frames should be located 2-3 centimeters from the rafter legs (the gap is needed for laying insulation).
If the window does not fit in the span between the rafters, fragments of the rafter legs are cut out and reinforced with auxiliary beams. Horizontal beams are installed 30 cm from the upper and lower edge of the window, vertical - 5 cm from the window frame. The thickness of the beams is the same as that of the rafter.

The height of the placement depends on the slope of the roof. If the angle is large, the windows are mounted lower, on a sloping roof - closer to the ridge. The height also depends on the location of the handle on the selected model. If it is located at the bottom of the frame, the window is installed 1.2-1.3 m from the floor, if at the top - 1-1.1 meters. The minimum height of the lower bar is 80 centimeters.
Some restrictions are imposed by the coating material: in metal sheets the opening can be cut anywhere, and ceramic tiles cutting is not recommended, you need to adjust the window niche for whole rows.

The size of the salary depends on the height of the profile: the higher the comb, the higher the salary. For flat surfaces, Velux produces DL/EDN flashings, for profiled coatings - W.


The method of opening the sashes (along the upper axis, along the central one) depends on the design project and the personal taste preferences of the owners.
- on a roof with a small slope, it is better to install models with a combined opening, with a turn around the upper and central axis;
- if it is planned to install furniture under the window, a turn around the central axis is preferable;
- if the windows are located high, the way the sash is rotated is unimportant. For such cases, the manufacturer recommends models with remote control.
Our work
Installation instructions for Velux skylights
If the insert is made into the finished roof, the first stage is the preparation of the opening:
1. Remove trim (if any).
1. Attach four slats of timber to the rafters - the base to which the box will be attached. The thickness of the beam is 5 centimeters, the indent from the crate is 8-10 centimeters. Check the horizontal and vertical level.

2. Cut out the crate with an indent of 2 cm from the rafter legs.

3. Cut out the waterproofing section. On all four sides, you need to leave a margin of film. Later, the excess waterproofing will need to be turned outward and fixed to the crate or to the frame.

4. Cut a piece of cover to fit the opening.
Before cutting the waterproofing, markup is drawn on it:
- bottom for profile coatings leave 9 cm;
- from below for flat coverings ( flexible tile etc.) - 4-6;
- top - 9-15;
- from the sides by 3 cm.
The rectangle is cut out with an indent of 20 cm from the marked lines.
2. From above and below, nail the waterproofing film with a stapler to the corresponding rails. Pull the vertical edges of the film outward.
3. Remove the sash from the window, remove the salary.
4. Attach the brackets and mounting plates to the box. With a large window height (1.4 meters and above), additional brackets are attached in the middle of the side frame bars.

5. Install the box.

6. Fasten the bottom brackets to the crate. Install top but do not fully tighten.

7. Install the sash. Check the fit, adjust the upper fasteners - the gaps on all sides should be uniform. Remove sash.

8. Place a heater in the upper gap, fix with a stapler.
9. Lay thermal insulation on the remaining three rails, press with a frame.
10. Level the box according to the level, tighten the fasteners.
11. Install a waterproofing apron around the perimeter of the frame. One side of the apron is brought under the crate, the second is attached to the box with clamps from the kit. At the top, the waterproofing film is brought onto the drainage gutter, the apron - under the gutter. Clamp fixing.
12. The drainage gutter itself is installed above the frame at an angle. Its purpose is to divert water from the opening to the roof.
13. Set the salary: the lower apron, then the sidewalls, the upper part, the last - the lining. Parts of the salary are fixed to the crate and the box, the lower apron at the top - directly to the roof. When installing the sidewalls, do not confuse the right and left parts.

14. The side edges of the lower part of the salary must be bent (especially on a flat roof). This is done to prevent leaks. It is recommended to tap the bottom edge with a rubber mallet to fit snugly against the roofing. The salary is fixed to the roof with sealant or wire, screws are not allowed.
15. Replace the sash.
Do not use foam to seal the joints of roof windows. The material kit contains a sealant designed for this purpose.
The final stage is the installation of slopes. The upper slope should be oriented horizontally, the lower - vertically: with this arrangement, the flow warm air from heating devices will not be blocked, condensation will not appear on the windows.
If you are installing a window with a remote control, you must run the cable before installing the slopes. In the upper part of the box for it there is a special hole closed with a plug. A wire with a cross section of 2 by 1.5 millimeters is passed through it (with a wiring length of not more than 40 meters).
Related Articles
Features of installation of the roof window Velux
Installation recommendations for skylights from different manufacturers are the same in essence, but may differ in details. The above procedure is universal. What you need to pay attention to when installing Velux roof windows:
- the window is attached to the crate (at Roto, for example, it is allowed to mount windows to the rafters);
- it is necessary to remove the double-glazed window when installing from the attic. If from the roof, then you can not remove it.
Insulation for Velux windows is usually included in their package. This is a contour of strips of extruded polyethylene foam on a steel frame. If this element is present, the procedure is as follows:
- first, the frame is assembled from guides with insulation;
- install it in the prepared opening on the mounting beam;
- install a window frame;
- fix the heat-insulating contour together with the box to the crate with mounting plates.
If the gap between the rafters is not wide enough, the contour is adjusted in size by breaking along the groove on the sides.
note
There are some nuances in the installation of salaries on different types roofs. On a profile roof (let's say it is a metal tile) before installing the lower W-glare strip sharp corners sheets are cut. The bar is fitted, the flexible part is bent according to the shape of the profile. The bottom is also folded in to ensure a snug fit.On the roof of shingles the lower part should cover the roofing material with the same overlap as the tiles themselves are laid.
Good day and interesting reading!
Who would have thought that one of our school losers at the next meeting of graduates would show himself from a completely unusual side.
According to his stories, he gave his parents a chic house and is now building a bathhouse, and with an attic.
We talked with him, told him that you can make the attic more comfortable if you install slanted windows. He liked the idea and decided to apply to our company.
This is how professional connections are made.
If you are interested in this idea, then I recommend reading useful information about the features of their installation.
 Installation of skylights - instructions:
Depending on the applied roofing material, architectural and thermal insulation conditions roof windows can be installed:
- at different depths (three landing levels): N (0 cm), V (-3 cm), J (-6 cm)
- on rafters or sheathing
1. Skylights can be installed in roofs with a pitch of 15° to 90°.
The installation height can be arbitrary, however, taking into account the operating conditions, the visibility and illumination of the room, as well as building codes, the windows must be installed so that the lower edge of the window is at a height of 170 cm from the floor level.
The installation height also depends on the angle of the roof and the size of the window.
2. The window must be installed above the tiles - there must be a whole, uncut row of tiles under the window.
If the roof is covered with profiled roofing material, the window must be installed at the recommended distance between the top edge of the roof and the bottom edge of the window.
In the event that the roof is at a considerable distance from the window, it is necessary to install an additional row of roofing material.
 If the roof is covered with roofing material with high profile, it is necessary to cut or rivet the roof waves in such a way as to prevent damage to the lead apron of the salary.
- under the window: 0-4 cm for flat roofing materials, with a planting depth J - 14 cm;
- 10 cm for low profile roofing materials;
- 12 cm for highly profiled roofing materials;
- along the window: 3-6 cm;
- above the window: 6-15 cm;
4. When mounted on rafters, the window is attached to the rafters using mounting brackets.
The distance between the rafters should be commensurate with the width of the window and can be 2-5 cm more (for example, for a window 55 cm wide, the optimal distance between the rafters is 57-60 cm).
 Helpful advice!
In the event that the distance between the rafters does not correspond to the width of the window, it is necessary to change the roof structure.
At the same time, be sure to pay attention to cross beams place at an appropriate distance from the bottom and top edges of the window for proper interior decoration(above the window - horizontally, below the window - vertically).
 5. Mark the location of the window installation on the hydraulic barrier. Cut a hole in the indicated place with a margin of 10 cm on each side, in order to then attach the hydro-barrier to the window frame.
Cut out part of the crate in the prepared place. To install the drainage gutter, cut out fragments of the counter-lattice and cut the hydraulic barrier obliquely.
6. Take out the aluminum profile-linings 1 and 2 from the window packing. Disconnect the lower profile-lining 3, as well as the transport wooden blocks from the window box.
7. Remove the window sash from the window frame. To do this, you need to install the window with the bottom edge on the floor and tilt it easily. Open the window and turn the sash 150°.
While holding the window in this position, use a screwdriver to tighten the locking screws in the loops three turns clockwise.
 8. Remove the sash from the window according to the indicated direction. Carry out this operation carefully while removing the sash from the hinges. Failure to comply with this requirement may result in damage to the hinges.
9. Screw the mounting brackets to the window frame at a distance of 10 cm from the edge so that they do not fall on the roof battens.
Outside the window frame, grooves are milled, marked with the letters (N, V and J) corresponding to different depths of the window.
Each groove corresponds to a certain type of salary. In the salary designation, the salary type (N, V or J) is indicated by the last letter, e.g. EZV 06.
Screw the mounting brackets to the box in such a way that the number on the angle ruler:
- corresponded to the thickness of the crate;
- coincided with the groove of the selected window landing depth.
The selected window seating depth (N, V or J) must correspond to the designation on the flashing package. Installation of a window in a roof with a continuous crate is carried out similarly to the installation of a window on rafters.
 10. Install the window frame in the prepared roof area. The mounting brackets must rest on the rafters. Check if the groove on the window frame coincides with the upper plane of the crate.
Using a level, check the horizontal line of the bottom edge of the window. If necessary, placing a wedge under the corner, set the horizontal. Screw only the lower corners to the rafters.
11. Insert the window sash into the window frame.
For this you need:
- take the sash in hand, i.e. outer glass towards you, and the bottom of the window up;
- holding the sash in a vertical position, insert it from the outside into the hinges evenly without skew;
- unscrew the locking screws three turns counterclockwise, and close the window.
12. Open the sash and check the parallelism of the gap between the sash and the frame at the bottom of the window. By placing a plastic wedge from the mounting kit under the upper mounting bracket from the side of the smaller gap, eliminate the non-parallelism.
13. Close the window and check the parallelism of the gap between the sash and the frame on the sides. If necessary, move the upper part of the box to the left or right to eliminate the non-parallelism.
Screw the upper corners to the rafters with screws.
Note!
If a hydro-barrier is used during the construction of the roof, it is necessary to install a drainage chute above the window.
14. In the event that a hydrobarrier is used during the construction of the roof, it is necessary to install a drainage chute in the prepared place above the window to drain condensed moisture away from the window, and also attach the hydrobarrier to the window frame.
15. Check the reliability of the window. In models with a ventilation device, the sieve must be opened completely.
source: leroymerlin.ru
 ProfMarket is pleased to offer you to buy skylights, the price of which is available to everyone from the best manufacturers, Wholesale and Retail.
If you are going to buy attic plastic windows, our company will offer the best value and wide choose, and our professional consultants will answer all your questions regarding the products in the catalog of the Profmarket website.
Dormer windows are called windows, the installation of which is carried out directly into the roof.
At the same time, roof windows are needed not only to illuminate the under-roof space, but also to protect against atmospheric phenomena.
So, skylights are a constructive part of the roof. In view of this, they must meet all the requirements characteristic load-bearing elements reliability, strength, water resistance.
 The main feature of the roof window is its location - in the plane of the roof. Due to its inclination, the fasteners of the structure experience an increased load, because they have to hold the window.
This window differs from the usual one in the way of opening - along the central axis, although today models with side opening and along the upper axis have already been invented.
These design features make it easy to clean windows and provide improved visibility. And with the help of unique fittings, the sash can be well fixed in any position.
Attic windows can be of different shapes, which usually depend on the configuration of the roof, which allows you to repeat its curves and originality.
This is also helped by a universal mounting system and the availability of various configurations. Large light transmission and small window openings provide better lighting.
Especially for different regions suitable double-glazed windows were invented: for cold ones - multilayer, energy-saving, for hot ones - mirror, tinted, reflective.
From a practical point of view, windows with anti-condensation tempered, shockproof, self-cleaning double-glazed windows are often used, and in terms of decorative functions, stained-glass windows or colored glass are often used.
In addition, skylights can be equipped with remote control and other external and internal systems.
Velux windows
The famous company Velux is famous for its unsurpassed quality of products that will make your attic light and cozy.
Extensive experience in the global market allows the company to constantly improve products and achieve new quality standards.
Among the advantages of the roof windows of this company, one can distinguish them:

Facro publications
Fakro manufactures roof windows from high quality pine wood. During the production process, the wood is treated with an antiseptic and coated with varnish composition in 2 layers.
On the outside she's protected aluminum profile covered with polyester.

There are hinges in the middle of the window sash, which allows the window to be rotated 180° and easy to clean. A special latch fixes it in absolutely any position.
Thanks to the ventilation grille available on all Facro roof windows, it is possible to ventilate the room when closed.
The lattice has original design with good acoustic and filtration properties.
The handle on these windows is located at the bottom, which facilitates their opening without the use of additional tools. And its opening allows you to fix the structure in 3 positions: closed, ajar and open.
Fakro double-glazed windows are equipped with tempered impact-resistant glass.
 The German company ROTO-FRANK invented Roto skylights, which are able to withstand the same load as the roof. Due to their special design and salary (for different types of roofing), the junction points will never leak.
These window designs have advantages that distinguish them from windows from other manufacturers:
- special fittings;
- built-in corners for mounting;
- complete set with a vapor barrier apron;
- finished thermal insulation block;
- adjustment of the sash after installation;
- the presence of a reliable seal around the perimeter of the sash and box.
Not so long ago, the company "ROTO-FRANK" began to produce roof windows of a new generation - Roto Designo. They have unique design, unique colors, modern finish, smooth shape of overlays, hidden fastenings.
In addition, expanded color palette overlays, and anthracite metallic was added to the standard colors. All places where the window adjoins the roof are equipped with special seals, locks and other elements.
Which roof windows are better: Velux, Fakro or Roto
Composition comparison
Velux products are made from northern pine, a very dense and durable material. It is a glued beam coated with a fungicidal and varnish composition (in 2 layers).
Note!
Compared to other windows, these designs are considered stronger and more durable.
Facro products are made from high quality pine. It is made in the form of a glued structure impregnated with an antiseptic composition (under vacuum conditions) and coated with polyacrylic varnish in 2 layers.
Roto windows. For the manufacture of these roof windows, northern pine is used in the form of glued beams. Depending on the model, it can be two- or three-layer with fungicidal impregnation and varnish coating.
Double-glazed windows
 Velux structures have energy-saving double-glazed windows produced according to modern technology"warm perimeter".
The weakest point regular windows– perimeter, so the separating frame is not made of traditional aluminum, but of thin-walled solid steel with rounded corners.
Inside the double-glazed roof window contains an inert gas - argon, the loss of which is helped by silicone sealing (instead of butyl sealant). Velux double-glazed windows are able to withstand frosts down to -55 degrees.
Facro windows use energy-saving argon-filled double-glazed windows, as a result of which attic room will be warm and cozy all year round.
The glasses themselves have increased strength, resistant to extreme weather conditions. Thanks to special fuses, the double-glazed window is protected from extrusion and breaking.
 Roto skylights consist of a single-chamber double-glazed window, the glass of which has a thickness of 4 mm. Argon (krypton) is pumped inside it, which provides high thermal insulation.
The glass of some models goes through tempering to increase the strength characteristics.
Opening windows
Velux designs open very easily with a handle at the top of the frame. Thanks to this, it is possible to place them at the optimal height (up to 110 cm from the ceiling), which will ensure good review even a sitting person, even standing.
Any interior items can be placed under the window, as the top handle will remain accessible.

Fakro roof windows can be fixed in six positions with the help of a handle and special latches. The handle is located at the bottom of the structure, which, of course, is convenient for short people, but dangerous for children and will not allow you to place anything under the window.
Roto products have a mechanism that allows them to rotate along two axes. Opening the window along the upper axis opens up an excellent view and at the same time will not let you get wet in rainy weather.
When using special fittings, the doors can be blocked at 4 points, which will protect against hacking.
Ventilation characteristics
 All Velux models are equipped with a ventilation device, and some of them have a handle combined with a unique vent valve for ventilation.
These designs have a fairly high air exchange, which depends on the size. In addition, all of them are equipped with a removable filter that acts as protection against insects and dust.
Skylights from Fakro and Roto firms have similar ventilation valves, but in terms of the device they are slightly inferior to the Velux company.
Mounting Features
The Velux company has provided for everything, so there is nothing complicated in the installation of their windows, because only ready-made, fitted accessories are used in the installation process.
Thanks to them, the probability of error is minimized and it perfectly protects against cold, leaks, and freezing. All Velux skylights are supplied with pre-installed brackets to facilitate the installation of curtains.
Fakro windows can be mounted both on the crate and on the rafters.
There is nothing complicated in their installation either, if it is carried out on the crate, because you do not need to adjust the step roof structures for the size of the window.
Roto structures are also mounted easily and simply on various roofs. They are attached to the crate, but you can additionally fix them on the rafters thanks to the installation corners.
tightness
 Velux roof windows are equipped with a three-level contour seal, which perfectly protects against drafts and heat loss. Such unique system allows them to be used in almost any region of the country.
Facro designs have a sealing contour around the perimeter, which ensures a snug fit and prevents heat loss.
Roto products are also equipped with seals between the double-glazed window and the adjoining aluminum profile, which will eliminate condensation along the glazing contour.
Window accessories
Windows of all manufacturers can be equipped with various accessories, but Velux products have more decorative elements than others.
For example, they will decorate the house and make it cozy with a variety of curtains, roller shutters, awnings, blinds, mosquito nets, a remote control system (electric, solar-powered).
Thus, having considered the 3 main manufacturers of skylights, you can make the final choice, which will remain only for you!
source: profmarket74.ru
Do-it-yourself installation of skylights
Installation of skylights should be carried out only according to the instructions and with a constant check of the quality of the installation. Otherwise the roof will leak.
In addition, many people make mistakes when self-assembly, which also leads to disastrous consequences. So read and remember.
How to install
To find out how to properly install a roof window, follow the recommendations below:
 1. First of all, remember: the roof window is not attached to the crate, but to the truss system (vertical rafters).
2. If in design truss system there are transverse horizontal beams, then it is better to place the lower part of the window on them. You can also focus on the slats of the crate.
3. The distance between the window frame and the rafters should not be less than 3 cm on each side. This distance is necessary to align the roof window.
4. To facilitate installation, you can install a horizontal beam under the bottom of the window to the truss system.
5. Installation of a roof window. Align the lower part of the window with a level and fasten the corners (not completely) with self-tapping screws (should be included).
6. We try to align the length of the window parallel to the rafters and tighten the screws in the oblong holes on the mounting brackets (also not completely, so that later you can fine-tune the position of the window frame).
7. When the roof window is already self-supporting, you need to align its position so that the distance between the frame and the rafters on the sides is approximately the same.
8. After the final adjustment and checking on all sides, the bolts can be tightened completely.
Helpful advice!
The waterproofing material must completely frame the window frame with an overlap on the sidewalls of the frame.
9. Laying waterproofing material. It should completely frame the window frame with an overlap on the sidewalls of the frame. The stacking order is from bottom to top.
First, the lower part of the material is fitted to the frame with an overlap, a cut is made in the side ledges to attach them to the roof. The side insulation sheets are then added with an overlap to the sidewalls of the frame.
The upper and lower protruding parts are cut from below and from above and are wound under the first lower insulating sheet, and from above onto the sidewall of the box.
The top sheet is laid in the same way as the bottom sheet, only this time over the sidewalls (cuts on the edges are made in such a way as to put them on the side sheets). As a result, all places of insulation overlays are screwed onto each other with self-tapping screws.
 10. If you have a profile roof, then before installing the flashings under the roof window, you need to nail a thin rail in order to fix a soft corrugated apron on it, which will smoothly lie on the profile.
The rail is located at a distance of 10 cm from the lower edge of the window frame, and protrudes 30 cm on the sides.
11. Setting salaries. To begin with, remember: if your salaries are fixed with latches, clamps or latches, then additional mechanical fasteners (nails, self-tapping screws) are not required.
Just as with insulation, the lower salary is first mounted (on top of the roof). A fixing pad for a roof window is put on top of it. The flashing and the overlay are fixed with the help of the supplied self-tapping screws into the prepared holes.
The side sections of the lower flashing are nailed to the frame with short nails (2 cm). The side flashings are inserted into the lower flashing until they stop (special cuts can be bent outward to strengthen the fastening).
Side salaries are also nailed to the window frame, and to the crate or rafters with clamps.
If you have mild or flat roof, then the side edges of the flashings can be slightly crushed so as not to lift the roofing material.
Before the upper salary, you need to install the lining on the roof window and screw it with self-tapping screws through special holes. The upper salary is installed simply: from the sides it is screwed to the window with self-tapping screws, it is attached to the crate with clamps.
12. If you have a soft or flat roof, then it can be laid from the sides on the salary only using bituminous materials. The profile roof is turned on its sides so that it ends with a whole upper arc.
And from above, the roof must be laid on a salary with an indent from it of 6-10 cm.
13. The junction of the flashings with the roofing material must be insulated with the sealant supplied with the kit, or with other adhesive tape.
14. After installing the attic box, a sash is put on it (or a double-glazed window if the window is deaf).
 15. Window insulation can be carried out from the inside by slipping insulation around the perimeter (mineral wool) and closing it from the outside with a foil heat-insulating layer from condensate. From the sides of the slopes, the insulation also fits.
16. A vapor barrier is put on the insulation. As a rule, at its ends there are latches for fastening to a dormer-window.
In places where the vapor barrier apron leaves, additional fastenings can be made with self-tapping screws or sealant.
As a rule, rough slopes are installed in the attic window, which are subsequently closed by the general decoration of the room. It is not difficult to make such slopes: you just need to mark the length, width and angles for the top and side slopes.
Slopes for triangular attics are arranged in such a way that the lower slope looks vertically down, and the upper one horizontally. Attic with broken roof may not have strong slopes.
Note!
Do not forget that there should be heating under the attic window.
It should be borne in mind that the methods of installing roof windows may differ slightly from different manufacturers. In the future, we will consider them separately.
Installation methods will also be considered. various kinds skylights and accessories.
source: gold-cottage.ru
Installation of skylights
 Skylights are installed in roofs. Such windows in terms of design, as well as the principles of installation and operation, differ significantly from facade ones.
The main parameters affecting the operation of skylights:
- roofing pie device;
- correct installation;
- operation in the winter;
- microclimate.
Roofing pie device
In accordance with the instructions of most roofing manufacturers, an insulated roofing cake should consist of the following layers (from top to bottom):
- roofing (metal tiles, flexible tiles, etc.)
- crate for roofing (solid or step; installation of skylights is carried out on this layer)
- ventilation gap (most often formed by a counter-lattice above the diffusion membrane)
- diffusion membrane (permitting steam from inside the room)
- wooden rafters, insulation
- vapor barrier
- rough binder
For details, see the manufacturer's instructions.
If roof windows are installed in the wrong roof pie (for example, there is no ventilation gap), there is a possibility of leaks in the window area associated with under-roof condensate.
Skylights Velux, Fakro, Roto
It is optimal that the installation of windows, whether they are Velux, Facro or Roto windows, is carried out by specialists who have experience in this type of work and who know the principles of the roofing pie.
When choosing a contractor, you should pay attention to the experience of the company, the number of employees, the existence of a contract, guarantees.
If you decide to install skylights on your own or involve installers without experience in this type of work, you need to read the instructions attached to the window and other branded products.
Installing windows requires the preparation of an opening. The width of the opening for mounting the roof window should be greater than the width of the window: for Velux - by 4 - 6 cm (preferably 6 cm), Fakro - by 2 - 5 cm (preferably 4 - 5 cm), Roto - by 6 - 7 cm (preferably 7 cm).
The height limit will depend on the shape of the slopes. For a slope of an “open” form (the lower slope is vertical, the upper one is horizontal), the location of the transverse boards is determined using a level.
For a slope perpendicular to the window, the distance between the transverse boards should be 4 - 6 cm greater than the height of the window (see installation instructions).
 When installing a roof window, it is recommended to plan the slope of the "open" form, because. it provides better ventilation windows and better lighting.
Window frame installation. The window frame is installed using the brackets included in the kit on the batten / solid base on which the roofing is laid.
For correct installation roof window, the window frame must be aligned in a plane. If the slope is not even, wedges can be installed under the mounting brackets, usually included in the kit.
Also, the bevel of the window box from a rectangular shape should not be allowed. To do this, it is necessary to install the rotary part on it and align the window frame with it.
Insulation, waterproofing around the window frame. The window frame is usually located above the roof insulation layer, it is important to correctly insulate the “bridge” between the roof insulation and the window frame.
 When installing a roof window, it is best to insulate this place with the material that is part of the installation package:
- Velux - heat-insulating belt made of foamed polyethylene
- Fakro - insulation blocks made of sheep wool
- Roto - built-in thermal insulation belt made of foamed polyethylene
When installing Velux or Facro roof windows, this area can be insulated with mineral wool, penofol and other materials ( mounting foam cannot be used), but it is more difficult and can lead to a reduction in the life of the window.
Waterproofing around the window frame is carried out according to the manufacturer's instructions.
Salary setting. It is carried out according to the manufacturer's instructions, it differs depending on the roofing. It is impossible to violate the integrity of the flashing strips (for example, drill with a self-tapping screw when fastening the metal tile around the flashing).
Insulation, vapor barrier slopes. After installing the roof window, it is important to lay the insulation on the slopes, if this is not done, the window may “freeze”. When mounting the frame under the slopes, the vapor barrier must not be damaged.
Helpful advice!
After installing the roof window, it is important to lay the insulation on the slopes.
When installing branded slopes, the frame is not required, because. the slope is held on the window frame in a special groove.
This article is for informational purposes only and is not intended to be a guide to installing skylights.
Remember: professional window installation is cheaper than reinstalling an incorrectly installed one (especially in cases where any elements of the window / flashing / roof have been damaged).
To improve the atmosphere of the attic, make it comfortable and bright, it is recommended to install one or more skylights. One of the best high quality skylights are Velux windows. We will consider their features, characteristics and installation further.
General concept of skylights
A roof window is installed on the roof of a house that has an attic. These windows must withstand extremely heavy loads, such as the roof. It is this feature that distinguishes them from ordinary windows.

Friction hinges are one of the components of the roof window, on which its sash rotates. They are located near the top of the window, so that when water enters, it flows onto the roof and does not enter the attic.
Friction hinges are designed in such a way as to ensure uninterrupted rotation of the sash around the axis and its fixation in any of the required positions. Thanks to this quality, the maintenance and cleaning of roof windows is facilitated, and there is also no risk of the window closing on its own in strong winds.
The design features of these windows allow you to separate the frame from the sash if necessary to perform window installation work. Almost all skylights have small size, their area does not exceed 1.5 m². If you need to install big windows, you need to use special salaries that combine several windows into groups: horizontally or vertically.
Since the location of the roof window is a roof that has a certain angle of inclination, the window is affected by external factors environment such as water, ice, wind, sun, precipitation. Therefore, there are certain requirements for the design of roof windows, namely:
- rigid frame;
- accurate measurements;
- high level thermophysical characteristics.

High-quality and durable materials are used to manufacture the frame of skylights. If the structure is made of wood, then the most powerful tree species are selected: pine and other conifers. A mandatory process is the treatment of wood with antiseptics and varnish.
Metal lining on the outer part of the window provides protection from atmospheric precipitation. For their production, aluminum coated with polymer-based paint is used. The function of these salaries is to fix the window on the roof and in the drainage system.
Locking systems are used as fittings, which consist of handles, locks and hinges. Roof windows have 1 to 5 locking points. The location of the handle is side, top or bottom.
When the handle is located on top of the window, an adult can easily open it, but children will not. Although people who are of average height will not reach such a handle.
The location of the handle at the bottom also has its advantages and disadvantages. It opens easily and you do not need to reach for the handle, but at the same time, if there are flowers and other elements on the windowsill, you need to constantly touch them to open the window. Therefore, the most best option installing a handle on the side of the window.
Most skylights are made of single pane glass, which has low thermal conductivity, lighter weight and higher security than double or triple pane windows.
Glass is used in the design of skylights:
- hardened type;
- fluate glass;
- triplex glass.
To minimize heat loss in winter time year, energy-saving glass is installed.
Ventilating a roof window is very simple and the process is faster.
Roof windows "Velux": characteristics and features
Velux products in the form of skylights are distinguished by a high number of positive customer reviews.
Velux roof windows are produced in three series:
- "Design";
- "Innovation";
- "Standard".
Velux roof windows of the first series consist of elements that can emphasize unique interior attic. They are easy and convenient to install, have an attractive appearance. This series has several types of windows:
- "Design Suite";
- "Panorama Design";
- "Design Vertical";
- "Design Gemini".

Roof windows "Lux" are a combination of two closely spaced windows that can create the effect of a large space in the room, as they let in light and make the attic spacious and cozy. To protect from the heat, use curtains in the summer.
Series "Design Panorama" - is a combination of one window, located vertically with a panoramic window.
“Vertical” - two skylights, the top of which has an external opening mechanism, and the bottom one is deaf.
Series "Gemini" - consists of two classic identical windows, which are located at a distance of 100 mm, filling the attic room with a lot of light.
Windows of the second series “Innovations” are divided into four categories:
- “Lounge Innovation”;
- “Bedroom Innovation”;
- “Bathroom Innovation”;
- "Innovation Top Light".
The first option is a smart roof window that has a remote control and built-in rain sensors. Used for decoration modern curtain equipped with electric drive. All processes are automated.
The second option for roof windows involves their installation with an attic in the bedroom. They are characterized by having smart control and rain sensors. Used to dim the light roller blind. For privacy in the bedroom, protection from heat and extraneous sounds, automated blinds are used.
Skylights installed in the bathroom are made of white moisture-resistant polyurethane. They have a remote control. It is possible to program the window, for example, to close after taking a bath or shower. To avoid the heat in the summer, blinds and blinds are used.
Roof windows, which provide the attic with overhead light, are made of wood. They are remote controlled for ease of ventilation. The outer glass is a self-cleaning coating that washes the window when it rains. The package includes a kit that provides protection from heat.

The Velux Standard series is distinguished by the convenience, practicality and reliability of skylights. The optimal combination of price and quality. The window comes with an installation kit. The series represents four types of windows:
- "Living Room Standard";
- “Bedroom Standard”;
- “Bathroom Standard”;
- Office Standard.
The first option is a smart window with the presence remote control and rain sensor. decorative element is a roller blind.
The second option has the appearance of a classic window, which is an excellent heat insulator and has soundproofing qualities. Curtains protect the room from daylight and at the same time decorate the window. Availability mosquito net, will provide sound sleep and protection from insects.
For Velux windows mansard price depends on the type of series in which they are made. The most inexpensive option is the "Standard" series.
Benefits of installing Velux windows and an overview of popular models
We offer to consider the advantages of Velux roof windows, which have a central opening axis. These models are ergonomic and practical. The presence of a convenient handle makes it possible to install the window on optimal height, furniture or other items can easily fit under the window.
Ease of opening and closing is provided by the handle, it is possible to ventilate the room at a time when the window is practically closed. The window rotates 180 degrees on its axis, so washing it is easy and hassle-free.
The location of the handle in the upper position allows you to protect children from opening the window. Exists a large number of options for roof windows made in the following configuration: wooden, polyurethane, radio-controlled.
Velux windows are sized individually, according to the size of the attic.
Consider the popular models of Velux windows:
1. GZL - attic window made of wood, has a central opening axis and is an economy class model. The basis for the manufacture is glued wood, there is a double varnish coating. At the top of the frame is a ventilation outlet. This model does not involve the installation of electrical equipment. Advantages:
- double lacquer coating ensures the durability of the product;
- the presence of a removable filter that is easy to clean;
- the window is easy to clean;
- to easily install curtains or blinds, there are special fasteners.

2. GGL - roof window made of wood, it has a convenient handle bar that provides its opening. The window has a triple lacquer coating. Peculiarities:
- the possibility of placing furniture under the window;
- it is possible to ventilate the room;
- the window rotates 180 degrees along the axis;
- production material - glued wood;
- This window model is harmless and safe for health.
3. GGU - roof window, with moisture resistant characteristics, is made of wood but has a polyurethane coating. This model will perfectly fit into the bathroom or into the light design of the room.
The polyurethane coating has no corner adhesions, so the window has more long term operation.
4. Integra - a radio-controlled skylight, the first model in the world, developed by Velux. The remote control allows you to adjust the closing and opening of windows, curtains, blinds. There is a function of autoprogramming and saving settings.
The presence of a built-in motor makes it easy to open and close the window. Automatic activation of rain sensors on the remote control. All automatic components are manufactured and guaranteed by Velux. To turn on the window, you must connect it to the outlet.
5. Skylights Solar - powered by a solar battery, so do not require a connection to the power supply. This window is easy to install, very convenient and practical. Solar battery located at the top of the window. After completing all installation work, you should turn on the window using the remote control. The window package includes:
- solar panel;
- mounting plate;
- batteries;
- motor.

- it is better to purchase this window if it is installed in a region with enough sunlight;
- install a skylight in the south of the roof;
- the performance of the solar battery depends on the level of the roof slope;
- make sure that trees, other buildings do not interfere with sunlight;
- to ensure the performance of windows, blinds, shutters, marquise, an individual solar battery is required.
Maintenance instructions for Velux skylights
1. If the window is installed in a region with a harsh climate or a lot of precipitation, the window requires special care.
2. In winter, a large amount of ice and snow accumulates on the surface of the windows, so they need to be cleaned periodically, it is better to do this when the snow begins to melt.
3. Be sure to provide free drainage of water from the surface around the window and gutter system.
5. If snow and ice are not removed from the surface, the window will not function normally and perform its functions. Water will enter the room.
6. To ensure that water and snow run off the window surface freely, it is recommended to install a heating cable around the window. It is laid along the perimeter of the window and along the drainage system.

Roof windows “Velux” installation
To choose the right roof window model, you should determine its location in the attic. This process includes room planning. In most cases, windows are installed in the space between the rafters, but there are times when it is required to cut the beams.
The model of the window depends on the angle of the roof, Velux provides roof windows for roofs with an angle of inclination from 15 to 90 degrees, as well as for flat roofs.
The type of roofing material determines what salary will be installed around the perimeter of the window. In order for the window not to let water into the room, you need to organize the correct waterproofing.
After installing the Velux roof window, it is necessary to hydro- and thermally insulate the window frame and rafters. Materials for these works are provided by the Velux company.
In the inner part of the room, a slope should be built under the window. There are special branded Velux slopes, but there is also the possibility of its independent construction. If the window is installed in an office, bedroom or children's room, choose models that have triplex laminated glass inside, when the glass breaks, the laminated film will hold the fragments and protect people living in the attic. To protect the room from excess light, it is recommended to install additional accessories, which are also produced by Velux.
When planning the installation location of the window, you should consider the possibility of viewing the view from the window in any position. Windows that open in the center are more convenient, but they are not installed on roofs with a slight slope. If the installation height of the window does not allow it to be opened, then you should use automated system management.

The minimum height from the floor to the bottom of the window is a section of 80 cm. All skylights require room ventilation and ventilation valves.
The first step in the installation of a roof window is the construction of an opening in the roof, which is cut from any convenient side: both external and internal. Distance between beams and installed window should be minimal: 2-3 cm for thermal insulation.
If the window is installed from the inside of the room, the window sash should be removed. The package includes a set mounting plates that need to be installed on the window before mounting it in the opening. If the window size is more than 1.5 m, then special brackets are required, which will provide additional fixation of the window in the opening.
Velux skylights are thermally insulated with four polyethylene foam strips placed on metal rails.
The window frame must fit snugly against the frame, to ensure this action, it is necessary to level all parts of the window, starting from the bottom. The bottom of the box and frame should be parallel to each other. When the window is level, it is fixed. A breathable membrane from Velux will help waterproof the window and extend its lifespan. Its fixation is made with a stapler.
Next, you need to refer to the instructions that are located in the packaging of each window. It indicates the sequence of fixing salaries and overlays on the window. Do not confuse the details of the right and left sides. If there is no experience in installing roof windows, it is better to entrust this matter to professionals, since an incorrectly installed roof window will not perform the functions assigned to it correctly, which means that there is a risk of its premature damage.
Velux skylights, designed for installation on the attic floor, are very popular among manufacturers. There are not so many manufacturers of reliable attic structures on the market.
Velux was founded in 1941. Its first head was named Willum Kann Rasmussen. It was he who thought that the presence of windows on attic floor can improve the comfort of life. Thanks to this, the attic can become residential, and not just a place to store old things.
Roof windows Velux (Velyuks) are known to buyers within seventy years. Over such a long history of the brand, many modern and durable technologies have been developed to simplify the use of the window.
Today, Danish brand products are famous for their reliability, as well as the ability to operate in any climatic conditions. Products can be used at low air temperatures, do not lose their characteristics during rain, hail or snow.
The product line is represented by 25 window models, so you can choose the design that suits your parameters and design. There are about a hundred options color solutions goods. The company also offers its customers a wide range of fittings, accessories necessary for installation work. You can purchase a remote control system, smoke removal and other functions.
Velux windows have a number of advantagesExcellent quality. Products from the Danish manufacturer will protect you from any climatic conditions. The company is testing the product for the ability to withstand various weather conditions.
Checking products in Russia. The climate in our climate zone is extremely unstable. For example, in summer it is extremely cold, and in winter there are often very low air temperatures. For 20 years of sales in Russia, windows have demonstrated reliability and durability

Safety glasses. Velux uses triplex glass, which is resistant to mechanical damage. Even if the surface cracks, the fragments stick to the film
Large range of products. The provided models can satisfy any requests. You can choose products for any window size
Ease of maintenance. The design of the windows is such that they are easy to clean, because the sash can turn over. A convenient handle bar ensures ease of opening
Attractive design
Possibility of fast service. The company opened representative offices in 25 cities of Russia
Environmental friendliness. Products are manufactured in accordance with European standards. Therefore, windows can be mounted in any premises, including hospitals, schools, etc.
Top opening
Combined opening
Roof exits
Window-balcony and terrace
Remote
special purpose
Prices for skylights are an order of magnitude higher than for classic ones, because their design must be more reliable. The Velux company offers a fairly reasonable cost of production (from 8,000 rubles for a finished window). The following factors can affect the amount of your costs: window size, design, type of double-glazed window, type of sash opening, etc.
Also, in the final price of the product, prices for various additional accessories for the window should be included.
Velux offers its customers the following productsElements for providing thermal and waterproofing
Salary for installation work
Roller shutters, awnings, necessary to protect the premises from heat
You can choose a window with any characteristics. The more perfect the model, the more money you will have to part with. But such trifles as an electric drive or additional waterproofing not only ensure the comfortable operation of the window, but also reliably protect the premises from moisture and wind. A useful feature for the attic product is a rain indicator, thanks to which the window will close automatically after the onset of rain.
-
The comfort of the attic largely depends on the amount of natural light entering the room. It is practically impossible to solve this problem effectively with the help of dormer windows. A real revolution in this area was the attic, designed by Willum K. Rasmussen, the founder of Velux.
Velux skylights have a seventy-year history. During this long time, the first samples have undergone many changes. This applies not only to design - innovative technologies have greatly simplified their use, increased efficiency, functionality and reliability of the design.
In the domestic market, Velux skylights have been presented since the early nineties. The list of cities where you can buy them has long crossed the 70 bar.
Velux offers the following products as accessories for its products:
- materials for waterproofing and insulation;
- slopes;
- salary used during installation;
- roller shutters and awnings that protect the attic space from heat
They are also accompanied by instructions for installing Velux roof windows, which describes the process in detail.
What attracts Velux products

- It is noteworthy that in the production of a high-quality massif of an especially strong dense pine - northern. For frames and boxes, glued laminated timber impregnated with an antiseptic is used. Finished goods additionally protected by monolithic polyurethane applied to the surface of the frames or a special varnish.
- Installation is allowed on roofs with a slope of more than 15⁰. They are installed deeper than analogues from other manufacturers, almost flush with roofing. Thus, the junction points are much warmer, since in this case the window frame is much easier to insulate.
- The main feature of all windows is the unique ventilation device they are equipped with. For example, in the designs of the GGL or GGU models, an opening handle and a special vent valve designed for ventilation are combined. All of them have a removable filter - excellent protection against the ingress of insects or dust.
- For glazing, the Danish company uses energy-saving double-glazed windows made using an innovative technology called "warm perimeter". In such designs, the dividing bar made of aluminum is replaced by thin-walled steel. Such a replacement leads to the absence of condensate along the perimeter of the double-glazed window, which, in turn, increases the performance of windows.
- Velux double-glazed windows are filled with argon, and silicone is used for sealing instead of butyl sealant.
- They have a three-level seal along the contour, which eliminates drafts and improves heat-saving qualities. They were tested at a temperature of the order of minus 55⁰ and, according to the test results, were found to be frost-resistant. That is why they are recommended for use even in the coldest regions of Russia.
- Modern design, ergonomic shapes, as well as reliability, environmental friendliness and high quality, confirmed by the relevant certificates.
Model range for the attic
The range of Velux windows is very diverse: four modifications with a central axis, two with an upper, balcony structures and others.
Let's highlight the most common of them:
- "Economy" (GZL) - the basic model with a central opening axis. The profile is covered with two layers of varnish. It is supplied with the washing filter, ventilation is carried out through the top part;
- "Classic" (GGL) - a piece of wood, the opening is along the central axis, treated with three layers of varnish. For ventilation, a vent valve is used, equipped with a washing filter, allows the installation of electrical equipment
- "Smart" (GGL or GGU Integra) - equipped with an electric drive to adjust the position, there is a remote control, as well as a rain sensor. Allows the installation of curtains and roller shutters.

- "Moisture resistant" (GGU) - product white color, the surface of wood is covered with monolithic polyurethane. There is a valve window, as well as a washing filter. Allows the installation of electrical equipment.
- GPL - has two opening options: a central axis and an upper one by 45⁰.
- Window-balcony (GDL) - has an interesting design solution: when the upper sash is raised, something similar to the roof is formed, the fence is created by slightly opening the lower sash. “Having come out” on such a balcony, although a person continues to stay indoors, he is practically in the fresh air.
 inexpensive, but functional roof windows Velux Optima Standard
Dimensions
 The dimensions of velux roof windows vary within:
- length - 77.8 -160 cm;
- width - 55 - 114 cm
They have a special indexing: letters (C - S) are used for width, numbers (02-10) are used for length. For example, the designation C02 corresponds to the dimensions of the frame 55.0 by 77.8 cm, and S08 - 114.0x139.8 cm.
When choosing the dimensions of these products, they are guided by the pitch of the rafters, as well as the need for illumination, taking into account the fact that the areas of glazing and the illuminated surface are approximately one to ten.
How to install
- First of all, it is necessary to calculate window construction: number of windows, size, location. It should be noted that the sizes are standard, so you need to choose the best option that will provide an equally good view both in the sitting and standing position.
- is possible only on condition that the dimensions of the openings exceed the dimensions of the windows - by 3.0–4.0 cm in width and 4.5–5.0 cm in height, and the gap formed by the rafters and the box should not be more than 3 cm with any side.
- Next important point when planning, the slope of the roof is considered. The lower it is, the higher the structure should be.
- Window sashes with a handle at the top are placed at a distance of 0.8 m from the floor, other models - at a distance of more than 1.10 m.
Installation
- Installation is carried out by fixing the window to the crate or rafters using special clamps. Particular attention should be paid to the location of the lower edge. It should not complicate the lining. From the inside, the trim is laid vertically, and from the outside - horizontally.
On a note
Mounting on the rafters is certainly stronger, however, many choose the second option. The fact is that when installed on the crate, the frame can be clearly aligned, and this greatly simplifies the installation work.
- gaps between frame and roofing elements fill with putty. It must necessarily have a bitumen base.
- It is more convenient to install if you mount a temporary beam that will serve as a support under the window. In this case, it is necessary to use a level in order to accurately ensure horizontality: first it, and then the bottom of the frame. The lower corners are fixed with screws, after which they proceed to fastening the upper ones. Fix them with screws in the middle of the oblong hole. At the same time, a small gap is left so that the frame can be adjusted.
- The frame must fit snugly against the box, otherwise the structure will begin to leak. This, as well as ensuring optimal functionality, requires adjustment of the system. To begin with, they adjust the lower part of the box and the lower crate, set to the level, to each other. In this case, it is necessary to achieve uniform gaps on the sides. Further, it is necessary to ensure the parallelism of the lower parts of the box and the swivel frame. The adjusted structure is re-leveled and the corners are finally fixed according to the instructions.
Warming and waterproofing
The installation of windows is carried out in conjunction with a device for high-quality insulation and waterproofing.
Velux products are equipped with a special BDX-2000 package containing:
- sealant made of polyethylene foam. Insulation is laid around the entire perimeter, which eliminates "cold bridges";
- a moisture-proof apron, they frame the structure and connect it to the waterproofing of the roofing pie.
The list of accessories also includes a drainage chute. Condensate is drained through it, which can fall over the frame from the side of the warm attic.


