One of the main indicators of the comfort of living outside the city is the presence of a permanent water supply in a private house. The task of building a comfortable turnkey cottage is unthinkable without a reliable water supply and sewerage system. The device of the water supply system country house is a difficult task: it is necessary to choose a source of water and equip a water intake structure, mount water supply network, as well as select and install suitable pumping equipment.
It may seem that water supply and sewerage are unrelated systems with directly opposite functions. But this is only at first glance. A professional approach requires considering the water supply and sewerage system as a single closed-loop system.
The project of the water supply system in a private house
- The design of the water supply system of a private house begins with the answer to the question - how many people will permanently live in country house. The power of the main pump and the volume of treatment facilities depend on the answer to this question.
- Next, we define the level ground water, type, volume and location of treatment facilities. You can read more about the installation of concrete septic tanks in the additional information section.
- Determining the source of water. Artesian deep wells in the Moscow region have a depth of 80 to 140 meters. Drilling such a well is expensive, the cost - only drilling without well construction - is 2,500 rubles per 1 meter of well depth. In addition, water from such wells has a high iron content, is very hard and requires mandatory installation filtration systems. But these wells have an unlimited debit. This well will never dry up and run out, but if there is a well with a good debit on the site, then it is advisable to use it. This option is cheaper and the water in the well is usually cleaner.
- When designing a water supply system, attention should be paid Special attention on the relative position of the drinking water source (well or well) and the septic tank. The septic tank should be located below the slope and at a distance of at least 20 meters from the water supply point.
- Let's move on to design internal networks plumbing. The choice of a wiring and installation scheme for a water supply system, a brand of pipe or other equipment and devices depends on economic indicators and the desire of the customer. In each specific case, optimal choice equipment. But absolutely in all cases we do not compromise on the issue of quality and reliability.
Installation of plumbing in a private house
- Well drilling. This work is carried out by specialized organizations. After drilling and installation of pipes, our company mounts the caisson and performs well construction. Installation and connection to the power supply of a circular pump, installation of automation, well sealing. The well should have access to repair vehicles.
- Entering water into the house from external source water supply is carried out by a HDPE pipe 32 mm. The pipe is laid in trenches at a depth of at least 1.8 meters, otherwise there is a risk of the pipe freezing in winter time. At the point of entry into the house, it is necessary to provide for the insulation of the mortgage sleeve.
- Installation entrance group and security groups. If the water supply of a country house is carried out autonomously, then it is necessary to install expansion tank with pressure sensor. We recommend installing an expansion tank with a capacity of at least 100 liters. The pressure is set to 2 atmospheres.
- A coarse and fine filter is installed. Water filtration, iron removal and softening systems are designed and installed separately by specialized organizations.
- Distribution of water supply pipes according to interior spaces Houses. We install the following types of pipelines: cross-linked polyethylene; polypropylene; metal-plastic In general, wiring water pipes does not differ from the distribution of heating pipes and has the same features and requirements. Therefore, we will not dwell on this in detail here. The only significant difference is that if, when distributing heating, laying pipes in a heater is only desirable, then water supply pipes must be installed in a heater.
A few words about sewerage. We all know how frustrating sewer clogging can be. When installing sewer pipes, you must follow a few simple, but very useful ones that will make the system absolutely reliable. You can read more about sewerage in a private house on a specialized page of the site. Here we only note that the organization of water supply must take into account the requirements for the removal dirty waters. This is a single system.
Turnkey water supply price for a private house
Our company has the necessary experience to create a system autonomous water supply country house on the high level. We will tell you which source to use to supply water to the house, whether it be a well or a well. Let's pick up for you system of filters for water treatment of the house. This system is important because directly affects the service life of household appliances and plumbing equipment.
Wishing to have own house outside the city, or at least a dacha in our time, a lot. But not everyone has the opportunity to fully pay for the construction and get ready-made housing with all the amenities on a turnkey basis. Therefore, the future homeowner plans to purchase building materials and build a house on his own. At the same time, water supply and sewerage, as well as other life support systems, will be within his power, subject to the basic rules.
If there is centralized water supply and sewerage near the construction site, then there really will be no problems with installing these systems in the house. If missing central water supply and sewerage, then it will be necessary to dig a well or drill a well, create, that is, do everything that is necessary for a comfortable stay on your own.
This task requires certain skills and knowledge during construction ordinary house With necessary systems life support, which are represented by water supply and sewerage, heating and electricity. Not bad to have a centralized gas supply. Otherwise, you will have to use balloons.
Centralized system
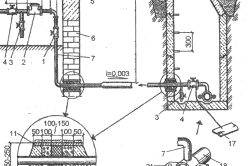
Image 1. Plumbing input device: a - input through the foundation; b - water well; 1.4 - valves; 2 - water meter; 3- drain tap; 5 - semi-basement (basement); 6 - foundation; 7 - input pipeline; 8 - cement mortar; 9 - resin strand (tow); 10 - crumpled clay; 11 - case; 12 - blind area; 13 - hatch; 14 - running brackets; 15 - shaped concrete ring; 16 - clay castle; 17 - grounding; 18 - street water pipe; 19 - rubber gasket; 20 - welding; 21 - collar.
To use the centralized water supply system, you must obtain permission from the local Vodokanal authority and specifications indicating the place of connection.
The diameter of the input to the consumer depends on the material from which the pipes are made and the intended maximum flow. It is necessary to take into account the maximum possible number of simultaneously switched on consumers, as well as the cost of watering the garden or garden.
The input can be made of cast iron, galvanized steel or polyethylene pipes high density (PVP). Cast iron pipes use if the input diameter exceeds 50 mm, in other cases steel or HDPE pipes can be used.
The entrance to the house should be located perpendicular to the pipe providing the central water supply, and along the building, in order to avoid unforeseen flooding of the basement, the water conduit should run at a distance of more than 5 m from it.
An example of the organization of input, if the water supply is centralized, is shown in image 1 a), b). Image 1 a) shows the passage through the foundation and the beginning that the indoor water supply must have. Please note that the irrigation system must be connected through a water meter.
Image 1 b) shows a water well. Here it is necessary to pay attention to such an important element as grounding. It must be carried out according to certain rules, because only grounding, the resistance of which does not exceed 4 ohms, will provide protection against damage. electric shock in case of accidental contact with the voltage of the power supply network on the conductive system. They can be all types of water supply, sewerage.
In image 1, everything is indicated in sufficient detail. We only note that the drain valve 3 is necessary in the event of an emergency.
Name of other elements of water disposal:
- valves 1.4;
- water meter 2;
- cellar 5;
- foundation 6;
- input pipeline 7;
- cement mortar 8;
- resin strand 9;
- crumpled clay 10;
- case 11;
- process 12;
- hatch 13;
- running brackets 14;
- shaped concrete ring 15;
- clay castle 16;
- ground 17;
- street water pipe 18;
- rubber gasket 19;
- welding 20;
- collar 21.
Installation of internal plumbing
For a reliable water supply, internal installation cold-rolled galvanized pipes with an inner diameter of 15, 20 and 32 mm or HDPE pipes intended for water supply with an outer diameter of 20, 25 and 32 mm are used.
Image 2. Drinking water supply scheme: a - with shut-off valves on the branches; b - with a distribution manifold: l - water fittings; 2 - irrigation pipeline; 3 - shut-off valve; 4 - lowering crane; 5 - distribution manifold; 6- check valve; 7 - water flow meter.
Image 2 a), b) shows options for schemes that can be used if water supply comes from centralized system. If the water supply is carried out from a well or well, then with some changes it is also suitable for this option.
Image 2 a) shows the piping in a two-story mansion with a basement, in which the valves are mounted separately. Image 2 b) shows a wiring option using a distribution manifold. Such a collector is shown in image 3. The principle of operation and its design does not require special explanations.
Fragment A of image 2 shows in detail the input to the house if centralized water supply is used. If the source of drinking water is your own, then a water flow meter is not needed, and the input does not have to be carried out through the basement.
Elements indicated in image 2:
- water fittings 1;
- irrigation pipeline 2;
- shut-off valve 3;
- drain cock 4;
- distribution manifold 5;
- check valve 6;
- water flow meter 7.
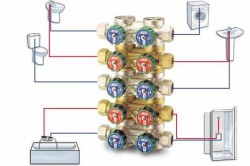
Image 3. Distribution unit (collector) of cold and hot water supply systems.
Rules to be followed during installation:
- The risers should not deviate much from the vertical position. The permissible deviation should not exceed 1 mm per linear meter. This is a rather strict requirement and it is not easy to fulfill it.
- If, after installation, any internal construction works, then the laying of pipes must be carried out in such a way that their connections do not end up in walls, partitions or ceilings.
- Horizontally located pipes should be inclined towards water folding devices with a slope of 2-5 mm per 1 linear meter.
- When passing through the ceiling, HDPE pipes must be hidden in roofing steel sleeves. The sleeves should protrude approximately 20 mm above the clean floor.
- The distance from the wall to the pipe should be 15-20 mm.
- Pipes in unheated rooms, in which water can freeze at low temperatures, must be insulated.
- At the lowest points of the pipeline, plugs must be provided to drain water from the system.
Home connection

Image 4. Laying the drainage pipe.
In cities, and now in small towns, there is a centralized sewage system. By contacting a specialized company, you can crash into the main pipe and the organization will independently issue all permits.
If you do the tie-in yourself, then you can save a lot on paperwork, sewage will be cheaper, but you will have to spend a lot of time. To imagine all the difficulties that will need to be overcome in this case, we simply list what documents will be required so that the house has a sewerage system.
- Contact the land committee, whose specialist should draw up a plan for the section of the route from the house to the common pipe.
- Submit an application with a request to develop technical documentation for equipment.
- Conclude a contract for the drafting of the tie-in.
- Approve the project in Vodokanal and the architect. The architect must issue a permit indicating the enterprise admitted to perform the work.
- Negotiate with neighbors, past whose houses the trench will be laid, and obtain written permission from them.
- Get permission from the road builders (if you lay a trench across the road).
- Notify the water utility in writing about the upcoming work and, upon completion, conclude an agreement with it on the provision of services and their payment.
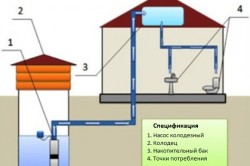
Image 5. Decentralized water supply scheme.
In no case do not make a tie-in without overcoming all of the listed obstacles, because this is fraught with a decent fine and the dismantling of everything done. Therefore, we do everything ourselves according to the law. Work sequence:
- We are building a revision well on the site in the place indicated on the plan, image 4 shows a variant of the well with two entrances.
- We dig a trench from the well, lay pipes and connect them to the well.
- We connect pipes internal sewerage and we call an employee of a specialized enterprise to insert the system into the main pipe.
An autonomous branch can be connected to and storm sewer. To do this, it will be necessary to build a receiving well and connect it with pipes to the revision well.
Connection problems may arise, the house is lower than the main sewer. In this case, you will have to do it using pumps for pumping settled sewage, that is, to build a septic tank. Probably, in this case it is easier to create autonomous system cleaning Wastewater.
Autonomous water supply
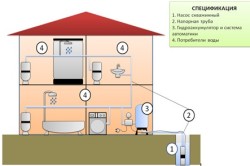
Image 6. Scheme of autonomous water supply.
Autonomous water supply is possible if there is either a well or a well on the site. In addition, these types of water supply and sewerage are associated systems. So it turns out: before supplying water to the house, an autonomous sewage system must first be created.
To pump water into the house, you need a pump, a control system for it - a water tank and, of course, pipes. The simplest pressurized water supply system is shown in image 5. Such a system is used if there is not enough water in the well.
The pump is turned on manually and the water fills storage tank. The pump stops working as soon as the water in the well drops to a level at which it must be turned off, otherwise it may overheat and fail. The storage tank is not protected from overflow, so it is necessary to provide a drain pipe in it.
Image 6 shows a pressurized water supply system. It assumes that there is enough water in the source, and the pump located in the well is controlled from the surface using a membrane located inside the accumulator. The membrane divides the accumulator into two parts. One contains air under initial pressure equal to p 0 = 1.5 bar (≈1.5 atm), and the other part is designed for water.
As the tank is filled with water, the air pressure in the first volume increases and when the value of pmax is reached, a relay is activated that turns off the pump. As the water is withdrawn, the air pressure decreases, and when the set pressure value equal to p min is reached, the relay turns on the pump. The value of p min is chosen so that it ensures the supply of water from the accumulator to the highest sampling point.
Networks in a private house
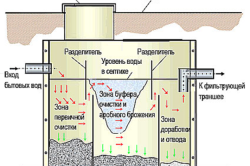
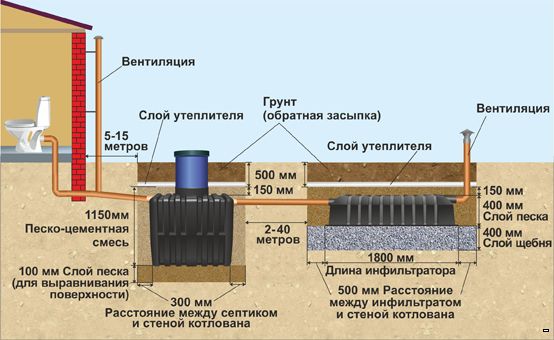
Image 7. Homemade septic tank in a private house.
Sewerage and water supply systems are interdependent mechanisms: without water in the house, sewerage is practically not needed. But water supply, if there is no sewerage, is not a particularly attractive convenience. With storm water supply, sewerage, they do not affect each other in any way.
Usually output sewer riser already provided in the foundation of the house. Now you need to decide on the installation site of the wastewater purifier (septic tank), dig a trench to it and lay pipes.
If during the construction of the foundation the depth of soil freezing was taken into account, then the conclusion sewer system was carried out at the appropriate depth. If the foundation is made without taking into account the depth of freezing (there are such types of foundations), then you will have to dig a trench taking into account the freezing of the soil.
The industry produces septic tanks deep cleaning waste water. After such purifiers, water can be used without further purification for watering trees or a garden.
In order to save money, a simple septic tank can be made independently. One of the options for such a septic tank is shown in image 7. The main task during construction is to provide good insulation so that wastewater does not enter the ground without treatment. After such a septic tank, it will be necessary to build a post-treatment system. So we get water supply, for which sewerage will not be cheap.
Creating comfort in a country house or in the country is not an easy task, moreover, it is quite expensive. To all of the above, it is necessary to add financial costs and labor for the construction of wastewater treatment facilities, a well or a well. To get to absolutely clean water, it is necessary to drill very deep artesian wells.
In the very ideal heating, water supply and sewerage systems are connected to centralized networks. However, such networks may not exist in a cottage settlement. In this case, it is necessary to use autonomous analogues for each type of communications - equipment that can serve a separate house.
If there is no running water in the village, it will be replaced by a well or a well with a pump. Modern treatment systems and septic tanks are responsible for the purification of wastewater, and an individual boiler will be the solution to problems with heating.
Installation of water supply, heating and autonomous sewerage almost any man can perform on his own. About the intricacies of installation, features of systems engineering communications and some of the pitfalls that everyone may encounter in the process of conducting them, you will learn from this article.
Water supply
It is not worth ignoring the stage of drawing up a water supply scheme. It will greatly facilitate not only the calculation of the quantity the right materials, but also further work on laying the pipeline.
The standard water supply system of a country house consists of:
- source;
- water pump with check valve (pumping station);
- hydraulic accumulator (reservoir with water);
- a tee, from which water will be distributed using two pipes - for domestic and technical needs;
- cleaning filter;
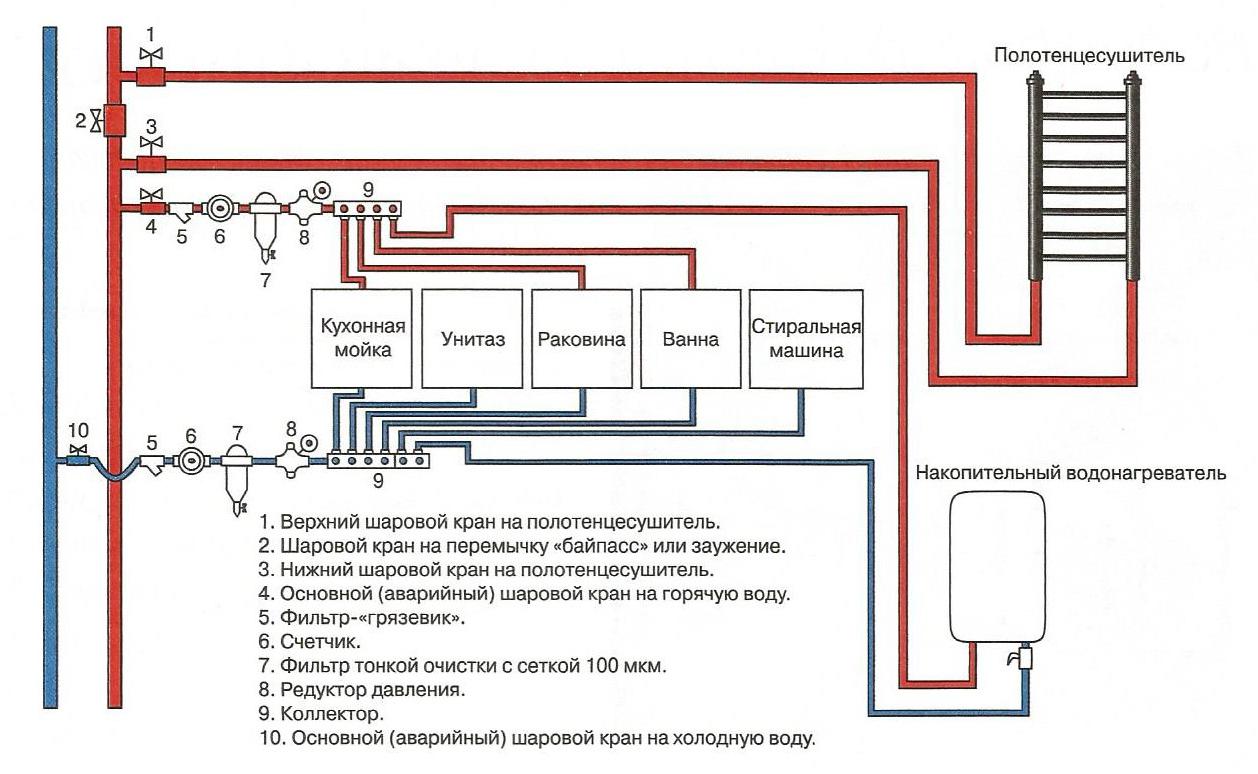
- a tee dividing the water supply into cold and hot;
- collector for cold water with stopcocks;
- a heater (gas boiler or boiler) for connecting a water supply system that supplies hot water;
- hot water collector.
Pipes are laid by connecting water consumers in series, or using a collector connection.
Serial connection. The scheme works as follows: from the water supply source, water is supplied to the first consumer, in this place a tee is attached to the pipe, with the help of which water moves to the next consumer.
Collector connection. It implies the use of a collector - an element from which pipes are laid individually to each consumer. In this case, slight pressure losses may still be present (this depends on the distance of the consumer from the pump), however, unlike a serial connection, the collector allows you to create almost equivalent pressure in any room of the house. Note that such a wiring system is economically more expensive, because. involves the use a large number pipes.
Serial and collector wiring diagrams
Installation of water supply in a private house
Many people think that the advantage of a private house over an apartment is, among other things, that water consumers can be installed anywhere. Experienced Builders it is advised to have a toilet, bathroom, kitchen and other rooms that require water supply in the same zone. So you can avoid problems with pressure drops on each of the consumers.
Installation with connection to the central water supply
Step-by-step instructions for connecting to the central water supply:
- Get a plan for your site.
- Next, contact the water utility, where you will be issued the technical conditions for connection. To do this, you must submit an application and documents confirming your rights to the building and the site, as well as the plan of the latter.
- With technical specifications and a title certificate, go to the SES, where in exchange for an application you will be issued a conclusion on connection to the central water supply.
- Based on the TU, it should be issued project documentation and then register it with the SES.
- Get permission to carry out land works utilities, whose networks (electric, telephone lines, gas) pass in the place where it is planned to lay a water pipe.
- In the water utility, you can get a list of companies that have permission to provide services for tapping water pipes and installing meters to account for water consumption. It will not work to save on this, because you can be fined for amateur performance. Having chosen the contractor you like, conclude an agreement with him.
- After the completion of the land works, it is necessary to invite the employees of the water utility, who will draw up an act of putting the equipment into operation.
- At the final stage, an agreement is concluded with the water utility and payment is made taking into account the indicators of water meters.
Installation with connection to an individual source
A trench is dug between the house and the well, on the bottom of which a pipe is laid. The depth of its laying is determined by the level of soil freezing and should be below this mark.
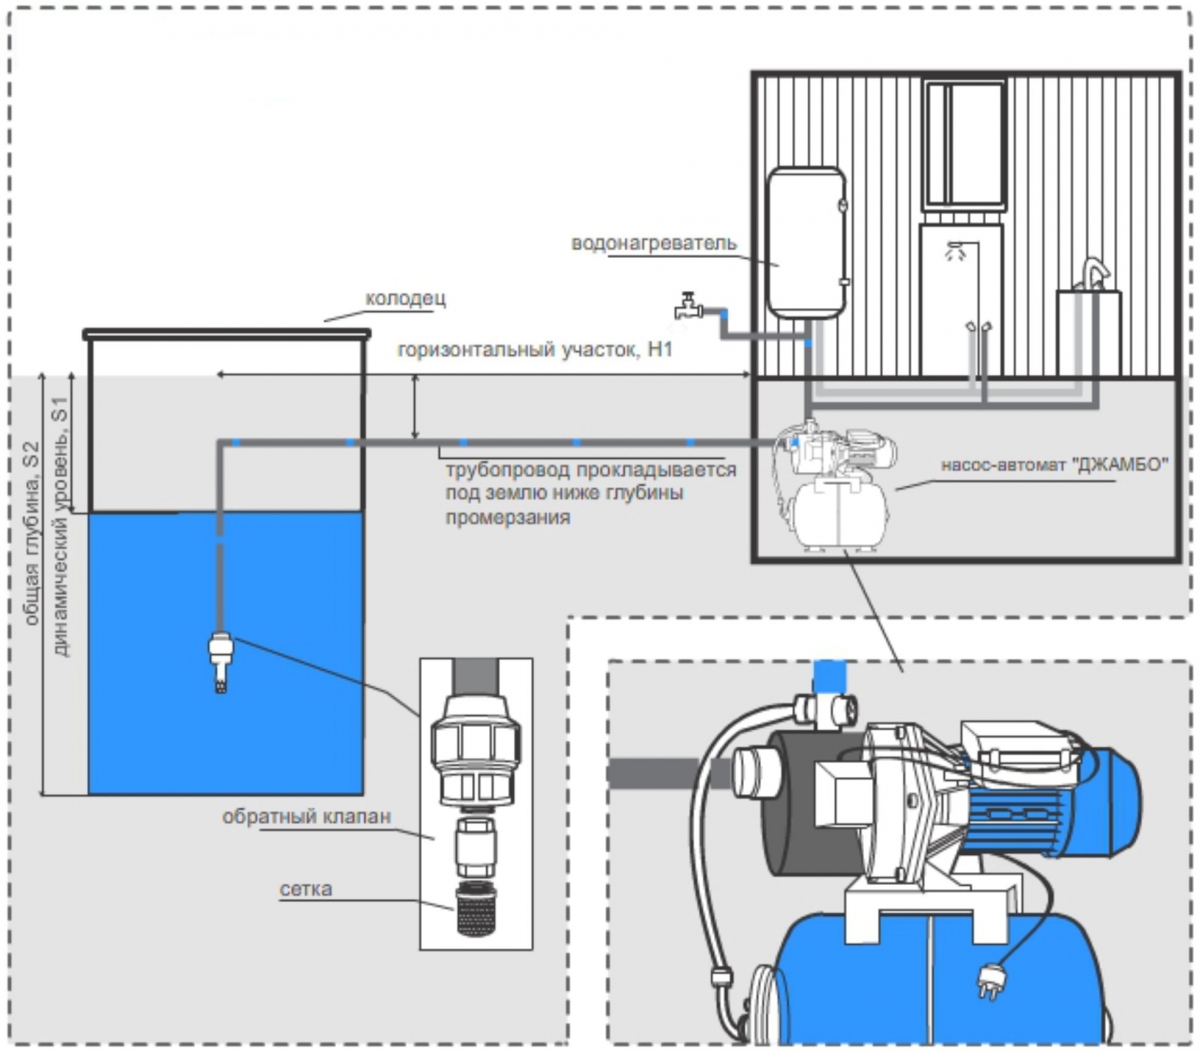
Connecting to an individual source
Around the well, it is necessary to make a clay castle, which will prevent the ingress of groundwater and precipitation. Before entering the pump, install a check valve and a coarse filter, at the outlet - a fine water filter.
Sewerage
The sewer system consists of two interconnected parts - internal and external. First, an internal sewerage system is built.
Internal sewerage
Determine the exact location of all plumbing fixtures. A schematic drawing will help determine the length of the pipeline and the amount of auxiliary materials for installation.
Wiring diagram for internal sewerage elements
The pipeline can be located on the floor or run along the wall. Exists Alternative option, in which he hides under the floor or in the walls, which will have to be ditched. The internal sewerage is completed by bringing the pipeline to the street.
External sewerage
External sewerage systems are conditionally divided into storage or treatment facilities.
The first type is cesspools without a bottom and hermetic storage tanks for drains.
To the second - all types of septic tanks: single-chamber, two-chamber, septic tanks with a field for filtration, with biofilters and with forced air supply.
Remember that the septic tank must be at least 5 meters away from the residential building, 20-50 meters from the water supply source and 10 meters from the garden.
Scheme of external sewerage in a house with a septic tank and a filtration field
After determining the location of the well, a hole is dug under it. On this stage pay attention to compliance with the requirements for the angle of inclination (in the range of 2-3 centimeters per 1 meter of sewer pipe) and the depth of the pit. The standard pipe laying depth is 70-80 centimeters, but this value may vary depending on the level of soil freezing and the length of the pipeline.
Important at exit points sewer pipes from home and near the docking point with central sewerage(autonomous purification plant) install inspection hatches. It is necessary to mount a check valve in the pipe itself, which will prevent rodents and sewage from entering the house. Professionals agree: best option for autonomous sewage - a septic tank, which, if desired, can be assembled independently.
Heating
Heating systems are:
- water;
- steam;
- air;
- electric.
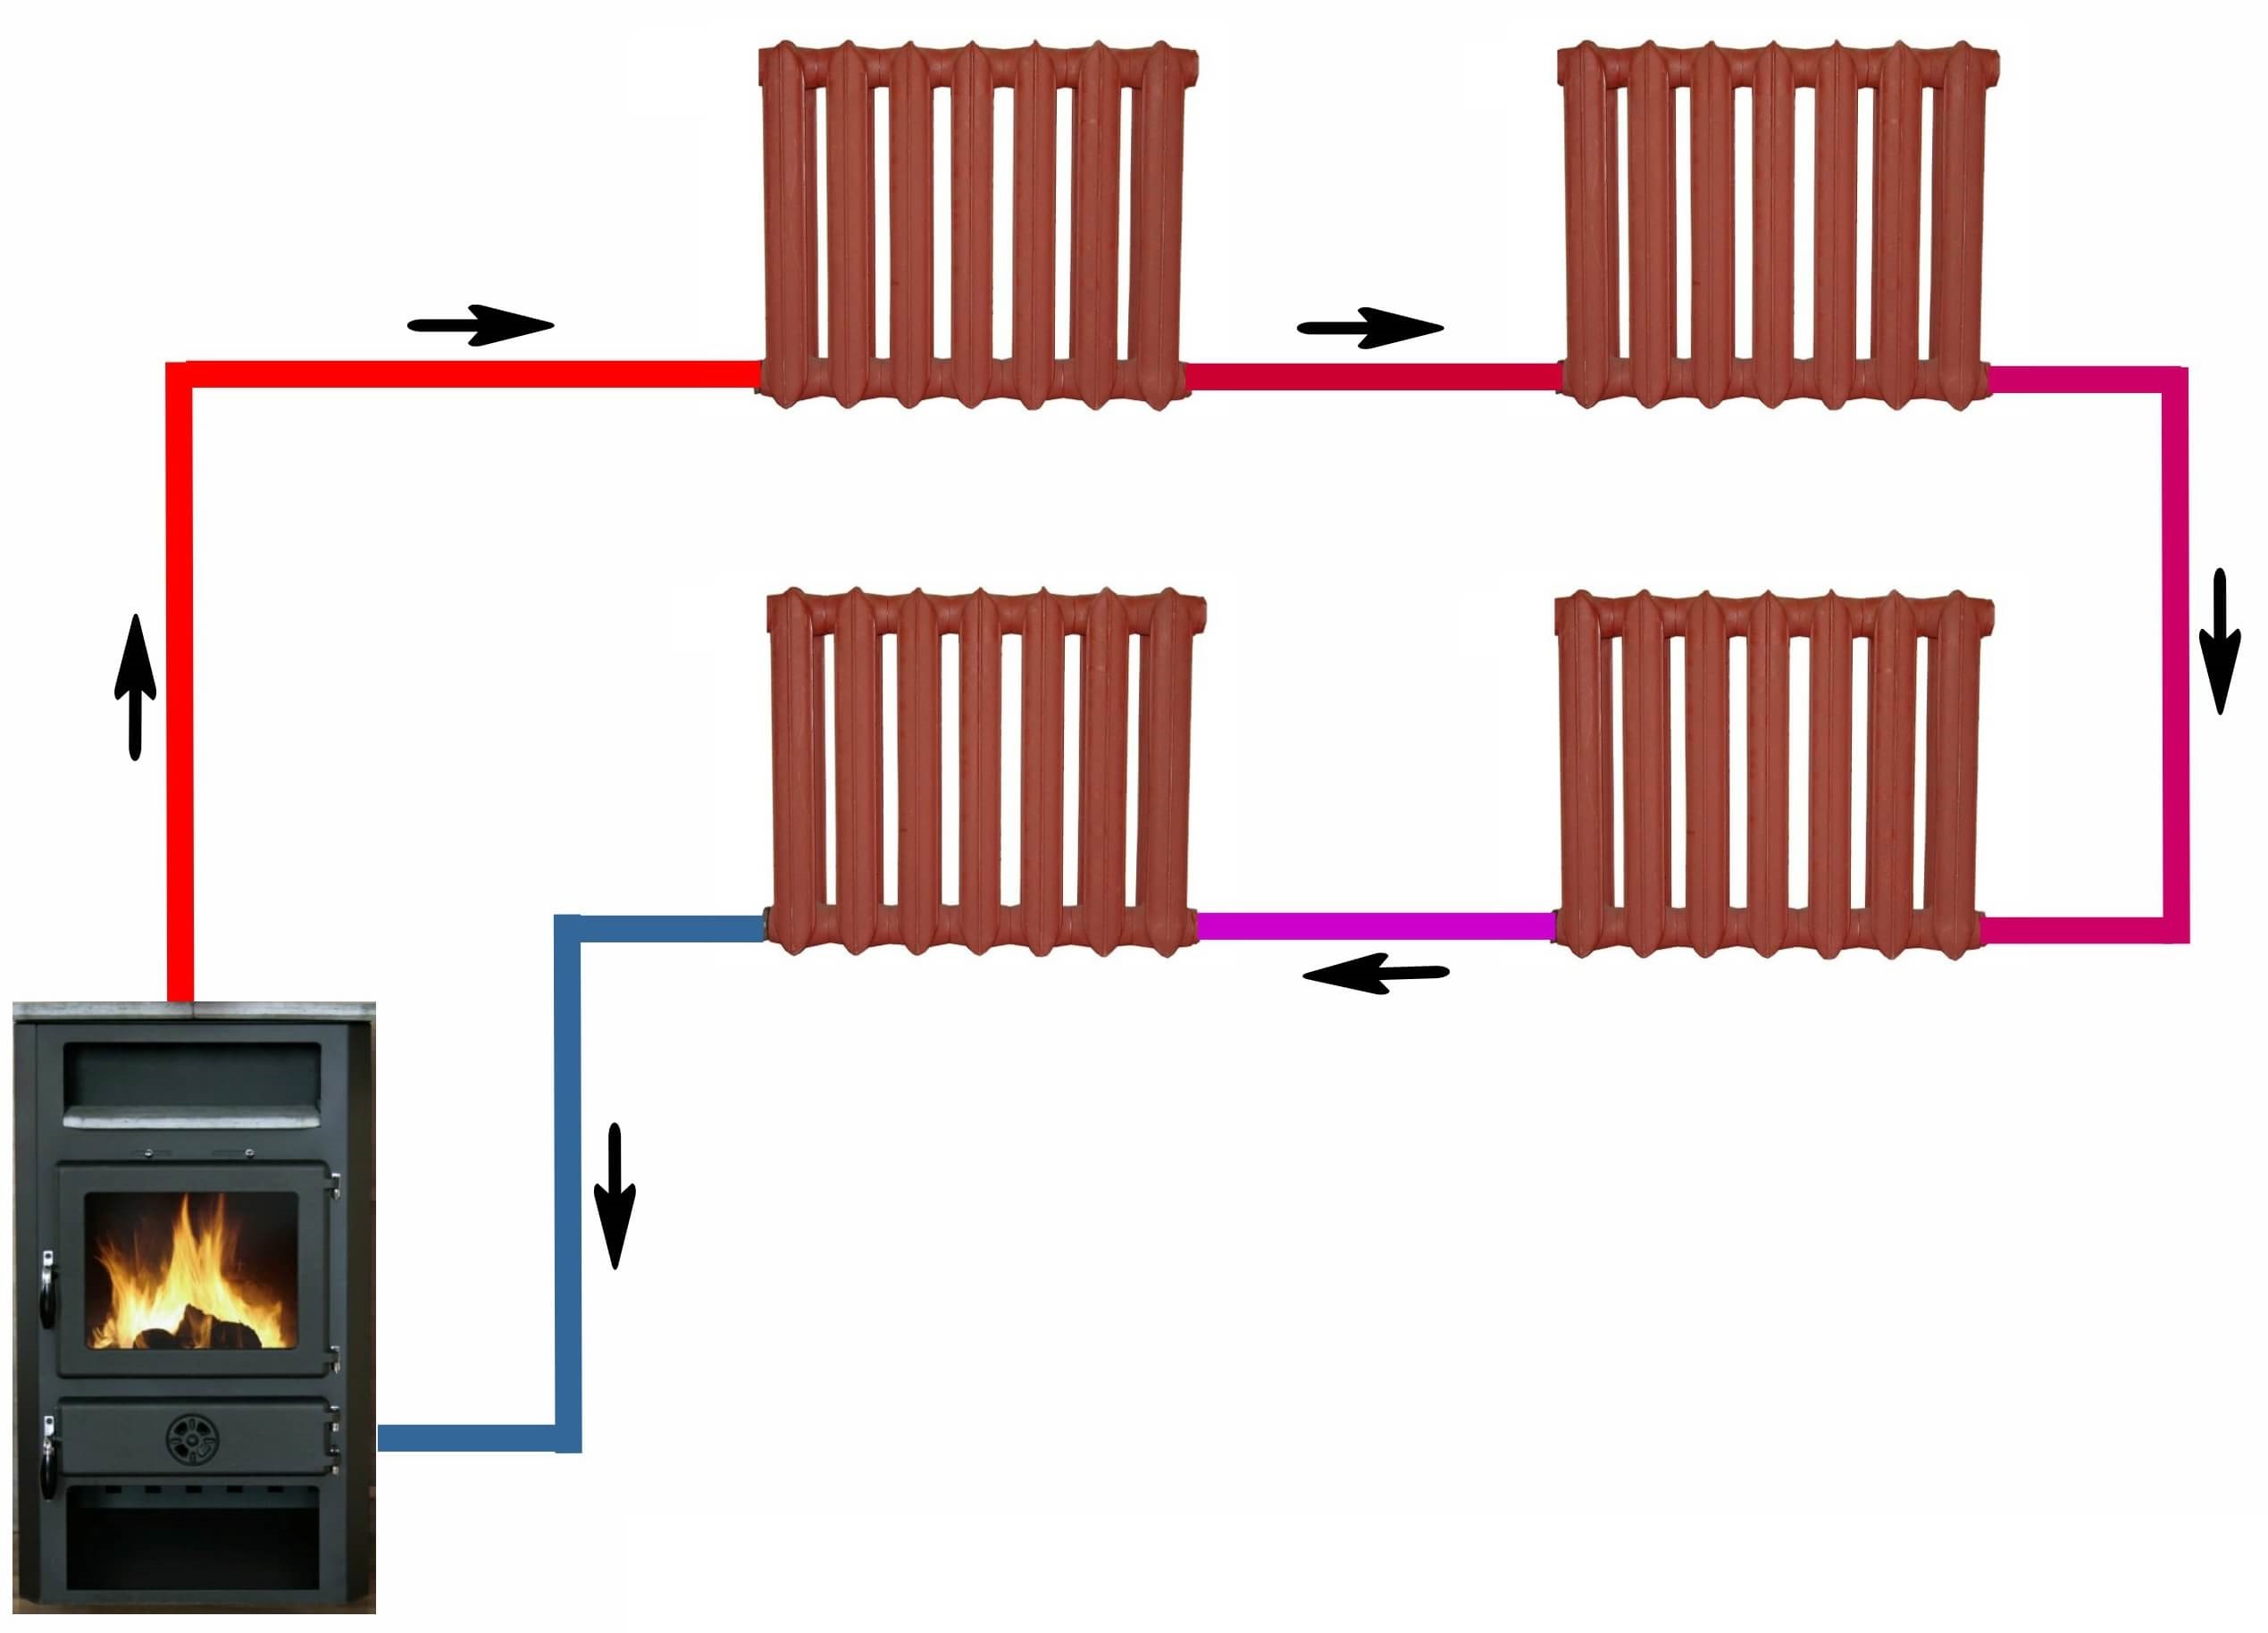
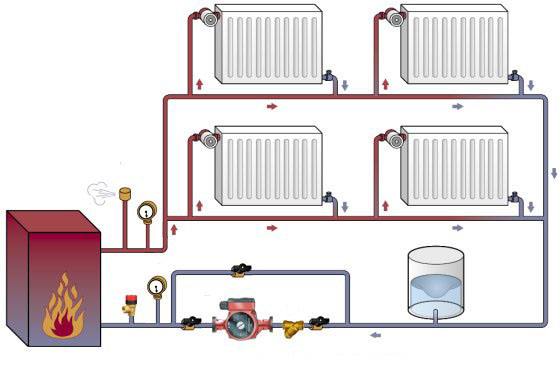
The simplest and most reliable system is water. Here's how it works: water (coolant) is heated in a heating boiler and then flows through pipes to radiators. Being in them, the water gives off its heat and returns back to the boiler. This process is cyclical.
Water heating scheme
Types of heating schemes
There are one-pipe and two-pipe schemes heating.
Single pipe heating system
The first one looks like a ring with consecutive installed radiators. The heat carrier moves from one heater (radiator) to another and then returns to the boiler. The problem is that the coolant enters each subsequent radiator, losing its temperature. To eliminate this disadvantage, more fuel for the boiler has to be spent.
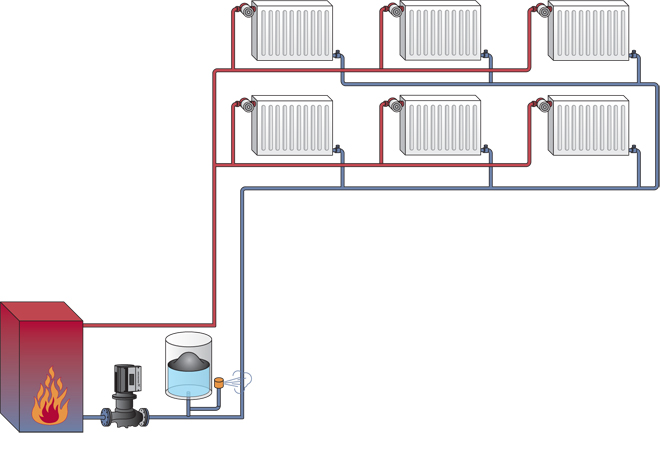
Two-pipe heating system in the house
The two-pipe scheme is much more economical than the first, since an individual pipe for supplying the coolant is connected to each of the heaters. From each of the devices to the common return circuit, another pipe is diverted, which returns the coolant to the boiler.
What you need to know when installing a heating system with your own hands
Do not forget to tie all the components of the system. For example, using linen threads. This is very important point directly affecting the quality of work and durability of the heating system.
Basic installation rules:
- heating radiators must be placed only near windows;
- the distance from the window sill to the top of the radiator must not exceed 60 millimeters, and from the floor to the bottom point must be more than 100 millimeters.
- radiator sections in all rooms should be located at the same level;
- horizontal arrangement of radiator fins is prohibited;
- any heating system must have a drain, which is used for mandatory replacement of the coolant.
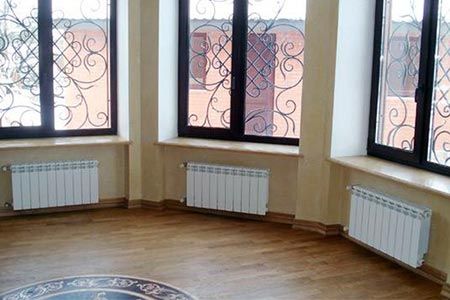
Place radiators near windows
After finishing installation work the system is filled with coolant and run in test mode. Providing the pressure that will be created during the further operation of the system, the connections of its elements are checked for leaks. When the latter are detected, the system turns off, the coolant descends, and the faults are removed.
Most often, problems arise due to violations of tightness at the junctions between sections of radiators or parts of pipes. The tightness can be broken due to poor-quality strapping of the elements.


