A beautiful dacha is the dream of every summer resident. For a resident modern metropolis The dacha is almost the last refuge of nature and an opportunity to bring your creative impulses and fantasies to life. Everyone wants their plot to be unique and comfortable, so that the eye is pleased with their favorite beds and flower beds, and the neighbors look with envy and delight.
Of course, you can hire a landscape designer, but it’s much more interesting and pleasant to do beautiful dacha. Each of us has a craving for creativity, which we are not always able to realize, so why lose the unique opportunity to express ourselves and do everything on our site the way we want. Let everything at your dacha be the way you want it. Photos of beautiful dachas on our website will help you generate new ideas in dacha design.
How to make it beautiful at the dacha? The main advantage of any dacha and its decoration are. It is important to plant the plants correctly, because in a large area they will be visible from all sides and your mistakes will be much more noticeable. Water, air, heat and light are the main factors on which the development and growth of plants depends. They are closely interrelated and do not replace each other. Therefore, in order to make the dacha beautiful, you need to create appropriate conditions for the plants. Plants in closed ground at poor lighting need low temperature. Better to plant more unpretentious plants one species rather than trying to grow exotic but capricious species. How to make your cottage beautiful
Shrubs are less demanding to care for, so they are perfect for decorating your garden. An excellent decoration for your site can be a pond, which, if necessary, can be used for irrigation, because the water in the pond warms up perfectly in the sun. A forest corner looks great in a dacha. A shady space will give you a lot of joy on hot summer days. How to make it beautiful at the dacha
When creating a beautiful dacha with your own hands, do not forget to choose plants that are suitable specifically for your site. Moisture-loving plants planted in dry soil may wither and die. Most plants do not like excess moisture as well as lack of it. With very strong and frequent watering, the root system of plants begins to suffer due to the lack of oxygen, as a result of which it weakens, the plant gets sick and soon dies. Therefore, soils that can retain water after watering or rain are not used for growing flowers or special soil drainage is created.
For the garden it is necessary to prepare a sunny area and Special attention It is worth paying attention to paving, do not use recycled materials. This will be especially important if your garden is visible from the second floor; you risk spoiling the view from the window for yourself and your neighbors. Smooth and beautiful paths will make you personally feel spring and autumn. It is during this period that they will be responsible for the attractiveness of your dacha.
Kira Stoletova
Greenhouse for peppers made of polycarbonate – perfect place for growing and obtaining big harvest heat-loving crops. Making a greenhouse for peppers with your own hands can be done quickly and without any special expenses.

DIY greenhouse
Peppers are a crop that loves light and warmth, so greenhouses are often used to grow peppers. If you make greenhouses for peppers yourself, you can save a lot. It is better to make small greenhouses; it is better to use materials that are not very expensive and available from the vegetable grower.
Manufacturing stages
Among the stages of making greenhouses for peppers with your own hands are:
- determining the location for the structure;
- purchasing materials;
- construction project;
- assembly.
Selection of location and materials
The choice of location for greenhouses for growing peppers must be approached responsibly; the following factors must be taken into account:
- openness and sun exposure of the area, absence of unevenness, elevated and low-lying areas;
- lack of buildings and tall vegetation;
- the direction of the structure is west-east;
- The dimensions of the site in width, length and height are 1m, 3m, 0.5m, respectively.
The choice of materials for making a greenhouse for peppers directly depends on the abilities, skills and capabilities of the gardener. You need to understand what service life is expected from the building, what quality is required from its use. Considering all these points, making a greenhouse for lettuce peppers will not be difficult.
Greenhouse on foundation
Bricks are laid along the entire length and width of the building and filled with cement.
The walls are erected using old boards. timber. So, based on the design, a box has the shape of a rectangle. Its upper part is closed with old frame or a frame consisting of slats and covered with film. For convenience, the roof is attached with hinges and is created as a single or gable roof. For a pitched roof, one edge of the box is made 20-25 cm higher. The height of the box is no higher than 40-50 cm, otherwise the crops will not have enough lighting.
Greenhouse made of arcs

PVC arcs are in demand among gardeners. They are highly durable, have a good service life and are versatile.
First of all, we choose good quality PVC arches. Provided that the crops in the greenhouse for peppers will not grow to full readiness, it is necessary to take arcs 0.7 m long. The width between the bases of the arcs is about 1.5 m, the choice depends on the individual requests and needs of gardeners.
The process of assembling an arc-shaped greenhouse
The number of elements included in the structure depends on the future size of the structure. It is assumed that 1 arc is designed for approximately 1 m of the finished structure.
Assembly consists of the following steps:
- preparing the base from timber or slats;
- attaching arcs to the base or instantly digging them into black soil;
- length between sectors is 70-80 cm
- the top of the frame is fastened with reinforcement;
- The structure is covered with film, secured with a stapler.
Greenhouse made of polypropylene pipes
Using plastic pipes, it’s easy to create a greenhouse for peppers with your own hands. The foundation is necessary when creating a structure for many years, but if it itself is needed for temporary use, we do without a foundation. A more reliable structure requires the use of wooden blocks for the frame.
In the possession of any self-respecting gardener there is always one or two greenhouses for growing seedlings and heat-loving plants. If you have not yet installed such a structure on your site, it’s time to start construction. We will describe in detail how to make a greenhouse with your own hands.
Materials used
To create a frame, many types of materials or a combination of them are used:
- wooden beams, boards, slabs, etc.
- aluminum metal profile
- metal corner or pipes
- PVC pipes
You can glaze the greenhouse using window frames or polycarbonate. Polyethylene film or spunbond material (agrofibre) is more often used to make temporary plant shelters and protect seedlings from spring frosts. You can also cover a stationary greenhouse with film, but in this case it will have to be changed annually - winter winds will quickly render it unusable.

IN last years Reinforced film appeared on sale. It also transmits light excellently, while its strength is much higher than usual.
Greenhouse shape and size
These parameters depend on the type of crops grown. Low greenhouses are used for radishes, dill, strawberries and other low-growing plants. How to make a greenhouse for cucumbers and watermelons? His optimal height– 1.8 m. To shelter cucumber seedlings, a structure up to half a meter high is sufficient.

Tomatoes and peppers are tall crops, so greenhouses for them are built the size of a person. For such buildings, full doors and a wide passage between the beds are equipped. The width of such a greenhouse is 2-3 m. The length depends on the number of plants planted. Building longer than 6 m without system forced ventilation It’s not worth doing, otherwise it won’t blow through in windless weather.
There are many designs of greenhouses:
Simple

Simple
Protozoa in the form of arcs dug into the ground; they are popularly called “snowdrops”: they are used mainly as a spring shelter for seedlings; Even a woman can make such a greenhouse herself.
Triangular

Triangular
Triangular, assembled from boards: the film or covering material on them holds more firmly than on the arcs; If desired, such a greenhouse can be easily moved to another place.
From window frames

From window frames
Assembled from window frames: a durable and reliable structure that can be used for growing many crops, including tall ones.
Folding

Folding
Folding butterfly greenhouses of a round shape, the side windows of which rise on both sides; in this form they really resemble the wings of a flying butterfly; How to make such a greenhouse for seedlings will be described below.
Greenhouses

A greenhouse that looks like a breadbox
Greenhouses
Greenhouses-breadboxes (they are also called snails or shells): when closed, they resemble the previous version, however, the doors do not tilt up, but rotate on hinges along the axis.
According to the shape of the roof, all greenhouses can be divided into:
Arched

Arched
Arched: they are made mainly of polycarbonate, bending which is not a particular problem; This form of the structure allows snow to easily roll down without lingering on the roof.
Single-pitch

Single-pitch
Shed: with a roof pitched to one side.
Gable

Gable
Gable roofs: their roofs are formed by two inclined slopes.
A-shaped

A-shaped
A-shaped: a type of gable; They have no walls, they consist only of slopes that are very elongated in height.
Drops

Drops
“Drops” (with a pointed roof): a combined version of an arched and gabled version; is considered the best option for areas with snowy winters - snow does not linger on such a roof; Such structures are less likely to be damaged during strong winds.
Wall mounted

Wall mounted
Wall-mounted greenhouses: allow you to significantly save materials during construction; they are built if the wall is well lit by the sun and is located on the south side.
Greenhouse made from window frames
Throwing away window frames remaining after renovation is a real crime for a gardener. After all, they can be used to make a full-fledged greenhouse. Indeed, why spend money on a ready-made store structure if you have excellent material at hand?

So, let's describe how to make a greenhouse from window frames for tomatoes:
Do you need a foundation?
The mass of a greenhouse made from window frames is significant, and without a foundation, the structure may become warped during the process of soil subsidence. Therefore, it is erected on a strip or brick foundation (you can use old brick). It is also possible to use foam blocks, columnar concrete foundations or metal piles.

In some cases, instead of a foundation, a double row of thick wooden blocks is laid in the ground. However, such a foundation is permissible only in the presence of dry sandy soils. But even in this case, it will last no more than 6-8 years.
It is advisable to use wood coniferous species– it doesn’t rot so quickly. The timber is pre-treated bitumen mastic and turns into roofing felt. Two rows of beams are connected with anchor bolts or wooden dowels. You can simply hammer pieces of reinforcement into the tree.
Strip foundation
Let us describe in detail the process of constructing a shallow strip foundation:
- The ground at the location of the future greenhouse is carefully leveled. The turf layer must be completely removed.
- The depth of the pit is 40-50 cm. It is also necessary to take into account the height of the sand and gravel cushion. It is poured in a layer of 20-30 cm.
- When pouring the foundation, anchor bolts are pre-installed into it, onto which wooden blocks will later be attached to hold heavy frames.
- On the bottom of the formwork before pouring it is better to lay a layer of old plastic film so that the soil does not draw water from the solution. The concrete will be more durable, and the film itself will act as waterproofing.
- The reinforcement can be replaced with layers of cheaper rubble stone. Broken brick It is undesirable to use it - in the ground in a few years it will simply collapse.
- The poured foundation must be covered with a damp cloth so that it dries more evenly. All further work begins no earlier than a week later, when the concrete has completely hardened.
The lower trim in the form of wooden blocks is laid on last stage building a foundation so that it can adhere to the concrete.
Frame assembly. Frame fastening

The frame must be strong enough to support the weight of the window frames:
- Using anchor bolts, which we installed in the concrete, we attach two rows of bars to the bottom wooden frame, between which the window frames will be inserted. The distance between them is equal to the width of the frames.
- We mount four corner posts from timber with a section of 15x15 cm or a metal corner.
- Next, vertical posts are placed at a distance equal to the width of the windows.
- To give the structure stability on the outside of the greenhouse, we prepare wooden supports that are dug into the ground and fastened to vertical support posts.
- If the frames have different sizes, you will need not two, but three rows of vertical strapping. The first is at the bottom (it is attached to the foundation grillage), the second is in the middle, the third is at the very top. For window frames of the same height, two trims are sufficient - top and bottom.
- To ensure ventilation, windows with vents are located at opposite ends of the greenhouse.
- The frames are fixed to the frame support posts with metal corners, metal plates and self-tapping screws.
- Fastening frames using metal plates is more convenient. It makes it possible to quickly repair or replace the frame if it breaks.
- When using window frames of the same size, frameless fastening is allowed. But such a connection will be less durable and may not withstand strong wind loads. It is preferable to use this option if the height of the greenhouse is small.
- At the top of the frame, they are connected to the frame in a similar way through a separate block.
- It is advisable to cover the roof with a lighter material, for example, several sheets of polycarbonate. Window frames are too heavy.
- For the roof, rafter joists are prepared, which are attached to the top frame. To do this, small recesses are cut out in it. At the top, the logs are attached to the ridge beam.

To protect the foundation from moisture (after all, the soil next to the greenhouse will always be wet), make a drainage trench around the perimeter of the greenhouse and fill it with crushed stone or gravel, and then fill it with concrete.
Polycarbonate greenhouse
Perhaps the best greenhouse option today for home use. It has minimal weight and does not require a powerful foundation - a 0.3-0.5 m deepening into the ground is sufficient. We described the types of foundations for a greenhouse a little higher.

Quite durable and easy to assemble, it is most popular today. The special structure of polycarbonate sheets with an air gap makes them excellent heat insulators. And from the outside, such a structure looks very aesthetically pleasing.
Frame assembly

Metal profiles or wooden blocks are used as a frame:
- The minimum cross-section of a metal profile for a standard greenhouse is 20x40 mm. It is better to use a stronger rectangular or square pipe. The thickness of the timber timber is from 50 mm. For small structures, it is possible to use a profile with a U-shaped section.
- Screw the frame to the bottom trim from wooden beam should only be done after complete assembly. It is better to assemble the greenhouse using self-tapping screws equipped with a press washer - their heads will cling less to the skin. For connection profile pipe You will need bolts and nuts with washers.
- When using welding, it is required additional protection seams from corrosion.
- Individual elements of the frame should not be immediately pulled together too tightly. The bolts are tightened until they stop only after adjusting and leveling the structure with a building level.
- First, the end parts of the frame are assembled, and then the side stiffeners are screwed on. The horizontal cross members are attached last.
- Don’t skimp on material – to get reliable design the distance between the stiffeners should be 50-75 cm.
- You can strengthen the frame using jibs - short slats attached at the corners.
How to bend a pipe
Arched structures or streamlined teardrop-shaped greenhouses are more practical. There is never too much snow accumulated on their roofs; it easily rolls down.

Pipes of only a small cross-section bend easily. With a profile height of 40 mm or more, bending them without preheating is problematic. This can only be done with a special profile bender.
If you don't have a device, you can do the following:
- To protect against bulging and cracks, the pipe is filled with dry sand through a funnel, and its ends are plugged with wooden plugs. On the sides of such plugs it is necessary to select small grooves for gas outlet.
- We clamp one end of the pipe in a vice.
- We insert a pipe of smaller diameter into the second end, which will serve as a lever (“shoulder”).
- If there is a weld in the metal, turn the pipe so that it is located on the side. Otherwise it may fall apart.
- Warming up the bend area blowtorch red hot For convenience, this place can be marked in advance with chalk.
- In order for the profile pipe to be located in the same plane after bending, without the formation of folds, the pipe must be bent in one smooth movement strictly in one direction.
- It is not recommended to heat the metal several times due to a decrease in its strength, but when creating an arch this does not always work. Sometimes you have to “afterburn” adjacent surfaces. But it is still necessary to reduce the amount of heating to a minimum.
You should not leave a half-assembled polycarbonate greenhouse. Due to the high windage of the material, strong gusts of wind can cause damage to the sheets. They must be fastened in calm weather.
Polycarbonate fastening

How to make a greenhouse from polycarbonate? To ensure that such a greenhouse lasts longer, adhere to the following rules when assembling it:
- The protective layer on which the inscriptions are applied must be located on the outside of the greenhouse.
- To get the maximum robust construction be sure (!) to pay attention to the location of the polycarbonate “honeycombs” - they should only go vertically, in inclined structures - parallel to the slope.
- When creating arches, keep in mind that polycarbonate sheets bend only in one direction - lengthwise, that is, along the line of the stiffeners.
- The joints of the sheets should be at the center of the frame post; the sheets are connected only in this way.
- This type of plastic is cut with a construction knife, jigsaw, or grinder. You can also use a hacksaw or a circular saw.
- To firmly connect the sheets to each other, special plastic profiles. Manufacturers do not recommend overlapping polycarbonate. In practice, when making a polycarbonate greenhouse with your own hands, it is not always possible to cut and fit the sheets perfectly. Some craftsmen even manage to do without connecting profiles, placing polycarbonate overlapping. The most important thing is that the joint must be in the center of the rack, and not sag in the air. Moreover, even with ideal installation, snow pressure can force the sheet out of the profile. In the case of overlap, this does not happen.
- It is not advisable to use a powerful drill for screwing in self-tapping screws - it will overtighten the fasteners and often slip off during operation. It is better to work with a regular screwdriver. Polycarbonate is drilled at low speeds with little effort. Next, turn off the tool, insert the screws and continue working.
- The distance between the screws to be screwed in is 25-70 cm. It all depends on the type of frame and the expected snow and wind load.
- When assembling polycarbonate structures, rivets are sometimes used instead of self-tapping screws. However, dismantling the greenhouse or replacing a damaged sheet in this case will be more difficult.
- When the temperature changes, plastic can change size. When making butt joints, a small space of a couple of millimeters is required to be left between the sheets - technological gap. Otherwise, cracks will form at the junction. For the same reason, the size of the holes for fasteners is made a little larger. To prevent the plastic from cracking, do not tighten them all the way.
- To compensate for expansion and protect against cold bridges, it is recommended to use special thermal washers for polycarbonate (screws are purchased separately). It is allowed to use EPDM roofing screws, equipped with a gasket or standard for metal with a rubber thermal washer, in which the threads have a small pitch.
The polycarbonate stiffeners are placed perpendicular to the ground so that moisture flows down. Otherwise, the water accumulated in the honeycombs will tear the sheets during frosts.
Read also:
- Making a greenhouse with your own hands from a profile pipe and polycarbonate: a complete description of the process, drawings with dimensions, watering and heating (Photo & Video)
Greenhouse made of plastic pipes
To create arched structures, they often use not a metal profile, but PVC pipes. After all, this plastic is quite durable - one single pipe can withstand a load weighing 500 kg. It is much easier to bend it into an arc than metal. Plus, users are attracted by the price of PVC products - assembling a greenhouse from it is quite inexpensive.

A serious disadvantage of such products is their lightness. A greenhouse with a frame made of polyvinyl pipes requires reliable fastening. Otherwise, with strong gusts of wind, the structure may collapse.
Materials and tools
How to make a greenhouse from pipes yourself? For this you will need:
- 2.5 mm water pipes PVC and connecting fittings - tees and crosses.
- Metal plates and galvanized screws are used to connect the frame to the wooden base.
- We will cut the pipes with a regular hacksaw for wood or metal with fine teeth.
- It's great if you have a special one in your house or your friends' house. welding machine for welding plastic pipes. But you can do without it - they can be connected to each other using glue.
How to bend plastic pipes
To bend PVC products, they must be heated. To do this, use hot sand, salt or a hair dryer. To begin with, you can practice on a small piece of pipe.

We tell you how to make an arched greenhouse at home:
- To warm up the arcs large diameter It is better to use a hairdryer - the sand will cool quickly.
- To create several arches of the same size, it is better to prepare a frame for them from wooden blocks.
- Warm up the pipe with a hairdryer.
- Smoothly bend it in one plane, trying to avoid any displacement along the axis.
- If you don’t have a hairdryer at hand, heat sand or salt on the stove.
- We insert a wooden plug into one end of the pipe.
- We take a funnel in our hands, insert it into the free end of the pipe, and add heated sand or salt.
- We close the pipe with a second plug.
- With a gentle movement we bend it into an arc.
Assembling a small greenhouse from PVC pipes
We will describe step by step how to make a greenhouse from PVC:
- To create a simple greenhouse for seedlings from PVC pipes, just assemble a rectangular base from boards and secure it along internal corners metal stakes or reinforcement stakes.
- In places where arches are installed, metal stakes are driven into the ground so that they rise above the ground by 0.3-0.4 m. The distance between the arches is 0.8-1 m.
- We put prepared arcs made of PVC pipes on the stakes. To strengthen the attachment point, we connect the pipes to the wooden base using metal strips and self-tapping screws.
- We strengthen the frame using horizontally located pipes. We fasten them together with self-tapping screws.
- The mini-greenhouse for seedlings is ready.
To reduce heat transfer, the greenhouse can be slightly deeper into the ground. For low-growing plants, half a meter will be enough. You shouldn’t go too deep into the ground, otherwise the plantings will end up in the shade.
Pipe connections with crosses and tees

Assembly using corners and crosses
Fastening with corners and crosses is more durable. This method allows you to create not only small arched, but also more massive full-fledged structures:
- For such a greenhouse you will need a base in the form of bricks dug into the ground to a depth of 0.3-0.5 m or two rows of wooden blocks.
- When covering a greenhouse with polyethylene, the distance between the frame posts is not of fundamental importance. If the greenhouse will be later sheathed with polycarbonate, it is better to use a distance that is a multiple of the width of the sheet so that it does not have to be cut. Standard size polycarbonate - 2.1x6 m. To create a greenhouse 6.3 m long you will need 3 sheets (multiply the number 2.1 by 3). When bending 6-meter sheets into an arc, the width of the greenhouse will be 3.8 m.
- First, it is assembled from pipes bottom harness, then vertical posts are attached to it.
- If you don’t have a pipe welding machine, we use special glue for PVC. We clean the joints with crosses or tees with sandpaper and coat them adhesive composition. It is necessary to cover 2/3 of the fitting with glue. We insert the pipe into the cross, turn it 90 degrees and wait a couple of minutes.
- Instead of glue, you can use self-tapping screws to connect the pipes to the fittings. In this case, the greenhouse will be collapsible.
- While creating gable roof reinforce it with additional stiffeners. Otherwise flexible pipes PVC simply will not withstand a lot of snow.
- The PVC frame is attached to the lower wooden frame only after complete assembly using metal plates and self-tapping screws.
- Doors can be hung using Velcro tape.

Preparing a butterfly greenhouse
- The frame for it is made from both profiles and PVC pipes. We described above how to bend metal and PVC pipes.
- First, we weld or bolt the pipes together to form a quadrangle. We attach two half-arcs to the end parts and attach the upper jumper between them.
- We assemble two “butterfly” wings from pipes and two half-arches.
- We prepare holes in the upper jumper for inserting hinge joints.
- We screw the lower part of the hinge to the “wings” of the butterfly. For the convenience of opening and closing such a sliding greenhouse, we attach handles to them (ordinary door handles will do).

Greenhouse-bread bin
Making a greenhouse-bread bin is not difficult. The principle of its creation is similar to the previous one. The only difference is in the method of fastening the sashes. If in the first case hinges are used, located on the upper horizontal jumper, then for a greenhouse-breadbox the hinge joints are located at the very bottom, on the sides of the frame. Since such a structure has a small height, any type of plant can be grown in it, except climbing ones.

Such a greenhouse can be easily moved to another location. It is better to strengthen a large greenhouse with horizontal guides. It would be better to make it collapsible so that, if necessary, it can be easily assembled and stored for the winter. To prevent such a structure from being torn out of the ground by the wind, it is installed on wooden blocks. To protect seedlings from drafts, soil is laid around the perimeter of the greenhouse and compacted well.
Greenhouse on the balcony
In early spring there is still little work to do in the garden. I don’t really want to travel long distances just to water seedlings every day. It is much wiser to make a mini-greenhouse on the balcony. It can also be used for growing the most different types colors. In warm weather, plants begin to be sown on the balcony in March-April. They can be grown on insulated loggias all year round.

Any materials can be used for production. After all, the balcony is already protected from the winds, so capital structures are not needed here. We described in detail the process of creating greenhouses from PVC pipes, metal profiles, wooden frames, and polycarbonate. When creating a greenhouse on the balcony, you can use any of the methods.
- The simplest greenhouse is racks attached to the main wall and covered with film or polycarbonate.
- You can install shelves on a narrow balcony.
- It will be inconvenient to maintain a structure more than 3 m high. The most common sizes of balcony mini-greenhouses are 2.8 x 0.8 m.
- You can attach the film to the frame with double-sided transparent tape.
- Don't forget about the correct arrangement of plants. In a small space they can shade each other. Place a pot with the most in the center big flower. Place smaller sprouts around the edges.
To illuminate plants, purchase LED lamp. She spends minimal energy.
The harvest of juicy vegetables will delight every farmer who has worked on the land. Greenhouses and greenhouses have long been used to protect plants, because no one is immune from frost or drought. The simplest and cheapest way to protect peppers in the garden is to install a greenhouse, created with your own hands, or a purchased structure.
The simplicity of the design allows you to make your own greenhouse from scrap materials with a small purchase from hardware store. The complexity and high cost depend only on the selected materials and the personal wishes of the farmer.
The main difference from a greenhouse is that the design does not provide a large internal space, additional heating and the presence of a person there. All work with plants is carried out outside, and therefore it is the cheapest and best option for a summer house or garden.
Advantages and disadvantages of a homemade greenhouse
The main feature is that there is no need for construction education - everything is simple and cheap. Using improvised means, you can save a lot of money in purchasing materials, which cannot be said about ready-made models from the store. The dimensions, shape and design features depend only on the wishes of the builder. Disadvantages in homemade greenhouses can appear only for two reasons:
- Poor quality materials.
- Errors in design.

But all this can be prevented at the stage of planning and purchasing materials.
Types of greenhouses
The design depends on the selected material and installation features. Here are commonly used constructions:
- On the foundation.
- With walls.
- Arc-shaped tunnel greenhouse.
- Frame.
On the foundation

The structure is installed on the foundation, built above the surface or underground with a recess of 10 - 15 cm. The structure in the form of walls is constructed from bricks bonded cement mortar. Also, beams of various sections and lengths are used for the foundation.
With walls

A rectangular box is created from timber, boards and installed on the foundation or on the ground. The top is closed with a frame made of slats in the form of one or gable roof . The frame is hermetically sealed with film, polycarbonate sheets or with inserted glass. So that the sun fully illuminates the plants, pitched roof make at an angle towards the south.
Arc-shaped tunnel greenhouse

Portable design with a light frame. It is possible to dismantle before winter and reinstall in the spring. Consists of wires bent into an arc, wooden rods or polypropylene pipes . Placed in increments of 50 - 60 cm and fixed on wooden frame. 4 rows of peppers should be planted between the arches. The top is hermetically sealed with a film of different densities. The structure is secured to the ground with pegs, rope loops or heavy objects. The arches can be connected to each other with wire or a frame to increase rigidity.
Frame

Structures made of slatted frames, covered with film or polycarbonate sheets. The base for the frame is assembled in the shape of a box or house from timber or boards.
How to make a greenhouse for peppers with your own hands
Building a greenhouse for peppers yourself does not require much work. The work can be divided into several stages:
- Search for installation location.
- Purchase of necessary materials.
- Design planning.
- Assembly stage.
Installation location

Heating and lighting from the sun play important role in the growth of peppers, because When choosing an installation location, several generally accepted requirements must be taken into account. Maximum access sunlight to the plants will take place in an open, unshaded area with the greenhouse oriented east - west and opening it on the south side.
Trees and agricultural structures are permitted on the north side only. We choose clean and as fertile soil as possible. It is better to avoid low relief and slopes.

Necessary materials
For a greenhouse with walls you need:
- Board selected to your size.
- Beam for foundation 150x150.
- Beam for frame 50x50mm.
- Self-tapping screws with anti-corrosion coating.
- To choose from: wooden slats or metal profile, corners, fittings, PVC pipes.
- Polycarbonate sheets or film.
- Simple door hinges.
- Silicone for sealing seams and adhesive tape.
- Antiseptic for wooden parts.
If the household has old windows, then you can save on slats and metal profiles. Instead of building a cover, old windows with glass or frames covered with film are often used.
Design
Boards with a height of:
- Side walls– 250 mm and 200 mm at the ends (the shape is similar to an elongated trapezoid).
- Front wall– 200 mm at both ends.
- Back wall– 250 mm at both ends.

It is necessary to create a slope towards the south to achieve maximum sunlight. The optimal angle of inclination is achieved by a difference in wall height of 5 - 10 cm with a box height of 20 - 30 cm. If windows are installed instead of a cover, the dimensions of the structure are adjusted to fit the windows. The width of a one-sided structure is best measured in the working position - arm length plus 10cm.
The lid is assembled from metal profiles, wooden slats or old windows. The frame is covered with polycarbonate, glass or covered with film. It is advisable to lubricate all seams silicone sealant . The lid and frame are connected by simple door hinges. The main feature of the shelter is its full opening ability for warming up in warm weather and working with plants.
Assembly principle
Before assembling a greenhouse with walls on a foundation, you need to level and compact the installation location of the box. This work is carried out using building level and a stretched rope. Next, install a foundation made of timber or brickwork under level. The boards are tightly fixed to the base with nails or self-tapping screws, and the seams are additionally lubricated with sealant.

The frame for the lid is assembled slightly wider than the box to protect it from heavy rains. The places where the film or polycarbonate is fixed are lubricated with sealant or sealed with adhesive tape.
The frame and the box are connected with hinges from the north side so that the lid can be completely opened. All purchased materials can be replaced with what you have at home and save a lot of money.
Conclusion
Building a greenhouse with your own hands will not take much time and effort, but future harvest will be preserved in all weather conditions. The simplicity and low cost of the design allows you to install a greenhouse in any garden or summer cottage.
Having even a small plot of land, it is difficult to do without a greenhouse. Grow seedlings, get an early harvest, protect them from possible frost, from heat, make the plants bloom earlier - all this can be done with the help of this device. Moreover, making a greenhouse with your own hands is not difficult. There are absolutely simple designs, there are more complex ones, but making any of them does not require special education.
The frame for a greenhouse can be made of wood (boards), metal (angle, profile pipe or fittings) or PVC pipes (round or square). Cover the greenhouse with the same materials as : film, spunbond (also called agrofibre or non-woven covering material), polycarbonate and glass. Since the size of greenhouses is smaller (plants in greenhouses are maintained from the outside), the requirements for them are not so stringent: even strong winds are not afraid of them.
Greenhouse sizes
Since in a greenhouse the plants are served from the outside, its width is chosen so that it is comfortable for you to process plants planted closer to the middle. You determine this experimentally: sit down and try to reach some area with your hand. Measure the distance. You get the width of the greenhouse with a one-sided approach. This is if the greenhouse is located in such a way that it is impossible to get to it from the other side (near a wall, for example). If you can approach from both sides, you double this result.

The distance is different for each person: height and physical condition affect. You should not chase savings by making it wider than necessary. You will have to spend a lot of time weeding, loosening, fertilizing, and other work. A couple of hours in an uncomfortable position, and there is no strength left. Therefore, it is better to make the greenhouse a little narrower, but to make it convenient to work: while enjoying your work, you spend less effort.
And the length of the greenhouse is chosen based on the layout of the site. It's arbitrary.
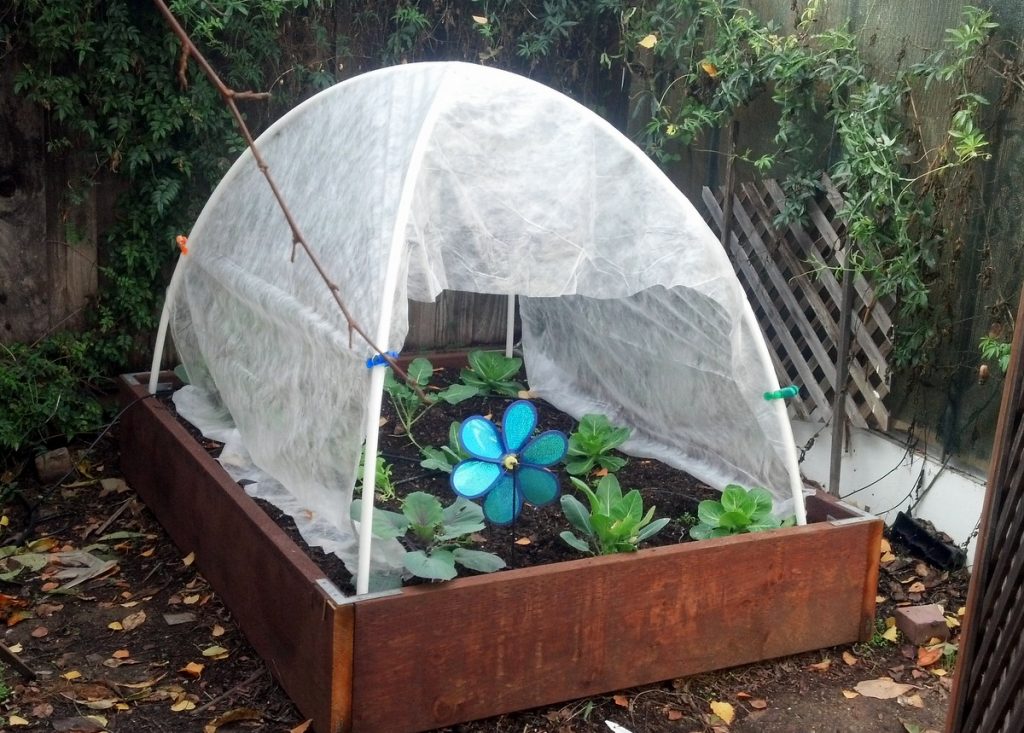
A simple greenhouse made of arcs under film or spunbond
This greenhouse is made of several boards, knocked down to the required dimensions, arcs of PVC pipes, which are attached to wooden base. The tops of these arcs are connected at the top by a beam or the same pipe. If it is a timber, it needs to be well processed, rounding the edges so that the film does not tear.

How to secure the arches
How to attach arcs of PVC pipes to a greenhouse frame. They are most often secured using metal perforated tape. Take a small piece of it about 5-6 centimeters, screws and a screwdriver. And they are secured on both sides. To be on the safe side, you can do it twice.

In exactly the same way, you can fasten them from the inside to hold them tighter by adding bars.

Another option: drive in pieces of reinforcement near the frame, place pipes on them and only then secure them with clamps to the frame boards. This option is more reliable.
How to attach the film
You can attach the film to PVC pipes using double-sided tape. But only if inexpensive polyethylene film was used: it is impossible to tear it off without damaging it, and polyethylene lasts no more than a year. So for a seasonal greenhouse this is a “cheap and cheerful” option. The second method is special clips for fixing films and anything that can replace them - a piece of an old hose cut lengthwise, a clamp for pipes that are used for installing pipelines, office binders, etc.

It also makes sense to secure a block on both sides along the edges of the film. To do this, the film is cut to a length greater than necessary, a block is wrapped in the excess and the film is secured to it. Now you have a piece of film with bars attached to its short sides. Leave one on one side, throw the second on the other. Now you don’t need to press the film to the ground with stones: the block holds it well. It is also convenient to open the greenhouse for ventilation; wrap the film and place it on top.

You can use small nails to attach the film, but place washers under the caps. Work faster construction stapler with staples. To prevent the film from tearing at the attachment points, it is padded with something. You can use thick braid or just a strip of fabric, and hammer fasteners into it.

More powerful option
If there is a need to make a greenhouse with PVC arches more reliable, nail it to the base of the boards in the center of the short side wooden racks. A board is attached to them on the edge, in which holes are pre-drilled with a diameter larger than the outer diameter of the pipes.

During installation, the pipe is threaded through the hole. You can fasten it on the sides as suggested above, or you can do it another way: first install pins in the bars and put the pipe on them.

The simplest greenhouse
The good thing about PVC pipes is that they are easy to bend. Also because they weigh little. Perfect option for a lightweight, portable greenhouse, especially if combined with spunbond. This material can be sewn. Take a piece with a density of 30 kg/m2 and make drawstrings in it in increments of 50-60 cm. For the drawstring, stitch across a strip of the same material about 10 cm wide (it is stitched on both sides). Insert pipes cut into the required lengths inside.

Now all this can be installed on the bed: stick pegs in two rows on one side and the other of the bed, and place a pipe on them. You immediately get a ready-made greenhouse. And what’s more convenient: you open and close the plants simply by collecting or straightening the spunbond on the arc. This is a very convenient temporary greenhouse: as soon as it is not needed, it can be removed and folded in a couple of minutes.

Greenhouse - it couldn't be simpler
This greenhouse is good for seedlings, but you can make it for peppers and eggplants. A stand is nailed in the middle of the base. There are two inclined boards attached to it. The cross section results in a triangle. If you need a long greenhouse, the same structure is installed approximately every meter. All tops are connected with a long bar or pipe. This greenhouse has a simple and convenient design.
Cucumbers are grown with it only until they begin to curl. Under the cucumbers, the covering material is removed, posts are nailed (screwed) to the sides, and twine is pulled between them.


Greenhouse “Breadbox” and “Butterfly” - photo
This design is called a “bread box” because it looks exactly like a plastic bread container. Its lid also rises upward, hiding behind the second half. If you look at the photo, you will understand everything.

There are two types of such products: opening on one or both sides. If it is shallow, you can work with a lid that opens on one side. If the width is more than a meter, it will be easier to work if there is access from both sides. This design with two opening sides has its own name: “Snail”.
A film or spunbond is stretched over the manufactured frame, but polycarbonate is more popular for this design.
The second design differs in the type of door opening. Its vault is also made on arches, but opens on hinges upward (see picture).

They can be installed directly on the ground or on a prepared foundation made of bricks or timber. In some cases, the lids do not open immediately from the ground, but there is a small side of 15-20 cm.
From scrap materials
Turning unnecessary things into useful products - our people have no equal in this. They make greenhouses from things you would never even think of.
For example, you can easily make a greenhouse with your own hands from old window frames. When replacing windows, do not rush to throw them away. They can be used to make an excellent greenhouse. Moreover, the designs may be different. The simplest is a body made of boards, to which a lid is attached on top. window frame(with glass, of course).

To ensure that the plants receive maximum light, one side of the frame is made higher (which faces south or east). There are different frames, any of them can be used for these purposes. As proof, here is a photo gallery of greenhouses made from frames that were made with their own hands by zealous owners.
They make greenhouses out of barrels. Cover with an old umbrella made of transparent film or cut-off plastic canisters for water.


A homemade greenhouse can be made from a plastic or foam box. Although “do” is a strong word. All you need to do is stretch the film.


Mini-greenhouses for seedlings
For those who grow seedlings for their own vegetable garden or flower garden, large volumes are useless. We need small greenhouses. Moreover, many grow seedlings on balconies. All of the above designs can be used for a balcony in reduced sizes. For very small plantings, you can even take plastic egg trays. On one side there will be a container for soil and a lid instead of a shelter. Look at the photos for other ideas.
 Usage plastic bottles already familiar, only the form is non-standard. The bottle is only cut and a glass with seedlings is inserted inside, or you can plant it directly in the lower part... And this is a portable mini-greenhouse for plants
You can assemble a greenhouse with your own hands in a few hours. None complex structures no need to build. Everything is very simple, economical and practical.


