Hi all! Tell me, when you give your baby a toy, do you think about where it will live? Believe me, the baby is definitely thinking about this. And all because he projects his life onto them. He plays during the day, just like a toy, but evening comes and the little one has to go to bed. What about his ward? What to do with it? To give your child pleasure, continue playing and teach your little one to be orderly, let's find out today how to make a doll house out of a box with your own hands.
Preparing to create an apartment for a doll
Before you start working, decide what exactly you will create. The box itself already has “walls”. All that remains is to make them look like their place of residence. The size of the house can be different: it can be two-story or one-story, with one or several rooms; furnished with homemade or purchased furniture.
What materials and tools will be needed for the work:
- Cardboard boxes;
- Glue;
- Colored paper;
- Scissors;
- Pencil;
- Ruler.
When everything you need is collected, you can start tinkering.
First house
I recommend practicing on small house from one room. Then it’s not such a shame to throw it away, and the children quickly get bored with everything. Look how cute and cozy they are, even though they are small. Pictures enlarge by clicking.


But what a cute little house, even without wallpaper it already looks decent, but what if you hang curtains, throw in a couple of pillows, and lay down a carpet? By the way, the easiest way to make a carpet and pillows is from felt. And you don't have to sew! You can simply glue the felt with a moment or a hot gun.


As soon as you get bored, you can build either a castle or a country villa. You already have experience, your hand is full.


“Building” a house
From me detailed master class with photo. Hope it helps you!


The little one's help will depend entirely on how interested the parents are and involved them in the process. Therefore, show your creative processes, prepare with a fairy tale or interesting story your baby. Assign him a certain task or ask him for advice on a craft.
Furniture
Of course, dolls simply need furniture! And playing with an empty house is not interesting. What can you think of?
Bedroom furniture
Bedroom furniture can be made from paper using the origami technique, glued from cardboard and laid out, but the most comfortable and nice option — cushioned furniture made of cardboard, foam rubber and fabric. You can glue everything using regular PVA, although it will take a long time to dry. Instead of foam rubber, you can take padding polyester or batting, for extreme case cotton wool
Bed MK

Step-by-step photos of production - enlarge when clicked:


Armchairs
Photos enlarge by click


Kitchen
The kitchen can be filled with a refrigerator, stove, countertop, beautiful chandelier And dining table. Cardboard and ice cream sticks are also suitable materials.
If you have a 3D pen, you can make furniture out of plastic.
Cardboard plate

Lockers
Cabinets, shelves, and a refrigerator are simply made from cardboard. Easy to glue with hot glue.


Furniture for kitchen
Furniture - chairs, a table - very beautiful ones made from ice cream sticks. You can cut such sticks with large scissors, but be careful, they can crack in half. You can glue with instant or hot glue.


Little things for the kitchen
You can put a bird in a cage in the kitchen, or put a box of fruit or flowers. Detailed master classes on the picture. Enlarge on click.


Fruits, vegetables, dishes
Fruits, vegetables, dishes are the easiest make from plasticine. To prevent the product from getting dirty and losing its shape, it is coated with transparent nail polish.
You can make vegetables from salt dough - they dry out and look like they came from a toy store. From play to They also sculpt food, but after it dries, the playdo cracks. That's why I prefer to do salty dough: 1 cup flour + 1 cup fine salt + water, knead a very stiff dough.
Also very a good option — air self-hardening plasticine (new material). It is cheap, bright, and when it hardens it is elastic, somewhat similar to hard rubber. We sculpt as from ordinary plasticine and leave to dry overnight.
Interesting ideas for a dollhouse
Some toys already come with a house, for example, for Lol dolls it is simply fabulous. You can copy some ideas from it. For example, the fact that the apartment is not limited only by the area of individual rooms, and the lower floor usually protrudes. Or you can even make a courtyard in front of the house with a sun lounger and flowers.


Another one interesting idea- bag house. This option is especially convenient when you are planning a trip with kids. You just need to attach a handle and “shutter doors” that close the house, and the mobile version is ready. 
If you like to sew, then perfect option soft bag house made of fabric.


And one moment. Did you think that your craft is just the beginning? Over time, more and more rooms may appear in which other toys will live.
Create, make your baby happy and be surprised at how talented your little one is! I hope you enjoy spending time with your child and can develop your friendship with him. I suggest you become friends with our site so that you can always be aware of the latest articles! Subscribe and receive messages about what you can read on the site. Don't forget to tell your friends what you learn.
Until next time. Bye bye!
Just like boys dream of a tree house, girls also dream of a dollhouse for their favorite toys. Of course, you can buy it, but a good house costs very indecent money, and you can’t buy a bad one for a child. It's another thing to do it yourself, but be prepared for it to take a lot of time. Especially if you don't have much experience. On average, it will take at least a week to make a doll house with your own hands.
Choosing material
You can make a doll house with your own hands from any sheet building material. The thickness of the material for a house about a meter high (on two floors) is 9-15 mm, for one-story houses it can be thinner. Let's look at the most common materials used in the construction of a dollhouse:
- . An excellent choice, as it is durable, holds its shape well, can be glued, connected using nails and self-tapping screws. Cut plywood with a metal saw (with small tooth), jigsaw (manual or electric). The ends will need to be sanded well so that there is no possibility of driving in a splinter. Upon completion of the work, you can varnish or stain, paint, wallpaper, etc.
- Drywall. After the repair, there are scraps left that can be used. To fasten the sheets together you will need tin corners (you can use a perforated corner). You will have to attach it to special screws, but they will stick out from the back, so this is not the best option. You can try to “plant” it with glue, but you will have to align the cut lines to reduce glue consumption.

Dollhouse IR from plasterboard - one of possible options
- . The properties of the material are similar to plywood, the only difference being that it is moisture resistant and made from wood chips. Working with it is approximately the same as with plywood.

OSB is also a good material
- Cardboard. The most inexpensive and most delicate material that does not hold loads very well. The situation is better with cardboard for scrapbooking (you can buy it in craft stores). It is denser and more durable; it can be made into one-story houses or used for roofing. Connect using glue or staples from a stapler. To make the dollhouse more reliable, it is better to assemble a frame from planks and then cover it with cardboard.

- Chipboard: regular or laminated (). The advantage of this material is that it can already be finishing. If you wish, you can order sawing of the entire “box” of the house with gluing of the edges from some furniture company. Then all that remains is to assemble. Moreover, it will be possible to use self-tapping screws or furniture fittings. There are three disadvantages - the material is too thick, which increases weight, formaldehyde emissions and fragility under lateral loads. If you can put up with the thickness and weight, then the release of formaldehyde should not be ignored. You need to look for ones with emission class E0-E1. Unfortunately, there is nothing you can do about fragility. Unless you use corners to connect parts, and this is not very beautiful.

- Furniture panels. They are made from wooden planks glued together using wood glue. An ideal option for making a dollhouse: environmentally friendly, durable, easy to process. But furniture panels You can’t call them cheap, although they are not as expensive as an array. In any case, it can be used to make a box - the bottom, side walls and ceiling. roof and back wall can be made from other materials (for example, fiberboard, plastic, etc.).

Furniture board is an environmentally friendly and beautiful material
There are also options such as laminate, wooden lining, thin planed board. But they don't work with them that often. In any case, the minimum thickness of materials is 6-7 mm. Then the dollhouse will be reliable and will even support your child.
Features of working with plywood
Most often, plywood is used to make a dollhouse. As you probably know, it can come in different brands. It is better to make a dollhouse with your own hands from sanded furniture plywood. Can I have them? coniferous species, but preferably from birch. It’s better not to take a construction one, even though it costs twice as much.
In general, working with plywood is not difficult. If you have a jigsaw and a jigsaw, cutting and preparing the parts will take a couple of hours. The only difficulty that may arise when making a two-story plywood doll house is the installation of the second floor ceiling. T-fastening plywood is not the easiest task.

The glue is not very reliable, and trying to install screw-type fasteners into the end with a thickness of 6 mm is difficult - the material can split, even with pre-drilled holes (the thinnest self-tapping screw is 1.8 mm). There are several options:
- do it on nails (not very reliable, unless you coat it with additional glue);
- install corners at the bottom (not very nice);
- install a bead around the perimeter that will both support the floor and “work” ceiling plinth(the best option).
After cutting out the parts, all joints must be sanded well. First, use medium-grain wood sandpaper and gradually move on to fine sandpaper. Once the edge is smooth, you can begin assembly.
Dollhouse project
The first thing to start building a dollhouse is creating a project. You need to decide on the height and number of floors, the width of the room, the type of roof, and whether or not there will be a basement floor. Choose the number of floors as desired. This is arbitrary, but all other parameters must be calculated.
The size of the dollhouse depends on the size of the doll inhabitants. To make playing comfortable, the height of the ceilings in the rooms must be at least twice the height of the doll. For example, with a doll height of 22 cm, ceilings of 40-45 cm will provide enough space for them to move freely, but if the ceilings are even higher, it will be even more convenient to play. But you also need to take into account the child’s growth. The height of the topmost ceiling should be slightly below eye level. In this case, it will be convenient to play, and the dollhouse will be “growth-able” - its height will be enough for a couple of years.
The depth of doll rooms also depends on the height of the dolls, but also on the availability of free space. On average, the depth is 30-45 cm. This is enough to accommodate the entire furnishings. But it could be deeper.

The width of the dollhouse depends on the number of rooms in it. Here you decide depending on the available free space. In shape, the frame of a doll's house usually looks like a rectangle, but whether it is extended in length or in height - this is determined by each person. If the structure turns out to be rather large, you can attach furniture wheels to the bottom. This is very convenient - the toy turns out to be mobile.
You can draw the project itself in any design program, but if you don’t own them, it’s easier to do it on paper. Why do you need a dollhouse project? To calculate the amount of materials required for its manufacture, and without the dimensions and number of walls, you will definitely be mistaken.
Finishing features
Decorating a dollhouse with your own hands raises no less questions than building it. In principle, you can use the same finishing methods as in apartments or houses. For example, in doll rooms, walls can be decorated in the following ways:

If you have chosen the option to “hang wallpaper”, it is easier to do this before the assembly stage. Even if there are several floors, the blanks are drawn out and wallpaper is glued. This is much easier than trying to cover the corners later.
The exterior decoration is not much different. Painting is most often used. This best option in terms of practicality and labor costs. If you want you can do something similar to decorative plaster. It can be imitated using gray toilet paper. You just need to choose thicker. It is torn into pieces, glued with PVA diluted with water (1 to 1), laid out on the walls, forming the desired relief. After drying, you can paint using acrylic paints. This and it can be used with colored or regular napkins.
Window and door decoration
Cutting windows in plywood, OSB, or any other material is not such a problem. First, using a drill and a drill bit, make a hole into which you can pass the saw blade. Next is a matter of technology. The cut hole is sanded until it is smooth, and then it is necessary to make the holes look like windows. For this you need frames and curtains. If desired, you can also make glass from transparent plastic bottles.

Frames with bindings can be made from cardboard white. Paste them after completion " finishing works" Children love to open/close doors, so it’s better to make them from thin plywood. Fasteners can be found - there are piano hinges or small furniture hinges. You can make deadbolts from wire and thin tubes.
Let there be light!
A house for dolls with lighting is aerobatics. Moreover, there is no need to fence the system with wires, converters, light bulbs and other electrical “stuffing”. There is a very simple and effective solution. Any more or less large lighting equipment store has small LED bulbs, battery operated. Moreover, they are mounted with Velcro. Each lamp is equipped with its own switch and operates on a voltage of several volts. In general, a very good solution.

These are non-volatile LED lamps
If you still want to make real light in a dollhouse, you need a 220/12 V converter or a battery with the appropriate voltage. You will also need light bulbs or LED Strip Light under the appropriate rating, a bunch of wires. In general, this path is much more difficult and requires much more time, but it is also a possible option.
How to make a roof
If the roof is planned to be ordinary - gable, the layout of the attic space or attic floor it is necessary to make sure that there is a partition in the center that will support the roof at the junction of the two halves of the roof. This is the easiest way. There are also more complex ones.

If you need a roof of a complex shape, we cut out several rafters from plywood that will define the shape. We attach them to the walls and cover them with some flexible material. It can be cardboard, fiberboard. The ends of the rafters are coated with glue (preferably carpentry glue), after which the material is laid. If the bend is too steep, additional fasteners may be needed. Usually thin small nails, like shoe nails, are used.
Photo options of different doll houses
Building a doll house is a creative process. You can make it the way you dream of your home, or recreate a house from a fairy tale or fantasy. And there are no restrictions here. Everything you want and how you want.


A one-story house is not so bad either. But you can put it on the table and play while sitting


So different…


This is how to make shutters

A happy childhood is a complete interesting toys room. The Soviet shortage has been replaced by variety and a wide range, so every child can find a toy to their liking. Girls especially love dollhouses: large or compact, furnished or empty, fairytale castles or realistic homes.
Purchased houses for dolls are always beautiful, often of high quality, but often expensive. Loving parents have a great chance to save a little and at the same time give their baby a unique toy.

Making a dollhouse with your own hands is not so difficult, because on the Internet you can find dozens of master classes, tips and recommendations for making such a structure from any material. You just need to choose the option that suits you and put in a little effort.

Dollhouses for children: we make them ourselves
The uniqueness of do-it-yourself dollhouses lies not only in their originality, but also in the opportunity to become closer with your child. It is better to make such a structure together with the baby: ask for her opinion, draw a house plan together, choose furniture, arrange the home like a real one. According to the general opinion of psychologists, such joint activity will benefit both parents and child.

Making a house for a doll is not difficult, and the child will be impressed for the whole year. You can show off a doll house made by your parents to your friends, and it’s also much more interesting to play with.

A classic dollhouse does not have a front wall to make it more convenient for a child to play with the dolls located in it. A homemade house can be different: without a wall, with a curtain simulating a wall, or with a real opening wall.

The choice of one option or another depends on the size of the house and the room in which the toy will be placed, the age of the baby and design features the building itself. Wooden or cardboard houses can be equipped with a spectacular closing wall, but a fabric dwelling is traditionally made open.

Dimensions of the future doll house also depend on a number of factors. You should take into account the age of the baby who will play with dolls: small children find it difficult to use bulky products, while older children love large toys with a lot of parts.

Be sure to consider the size of the children's room or the room in which the toy will be placed. A massive house may turn out to be too bulky, it will get in the way and eventually end up on the balcony.

Little dollhouse in a box
A compact toy is an ideal option that is not too troublesome or time-consuming to make, it does not take up much space, and playing with such a doll house is no less interesting.

Big doll house
Houses for dolls made of different materials
Doll houses are made from everything from wood to cardboard folders. The breadth of possibilities gives parents the chance to create a unique, original product for their baby that will take into account the interests and preferences of a particular child.

Compact soft houses made of fabric are more suitable for kids, light cardboard houses for children 3-6 years old, and solid buildings made of plywood or old furniture for younger schoolchildren.

But it's not enough to do beautiful house– you also need to furnish it: decorate the walls and floor, arrange furniture, add accessories, place dolls. A self-made doll house is a constant creativity: searching for new solutions, adding original details and settling in new residents who need new rooms and additional furniture.

Psychologists advise using the creation and arrangement of such a doll house as an ideal means of communication with a child, because during the game you can find common ground and better understand each other.

From cardboard boxes
Houses made of plywood, laminate, wood
There are many requirements for a dollhouse: the child needs a bright and interesting product, mom cares about the environmental friendliness of the toy, and dad cares about the strength of the structure. It is unreliability that is the main problem of purchased doll houses, which do not always withstand the active play of active children.

Dollhouse made of wood
Making a house for dolls from laminate or plywood means getting an original, creative and durable housing option for all the baby’s dolls.

Designer house made of plywood
ADVICE. A house made with high quality according to plans found on the Internet with neat finishing will look no worse than a purchased one. And its uniqueness and unusual details will make such a toy a reason for pride.

Toy house house made of laminate
To make durable and beautiful house for dolls, laminate or plywood (at least 7 mm thick) is cut according to pre-prepared patterns and securely fastened with inconspicuous corners and small nails, then glued with wood glue to ensure the strength of the entire structure.

The glue will also help eliminate any crevices that may look unattractive and become a place of loss. small parts toys. After the body of the house is assembled, you can begin finishing: the ideal option for walls, floors and ceilings is self-adhesive film.

Plywood doll houses
Dozens of available colors and textures make it possible to create a dream house in any style. Such a house is very durable, so it can withstand not only light cardboard or plastic furniture, but also more reliable wooden parts.

Houses made of boxes or cardboard
An ideal option for joint creativity is to create a dollhouse from cardboard boxes. It can be any size: tiny figures will feel comfortable in a shoe box, larger dolls will need a vacuum cleaner box, and if you want a doll mansion, look for a shoe box. washing machine or refrigerator.

House for dolls made from boxes
ADVICE. Big house can be made not from one, but from several small boxes, carefully fastened together. Such a structure can have several floors and rooms, a spacious attic and even a basement.

Cardboard dollhouse
Work with the box begins with removing one of the walls, as well as installing partitions between the rooms. The hollow box becomes a blank for the future home: the walls, floor and ceiling are decorated with paper, and plastic furniture that the house can support can be placed in the rooms.

Such a home for dolls is attractive due to its light weight, so moving it to another room or taking it outside in the summer is not difficult at all.

In addition, such a dollhouse is easy to renovate: just buy a few sheets of designer paper and it’s ready. new interior. Usually such construction is so exciting that adults and children begin making furniture and decor for dolls without stopping.

You can make a house not only from ready-made boxes, but also from sheet cardboard: you will need patterns, glue, scissors and colored paper, as well as imagination and the desire to turn boring brown cardboard into a real fairy-tale castle.


DIY dollhouses made from cardboard boxes
Plasterboard houses
It’s easiest to make a doll house when the apartment is undergoing renovation. Great amount building materials allows without special costs build a very attractive home for dolls of any size.

At the same time, the doll house will resemble a smaller copy of the apartment, because to decorate it you can use the remains of real wallpaper, laminate, linoleum and even tiles.

To make a full-fledged house from plasterboard you will need a diagram of the parts and the material itself. Carefully cut drywall is connected with small corners, and then the walls are puttied and painted (or wallpapered). Such a house looks like a real one, especially if you follow the layout of the rooms, as in a real home.

Houses made from old furniture
You can make an excellent dollhouse for your child from old furniture that has been collecting dust in the garage or on the balcony for a long time. Old chest of drawers, detail kitchen set or part bookcase after simple transformations it can turn into an attractive and interesting house for dolls.

ADVICE. A significant advantage of such a house is its size, which makes it possible to use large toys, as well as the presence of doors: all the dolls will sit in the closet, and the room will be in perfect order.

To turn an old cabinet into a stylish toy, you will need the help of your dad or grandfather, because you will need to cut out windows with a jigsaw, rearrange shelves, or change the configuration of the contents of the cabinet by adding partitions. For maximum comfort for a playing child, all surfaces are covered with a thin layer of putty, which also allows the house to look more attractive.

Final finishing finished house entrusted to the mother, who together with the baby chooses wallpaper for all rooms, floor coverings, furniture and decor. The walls of the house can be simply painted, or covered with wallpaper, colored or wrapping paper.

In the interior of such a doll house, ready-made or self-made furniture looks great: cabinets made from boxes, sofas made from juice bags, shelving made from cardboard and a bathtub made from a soap dish.


Houses made of fabric or stationery folders
Fabric dollhouses are great option for kids 2-5 years old. At this age, a child needs educational and safe toys, and a home for fabric dolls is absolutely safe. A fabric house can be of two types: hanging option with folding shelves or a handbag house that folds out into a full-fledged home. Both options look decent and deserve attention.


Fabric houses
The fabric house is mounted on the wall and does not take up space when folded, so it is chosen for small children's rooms or small apartments.

Playhouse made from a paper folder
Even a beginner can sew such a house:
- you need to make a dense back wall with a thematic pattern,
- provide space for future shelf rooms,
- sew the “floor of the room” and place cardboard inside,
- sew the improvised floor with one edge to the base and secure it with ribbons or ribbons in a horizontal position,
- pick up light furniture, soft dolls and populate the house.

Sewing a house for dolls in the shape of a handbag is a little more difficult: for this you will need a diagram of the parts, colorful fabric, filler for walls, decor for decoration and the ability to work with sewing machine or with a hand needle.

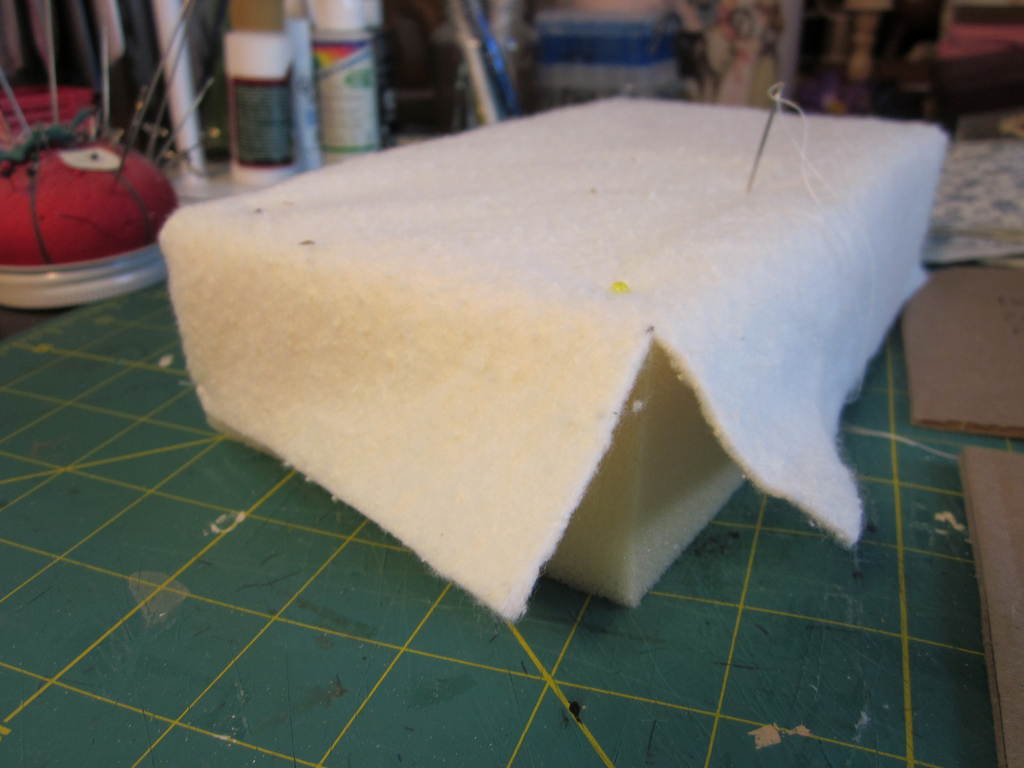
Since the walls of such a house must be solid, the role of the base is played by a plastic mesh or cardboard, which should be wrapped soft material(with cotton wool, thin foam rubber or sheet synthetic padding), and then cover it with the selected fabric. The walls of the house can be decorated with ribbons, buttons, applique, embroidery - making the toy interesting for a child of any age.

A slightly easier way to create a fun home is to use stationery folders as the base of the home. Such a home for dolls resembles a book with bright pictures that can become a platform for active children's games.

It’s easy to make such a toy: glue the inside of the folder beautiful paper imitating wallpaper, furniture is glued on top - and the room is ready. 3-4 vertically standing folders already look like real home, in which you can put dolls.
Any doll house that parents can make for their baby will be an original creation, suitable for the child’s play and development. Large or compact, durable or soft, fabulous or realistic, such a house is an excellent gift for your daughter or son for any occasion.
DIY doll house: drawings with dimensions


Andrey Vogachev talked about how to make it yourself. He noticed that his daughter was enthusiastically playing with houses the size of a cardboard shoe box. The idea arose to do something solid. Searching the stores didn't turn up anything worthwhile, they were either very small or too expensive. I thought it wouldn't work a lot of work do it yourself. After searching on the Internet, I found decent sizes, from which I subsequently plan to make a house.
In the drawing, the cutting markings are marked with red lines on how to cut plywood in the store. Please note that the more accurately you can mark and cut in the store, the less time it will take later. The shop cut it very accurately, while doing it yourself can introduce some flaws.
Drawing of a doll's house

Plywood dimensions 1.5 x 1.5 m. Weight 16 kg. Total area 2.3 square meters. Sanded plywood.


After cutting, all the parts began to form a smaller volume. White paint for facades. Small carnations. Glue and brush.
Markup process
All parts need to be trimmed. It's a small matter. Drill holes and cut out parts of the balcony. Continue from 5 minutes.
Every girl dreams that her favorite Barbie doll has a beautiful and cozy home. Of course, you can buy it in a store, but the price is often not encouraging. We suggest you make a house with your own hands. You can easily cope with this, and your daughter will be only too happy to help. In addition, for its construction you can use almost everything that is at hand!
Materials and tools
Whatever model of house you choose, during construction and finishing you may need the following tools:
- glue “Moment” or PVA, depending on the material;
- scotch;
- scissors;
- paints and brushes;
- colored paper or anything that can replace it (stickers, wallpaper, pictures);
- ruler or tape measure for measurements.
For interior decoration, scraps of fabric, fur or leather, beads and beads, bamboo sticks and whatever your imagination tells you will be useful. But the main question is what to make the walls of the house from. It turns out that there are a huge number of options here too. you can use carton boxes, scraps of plywood, fiberboard or drywall, boards and even old furniture!
You can even make such a doll house yourself from scrap materials.
The house can even be two- or three-story, horizontal (without a roof and with a top view) or vertical (with a removable front wall), simple or complex to manufacture, requiring certain skills in carpentry. But in any case, its construction and arrangement with your own hands will be exciting activity for the whole family. In addition, you can make furniture and interior items for the dollhouse yourself from the same materials at hand.
House made of fiberboard
You can easily make such a house model from fiberboard or plasterboard by gluing the parts with PVA glue. Most likely, you won’t even have to buy anything: many people have surplus building materials after renovation. You will also need:
- cardboard;
- wallpaper;
- colored paper;
- bamboo slats (they can be removed from the hot tray).
A house for Barbie can be made from fiberboard or plasterboard, gluing the parts with PVA glue
The peculiarity of this house is that in addition to three floors, it has an attic. We proceeded from the following dimensions: height - 65 cm, floor area - 16 X 28 cm. You can calculate the parameters suitable for you and draw a diagram according to which you will make the house.
Calculate the parameters of the future house and diagram it on paper
Note! Before you start making calculations, decide where the house will be located. Often such products stand in one place. The design should not take up a lot of useful space, “clutter” the room and get in the way.
According to the sketch, cut out the walls, roof and partitions between floors.
Cut out the walls, roof and partitions between floors
Connect all parts using PVA glue.
If the PVA glue is not thick enough, you can add a little sawdust for extra strength.
Cover the roof of the house with corrugated cardboard.
Cover the roof of the house with corrugated cardboard
Cover the outside walls of the house with colored paper. Glue the bamboo strips.
Execute external finishing house using colored paper and bamboo strips
You can decorate the base to make the house look more elegant. For example, stick on pre-cut “bricks” from colored cardboard.
The base can be decorated with cardboard ‘bricks’
Glue the entire building onto a frame made of fiberboard or plywood. It should be larger in area than the floor of the first floor. Firstly, this will give the house stability, and secondly, it will be possible to organize a “flower garden” on the frame.
Glue the house onto a frame made of fiberboard or plywood
Cut out window frames from thick cardboard.
Cut window frames from thick cardboard
They need to be glued on both sides.
Glue the frames to the windows on both sides
Make a balcony. For the floor and railings, use thick cardboard; simple toothpicks will serve as balusters.
Cut out a door for the balcony from thick cardboard
You can attach wire hooks to the railings. Hang a cardboard box with toy flowers on them.
The balcony can be decorated with a toy flower garden
Insert an attic window.
Design an attic window
The front door is also very easy to make. It is enough to paste over the cardboard base with a picture cut out from an advertising brochure. The handle can be made from plasticine.
In order to create the effect of a grass lawn around the house, cover the frame with the hard parts of ordinary kitchen sponges. Make flower beds out of cardboard boxes and “plant” them with plastic or paper flowers.
Interior decoration
The inside of the house must also be beautifully decorated to match its owner - the most beautiful and fashionable Barbie doll.
Cover the walls with wallpaper, colored or wrapping paper, it depends on the purpose of the room. For the floor, colored cardboard, cellulose kitchen napkin (it imitates carpeting), and fabric with a soft texture are suitable.
Complete the interior decoration of the house using wallpaper, wrapping and colored paper, cellulose kitchen napkin
Ceilings can be covered with white paper.
Be sure to make curtains by hanging them on curtain rods from bamboo strips.
From cardboard boxes
For such a house you will need:
- cardboard boxes - according to the number of rooms;
- glue - you can use a stapler or double-sided tape;
- wallpaper, colored paper, magazine clippings, organza, fabrics - for decoration.

If this model is too big for your living space, you can make a folding house that is easy to make and very compact. To do this, just connect two cardboard sheets crosswise into grooves. Cut doors in the walls, cover the “rooms” with wallpaper and pictures, and celebrate a housewarming party with your favorite doll and her friends.
Do compact house from cardboard, connecting two cardboard sheets crosswise into grooves
From plywood
This option is more difficult than the previous ones; you will need patience and the ability to work with tools.
A plywood dollhouse is more difficult to make, but the result is worth the effort.
For a plywood house you will need:
- hammer;
- jigsaw;
- nails;
- sandpaper;
- primer;
- dye;
- wallpaper or adhesive film.
Think about the layout of the house. Cut out the parts from plywood. Use the drawings below or come up with your own project. You can change the sizes as you wish. Just remember to maintain proportions.
Be sure to treat all surfaces sandpaper so that the child does not get hurt by burrs while playing. Assemble all the parts according to the plan.
Assemble all the parts according to plan
Attach the back, front and side walls. Cut out the windows. Their dimensions are 9 X 6.25. The triangular window is the same width as the others, and its shape and height must be calculated according to the angle of the roof.
Cut out the windows
A plywood house needs to be nailed together.
Glue will not work here: PVA is unlikely to hold the parts together firmly enough, and “Moment” will look sloppy at the joints.
Cover the gaps formed between the parts with a primer.
Paint the outside of the house a suitable color.
Paint the outside of the house
Paint the interior surfaces, wallpaper or self-adhesive film- optional.
Paint, wallpaper or self-adhesive film the dollhouse rooms
You can lay felt, fleece or carpet on the floor. Furnish your home and invite Barbie to your housewarming party!
You can make the front wall of the house in the form of opening doors.
The front wall of the house opens up like cabinet doors
An ordinary Christmas tree garland will provide lighting in the rooms.
Using a Christmas tree garland you can create lighting in the house
From old furniture
Consider the option of creating a house for Barbie from an old chest of drawers. Please note that such a massive thing will require a lot of space in the room; its mobility or compactness is out of the question. But such a house is strong and durable.
An old chest of drawers is a great base for a doll's house
First of all, compare the height of the doll and the boxes. From our chest of drawers it will turn out two-storey house, in which each floor is equal to the height of two boxes. Barbie will be able to stand at full height without her head reaching the ceiling.
Calculate the height of future rooms according to the size of the doll
Remove excess partitions. Do this carefully so as not to damage the interior surfaces of the chest of drawers.
Remove everything unnecessary from inside the chest of drawers
Recesses that formed on the ground former partitions, needs to be processed. To do this, you can sit them on glue wooden slats the right size. Press them down and wait for the glue to dry completely. You can put something heavy on top or use clamps.
Seal the resulting recesses with slats
When the glue has dried, level the surfaces. All cracks, damage on the outside and internal surfaces fill the chest of drawers with a thin layer of putty. Once dry, sand the chest of drawers until smooth. The doll house is almost ready, now you need to paint it inside and outside in two layers. It is best to use white paint for this.
Level the surfaces, sand and paint the chest of drawers white
All that remains is to arrange toy furniture, hang mirrors and paintings on the walls. On the ground floor of our house there is a living room and a kitchen, and on the second floor there is a bedroom.
Arrange furniture, hang paintings and mirrors on the walls
How to make a house for a Barbie doll with your own hands - video
As you can see, creating a house for Barbie with your own hands is not so difficult. You can come up with your own way. Believe in yourself and don’t be afraid of difficulties, especially since your daughters will probably want to help you build a cottage for their girlfriend. If you have any questions, please ask them in the comments. Good luck and easy work!


