Devices for entering the site through a ditch: creation, requirements, order of work. Check-in at the summer cottage provides an opportunity for its full service. Without proper arrangement of the entrance to the site, it will not be possible to carry out construction work, deliver firewood, fertilizers, and even more so, a personal car. Even on foot it will be difficult to enter the entrance, which is not properly equipped.
Quite often, it takes a lot of effort to ensure the necessary entry, but the problem can be solved with your own hands, if you understand the specifics of the work.
You can consider that the owners of the plot in the country are lucky if it is located on a flat area and there are no problems with the approach to it. In fact, such territories have an incredible relief - hills, pits, ravines, which means that there are obstacles in front of the entrance that will make it difficult for a car to drive. Usually laid along the main road drainage system to divert sedimentary and flood waters, and along the front of the site there is a trench, which is the most popular obstacle to entering the site.
The entry device can have several options:
- Normal, smooth entrance. This is perhaps the rarest case when it is enough just to lay the cover and install the gate of the required width.
- Entrance with a drainage system. Arrangement rules summer cottages it is recommended to lay the system along the road, which makes it necessary to create an entrance over the drainage trench when using a pipe.
- Ditch entry. If there is a large and wide ditch in front of the place where the gate should be, then the following methods of entry are used - using pipes, using wooden sleepers or laying. Depending on the width of the ditch, measures should be taken to strengthen the walls and create a reliable floor.
- Entry at an angle. In this case, certain security measures are required at the entrance to the vehicle.
Each option has its own, special specifics, which must be taken into account in order to ensure the normal arrival of not only a personal car, but also special equipment - if construction is underway, then a truck, as well as a truck crane, a fire engine, an ambulance van and so on.
Choosing a coating
The entry device to the site through a ditch is subject to the most intensive wear, which is due to the high requirements for the coating. The choice of material for the ride should be made taking into account whether you have a personal car, what vehicles can drive to your home, and whether parking is required. The coating must be durable, strong, resistant to climatic influences in different seasons, frost-resistant, and resistant to prolonged exposure to ultraviolet rays.
Coverage on the entrance area is of two types - economical rigid and simple or with a high level of strength. In the first case, it is a compacted and leveled soil with a bulk layer, which has such drainage components as gravel, sand and crushed stone.
A separate discussion deserves a hard coating, which has several types:

The choice of pavement material for entering the site will largely depend on financial condition owner. If the owners are not too rich, then most often they make a sandy layer, but pouring with concrete has gained the most popularity.
Regulatory requirements
In addition to the general convenience of residents and appearance, the device for entering the site must necessarily comply with SNiP standards, which help to ensure at least minimum requirements safety and do not give the opportunity to interfere with other people.
The following normalized parameters are distinguished:

The owner of the site must determine the entry devices himself, but at the same time, he must not in any way impair the traffic capacity of the road and not create a personal car park on it. In the case when the site is also part of a gardening partnership, then the creation of a check-in should also take into account the rules that are established in the partnership.
How to create a drive through a drainage ditch?
The entrance to the site should not block the system, which means that it is impossible to simply fill up the ditch. It will be possible to save drainage by laying a pipe with a diameter of 0.3-0.5 meters, depending on the volume of water that is diverted. You can use plastic, metal, reinforced concrete and even asbestos-cement products.
The arrangement of the entrance to the site through the ditch is carried out in the following order:

Entrance to the site through a ditch of increased strength is carried out using concrete walls. Such a construction can be done as follows:
- All actions before laying and laying are performed in the same way as in the method above.
- After the pipe is laid, formwork should be installed on both sides of it, the height of which will correspond to or slightly more than the height of the ditch.
- Reinforcing steel rods should be installed in the formwork, the diameter of which should be from 1.2 to 1.4 cm.
- After that, the reinforcing walls are poured. The width of the concrete tape should be from 15 to 20 cm.
- When the concrete has completely hardened, the formwork is completely dismantled.
- On top of the pipe, the entire space should be covered with a mixture of crushed stone and sand between the concrete walls.
When creating these types of entrances, the pipe must be laid parallel to the bottom of the ditch, i.e. be with the same bias. After backfilling the pipe, water should never seep through the prepared embankment.
How to make a check-in from the sleepers?
If the ditch is wide enough before entering the site, then you will need to make a flooring - a bridge. One of the fastest and cheapest options would be to use wooden railroad ties. The fact is that it is the sleepers that are impregnated with special anti-rotten compounds, which also give the tree resistance to moisture. We also note that they are not strong enough for the movement of loaded trucks. In addition, sleepers (especially those that have been used) have a special smell that becomes stronger in the sun.
But the material attracts low cost and ease of installation, even with your own hands. It should be borne in mind that during the season when the soil is very wet, the sleepers may begin to diverge. To avoid such cases, they need to be very well fastened together.
Overlapping with reinforced concrete slab
The device for entering through a ditch with a reinforced concrete slab overlap is fast, but expensive. But the strength of this overlap makes it possible to call in any type of transport. The main disadvantage is the large weight, because of which you will have to pay for the work of the crane operator. Also, problems sometimes arise if the walls of the ditch are weak and cannot support the weight of the slab. The most common option is to install supporting concrete walls on both sides. This will require the installation of formwork, after which steel reinforcement is laid and poured with concrete mortar. The gap between this type of support and the walls of the ditch should be covered with rubble and sand, and then compacted.
Inclined entry device
Often the entrance to the site is complicated by the presence of a slope down or up. In this case, spontaneous movements of cars should be excluded and the adhesion of the wheels to the road surface should be increased. The most common way to solve this problem is to use the ramp principle, the maximum slope of which is 24 degrees.
The manufacture of the ramp for entry is carried out in the following order:
- Cut off the ground from the surface with the formation of steps.
- On the sides, the entrance is limited by curbs (concrete walls). To do this, make a formwork, install a reinforcing mesh and pour concrete.
- Pour crushed stone between the curbs, and the thickness of its layer should be from 12 to 18 cm with the formation of the required slope and good.
- Fill the drive surface with concrete, the thickness should be at least 10 cm.
If possible, you can put on top top coat. The most attractive option is paving slabs.
The procedure for performing work on concreting
One of the most reliable and simple ways arranging the entrance is pouring concrete. This way you will make both the entrance and the parking / parking area. When concreting follow the following order:
- Remove the soil to a depth of 20-30 cm, and tamp the bottom.
- Fill in a cushion of crushed stone and sand, its thickness should be from 25 to 35 cm (after compaction).
- Lay a finished steel reinforcing mesh on top of the pillow or install a reinforcing layer of steel reinforcement with a diameter of at least 1 cm with laying in the form of a grid and cells no larger than 25 cm.
- Make a mortar of cement, and its grade must be at least M300 (1 part), sand (3 parts) and crushed stone (4 parts).
- Pour the resulting concrete solution with a thickness of at least 12-15 cm into the race and carefully compact. The surface should be leveled and checked with a spirit level.
In no case should there be depressions on the surface in which water will accumulate. It is advisable to make an entrance with a slight slope from the center line so that sedimentary moisture flows off.
Alternative
If you have big problems, can choose alternative ways solutions. With a large slope angle, you will have to make an entrance along a curved path, which will help to gradually reduce the magnitude of the difference. If the area in front of the site does not allow you to do this, then you will have to make an elongated entrance that will run parallel to the site, and there must be a turnaround area in front of the gate. Too big bumps and ditches will sometimes have to be bypassed if you make an entrance to the site from the back side of the site. On the front side, it will be necessary to make convenient and small bridges to install a gate for those who have income to housing, but do not reach it.
Starting to equip their newly acquired site, many happy owners are faced with the problem of hard-to-reach check-in on it. The reason for this is wastewater or that run along the road or even around the entire perimeter of the village. The most accessible thing that you can easily do with your own hands and that the first thing that comes to mind for inexperienced summer residents is to fit a bulldozer or arm yourself with shovels, fill the ditch well, level it, tamp it down and asphalt it.
The design of the entrance to the site through a ditch
Many people do just that. Excellent, no problem until the period of heavy rains or snowmelt comes. The fact is that the waste ditch is left for a reason, but in order to direct groundwater or wastewater to bypass the site. Otherwise, flooding threatens the buildings, the cellar, and the basement of the house.
Making the right entry to the site is more difficult than just digging a ditch, but more reliable.
This work does not constitute big difficulties, the main thing is to take into account some nuances.
The dissimilar location of the plots, the terrain, the type of soil determine various device entry into the territory through a ditch, but still some common features must be taken into account when doing these works with your own hands. What do you need to decide before starting?
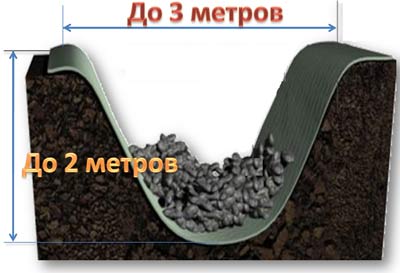 Scheme with dimensions for mounting the entrance to the site through a ditch
As a rule, ditches are made on both sides of the street in the village to drain water.
The simplest structure for driving a car through a ditch.
Consider the options for bridges for the passage of cars.
Along the edges of the ditch, pits are dug for laying beds (Fig. 91), for which the most resinous logs are taken.
At the bottom of each pit, a sand cushion 15–20 cm thick is arranged.
Beds are hewn on one side, impregnated with anti-septics or coated with hot resins (asphalt, tar, etc.). They are laid in prepared pits so that the notch is at the top.
Four transverse logs are placed on top of the beds, two on each side.
The transverse logs should be hewn from above along the entire length, and from below only from the ends (where they will lean on the beds).

Rice. 91
Cross logs are laid on the width of the wheelbase trucks, fastening them to the beds with staples or capercaillie (special large nails).
Super transverse logs are nailed to the flooring from boards 60 mm thick.
better boards lay with a gap between them of 15 - 20 mm.
Thanks to this, the flooring is ventilated, which increases the durability of the bridge.
Cross logs and boards are impregnated with antiseptics or coated with hot resin.
Two boards are nailed along both edges of the flooring (from above), additionally securing it.
More long-lasting than wood (Fig. 92).
It is made from factory or home-made concrete slabs.

Rice. 92
First, dig holes for supports.
The supports are ready-made slabs, or they are cast from rubble concrete on site.
Under the supports make a sand cushion with a thickness of 15 - 20 cm.
A bridge slab or slabs, if there are several of them, are laid on top of the supports.
Pipes laid in a ditch successfully replace a bridge across the ditch.
The depth of a roadside ditch is usually 50 - 100 cm.
In autumn, the maximum water height in the ditch is noted (points A - A, Fig. 93).
If the pipe is single, then its inner diameter must be greater than the distance from the bottom of the ditch to this height.

The fact is that at the maximum level of autumn waters, permanent frosts can suddenly set in, and if the water in the ditch freezes above the inner diameter of the pipe, then in spring the ice plug inside the pipe will not allow melt water to escape, and it will flood not only the bridge, but also the site . 
A laid pipe with a length of at least 3 m is covered from above first with sand, and then with crushed stone. Both are rammed in layers of 20 - 25 cm (Fig. 93, a).
If you have only thin pipes, then they put two or three (Fig. 93, c), but so that the maximum level of autumn waters (line A - A) passes approximately in the middle of the upper rough.
The pipes are placed one on top of the other, fixing them on both sides with wooden, and preferably concrete, racks.
Pipes fall asleep in the same way as in the previous case.
The first step is to choose the drainage material. In this case, it is very important that it withstand strong pressure loads. Therefore, you first need to find out which pipes are best suited for driving through a ditch.
Reinforced concrete products are quite common. Their strength is not disputed by anyone. Laying them on your own is impossible. Very heavy products have to be mounted using special equipment.
Manufactured concrete look pipes in two stages:
- First, a steel frame is made of reinforcement bars welded round each other.
- Next, the base is poured with high-grade concrete mortar. After that, the workpiece is compacted using a centrifuge and vibrocompression.
Due to the peculiarities of production, reinforced concrete products are very durable and smooth. Therefore, in this case, you should not worry if you decide to lay the ends of the pipe under the race with stones.
The structure of the vibropressed material is as dense as possible. Therefore, water cannot penetrate inside it and contribute to the rusting of the steel frame.
Consider the parameters of reinforced concrete pipes:
- their cross section can be 0.3-1.2 m;
- wall thickness is 140-200 mm;
- length ranges from 250 to 500 cm.
Reinforced concrete pipes for drainage ditches have two stiffness classes:
- The parameter of the first category means that the product can be laid in the ground no more than 6 m. Such structures are not suitable for deeper burial.
- The material of the second stiffness class has a higher bearing capacity. It can be placed at depths up to 10 m.
The main advantages of reinforced concrete drainage are its high level strength and long service life. The main disadvantages are high cost, big sizes and weight. Concrete structures can be laid only with the help of special equipment.
A separate type of such structures are asbestos-cement pipes for check-in. They are lighter and more compact than reinforced concrete counterparts.
Plastic analogues
Plastic pipes in the ditch at the check-in are the most modern. They are light in weight and easy to install. This does not require significant physical effort and hire special equipment. Arrangement drainage ditch with a plastic pipe, you can do it yourself.
Costs plastic drainage inexpensive. Important Benefits material, in comparison with metal - it does not corrode and is inert to chemically aggressive environments. Drainage structures are made of especially durable plastic. It can withstand increased pressure loads when driving vehicles. Therefore, products from it are laid even under the main roads. The process of laying plastic pipes in a ditch for the race is completely safe. Also, the material can withstand temperatures from -60 degrees to +95.
In the manufacture of polymer drainage, the following are most often used:
- polyvinyl chloride;
- polyethylene;
- polypropylene.
In most cases, PVC products are used. It can be single layer or double layer. In the second case, the products are corrugated pipes, they are also perfect for driving through them to the site. Their upper layer performed in the form of an accordion. This increases the elasticity of the drainage and helps it withstand pressure loads.
Corrugated products may have large diameter and length from 1 to 6 meters. Also, their top layer can be filtering.
For laying in a ditch, it is desirable to use the most rigid drainage material made of plastic. Such an entrance will also withstand heavy vehicles. The best option is to choose a two-layer plastic corrugated pipe for installation. It is the most durable of polymer analogues.
The cross section of such structures can be from 0.2 meters to 1. It is highly undesirable to install used structures. They have reduced strength, and the life of such drainage will be short.
Do-it-yourself installation of pipes in a ditch: a step-by-step procedure
Watch the video
When the soil in the territory is prone to swamping, then before making a check-in to the site through a ditch with your own hands, it must be drained. It is important here, when constructing drainage, not to harm the natural runoff of rain, melt or subsoil water.
First, let's talk about how to make a simple version of entering the site through a ditch with your own hands. You need to work when the trench is not filled with water:
- Remove the top layer of soil along the future entrance.
- Scatter quartz river sand at the bottom of the trench. Flatten it and tamp it down. The thickness of the sand cushion should be 15-20 cm.
- When the width of the passage is 6 meters, a structure with a length of at least 8 m is placed in the ditch. Its diameter is selected based on the volume of drains. Most often, products with a diameter of 30-50 cm are laid. This implies that water will fill them by a quarter. Otherwise, in the spring season, melted moisture is able to fill the courtyard without finding a way out through the ice crust.
- After installing the pipe under the road for arrival, it should be covered with a mixture of sand and crushed stone or gravel. Filling can be done in two layers. First, throw sand into the trench, lay geotextile on top of it, and then lay rubble.
- In the same way, areas with the top layer of soil removed should be filled up.
- All layers after their laying should be well mortified.
- It is recommended that the entry device be completed with concreting. Without a screed, as well as limiters on the sides, the road will begin to part when cars move.
More complex drainage entry structure with retaining walls
It is more reliable because it is plastic. corrugated pipe for arrival it is concreted on both sides. Thus, the road is limited by supporting walls. They can be made protruding above the arrival plane or poured flush with it.
Here is a diagram of how to equip not only a durable, but also a more aesthetic passage to the site:
- When the laying of the pipe into the ditch for the race is completed, the formwork for the head of concrete is mounted in turn on both sides of it.
- Then it is highly desirable to strengthen the supporting walls with a welded reinforcing cage.
- After that, a high-grade concrete mortar - M-400 or M-500 is placed in the formwork.
- Concrete should dry for at least 3-4 days. Then the formwork can be removed.
- Further, the pipe under the arrival is covered with sand and crushed stone (or gravel). The heads will not allow the gravel to disperse. Therefore, it can not be covered with geotextiles. Stone chips are better to use granite, not white lime.
- After that, the passage can be lined with a concrete screed, road slabs, paving slabs, paving stones, natural stone etc.
How to equip the entrance to the site with a slope
It may happen that on your site the passage to it will not be smooth, but with a slope. In this case, the slope can be both positive and negative. In other words - up or down from the roadway.
Watch the video
In any case, it is necessary to ensure sufficient coupling of the roadway with the wheels of vehicles in order to ensure safe passage. There is no need to leave such a situation to chance.
Entry device for slopes up or down from the road
![]()
When the terrain in front of the site has a slight slope or you are planning to build a basement garage, it is best to equip the drive in the form of a ramp. The slope of the road (up or down from the site) up to 25 percent is considered small. In other words, for each meter of the length of the canvas, the height difference is up to 25 centimeters. In front of the car park, the slope should be leveled to a flat horizontal plane.
The pipe for entering the site through the ditch should be laid correctly. With the existing slope, it is necessary to carry out the following stages of construction:
- First produced excavation. Marking is done, then the top layer of soil is removed in the form of steps.
- The sidewalls of the race are reinforced with retaining walls. Formwork is knocked down under them, in which a frame of reinforcement is welded. Then the concrete solution is poured into the box.
- When the slope is small and the car does not need to be lowered into the basement, the edges of the road can be limited by a curb made of concrete slabs.
- Then a pipe for a drainage ditch for the race is laid on a sand cushion.
- Then the drainage is covered with gravel with a layer of 10-15 cm. The pillow should be well compacted.
- Then the ascent or descent is poured with a concrete screed. Its thickness should be at least 10-12 cm. The mixture should be kneaded sufficiently dense and viscous, otherwise it will begin to slip when setting.
- When the screed is completely dry, the passage can be lined with paving slabs, paving stones or natural stone.
Other solutions for safe driving with uneven terrain
![]()
As a variation of safe passage to the site, one can consider its arrangement along a curved path (spiral). In this case, the length of the path will increase, but the angle of inclination will decrease. With this option, the roadbed can be started around the circumference of the main building.
This solution will make it possible to arrange parking for several cars. The only restriction for the construction of such a check-in is suburban area must be large enough.
To protect the passage from icing, you can put a canopy over it. The easiest way to build it is from polycarbonate screwed to metal frame from supports and trusses in the form of arches. As a roofing material for a canopy, asbestos-cement slate, metal tiles, and profiled flooring are also suitable. In particular, such protection will be useful if you do not build a garage.
As an anti-icing measure, you can use a cable electric heating road coverage. Then its surface in the cold season will always be clean from snow and ice.
Conclusion
Watch the video
Knowing how to lay the pipe in the run-in ditch will help you ensure safe and efficient site drainage. It is possible to use products from different materials. All of them have their pluses and minuses.
- Russian polypropylene RVC
- Toilet for country toilet do it yourself
- How to avoid water hammer in the water supply
- small bathroom design with shower
- Diameter polypropylene pipes for water supply in the apartment
Types of arrangement of a ditch for the formation of an entrance
There are many ways to build a crossing over a ditch or canal. There are complex technologies among them, where you have to use heavy equipment, there are simple ones that are carried out almost manually. Let's take a look at some of the most commonly used options.
Option number 1 - concrete slabs
The entrance to the site through the ditch is formed by road slabs. There are several varieties of reinforced concrete products, but more often two are used:
1P or 2P with dimensions 3000x1750x170 mm;
PDN with dimensions of 6000x2000x140 or 180 mm.
It is clear from the dimensions that the choice depends on the width of the ditch. Note that these are quite powerful plates that can easily withstand a loaded dump truck. To cover the ditch, two slabs are laid across the obstacle.

Crossing a ditch made of road slabs
The reinforced concrete products themselves are heavy material, if you add the weight of the car, and even loaded, then the pressure on the soil of the banks of the ditch will be significant. To avoid subsidence of the soil, and, accordingly, the distortion of the crossing, it is necessary to strengthen the places where the plates are laid. How it's done:
Remove the soil on the shore to a depth of 0.5 m.
Crushed stone of the middle fraction is covered with a layer of 10-20 cm.
A concrete screed with a thickness of 20-25 cm is poured. For reinforcement, a reinforcing frame of steel reinforcement connected in the form of a lattice with cells of 20x20 cm can be laid.
After the screed has dried crane install plates.
To speed up the installation process from using concrete mortar you can refuse. Instead of a screed, FB foundation blocks are installed. Their height is 60 cm, so you will either have to deepen the area along the coast for the installation of plates, or install them according to the dimensions indicated above. In the second case, the laid road slabs will be located above the level of the banks of the ditch. For leveling, crushed stone bedding is done, followed by laying asphalt or concrete mortar. You can carry out facing with stone or paving slabs.

Reducing the width of the ditch with concrete slabs country house Full construction. You can directly communicate with representatives by visiting the exhibition of houses "Low-Rise Country".
If the ditch is wide enough and cannot be covered with one slab, then the channel of the obstacle is reduced. For this, concrete slabs are used only for a different purpose. For example, for ceilings or wall.
They are installed at the bottom of the channel, as they say "on the butt", that is, on the edge. Use a crane.
The space between them and the shore is covered with soil.
To prevent the plates from folding inward, spacers are placed between them, for example, from a metal profile or a steel pipe.
After strengthening, the road slabs themselves are laid using a crane.
If the obstacle is not wide, then the device for entering the site through the ditch is formed by a pipe. It is better to use reinforced concrete products. Today they are offered by manufacturers of different sections, so it will not be difficult to find the width of the channel. It is simply laid on the bottom of the ditch, covered with soil, and reinforced concrete slabs are laid on top.
Video description
The video shows how a passage is constructed from concrete slabs and pipes through a ditch:
Driving through a channel formed by road slabs, solid construction. The above three options are just a small part of how to arrange the entrance to the site using a slab platform. The main task of the manufacturer of works is to create strong supporting structures under the slabs to be laid. Here are some support options:
steel pipes laid across the ditch, two pipes under each slab;
logs treated with hot bitumen or bituminous mastic;
channel or I-beam.
The photo below shows an interesting design of the support, which itself can withstand a lot of weight, not to mention the reinforced concrete slabs laid on top of it. By the way, it is in this state without coating that it is used. But this applies to the second main option.

Support structure made of pipes for crossing the canal It might be interesting! In the article on the following link, read about the foundation of asbestos-cement pipes: features of the base, calculation and installation subtleties.
Option number 2 - metal and wood
Instead of reinforced concrete slabs, other materials are used: lumber, metallic profile and sheet metal. We must immediately indicate that the last option is not a cheap pleasure. It is not recommended to use used metal for crossing ditches. In addition, it is not easy to assemble structures of this type, it requires electric welding and a highly qualified welder. There is no place for amateurs here, the site is too dangerous in terms of loading the crossing.
You can approach the solution of the problem of entering the summer cottage through the ditch and from the cheaper side, using lumber. In fact, we need to build a bridge. It is small, but the requirements for it are no weaker than for a slab crossing. After all, a car will pass through such a bridge.
As supports, a bar with a minimum section of 250x250 mm is used here. You can use logs. They are laid with edges along the banks of the ditch with a step of 1.5 m. The ends of the beams that are laid on the ground must be waterproofed: coated with bituminous mastic and wrapped with roofing material. It is optimal if the waterproofing is carried out in two layers.

Wooden crossing over the ditch to the cottage
Boards with a thickness of 50 mm are laid across the laid supports. If loaded dump trucks or other types of trucks will pass through the structure under construction, transporting building materials to the construction site, then it is better to reduce the step of laying the beams. On top of them, lay logs or beams of a smaller section across them, and then boards. It should look like the one in the top photo. Of course, the design should have a more presentable appearance.
It might be interesting! In the article on the following link read about the device drainage pipes.
Option number 3 - an embankment with a drainage pipe
This option for arranging the entrance to the site through a ditch is used more often than others. It is easier to work and cheaper. It all depends on the width and depth of the obstacle.
If the ditch is small, then a pipe (metal, asbestos, plastic or concrete) is laid in it, covered with soil, and a solid flooring is laid on top of the resulting passage. It could be concrete screed, or as in the first option reinforced concrete slab, asphalt, paving slabs and other building materials used to pave paths.

Passage through a ditch with a pipe laid in it
Useful advice, if a plastic pipe is used for travel, then it must be borne in mind that it cannot withstand point loads, that is, pressure from stones, broken bricks and other materials with sharp edges. Therefore, before laying it, sand is poured into the bottom of the ditch, a pipe is laid, which is again covered with a sandy layer from above. And already on top you can pour crushed stone or gravel.
If the ditch is deep and wide, then when the pipe is backfilled, the edges of the embankment will collapse all the time, which will reduce the strength characteristics of the entire structure. Therefore, the edges of the structure are reinforced. Usually concrete or stone is used for this.
For example, in the photo below, the edges of the passage were assembled from stone. They made walls that hold back the embankment from destruction and washing out.

Driving through a ditch formed by pipe and stone
The next photo is exactly the same design, only poured from a concrete solution. It is more difficult in that for pouring concrete, it is necessary to assemble the formwork along the edges of the embankment. The poured walls are kept in the formwork for a week. In addition, it is recommended to waterproof their internal planes using bituminous mastic. After that, the space between the walls is covered with soil, gravel or sand.

Concrete driveway through a ditch It might be interesting! In the article on the following link, read about a cottage on a hillside in Montana.
Conclusion on the topic
As you can see, the type of ditch arrangement along the site depends on the size of the obstacle itself. If this is a small trench, then the best option is a pipe laid in it, covered with soil. If it is a wide and deeply dug structure, then you will have to fork out to purchase expensive building materials. In addition, for laying many, heavy equipment will be required, the services of which will have to be paid. But if the entrance through the ditch is made for permanent operation, then you should not save on this structure.
Before starting the construction of a future race for a car in the country, first of all, it is necessary to determine its size, which ideally should be 2.5–3 meters. Too wide a race is hardly justified in a small summer cottage, when it is desirable to save meters. On average, the length of the car is about 2.5 meters, respectively, the length of the race should be four meters. Based on this, the dimensions of the site are 3.5 by 4 meters.
 An example of covered parking in the country
After preparing the check-in plan, you can begin to calculate the cost building materials. To do this, you need to decide what kind of surface for the race will be used: asphalt or concrete. If you decide to use asphalt pavement, then keep in mind that you will have to fiddle with it a lot, additionally using an asphalt paver. It takes a lot of effort and time to complete your own quality styling asphalt. It is for this reason that many people choose to work with a simple concrete pavement.
First of all, you need to make a foundation pit. The race itself should be marked with pegs, then a pit should be dug about 20 centimeters deep. Then you should level the surface of the base under the coating, and then make the formwork around the entire perimeter of the pit. Formwork can be built using plywood or ordinary boards.
 Scheme of installation of formwork for pouring parking
Then you need to make a base of sand about 10 centimeters high. The amount of sand that will be used is about 4 cubic meters. For arrangement concrete base it will take four cubic meters concrete mixtures. When building a check-in, it will also be necessary to arrange its drainage, which can be done using a specially designed basalt grid.
But if you approach the device of this important system professionally, then drainage pipes are used. If you look from the point of view of professional construction, then you need to lay drainage pipes: they are hidden in the sandy base.
The top layer of the sand base is made from a dry cement mixture.
After preparing the pit, sand can be poured into it. The result should be a coating about 8 centimeters deep. Now you need to spill the sand with water and compact it.

To do this, use a special ramming tool or an ordinary wooden deck with two handles. The remaining sand must be mixed with dry cement mixture(only one bag is enough). After that, the resulting cement-sand mixture is poured onto the first layer, leveled and compacted.
On this we can say that the work on the basis of the future check-in has been completed. After that, you can carry out concrete work.
A basalt drainage mesh is laid on the finished base, after which a concrete layer can be poured.
The top layer of the coating should be leveled, and it is better to do this with a special construction vibrator. In order for the water to flow down the sides, then the profiling of the coating is carried out. Such a surface drainage of water is done using special plastic trays.

Check-in for the car in the country is ready. Now he needs to let stand for 20 days.
How to build a budget parking lot
The arrangement of the parking lot, first of all, should take place at the very summer cottage, and not somewhere beyond its borders. In addition, parking should not cause any inconvenience, for example, do not interfere with children playing on the summer cottage sports ground. It must also not obstruct the passage of others. Vehicle next to your home. Therefore, first you need to equip the entrance of the parking lot, and then only begin its construction.
The entrance to the site can be equipped with swing or sliding country gates, which can also be installed after all construction works Location on. You can even build a temporary check-in to the cottage with the help of rubble with your own hands. When the entrance to the site is ready, you can start building the parking lot.
You will need for this:
- Sand;
- Gravel;
- Metal pipes for drainage;
- Roof covering.
For parking to be good, you need a flat and roomy space where it would be convenient for you to drive your car. For its construction, a variety of materials can be used, which will be most convenient for you to use, taking into account the characteristics of your summer cottage. One of these options can be an ordinary lawn. It is possible to plant it in any soil, and from time to time just cut it with a lawn mower.
 Example of lawn parking for a car
Sand can be used to equip the site - this is not only very comfortable material but also very economical. Its consumption for this kind of work is small: the layer of sand for the site should be about 10 centimeters. You can also save money by using gravel for this purpose. They only need to evenly cover the area of \u200b\u200bpersonal parking. Both materials allow you to reliably get rid of water. The site will not be afraid of even prolonged rains, because the water in the parking lot practically does not stagnate.
Decorative elements can be a low fence that can surround the parking lot, a small border planted nearby ornamental plants or flowers. But the most important thing is to build a canopy that will protect the car from the sun, rain and snow. By the way, equipping a canopy is much easier than building a parking lot directly.

In the event that a place for a car is located near the building, it is not difficult to hide it from weather troubles. Several corners are installed metal pipes, the actual “roof” is made from the material that you prefer, for example, tarpaulins, films. When the parking lot is located at a considerable distance from the buildings, it is necessary to make an arch, which then needs to be strengthened and covered with roofing materials.
Parking construction
Home parking should be built in such a way that moisture from precipitation does not accumulate on it, forming slush, then this good option. This is only possible if it is perfectly flat. Do not allow the formation of depressions and pits on the surface coating.
Starting to lay the coating, you need to have the appropriate knowledge and professional skills, have special equipment and tools, which can require considerable costs. But the fundamental parking for a car in the country fully justifies all the funds invested in it, because it will be used for many years.

The main element of personal parking will be a roof that will protect your car from adverse weather conditions: heat, rain - or even involuntary mischief of birds, whose droppings can adversely affect appearance car. It is important that the roofing materials are of high quality and are attached to a reliable frame. Even ordinary metal or brick is quite suitable for this purpose.
It goes without saying that reliable frame base should be a good foundation. When a reliable foundation is ready, a foundation is made, and it becomes a support for the frame of the future roof. The roof will be durable, it is recommended to make the frame from a profile or metal corners. They are covered with a special resistant paint.
 timber frame canopy project
Starting the construction of the frame and roof of the car park, you need to consider what materials they are made of. After all, the material from which the load-bearing structures will be made must “support” the weight of the roof. One of the most popular roofing materials for parking is polycarbonate. This material is very light and has good strength, in addition, it is easy to install. After the construction of the frame, you can proceed to cover the roof with roofing material.
Ways to build a car park
Gravelled parking
This method is low budget. Such parking for a car in the country has excellent water throughput, and, in addition, it does not crack. The negative point of such parking can be considered not flat surface, at which it will be very difficult to clean from snow in winter. The thickness of the base layer should be 0.2 meters. For the main surface layer, a mixture of sand and gravel is used.
Parking with paving bricks
For this type of parking, a mixture of sand and gravel is used, it is installed with a slight depth under the paving bricks. This material creates a flat surface, without the formation of dust and cracking of the canvas in winter.
Paving bricks can pass water well, so that it does not linger on the surface for too long.
Some builders recommend laying paving bricks on cement. But the cement, after a certain time, will begin to crack, which will lead to poor water infiltration. The traditional technology for laying paving bricks is on sand or its mixture with gravel.
To prevent the destruction of the parking lot over time, its main (bearing) layer is created in the pit. It is necessary to fill it with about 0.1 meters of sand and compact it well.
 tamping sand for parking in the country
When calculating the depth of the pit, the thickness of all its layers is taken into account. Sand and gravel mixture requires careful tamping. From below, a layer of geotextile is laid on it, as well as in the middle. It is important that in the autumn-spring period the carrier layer is in no case exposed to moisture. If this still happens, and the parking lot itself is located in the bottom of the site, then you should take care of the drainage system and good drainage in advance.
concrete car park
Concrete parking is one of the most durable and durable options. When arranging it, the lining can be used as diverse as possible. The base of such a parking lot is very strong, which allows the use of natural or artificial stone for cladding. Such a coating is laid using a special tile adhesive, which has good resistance to frost.
 concrete car park project
So that rains or floods do not create problems in the parking lot, when filling concrete mix small slopes should be provided for water flow. And in order to avoid compression of concrete during temperature fluctuations, expansion joints must be made on its surface every five meters.
Stages
It is important to consider the main steps on how to make a good check-in to the site.

First you need to do a pillow mound. Rubble most suitable option in this case. Before you fill them with the bottom of the ditch itself, you should prepare and clean this area.

The functional load of such a pillow is to support concrete pipes. After all, they should not sink into the surface of the earth. The material of the pipe is most often plastic, the size of which is 0.46 / 6 m. If we are talking about concrete pipe, then its size fluctuates around 0.5 / 2.5 m.


The next step is pipe laying with a truck crane. With a small passage width, the use of plastic pipes is acceptable.

Note! plastic material pipes are not the worst option comparatively concrete material. It should be taken into account when choosing the load of travel.

The second stage of how to make a convenient check-in to the site is to install retaining walls. Through their use flowing waters will not wash off pre-sprinkled materials. This also has a positive effect on the race itself. It is not destroyed, it can be used for a longer period of time.

Before direct installation, the formwork must be properly installed. A double mesh is installed, poured with a concrete-based solution. Among the good grades of the solution are M200, M250 and M300.

At the third stage of creating a check-in at the site with your own hands, the solution solidifies. The duration of the process is about a week, during which the concrete solution hardens, becomes a certain shape, and has the appropriate quality characteristics.

Important! When pouring concrete mortar, it is necessary to observe certain temperature regime. In particular, this applies to temperatures not lower than 5.

Summer, autumn or spring time is considered the most the best option. At temperatures well below 5, special mixtures are used that provide for this condition.


The distance between the retaining walls should be filled with crushed stone. A geological textile is laid on top of its area. Thus, it will increase the service life of the entrance to the site through the pipe.

After a month of these works, the materials gradually shrink. After three days of finishing all installation work check-in can be used.


