Hello everyone! Everyone who loves to work with resin and who loves the "kitchen" of creating something with their own hands!
So, I started by choosing from my stock, those flowers that I want to pour, and outlined the desired contours of the fortification on paper (the plants must be completely dried). You can skip this stage and pour it without a stencil, but I wanted the plants to fit =))
I chose heather flowers, forget-me-nots and oak veronica.


Now you need to prepare the resin: knead (according to the instructions!) And leave for about 2-3 hours (to gain viscosity). Immediately after kneading, there are a lot of bubbles in the resin, they will go away on their own after a while and you can use it. At this stage, it is good to pour it into molds. But I'm waiting for it to thicken.

While the resin is infused, I make the number of stencils I need and cut out:

Important point- it is necessary to prepare the surface on which the products will harden. It should be as even as possible; dust, if not removed before pouring, will be on future brooches-earrings. In my case, the surface is glass, and using building level you can put it as evenly as possible, putting something under it.

The next step is to place a file or several files on a flat surface and UNDER them to place stencils.

Pour the prepared slightly thickened resin directly onto the file and spread it with a toothpick so that the height is about 2-3 mm. Necessarily you need to cover it with a dome-lid! By experience, I found out that under a low dome, the probability of dust sticking is less than if you cover it with one common and high one. After 15 - 30 minutes, the resin may crawl away from the contour, then you also need to return it with a toothpick to its place or drop more resin and distribute it.


Now we forget about the resin for about a day. It is necessary that the newly made bases harden completely and then you can separate them from the file (you can separate them earlier, but the uncured resin will bend and leave fingerprints) The edges of course will not be perfectly even, therefore sandpaper or a saw needs to process them. If there are paired elements such as earrings, then you need to make them as symmetrical as possible.
The files themselves are convenient to use for any work with resin! Thus, protect your table from resin adhering to it.


We knead a new portion of the resin, leave it to infuse and in the meantime try on the location of the dried flowers, and if everything suits you, you can continue!


After the bubbles have come out of the resin (30-60 minutes have passed), we drip a couple of drops onto the base, distribute them and arrange the flowers. This is necessary in order to fix them in the right place. Cover with a lid and leave to dry.

Well, another day has passed)) (or half a day). Again we are preparing a new resin, leaving it to thicken, but not much! Otherwise, when pouring too thick resin, the resulting bubbles on the plants will be difficult to remove and you can break a twig or leaf, expelling the bubbles with a toothpick! It is better to use its medium consistency, which is similar to fresh honey). This filling is needed first of all in order for the resin to flow into all the irregularities of the plant. Remind me of a flat work surface, because if at this stage it is not even, then the resin will simply drain and spoil the mood and work. The higher the lens needs to be formed, the smoother the surface needs to be!

Further according to the well-known scheme: cover with a lid, leave to dry). After a day, you need to dilute the new resin and wait for its thick consistency (thick honey) and pour it again to form a volumetric coating. Remove again to COMPLETE drying under an anti-dust cover on a flat surface (complete drying is different for different resin manufacturers, but it is better to play it safe and not touch the products for several days; if the plans did not include leaving fingerprints, of course)
After complete drying, turn over the finished front side and make another pour with thick resin, because. there are no plants on it, you can make just one fill so as not to leave a flat back surface and remove the texture of the file! Thus, the plant is inside the form. At the same time, the form becomes very strong and it will not be possible to break it, just saw it))) All this work seems simple, but to do everything carefully, you need to have a certain amount of patience and skills!
Decorations made using resin require careful handling and do not like the open sun (plants can burn out for a long time, for example, on the windowsill)
When all the fillings are completed and dry, you can make the intended decoration (for example, make a hole with the thinnest drill) or use it as you please. I love simple shapes and a minimum of decor, so I got such decorations and photos in the new winter:
Heather pendant 20 x 80 mm


Forget-me-not earrings with silver hooks 28 x 70 mm

Pendant with a sprig of Veronica oak grove 30 x 62 mm

Earrings on silver earwires with a sprig of Veronica oak 23 x 64 mm


Thank you for your attention! I wish you all inspiration and realization of your ideas!
Epoxy resin for jewelry is a modern chemical material that is very popular among craftsmen who create jewelry. self made. From the plastic mass, you can make products that completely imitate glass. Looks amazingly attractive natural materials(cones, dry flowers, leaves, etc.), filled with a transparent gloss.
People who are indifferent to beautiful decorations and those who are fond of creating all kinds of crafts with their own hands, we invite you to find out together what jewelry epoxy is, what are the rules and subtleties of working with it. As part of the article, we will conduct a small master class on making a pendant.
The word "resin" is usually associated with the natural origin of the substance. But in this case we are talking about a chemical product. Externally, the glaze is a transparent liquid, which consists of two components: resin and hardener.
When combined, substances enter into a chemical reaction, polymerizing with each other. As a result, the resin is completely cured. Before polymerization begins, solid fillers can be added to the glaze, which can change the properties of the resulting plastic in the desired direction.
Varieties of modified plastic
Made by hand based on famous brands glue of domestic production - EKF and EDP. You can buy them in stores selling household supplies. A small package of 280 g costs about 70-80 rubles.
The ratio of modified resin to hardener should be between 8:1 and 10:1. The chemical process of polymerization occurs when room temperature and lasts for several hours. It will take at least 12 hours for complete solidification. hardener for epoxy resin affects the rate of polymerization: the more it is in the composition, the faster the shape of the product will be fixed. The ratio of components must be measured very accurately - this directly affects the final result.
Another product of the domestic chemical industry is epoxy resin ED-20. It is very convenient to work with it at home, and the price looks more attractive (half the price of ECF and EDP). A significant disadvantage is the large packaging: 6 kg of resin and 1 kg of hardener.

On sale you can also find two-component formulations of foreign production. Based on them, excellent epoxy resin products are obtained. In addition to the main raw materials, protective gloves, plastic measuring cups, wooden stirring sticks can be found in the package. Such sets are much more expensive than domestic counterparts. The mixing ratio in them can be very different: 2:1, 1:1 or otherwise. It is possible that the proportions will have to be calculated using a special formula. In any case, the manufacturer's recommendations must be followed.
We are careful at work
Epoxy resin has a wide range of applications in construction, finishing works as well as in the printing industry. Raw materials for technical purposes have a pronounced chemical smell, and fumes irritate the respiratory system. When working with industrial material protective equipment should be used.
Epoxy resin for jewelry and decorative works proven manufacturers does not harm health. Although safety rules should not be neglected. Usually they have detailed information on factory packaging, but it would be useful to mention this now. So, precautions when working with chemical glaze:

We maintain the temperature
The polymerization process is accompanied by the release of heat. As a result chemical reaction resin can be heated up to 60 degrees. This feature must be taken into account when choosing casting molds, it is desirable that they be heat-resistant.
Preheating of the initial components accelerates the polymerization process. As the temperature rises, the fluidity of the resin increases and its viscosity decreases. Pouring with epoxy small parts will occur faster and better if the solution is preheated to 25-30 o C. Then the filler is introduced into it and only after that the hardener.
A decrease in air temperature and an excess of moisture adversely affect polymerization. Under such conditions, the process may take too long or not reach completion at all.
Getting the right consistency
Until the epoxy resin for jewelry has entered the polymerization stage, it retains the properties of a viscous liquid. If a dry filler is introduced into the solution, then it can sink down (cement, gypsum) or rise to the surface (wood chips, cork). This feature of the material must be taken into account when choosing and distributing the composition over it.

The use of aids
The main difficulty that you will have to face in the process of work is air bubbles. If you let the mixture stand a little or warm it up slightly, they will float to the top. To get rid of bubbles stuck to the mold, you can use a regular toothpick. To make the epoxy resin with your own hands the perfect consistency, pour in a thin stream through a fine strainer.
Easy to use with frosting disposable tableware to prepare a separate portion of the mixture. Plastic jars from dairy products (yogurts, curds) are well suited for these purposes. Stir the mixture conveniently with wooden ice cream sticks.
To make an accurate dosage of the components, you can use medical syringes of various capacities. Please note that in this case the epoxy must be poured into the container from above. And the hardener is drawn into the syringe in the usual way.
It is advisable to grease the molds for pouring with a protective solution. It can be replaced by ordinary petroleum jelly or parquet mastic. Apply a thin layer and remove excess conveniently with a cotton swab. If the molds are made of silicone, polyethylene or plexiglass, then they do not need pre-lubrication.

Let's talk about fillers
Solid and liquid additives affect how the final epoxy jewelry will turn out. Most often, alabaster, cement, chalk, wood chips or glitter (sparkles) are used for these purposes. The content of the additive in the total volume of the mixture is not more than 50%.
Dry fillers provide a hard but brittle plastic. Liquid plasticizers are used to neutralize undesirable quality and improve the plasticity of the material. The simplest and most affordable supplement can be castor oil. Usually one or two drops is sufficient.
Choosing the composition for the manufacture of the pendant
A special transparent epoxy resin for jewelry will help us create an ornament. As an example, we can take the two-component Gedeo composition produced by the French company Pebeo with a capacity of 150 ml.
The material perfectly imitates glass and is used not only in the manufacture of jewelry, but also for multi-layer coatings, surface decoration, and restoration of cracks. The basis for the application can be glass, metal, faience, silicone, plastic, painted wood. The icing is exceptionally clear, odorless and easy to prepare. Ready product characterized by increased strength and does not turn yellow over time.

step by step

If you don't want to wait too long, you can speed up the drying process by slightly warming the mold in the oven. Try not to overheat, otherwise bubbles may form on the surface.
A hole for the lace can be made with wooden stick while the product is in a soft state. If you are late with this - it does not matter, you can carefully drill a hole in the frozen pendant.
Make sure that the surface where the form is located is absolutely smooth. This will prevent the mass from rolling in one direction.
After removing the finished decoration from the mold, sand it with a non-rough sandpaper to smooth the edges. Thread a string through the hole and wear the pendant to your health.
Greetings, brain talents! How about making a painting... a 3D painting? This article will help you create such brain crafts, consisting of several painted layers of epoxy resin.
Disclaimer 🙂 3D creation crafts will require more a large number 4-dimensions. All these spaces require patience, but the result is worth it.
Step 1: Materials

Let's talk a little about security first.
When working with epoxy, it is important to take the appropriate precautions, namely to read and follow the manufacturer's warnings. I will not retell them, but nevertheless I will note that when working with epoxy, it is necessary to avoid getting brainmixture on the skin and inhalation of its vapors during mixing and curing.
I use the following security measures:
- eye protection
- latex gloves
- respirator
- and an isolated room in which the homemade product is left during the curing of the epoxy.
We figured out security, let's move on to materials and tools:
- epoxy resin (such as Parks Super Glaze)
- disposable measuring cups 230ml
- wooden mixing sticks
- a reservoir that will serve as a restrictive circuit
- building hair dryer
- paint brushes
- acrylic paints
Step 2: Preparing the mixture


If you are going to be accurate in the thickness of the layers, then you first need to calculate the right amount of mixture components for one layer. To do this, we determine the number of layers that you plan to receive, and divide by this value the depth of your restrictive reservoir, thereby obtaining the desired layer thickness. My layers are usually around 3mm thick.
Then we multiply the calculated layer thickness by the tank area, and we get the volume of one medulla. One fluid ounce is 29.6cm3.
Divide the number of ounces in one coat by 2 to get the final number of ounces to be measured for each of the resin components, A and B.
Now we put on protective equipment. After that, pour equal amounts of component A and component B into a measuring cup - for my epoxy, the ratio is 1:1 - and mix for at least two minutes. The mixture is quite viscous, so we carefully “scrape” it from the sides and pay attention to places where it could not mix. As a result, the mixture should be homogeneous (although this moment there will be a lot of air bubbles in it). Now we are ready to fill!
Step 3: Pouring Resin and Removing Bubbles


The following steps must be performed in a dust and hair free space, although dust will be present in your homemade, but we will deal with it later.
fill
Pour the prepared mixture into the restrictive tank, and tilt it in different directions so that it spreads evenly along the bottom. If you like, you can rock it so that the resin coats the sides of the tank, and this will make it easier to scrape off bits of paint that may have been there by accident, without wetting the walls it will be more difficult.
Removing bubbles
We turn on the hair dryer at minimum power and heat the tank with the mixture with it, evenly driving it over it. We do not stay in one place for too long, so as not to burn the resin and it does not crack. ( Valuable advice: Blow out the dust dryer by turning it on and turning it somewhere else, not over under the tree).
Most of the large bubbles will come out pretty quickly (and at first glance will look pretty satisfactory), but you should pay more attention to the "crumbs". We highlight the filled layer and look for the presence of small bubbles, if they are present, they will cast shadows.
Step 4: "Dusty" Procedures


When we highlight the filled layer and look for bubbles, we can see speckles and fibers on the surface of the layer. During the implementation of this brain crafts, short of creating it in a kind of "laboratory environment", these dust particles, hair or fibers are so annoying, but almost impossible to completely get rid of them. However, with correct technique(and good luck) the dust in the 3D picture will be almost imperceptible.
FYI: It's really amazing how much dust and hair is everywhere. They "float" in the air and we breathe them all the time... I think working with epoxy resin will surprise you a lot with how much everything around us is happening at the micro level.
Search for dust and hair
So, highlighting the resin layer, we look at the highlights on its surface. The specks on this surface will be visible due to the "violating" reflection of the surface tension of the resin. Examining the entire surface brainpictures to find those pesky bits. At the same time, we concentrate on larger ones, since too small ones for the most part disappear after pouring the next layer, but you should make sure that all large hairs and fibers are found, they will be visible.
Mote removal
To "catch" the debris, you can use the "bait" of scraps of paper. The corners of the paper are especially good in this business, as they cling nicely to the fibers. You should not use these “baits” again, otherwise you can again “contaminate” the layer with previously caught garbage.
Covering layers
After the resin is cleaned of specks, then during its curing it is worth covering it with something to protect it from debris. For this, I mainly use foil or a board with which I cover the tank. The advantage of metal brain foil the fact that it can tightly wrap the entire tank, because dust is such a “magic” substance that it can seep through the smallest holes ...
Actions with "mean" specks
But what if large dust particles, or even worse, hair, are interspersed in the layer, and it has already frozen? You may have to change the concept of the picture to hide them. For example, for this I had to add elements to the paintings more than once. But nevertheless, usually all these additions, caused by initial defects, I liked as a result. Problem solving is one of the most attractive features of art and design. Don't cry over spilled milk, find something more graceful brainsolution! However, if you really need to clean something up, you can sand the epoxy to remove that defect, which is a hassle... but we'll get to that later.
Step 5: Curing the Resin

While the resin is curing, it is necessary to keep the tank in a place where you will not inhale its fumes. The resin curing process itself is due to heat, not exposure to air or evaporation, so do not leave the resin tank in a cold place, as this will significantly slow down the process. On the other hand, you can warm brainwashing to speed up curing, but not too much - follow the manufacturer's recommendations.
Once I left the resin tank in a preheated oven for too long, and it turned out ... really bad (see photo). At room temperature, the layer takes about 8 hours to dry, after which you can paint on it!
Step 6: Drawing


The epoxy layer is ready, the fun begins!
Painting on resin is different from painting on canvas, as the surface of resin is so smooth that the paint doesn't "cling" to it, making it difficult to apply opaque strokes in one go, but at the same time it gives a great opportunity to draw translucent details!
The photo shows a brush stroke, and as you can see it is transparent, if you need to make it opaque, you will have to wait for it to dry brainpaint and apply another layer on top. Another big plus of painting on resin is the ability to wash off the paint without much difficulty if it has not dried out, and if it does dry out, then it can be scraped off. That is, you can create sketches and experiment with a brush, and in case of failure, simply erase or peel off the paint. At the same time, even if you slightly scratched the surface when cleaning, then when pouring a new layer, these small scratches will disappear.
To get crisp, even edges, I sometimes use duct tape, and you can see this in the photos provided, the last 4 of which show the first 4 layers.
Preparation for pouring the next layer
After the painting process is completed, it is necessary to clean the surface in order to brainpicture was crystal clear. I use damp paper towels for this, after which I also wipe with microfiber, and control the process using the same trick of highlighting the surface and observing the reflection, in order to find stains and removable debris. Again, don't worry about small scratches that may appear after cleaning.
When finished with cleaning, return to the previous step and repeat brain procedure pouring a layer, curing and applying a pattern, and so on until the tank is completely filled crafts!
Step 7: Eliminate Large Defects

With your homemade various troubles can happen that can become critical. For example, in the above photo of the top layer of epoxy, I touched the material with which I covered it from dust during curing, and which left an unpleasant mark on the layer in the lower right corner. The flaw was significant, and I needed to somehow fix it ...
Cleanup
If the defect is critical and needs to be eliminated in any case, then you can simply clean the defect completely and fill it again, so that ideally it becomes transparent again. In this case, ALWAYS wear a respirator, yes, and take other precautions so that neither you nor anyone else inhales the dust being cleaned. You don't want to clog your lungs with hard particles, which are essentially very small pieces of plastic.
If the defect being repaired is too deep, then you can use a dremel or other similar tool to clean it up to speed up the process. Next, clean the place with coarse sandpaper, and gradually increase it, bringing it to the 600th grain, while wet grinding will significantly reduce the amount of sprayed solid particles.
After finishing sanding with 600 grit sandpaper, it will be possible to fill in a new layer brainpictures, and it will become transparent again. My process of fixing the defect in the above picture is in full swing, but the resin manufacturer assured that everything should work out as it should.
Step 8: Finishing touches


To protect your brain crafts from exposure to UV radiation, due to which the epoxy turns yellow, it is necessary to cover it with a special protective filter. An epoxy 3D painting is quite heavy, so you should use materials to finish it that can support its weight. I cut out the body of my first painting with laser cutter made of white acrylic that holds the UV filter but does not hold itself under the tree. So to hang my 3D painting, I screwed eye hooks into the wooden containment tank and tied a wire to them.
Step 9: Get creative!


Here are some more photos with my masterpieces, and I hope you like them... :) I also started experimenting with glass containers, and such homemade quite elegant, as you can see through them from different angles. Besides, upper layer reflects the interior and looks cool - you can see it in the second photo.
If you are interested, you can check out my other crafts and I can't wait to see what others have created with this 3D painting technique! And let all your bubbles come out, and dust particles be invisible! Good luck to all!
One type of synthetic resin is an epoxy-based material. The versatility of this material determines the breadth and popularity of its application. How to make products from polyester resins, we will consider further.
Epoxy acrylic resin products - material features
If we consider the structure of the resin from a chemical point of view, then it consists of synthetic oligomeric compounds. Epoxy-based materials are widely popular in various industries and life activities. However, in order to obtain a polymerized material, the presence of a hardener is required. With its help, the resin takes on a solid form.

If combined with each other different kind resin-based materials, it is possible to obtain substances of various kinds of density. Among the advantages of epoxy resin are:
- resistance to acid environment;
- resistance to various kinds of chemicals, such as halogens, alkalis;
- after curing, the resin does not emit harmful substances, has a slight shrinkage.
There are two main elements of the epoxy composition. If they are mixed together, then the polymerization process begins. By combining different kinds of resins with hardeners, it is possible to obtain materials that have a hard, rubbery or soft texture.
The use of phenols, tertiary phenols makes it possible to obtain polymerization of the resin. The type and amount of hardener for the resin is determined by its composition and the desired curing result. Epoxy resins are a thermoset, the process of combining the hardener with the resin is irreversible. After polymerization, the hardened resin cannot be dissolved or melted.

If you add a large amount of hardener to the resin, or vice versa, add too little of this substance, then the quality of the resulting polymer will be insufficient. There is a risk of reducing its strength, resistance to heat, chemicals or water. If too little hardener is added, the resulting polymer will be tacky because the resin will remain insufficiently bonded. Excess polymers gradually come to its surface. The amount of hardener is determined individually, and is indicated in the instructions for use of the epoxy resin. Most often, the ratio of resin and hardener is one to one or one to two.
Please note that the curing process takes some time, and you should not add too much hardener to speed it up. In order to accelerate the polymerization, it is enough to heat the material to a certain temperature. If you increase the temperature of the composition by ten degrees, then the polymerization will take place two, three times faster.
Some of the epoxy compounds freeze and cold. However, the decisive factors on which the curing speed depends are the temperature of the work and the type of substance with which the curing is carried out.
Epoxy resin products photo:

Among the advantages of using epoxy resin are:
- high strength connections;
- minimum shrinkage rate;
- low level of moisture intake;
- high resistance to abrasive wear;
- excellent physical characteristics.
Polyester resin for casting products: application features
In order to cure the temperature resin, it is enough to use the material at a temperature of -5 +190 degrees, in relation to the composition used. There are two types of resins:
- cold hardening;
- hot polymerization.
IN living conditions the most commonly used resin with a hardener of the first type. In addition, the use of this material is relevant if it is not possible to carry out heat treatment.
In order to produce products that are characterized by high strength, good resistance to high temperature And chemicals, hot curing resin should be used. In this case, it is possible to form a denser mesh temperature regime. There is a variant of epoxy resin that can polymerize even in sea water.

We offer you to familiarize yourself with the scope of the use of epoxy resin:
1. With the help of these resins, fiberglass or glass fiber is impregnated. These materials, in turn, are used in the electrical, radioelectric industries, mechanical engineering and aviation.
2. Performing a waterproofing function. This material is waterproof basements, pools, floors and walls.
3. Production of coatings with chemical resistance. Epoxy resin is included paintwork materials used in the process of internal and exterior finish buildings. Besides, given material is part of the compounds that protect wood, metal, concrete from damage.
4. In domestic use, the design field of resin is used to make volumetric products that are an excellent decoration for the interior, exterior and household.
Most often, the use of epoxy resin is associated with its function as an adhesive. Help. Epoxy resins can bond materials that have a porous or flat surface.
In addition, some of the epoxy compounds act as an adhesive, as they have high adhesion with various kinds of substances. These compositions also differ high level stiffness and elasticity.
Some of the cold curing hardeners are easy to use, as they do not need to be diluted in a certain proportion.
Epoxy-based glue is distinguished primarily by its strength and reliable connection between parts. Therefore, it is widely used in various industries.
In order to prepare this substance, a little hardener should be added to the epoxy resin. The approximate ratio of components is one to ten. Components are interconnected manually.
DIY resin products: how to make resin
In order to prepare epoxy resin at home, you will need the resin itself and the hardener itself. Please note that when making a large amount of resin, a lot of heat is generated during the polymerization of the material.
There are some epoxy resins that cure instantly after the addition of a hardener. If certain resin manufacturing technologies are not followed, then there is a risk of it boiling, emitting smoke and spoiling the finished product. In some cases, the resin may catch fire.
Therefore, in the process of purchasing material, consult the seller about technical properties material, its scope. After polymerization, a transparent, uniformly hardened raw material should be obtained from the resin.

If we consider the process of manufacturing resin and glue, then these technologies differ from each other. Before adding a plasticizer to the resin, for the manufacture of bulk products, its temperature should be increased by heating. In addition, in this way, it will be possible to reduce the viscosity of the material. To heat the resin, use a water bath, then lower the resin into a container of water and cool to fifty degrees.
Please note that this heating method will also help increase the time for the resin to cure. In the process of boiling the resin, a white foam appears on its surface, and its color becomes slightly cloudy. This composition is not suitable for use, therefore, in order to reduce its viscosity, a solvent must be added to it. However, it should be noted that the presence of a diluent in the resin negatively affects its strength, so the quality of the material in this case remains at a low level.
Water must not be present in either the resin or the hardener. When moisture gets into the resin, it begins to become cloudy. The procedure for preparing the resin begins with the addition of a plasticizer to its composition. In this case, the composition is gradually heated.

In order for the ingredients to mix well with each other, you should use construction mixer or a special nozzle electric drill. In the instructions, you should look at the amount of plasticizer added to the resin, most often it is from five to ten percent in the composition.
Further, after adding the plasticizer, the process of introducing the hardener into the composition follows. In this case, the resin must be cooled to thirty degrees. Since the mixture should never boil. The ratio between resin and hardener is one to ten. In order for the quality of hardening to remain at the proper level, all components of the composition should be well mixed together.
To obtain a homogeneous composition, the hardener is poured in gradually and very slowly. Please note that if you slightly exceed the proportion of hardener, then the resin begins to boil. In that case, her further use- unacceptable. In order to prepare a lot of resin, use a drill to mix it.
There is such a term as the vital activity of the resin, which means the process starting from the moment a hardener is added to the resin, and ending with the complete polymerization of the material.

Transparent resin products: how to do it yourself
In order to make a large material from resin, you will need to follow a certain technology for working with this material. As a result, the finished item should be particularly transparent and should not contain air bubbles.
At the same time, the resin should solidify evenly, both inside the product and outside. With a product thickness of more than two millimeters, the material is applied gradually, only after the first layer has solidified.
There is the option of pouring resin into specially prepared molds. In order for the product to be easily removed from the mold after polymerization, it should be lubricated with petroleum jelly or any fatty substance before pouring.
For coloring the product, special dyes are used in powder form. After pouring, the product is kept at a certain temperature, after two or three hours, it begins to polymerize. In order to speed up this process, we recommend placing the product in the frying hour for five hours. The process of complete polymerization takes more than a week.
Further actions on the account of the epoxy resin product are based on its machining, cutting, grinding. In the process of manufacturing epoxy resin products, preference should be given to foreign-made resin, since domestic materials are characterized by low and uneven polymerization, especially inside products.

To prepare a colored epoxy composition, you should use special dyes. Please note that the color dye should be evenly distributed in the composition. Otherwise, the product will be painted unevenly.
Please note that only quality pigments should be used, as otherwise there is a risk of the resin becoming cloudy or unattractive. Products from polyester resin and fiberglass fabrics are highly practical and have good adhesion. However, due to their high cost, they are not common.
It is possible to combine epoxy resin with polyester. However, please note that the contact of these two liquids without a polymerizer is not allowed.
Learn that the use of epoxy in liquid form is highly toxic, so the process of making products from jewelry resin must be carried out in compliance with certain safety rules.
We invite you to familiarize yourself with them:
1. It is forbidden to pour resin into dishes that will later be used to store food.
2. To avoid getting burns or dermatitis, it is mandatory to wear special clothing, gloves, and a protective mask.

3. The resin storage period is one year, after this period, it becomes unusable.
4. If resin gets on open areas skin, then wash it off the surface with soapy water.
5. If working with resin is performed indoors, then it must have a high-quality ventilation system.
Epoxy resin products video:

Both epoxy and jewelry wire, in the sense of jewelry, are special. Regular wire is uncoated and will darken over time. This can of course be used as an advantage, but it is not a fact that oxides will not spoil the product in the process. More or less suitable aluminum wire can be in flower shops. But again, most likely without coverage.

We take the wire soft enough, but not too thin. I have aluminum 1.5 mm coated. We turn the ring. It is advisable to use some obviously even shape.

Cut the long end of the wire with side cutters. Keep in mind that in this case one tip (here it will be on the right) will be sharp, and the second will be perpendicular to the wire, which is what we need.

In the same way, we cut the tail very, very close (or better, even with a meager margin) to the first cut.

We connect the ends of the ring. The closer they are to each other, the better.

And now we stick our ring on a wide adhesive tape, which it is desirable to first fix on flat surface(I have ceramic tiles or glass) sticky side up.

Since it is better to dilute the epoxy with at least 10 ml, then several blanks should be made at once, unless of course you want to throw away the excess diluted epoxy. It is very important to check the tightness of the ring to the surface.

Next, I fill the frames with artistic debris - inlays. In fact, it is advised to first pour the bottom layer, and then pour in the garbage, but since the time from kneading to solidifying the epoxy is limited, I do it in a different order.

So, the blanks are laid out, the tightness is checked, you can breed.

I use Ice Resin (odorless, liquid and almost no bubbles - the last point is important). I measure the same amount of resin and hardener...
It is very important to measure the exact amount of liquids. Epoxy is an insidious thing: a little more hardener and it will start to "goat" (that is, reach for the tool with such horns) too quickly; a little less - and you will wait until the lenses harden forever. :) Once again: special epoxy, jewelry Ice Resin or Crystal Resin. It differs from the industrial one by the absence of smell, greater transparency and less bubbling. I ordered it here: http://vkontakte.ru/club13872192 - here it is: 
Once upon a time I tried to make fillings with epoxy glue - the quality is much worse, it is more difficult to work with it and in general it is not intended for jewelry purposes.

I knead. At first, the resin becomes cloudy, opalescent stains appear in it - this is normal. We continue to stir for another minute and a half ... Until the mixture becomes transparent. Large bubbles will come out on their own, small ones gradually too. However, in the product they will need to be helped to "hatch". From the beginning of the kneading to the beginning of the "rising" of the epoxy, we have somewhere around 30-40 minutes.

Filling lenses. I use a rubber glass for oil (it will be further in the frame), I also expel bubbles with it.
Primary filling, as seen in the photo, does not completely cover the "garbage". This is fine. On this stage we only need to create a "bottom" and fix the drawing. You can even pour even less - I overdid it in the frames in the lower right corner. :) For everything about everything, we have half an hour: pour, expel bubbles with a needle or a stack, make sure that the lenses are filled more or less evenly.
Now we exhale for 8-10 hours and hide our plates with fills on the far, dust-free shelf and cover with a lid, leaving a small gap for air between it and the shelf.

Stage two. After 8-10 hours the lenses are ready for refilling. Knead the epoxy again and carefully apply the second layer. It should cover all protruding parts.

Epoxy does not contain solvents, so it does not shrink when cured. In addition, it is viscous, so if you pour it "with a slide", then it will leak to the edge and stop there. But here it is important not to overdo it.

After another 8-10 hours, we open our lenses from adhesive tape. On
At this stage, they look terrible. Now we take the solvent and wash off the remnants of adhesive tape. Alcohol, gasoline, white-spirit, acetone or nail polish remover will do.

Pour the third layer from the inside and dry for another 8-10 hours. Voila. :) You can drill, insert into a frame, braid with wire and everything else that your heart desires.
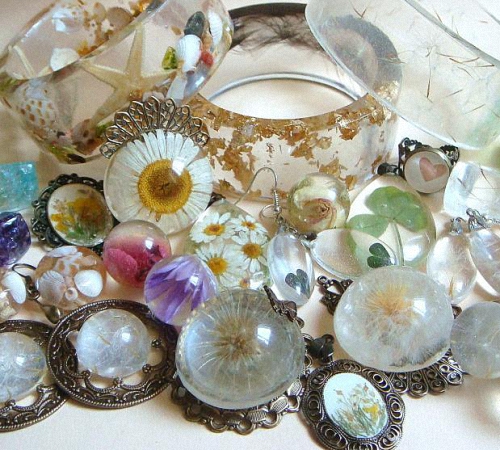
More epoxy work


My favorite heather. :)

Heather bracelet


The poppies are plastic, but the lemon balm petals and blades of grass are natural (and the herbarium came in handy).

Bracelet " Fresh water". River pearls, mother-of-pearl and other rubbish. :)

Jasper chips, aventurine glass, fluorite sand and mother-of-pearl chips in jewelry epoxy and gilded wire. Pendant "tie"

Lapis lazuli, mother-of-pearl, dried heather, fluorite sand in epoxy and gilded wire. Bracelet.

Bracelet and medallion.


