Before the invention of modern insulation materials, the foundations of private and multi-storey buildings They were insulated the old fashioned way, and most often the function of insulating the base was performed by heating pipes that ran through the basement. That is, energy resources were wasted, and heat was supplied to apartments and houses with great losses. With the advent of penoplex and other effective heat insulators, the situation has changed radically - insulating the foundation with penoplex with your own hands gives a powerful economic effect, and the heat that is generated heating system at home, is not wasted (total savings when retaining heat reaches 20%). In addition, penoplex insulation significantly improves the moisture resistance of the base and walls of the building, and this increases the service life of concrete and brick structures of the house.
What is penoplex and why is it better than analogues?
Traditional mineral insulation, rags went into the shadows after the appearance of extruded polystyrene foam on the construction market, even despite its high cost. Penoplex is not one material with certain properties, but a line of insulation materials, distinguishing characteristic which is the formation of a heat-insulating layer by foaming the original substance at high temperatures. In order for polystyrene foam to begin to foam, a gas mixture of carbon dioxide and freon (CFH 3 and others, CO 2) is added to it. The result of the interaction is a high-strength and dense substance that has a uniformly distributed structure with granules Ø 0.1-0.2 mm in the composition. Expanded polystyrene is produced in slabs different sizes and dimensions.

By saying “penoplex”, builders mean insulation, but in fact this is a branded Russian trademark of a company that produces extruded polystyrene foam for construction needs - it insulates the basement and other surfaces and structures of buildings, and thermal insulation of communication pipes, and protection from frost of the road coverings. Each brand of polyurethane foam is endowed with its own unique characteristics that are optimally suited to the place where the insulation is used. Thus, the thermal insulation of the foundation from the outside with penoplex is carried out mainly by the brands “Penoplex Foundation”, “Penoplex Comfort” or “Penoplex 45”. 
The advantages of this substance are obvious:
- The minimum thermal conductivity coefficient among analogues: λ = 0.03-0.032 W/(m×K). In practice this means that polystyrene foam boards they are used in much smaller thicknesses than conventional ones;
- High compressive strength – 27000 kg/m2;
- Low coefficient of moisture permeability. If you keep such a slab in water for a month, it will be saturated with moisture by only 0.6%. This indicator is very important, since the base and foundation of the house are constantly in an environment with high humidity exposed to precipitation and groundwater;
- Extruded polystyrene foam can be used in the temperature range -50 0 C/+75 0 C;
- The small mass of the slabs makes the installation of insulation simple and quick, while practically not being loaded with additional weight of the material, therefore insulating the foundation with penoplex is considered the most effective and least expensive;
- PU foam is not infected by fungi, does not decompose under the influence of moisture and aggressive external environment, is non-toxic and is recommended for use in housing and sanitary construction;
- The ease and speed of installation of the slabs is ensured not only by their low weight, but also by the presence of a tongue-and-groove system. The material is also easy to machine. Including manual;
- The guaranteed service life declared by the manufacturers is at least 50 years.
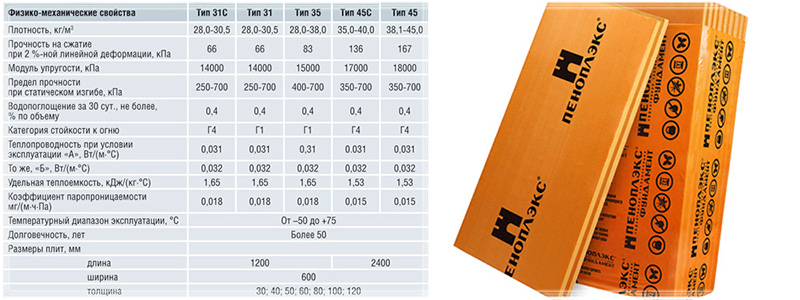
Thermal insulation of a base or foundation from the outside with penoplex is the maximum service life of the base building material plus fire safety according to group G4. This means that the material can catch fire, but given its constant presence in the ground without air access, plus the protection of insulation layers with plaster, this is almost impossible. The dimensions of the expanded polystyrene slabs are 600 x 1200 mm, the standard slab thickness is from 20 to 100 mm (step by step: 20 mm, 30 mm, 40 mm, 50 mm, 60 mm, 80 mm, 100 mm).
Which is better – external or internal foundation insulation?
When insulating your house, in particular the foundation, you should first calculate the thickness of the material and its properties for the right choice brand of insulation, and you can make fairly accurate calculations on your own. The formula looks like this:
R = h 1 / λ 1 + h 2 / λ 2 ;
- R – resistance to heat transfer in the region;
- h 1 – thickness of the base walls, mm;
- λ 1 – thermal conductivity of the base building material;
- h 2 – thickness of the polystyrene foam board;
- λ 2 – .
Example: when insulating a reinforced concrete foundation with characteristics λ = 1.69 W/m K and a wall thickness of 400 mm, the calculations will look like this:
- 3.2 = 0.4 / 1.69+H 2 / 0.032;
- 3.2 = 0.24 + H 2 / 0.032;
- 2.96 = H 2 / 0.032;
- H 2 = 0.0947 m, or ≈95 mm.
Result: With a foundation wall thickness of 400 mm, it is necessary to purchase 100 mm thick foam boards. When making calculations, rounding should be done upward, ensuring a margin. 
In order to prevent the appearance of “cold bridges”, “dew points”, and to bury all the cracks, cracks and joints, it is recommended to attach the outer penoplex in two layers in a checkerboard pattern. That is, with a calculated heat insulator thickness of 100 mm, two layers of slabs 50 mm thick can be used. The total number of slabs is easy to calculate: in one package – 8 units.
Thermal insulation technology
When insulating the foundation with penoplex, the technology must be strictly observed, taking into account the cost of the material. – a very technological material. If the foundation strip is insulated from the inside out, then the installation sequence will be as follows:
- Foundation;
- Waterproofing layer;
- A layer of foam boards;
- A layer of cement-based plaster;
- Ground cushion;
- Again a layer of foam boards - under the blind area;
- The blind area itself.
When insulating from bottom to top, the following sequence is used:
- Sand cushion;
- A layer of foam boards;
- Foundation;
- Waterproofing layer;
- Concrete subfloor screed;
- A layer of waterproofing at the end of the foundation wall;
- A layer of foam slabs along the end of part of the foundation slab. The slabs are laid from the beginning of the sand cushion and 0.4-0.5 m above the ground surface;
- A layer of foam boards under the blind area;
- The blind area itself.
How to insulate a foundation with polystyrene foam
First step - excavation with a foundation. An option with an already built house and insulation of the finished foundation is being considered. A foundation is dug along the entire depth of the perimeter - you need to make a trench up to 1.5 m wide parallel to the base. If the foundation is laid higher, then the insulation is still laid to the freezing depth, that is, below the base.
Important: extruded polystyrene foam (penoplex) should not come into contact with acetone and its derivatives, as well as benzene and alcohol solutions.

In parallel with the trench work, foundation drainage is being done - for this, drainage pipes are laid along the perimeter of the building at a distance of up to 0.6 m from the base. A separate trench is dug for them with a crushed stone-sand cushion at the bottom in a layer of up to 10 cm. The last layer in the cushion will be geotextiles, on which drainage pipes are laid. The slope of the pipes is 20 mm per 1 meter. The pipes are covered with the same pillow on top and wrapped in geotextiles. The pipes are discharged into the local storm drain.
The base walls are leveled using the following technology:
- The beacons (perforated ribbed metal corner), on which the insulation will be mounted, are attached in increments of up to 1.5 m from each other. The height for beacons is from the bottom surface of the base and 0.5 m above the ground surface;
- The solution is prepared in a ratio of 4:1 (sand - cement) to a thick state, poured onto the entire surface of the walls between the beacons, and leveled according to the rule;
- After the rough layer has hardened, the final layer is applied to generally level the surface.

The next layer is waterproofing and should consist of two layers. These are bitumen and TechnoNIKOL slabs. Bitumen is applied with a brush or roller in a layer of up to 5 mm over the entire surface. After it dries, TechnoNIKOL slabs are glued from bottom to top, heating the back side with a gas burner. The slabs should be attached with an overlap, with an overlap of 10 cm, the joints should be covered with bitumen.
The first and second layers of penoplex are attached vertically pointwise, in the direction from bottom to top, using acrylic glue, or adhesive compositions on an inorganic basis. All slabs are connected using a tongue-and-groove system; the joints are filled with glue or construction foam.
Plastering a heat insulator performs two tasks - protecting the walls and leveling them. A metal or fiberglass reinforcing mesh is attached to the top of the plaster and is also plastered with a thin layer. After the plaster has hardened, the trench is filled with soil. 
Backfilling with soil is the last step in insulating the foundation of the house. First, a cushion is made of sand and small crushed stone, followed by compaction at a depth of 0.3-0.4 m from the surface of the filled soil. Then any waterproofing material (polyethylene, roofing felt) is laid on the sand, and penoplex is laid on top. Joints and seams (both roofing felt and penoplex) are coated with bitumen or acrylic glue.
The blind area is made in the form of an inclined cement screed– for drainage of rain and melt water. The foundation can be finished with natural or artificial stone, ceramic tiles, siding or clapboard. The quality of foundation protection will be much higher if you use certified materials and follow the technology of all processes. With proper arrangement of the foundation with insulation, you can completely forget about repairing the foundation.
Until quite recently, no one thought much about the thermal insulation of the foundation, and all heat losses were compensated for by more than powerful heating. Today, the policy of saving energy resources forces us to take a fresh look at the problem. It turns out that insulating the foundation will not only avoid almost 20% of heat loss, but will also provide the foundation with comfortable conditions, increasing its service life. As practice has shown, properly waterproofed and insulated foundations are not subject to destruction longer, which means they “live” longer. In the question of what is the best way to insulate the foundation, a new material has taken over the palm from the good old polystyrene foam - extruded polystyrene foam. Despite the fact that this material costs almost twice as much as polystyrene foam, insulating the foundation with Penoplex is becoming a widespread fashion. And all thanks to its unique qualities and durability.
Meet Penoplex
Extruded polystyrene foam is a whole type of materials made from expanded polystyrene by foaming it at high temperature. Seven of the gases freon and carbon dioxide are added to the composition as a foaming agent. The result is a durable material with a dense, uniform structure containing granules of 0.1 - 0.2 mm.

Penoplex is the name of one of the Russian brands, which produces extruded polystyrene foam for various needs, be it insulation of roofs, pipes, road surfaces, walls of a house or its foundation. Each of them has its own unique features, which are relevant for a specific location of application. To insulate foundations, Penoplex Foundation slabs and, less commonly, Penoplex 45 are used.
Advantages of using Penoplex for foundation insulation are obvious:
- Low thermal conductivity (λ=0.03-0.032 W/(m×°K)). This indicator is the lowest among publicly available insulation materials, which means that slabs of smaller thickness will be required.
- Exceptional compressive strength - 27 t/m2, which is very important, since colossal loads act on the foundation.
- Practically does not absorb moisture. As experiments have shown, during 30 days spent in water, Penoplex slabs absorbed and filled with moisture by only 0.6%. Considering the constant influence of groundwater and rainwater, the low water absorption of the material guarantees protection of the foundation from moisture, and the insulation itself will not deteriorate or change its properties from constant contact with water.
- Wide temperature range - from -50 °C to +75 °C. The material can withstand both severe frosts and heat.
- Light weight facilitates installation work and avoids additional load on the foundation.
- Penoplex is not afraid of mold, does not rot or decompose. There are no mice in it.
- Resistant to many aggressive substances that may be in the soil.
- The material does not emit harmful substances and fumes and is safe for use in residential construction.
- Penoplex boards are easy to install, as they are made with a tongue-and-groove system; they are easy to cut, glue and fasten.
- The material is extremely durable (up to 50 years).
Thermal insulation of the foundation with Penoplex slabs will ensure the durability of the structure and material of the foundation, as well as the basement or basement. I would like to note that Penoplex Foundation has a fire resistance class - G4, i.e. burns. But taking into account the fact that the material will be hidden by a layer of plaster and primer, this is not scary.
Penoplex Foundation is produced in slabs with dimensions 600x1200 mm and thickness 20 - 100 mm (20, 30, 40, 50, 60, 80, 100). This allows you to select the material of the required thickness for each specific case.
What is the best way to insulate the foundation - from the outside or from the inside?
The location of the insulation on the foundation - outside or inside - is very important. To protect the foundation as much as possible from negative influence environment, it is necessary to insulate the foundation from the outside. But this is easier to do during the construction process than during the operation of the house. For example, those who want to insulate the foundation of an old house really don’t want to dig up the foundation walls, as this is labor-intensive, difficult and time-consuming. But know that insulating the foundation from the inside is actually insulating the basement or ground floor, but not the foundation, since the structure and material of the foundation remain unprotected and are susceptible to the influence of moisture, frost and soil heaving.
Advantages of insulating the foundation from the outside:
- The foundation is protected from freezing, the cold does not penetrate inside.
- The foundation concrete is protected from moisture and numerous defrost-freeze cycles, which extends its service life.
- Serves as an additional barrier for ground and storm water, presses and protects the waterproofing layer from mechanical stress.
- Copes well with seasonal temperature changes.
- An optimal microclimate is created in the basement or ground floor.
- The dew point shifts, which has a beneficial effect on the foundation material.
If you decide to insulate from the inside, be prepared for the fact that the foundation remains unprotected from frost, soil heaving and water. As a result, seasonal temperature changes, frosts and soil heaving will lead to the appearance of cracks in the foundation and its deformation. Think, maybe it’s worth doing everything right once, rather than limiting yourself to half measures.
Calculation of Penoplex thickness for foundation thermal insulation
The first question that interests you when insulating a foundation is what thickness of material to use. To determine this, you will have to perform a series of calculations. Although the manufacturer indicates the minimum thickness of Penoplex for different regions construction, it’s still better to calculate everything yourself.

R is the heat transfer resistance for a specific region. For Moscow and the Moscow region it is equal to 3.2 m2x°K/W;
H1 - foundation thickness;
λ1 - thermal conductivity coefficient of the foundation material;
H2 - thickness of the insulation material (Penoplex);
λ2 is the thermal conductivity coefficient of Penoplex.
If we are going to insulate a reinforced concrete foundation (λ=1.69 W/m*°K) with a thickness of 400 mm (0.4 m), we get:
3.2=0.4/1.69+H2/0.032;
3.2=0.24+ H2/0.032;
H2=0.0947 m. This is approximately 95 mm.
In total, it turns out that to insulate a foundation 400 mm thick, you will need a 100 mm layer of Penoplex. You should not round down, it is better to take it with a reserve. For foundation insulation with Penoplex, the price depends on the area that needs to be covered with slabs and on the thickness of the material.
For example, the insulation height is 2 m, the length of the walls is 10+8+10+8 m (for a house 10x8 m). It turns out that the insulation area is 72 m2. The area of one Penoplex slab is 0.72 m2. To insulate the foundation we need a minimum 100 slabs of material.
In order to avoid cold bridges as much as possible when insulating with Penoplex and to cover all joints and cracks, it is recommended to lay the insulation in two layers offset, in a checkerboard pattern. If 100 mm of insulation is required, then two 50 mm slabs must be used. In total, we need 200 Penoplex slabs with a thickness of 50 mm. There are 8 slabs in a package, which means we buy 25 packages. In total, the insulation material will cost 930 - 950 USD.
To insulate the foundation with Penoplex, the cost of the insulation material makes up the lion's share of the budget. To this it will be necessary to add the cost of waterproofing, bitumen mastic for gluing insulation, umbrella dowels, and cement for plastering the surface. All this is just a small thing compared to the total cost of insulation work.
Technology of foundation insulation with Penoplex
Penoplex is a very technologically advanced material. But to take full advantage of its benefits, it is better to follow the technology of its use for different cases.
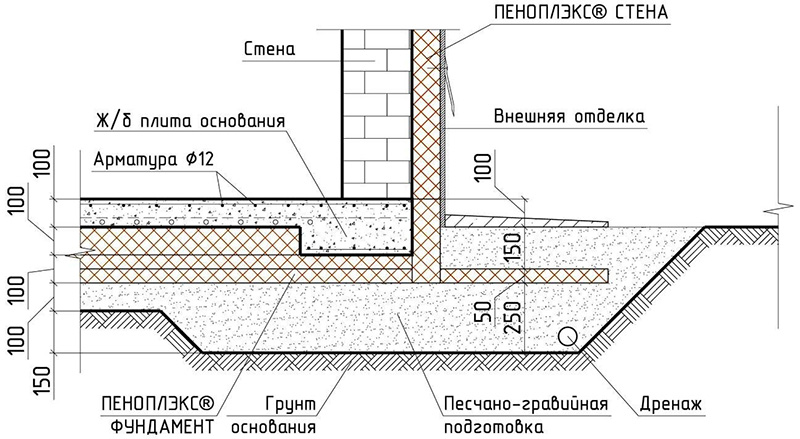
Insulation strip foundation Penoplex(insulation cake from the inside out):

- Foundation wall.
- Waterproofing.
- Penoplex slabs.
- A layer of cement-sand plaster.
- Backfilling with soil or sand, expanded clay.
- Penoplex slabs (horizontally) under the blind area.
- Blind area.
Insulation slab foundation Penoplex(pie from bottom to top):

- Sand.
- Penoplex slabs.
- Concrete slab.
- Waterproofing.
- Floor screed.
- Waterproofing the end part of a concrete slab.
- Penoplex slabs on the end part of the slab, laid from the depth of the sand bedding to the very top - 40 - 50 cm above ground level.
- Penoplex slabs under the blind area.
- Blind area.
Please note that Penoplex slabs can be laid on the foundation slab directly under the floor screed.
Do-it-yourself foundation insulation with Penoplex
All work on insulating the foundation with Penoplex can be done independently, without the help of construction organizations. At least you can save money on this. Of course, it is much more convenient to do insulation at the construction stage, even before filling the pit around the foundation. But if the moment is missed, and now there is a need to insulate the foundation of an old house in use, then you will have to work hard. Please also note that repeated excavation of the foundation may lead to the appearance of cracks in it, as the house will sink unevenly. This is dangerous, so it makes sense to calculate the loads before starting work.
Let's consider this more labor-intensive option.
Excavation
The first task is to dig out the foundation. A trench is dug around the perimeter of the entire house, deep down to the sand, i.e. to the entire depth of the foundation, and a width of at least 1 - 1.5 m. The depth of the strip foundation usually drops to the level of soil freezing in winter; this indicator can be found in the local geodetic service.

Despite the fact that Penoplex does not allow or absorb moisture, it still makes sense to equip a high-quality drainage. It is especially necessary if in a construction zone high level groundwater or heavy floods. We arrange drainage at the level of the sand cushion under the foundation. Along the perimeter of the entire house, at a distance of 50 - 60 cm from the foundation walls, we dig a shallow trench for drainage pipes. At the bottom of the trench we pour sand in a layer of 5 - 10 cm, then crushed stone 5 - 10 cm, then we spread geotextiles, the edges of which are placed over the edges of the trench. Inside the trench, we lay drainage pipes with holes directly on the geotextile sheet. The slope when laying drainage pipes should be at least 2 cm per 1 m. Then sprinkle everything on top with a 10 cm layer of crushed stone, wrap the edges of the geotextile so as to wrap them around the pipe. The pipes must be drained into a well for storm drainage.
Preparing the foundation surface
The foundation and plinth walls must be cleaned of soil residues, broken pieces of concrete and other dirt. To do this, you can use a brush with hard synthetic fibers. After the surface is completely cleaned, it must be leveled. Smooth surface- the key to the durability of the waterproofing coating, which can damage any sharp protruding edge or piece. It is extremely rare that after some time of operation the foundation walls remain perfectly smooth, so it is necessary to plaster them.
Leveling foundation walls:

- We install and secure the beacons at a distance of 1 - 1.5 m from each other. You can use perforated guides. We install the beacons to the entire height at which we are going to attach the insulation - from the very bottom of the foundation to a level of 50 cm above the ground.
- Mix the solution: 4 parts sand and 1 part cement, add water and knead until thick, but the solution should not be dry. The liquid solution will immediately drain from the surface.
- Using a trowel, we spread the mortar onto the foundation walls. We make sharp movements with our hands and begin to throw from bottom to top.
- When the entire surface is filled with solution, take a rule 2 m long, apply it to the beacons and stretch it from top to bottom, removing excess solution. It is advisable not to pull straight down, but to make slightly wave-like movements.
- After the first layer has dried, you can apply a second layer - leveling.
Important! If there were differences of more than 2.5 cm on the foundation walls, then additional reinforcement must be used for plastering. You can use a chain-link mesh secured with staples.
Do not continue work until the leveling solution is completely dry. This will take from 7 days to 20 if the foundation was poured a long time ago. If we are insulating a new foundation, then we need to wait a month until the moisture is completely removed from the concrete.
Foundation waterproofing
It is better to carry out high-quality waterproofing of the foundation in two layers: the first is bitumen mastic, the second is Technonikol sheets.
Bitumen mastic You can buy it ready-made - unpack and spread it, or prepare it yourself from a purchased bitumen block. If you bought dry bitumen, then you need to melt it in some container, then add used oil (motor) to it at the rate of 50 liters of oil per 120 - 150 kg of bitumen. The oil will add plasticity to the bitumen and then it will not crack in cold weather.

Using a roller, apply bitumen in a layer of 2 - 4 mm to the entire surface of the foundation and plinth. We try to fill all the cracks and small pores. When the bitumen dries, glue the sheets of TechnoNIKOL. We glue the sheets from bottom to top, melting their back side using gas burner. Keep the burner at a distance of no closer than 20 - 25 cm, otherwise TechnoNIKOL will burn. We smooth out each glued sheet, releasing air from under it. We glue the sheets with an overlap of 10 cm, then coat the joints with mastic.

Important! Many people waterproof the foundation only using Technonikol sheets. This is not the most The best decision, as it does not allow filling small cracks and pores. And if moisture gets under the sheets, they will quickly peel off. But coating with mastic protects the surface better, although the process itself is very dirty and labor-intensive.
Insulation of strip foundations with Penoplex
After finishing waterproofing works You can start attaching the insulation.
Important! Very important nuance- You may come across recommendations that in order to fix Penoplex slabs you need to reheat the bitumen waterproofing and glue the material onto it; in fact, you shouldn’t do this. There is a high probability of damaging the waterproofing.

We attach the Penoplex slabs to the foundation in a vertical position, starting from the bottom up. To secure it we need acrylic glue or any other adhesive based on inorganic solvents. Apply glue to the Penoplex board pointwise - 5 - 6 points. Then we press the slab to the surface of the foundation and press it down to secure it. We wait 1 minute. All subsequent Penoplex slabs are fastened in the same way, only they must be connected to the already fixed ones using a tongue-and-groove system. We fill the gaps between the slabs polyurethane foam or acrylic glue.

We attach the second layer of Penoplex slabs in the same way - with glue, but with an offset to cover the joints between the slabs of the first layer.
Important! Fixing Penoplex slabs on the part of the foundation that will be covered with soil cannot be done using mushroom dowels, as this can damage the waterproofing layer.
Dowels can only be used on the base part; there, 5 dowels (120 mm long, 10 mm in diameter) are fastened to each slab. The depressions from the dowels must be covered with acrylic glue. We continue further work only after the glue has completely dried.
Leveling the surface
Now the Penoplex insulation needs to be protected from the effects of soil; to do this, we plaster the surface again.

We attach a reinforcing fiberglass mesh on top of the Penoplex, joining the sheets with an overlap of 10 - 15 cm so that cracks or chips do not form at the joints where the mesh is attached.

Some sources recommend that all leveling be done using only one acrylic glue, applying it in several layers until the surface is level. But you can perform classic leveling using a cement-sand mixture. After the layer of plaster has completely dried, you can fill the foundation pit.
Backfill and warm blind area from Penoplex

Instead of soil removed from the trench, sand or expanded clay can be poured under the house to improve thermal insulation. Although you can fill up the soil that was there. But not completely. The final stage of foundation insulation is a warm blind area.
Approximately at a depth of 30 cm from the top, pour a 10 cm layer of sand and compact it thoroughly. Then we spread waterproofing material 1 - 1.5 m wide from the foundation itself. It can even be ordinary roofing felt, the joints of which are carefully coated with bitumen. After hardening, Penoplex slabs are laid on top, the joints are coated with acrylic glue or filled with polyurethane foam.

When the insulation layer is laid on the ground, you can build a blind area on top. For this purpose it is poured concrete screed at a slope from the foundation of the house to divert waste and storm water from it.
The base of the house, on which Penoplex is also attached, must be decorated with stone, clinker tiles or any other method.
Remember - a high-quality protected foundation is the foundation of your home. Do waterproofing and thermal insulation on time, and you won’t have to regret it, and you won’t remember about major foundation repairs for a long time. Penoplex is an excellent technological material that is very convenient to use for foundation insulation, it is easy to install and does not require special treatment. It is important to know only one thing - extruded polystyrene foam is destroyed by contact with acetone, benzene, alcohol and other organic solvents.
Foundation insulation with Penoplex: video
Building a country house is the dream of many of us. But in order to ensure the necessary conditions For favorable living of the whole family in winter and summer, it is imperative to insulate the foundation of the house from the outside. Without thermal insulation, not only does the level of heat loss increase, but there is also a danger of destruction of the underground structures of the structure.
On a suburban area
Thanks to high-quality insulation of the foundation and basement, heat is retained in the room, the penetration of groundwater is prevented, and protection from low temperatures is also provided. In order to prevent the impact of an aggressive environment on the foundation of a house, protective measures are taken, and the most important of them is external thermal insulation.
Requirements for insulation
To obtain a high-quality result, it is not enough just to carry out all activities professionally.
Important factors are also the right choice Supplies and their high quality.
Choose insulation that is optimally suited for a specific purpose both in quality and with financial side, pretty hard. After all, today you can find many options for insulation in different price categories and from different manufacturers.

Do-it-yourself installation of extruded polystyrene foam on a plinth
Therefore, when choosing, you should pay special attention to the following qualities of the material:
- Low hygroscopicity. This parameter is very important as it determines the degree of moisture absorption. At a high rate, the material will absorb moisture and as a result will collapse, which will lead to the destruction of the base itself.
- High strength. The thermal insulator must withstand heavy loads of underground compressive forces. For example, the impact of soil, which increases in volume when frozen.
- Low thermal conductivity. The thermal insulator must have a reduced thermal conductivity coefficient to ensure good thermal insulation.
- Long service life. The thermal insulator should have approximately the same service life as the building, because replacing it is a rather labor-intensive process.
Taking into account all these requirements, you can choose the most suitable material for insulating the outside of your house with your own hands.

Coating waterproofing and penoplex
Selecting a thermal insulator
To insulate the foundation of a house from the outside, it is important to select a material whose properties are most suitable for the building, taking into account all its features and the climatic conditions of the area. Today, the following are especially popular among many consumers:
- expanded polystyrene;
- liquid polyurethane foam;
- extruded polystyrene foam.
Expanded polystyrene
It is an improved version of polystyrene and its derivatives and is a gas-filled material. Widely used in various branches of construction and industry.

Penoplex installation
The main advantages are:
- Low degree of thermal conductivity. Allows you to keep the room warm. For example, a material 11 cm thick gives the same results as a two-meter brick wall.
- Waterproof. Moisture absorption is about 6%, which allows the material to be used in conditions of high humidity without fear of deformation.
- Long service life. Withstands up to 60 operating cycles temperature conditions from -40 to +40 C.
- Insensitivity to biological effects. The material is not exposed to microorganisms, mold and fungi.
- Environmental friendliness. During production, substances that are harmless to human health and the environment are used, so expanded polystyrene is also used in the food industry.
- A light weight. Thanks to it, the insulation of facades becomes labor-intensive and does not take much time.
- Heat resistance. When ignited, fire-resistant types of polystyrene foam tend to self-extinguish.
- Soundproofing properties. This is especially important for owners of houses and apartments in noisy areas. The use of 3 cm thick polystyrene foam sheets for insulation can reduce noise by 25 dB.
- Vapor tightness. The indicator depends on the density and structure of the type of polystyrene foam. Varieties with low vapor permeability are similar in this indicator to certain types of wood: pine, oak.
- Chemical resistance. The substance is not subject to the aggressive effects of ethers and alcohols, but is destroyed under the influence of solvents.
- Resistance to mechanical stress. Mechanical strength during tension is approximately 20 MPa.
- Relatively low price, which increases the availability of the material for many consumers.

Wiring diagram
So, expanded polystyrene is perfect option for use for various purposes, especially for thermal insulation of foundations.
Liquid polyurethane foam
Liquid polyurethane foam is a polymer insulation material that is widely used to obtain a uniform insulating coating.
This is one of the few materials that are simultaneously a thermal insulation, vapor barrier and waterproofing layer. They allow you to significantly save money and labor costs when performing thermal insulation work.

In the context
The advantages of liquid polyurethane foam are:
- Low degree of thermal conductivity. This allows you to significantly reduce heat loss.
- Long service life. The service life is more than 30 years.
- The ability to create a favorable microclimate in the room due to optimal performance thermal conductivity and sound insulation.
- Considerable strength. Due to its good density and strength, the material is able to withstand large mechanical loads without losing its performance properties.
- Absolute sealing, which is very important when performing any type of insulation work.

Liquid polyurethane foam
Thermal insulation of the foundation using liquid polymer can be carried out both from the inside and from the outside. For external use, additional protection from direct sunlight may be required.
Protection is carried out by applying liquid rubber or facade paint, which prevents loss of waterproofing properties and increases service life.
Extruded polystyrene foam
It is a relatively young type of polymer heat insulator and is produced by foaming raw materials during the extrusion process. Due to a number of advantages, the material has won the trust of many consumers and today is widely used in various fields of construction.

Formwork for blind area
The advantages of the material are:
- low water permeability;
- low thermal conductivity;
- resistance to chemical attack from inorganic solvents;
- ability to withstand a wide range of temperature changes: from -50 to +75 C;
- long service life;
- a light weight.

Installation drawing
Extruded polystyrene foam is widely used for internal and external insulation of buildings, roofs, and is integral part sandwich panels, etc. One of the most common types is penoplex.
Insulating the foundation from the outside with penoplex is relevant and popular due to its excellent performance qualities. Such slabs have increased strength and can withstand enormous loads, providing excellent waterproofing and drainage of groundwater.

Do-it-yourself thermal insulation of the foundation with penoplex allows you to solve several problems related to the construction of the foundation and equipment of the basement.
Foundation thermal insulation
Usage modern methods thermal insulation is of great importance, especially in areas with harsh climatic conditions. This prevents a significant portion of heat loss and freezing of soils, which increase in volume, which leads to a rise in their level.
Foundation insulation with polystyrene foam
Insulating the foundation of a house from the outside with polystyrene foam is excellent option to improve the thermal insulation qualities of the base of the house and prevent freezing.
Expanded polystyrene is an improved type of foam. Its use is more profitable, and installation is easier.
The video describes in detail how to insulate the base of a residential building with your own hands.
The process works as follows:
- Preparing the base. This stage can be carried out both during the construction of the building and after its completion. To do this, you need to dig out the foundation, clean it of soil, debris, rust and grease.
- Selecting sheets. In this case, you need to pay attention to two factors: density and thickness. They mainly use sheets with fire retardant additives and a density of 35 kg/m3.
- Waterproofing. This will prevent the influence of groundwater and its penetration through the insulator layer.
- Fastening polystyrene foam sheets with contact adhesive. You can attach two layers, but so that the panels of the second layer cover the joints of the first.
- Protection of insulation with a reinforcing mesh to avoid strong mechanical stress and the penetration of rodents. A layer of cement mortar can be applied to the protective mesh.
- Providing drainage. This step is considered mandatory when constructing a building on wet soils.
- Basement insulation. The base also needs to be insulated in the same way, followed by finishing. After the glue has dried, the panels are additionally secured with nails.
- Soil insulation. The event involves isolating the surrounding land with a blind area insulated with polystyrene foam slabs.

Insulating the foundation and blind area can significantly increase the temperature in the structure and protect the foundation from destruction.
Insulation of the foundation with liquid polyurethane foam
It is considered a fairly effective method that reduces heat loss by 20–25%.
The main difference is the method of application using special installation for spraying.
To do this, two liquid components are mixed with each other, forming a thick foam. When applied, it increases in volume and hardens, forming a protective seamless layer with excellent thermal insulation and waterproofing properties. The optimal application thickness is considered to be 60 mm.

Wooden building
The polyurethane foam layer can be applied at a temperature not lower than +5 C. Surface preparation involves cleaning from contaminants, and surface quality is an unimportant factor.
As the foam hardens, it changes color. When performing work, various problems may arise related to equipment and neglect of weather conditions.
For example, when applied in sub-zero temperatures, cracks may appear that must be repaired in the future, otherwise water may accumulate in them and freeze. After polymerization, the polyurethane foam layer has low plasticity.

Foundation insulation using EPS
As a rule, not all insulation materials are suitable for thermal insulation of the base. To choose the right material for this purpose, you need to consider its service life: it must be as durable as the building itself.
Insulation with extruded polystyrene foam (EPS) is considered a more reliable method than, say, polystyrene foam, since this material is more durable and has excellent performance characteristics.

Blind area with trays
For this purpose, you need to purchase heat insulation boards and suitable glue for attaching it. After this, a number of preparatory activities should be carried out:
- Dig a trench around the foundation, digging into the ground.
- Apply EPS to the freezing depth of the ground.
- Clean the foundation from debris and dirt.
- Apply a special primer in two layers, wait for it to dry and absorb into the concrete.
- Provide waterproofing bitumen mastic.
- Apply glue to the boards.
Attaching the slabs to the outer part of the foundation is allowed 1 minute after applying the glue. If the panels have a large area, you need to apply the glue in several strips using a comb spatula. If the slabs have locks, then a few days later the seams are sealed with polyurethane foam, and the slabs themselves are additionally secured with dowel nails.

Two-story mansion
How to insulate the foundation of a wooden house
Many owners of wooden houses believe that to ensure favorable living conditions it is enough to insulate the walls and floors. However, this is not true, because serious heat loss can occur through a wooden floor - up to 20%. Therefore, thermal insulation of the foundation is mandatory, especially if the house is located in an area with harsh weather conditions.
Foundation insulation wooden house outside will not only create favorable conditions indoors, but also to prevent adverse effects on it. For this purpose, polystyrene foam and its varieties, as well as expanded clay, are usually used.

Stone finishing
Insulation of the foundation of PPS or EPS
Expanded polystyrene has excellent consumer properties, such as low thermal conductivity and moisture absorption, resistance to negative weather conditions, affordable cost, ease of installation, etc.
These and other characteristics have made this material one of the most relevant and in high demand among many consumers.
To insulate only the above-ground part of the foundation or plinth, a fairly simple installation is required. PPS sheets are simply attached to the surface using glue or special fasteners.
After this, cladding or plastering is performed. However, you should know that installing insulation does not mean complete waterproofing, so it should be carried out separately to avoid groundwater from penetrating under the floor.

At the summer cottage
If you have a basement, you should insulate not only the above-ground part of the base, but also the part that is underground.
In this case, it is necessary to completely waterproof the walls. For this purpose, a trench is dug around the wooden house, then the foundation is cleared of soil and debris. Next, EPS panels are attached to the surface, after which the whole thing is backfilled and compacted.
The insulated base can additionally be finished with brick or other types of cladding that can withstand adverse weather conditions.
Foundation insulation with expanded clay
Often wooden house insulated from the outside with expanded clay. However, it has increased moisture absorption.
To avoid the negative effects of this phenomenon, a trench is dug around the house and formwork with waterproofing is installed, after which the expanded clay itself is filled.

Blind area
This method is no less effective, but requires special attention and the need to adhere to all installation rules.
DIY insulation video
The video explains in detail how to insulate the foundation of a house yourself.
The use of insulation when arranging the foundation is a common way to improve the thermal insulation performance of a building and protect the foundation from negative influences subzero temperatures air. Among other insulation materials, extruded polystyrene foam has gained great popularity. Unlike conventional polystyrene foam, the material has an increased safety margin; in addition, the special shape of the boards allows the installation process to be significantly simplified.
Let's figure out how to insulate the foundation of a house with penoplex from the outside with your own hands. The procedure is very similar to thermal insulation of walls. Special heat-insulating slabs are fixed to the side parts of the foundation, which are located above and below the soil surface. The use of insulation allows you to reduce the rate of heat exchange between the foundation walls and soil layers.
Why insulate the foundation
Some owners of private houses refuse to insulate the basement, trying to save as much as possible Money. At the same time, experts in the field of construction work insist that thermal insulation of this part of the house is simply necessary, and it is better to attach the insulation to the outside of the structure.
General scheme of foundation insulation with penoplex
The following arguments are put forward in favor of insulation:
- After insulation, the foundation becomes protected from the negative effects of sub-zero air temperatures. This factor is especially important in places with high humidity. If, when the temperature drops, moisture gets into concrete cracks, it begins to rapidly expand and ultimately tears and damages the concrete structure;
- The degree of protection of the foundation from temperature fluctuations increases. The concrete structure experiences much fewer cycles of compression and expansion, resulting in a building lifespan without overhaul the foundation increases significantly;
- The insulation becomes an additional barrier to groundwater that tends to penetrate to the foundation.
What is the best way to insulate the foundation: from the inside or the outside?
The foundation can be insulated from the inside or outside. Both methods have their advantages and disadvantages.
Internal thermal insulation
To the benefits internal insulation include:
- Improving the microclimate in the basement;
- Effective control of indoor dampness;
- Protecting the basement from groundwater penetration.
The disadvantages of internal insulation include:
- Such thermal insulation does not protect the foundation from soil freezing;
- Moisture easily enters pores concrete base and destroys it;
- The dew point shifts inward.
Insulation from the outside
This insulation method has the following advantages:
- The foundation is reliably protected from freezing;
- The dew point shifts towards the street;
- The concrete base is protected from any negative influence from the environment;
- The overall service life of the premises increases significantly;
- Some insulation materials can provide additional strengthening of the foundation;
- When installing a thermal blind area, you can protect not only the foundation from freezing, but also the soil within a radius of about half a meter from the installed insulation.
External insulation will require more time and materials, and this is the only drawback of this method.
 It is very important to understand that external insulation of the foundation provides a reliable guarantee of protection for the entire house, and thermal insulation from the inside will only protect the basement from the cold
Having assessed all the advantages and disadvantages of external and internal methods we can conclude that it is better to give preference to external insulation.
In order for the insulation to fully cope with the tasks assigned to it, it is worth remembering that thermal insulation foundation work should only be done after all the walls have been insulated. Be sure to treat all joints between the insulation with polyurethane foam - this will increase the efficiency of the thermal insulation of the room.
By the way, preference for insulating the foundation with inside given only if for some reason it is impossible to install insulation outside.
What is the best way to insulate?
When planning work on installing thermal insulation for the foundation, the issue of choosing and purchasing suitable insulation is initially resolved. The material for foundation insulation should have the following characteristics:
- Be resistant to deformation against the background of constant pressure from the soil;
- Do not absorb moisture from the soil.
On the modern market, insulation materials are presented in a wide range, and a newcomer to the construction industry may get confused in the abundance of offers. It is worth saying that the common insulation “ mineral wool» not suitable for thermal insulation of foundations. Not only is it not durable, but it also absorbs moisture well, as a result of which all its positive performance characteristics are negated.
 Despite fire resistance and low thermal conductivity, mineral wool has a significant drawback - high hygroscopicity
At modern construction For private houses, two materials are best suited for foundation insulation:
- Polyurethane foam.
Polyurethane foam is a modern insulating material that guarantees thermal, sound and water protection of a concrete structure. The material is sprayed onto the surface using special equipment in several layers. This application technology eliminates the appearance of gaps and seams. The advantages of the material include:
- Possibility to apply thermal insulation coating without seams and gaps;
- Excellent adhesion characteristics;
- Low thermal permeability;
- Steam protection;
- Increased reliability;
- Long service life;
- There is no need to purchase additional material for steam and water protection of the foundation.
The main and rather significant drawback is that special equipment is required to lay the material, as a result of which the process becomes impossible to implement at home. In addition, polyurethane foam has a high cost.
Penoplex, in turn, does not require special skills or special equipment for installation. Among other things, it has the following advantages:
- The cellular structure does not allow moisture to pass inside, as a result of which the slabs do not collapse over time after freezing;
- Increased strength characteristics;
- Ensuring a long service life of the foundation;
- Low cost;
- Long service life of the material;
- Preservation thermal insulation characteristics during the entire period of operation;
- Rodents do not use the material as food, unlike regular foam.
 Penoplex insulation reduces heat loss by 20% and helps the foundation last longer
Penoplex is an improved version of polystyrene foam. The material allows moisture to pass through very easily, and after several cycles of defrosting and freezing it will simply crumble into segments. Let us add that several years ago, expanded clay was also in demand on the construction market as insulation for the foundation. The material is inferior to penoplex due to its high cost, as well as reduced efficiency in providing thermal insulation.
Calculation of insulation thickness
In addition to the correct choice of insulation, it is necessary to pay attention to calculating its optimal thickness. If the penoplex is of insufficient thickness, this may result in freezing of the foundation and transfer of the dew point inward basement, which will ultimately lead to condensation on the walls and an increase in humidity levels.
You should not take too thick a material: this will not increase the degree of thermal insulation, but the costs will significantly hit the family budget.
Correct thickness calculation insulation material– a guarantee of warmth in the house, lack of humidity and minimal financial costs.
Thermal resistance is denoted by the Latin letter R. This value is constant, but for each region the value is different and depends on general climatic conditions. For example, for the Moscow region it is equal to 3.28 m 2 K/W. For other regions of Russia, the value can be taken from the table:
| Region | Thermal resistance, m 2 K/W |
| Moscow | 3,28 |
| Krasnodar | 2,44 |
| Sochi | 1,79 |
| Rostov-on-Don | 2,75 |
| Saint Petersburg | 3,23 |
| Krasnoyarsk | 4,84 |
| Voronezh | 3,12 |
| Irkutsk | 4,05 |
| Yakutsk | 5,28 |
| Volgograd | 2,91 |
| Astrakhan | 2,76 |
| Ekaterinburg | 3,65 |
| Nizhny Novgorod | 3,36 |
| Vladivostok | 3,25 |
| Magadan | 4,33 |
| Chelyabinsk | 3,64 |
| Tver | 3,31 |
| Novosibirsk | 3,93 |
| Samara | 3,33 |
| Permian | 3,64 |
| Ufa | 3,48 |
| Kazan | 3,45 |
| Omsk | 3,82 |
Thermal resistance is calculated using the formula:
R = h 1 /λ 1 +h 2 /λ 2
where h 1 is the thickness of the foundation (in meters), λ 1 is the thermal conductivity coefficient of the foundation (for a reinforced concrete foundation λ 1 = 1.69 W/m ° K); h 2 – thickness of the insulation material (in meters); λ 2 – thermal conductivity coefficient of insulation (for penoplex λ 2 =0.032 W/m ° K).
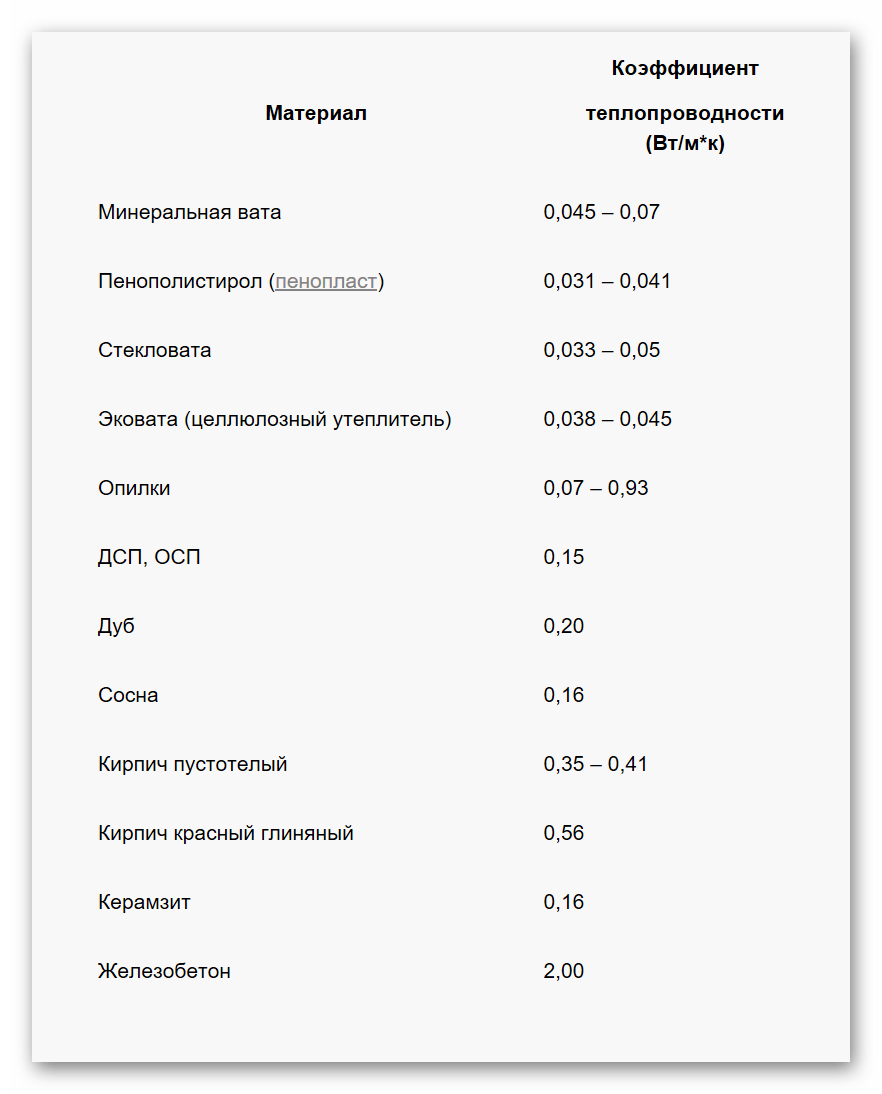 Thermal conductivity coefficient of various materials
Therefore, the thickness of the insulation is calculated using the formula:
h 2 = λ 2 (R-h 1 /λ 1)
Let's look at an example of calculating thickness thermal insulation material for a private house in St. Petersburg with a reinforced concrete foundation half a meter thick (h 1 = 0.5 m):
h 2 = 0.032(3.23-0.5/1.69) = 0.094 m, that is, 94 mm.
The value must be rounded up to the nearest centimeter. Thus, the thickness of penoplex for insulating a half-meter reinforced concrete foundation of a house in the Leningrad region is 10 cm.
Insulation technology
Following the sequence of penoplex insulation will allow even novice builders to cope with the process.
It is advisable to carry out work on insulating the foundation at the stage of construction of the future house. This makes the process much easier. But what to do if the house was built several years ago and was not initially insulated?
In this state of affairs, the foundation is excavated to the ground. Ideally, dig to the depth of the soil, but if working resources are limited and it is not possible to cope with such a volume of work, it is worth digging a trench near the foundation for the length of the insulation used.
The thickness of the trench is determined by adding the thickness of the insulation sheet used, as well as the minimum space required to complete the work. Making a trench too wide will be inconvenient, especially if you do not plan to involve specialized construction equipment in the process. A trench that is too small will complicate the work process.
 If you decide to use special equipment for excavation, it is recommended to be careful not to damage the foundation walls
The bottom of the dug trench must be filled with sand, the layer of which should not be less than 20 centimeters. Be sure to compact the sand thoroughly and make a slight slope in the direction opposite to the foundation. Sand will act as additional protection from moisture.
After the foundation has completely dried, it is necessary to begin preparing the future surface for laying sheets. We carefully clean the foundation wall and plinth from adhering soil, damaged pieces of concrete and other contaminants. It is most convenient to clean with a brush with stiff synthetic bristles.
After cleaning, it is necessary to level the surface: only a flat concrete wall will ensure a reliable fit of the waterproofing coating.
Leveling the foundation walls is carried out according to the following principle:
- On a surface concrete walls We install beacons, the distance between which must be at least 1 meter from each other. Beacons must be mounted on the entire surface where insulation will be installed in the future;
- Prepare the solution. To do this, thoroughly mix 4 parts sand and 1 part cement in a container, after which we begin adding water. Make sure that the consistency is not too liquid or dry, otherwise the leveled surface will not be reliable;
- Pour the mixture onto the surface from bottom to top;
- We apply a rule to the beacons and with a sharp movement from top to bottom we level the surface, while removing excess solution;
- After the first layer of the mixture has dried a little, you can apply the finishing layer, which will finally level the surface.
 To level the walls, it is recommended to use a rule about two meters long, since working with a float takes too much time
This method is suitable for more or less even walls. If differences of more than 2.5 centimeters are observed on the surface, a reinforced mesh is additionally used.
You should proceed to the next stage of work only after cement mixture completely dry. On average, the process takes from 7 to 20 days. If a recently poured foundation is being insulated, insulation begins no earlier than a month after installation.
It is better to isolate the foundation from moisture penetration in two layers with the application of bitumen mastic and waterproofing Technonikol.
It is recommended to buy ready-made bitumen mastic - it’s easier than preparing the solution yourself. If you decide to do it manually, then be sure to add used machine oil to the mixture, which will protect the mastic from cracking when the air temperature drops.
It is most convenient to apply mastic using a roller. The layer thickness must be at least 2 mm. After the bitumen has dried, we proceed to installing Technonikol. The sheets are glued from top to bottom. The back side is melted using a burner, and the joints between the sheets are covered with mastic. The material fills all small pores and cracks and prevents moisture from causing Technonikol sheets to peel off.
 To avoid cracking of the mastic under the influence of temperatures, it is recommended to add used machine oil to the solution at the rate of 5 liters of oil per 12 - 15 kg of bitumen
Installation of penoplex
It is most convenient to install penoplex sheets using an adhesive solution or foam glue. Additionally, you can use dowels in the form of umbrellas, but they violate the integrity of the insulation sheet.
Apply glue to the sheet using a notched trowel, then the insulation will lie smoothly, without gaps between the sheet and the foundation wall.
Experts advise giving preference to foam glue in cylinders. It not only simplifies and speeds up the process, but is also used more economically.
 After pressing against the wall, the adhesive should cover at least 40% of the foam board
If the sheets are laid in two levels, then a checkerboard order must be observed. In this case, the distance and gaps between the insulation sheets should be minimal. The gaps can be additionally treated with foam.
Reinforced mesh and finishing
To enhance the overall strength of the structure and protect the insulation from external sources It is recommended to use reinforced mesh. The material is used only if the foundation is above the ground and can be damaged in the future.
The mesh is laid on foam sheets, and an adhesive solution is placed on top for fixation.
At the next stage we begin finishing foundation. You can get by with regular plaster, use siding or any other material for exterior finishing.
If desired, the resulting trench can be filled with sand or expanded clay, and the materials will act as an additional layer of insulation.
Backfilling of the trench is not carried out completely, but space is left for the formation of a warm blind area. The work is carried out in several stages:
- At a depth of about 30 cm from the surface of the earth, pour a layer of sand 10 cm thick and compact it thoroughly;
- We spread waterproofing material at the foundation (ordinary roofing material will do, the joints between which are lubricated with bitumen mastic). The boundaries should be adjacent to the foundation on one side and extend from it to a width of about a meter;
- We lay foam sheets on the waterproofing layer, and treat all joints with glue or foam;
- Next, a blind area is constructed from concrete mixture. It must be done at an angle from the foundation, which allows for further drainage of wastewater.
 The foundation is the foundation of your home, so don’t skimp and do the insulation well
Only maximum compliance with all the rules for laying insulation on the foundation will protect the foundation of the house from freezing and subsequent premature destruction. Savings on foundation insulation may result in more serious financial costs in the future.
Having decided to start building a country house, even at the design stage it is worth considering a large number of questions. One of them is insulating the house and choosing insulation.
In winter, if the thermal insulation is poor, you will have to pay for excessive heating of the house. How to insulate and how to do it, we’ll figure it out further and try to protect you from mistakes.
In contact with
Classmates
Important points of thermal insulation
First of all, when building a house, you need to decide whether the house will have a basement or not. In the case of a house with a basement that will be used as a living space, there is a need to insulate it to prevent heat from escaping through its walls.
In this case, the total heat loss can reach up to 15% of the heat loss of the entire building. To reduce the cost of insulation work and to avoid errors associated with the installation of insulation, it is necessary to solve many factors at the design stage.
It is worth paying attention to:
- functional purpose of the basement;
- initial Construction Materials, used for the construction of walls;
- climatic zone of residence.
Insulation methods

Today, there are many options for insulating the base. First of all, the foundation should be divided into 2 parts, one of which (underground) is in constant contact with a moist environment (rain, melt water, dampness).
To prevent humidity from damaging the insulation and it, in turn, not losing its thermal characteristics, it is necessary to use moisture-resistant insulation, for example, penoplex.
An analogue of penoplex also has high moisture resistance - ( comparative analysis insulation materials are given in).
When insulating the base, two methods are used:
- External insulation. With this type of insulation, it is preferable to use a material that has zero water absorption. Penoplex has similar properties. This work You can do it yourself without resorting to the help of specialists. Additionally, you will need to make a good waterproofing of the foundation, for example, from roofing felt, or treat the surface with bitumen mastic.
- Internal insulation. The procedure for insulation is similar to the steps in the first method. The only difference is that the base is lined from the outside. Advantage interior design is that:
- protection from groundwater occurs;
- the microclimate improves.
However, there is also a drawback: the appearance of condensation between the insulation and the wall.
Note: big advantage external insulation is to extend the service life of materials by protecting it from atmospheric influences.
Preparatory work
Having analyzed the advantages and disadvantages, let's consider the stages preparatory work for external insulation:


Keep in mind: a more reliable option would be to use deep penetration waterproofing, such as Penetron.
Installation work

When starting to install penoplex, we will need the following tools:
- plastic dowels;
- slope corner;
- construction knife;
- hammer;
- toothed;
- trowel (trowel);
It is important: materials and tools should be chosen of high quality.
Work order


Insulation of the basement is an important and critical stage of construction. However, it is quite possible to cope with this work with your own hands, having first studied the technology of installing penoplex foam.
It should be remembered that the thicker the insulation, the more effective the thermal insulation will be. However, it is worth calculating the thermal engineering calculations of the walls in advance in order to find optimal thickness insulation. This will reduce the cost of the material when purchasing it, thereby preventing overconsumption of insulation.
Look video on how to insulate the basement of a house with penoplex with your own hands:
In contact with
See inaccuracies, incomplete or incorrect information? Do you know how to make an article better?
Would you like to suggest photos on the topic for publication?
Please help us make the site better! Leave a message and your contacts in the comments - we will contact you and together we will make the publication better!


