In many apartments of old buildings you can find small ones that were previously used for storage rooms with conservation and other similar “treasures”. Currently, these secluded corners are reserved for clothes, making them built-in wardrobes. We offer two simple options on how to make such a built-in wardrobe yourself.
Making built-in wardrobes from scratch
So, in your apartment there is just such a secluded corner that is empty and can become quite useful.
Built-in wardrobe: rationalize the filling
Suppose you already have a similar cabinet, but its contents are not very convenient or the space in it is empty. In this case, you can slightly modify the design and make it more functional.
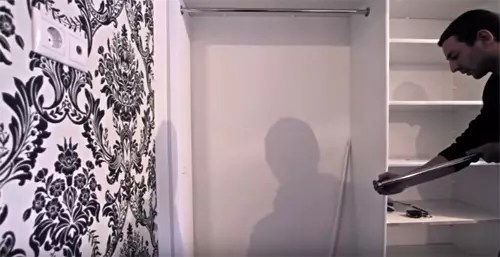
- Before making a built-in wardrobe, we completely empty it and begin preparatory work.
- In our case, almost all of the upper space is empty. It makes sense to supplement the closet with shelves or other structures.
- We nail boards around the perimeter. Important point: When doing this part of the job, always drill the hole a little smaller than necessary and then drill out in place. This will prevent the boards from splitting into two parts. Refers to the holes located at the ends of the boards.
- So, we nailed the base. In the corners the design looks like this.
- The top shelf is sorted out. Now we will improve the side parts of the cabinet in a similar way. There we nail the same board for the base of the shelves.
- The basis for the new filling of the built-in wardrobe with your own hands is ready. Let's move on to the shelves themselves. We will make them from laminated chipboard. Using special glue and an iron, we process the ends.
- The difference, as they say, is obvious.
- We try on our shelves in a new place.
- To make the entire structure look neat, all of our bases for shelves can be puttied and sanded. Then the surface will become completely smooth even after painting. appearance will be presentable.
- We sorted out the side shelves. Let's go back to the top now.
- We need to cut out (or maybe buy similar ready-made designs) a T-shaped part on the machine. We will need it to connect the two parts of the shelf. Its length is equal to the width of the shelf.
- We install the first part of the shelf, then we nail our T-shaped blank to it.
- Now we fix the second part of the shelf. This is what the connection looks like.
- The shelf is long and will store a lot of things, so we reinforce it with a metal corner in the center.
- Since our filling has become more rational and upper shelves have appeared, it is quite logical that we will need something to reach them. We build a simple bench from the remains of chipboard slabs.
- This is how easy it was to make your own built-in wardrobe much more spacious and practical.


have recently become one of the most common pieces of furniture. This design provides convenient. Most often they are purchased not in finished form, but they are made to order. But if there is a possibility necessary materials You can make a furniture set yourself. Before you begin, you need to decide on the number/location of shelves and drawers. It is also important to plan the design taking into account the dimensions of the room. In any case, all these points need to be studied before making a wardrobe with your own hands. In this case, the drawings are a kind of starting point, and our review today will help you cope with this rather difficult task with a minimum of errors.
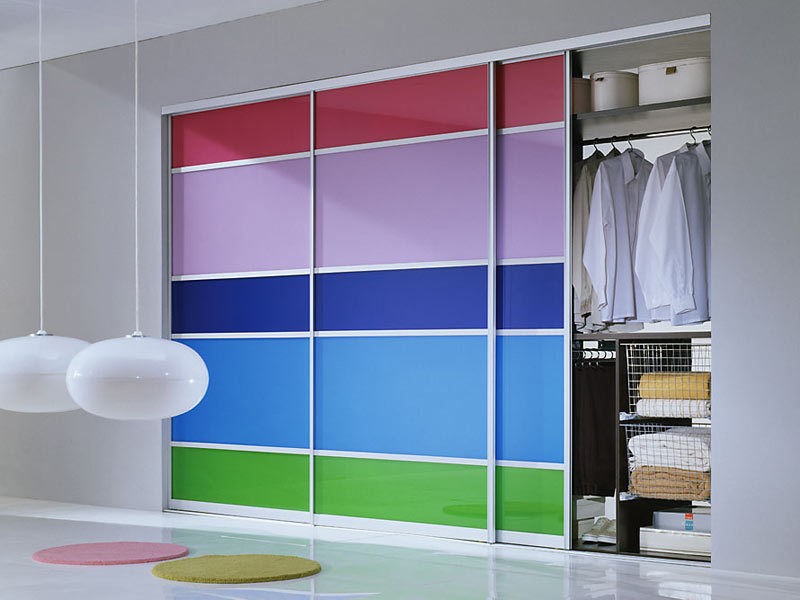
A feature of this type of furniture designs is that they allow you to save usable space in the room. At the same time, sliding doors for a wardrobe can be glass, mirror, rattan, plastic or bamboo.

So, let's look at the main advantages of furniture sets:
- variety of designs: built-in, rectilinear, cabinet and;
- furniture sets allow you to effectively use even small space. This perfect solution for small rooms. At the same time, mirror surfaces allow you to visually increase the space;
- brevity of designs;
- filling wardrobes. Such furniture sets allow you to hide everything unnecessary. They are used not only for clothing, but also for various household items and small appliances;
- models can be built-in, cabinet and with mezzanines;
- the wall of the room, as well as the floor or ceiling can be used as the walls of the cabinet;
- wardrobes are made to order;
- possibility of independent design.

It is worth noting some disadvantages:
- rapid wear sliding system;
- quality is required internal filling cabinet;
- the aluminum profile may be deformed;
- Careful maintenance is required: cleaning all surfaces and guides.
For your information! To prevent the door from coming off the rail, Schlegel for sliding wardrobes is used at the joints and ends. It needs to be glued, which will create shock absorption when the doors are opened suddenly.
Types of wardrobes
Let's look at the main types of wardrobes:
- built-in models that have no gender back wall and ceiling. Such headsets cannot be moved or rearranged. They consist of side walls, shelves and internal partitions. Built-in models are made to order, but you can also purchase separate elements for self-assembly;
- free-standing sliding wardrobes are equipped with doors that move on a rail. This design has a floor, a back wall and a ceiling;
- corner headsets are suitable for small spaces. It is compact in size but very spacious inside. Corner design suitable for a small rectangular room or square hallway;
- diagonal corner completely occupy the entire corner. Such designs are more spacious and look stylish. Inside you can hide not only a wardrobe, but also bed linen and blankets.


Wardrobe materials
Before you start making a corner cabinet or any other with your own hands, decide on the material.
Tree
For durable sets, you should choose solid wood. This is a prestigious material for furniture. It is worth considering that wood is not the most the best option for a built-in wardrobe. The humidity level is higher in the niche. For a wooden cabinet, you must carefully select wood that is free from cracks and knots. The frames of the doors are also made of wood. In this case, it is necessary to glue them together.
Wooden sets have the following advantages:
- environmental friendliness of the material. The tree does not contain toxic components;
- increased level of wear resistance;
- aesthetics of products. Wood furniture is distinguished by natural colors and unique patterns;
- naturalness of the material;
- possibility of carrying out restoration work;
- ergonomic use of space;
- variety of styles.
Drywall

One of the popular materials is, which is made from pressed wood chips. To create a dense composition, a thermoactive synthetic resin is used. This material is easy to process.

When working with plywood, it is necessary to take into account the softness of the material. Products may become deformed when twisted. It is recommended to use washers for such connections.
Popular and laminated plywood. At the same time, plastic reduces the influence of formaldehyde in resins.

Furniture panels
The best material for homemade designs are furniture panels. This material is known for its durability, environmental friendliness and reliability.
It is worth noting the following advantages of using this material:
- does not require significant funds;
- you can bring unusual design ideas to life;
- the product can have different shapes and designs;
- For a furniture set, you can choose functional fittings.

Location of the wardrobe in the room
Before you start creating a wardrobe with your own hands in the hallway or in another room, it is worth considering its location.
If you place the set along a solid wall, then the furniture itself will be perceived as a wall. It would be better if the closet reached the ceiling. Doors can be mirrored, which allows you to visually enlarge the room.

If you place two identical cabinets along the wall and leave a distance between them, you will get an alcove. You can put or in the resulting niche. In the living room, an alcove can be used to create an area with a false fireplace.

A practical solution would be to install the headset along the edges of door and window openings. A mezzanine can be installed above the opening. The cabinet can be recessed into specially created niches. If the size of the room allows, then small sizes can be used.
Depending on the specific design style of the room, it is not necessary to build built-in wardrobes or disguise them. For retro or glam vintage style, bulky furniture will only complement the colorful design.

It is also necessary to choose the right drawer mechanism for the wardrobe. It shouldn't be noisy.
Hallway


Children's
There are many things that need to be placed in a child's room. These are seasonal clothes and shoes, children's toys, Board games and sports equipment. In addition, you need to find a place for books, notebooks and bedding.
The sliding wardrobe is a spacious set in which you can place all your things and objects. The doors of this furniture item move apart to the sides, which does not take up much space.
Keep in mind that cabinet furniture is selected for children, so the shelves must be at the required height. It is important that there is no sharp corners at the ends of shelves and racks. Each thing must have a specific place, so the child will quickly learn order.
Note! When ordering externally, as a rule, it is not possible to control the consumption of material.
It is important to choose high-quality fittings, it depends on correct adjustment wardrobe doors. Doors should not jam or slide. Sliding systems consist of a profile and a sliding support. Roller mechanisms can be axial or bearing-based.

Choosing cabinet filling
The internal content helps decide what the layout will be. Not worth the section for outerwear place it in the center, as moisture from it can spread to the sides. It is better to place this compartment on the side. Boxes for bed linen are not recommended to be placed directly above the floor.

How to correctly arrange the elements and how to assemble a wardrobe with your own hands can be seen in the video below:
Number and sizes of doors, guides, rollers for wardrobes
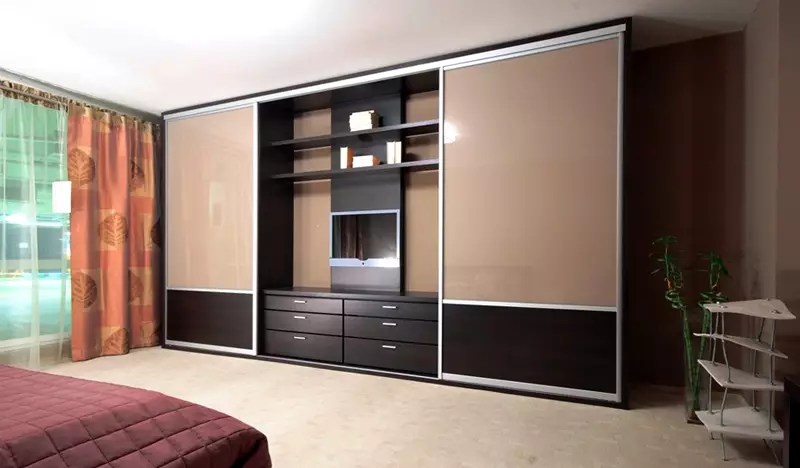
When choosing guides for a wardrobe, Special attention pay attention to the material used to make them. Has the lowest cost plastic profile, but it is characterized by low reliability and short service life. The best solution There will be the use of combined rail guides, in which the supporting surface for the rollers is made of metal.
Steel profile for sliding doors has increased reliability. Rail supports for furniture of famous brands are made from aluminum.

The rollers are made of metal, since plastic is not durable. The roller contains a ball-bearing internal mechanism that allows the door to move freely in the horizontal direction.
Do-it-yourself wardrobe and compartment door assembly
We invite you to familiarize yourself with the process of assembling a sliding wardrobe with your own hands in the table below:
| Photo | Description of work |
 | To assemble the wardrobe, you need to apply markings. It is necessary to note the dimensions of the cabinet in width and the location of the vertical rack. The heights at which the shelves will be fixed are noted. |
 | Drill holes for dowels. |
 | The profile is put on before installation. |
 | Install a vertical stand. |
 | We mark the mezzanine shelf and install it. |
 | The side wall is installed. |
 | The shelves are marked and installed. |
 | The clothes rail is marked by size and installed. |
 | False panels are installed. |
 | One panel is fixed at the bottom. |
 | The supporting upper part is attached. |
 | The bottom guide is secured with a screw. |
 | The top guide is attached in the same way. |
 | Doors are being installed. |
The process is presented more clearly in this video:
Interesting solutions for sliding wardrobes: photo examples
Don’t forget about the decor of the furniture set. Pilasters can be used as decoration. These elements are made from solid wood or MDF. You can install a furniture cornice on the roof. Interior baguette is used for decoration. You can choose a baguette different shades. Furniture with photo printing also looks stylish.

Article
Nowadays, all interior designers suggest saving the area of rooms so that there is space and free space. An excellent solution for this is built-in furniture, such as a wardrobe. Quite a profitable solution not only in terms of space savings, but also from a financial perspective.
A built-in wardrobe, in contrast to a conventional design, has a number of significant advantages. It holds much more things, less material is needed for manufacturing, due to which the cost of such a design is much lower. In addition, space is saved and space is freed up for other things. Basically two types of arrangement are used:

Installing a built-in wardrobe requires precise measurements. Due to the tight-fitting design, installation problems may occur due to improperly aligned surfaces or measurement errors.
How to design a façade for a built-in wardrobe?
On the modern market there are many materials from which you can make beautiful facade for a built-in wardrobe. Since the dimensions of such a structure are usually quite large, you can think about special design, for example, it is unusual to decorate the doors. Here you can show your imagination and come up with a personal sketch, or find something you like from the already proposed options:
- Mirror. The most common option for visually increasing the area of a room using additional funds. This solution is perfect for those who are faced with the problem of saving extra space. Mirrors can be placed either the full height of the door or used to decorate a small part of it. Designers also advise not to overuse this material and limit yourself to decorating one door in this way, and make the second one from a different material or decorate it in some special way. Can be used as additional elements drawings. They can be grooved or sandblasted. Both are distinguished by their special grace and create a gentle and romantic atmosphere. Thanks to modern technologies you can not be afraid to experiment with shapes, since it is possible to create a drawing of any complexity and even any color. Sandblasting patterns can be used not only as individual elements, but also as decoration for the entire surface of the mirror. Such an unusual solution – matting the mirrors – will add an element of mystery and sophistication to the style of the room;

- Film. Can be combined with any other material, is convenient to use and does not require special care. If glass is used as the main material, it is recommended to glue the film with reverse side so that it is less exposed to external influences. The modern market offers a wide range of films for decorating built-in wardrobes. You can use both matte and glossy or shiny materials. This variety allows you to create special compositions various forms and types, as well as colors;
- Photo facade. An unusual solution for cabinet design that is gaining popularity. Thanks to the use of photography to decorate the facade, not only the cabinet itself acquires an element of uniqueness and exclusivity, but also the entire room as a whole. Using photography, you can create a special atmosphere by placing a picture of a sandy beach, or, conversely, a tropical jungle on the front of the cabinet. Many people now use urban motifs in their design, placing a panorama of the metropolis as a photo facade. You can select individual elements, such as household items, people, animals, birds, plants and much more. Perfect solution for those who like to stand out and surprise;

- Acrylic. Goes great with mirror surface. Acrylic is characterized by a high degree of resistance to light. Never loses its shine, even after years of use. Always looks presentable and catchy. You can choose bright colors and arrange them, creating a special design or pattern. For decoration, you can place unusual elements in the glass melt, for example, unusual stones or simple glass beads, beautiful flowers or fragrant plants, colorful leaves or green algae and much more;

- Tree. For those who prefer a more discreet and classic style, it is proposed to use wood as a material for the cabinet facade. The most commonly used materials are bamboo or rattan. This material costs a lot due to its natural origin. But natural wood It will look great in an eco-style interior. It’s quite a fashionable trend now to be closer to nature, taking a break from the bustle of the city and at the same time paying tribute to the surrounding beauty. If it is not possible to purchase natural wood, then you can opt for chipboard or MDF. These fiberboards look no less presentable, but are much cheaper;

- Leather. The designers offer a rather unusual solution for those who want to decorate the cabinet facade in a special way. It would seem that leather is not the most suitable option for this, but if you look in more detail, you can find a lot of advantages from such a solution. Leather is a very practical and durable material, i.e. There is no need to worry that over time it will lose its presentable appearance and will look completely different from how it did when it was first used. For the cabinet facade, designers suggest using soft artificial leather. It can be used to sheathe the entire facing side, or just a separate part of it. Such a delicate material will give the room a feeling of coziness and comfort, without resonating at all with other interior items.

To decorate the facade of a built-in wardrobe, you can also use various accessories and decorative elements. However, it is important to remember that any design should not harm the main function of the cabinet - storing things within easy reach. Therefore, the doors should open easily and freely.
What can be placed in a built-in wardrobe?
Usually there is a lot of space in such a closet, so you can distribute it wisely, leaving space for all the necessary and necessary things. The main elements that can be in the closet:

It is best to divide the closet into three levels, where mezzanines with rarely used things will be located at the top, clothes will be located just below, and shoes will be stored on the lower tier. You should not place heavy objects on the very top, since under strong pressure the structure may not withstand it, break and collapse.
How to make a built-in wardrobe yourself?
After the location, material for the facade, as well as the internal filling of the cabinet have been chosen, you can begin to develop a drawing. It is best to opt for something simple and at the same time practical. It is necessary to make a drawing based on the size of the room itself. Each apartment may have its own flaws associated with the curvature of the walls and floor, so be sure to constantly adjust and measure load-bearing elements so that, in the end, everything turns out smoothly and beautifully. 
Since a built-in wardrobe is different from a regular one, it requires a special approach. Mounting to the wall can be using brackets or regular baseboards. True, the second option may not look very neat and stand out, but it costs much less. 
Doors can be hung in three ways: using top and bottom rails, as well as a monorail. The most the best option is the bottom design. It's easy and simple to do, and it's inexpensive. The rollers should also be chosen very carefully so that they are strong and can support the entire weight of the door. It is imperative to install stoppers for the doors so that they do not hit the cabinet every time they are used. 
If you follow all these rules, you can quickly and easily make a built-in wardrobe yourself. It's important to remember that there are no one-size-fits-all instructions here. Each design is individual, taking into account the characteristics of the room itself. You can use generally accepted basic rules and apply them to your project.
Detailed instructions on how to make a built-in wardrobe for a niche from gypsum fiber sheet. And what is the difference between gypsum board and gypsum board?
All the details about the location of the built-in wardrobe, the design of its facade, and the internal contents will help you make a similar structure yourself. The main thing is to follow some rules and follow safety precautions so that the manufacturing process brings only pleasure.
Regardless of the size of the apartment, you always need a place for compact storage of a huge number of things - clothes, shoes, linen, books and many other necessary (and not so necessary) things. And such a place is a closet.
The ideal option is a coupe - it saves space in the absence of swinging doors, it is spacious, and the design can decorate any room. Mirrors will visually enlarge the space, MDF inserts will make the interior unique, and soft triplex with a pattern of your choice will turn your furniture into a work of art.
DIY sliding wardrobe for the hallway
Which wardrobe should you choose? The answer is simple. If you have settled in your home seriously and for a long time, if you do not like rearrangements, if there is a free niche that you definitely want to use, then you need a built-in one. But if moving is still possible and you, due to the characteristics of your character, have a hard time parting with your loved ones and comfortable things, then your choice is a regular case, made according to your individual project.
Furniture, in the construction and design of which everything is thought out by you and for you, is more than a piece of furniture: it is your creation, your pride, a way to express your individuality.
You can, of course, just go to the store and buy an option that more or less suits you in color, filling, size and price. One of tens of thousands produced on assembly lines furniture factories. You can order production according to an individual project in one of the many showrooms. Or you can do it yourself, putting a piece of your soul into a thing that will be before your eyes every day. In one piece of furniture, realize yourself as a designer, constructor, sawmaker, assembler. And let some of your friends not like your creation. This is YOUR work and no one has the right to criticize it.
Built-in

Built-in corner cupboard coupe
Advantages
- Mounted in niches and closets, it saves space significantly. Here you can compactly store a variety of things - from jars of jam and tools to items of daily use.
- Thanks to the design sliding doors the niche disappears, the angularity of the room disappears and in its place a unique interior detail appears.
- There is no empty space between it and the wall - a place where dust constantly collects.
- It’s easier to make a built-in wardrobe - there are fewer parts, since the shelves are attached to the walls.
- Sockets and switches can easily be placed inside it.
Flaws
- The built-in one is absolutely non-transportable, and even if you decide to disassemble and transport it to another room, converting it to new dimensions will take a lot of time, effort and nerves.
- It does not have a back wall and you will need to prepare the niche before installation.
You can make a built-in wardrobe without having a niche with two main walls. It can be partially “built-in”. Its design may include a sidewall or a roof.
Hull

Double door wardrobe
Advantages
- Can be installed in any convenient location room or hallway.
- Can be used as a partition in a room to zone a room.
- No additional wall preparation is required. On the contrary, a closet can be used to cover up wall imperfections.
Flaws
- “Excess”, unused spaces: between the ceiling and the roof, between the side wall and the wall.
Step 2. Selecting design and content.

Internal filling of a large wardrobe
Has purchasing a wardrobe become a necessity? Then take a few days to decide WHAT exactly you want. Browse through the catalogs, go through furniture stores, read articles on the Internet. Mark it for yourself interesting solutions and details, and those nuances in construction and design that we would like to avoid.
Step. 3. Choice of material.
Main material
- The most common is laminated chipboard (LDSP). This is a very practical material. It is easy to process and affordable. Variety of colors gives ample opportunities For design solutions. Laminated chipboard is manufactured industrially. The sheets have different sizes and thickness. For production, slabs with a thickness of 16 mm are used, and for inserts in doors - 10 mm thick.
- 3.2mm thick fibreboard (fibreboard) is suitable for the back wall;
- MDF is beautiful, durable, more environmentally friendly, used for making furniture in rooms with high humidity, but a much more expensive material;
- Wood is the most environmentally friendly of materials, but, unfortunately, it is poorly suited for the manufacture of wardrobes.
- Due to its fragility, drywall is generally not recommended for making furniture.
Sliding door system. Currently there is a fairly large selection of different systems on the market:
- aluminum;
- steel;
- hanging;
- frameless, etc.
Each of them has its own advantages and disadvantages. For example, in aluminum systems there are convenient vertical handle profiles - perfect option for the hallway and nursery. Steel systems are distinguished by their elegance, which is especially important in the bedroom. Hanging systems will fit perfectly into the interior, where they should be invisible.
Step 4. Decide on the sizes.
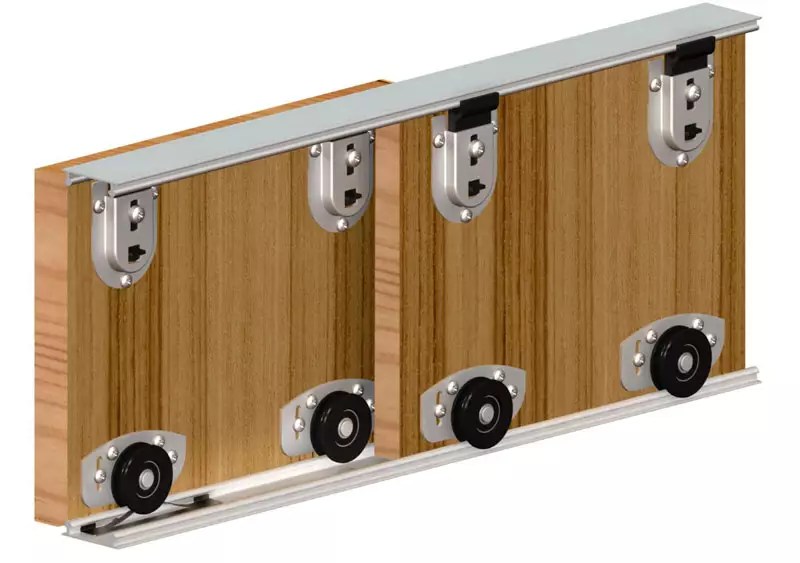
Built-in
- Width. Measure the width of the niche along the back wall along three horizons: at the ceiling, in the middle of the wall and at the floor. Take the larger value as the calculated value.
- Height. Measure along the wall on the right and left. Take the smaller one for the calculated distance between the shelves.
- Depth. Depends on what will be stored here. Will there be a horizontal bar for hangers or just shelves?
Hull

Approximate layout of a sliding wardrobe with dimensions
- Width. Measure in place. It is necessary to take into account: the curvature of the walls (if you plan to place the cabinet from the wall to the jamb, then due to the inclination of the wall even by a centimeter ready product may not fit into your intended space), availability of switches and sockets.
- Height. Firstly, even the tallest cabinet should be 15-20 cm lower than the ceiling height, while the need for upper, inaccessible shelves should be much more important to you than the ability to wipe dust from its lid without using a stepladder and, secondly, it’s not worth it ignore the recommendations of manufacturers of sliding wardrobe systems regarding the maximum permissible height.
- Depth. This parameter entirely depends on what you will store in it. If we are talking only about shelves, then we have: shelf depth + space for rails and doors (indicated in the system manufacturer’s instructions). If you mean a hanger bar, then this is at least 50 cm, since clothes hangers have a length of 45-48 cm. If this is a vertical holder for hangers with fastening to a shelf, then decide on it first.
Step 5. Calculate the number of sliding doors
The width recommended by manufacturers is from 60 to 90 cm. If the width is less than 50 cm, it will lose its stability, and more than a meter - ease of movement (there is a maximum permissible load on rollers, in which the manufacturer provides a guarantee for their long-term use).
The guides (top and bottom rails), depending on the manufacturer, have a length of 4 - 5.5 m. If your cabinet is longer than 3 meters, think about how you will transport a five-meter rail. There is a simple solution - install a partition made of laminated chipboard. You will get two independent niches. Visually the partition will be invisible. It is not recommended to dock the guides; this will quickly damage the wheels.
Step 6. Decide on the height of the doors
For built-in wardrobes
If the height of the niche is up to 280 cm, then the doors can be made to full height. If this size is larger, then you can consider two options.
- Install an upper mezzanine with hinged doors.
- Make a roof at a height of 280 cm (but taking into account the fact that the dust there needs to be wiped off at least sometimes).
The option with a roof is also relevant if available suspended ceilings, if a beam was not previously screwed to the ceiling in the right place, especially for installing built-in furniture.
For cabinet products, maximum height = height to ceiling minus 15-20 cm.
Step 7. Sketch

Preliminary sketch of a manual wardrobe
Before proceeding directly to the drawing, sketch out the desired arrangement of things. Measure them if necessary. For example, dimensions ironing board or existing baskets and shelves for shoes.
Make a sketch (as best you can). On the sketch, indicate the dimensions that must be strictly observed. Now mentally place the doors and move them right and left in various options, thus checking the accessibility to all parts of the internal filling.
Step 8. Drawing (Measure seven times - cut once).

Wardrobe drawing with dimensions
The most convenient way is to make preliminary markings directly on the walls of the niche with a pencil. This will make it possible to avoid errors in the dimensions of parts.
For example:
- top shelf = width of the niche x depth of the internal filling (that is, the depth of the cabinet minus the door);
- stand = niche height - top shelf height - material thickness;
- shelves on the right = (niche width/2 - 5-10 cm) x depth;
- shelves on the left = (width of the niche - shelves on the right - thickness of the material) x depth.
Additionally you may need
Additional parts are needed if it is not possible to level the side walls and floor. The rectangle in which the sliding doors will be mounted must be perfect. This can be achieved by installing a box for them in whole or in part. At uneven walls Gaps between the walls will be visible, and if the floor or ceiling is uneven, the door may even jam or jump out of the grooves, not to mention opening and closing spontaneously - after all, it will slide down the slope under its own weight.
Cabinet wardrobe
Decide:
- how will you attach the back wall made of fiberboard if it is located in a niche, from wall to wall, and if there is no answer, then you should consider the option with a built-in wardrobe where there is no back wall;
- whether your cabinet will rest on legs or on sides;
- what type of sliding door system you will use.
Carefully study the instructions for this type of door, paying special attention to the maximum and minimum permissible dimensions. The durability and reliability of the system itself depends on this.
Direct drawing. Armed with a ruler, a pencil and an eraser, proceed to the most important part of the work.
Let's consider the option with support on the sidewalls.
Main material parts:
- roof = cabinet length x depth;
- support = (cabinet depth - thickness of material for the plinth - 20 mm - width of the plinth) x height of the plinth;
- back wall (fibreboard) = (cabinet height - base - 2-4 mm) x (cabinet length - 2-4 mm);
- sides = (cabinet height - material thickness) x depth;
- bottom = (roof width - two thicknesses of material) x depth;
- base = cabinet length - two material thicknesses) x 70-100 mm;
- rack = (cabinet height - base - 2 material thicknesses) x (cabinet depth - doors);
- shelves = (cabinet width - 3 material thicknesses - width of the adjacent niche) x (cabinet depth - doors).
Here it is worth paying attention to the fact that the doors of the wardrobe are wider than 1/2 of the internal width, there is an “overlap” of the doors, and if you plan baskets or drawers, they simply will not move out of the closet, that is, the size of the niche with shelves under the baskets should be less than half.
Attention! Do not leave the roof unsupported by a support; it may sag.
Step. 9. Detail

Table of parts for making a cabinet
Based on the finished drawing, make a list of parts indicating their dimensions (specification).
Mark the parts whose ends need to be covered with a decorative edge and, taking into account the thickness of the edge, adjust the dimensions of the parts.
Mark the parts where you need to make “cuts”, for example, under the baseboard on the sidewalls.
Step 10. Pre-cutting

Approximate cutting of chipboard sheets
On a sheet of paper, to scale, arrange all the details compactly. If as a result you needed 1 sheet of material and a little more, then you can adjust the basic design by replacing some shelves, for example, with mesh shelves.
Now that you know for sure inner size, it is necessary, in strict accordance with the manufacturer’s recommendations for sliding wardrobe systems, to detail the doors.
Step 11: Tools and Materials
Tools needed for installation:
- roulette;
- wood hacksaw;
- square;
- building level;
- drill and confirmatory drill;
- corner clamps;
- screwdriver with a set of bits (phillips and hex);
- mallet;
- jig for perpendicular drilling.
Materials:
- main material provided for by the project (chipboard, fiberboard, MDF);
- edge (of your choice) and PVA glue;
- euroscrews 70x5;
- plugs;
- self-tapping screws (for fastening the back wall and fittings);
- furniture corners (plastic or metal) for attaching cabinet parts to frames;
- furniture fittings (bars, holders, mesh shelves, pull-out baskets);
- chalk or wax for painting over chips;
- components for doors (guides, profiles, rollers, strips, slats, latches - everything that is required to assemble this structure).
Attention! Carefully read the assembly instructions for the type of door you have chosen. Don't take a single step away from them!
Step 12. Step by step instructions.
Built-in wardrobe
Previously in the niche you need:
- clean from old finishing materials;
- level surfaces;
- paint or wallpaper.
Instructions

Details for the future wardrobe
- With the help of furniture plastic corners(or metal, if you think this is more reliable) attach the main vertical racks and transverse shelves to the floor, ceiling and walls in accordance with preliminary markings and drawings. The parts are connected to each other with Euroscrews.

We assemble the cabinet section by section and display it against the wall
- Check the correct fastening of each part using a building level.
- (if necessary) Mount the box or its elements in the niche. Additional parts are fastened together with euroscrews and attached to the wall using corners.

We mount the sections in the niche and assemble the frame
- Attach all the fittings (baskets, hangers) to the cabinet filling using self-tapping screws;

We fix all the outer shelves and racks to the walls, floor and ceiling, assemble the drawers and put them in place
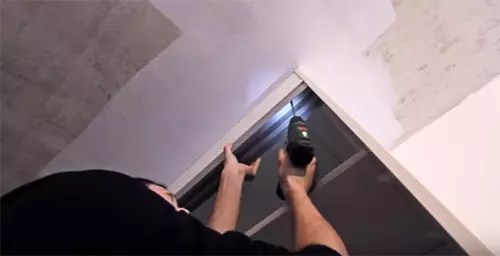
- Install the upper and lower guides.

We attach the guides to the ceiling and floor
- Measure the resulting door opening.
- Mask all visible chips with wax and secure the plugs.
- Assemble the doors in strict accordance with the manufacturer's instructions.

Wardrobe door assembly diagram
- Hang the doors.

Door suspension with bottom support rail

Appearance of a new functional wardrobe, assembled by yourself
Cabinet wardrobe.
- Sawing parts the right size, seal the visible parts with an edge.

Applying edging to cabinet parts
- Make markings to fasten the parts together.

Markings of fastening locations are applied to the bottom surface, holes are drilled for fasteners, after which a base of two strips and a central partition are attached
- Drill holes: on flat surfaces- through, at the ends - no more than 60 mm deep, 5 mm in diameter.
- Assemble the doors in strict accordance with the manufacturer's instructions.
- Assemble the body and its contents.


To fasten open side shelves with rounded corners, confirmats are used; the shelves are attached to the surfaces of the side and rear walls, 2 fasteners for each
- Level the cabinet by measuring and comparing its diagonals using a tape measure.

Installation of a sliding wardrobe door
- Screw the guides 1 cm away from the edge of the lid and bottom.

Guides for door leaf fastened with self-tapping screws and press washers
- Hang the doors.

To install the door leaf, rollers are inserted into the upper guide, the lower rollers are pressed and the leaf enters the profile, resting on the lower guide

Ready-made cabinet wardrobe, assembled by yourself
Video: How to assemble a wardrobe with your own hands. Installation video instructions.
If we are talking about making a wardrobe with our own hands, then we are talking about a sliding wardrobe. Today, its popularity knows no bounds, and it is due to several reasons. Firstly, the absence of swing doors, secondly, compactness and, thirdly, the possibility of hidden installation. In fact, it differs from an ordinary cabinet only sliding mechanism doors. It is this type of furniture design that we will talk about in this article, in which, together with the website, we will study in detail the question of how to make a built-in wardrobe with your own hands.
DIY built-in wardrobe photo
Assembling a sliding wardrobe with your own hands: calculations and cutting of material
This path to solving the issue of making a sliding wardrobe with your own hands can be called the simplest - it can be conditionally divided into three stages. Conquering the heights of furniture craftsmanship, you will have to learn the art of design and construction, perhaps carpentry and become a good furniture assembler. But first things first, let’s start by learning the basics of design and engineering skills.
I think you can figure out the design of the cabinet and the position of the shelves and partitions yourself - there are no subtleties here. The main thing is that it is convenient to operate this design, but we will discuss the technical aspects of making a sliding wardrobe with your own hands in more detail.
So, for convenience, we transfer the design of the sliding wardrobe you came up with from mental images onto a piece of paper and, in accordance with the installation location of the future wardrobe, we put down all the necessary dimensions. You need to start with the width and height of the entire product - it is on the basis of these that the dimensions of all other partitions and shelves are calculated.

Calculation of a sliding wardrobe with your own hands
Now you need to focus and be as consistent as possible. When the general dimensions are ready, making a sliding wardrobe with your own hands will require detailing all its parts - on another sheet of paper (can be to scale) we draw out each separate element closet Start with the sides, top and bottom - mark on each of the drawings full sizes details. Do not forget that the partitions and partitions inserted inside the cabinet must be smaller than the overall size of the cabinet by exactly the thickness of two sheets of chipboard used. This issue must be decided in advance; as a standard, such furniture is made from laminated chipboard 16mm thick. These are the ones that need to be taken into account.
We move on and, taking into account these 16mm, we put down the dimensions of each individual part of the sliding wardrobe. When this painstaking work is completed and everything has been checked several times, we move on to the next stage of design.
I hope everyone has seen how the front ends are made furniture chipboard? This operation is called trimming - when calculating a sliding wardrobe with your own hands, on each of the detailed drawings you need to mark the edges that will be glued special tape. It costs a lot of money to paste over the ends at the factory, so there is no need to mark everything - your task at this stage of work is to determine exactly those edges that remain visible from front side wardrobe

Making a sliding wardrobe with your own hands
Well, did you figure it out? Now you can take a deep breath and experience a deep sense of satisfaction, after which you can go to a specialized warehouse that sells furniture chipboard and, at the same time, saws it, and order all the necessary parts.
I completely forgot. But what about it? Everything is simple here - having the general dimensions of the interior of the cabinet, height and width, we report them all in the same warehouse and the local craftsmen independently determine the dimensions of all structural elements sliding system. You just have to choose the door material - as a rule, you are given a choice between all kinds of mirrors, chipboard and plastic pseudo-mirrors. Decide on this yourself.
How to assemble a built-in wardrobe with your own hands
After all this fuss, it's time to relax and get ready for assembly work. While the parts of your wardrobe are being manufactured, it would be a good idea to take care the necessary tool. The minimum that you will need is, just in case, a jigsaw (suddenly you miscalculated some dimensions), a drill for confirmations, a set of different drills for wood, a stapler with twelve staples and a lot furniture fittings, starting from fastening corners and confirmations and ending with small screws and wooden chops.
Assembling a wardrobe with your own hands is not difficult at all. During its development, you should have drawn a complete picture of this process - we can say with confidence that even half asleep you will clearly and clearly imagine not only the general assembly sequence, but also the installation of each individual part.

How to assemble a wardrobe with your own hands photo
You need to start with the main parts, that is, the sides, top and bottom, at this stage you need to twist the main box. Considering the dimensions of even the smallest sliding wardrobe, this will not be easy to do - first of all, it is necessary to mark and drill holes for confirmations. Once they are drilled, you can install a special hex bit on the screwdriver and connect the parts of the box into a single product. Then it’s easier - all the internal boards can be fastened, as they say, in place - installed, drilled two boards at once and screwed in the confirmation.
When the box with partitions is assembled, you need to take care of the back of the cabinet - as a rule, it is covered with laminated fiberboard. This part is attached with a stapler every 5-10cm.

How to make a sliding wardrobe with your own hands
With the shelves, things are even easier - they are held not by confirmations, but by special steel pins. You only need to drill four holes for each and drive pins into them, then the shelf is simply placed on top of them.
As for the adjustable legs, they had to be attached to the bottom at the stage of screwing together the wardrobe box - agree, assembled wardrobe It's not that easy to turn upside down.
Depending on the dimensions of the finished structure, from 4 to 6 such legs will need to be installed - in each of the corners and possibly in the middle.
So we got to the installation of the sliding system. Now our task is to do it ourselves. Despite their size, this is easy to do. We unpack them and find the upper and lower guides. How to distinguish them? The lower guide is flat with narrow grooves, and the upper one is voluminous and has wide grooves. We screw them into place - the top rail is up, and the bottom rail is down, respectively. All that remains is to insert and adjust them.

How to install a sliding door on a wardrobe
The doors are installed as follows - first we insert the upper rollers into the guides, then we lift the door and, pressing the lower rollers, install it on the lower guide. Adjusting wardrobe doors is no more difficult than installing them. At both ends of each door at the bottom (hidden under the boot) there are two screws - one fixing, the other adjusting. With their help it is necessary to achieve the position of the doors in the level.

Adjusting sliding doors photo
Installing a sliding wardrobe with your own hands will require you to adjust the stops - they are needed so that the doors do not hit the cabinet body. The stops are located in the grooves of the lower guide, and in order to protect the doors from impact damage, they simply need to be moved to the desired position.
That seems to be all. Now we can say with complete confidence that the built-in wardrobe with our own hands is ready. Difficult? Agree! But it's very interesting. And most importantly, you can be proud of the specialty you have mastered yourself.