The idea of creating designer furniture or decorative items with your own hands has always enjoyed special recognition. Have you ever tried to make something interesting, a chandelier for example? At first glance, it seems that nothing worthy will come of this idea, and this is the privilege of designers. Moreover, you need to spend a lot of time buying necessary materials, and have straight arms, otherwise the result will be disastrous. But this is only at first glance. In fact, you can create magnificent beauty from absolutely any things you have at hand or gathering dust in the attic. And there is absolutely no need to be a great master. All you need is a little ingenuity, imagination, free time - and the chandelier, made with your own hands, is ready.
Fluttering tenderness
A great option for a “test of the pen” is a chandelier made of butterflies. It’s very easy to do it with your own hands, and if you use your imagination and slightly change the idea, the result can exceed your wildest expectations. So let's get started.
What will it take?
We can say that you will need nothing at all:
The base of the chandelier itself with a socket and a light bulb (quite suitable from an old one); if desired, it can be repainted in a suitable color;
The frame for the lampshade can be taken from a previous chandelier or use a hoop from a hoop;
Pieces of tulle and ribbon or fabric, the main thing is that the color scheme is harmonious;
Lighter, fishing line and hot gun (matches, strong threads, glue);
You can cut butterflies from fabric, thick paper, plastic, in general, from any material that may be suitable for these purposes and is available;
A shaped hole punch for butterflies; if you don’t have one, you can use scissors.
Let's put this miracle together
First of all, we wrap the hoop with tape, securing it with inside glue and decorate it. Cut a ribbon of a different color into small pieces and tie them around the hoop in a circle, making indentations. Instead of scraps of ribbon, you can tie small, neat bows, as your imagination tells you. We singe the edges of the ribbons with a lighter so that the threads do not unravel. We knit pieces of tulle into the free spaces between the bows (shreds). We attach four equal strips of tulle or ribbons to the hoop; they will hold our future lampshade based on the chandelier. Tie them together with a bow at the top.
Let's move on to the butterflies. They can be cut in a variety of shapes and sizes. We use multi-colored materials, and, if they allow, we give the butterflies a shape and relief. They can be painted or covered with glitter.
It is better to first unwind and straighten the fishing line so that it does not gather in curls. Place a piece of fishing line on the table and hot glue the butterflies to it with a hot gun. The distance can be completely different. You can insert beads between the butterflies themselves for added beauty and also secure them with glue. Let the glue dry.
Tie the finished sections of fishing line with butterflies to the previously prepared hoop. You can evaluate the overall result and add as many as you wish. The butterflies can be placed either at the same level or along the entire length of the fishing line.

In our case, a chandelier consists of three shades. You can also design the top mount with your own hands, or you can buy a suitable one. It should hide all wire connections, set the distance and fit tightly to the ceiling.
All that remains is to put all the parts together. We connect the wires, attach the lampshades and... enjoy a job well done!
It will take a lot of time, but it's worth it, believe me.
Below is another beautiful option for a paper chandelier. Tell me where it is possible to buy one? Unless you do it yourself.

How to make this beauty?
We need a paper lantern, a glue gun and coffee filters. You will need a lot of them; one such chandelier takes almost 400 pieces.

The beautiful airy and fluffy lampshade is ready!
A little bit of nature
DIY chandelier made of wood. Do you think it's difficult? Not at all. Let's look further.
Materials
Here you will need:
Frame from an old chandelier;
Grape twigs and willow vine;
Twine, wire cutters and spray paint.
Front of work

We select grape twigs of suitable size, clean them of all excess and fasten them to the frame of the chandelier with twine. Each branch should smoothly fit against the bends of the metal, braiding it, and be well fixed.
Use willow twigs to wrap the string fixation points. They are more flexible and can be used to cover all difficult places. The DIY wooden chandelier is almost ready, all that remains is to paint it. The color range is very different, from white to blood red.
Another interesting option. A large grapevine is used. You just have to give it a shape and weave it into a ball. The vine may not be very pliable; you will have to wet it well and only then form the sphere. In this position it will have to dry. Carefully fix each strip and set the tone for the frame of the chandelier. It’s not a day’s work, but the result is worth it, incredibly beautiful.

With the aroma of Burgundy
What do you do with empty wine bottles? You probably throw them away? But in vain. These can make an original bottle chandelier. It's quite easy to make it with your own hands. You just need to stock up on empty containers, preferably not made from too dark glass (otherwise the lighting will be dim), a glass cutter, wires and cartridges. Now we will tell you how to make such a chandelier with your own hands.
Master class with bottles
First, rinse the bottles thoroughly and remove the labels. Afterwards you will need to cut off the bottom part. We only need the top one, it will be the lampshade. Draw a straight line with a glass cutter and walk along it, lightly tapping it with a hammer. Afterwards the bottom can be beaten off. Process the edges of the cut; it is better if they do not remain sharp. Place the wire inside the bottle and connect the cartridge. Screw in the light bulb. Ready!
You can use several bottles on the same level or different ones, combine them by glass color or shape. Your imagination has a green light!

However, not only glass bottles can be used. Plastic ones are just as suitable for this role. A little effort - and you will make a chandelier with your own hands! You just need to prepare the material; the more bottles you collect, the better. They can be of different shapes, sizes and colors. Cut off the lower parts, connect them together with fishing line and attach them to the base. Voila! And the best part is absolutely free.

The ideas for creating such unusual things are very interesting. You can invent, complement and create from absolutely everything. The field for activity can be not only chandeliers, but also floor lamps, table lamps and even sconces. They can be changed completely or improved with small additions that will bring harmony to the interior and create even greater comfort. Inspired by such ideas, you can make a beautiful thing not only for yourself, but also as a gift to a loved one.
Fantasize, search and try, and you will certainly succeed. Perhaps you will come up with something special, original. You can make not only beautiful, but also useful things, such as, for example, the popular Chizhevsky chandelier. You can make simple ones with your own hands, but really worth it products. Good luck in your endeavors!
Today, a chandelier is not just a source of lighting. It is one of the main elements of room decor. The most popular lamps are self made, because they personify the individuality of the homeowners and their extraordinary creative abilities.
Undoubtedly, handmade creativity is a rather difficult task, requiring a lot of patience and accuracy. However, doing something with your own hands is always quite exciting and educational. The topic of this review is how to make a chandelier with your own hands.

Choosing material for a homemade chandelier
In order to make a handmade lamp, a variety of materials are used:
- glass;
- tree;
- plastic.

In addition, sometimes very unusual things are used to make a chandelier at home:
- paper;
- cardboard;
- disks;
- straw;
- branches;
- wine bottles and more.

When choosing this or that material, you need to take into account your own preferences and the style used in the design of the room.

In addition to the material, devices may differ in manufacturing techniques. The most common are:
- Japanese origami;
- macrame;
- weaving;
- thread;
- knitting;
- applique;
- embossing

Ideas for creating a chandelier with your own hands - step-by-step instructions
Nowadays, there are many unusual ideas on how to create beautiful lamp for an apartment with your own hands. Let's look at those that are more popular.

Chandelier made of plastic spoons
Ordinary disposable plastic spoons are the simplest and most affordable type of material to make a chandelier. The advantages of such raw materials are:
- low cost;
- manifold color solutions;
- durability.

To make a lamp, you will need:
- 5 liter plastic bottle;
- disposable spoons;
- PVA glue;
- light bulb socket;

Procedure:
- Prepare the bottle. To do this, remove the label, cut off the bottom, wash the workpiece thoroughly and dry it.
- Prepare the spoons by cutting off the handles.
- Cover the entire bottle with scoops with the convex part facing out.
- Secure the cartridge in the made lampshade.
- Attach the chandelier to the ceiling and connect it.

Chandelier made from plastic bottles
An interesting solution from a decorative point of view would be a lamp assembled from plastic bottles.
- We take scissors and cut out different patterned shapes and unusual figures. We will assemble a chandelier from them.
- We attach several thin rods to the frame of the old lamp and connect them, removing the central one. At this stage lighting fixture takes the shape of a hedgehog.
- We fix all the prepared figures and forms onto the frame of the chandelier. The product is ready!

Let's consider a particular example - the process of creating a lamp in the form of leaves:
- Cut blanks from bottles small size imitating leaves. Usually birch leaves are chosen.
- Using a soldering iron, slightly melt the sections of the leaves and draw out the veins - this way they will look more impressive.
- Make holes in the stem of each leaf using a heated thin needle.
- Use wire to form branches. Screw them to the frame of the future chandelier.
- Attach leaves to the branches. The original design ceiling lamp is ready!

Chandelier with paper butterflies
A lamp with paper butterflies. This model looks very impressive and luxurious, although it is quite simple to manufacture.

Sequencing:
- The role of the base is played by the frame from an old lamp or a simple rim made of metal or wood.
- Take paper and cut out butterflies from it according to pre-prepared templates.
- Secure the cut insects to a fishing line or nylon thread.
- Attach the resulting threads to the frame of the future chandelier and decorate it.

Fabric chandelier
This type of lighting fixture is also based on a solid frame or thick wire. First of all, prepare the base, and only then can you start cutting out the material to create the lampshade.

The length of the finished product depends on your wishes, and the width must correspond to the size of the frame. After completing the pattern work, be sure to try it on. The next step is to sew the fabric to the base of the chandelier.

In order for the lampshade to retain its shape, you need to choose the material wisely. If you use light material, then the lower part of the lampshade should be weighted.

You can use fringe, braid or lace as decoration. But try not to overdo it with the decor.

Lamp made of threads and a balloon
To create such an original lampshade you will need to prepare:
- thick threads or rope about 1 m long;
- old cartridge;
- petrolatum;
- glue and brushes;
- balloons – 1 – 2 pcs.

Manufacturing process:
- Inflate the balloon to the required volume, and use a felt-tip pen to mark the boundaries of thread winding.
- Coat the entire surface of the ball with Vaseline using a brush.
- Pour the glue into a wide container and begin to process the threads with it as you wind it around the ball.
- After you fill the ball with threads to the marked boundaries, it should be left to dry.
- After a day, burst the balloon and remove it.
- Cut a hole in the top for the cartridge and insert it. You also need to cut a hole at the bottom of the lampshade - this will make it easier to insert the light bulb. The product is ready!

Wine bottle chandelier
This chandelier is more labor-intensive to create than the options described above. It's quite difficult to make. This requires patience and attention. But the effort is worth it!

Necessary materials:
- wine bottle;
- cartridge;
- cable;
- sandpaper;
- base made of metal or wood.

The tools you will need are a glass cutter.
Manufacturing procedure:
- Preparatory stage. Wash and dry the bottle, remove the labels, mark with a marker a line along which to cut the bottom using a glass cutter.
- Sand the cut with sandpaper.
- Insert the wire through the neck of the bottle and attach the socket.
- Attach the bottle to a pre-prepared frame.

The number of shades for a chandelier depends on you - you can leave one or make five or six.

Chandeliers made from laser discs
If the apartment has accumulated a large number of old CDs - don’t rush to throw them away. They make a pretty creative lamp.

To make an unusual accessory from laser discs, you will need to prepare a couple of round boards. Their size should be slightly larger than the size of the disks. Also needed:
- fluorescent light bulb;
- steel or wooden racks;
- old magnetic starter;
- a lot of CDs.

Take a board that is thicker and make a hole in it for the starter. Connect everything to the lamp. Then start stringing CDs onto it while simultaneously mounting the racks. At the end, attach the second board. The work is completed.

Wooden chandeliers
Wood is the most common material for various kinds crafts. The chandelier is no exception.

To make such a lamp, you need:
- wooden planks 0.4 m wide;
- glass jars 1 liter volume for lampshades;
- sandpaper;
- self-tapping screws

Procedure of manipulations:
- Process the slats sandpaper.
- Make recesses in them on the back side for mounting the wire and three holes for the lampshades.
- Cover the planks with varnish.
- Attach the sockets, screw in the light bulbs.
- The lampshades will be ordinary liter jars painted white.

Choosing a lamp for a homemade chandelier
To make a chandelier made by you from scrap materials look even more attractive, you need to choose the right light bulbs for it. The following recommendations will help you:
- Choose a lamp of suitable power. Remember that overly powerful products can cause a fire.
- Look at the number of lumens. The larger it is, the more natural the lighting.
- Consider whether the shape of the light bulb matches your device. Some chandelier models require bulbs of a strictly defined shape. Only then will they work efficiently and correctly reflect light rays.
- Be sure to look at the expiration date. If you plan to use the lamp frequently, then take a closer look at the lamps with the longest life expectancy.
- Ask what kind of light the lamp will glow - cold or warm. For your home, it is better to purchase an option with a warm shade of light. This will make the atmosphere seem more comfortable.
- Don't ignore the energy consumption of a light bulb. Optimal choice products with low level energy consumption.
- Check for mercury in the lamp - this will determine how it is disposed of. Products containing mercury cannot simply be thrown into the trash. They must be handed over to special collection points.

Decorating the product
As decoration homemade chandeliers and lamps you can use a variety of things:
- paints and varnishes;
- lace;
- satin ribbons;
- fringe and braid;
- beads, beads, rhinestones, stones.

Good decorations include artificial or dried flowers, feathers, and butterflies cut from fabric. In general, how to decorate the finished product depends only on you. You can use any available means that your imagination indicates.

In conclusion, we note that such a homemade lighting device as a chandelier will definitely bring a touch of freshness and style to the decor of the room. Your loved ones and guests will definitely note the originality of the accessory and your skill. In addition, a hand-made lamp is an excellent gift for a friend or colleague.
Original photo ideas for homemade chandeliers


The stores offer a huge range of lighting fixtures for any room. But a DIY chandelier for the kitchen or another room will be a truly exclusive option. home decor. You won’t be able to find another one like this, but the process itself will be enjoyable.
Materials and safety
In the process of working on a particular model of a homemade chandelier, scrap materials will be used, which means that the total cost of the device will be minimal, but the exclusivity of the product will be maximum. When selecting material, you should consider the following points:
- It must be non-flammable. After all, it is used to create an electrical device, and there is a risk of fire.
- Determine what type of lamp will be used. Thus, fluorescent and LED sources practically do not heat up, but incandescent and halogen lamps do the opposite.
- Feasibility of use. It is worth remembering that it is not always possible to make a homemade product the first time; the material must be chosen so that its damage is not a problem.
- Since the chandelier will be used in the kitchen, the material of the lampshade and shades should be easy to clean, and the lamp elements should be removable.
- A homemade chandelier cannot be hung on an electric cable, no matter how light it is. For hanging, you should use chains and special tubes (soft or hard).
Most homemade chandeliers are made in the form of a single shade or closed lampshade. Therefore, you should not count on too much luminous flux. Such a lighting fixture will definitely become a central element in the kitchen and will attract attention, but additional light sources must be provided for it.
Homemade chandeliers provide little light, although they can be very themedFrom threads
This material, which is on hand or can be bought very inexpensively, will help you create an original light chandelier. If you choose white threads, you can easily paint the chandelier in any color. The size of the chandelier can be anything, it depends on your desire. Appearance The product is simple, which will allow it to fit into the interior of any kitchen, but at the same time original.
Important! The basis of the lamp is threads; you can use thick cotton ones, but not woolen ones.
The work requires: threads, PVA glue, a brush, a round inflatable ball of the required size. Creation order:
- Inflate the balloon and draw a circle at its base.
- Pour the glue into a container into which it will be convenient to immerse the threads.
- Wrap threads pre-soaked in glue around the ball in a chaotic manner, going around the circle area that you drew in the first step. You can simplify the process by piercing the glue bottle closer to the bottom and threading it there. This way it will be evenly wetted with glue.
- When the winding is completed, the ball should be hung and the threads dried. Depending on the size and layer of winding, this will take about 24-48 hours.
- When the future lampshade is completely dry, you need to remove the ball after deflating it.
- All that remains is to select the size of the cartridge and connect the wires to it.
 Step-by-step production thread chandeliers
 Advice! On large kitchen 2-3 or even more of these small lamps look good. They can highlight certain areas. It is difficult to obtain a powerful luminous flux from them, but their effectiveness is at a high level.
Using the same algorithm, you can create an original openwork chandelier. The main material is ready-made knitted napkins. They are soaked in glue for 10 minutes, after which they are glued to the ball. They take longer to dry, about 3-4 days. A similar chandelier can be made either from one large round napkin or from individual elements any shape. The second option looks very original.
Made of wood
Such chandeliers are extremely simple to create, but their appearance is extremely non-standard. They are not suitable for every interior. It will be possible to fit without any problems into a kitchen decorated in a country style, in oriental style. The kitchen must be large to capture the beauty of this chandelier in small kitchen will not work.
In the process, you can use both massive beams and vines and even bamboo sticks. Options for homemade wood chandeliers:
- Knock 2 bars together in the shape of a cross and place the cartridges on them. This is the easiest option to implement even without any special skills in working with wood.
- An old wooden spinning wheel will come in handy. If such a rarity is found, then the chandelier can be created very original. The wheel needs to be sanded, varnished or painted, suitable lamps attached, and cartridges mounted.
- Ceiling lamp made from untreated branches. Very modern version, which can complement any eco-interior. The algorithm of work in this case is similar to the process of creating a chandelier from threads. Only the ball base is not wrapped with yarn, but branches are glued. This must be done so that each new branch has a support point on the ball and on those already glued.
- Another option from the branches. You need thin ones of different lengths. Holes are drilled in them through which the wire passes, which is used to attach it to the round base. The cartridge is installed in the center.
 Original chandelier from branches for country style
 Important! Any wooden elements, whether branches or timber, must be varnished or painted before or after creating a chandelier.
From glass jars
Such chandeliers have original look and absolutely safe. Glass is heat-resistant, so even incandescent lamps can be used in such chandeliers. To work, you need jars with screw caps. Step-by-step creation algorithm:
- Make a hole in the lid that is sized to fit the cartridge that will be used.
- Insert the socket with the light bulb into the hole and screw on the cap.
- Connect.
For such a lamp you need to provide a suspension, it can be a chain or a rod. A chandelier created using this algorithm can be:
- With one lamp-can. Such models are located on the ceiling in the amount of several pieces.
- With several lampshades. The basis for their consolidation is wooden plank or plywood. They can also be collected in a bun, which will look even more unusual.
- Glass is easy to decorate. In the process you can use: twine, special heat-resistant decorative composition, paints. The last option will help create an imitation of stained glass.
 Simplicity and originality - a chandelier made of cans
 Using a similar algorithm, you can make a chandelier from:
- Glass bottles. In them, the cartridge is launched through the neck, the fixing element is a cork plug. The bottom needs to be removed and sanded so that the edges are not sharp.
- Decanters. The process is similar to the previous one.
- Cups and saucers, plates. For a kitchen, such a themed chandelier is a real find. Do not forget that ceramic cups are quite heavy, so you need to provide a suitable base and fasten the chandelier itself to the ceiling.
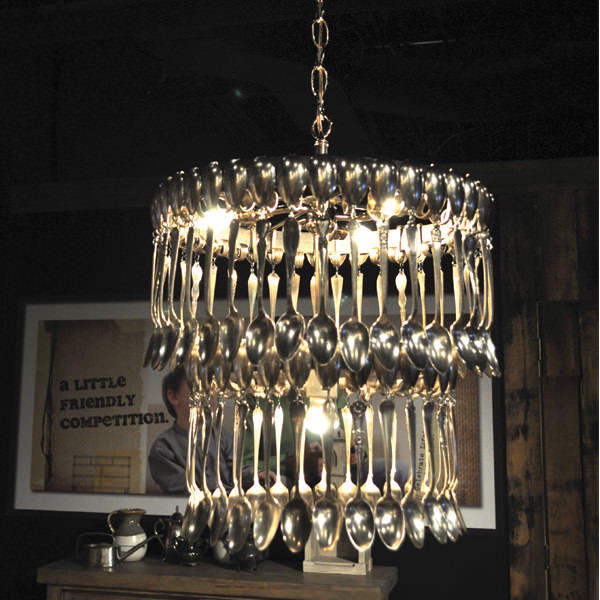
- Forks, spoons. Holes are drilled in their handle, a wire is threaded through them, which is attached around the perimeter to a wooden rectangular or square block of wood. The cartridges are mounted in the center of the structure.
- Colander, pots, graters, metal bowls, and in general any kitchen utensils that are not in use.
From fabric
Textile - comfortable material, from which it is possible to create original and intricate chandeliers. The procedure for creating a fabric lampshade for a chandelier is approximately the same, more specifically:
- You need a foundation. It can be an old lampshade, or any object of a suitable shape. If the base is metal, then it must be examined for rust stains. If they are, then clean them. If this is not done, the print on the fabric cannot be removed or painted over.
- Make glue. You need a composition that is used for gluing non-woven wallpaper. The powder should be diluted according to the instructions, when the glue is ready to immerse the fabric in it, leave for 10 minutes.
- Remove the fabric and place it on the base. It is advisable to make folds along the surface, so the texture of the finished product will look more original.
- Leave until completely dry at room temperature. Depending on the density of the material, this will take 1–5 days.
- The next step is coloring. If there are a lot of folds, then painting with a brush will be inconvenient; it is better to use a sponge. If necessary, apply several layers.
- All that remains is to create the desired decor. The following can be used in the process: artificial flowers, leaves, branches, ribbons, rhinestones, sparkles. The main thing here is not to overdo it, because in the kitchen there is no need for an overly decorative chandelier.
 A fabric chandelier can be like this
 Important! Such chandeliers provide little light, as their lampshade is dense. It is convenient to place them in the dining area; this will help highlight this area. Creating additional lighting is a must.
Making a fabric chandelier can be much easier. Ready-made lampshade frames, rings, and metal hoops will come to the rescue. Covering them with fabric is no more difficult than wrapping a gift. Using light tulle, you can create an original effect and diffuse light.
From beads or seed beads
From ordinary wooden beads or seed beads you can create beautiful chandelier. Order:
- Prepare a frame made of metal or other material. In this case, you can even use a frame from an old lampshade. Its condition does not matter, since it can be easily decorated.
- Beads or seed beads are strung on fishing line or dense strong thread. If beads are used, it is better to take multi-colored and various forms, this will make the lampshade more interesting.
- All that remains is to fix the threads on the base and attach the cartridge. The threads are fixed with tension or with free sagging, depending on the idea.
Such chandeliers look very original, imitating large crystal ones of the last century. Such chandeliers are suspended; a chain is used as a connecting element to the ceiling.
 Chandelier made of beads in the interior
 From plastic bottles
If you have accumulated a lot of plastic bottles, they can be used very usefully.
The first option is weaving. Cut off the neck and bottom of the bottle, cut the middle into thin strips. The more colors the bottles have, the better; they can also be painted. Now the basis is taken - metal carcass, pull tight fishing line or pieces of plastic around the rims and secure. Next, the creative process is weaving according to the principle of creating a fence. You need to weave tightly so that the lampshade holds its shape.
Second option: decorative chandelier. Creation order:
- Prepare the bottles in the same way as in the previous version.
- Chop leaves, flowers or any geometric figures different sizes.
- Treat the edges with a soldering iron so that they curl slightly. You can draw veins, so they will look more natural.
- From copper wire make branches, attach leaves to it.
- Secure the branches to the frame.
- The light from the bulb will shine through the foliage, creating an interesting effect.
 The process of creating a chandelier from a plastic bottle
 Third option: from a plastic bottle and disposable spoons. In the process you need: a 5 liter plastic bottle, disposable spoons, a glue gun. Process of creation:
- Cut off the bottom of the bottle.
- Cut off the handles of the spoons; only “scoops” are needed.
- Apply glue to the bottle and glue the spoons along the rows, starting from the bottom. Spoons are placed with the convex side out.
The result is a sort of scaly chandelier. It can be painted or left white.
From kebab sticks
An original country style chandelier can be created from wooden sticks for barbecue. In addition to them, you will need glue and organza ribbon. Which form you can choose yourself. The simplest option is square, when the skewers are folded into a “house”. Secure each stick with glue. Alternatively, you can make a star, a hexagon, or come up with another shape.
During the process, it is important that the sticks lie exactly on top of each other, otherwise the chandelier will look sloppy. The size of the structure can be any. After the glue has dried, you can decorate the chandelier with ribbon. It is threaded through sticks in any suitable place. On top wooden structure It is recommended to varnish or paint.
 Ready-made chandelier made from wooden kebab sticks
 From laser discs
From this material you can create an original chandelier with a lively lighting effect. You can make it in the form of a ball, according to the same principle as with a thread chandelier. Another option is to cut small elements and string them onto threads, which are secured to the frame.
Discs are a convenient and easy-to-handle material, so you should use your imagination with them and then be able to create an original decorative element.
Important! Whatever idea comes to mind, it is worth remembering that such a chandelier will not be able to fit into any kitchen interior, but perhaps one created in a high-tech style.
From cardboard, paper
Oddly enough, even from such materials you can make a very beautiful and original chandelier. The easiest way to make it is from cardboard; for this you need:
- Find a suitable stencil. The outlines of the chandeliers look beautiful classic style. Make 2 identical parts from it, cut them so that when connected they create a three-dimensional structure.
- If necessary, paint the cardboard.
- Assemble the parts and strengthen them with wire or thread. To do this, make holes first.
- It is suspended on chains and a cord is threaded through it. The cartridge is fixed at the bottom.
Using the same algorithm, you can make a chandelier from plastic or hardboard. Such materials are much stronger and more durable. In addition, the use of such a chandelier in the kitchen is more convenient. The chandelier elements will have to be cut out with a jigsaw.
Master class on creating a paper chandelier:
- You will need a foundation, it may be an old one. ceiling chandelier, a circle made of plywood or wood.
- Cut butterflies from thick white paper. It is convenient to use a cardboard template. IN finished product Butterflies of different sizes look original.
- Secure the butterflies to a thick white thread or fishing line. It is convenient to do this with glue; you can also string them through 2 holes on the workpiece.
- Attach the threads with butterflies to the frame. Moreover, these threads can be of different lengths, which creates the effect of movement.
- If desired, the chandelier can be additionally decorated with beads, rhinestones, and individual butterflies can be painted.
 Paper chandeliers: options
 Advice! You can cut out not intricate butterflies, but circles, they look no worse.
Selecting a lamp and socket
When making a chandelier, it is important to use suitable electrical materials. The first essential element is the cartridge. In most cases, you need one that has a ring to secure the lampshade.
For some of the presented models, a cartridge is suitable, which is rigidly fixed to the base with two self-tapping screws. You can attach it to any surface. As for the type of cartridge according to the size of the base for it, it is better to use standard ones. This will eliminate the problem of finding non-standard light bulbs.
Regarding the light bulb, it is better not to use incandescent lamps, they get too hot and consume a lot of electricity. LED and fluorescent products are the optimal solution both in terms of performance and efficiency.
How to choose the right chandeliers for suspended ceilingsWhen the kitchen renovation is completed, installed New furniture and equipment hanging on the window stylish curtains, but the purchase of such an interior component as a lampshade was not planned - do not despair. With your own hands you can make an exclusive model that can in many ways surpass factory analogues and create original design, because originality is usually determined by small accessories or decorative elements.


The design of a future product largely depends on the materials for its manufacture. You can make lampshades for the kitchen yourself from any materials at hand. To make a kitchen lampshade with your own hands you can use:
- Metal, plastic and ceramic dishes;
- Cutlery;
- Newspapers, wallpaper and paper;
- Threads;
- Ribbons, lace, textiles;
- Chinese or kebab sticks;
- Milk cartons;
- Foil;
- Clothespins;
- Old audio cassettes;
- Vinyl records;
- CDs;
- Glass and plastic bottles;
- Cupcake tins;
- Knitted napkins;
- Wire and beads;
- Tennis balls;
- Old light bulbs and much more.
Lampshade for kitchen chandelier can be done in any style that best suits the design of the kitchen, and in any technique, be it crocheting, embossing or papier-mâché.
Before you get down to business, you should pay attention to the advice of more experienced people. First of all, do not forget that the kitchen is a room with high moisture content and dirtiness. And if you want a handmade product to last a little longer than a disposable trinket, you should take the choice of material more seriously.

Basic rules that should be followed when selecting materials and techniques for making a lampshade with your own hands:
- An energy-saving lamp is a safe solution. If flammable materials are chosen for the manufacture of the lampshade, it is strictly not recommended to use ordinary incandescent lamps in them. It is better to opt for energy-saving lamps that do not heat up to dangerous temperatures.
- Imposing simplicity. Even if such inexpensive materials, like paper or plastic bottles, this does not give the product the right to be made vulgarly.
- Accuracy in work. When working with any materials or objects, you should be as careful as possible, since the slightest awkward movement can lead to damage to the product or injury.
- Light is a symbol of the sun. The light, the source of which will be the lamp covered by the lampshade being manufactured, is a symbol of the sun. It is this rule that is recommended to be followed when choosing the image of a future product, since the lamp should diffuse the light, exaggerating it, and not hiding it.
- Dust. The accumulation of dust on the lampshade can reduce the light several times; in addition, even a slight layer of dust on the lamp looks like a huge accumulation of dirt. It is this limitation that is a significant obstacle in the choice of materials. However, if the lampshade is necessary for the festive decoration of the room, it can be made disposable.


Some creative ideas
In order to make a lampshade for the kitchen with your own hands, it is important to know exactly the manufacturing technology of the model you like. Here are some key ideas that can help you make your own lampshade:
Lampshade made from napkins
If you are fond of crocheting or you inherited a lot of crocheted napkins from your grandmother, do not rush to throw them away. You can take as a basis a balloon inflated to the desired size and overlap napkins moistened with PVA glue on it in any chosen order. At the same time, napkins do not have to be the same size, same pattern or color. After the glue has completely dried, the product is removed from the base, a wire is inserted into the central hole of the main napkin and a socket with a lamp is attached. As a result, you can get something like this original lampshade, which will decorate the kitchen in your apartment or country house.


In the same way, you can make a lampshade from threads, lace or pieces of fabric.
Fabric lampshade
If you take a wire frame as a basis, using a pattern to match the curtains, you can sew an elegant lampshade that will fill the kitchen with coziness, fit harmoniously into the interior and give the room a special charm. You can decorate such a cute product with lace, ruffles, bows, and ready-made decorative elements.
You can also make a lampshade from ribbons, threads, lace or wallpaper on a wire frame.


Lampshade made from dishes
If you happen to have a souvenir cup and saucer in your collection large sizes By drilling holes for the wire exactly in the center of the products, you get a finished lampshade. Also, for these purposes you can use ceramic flower pot. However, based on old beliefs, there is an opinion that an inverted vessel in the house is not good sign for his well-being, but remember that all signs are only as true as you believe in them. An analogue could be a kitchen lampshade in the “heavy” style made from kitchen graters.


Lampshade made from cutlery
We often receive a lot of cutlery as a wedding gift, which sits in the package for many years and remains unclaimed. By turning on your imagination and taking advantage design ideas, you can get a truly original lampshade for your kitchen, which will also be durable and long lasting.

Acceptable in narrow circles, the “heavy” style gives rise to truly exquisite accessories

Using similar methods, you can make your own lampshade from disposable tableware.
Even if you take exactly any of the ideas and you don’t have the desire or opportunity, you can use them partially, taking as a basis the manufacturing method or the material itself and make something special yourself. Here are the basic, most common ideas that can become a fundamental factor in choosing a model and making a lamp. Good luck!
Lampshades for a chandelier in the kitchen: photos of original ideas


.jpg)


There is no doubt that properly executed kitchen lighting sets the tone for the entire interior. A chandelier can become the central element in this cozy and warm room.
Using scrap materials - or even waste - you can make a lampshade from threads, an eco-style lamp from jute twine or plastic bottles, or you can make a real masterpiece– a beautiful chandelier made of wooden or glass beads.
You can also not only hang a lamp made by yourself in the kitchen or dining area, but also give it to your loved ones as a gift.
Method 1. From scrap materials - anyone can do it!
The simplest DIY lamp is made from threads. Indeed, even a child can handle such a design. So, to make a chandelier from threads, we will need:

- Threads - you can take regular jute twine or thick cotton threads with a total length of at least 100 meters, the color is chosen based on your imagination and the existing interior;
- PVA glue and brush for applying it;
- Petrolatum;
- 2 balloons - one for work, the second for testing; It is better to take a round ball, not an ordinary one, then the shape of the lamp will be the correct shape.
Advice! Also suitable for children or a rubber beach ball. For very large lamps, a fitball, for example, is suitable.
Work on creating a ball of thread is carried out in the following sequence:
- Inflating the balloon required sizes. Do not forget that the resulting lampshade made of threads will repeat the shape of the ball. Using a marker, draw one or two circles at the top and bottom (more at the bottom).
- Pour glue into a container and carefully process the threads. And the ball itself can be coated with Vaseline with a brush.
Advice! You shouldn’t apply glue to all the threads at once - it’s better to move along the winding area.
- Next comes winding the threads around the ball, taking into account the drawn holes - the density of the winding determines how your lampshade will turn out in the end.

- After the ball is wrapped, you need to leave the future chandelier to dry for at least 24 hours.
- The ball bursts and its remains are easily removed from the robust construction. The result was a lampshade made of solid threads.
- A hole is cut at the top to accommodate the cartridge.
- You need to check the strength - another balloon is inserted into the lamp and inflated. This will demonstrate the flexibility of the design.
In this way, you can also create local lighting in the kitchen by creating several lamps from threads with your own hands. Or you can hang it in the dining area, as shown in the photo.


Do not forget that for a ball of thread you can make additional decor in the form of interesting coloring, beads, butterflies or artificial flowers, or you can make a whole bunch of balls of different sizes.

Using the same principle, you can come up with your own unique design lamp For example, from lace, or ceiling lamp as in the photo below.


Method 2. Creating a masterpiece - you need to try!
You can get excellent kitchen lighting if you make your own lamp from beads or fabric. You will get a lamp in style or a real candelabra chandelier.
For this job you will need:
- An old hoop, garden basket, hanging metal planter, or wire to create a frame;
- Decorative chains;
- Beads, beads, ribbons, strong threads;
- Lamp socket.


The lamp will be a two- or three-level structure of rings located one above the other and connected by chains or wire.
Rings can be taken in different sizes, creating a lampshade in the spirit of a vintage classic, or the same size - this is exactly the kind of lighting that is done in.


The base of the lamp is certainly painted, wrapped or decorated, after which they begin to string the beads.

The consumption of beads in this project is as follows:
Bottom part: beads with a diameter of 16 mm, 15 pcs. on a thread;
Upper part: beads with a diameter of 12 mm, 31-32 pcs. on the thread.
Here you can vary the degree of tension and the number of threads.
Advice! The work should be carried out by first hanging the chandelier and inserting a socket into it.
By analogy, you can create a chandelier from artificial fruits for the kitchen. And subdued lighting will be achieved if you use fabric to cover the frame. As a rule, such a lampshade is made for country and country styles.
Method 3. Lamps made from waste materials - for a modern kitchen!
Most original lamp can be made from this waste material, like plastic bottles and disposable spoons - they are beautiful, cheap and environmentally friendly!
We make a lampshade in a minimalist style and - no additional decorations from threads or beads, only matte white or colored plastic. To make such dim kitchen lighting with your own hands, we will need:
- Base made from a 5-liter plastic bottle;
- Cartridge with wire and lamp;
- Glue for high-quality fixation;
- Lots of disposable spoons.
To make a chandelier with your own hands, cut out the bottom of the bottle and cut off the handles of the spoons (not completely, so that a small handle remains). Using glue, we fix the cut spoons on the base bottle. They need to be placed evenly, in a row, then the lampshade will look attractive.
Advice! Each next row overlaps, without gaps.
The resulting chandelier will resemble fish scales. However, it should be remembered that this design is quite dense, which means that additional lighting will definitely be needed in the kitchen.
The shape of the lamp can be different, for example, in the form of a lotus.

You can also make such decorations from disposable spoons.

A lamp made from plastic bottles, or rather from their bottoms, made with your own hands, may seem like lace or consisting of many small flowers.

Advice! Such a lampshade can be made not white, but colored - which means you need to take colored bottles or paint it with paint of the original color: copper, gold, steel, pink, black, etc.
The resulting lampshade can be hung in the kitchen or above the dining table.
Let your kitchen be cozy and bright! We wish you creative success and present some more wonderful ideas for making kitchen lamps with your own hands from improvised materials.


