No matter how naive the reader is with the topic of a glue gun, with a repeated description of recommendations for its acquisition and its further operation, I will still share my improvement of this tool.
Glue gun became popular in Lately because of their opportunities, but for some reason some characteristics of many models want to be better.
A set of glue sticks with a diameter of 3.4mm to 43mm with different composition and different temperatures melting is good. Convenient loading of the rod into the heat chamber, convenient supply of glue to the surface to be glued, light weight of the tool, additional switch, power indicator and detachable power cord. Everything is fine!. But there is one significant detail indicated in the passport data of a glue gun used in everyday life - the magnitude of the supplied voltage and electric power heater.
As a rule, in each model of a hot melt gun, a semiconductor is used as a heating element, or rather, it will be said - a semiconductor resistor. He is a posistor (semiconductor ceramics).
Again, what is there to look for and discuss? Simple, convenient! But not reliable. Why? I'll tell you more.
Hot glue guns are very popular among designers, fashion designers, decorators, in TV and radio workshops, and even in funeral services workshops. They use hot glue for spot bonding or gluing small parts together. In everyday life, a glue gun is not often used. This is true. It's not every day that we glue something. But in some cases, the use of hot melt adhesive remains the only option that is not feasible due to the failure of the heating element, which bursts from overheating, and sometimes breaks a little.
In my practice, several glue guns were purchased in a couple of months, moreover, different models. In the technical passport of each, the supplied (connected) voltage and electrical (thermal) power were indicated, which in no way corresponded to the actual one. At the specified 40wt, the gun could not cross the threshold of 8wt. At 65wt, the heater did not consume even 20wt. Yes. The glue melted, but only on the basis of ethylene vinyl acetate.
Some people were happy with that, but I wasn't. It was necessary to glue long products (skirting boards, baguettes, corners), which were covered with hot glue in 7-12 minutes. The glue at one end was already hardening when hot glue was just applied to the opposite end of the baguette, for example. Not only that, several samples of glue guns 'showed fireworks in my hands' from the burnout of the heater just at those moments when it was glued ceiling tiles, because a professional and classic glue gun is heated up to maximum temperature 220°C. The melting points of polystyrene foam and polystyrene are 240°C, vinyl plastic is 230°C-250°C. failed to fulfill its purpose.
Converting a glue gun from 220 volts to 12 volts.
What has changed in the device of the glue gun.
Determined the length of the cut piece nichrome wire. The wire diameter did not matter. The calculation was made according to standard formulas (Ohm's Laws for a chain section).
- The starting point was the desired electric power of the glue gun. I settled on (≈)34-36Wt. It follows from this: 36(wt) : 12(v) ≈ 3.3(a). Determine the average current consumption.
- Now from I \u003d U / R we determine the resistance of the conductor, that is, the resistance of a piece of nichrome wire: R \u003d U / I. 12(v) : 3.3(a) ≈ 3.6(Ω).
- Using an ohmmeter (tester, multimeter), I determined a piece of wire. The probes of the device were located remotely from each other on the wire, so that the device (ohmmeter, multimeter, tester) would show on the scale a resistance close to the calculated one - 3.6Ω.
 Further, everything was simpler and the time I spent on the reconstruction of the glue gun did not take more than 35 minutes.
- Removed the old heating element from the camera and the power cord.
- Turned around the body of the heating chamber.
- I wound several turns of nichrome wire through a layer of asbestos paper.
- I installed a switch in the circuit of the new heater, which I mounted on the handle of the gun.
- The voltage at the battery terminals is 10.5v;
- heating element resistance - 3.6 Ω;
- the current consumption of the glue gun heater is about 3A.
- The temperature in the melting chamber of the rod - 172°C after 1 minute;
- - 197°C after 2 minutes;
- - 222°C after 4 minutes;
- - 262°C after 7 minutes;
- - 268°C after 8 minutes;
- - 280°C after 9 minutes.
Here it is for me! Why wait 7 minutes for a regular hot glue gun to heat up when this one melts in seconds? You can glue in the field, in the basement, in a boat, in a car. The consumption of glue is not 20ml per minute (never exceeded the consumption of 12ml-16ml), but 40ml-50ml.
Glue gun heater temperature control.
The electrical circuit of the device is simple. At that time, there was no thermostat installed. The melting temperature of the glue was controlled by turning the heater on and off via a switch. It was experimented to connect in series to the circuit of a car potentiometer (dashboard backlight brightness control), an adjustable charger for car batteries. Also convenient. Tried connecting the glue gun to a 6v battery. The glue did not melt as vigorously, but still the heater brought the tool into operation in a couple of minutes. The polystyrene ceiling tiles were installed step by step without delay.
 Later, in parallel with the switch, a self-made customizable glue gun temperature controller, turning off the chamber heater when it reaches the set temperature. That is, when the switch was on, the element heated the melting chamber for hot melt freely to the maximum temperature, when the switch was off, the gun worked with low-temperature material (within 175°C-190°C), depending on the setting of the regulator mode.
Not so long ago appeared on the shelves construction stores, hot melt glue quickly gained popularity among needlewomen and home craftsmen. Due to the speed of gluing and the breadth of application, glue and heat gun are unmatched in convenience and affordability. Of course, the strength of the joints in this way is not the highest and the scope is limited by temperature limits. But with everyday manufacturing tasks various crafts do-it-yourself hot melt adhesive copes with ease and speed, satisfying most requests.
Safety
To begin with, it is worth mentioning the safety measures when working using hot melt adhesive. With their own hands, many housewives felt the danger of high temperatures in the kitchen and at home, so you need to remember about safety.
Glue, sticking to the skin, releases a significant part of the heat not only during cooling, but also during hardening. Therefore, it can cause burns much deeper than a hot frying pan or tile, from which you can pull your hand away in time, receiving minimal damage. Additionally, you should carefully read the instructions for the device and follow the recommendations specified by the manufacturer.
Wax instead of glue
It's time to try the device in action. Of course, they can glue, but it is much more interesting for him to find original application. The principle of operation of the gun is to heat the material and melt it to a liquid state. This means that any material with a suitable melting point can be used in the gun. So, when heated in this way, they become not just a gel-like mass, like glue tubes, but a liquid, like drinking yogurt.
Using different colors and fantasy, you can get colorful drops on cardboard or thick paper, and if you drip from a height of half a meter, you get blots. The gun, of course, can get dirty, and in order to clean it after artistic activities, you should skip some factory glue, which will wash off the wax from the inside. Recall that wax is a rather oily material, and not all surfaces in a row will be able to hold it for a long time. The porous structure of wood or cardboard is able to provide sufficient adhesion.

Vintage wax seals
In the same way, wax can be heated for making seals and impressions, for example, to seal a letter of congratulations or a personal message. Using coins or other embossed metal objects, you can even achieve resemblance to obsolete items.
A letter with such a seal will not only please the addressee with its originality, but will also bring some intimacy and mystery to the correspondence. Oh yes, wax is quite fragile, unlike sealing wax, so do not trust these letters to the mail, present them personally.

Glue decoration
Do-it-yourself transparent or colored hot-melt adhesive can be turned not only into a fastener, but also into a decoration element. Simple and nondescript glass vases, treated on the outside with a hot-melt adhesive pattern, will sparkle with new colors and impress your guests as an original work of your own hands.
In the same way, you can draw three-dimensional figures and whole pictures on any household containers, boxes, and simply on cardboard under a frame on the wall. Not any paint is suitable for coloring colorless glue - watercolor or gouache will quickly be erased from the surface. It is best to use acrylic-based paints or, in last resort, nail polish.
Do-it-yourself hot melt adhesive crafts are a great pastime with children, training accuracy, responsibility and artistic flair in them. The main thing - do not leave children alone with the device turned on or just warmed up.
Adhesive color classification
Let's deal with these colored sticks. It can't be that manufacturers just randomly added dyes. Indeed, there is a recommended international marking and here are the main types of rods for a thermal gun:
Simple translucent cylindrical sticks are the most popular type of glue. Universal, used for a wide variety of surfaces and materials, suitable for almost any hidden and open fasteners.
Colored opaque rods differ from universal ones only in color. It makes sense to buy them for those who are engaged in crafts, children and florists. They allow you to mask the place of gluing under the overall color of the product without the use of additional coloring.
Black and gray stickers are designed for waterproofing areas, and are also used as electrical insulation. The non-shrink and adhesive properties of the material are used in sealing window frames and in the insulation of current-carrying parts of electrical appliances.
White opaque rods are used specifically for gluing metal and glass, except, of course, for universal adhesives painted in White color pay attention to the packaging.
Yellow or candle, wood-colored translucent sticks have better adhesion to the porous structure of wood or cardboard.

In any case, not all manufacturers have yet come to common standards and it is necessary to check technical properties glue, referring to the packaging. There you can also find out the melting point of the material and the approximate temperature range of its use.
In electrical appliances, materials are often required that can withstand prolonged heating, in other cases, a non-rigid plastic fixation, such as silicone, may be required, for example, in the manufacture hand tool. You also need to take into account the capabilities of your device for working with glue, so that the thermal gun has enough power to melt the material during operation.
Do-it-yourself pistol
The market is now flooded with instruments not best quality, and heat guns are no exception. They usually break at the most inopportune moment, and you may need to reliable device to use the remaining hot melt adhesive.
You can quickly build a heater to work from an old iron or use a soldering iron, but here you can run into the problem of overheating the material. For permanent work, craftsmen are more likely to be inspired by the idea of \u200b\u200bmaking a hot-melt glue gun with their own hands.
The current power regulator will help control the temperature
First of all, we need to make a current power regulator, no matter what heating device we use. Overheating of the adhesive material will inevitably lead to its strong liquefaction (as a result, spontaneous leakage from the gun) or even burnout.
A regulator is made by sequentially connecting a dimmer to a circuit break, like a switch, where it will perform the named functions and adjust the power of the supplied current. It will be convenient to make a separate outlet with a regulator on a piece wooden board, it is likely that current power control will be needed for other devices.
based on a boiler

Now we can be sure that the boiler will not burn without water, but will only heat up to the desired temperature. The next step is to make a comfortable handle so that you don’t burn yourself on a heated device. Most available material for the handle - wood, but it is also afraid of high temperatures and you can use Teflon tape used in cooking to protect it.
As a working container, you need to make out tin can tube and funnel, connecting them together so that the edges of the funnel cover the tube. The diameter of the working crucible should be such that the funnel is tightly clamped by the coils of the boiler. Strengthening the design copper wire and test the device on a suitable piece of glue stick. This design compensates for the lack of a feed lever with an incredible “omnivorousness”, that is, the tool is suitable for any type of hot melt adhesive, regardless of its melting temperature.
If you run out of glue
Consider the situation on the contrary, there is a useless thermal gun without suitable stickers, and something needs to be glued “here and now”. We put off the orphaned instrument until the purchase of suitable Supplies and turn our attention to another, no less versatile heating device in use - a hair dryer.
Of course, hair models will be out of place here, meaning a professional one that gives out high air temperature. Here they can heat up the glue right at the junction. By the way, the glue itself is literally lying underfoot.
We offer 2 of the most common options for how to make hot melt glue with your own hands:
Foamed polypropylene or polyethylene can occasionally be found as a packaging material, but most often it is found in construction and finishing works as heat and sound insulation. The connection is not so much strong as plastic, not afraid of shock and vibration.
Everyone knows plastic bottles, which filled the landfills of the whole Earth, are also suitable as an adhesive material. Heat the whole bottle with a hair dryer for quite a long time, so it's better to cut off the plate right size at the point of gluing.
Both options are unstable at high temperatures, but will work for most jobs where a regular hot melt adhesive is sufficient. Thus, you dispose of the garbage and get an almost inexhaustible supply of glue.
Name confusion: electrical circuit adhesive
For people associated with circuitry, the words have the same meaning as "hot glue for heatsinks." It is very difficult to make such material with your own hands, since it uses chemical reactions, and not a change in the state of aggregation of a substance under the influence of temperature.
It is impossible to compare hot melt adhesive for a gun and hot melt adhesive for LEDs, which are different in composition and purpose. With your own hands, it is possible to make the so-called glycerin cement from lead litharge and glycerin as a heat-conducting layer and an adhesive at the same time.

There are also proven industrial options for heat-resistant materials for gluing, which, of course, are better to have available than to prepare hot-melt adhesive with your own hands. "Alsil-5" and "Radial" - the most famous brands among specialists. In addition, several types of heat-conducting rubber are produced. And how exactly heat-resistant glue is used, you should read in the instructions.
Nowadays, there is a huge variety in the world of needlework, and crafts are made from various materials. Basically, these are paper, bottles, plasticine and the like that are familiar to us. Most DIY crafts require glue to hold together, but in this article, we'll show you how to make hot glue crafts with a gun. Such crafts look very beautiful and unusual, and most importantly, they are very simple to perform. Even children of 5, 6, 7, 8 years old can cope with such work. This article provides several crafts with step by step instructions, as well as video tutorials for a more understandable description. So, let's see what can be done with ordinary hot melt adhesive.
Original vase for sweets
Making a vase will give you pleasure, because it is a creative process. You can put sweets in such a vase, decorating festive table handmade craft. To make a vase craft, see below for a full description with detailed instructions.

You will need:
- hot glue gun
- Paint (preferably in a can)
- Glass bowl for base
Progress:
- We apply cream on the outside of the bowl so that the glue can be easily removed later.
- When the glue has warmed up, we begin to apply it to the bottom of the bowl in an even layer. Thus, we will get a stable bottom.
- Next, starting to move from the bottom of the bowl, apply the pattern with glue. The drawing can be anything, as long as you have enough imagination.
- Let the glue dry completely.
- When everything is frozen, carefully remove the adhesive base, starting from the edges.
- When you have removed it, you get an almost finished basket, all that remains is to paint over it with paints. In this way, you can make not only a vase, but also other containers.
Videos hot glue pot
Hot glue bracelet
Such a beautiful bracelet can be made with your own hands very quickly and simply. Such decoration will not leave anyone indifferent. How to make such a craft, we will tell you with full description every step. 
You will need:
- Can of Coca-Cola
- Hot glue
- Jewelry for a bracelet
Progress:
- Apply glue to the jar in horizontal stripes. The width of the bracelet will depend on the number of strips.
- When the glue is completely dry, carefully remove it from the jar. This will be the base of the bracelet.
- On this base you can glue various beads or applications, it can also be painted with paint.
hot glue butterfly
A beautiful butterfly from ordinary hot glue will become good decoration flower pot. The craft is quite simple to perform, so you can do it together with your child. The following describes how to make a butterfly with your own hands. 
You will need:
- Hot glue
- Glass
- thin wire
- Rhinestones
Progress:
- Apply cream to the glass so that it is easy to remove the glue afterwards.
- First, with glue, draw the outline of the wings on the glass, then fill in the middle with a zigzag.
- In the same way we draw the torso and antennae.
- When everything is dry, remove our blanks from the glass.
- With the help of glue we collect our butterfly, then we attach it to the wire.
- You can decorate our butterfly with rhinestones or beads.
Decoration for the new year "Snowflake"
A hot melt snowflake will be a wonderful decoration for the New Year's interior. Even a child of 4, 5, 6 years old can cope with such a craft, because it is very simple to perform. We will tell you how to make a beautiful and bright snowflake with your own hands with detailed instructions. 
You will need:
- Hot glue
- Stencil
- glitter
- parchment paper
Progress:
- Take a stencil and put parchment paper on top.
- Apply glue on top of the translucent pattern.
- Pour a little glitter onto a piece of paper and dip a still warm snowflake into it. Our bright and festive craft is ready.
Videos new year snowflake
Convenient pencil case
Hot glue can be used to make not only decorations, but also useful items, such as a pencil case. No one will have such a pencil case at school, because it is made by hand. To get started with our crafts, read the step-by-step instructions, or watch the video master class. 
You will need:
- Hot glue
- Lightning
- Wide aerosol can with paint
- decorative butterflies
Progress:
- Lubricate the bottle with cream.
- We start applying glue with circles at the edges.
- We make two vertical stripes the width of the corresponding zipper.
- Then we continue to draw horizontal stripes in a circle (receding arcs from each other by about 1 cm), while not going to the line for the lightning.
- On horizontal stripes we draw a pattern similar to a Christmas tree, or a zigzag.
- When everything is dry, remove the balloon, and substitute the cap from the balloon into the side parts one by one to apply the pattern.
- We apply the drawing with a frequent mesh so that nothing falls out through the holes.
- When the whole structure is dry, insert the zipper, fixing it with glue.
- We paint over our pencil case with paint and glue it to decorate the butterflies. Now you can put whatever you want into it.
Video how to make a pencil case with your own hands
Amazing roses
Beautiful roses will be a wonderful decoration for your interior, or you can use them as a gift to family and friends. To make it easy for you to understand how to make a rose craft with your own hands, we made detailed description crafts with step by step instructions. 
Helpful Hints
Regular glue gun hot glue can be used not only for gluing various details, but also to create various patterns and crafts.
When working with hot glue, be careful and pay Special attention child safety as the glue gun gets hot and the glue comes out very hot.
Here are some very interesting and extraordinary ideashow else you can use a glue gun and hot glue:
Glue crafts. We use wax crayons.

You will need:
glue gun
Wax crayons
* It is possible that after using wax crayons, your glue gun will deteriorate, so it is advisable to use an old or inexpensive gun.
* If children are working on the project, then carefully monitor the work with a hot glue gun and hot melted crayons.
1. Remove the labels (papers) from the crayons.
2. Cover the workplace with an old towel.
3. Heat up the glue gun.

4. Gently insert the crayon into the glue gun and gradually push it through. The glue gun's trigger won't be able to push them through, so you'll have to do it by hand.

5. The wax will start to melt and you can use the colored drops of wax to create vibrant blobs.

Wax printing is another way to use wax crayons and a hot glue gun to create vibrant pictures.

Crafts from glue with your own hands. Decorate a vase or candlestick with hot glue.

You will need:
Inexpensive, round vase or candlestick

Heat up the glue and start gently applying it to the vase, layer by layer, until you end up with transparent lines on the walls of the vase.
If you want to make smoother lines, ask someone to help you - have the vase spin while you apply the glue.

Unusual crafts. Hot glue corals.

You will need:
thin wire
Glue gun with hot glue
acrylic paint
tassel
piece of plywood
Nails and hammer.
Making red coral
1. Cut the wire into several pieces of different lengths. In this example, their length varies from 10 to 40 cm. Bend each piece in half.
2. Heat the glue and gently cover all the pieces of wire with it.

3. Choose the color you want to paint the coral, in this case red. Use acrylic paint to paint the glue on the wires.

4. When the paint is dry, you can collect all the details into one coral. Take 2-3 pieces of wire with glue and connect them together with another thin clean wire (not covered with glue).
Add 2 more parts to the structure and connect them again with clean wire.

For the coral to stand on flat surface, all ends of the clean wires must be twisted and bent into a stand shape (see image).

Making white coral
1. Cut 3 pieces of wire, each between 30 and 35 cm long, and twist the ends together.

2. Bend all the wires to your liking and lay them on a flat surface where hot glue won't stick - glass, for example.

3. Cover all wires with glue. After that, you can add additional branches of glue to your design.

4. Once you've made the coral the shape you want, let the glue dry and paint it white acrylic paint.

5. To make the base for the craft, prepare a piece of plywood and attach the ends of the wires to it with nails.
6. Cover the ends with glue and paint with acrylic paint.

Unusual handicrafts. Hot glue snowflakes.

You will need:
Glue gun with hot glue
Nail polish or acrylic paint
Parchment paper (NOT wax paper)
Drawn snowflake shape (optional).
1. Print or draw a snowflake on a plain paper and place the drawing under parchment paper.

2. Using a glue gun and hot glue, trace around the snowflake pattern. Wait a minute for the glue to dry.
If necessary, after the glue has dried, you can slightly trim the shape with a hair dryer.
3. Carefully remove the snowflake from the paper. The paper can be used further to create more snowflakes.

4. Both sides of the glue snowflake can be painted with nail polish or acrylic paint.
Original DIY crafts . Rolling pin with a pattern.

You will need:
Any rolling pin
felt-tip pen
1. Draw any pattern on the rolling pin. It is advisable not to draw too many lines.

2. Heat the glue and start applying it to the lines drawn on the rolling pin. It is advisable to carry out the entire process on a flat surface covered with newspaper or cardboard.

3. When the glue is dry, you can use a rolling pin to trace the pattern on the clay by rolling it out.
The glue can be removed and a different pattern applied.
Original crafts. Candle glass holder.

You will need:
small glass vase or glass
Glue gun with hot glue
Aerosol or acrylic paint
Spray oil or plain vegetable oil.

It is advisable to choose a wide vase so that the heat from the candle inside it does not heat up the glue, which can leak.
1. Wash and dry the vase, then wipe it with vegetable oil and paper napkin.
2. Start applying hot glue to reverse side the bottom of the vase, drawing patterns with them. The main thing is that all the lines are well intertwined so that it is easier to remove the glue from the vase.

Continue to paint patterns with glue on the sides of the vase.
It is advisable to wear goggles to protect your eyes, as the glue will heat up the glass.
3. When the glue is dry, gently begin to separate the pattern from the vase. You may need to use a screwdriver, knife, or other tool to make it easier to separate the pattern from the glass vase.

4. Clean the vase of glue residue. Use dishwashing detergent.
5. Paint the drawing with glue. If you are using spray paint, read the instructions carefully and follow them.

Now you can insert a glass or a vase into the candle holder and you will get an excellent interior decoration.

Interesting crafts for kids. Multicolored dots for various crafts.

You will need:
Glue gun with hot glue
Acrylic paint or nail polish
Tassel.
You will have to practice a little to get such even parts, but in the end you will succeed, and all these parts can be used to make various crafts and postcards.

Each dot can be painted with acrylic paint or nail polish.

Crafts for children: do-it-yourself printing (video)
* First, cover the table surface with a special silicone board or silicone oilcloth.
Crafts for the home: making a vase of glue (video)
Interesting DIY crafts. Makeup brush cleaning board

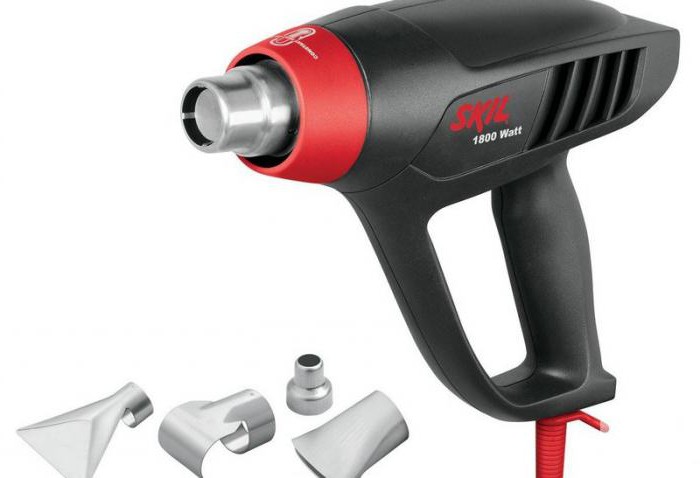
Builders, as well as home craftsmen, who are often involved in repairing their apartment or fixing things, appreciated the thermal gun, which makes it extremely easy to glue various surfaces. It is used by florists, designers and needlewomen, who are assisted by a hot glue gun in making souvenirs, doing scrapbooking or creating designer dolls. It is hand-menda lovers who often ask themselves the question: how to choose a glue gun for needlework.
Types of thermal guns
Glue guns are divided into several categories, namely:
- Professional;
- Household.

Professional ones are quite massive, they are used for long-term work, which is provided by a rod with large diameter required during construction work.
Household - can fit in the palm of your hand, light and convenient for gluing various small things and performing simple jobs, when decorating crafts or interior items.
- mechanical, that is, the glue is supplied by simply pressing the trigger;
- automatic, when the adhesive is supplied using an electromagnetic starter.
Undoubtedly, the tool for professional builders is more reliable in work, but their cost mainly depends on the modification, versatility and brand of the manufacturer.
Design
In the body of the glue gun, to which the power cord is connected, elements are fixed that allow the tool to properly perform its functions:
- nozzle;
- trigger or trigger;
- cylinder for installing the glue rod;
- legs.

The big advantage of the model is the presence of a kind of recess on the body, through which it is possible to determine the presence of the remaining adhesive composition, the integrity of the rod and its timely replacement.
In the case, made of plastic, special legs are built in, which allow the tool to be inoperative with the spout down, since in a different position it can overheat, which leads to malfunctions and failure of the gun.
The presence of a button that can turn off the energy also has a positive effect on the operation of the tool, since the adhesive is saved, which, in between use, can leak.
The hot glue gun, provided with tips of various configurations, belongs to more complex product modifications. Usually, such nozzles make it possible to change the diameter of the hole through which the adhesive enters the working surface and thus control the amount of adhesive. Replaceable nozzles with long, small-diameter elements are used for gluing product fragments in hard-to-reach places. In this case, decorating with a glue gun requires great accuracy and skill from the needlewoman.
Replaceable parts are made of metal, and manufacturers who value their reputation provide them with a rubber or silicone protector, which significantly reduces the risk of burns.
In order to understand the principle of operation of this tool, you need to have an idea of \u200b\u200bhow the glue gun works inside. This will help determine some of the parameters and characteristics of the device.
So, a thermal gun is a tool inside which the polyurethane adhesive is heated to a liquid state. The device is charged from the back with rods, the diameter of which varies from 7 to 11 millimeters.
The rod, passing through a special bushing, enters a rubber tube, after which the reserve is driven into the chamber, where, under the influence of the temperature created by the heating device, the polyurethane composition is melted. This process takes about five minutes. Then, the action of the trigger causes the spare to act like a piston, pressurizing the heated cylinder and squirting adhesive through the nozzle onto the work surface.
The heating chamber is a metal cylindrical container containing the so-called heating unit, consisting of a heating element. It is the size of the heating chamber and the power of the heater that determines the volume of the adhesive mass ready for work, that is, the performance of the tool. Therefore, when answering the question of which glue gun to choose for needlework, these characteristics must be taken into account.
Power consumption
The power consumption of the heating element of the glue gun largely determines the rate of transformation of the adhesive into a liquid and affects the amount of consumed electrical energy. So, devices for professionals can take 300 W or more, and pistols for needlework are limited to consumption of 30 - 150 W.

Some manufacturers produce heat guns with power regulators. Then, at the start of operation, the device consumes 200W, switching to an operating state with an electricity consumption of 40W, and while waiting, it reduces requests to 15W.
However, the speed of "melting" of the adhesive composition may not affect the performance of the tool at all, since it is necessary to take into account the capacity of the heating chamber.
When the heating element is able to provide operating temperature, and there is a sufficient amount of adhesive in the heating tank, the power of the device can be ignored.
Trying to find the answer to the question of which glue gun is best for needlework, you should focus not on its power, but on performance.
In addition, crafts with a glue gun can be made from different materials, some of which are quite sensitive to high temperatures.
So, for polymers, paper or fabric, low-temperature adhesive compositions. Moreover, special guns have been developed for such rods or tools with the ability to adjust the temperature regime must be used, which often affects such a characteristic as the price of a glue gun for needlework, you must choose, taking into account various parameters.
The World Wide Web opens wide choose Internet resources where you can buy gun glue for needlework, in rods of various diameters, colors and lengths.
Crafts with a glue gun, often, are genuine works of art, and many craftswomen have appreciated the capabilities of this tool. It is convenient and safe, and the results of the work that is created with the help of a glue gun are simply amazing.

Besides:
- adhesive composition for thermal guns is less toxic and does not exude unpleasant odors;
- replaceable nozzles, allow you to work in those places where it is very problematic to get to by conventional means;
- correct inaccuracies, since when heated, the parts are easily detached;
- glue sticks perfectly retain their qualities for a long time;
- polyurethane substance sets quickly and firmly;
- seams created with a glue gun perfectly tolerate moisture;
- allows you to firmly hold both synthetic and natural materials.
However, care must be taken, as if used awkwardly, you can burn your hands. It is not recommended to use the adhesive properties of the tool on thin synthetic materials or polyethylene.
The cost of a glue gun for needlework depends on its power, the possibility of using various temperature conditions and varieties of rods suitable for this model.
You can buy a glue gun for needlework in specialized online stores, in the same place where the glue gun is sold, in this case, it will not be difficult to choose, it is important not to miss some of the nuances.
What to look for when buying

Having decided where to buy a glue gun for needlework, first of all, you should pay attention to its technical characteristics:
- power;
- operating temperature of the melt;
- productivity, which in the documentation, more often, is referred to as the speed of work, that is, the supply of adhesive;
- power supply options.
However, as already noted, the performance of the tool is usually more important than its power, and it is this indicator that will be the main one for determining the category of the tool, as for the remaining parameters, they can significantly affect how much a glue gun for needlework costs. And this is from 250 rubles and more.
Undoubtedly, the Internet allows you to compare prices on resources where you can buy a hot glue gun for needlework, but it is useful to know the features thanks to which you can make the best choice.
So, if you have to work with a pistol periodically, then it makes no sense to purchase an expensive modification that can support high temperatures, for home creativity, devices with camera heating up to 165-170˚ are quite suitable.
In addition, it is not worth buying a thermal gun with the ability to work autonomously, a work of applied art can be created by a mains-powered tool.
However, before deciding which glue gun is best for needlework, you need to familiarize yourself with its capabilities:
- switchable temperature mode;
- the presence of electronic regulation, excluding the possibility of overheating;
- determination of the state of readiness for work;
- the presence of a push-button switch on the body;
- illumination of the working area;
- the presence of a viewing window on the body;
- special trigger designs;
- the possibility of changing nozzles;
- the presence of a nipple on the nozzle;
- the presence of a leg-stand;
- complete set of the tool with a special case, a set of rods.
It should be noted that, despite the large selection of similar tools industrial production, and a fairly affordable price, craftsmen, if possible, are quite capable of making a thermal gun with their own hands.
How to make a thermal gun yourself
Certainly, homemade tool will not have the capabilities of industrial analogues, however, there are situations when such a device is urgently needed.

In this case, for those who wondered how to make a glue gun on their own and quickly solve this problem, you will need:
- a roll of non-stick tape;
- a tin sheet that can be cut from an ordinary tin can;
- coil of copper wire;
- wooden block with a section of 2 × 4 cm;
- small household boiler;
- silicone rod.
First of all, a wooden handle is made, for which the length of the boiler handle is measured, to its working part. It is about seven centimeters. This value is measured twice wooden block and cut off two parts.
Then, with a hacksaw, stepping back half a centimeter from the edges, two longitudinal cuts are made on one side, for each of the resulting blanks.
The depth of the cuts should completely drown the handle of the boiler, after the excess wood was selected from the grooves with a chisel.
The boiler is isolated from wooden surface with Teflon tape and placed in the handle box, after which both parts are fastened with self-tapping screws or insulating tape.
The main part is ready.
Now, it is necessary to make a nozzle-nozzle and a cylindrical heating chamber. To do this, a silicone rod is wrapped in half of a tin sheet cut from a can. The resulting cylinder should freely enter the coil of the boiler.
With the help of pliers, a funnel is made from the rest of the tin sheet, which should fit tightly with its wide end on the cylinder of the heating chamber.
The connected parts, threaded into the coil of the boiler, are firmly fixed with copper wire.
By inserting a glue stick into the tool, you can get to work.
It is important to note that the glue gun, where a boiler is used as a heating element, cannot work directly from the mains. To connect the device, a special power regulator is required, which can be used to control the heating of the device.
Of course, a home-made thermal gun will not be able to replace industrial designs, and, most likely, will not be useful to home craftswomen in their work, but it will help in urgent repair work he is quite capable.


