The hallway is the calling card of every apartment or private house. The room not only optimizes the living space, but also carries an aesthetic and functional load. Standard furniture does not always accommodate the necessary things if the room is small.
Hallway design open type with more functional content.
The dressing room has a number of advantages:
- Unity - the storage system takes into account the rational arrangement of all planes;
- Conciseness - the use of built-in modules for a small room;
- Cost-effectiveness – the ability to save money through the use of a facade;
- Reconstruction of surfaces – leveling of minor irregularities.
There are also disadvantages:
- Lack of mobility - embedded systems cannot be moved to another location;
- Repair - after completion of dismantling work is carried out redecorating individual areas or the entire room;
- Complexity of assembly - to arrange the structure, certain knowledge and skills are required.

Design of a dressing room in the hallway.
Kinds
All furniture for the hallway should be as spacious and functional as possible. Drawers, containers or boxes are suitable for small accessories. Everyday items are located with easy access to them. Seasonal clothing is placed on top. High long pencil cases are installed for shoes. Shoes and summer footwear are placed on special hangers. A mirror in the full height and a small, comfortable pouf.
Corner
Ideal for small rectangular corridors corner option dressing room. Rational design maximizes the space for the whole family's belongings. The configuration in the hallway is most suitable for small apartments. Modular design implies a capacious storage system:
- Open shelves;
- Pull-out drawers;
- Metal crossbars.
The bulkiness is significantly reduced by the mirror side, visually enlarging the room. A corner multifunctional dressing room is an alternative to a dressing room.

Corner dressing room in light colors With small mirror fits perfectly into the space of a small hallway.
In a niche
A wardrobe in a niche is a budget-friendly way to place things without disturbing the unity of the space. It is important to comply with the stylistic design of the house. Doors can be:
- Swing;
- Folding;
- Sliding;
- Pendulum type.
The fabric used is:
- Tree;
- Glass;
- Plastic;
- Laminated surfaces.

Design of a dressing room in a niche.
Glossy, reflective surfaces will help to increase the space in small hallways. The dressing room is usually quite spacious in the niche. Used as a closet and changing area.
Open type
The illusion of a spacious hallway is given by an open-type dressing room. Variation involves the arrangement of all things in the field of view. It is necessary to maintain order. The design of the system consists of metal or wooden dividing walls and fairly spacious shelves. The compartments at the top and bottom are closed with doors.

Small items and things are stored in decorative containers and boxes. It is recommended to place a comfortable pouf or small couch along the shoe racks and with things. The dressing room assumes the continuation of the room, so it does not deviate from the unity of style.
Closed
The parameters of a closed dressing room depend on the size of the hallway. In small-sized narrow hallways Suitable for installation of compact options. In both cases, the main advantages stand out:
- Isolation of things;
- No dust pollution.

Wardrobe closed type hidden behind the doors.
The equipped room allows you to do fittings for any occasion. Installing an ordinary mirror will turn your dressing room into a real one toilet room. Correct location involves choosing a location, ventilation and lighting system.

Arrangement, filling and storage systems
Sometimes it is not practical to use wardrobes made of solid wood, chipboard, or MDF. These are too cumbersome options. Remaking such structures is problematic. Metal systems are gaining popularity. They represent modules located on vertical structures. Two types of fastening:

The fastening system depends on the decision of the manufacturers. Each suggests minor changes to the placement of what is needed.
Mobile modification systems are equipped with notches along the entire length. This allows each element to be moved independently of the other. Can be moved from row to row. The height of the shelves and the width between them are adjustable. To fasten components, racks with a straight section are selected. Grooves are cut on both sides.

Shelves and drawers are selected individually. Made from wood, metal, plastic or other materials. Installed on racks or pulled out.

This photo shows more varied contents for the dressing room.
To save money, it is not difficult to build a dressing room with your own hands. You will need round chrome furniture pipes and fasteners. The mobility of the structure will depend on the design methods.

For clothes, there are not only standard storage systems, but also interesting devices:
- Skirt hangers - strips with clips are attached to the guides, allowing you to hang skirts and trousers evenly;
- Hangers with crossbars;
- Retractable designs for ties;
- Retractable brackets;
- Pantograph - a lowering bar;
- Wall rod.

This photo shows different variants placing clothes in the dressing room.
Shoe storage systems
The main problem may be shoe placement. The abundance of pairs is not easy to arrange in one place. Typical sets of equipment for storing shoes can solve the problem:
- Practical retractable system. The modules are located on the mobile frame;
- Wall-mounted mini chests of drawers or hanging organizers;
- Ergonomic wheel;
- Swivel cabinet or drawers;
- Hangers with clothespins for winter shoes.

A cheap and practical way to store seasonal shoes is using racks with hooks. The mechanism is often used in shops. The hooks are attached to a mesh or perforated panel. Convenient adjustment of distance and pad type.

When arranging a dressing room, you can find interesting fixtures among commercial equipment. All shoe stands are designed for maximum occupancy with minimal space.

Decor
In the creation of expensive, luxurious dressing rooms it is used natural massif. For economical options MDF and chipboard materials are used. Compartment doors are often wooden or made of durable glass. Storage systems in the form of baskets and boxes are usually made of plastic, rattan or wicker.
Wardrobes in dark shades are suitable for spacious rooms. Bed shades are suitable for small areas. In both cases, the overall design concept of the apartment is taken into account.

If there is insufficient natural light or its complete absence, it is important to pay attention to artificial lighting. Ceiling chandelier does not reveal a full overview of the entire storage system. Illumination of individual zones is required. LED strip and spotlights create soft, diffused light. Competent design organizes space, creating maximum functionality and comfortable storage of things.

Making a dressing room project
Making your own dressing room requires advance training in the intricacies of the work. It is recommended to watch the training video or study the necessary literature. This will eliminate errors during the manufacturing process.
The first step is to create a dressing room project. The circuit implements the subsequent execution of actions. How to make a dressing room in the hallway with your own hands, important points in forming a sketch:
- First, a drawing of the compartment is created;
- The data is transferred to paper or to a special program on a PC. Without sufficient experience and skills, difficulties often arise;
- The dimensions of racks and shelves are formed. A depth not exceeding fifty centimeters is taken into account.
- If difficulties arise in the selection, the finished drawing is taken as a basis.
- The presence of doors, sizes and configurations are determined: standard, swing, sliding types.
- Reliable fasteners for all elements are thought out.
The completed project contains necessary calculations and a visual visualization of the dressing room. Additionally, an estimate of the required material is drawn up.
Materials
To make the structure you will need some tools and materials for the work. The list is compiled based on the information from the compiled project:
- The frame is created from guides and rack profiles. It is important to consider the thickness of the partitions. Thick ones take up a lot of space, limiting space;
- The partitions are covered with plasterboard up to fifteen millimeters. It is advisable to choose moisture-resistant varieties;
- The frame is filled with soundproofing materials, for example, mineral wool;
- For finishing work: putty, mesh that strengthens the putty layer, finishing in the form of wallpaper, paint or wall panels;
- Lighting devices, sockets, switches, wires for electrical wiring;
- Accessories for storage systems, doors and other possible elements;
- Shelves, racks, mirrors, other filling elements. When choosing, they rely on the layout, individual wishes and financial capabilities.
Work plan
Self-production of a plasterboard dressing room is easy to implement if all steps are carried out sequentially.
Installation of the structure:
- Apply markings to the walls using a building level;
- Make holes for the dowels according to the markings;
- Secure the profile with screws;
- Mount the ventral posts into the guides, taking into account a distance of sixty centimeters;
- Assemble the structure;
- If there are doors in the dressing room, strengthen the structure with special lintels.
The resulting device must have a strong foundation. Avoid deflections, distortions, and instability.
Rack
The wardrobe rack is able to embody all the ideas of the owners. Increases capacity, functionality and appeal. Made from affordable and easy-to-process materials. Sequence of stages:
- Apply markings to the walls and floor;
- Install the guides, taking into account the formation of a groove for attaching the racks;
- Carry out the sheathing based on general style and preferences.
Pencil case
Narrow cabinets are used to store clothes and small items. The pencil case can be equipped with retractable side hangers. The stages of creating a pencil case do not cause difficulties or problems:
- Selection of necessary materials. Pay attention to the special side rollers;
- Assembling the hanger and securing the rollers;
- Fixation of the rear and upper walls;
- Hanger location;
- Side panel assembly.
Finishing
The type of dressing room is decided at the first stage when drawing up a sketch. If the finishing is done on plasterboard sheathing, you can fix the decorative elements. Finishing sequence:
- Fixation plasterboard sheets to the frame;
- Putty with prevention of cracks due to self-adhesive tape;
- Applying a second layer;
- Primer with protection against excessive moisture;
- Painting or paneling.
Ventilation and lighting
The dressing room often does not have windows. There is no flow of fresh air and natural light. Worth considering proper ventilation and installation lighting fixtures:
- Construction of partitions and doors with technological gaps;
- Hole in the wall above the baseboard level;
- For private houses, ventilation holes are made directly in the floors.
For optimal lighting Several lamps are needed, taking into account the features of the dressing room. One or more lamps on the ceiling, LED lighting in the volumetric compartments of the structure, mirror lighting.

An example of lighting in a dressing room without windows.
Wardrobe room - rational storage of all kinds of clothing items. Designing it yourself is not difficult. At the beginning of work, it is important to familiarize yourself with the teaching technique in detail and understand the nuances. Well-designed sketches and drawings will make the work easier. High-quality materials will extend the service life.
Video: DIY dressing room
Dressing rooms are special rooms designed for storing things, shoes and other small items. They are usually represented by separate rooms equipped with different systems for storing things. They are often formed independently in the hallway or converted from a small storage room. They are considered multifunctional and comfortable to use, and you can make a dressing room with your own hands, for which they are used different materials and drawings.
If you plan to do the work yourself, it is recommended to watch the training video in advance to learn all the intricacies of the work, as well as take into account various errors and problems that arise in the process. The first stage of creating a dressing room is the formation of special drawings, according to which subsequent work will be carried out. When a sketch is formed, important points are taken into account:
- Initially, a drawing is made of the immediate compartment intended to create a dressing room, and it can be represented by a small storage room or even a small niche located in the corridor, bedroom or other room of the home;
- all results are transferred to paper, and it is quite difficult to do this work yourself without experience or special skills;
- it is determined what dimensions the racks, shelves and other elements installed in the dressing room will have, and it is taken into account that the shelves should not have a depth exceeding 50 cm, and there should be a distance between them of 35 cm;
- if difficulties arise in determining the appearance of a given compartment, then it is advisable to look at the photos in the selection in order to take a ready-made drawing as a basis;
- it is important to decide whether there will be a door in the design, because if it is planned, then it is decided what size it will have, and also whether it will be standard, hinged or sliding;
- do-it-yourself wardrobe drawings and diagrams of which can be seen in the selection must be made durable, of high quality, therefore all the elements contained here must be securely fastened, so the fasteners used for these purposes are thought out.
The finished project should contain numerous calculations and photos so that you can clearly imagine how the dressing room will look in the apartment, as well as what fasteners and materials need to be purchased to complete all the work.


Tools and materials
Making a dressing room on your own requires advance preparation. various materials and tools used during this work. At this stage, you should use the information calculated and obtained as a result of the design.
The following elements must be prepared:
- rack and guide profiles designed to create the frame of a future wall, and their thickness should not be significant, since partitions of significant thickness take up too much space, which is not suitable for limited space;
- plasterboard used in the process of cladding partitions, and it is desirable that its thickness varies from 12 to 15 mm, and it is also recommended to use moisture-resistant material;
- to increase sound insulation parameters, it is recommended to fill the space of the frame with some suitable material, and mineral wool is considered an excellent solution for these purposes;
- materials for conducting finishing works, and this includes putty and mesh to strengthen the putty layer, as well as finishing material, and paint, wallpaper, and various wall panels can be used;
- to create high-quality, uniform lighting, lighting fixtures are purchased, as well as wires for wiring, sockets and a switch;
- accessories for different systems storage, doors, other elements used indoors;
- creating a dressing room with your own hands necessarily involves the use of different shelves and racks, mirrors and other elements to fill it, and their choice depends entirely on the chosen layout, the preferences of the owners and their financial capabilities.
When purchasing lighting fixtures, it is recommended to give preference LED lamps And special tape, since these elements guarantee high-quality and uniform lighting, and are also considered economical to use.

Drywall

Frame elements

Tools
Installation of plasterboard construction
At this stage, the actual creation of a plasterboard dressing room begins. For this purpose, walls are created from pre-purchased metal profiles. The whole process can be easily implemented independently at home, and it is recommended to watch the training video in advance to take into account the nuances of the work. Consistent and correct actions are performed:
- markings are applied to the walls in those places where it is planned to attach the structure to the walls, and for the correctness of this process it is necessary to use a building level;
- holes are created for the dowels, and it is important to know how to make them correctly, since they must be located where there are markings for this;
- the profile is fastened, and this process must be done quickly and reliably, for which dowels are inserted into the holes made in advance, where the screws are driven, and then the profiles are attached;
- we assemble the structure, for which we install ventral posts that are inserted into already fixed guides, and the distance between them should be approximately 60 cm;
- if you plan to make a dressing room with a door, then where there will be an opening, it is necessary to strengthen the structure, for which special lintels are used.
Do dressing room with your own hands, it is necessary in such a way that the resulting structure is not skewed in any way, and it should not sag or wobble.

Marking


Profile fastening

Wardrobe rack
Such a special rack is considered the optimal solution for every dressing room. It fits perfectly even in a small room, and it is also easy to assemble. It can even be made independently from chipboard or other affordable and easy-to-process materials. There are many photographs with this design, so you can be convinced of the attractive appearance of such dressing rooms.
The wardrobe rack can be purchased from finished form or made by yourself. In the latter case, you can realize unique ideas, ideas, and also arrange a dressing room that ideally matches the needs of the owners of the premises.
Photos of such ready-made racks are available in large quantities below, so you can choose best option. When creating independently, the following stages are implemented:
- Initially, markings are applied that determine the dimensions and parameters of the future structure, and it should be located both on the walls and on the floor of the room where the work is planned to be performed;
- the guides are being installed, and they must be attached to the base base with the back so that a groove is formed for inserting the racks;
- The structure is sheathed with plasterboard or different slabs, and the choice depends on the preferences of the owners of the future dressing room, as well as on the chosen style.
Thus, the rack is ideal for dressing rooms. Wardrobe rooms with this design are distinguished by high spaciousness, attractiveness, and versatility.

Assembling shelving elements

Painting metal parts

Frame installation

Fastening the shelves

Fastening the assembled rack

Finished design
Pencil case
Often a special pencil case is installed in this room. It is a narrow and long wardrobe designed to store various clothes or other not too large things. Often it is additionally equipped with a special hanger in the form of a frame, which extends from the side. The number of shelves in such a pencil case may vary, and it is determined depending on the number of people living in the residential property.
The process of creating such a design is divided into successive stages, which allows you to create a truly high-quality and multifunctional pencil case in your apartment:
- are purchased necessary materials for work, and it is important to choose high-quality rollers;
- First, the hanger is assembled, and then special rollers are attached to the sides;
- the back and top walls are fixed;
- the hanger moves in;
- Next we make the remaining sidewall.
Thus, if you figure out how to build a wardrobe pencil case, then this process will not cause any difficulties or problems.


Finishing
When learning how to make dressing rooms in rooms, you need to decide on finishing materials. Drywall is most often chosen as cladding, and various objects and elements can be fixed on structures made from it. After creating the frame and fixing the sheathing, putty and finishing of the walls are carried out. To carry out the work correctly and competently, you must follow a certain sequence of actions:
- sheets of drywall are fixed to the frames made;
- if necessary, they are cut and bent in different ways;
- the structure is puttyed using self-adhesive tape, and it prevents the occurrence of cracks;
- it is advisable to apply the material in two layers at once;
- a special strengthening primer is applied, which reduces the absorbency of the base and also increases paint adhesion;
- The surfaces of the resulting structure are painted, and it is also allowed to use other materials for cladding, for example, wall panels.
Thus, if you carefully study the structure of the dressing room with your own hands, this process will not take much time and will not require investing a significant amount Money. At independent work makes it possible to obtain a truly unique design, ideally suited for a specific room and its style.


Lighting and ventilation
To others important point It is considered to create high-quality ventilation and lighting in the dressing room. Most often, it is a room without windows, so natural renewal of air and the flow of air are impossible here. sunlight. Therefore, during the finishing process of this premises features taken into account:
- a sufficiently large gap will certainly be left under the dressing room door, through which fresh air will flow into the room;
- during the construction of partitions, special technological gaps are certainly left;
- small holes may be created in the walls above the baseboards;
- if the work is done in a private house, it is recommended to do it on the floor vent, covered with a durable and fine mesh grille.
Lighting in dark room must be of high quality and optimal. Therefore, it is advisable to use not only a general lamp installed on the ceiling, but also additional lighting. To increase the comfort and speed of finding various items on the shelves, it is recommended to attach them to LED backlight, presented in the form of ribbons.


Drawings and diagrams
If you create a dressing room with your own hands, then you need drawings and diagrams according to which the main work will be carried out. These documents certainly include the following main points:
- room size;
- the location of all elements contained herein;
- the need, size and other parameters of the doors are taken into account;
- calculation is made finishing materials and fastenings;
- the use of various retractable structures is envisaged;
- calculation of all costs necessary to obtain a complete and comfortable room is carried out;
- planning is thought out in advance.
The drawing must be created first on paper, and when you study it, you will see schematically what the room will look like after the work has been completed. If you have no experience working with drawings, you can use special programs.
Thus, a dressing room is a useful, multifunctional room designed to store various items and clothes. To understand how to make a dressing room with your own hands, it is recommended that you first carefully study the training video in order to take into account the numerous nuances and features of this work. It is important to use pre-made drawings during work, and also to use only high-quality, reliable materials. With a competent approach, we guarantee a high-quality, durable structure that can withstand different loads and impact. We must not forget about optimal ventilation and uniform lighting. The comfort of using a self-made dressing room depends on all the above nuances.


A dressing room is a great way to place not only clothes and shoes, but also various household items in one place. However, many people are intimidated by the construction of this small room. Don't worry, you can do it with my own hands from scratch, and at a very low cost.
First, decide on the location of the dressing room. If you have a large enough hallway, you can take a small corner from there. Plus, this way you won’t lose useful space in other rooms.
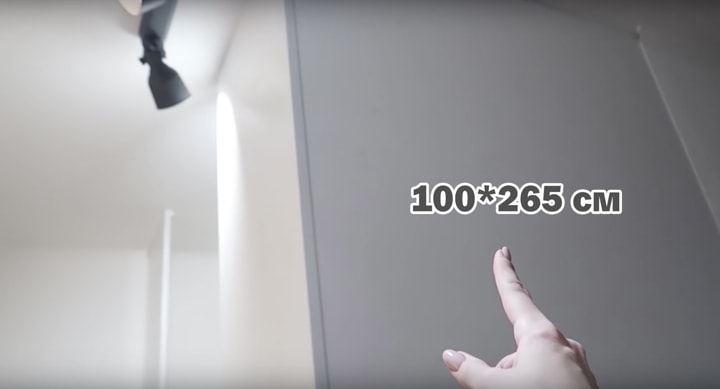
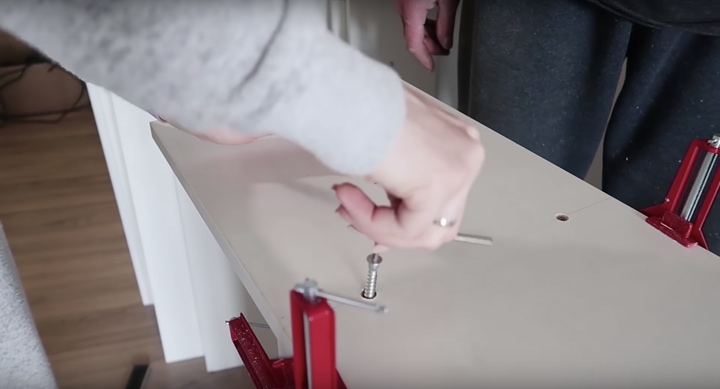
To build a dressing room, you can use plywood, wooden panels, and chipboard. But exactly cutting chipboard with gluing the edges it will be the most simple option on processing and cost. In this project, the dressing room was built with dimensions of 100 by 180 centimeters.
Youtube | Bubenita
For the wardrobe body
- 2 pieces of chipboard 50x266 cm;
- 1 piece of chipboard 100x266 cm;
For shoe shelves
- 6 pieces of chipboard 80x30 cm;
- 4 pieces of chipboard 50x30 cm;
For mezzanines
- 2 pieces of chipboard 80x40 cm;
For bottom rack
- 2 pieces of chipboard 100x30 cm;
- 6 pieces of chipboard 80x30 cm;
For top rack
- 2 pieces of chipboard 150x20 cm;
- 6 pieces of chipboard 80x20 cm;
General
- drill;
- plastic corners;
- hexagon;
- confirmations;
- plugs for confirmations
How to do
 Youtube | Bubenita
To attach chipboard to the wall, you can use ordinary plastic corners. Drill holes in the wall, insert dowels and screw the corners with screws. Corners are attached to the ceiling, walls and floor.
 Youtube | Bubenita
The most large detail is installed as a second wall, two smaller parts will serve as the front walls with the entrance.
 Youtube | Bubenita
Depending on what kind of dressing room you want to see, you may need drawers, shelves, and rods. For the shelves, it is enough to assemble the chipboard by screwing the boards to the sides using confirmations.
 Youtube | Bubenita
Use special holders to secure clothes rails to the wall.
 Youtube | Bubenita
Instead of sliding entrance doors You can hang an ordinary curtain. This will help make the space more comfortable and also save money. To hang it, you can use the same rod as in the dressing room if the curtain has rings.
The cost of such a room will be about 10 thousand rubles with all consumables.
Owning your own dressing room is the dream of many women. It’s difficult to limit yourself to just one closet, having a heap of clothes and shoes, as well as handbags, scarves, hats and other things. But the wardrobe will accommodate all these items and will allow you to allocate a suitable corner for everyone. In private houses, you can often see a room for things that was originally included in the construction plan. In some modern apartments There are small pantries that can be converted into storage space. If they are not there, then there is a way out - a do-it-yourself dressing room. To arrange it, you will need to tinker, but the time and money spent on purchasing materials and searching suitable schemes- nothing before the realization of a dream.
Why do you need a dressing room?
A dressing room is a room designed for storing and organizing clothes, shoes and accessories. Often they are supplemented with sports equipment or some household items, for example, additional blankets, pillows or equipment. These are rooms that are equipped with storage systems. Sometimes closets or separate suitable parts of the hallway are converted into a dressing room. Such premises are multifunctional and their use brings additional amenities to the inhabitants of the house.
A dressing room allows you to rid your home of large closets, chests of drawers and massive cabinets with clothes
You can build a retractable ironing board, mirror and other additional tools into the dressing room that will make life more comfortable.
How to make a dressing room with your own hands
Of course, the easiest way is to entrust the work of creating a dressing room to professionals, but if you don’t want to overpay, then you can take matters into your own hands. Beforehand, it’s worth watching several training videos to evaluate the intricacies of the work and take into account problems and errors that may arise.
The initial stage is the development of the drawing. You need to determine the size of the dressing room. This could be a room left over from a former storage room or a niche (corner) in one of the rooms. All measurement results must be carefully recorded and supplemented with a schematic drawing for a rough understanding of which measurements relate to what.
Based on the dimensions of the future room, you can already roughly imagine the parameters of racks, shelves and other elements that are supposed to be placed in it. It is necessary to take into account some nuances. The depth of the shelves should not exceed 50 cm, as it will be difficult to reach their edges. The distance between them should be about 35 cm and so on. You should also think through the nuances of lighting in advance.
You can use ready-made diagrams as an example or copy them completely if the dimensions on them coincide with the parameters of the future dressing room
You need to decide on the availability and format of the door. There are models:
- sliding;
- accordions;
- swing;
- coupe;
- mounted
You can do without them altogether or prefer thick curtains.
The installation process must be carefully verified, elements must be securely fastened and selected quality materials to get a functional room.
Drawings and diagrams
If the dressing room is made with your own hands, then you cannot do without diagrams. They think through and calculate:
- room dimensions;
- arrangement of shelves and their number;
- door parameters;
- finishing materials and fastenings;
- installation of retractable structures;
- expenses;
- planning of ventilation and lighting systems.
Below are a few diagrams that can be used as ideas.
The simplest dressing room is 2.5 meters high and 1.3 meters deep. You can place an ironing board in it. There is a separate space for shoes and clothes, household items and other things.
The diagram includes all the approximate parameters for building a dressing room
Option for a different type of dressing room. Storage spaces in it are located along two walls (left half of the picture) or three (right half of the picture).
All shelves in the wardrobe type are located on one wall
The storage system will be convenient if the space for its installation is shallow but long. In addition to the usual shelves and hangers, the diagram shows an installation example drawers for storage.
The structure of the dressing room allows you to differentiate it by type or season, and use shelves for accessories
A dressing room with maximum variety in the type of placement of clothes and accessories. There is a section with a pull-out trouser bar, racks for bags and shoes, and several hangers for clothes.
A small compact space will accommodate a large number of things and unload other rooms
A small dressing room with a minimal set of shelves. Suitable for installation in a pantry.
Corner dressing room allows you to save free space due to the beveled edge
The dressing room can also be located in the corner of the living space. Although its size is small, it helps to save space in the room due to its functionality.
Required tools and materials
After creating the diagram, you should take care of the materials and tools used. Information obtained during design will be required.
The following items are required:
- rack and guide profiles (for limited space, small thicknesses are needed);
- moisture-resistant plasterboard for covering partitions with a thickness of 12–15 mm;
- mineral wool or other materials to fill the frame space;
- putty and mesh to strengthen its layer;
- paint or wallpaper;
- drill;
- screwdrivers;
- dowels;
- screws;
- Wall panels;
- lighting fixtures (you should give preference to LED strips and several point light sources);
- wires for laying wiring;
- sockets;
- switches;
- fittings for storage systems, doors and other things;
- shelves, racks, mirrors and other elements for filling the wardrobe.
Step-by-step instruction
The construction of a dressing room also has its own nuances. If installation is planned in one of the corners of the room, then the walls are created from profiles and sheets of plasterboard. After completing their installation and zoning the shelves, you can begin attaching the door.
The sequence of actions for installing a dressing room is as follows:

In addition to the above option, mounting a wardrobe can also be done using a wardrobe rack. It can be purchased at furniture store or make it yourself from plasterboard or chipboard.
The dressing room can be in the form of a pencil case. The number of shelves and hangers in such a system is determined by the number of people who will use it.
The creation process begins with measurements and acquisition of materials. The hanger is assembled first, and then special rollers for installing the door. The rear and upper walls are fixed. The hanger is retracted and the sidewall is made.
One lamp installed in the ceiling for quality lighting a dressing room is not enough
After the formation of the future dressing room, you can begin finishing. Sheets of cardboard are attached to the frame. The entire structure is puttied using self-adhesive tape, which avoids the formation of cracks. The material is laid in two layers. After it, primer is applied, which increases paint adhesion. And finally, the surfaces are painted, wallpapered or paneled.
In the process of finishing the wardrobe, it is necessary to take into account the need for ventilation and lighting. A small gap is needed under the door for air to enter; when constructing partitions, technical gaps must be left; small holes can be made in the walls above the baseboards. For good lighting It is most convenient to additionally secure it on shelves LED strips backlight.
How to make sliding doors
The most common type of door for a dressing room located in a room is a compartment. They move along guides parallel to the wall. When opening, their parts can slide one after another (the number of elements is two or more). If the front side of the proposed room is large, then you can leave a stationary wall and make part of it with doors.
Door sizes are selected depending on the selected drawing
It is necessary to take measurements doorway. This must be done using a plumb line, tape measure and level. We put marks at the corners of the opening and in the middle to find out exactly the required size for the future door. The approximate width of the guides is 10 cm. This distance should also be measured in the depths of the niche. Based on the measurements, you can draw up a project and select necessary materials for installation.
It is best to purchase ready-made furniture systems in a specialized store. The minimum and standard installation kit includes:
- metal profiles;
- roller mechanisms;
- plugs;
- gaskets;
- jumpers;
- fastenings
You will also need material for the doors themselves:
- sheets of clear or tinted glass;
- mirrors;
- plastic;
- Fiberboard or MDF;
- other materials.
You can purchase them either separately, having previously calculated the required size so that the door does not turn out to be too small or large, or together with a fastening system. In the latter case, problems with mismatched dimensions can be avoided.
The doors will need to be assembled according to the instructions. More detailed information can be found in the video below.
Video: installing sliding doors
Planning space for things
A separate dressing room, planned taking into account the needs of the owners, helps not only to arrange things as comfortably as possible, but also saves space.
Before creating a room, you need to roughly imagine its dimensions. Then determine how many people it will be intended for. When the entire space belongs to one person, it is easier to plan a wardrobe, but if the room is owned by the whole family, then each member should have their own personal area.
If shoes do not fit on the lower shelves, then you can allocate a separate rack for them
You should determine what types of things will be located in the room:
- cloth;
- shoes;
- blankets and pillows;
- suitcases;
- bags;
- Sports Equipment;
- decorations.
Variations in the set of items depend on the size of the wardrobe.
The third step for planning involves sorting your things. It is necessary to determine which of them should be stored on hangers, and which will be sufficient to install shelves. Based on the data obtained, one can estimate required amount shelves and hangers. A small reserve should be left for the possible appearance of new things in the wardrobe. In addition, you can take into account that the dressing room is not limited to rods and shelves. Can be added to existing systems:
- pantographs (bars with a mechanism that allows you to change their height);
- pull-out trouser hangers;
- drawers and shelves;
- boxes and baskets;
- shelves for storing shoes;
- hangers for ties, scarves, umbrellas, belts;
- compartment for ironing board;
- place for a mirror.
Measuring the length of hanging items allows you to understand what height of hangers you will need. But you can't base it on just one piece of clothing. If you focus on a single long dress when choosing the height of the shelves, then you can pack it in a case and throw it over a hanger and use the rest of the clothes as a basis for determining the size.
To determine the height of areas for clothes on hangers, you should use various items of clothing
Knowing the dimensions of the room and the approximate number of storage elements that are needed, you can begin to draw up a rough plan and draw a sketch. It is worth considering not only the possibility of placing clothes and accessories, but also the ease of use of the room, as well as zoning rules. They are simple, but allow you to rationally arrange your wardrobe. You need to start planning with the distribution of long clothes. It will require the installation of a barbell taking into account the length of the outfits. Afterwards it’s easier to arrange the rest of the hangers and shelves.
Things are placed according to the height according to the principle “both we wear and store”, that is, shoes are at the bottom, and hats are at the top. Clothes that are constantly worn must be placed in plain sight, that is, on rods or in the most accessible drawers. The upper part of the dressing room is a place to place things that are rarely used. This could be suitcases, bed linen, blankets and pillows, seasonal clothing.
To plan pull-out shelves it is necessary in advance to provide for them a space into which they will move forward. Usually, a space of 50 cm deep is left for this. A person also needs space to move between cabinets. Usually a 60 cm wide passage is sufficient.
You can get a rough idea of the size of the sections by looking at the image below.
The main priority when placing things should be ease of use of the cabinet
A dressing room is a useful and multifunctional room that is suitable both for storing clothes and for arranging various items. Before deciding to install it yourself, you should watch several training videos to take into account the features of the work. It is necessary to create a drawing that will allow you to accurately formulate an idea and think through ventilation and lighting. You need to use high-quality materials. A competent approach to creating a room guarantees a structure that will be of high quality, durability, can withstand heavy loads and will last for a long time.
Classic dressing rooms, or dressing rooms, occupy about 15-20 m2 of space and are designed not only for storing wardrobe items, but also for putting them on. Such spacious dressing rooms are a privilege for owners of large apartments or houses, but with the right approach and 2-3 m2, you can organize a spacious storage area that will allow you to place all your existing clothes and shoes. Of course, it is more difficult to act in a small space, but if you take advantage of the accumulated experience of professional designers, then in the most ordinary and even very miniature apartment you can find a place for a dressing room and place everything you need there. We reveal the main secrets of the design of a small dressing room in an apartment.
A wide selection of custom-made wardrobe rooms is presented on the page https://meb-el.ru/vsya-mebel/garderobnye/. The factory produces furniture using its own equipment according to GOST standards.
No. 1. Is there a need for a dressing room?
Surely, almost every girl dreams of a separate room where numerous pairs of shoes would be neatly arranged and beautiful outfits hung. Going to such a room to choose clothes suitable for a particular occasion would turn into a whole ritual with mandatory fitting. Often such a dream remains a dream, because it encounters criticism. Why do you need a separate dressing room in a small apartment when all your things can be hidden in? It would seem that everything is correct, but part of the family wardrobe will still be stored in small cabinets throughout the apartment, and all outerwear And most of shoes - in . The usual arrangement of things, in which space is not saved at all. 
A dressing room, albeit small, gives its owners a lot of advantages:
- the opportunity to get rid of bulky cabinets, shelves, bedside tables and hooks dispersed throughout the apartment. This will make the home more neat and free, and visually it will be perceived even more;
- Finding the necessary item in a dressing room with open shelving and rods is much easier than rummaging through an often dark closet with narrow shelves;
- the ability to make the most of the dressing room space by building shelves up to the ceiling and combining different zones storage at your discretion. Even a small dressing room can accommodate more things than a wardrobe;
- wardrobe items that are neatly folded on shelves or hang freely on a rod retain their original appearance much longer appearance. Of course, this advantage is also typical for a large wardrobe with thoughtful filling, but often in wardrobes clothes are folded too tightly.
The main difficulty you will have to face on the way to creating a dressing room is the search suitable place and his department. Of course, on construction of a partition Some of the usable space will be lost, but upon detailed comparison it turns out that having a separate dressing room, especially if family members have a lot of things, is still more profitable. Modern systems storage allow you to create a convenient dressing room even for 2-3 m2. The minimum possible area of a dressing room is 1.2-1.5 m2. 
No. 2. Choosing a place for a dressing room
To find a place for a small dressing room, we analyze all areas and corners of the apartment. The potential and most successful places for a dressing room are:
- pantry. There are no comments at all. In many apartments the project includes a small utility room. If you didn’t get rid of it at the time, then converting it into a dressing room is not difficult. and a dressing room are largely similar in functionality, but their purpose should not be confused. A pantry is a place for storing things of a completely different nature, which are this moment not needed or rarely used. Only clothes, shoes and accessories are stored in the dressing room, and a dressing room ideally implies the opportunity to change clothes there, however, this is not always easy to do in a small dressing room. Let us note that in modern small-sized apartments the pantry and dressing room are often combined - this is acceptable, but the main thing is not to make a mess and not to store items with a strong smell next to clothes;

- part of a bedroom or other living room. You can get a small dressing room if you fence off a corner or end of the room, and you can use both stationary partitions and sliding doors. This option will be ideal if it is very elongated in length, then you can not only highlight the dressing room, but also give the room the correct geometry. A corner of a room is often separated in cases where there are doors or windows in adjacent walls, and it is still impossible to arrange the corner in any way;


- you can get some extra space and use it to create a dressing room, but this is not the most popular option;
- if there is one in the apartment dead ends or so-called "appendices" which have not been properly used for many years, then there is a place for a small dressing room;

- don't forget about niches, which are provided for in the layout of a number of apartments, are located in the bedrooms and have sufficient depth for arranging a dressing room;

- the most extravagant and unusual option– location of the dressing room on loggias. To do this, it must be more or less spacious, and...

No. 3. Wardrobe borders and doors
To separate a new room, you can use one of the following materials:

Doors to the dressing room can be . Swing require space to open, so in conditions of acute space saving they are rarely used, but they have one big advantage - on inside You can place several hooks or envelopes to store accessories. It is better if the swing door does not open into the dressing room, but if there is very little space in the adjacent room, then the opposite option is also allowed. 
Accordion doors and sliding doors save space to the maximum and are often used in wide and shallow dressing rooms. The decor of such doors can be done in such a way that an outsider is unlikely to guess that another room is hidden behind them. Lightweight alternative– fabric curtains and louvered doors. 

Doorway width must be at least 60 cm. Door material can be anything: wood and its imitation, plastic, glass, mirror, etc. The main thing is that the door fits into the interior of the room adjacent to the dressing room.


No. 4. Choosing a dressing room layout
The layout of a dressing room refers to how the storage areas will be located in it. This largely depends on the area of the room, its geometry and the personal preferences of the owner.
There are different types of wardrobe layouts::
- one-sided, or linear assume the location of the entire storage system along one wall. Depending on the characteristics of the allocated room here there are a couple of options possible. The first one is reminiscent of a wardrobe - when you open the doors to the dressing room, all the shelves with clothes “look at you” at once and it can be problematic to go inside the room. The second option is to place the door at the narrow end of the dressing room. The minimum width of the room in this case is 1.2 m, which will be enough to provide space for moving around the dressing room and trying on things, as well as storage space 55-60 cm wide. This great option for small apartments
, which allows you to conveniently arrange things, have normal access to them, and even change clothes in the dressing room;

- corner, when a corner of the room is separated by a partition or doors, and storage systems are placed along two adjacent walls forming the corner. Not a bad option, but to get a dressing room in which you can turn around, you will have to take away a decent part of the corner from the room;

- L-shaped- these are dressing rooms where the racks are located along one long and one short wall. The layout resembles a linear one, only more storage space is added at the far end. Great option arrangement of a small dressing room;


- double-sided layout involves a parallel arrangement of two rows of things. This way you can arrange a dressing room minimum width 1.5 m: 60 cm is the door and passage, 60 cm is the main storage area and 30 cm is allocated to cellular shelves in which shoes, accessories and some things can be stored. Placing two wide full-fledged racks 60 cm wide will require minimum width dressing room 1.75 m;

- U-shaped layout- not an option for small dressing rooms, since for normal use a width of at least 2 m will be required, otherwise access to the space in the corners will be limited, or they will not be able to be used normally at all. Like the U-shaped layout, it is not used when arranging small dressing rooms. 4-sided layout when some of the shelving is placed near the wall with the front door.


No. 5. Creating a dressing room design project
Since we are talking about actually tiny rooms, it is very important to plan the entire space in such a way as to use literally every centimeter with maximum benefit. It is necessary to carefully consider in advance the location of each element in the future dressing room, and even better - all your thoughts and ideas draw on paper or use a special application. 
First, you need to measure the parameters of the existing room and imagine the future dressing room on paper on a scale. Now let's decide which elements must be placed in the dressing room, which depends on the type and quantity of clothing. Some are moving towards them requirements:

Very important properly evaluate your wardrobe, understand how many and what things you have, choose for them the right conditions storage, and only then start designing the dressing room. Please note that the passage between the racks must be at least 60 cm. 
No. 6. Equipment and furniture for a small dressing room
From all that has been said, the question may arise: so where to get furniture? There are several options:

In a professional environment, everything storage systems are divided into two main types: 
The dressing room space can be divided into three zones:
- lower(up to 60-80 cm) is often used for storing shoes. In this case, the depth of the shelves should not be more than 20-30 cm, otherwise it will be inconvenient to search for the required pair. Part of the lower tier can be equipped with drawers;
- average(from 60-80 cm to 180-200 cm) – a place to store frequently worn clothing, so this area is the easiest to access;
- top(180-200 cm and above) is used for storing out-of-season or rarely used clothing. You can place boxes of shoes there, and sometimes suitcases are stored on the upper shelves.
Try to make the most of the entire height of the dressing room. If there is space left on the shelves, you can put baskets there. It would be nice to provide storage space for umbrellas and an ironing board.  , a musty smell will quickly appear in the dressing room, and the accumulation of excess moisture will lead to the appearance. Ventilation in the dressing room can be ensured in the following ways:
- regular ventilation is the simplest option, but often insufficient;
- installation exhaust fan which will connect to common system home ventilation. Some craftsmen build a separate channel leading to the street or roof of the house;
- installation of an air conditioner with an antibacterial filter;
- arrangement of a full-fledged supply and exhaust ventilation system, but this is difficult and expensive.
When using curtains as doors, it is not necessary to provide additional ventilation. 
No. 9. Some design tricks for a small dressing room
Designers have accumulated a lot useful tips And effective ways organize the space of a small dressing room with maximum convenience and comfort:

The final touch when decorating your dressing room is the selection of aromatic sachets that will fill the room with a pleasant smell.