Modern man accustomed to being around different kind conveniences wherever he needs. And country estates are no exception: in private houses and summer cottages, we also want to spend time in comfort, without parting with the usual urban conditions. Therefore, it is necessary to think about purchasing comfortable country furniture that will be comfortable and durable.
An excellent solution for garden plots will be a cozy summer chair, where you can have a good time in the fresh air. A competent choice of a chair for a summer residence is a responsible matter, it is necessary to take into account several features of garden furniture.
![]()
Differences of country chairs from ordinary furniture in apartments
The country chair differs in greater practicality, it is specially intended for use on the street. It is made of special materials that dry quickly or do not get wet at all, do not fade in the sun and are not inferior in convenience and practicality. Also, such material is easy to clean and practically does not wear out.

A distinctive feature of chairs and chairs for summer cottages is their mobility: they can be easily moved around the site, and some can even be folded and stored indoors. Therefore, by moving the chair to the right place, you can sunbathe in the sun or relax in the shade.

![]() And if you are looking for a good massage chair for giving, then we recommend the US MEDICA store, they have the largest selection and variety of models, which will allow you to find perfect solution. Modern massage chairs are not only comfortable and practical, but also beautiful and easily help to quickly relieve fatigue. Comfort and modern design will help make the time spent in the chair truly enjoyable.
And if you are looking for a good massage chair for giving, then we recommend the US MEDICA store, they have the largest selection and variety of models, which will allow you to find perfect solution. Modern massage chairs are not only comfortable and practical, but also beautiful and easily help to quickly relieve fatigue. Comfort and modern design will help make the time spent in the chair truly enjoyable.
In the photo you can see what the massage chair will look like in the interior of a private house

It is worth understanding what options are on the market, and what rules should be followed when buying.
Types of chairs for giving
Country furniture manufacturers provide wide choose interesting solutions that will suit even the most picky client. There are several main types of garden chairs, each with its own purpose and features.

When buying, consider how you will use it so that it is as functional as possible. Below are photos of chairs for giving, which are worth telling a little more about.
Plastic chair for giving
The most budget and unpretentious option. The variety of shapes and colors provides an opportunity to choose the right solution for relatively little money. A chair made of plastic cannot be called practical: it can crack or bend.

For people who care about health plastic version may not seem the best, but modern furniture manufacturers are trying to minimize the harm from plastic. Before buying, be sure to check the quality of the product, it should not exude unpleasant odors.

But due to their simplicity and low cost, they have become quite popular with buyers. They can be easily replaced with new ones if the old ones suddenly become unusable or your mood changes. If you like change, a pair of new armchairs or chairs in a bright color will add variety.
Folding chairs
Since quite often country furniture is made of wood, it does not like high humidity. Therefore, in order to save the acquisition for many years, it is necessary to remove it in rainy weather under the canopy

Furniture that can be folded and moved at any time is very mobile and convenient. It can be either a folding chair or a lounge chair. Such models do not take up much space, when folded they can be stored in a country house.

Chaise lounges from the beaches have also migrated to summer cottages, as they are very comfortable and easy to care for. The material is durable and comfortable, and the ability to transport it only adds to the pluses. A bright and comfortable deck chair on the site will give you the opportunity to get a gorgeous tan without visiting the beach or solarium.

Wicker chair for giving
for weaving consumable is the willow vine: it is practical and flexible at the same time, and wicker patterns look appropriate and beautiful in nature. By attaching a soft seat made of quick-drying fabric to a wicker structure, you can get a cozy option, ideal for relaxing in the fresh air.
The wicker chair is almost not deformed and does not wear out. Having adapted a little, you can make such a chair yourself, it will delight you for a long time.

Rocking chair for giving
If you want to take a break from the hustle and bustle and enjoy the surrounding greenery, a rocking chair will be the right solution for you. This piece of furniture is made of wood, metal or willow vines: the material is safe and environmentally friendly.


You should not treat this model as an attribute of the older generation, modern rocking chairs are presented not only with classic options, but also with unusual ones, somewhat reminiscent of a large swing. Thanks to a large number of options, you can purchase a stylish chair that brings comfort.
hanging chair
An unusual and original solution that looks very impressive and modern, ideal for suburban areas. It can be installed both on a special stand and hung on brackets to a tree branch.

When choosing such a model, be sure to calculate the load on the fasteners to eliminate the possibility of breakage.

Get detailed information about all the features in the store at the time of purchase. Products can be made from artificial rattan or bamboo, woven from a vine. You have the opportunity to purchase suspended structures of any complexity in our store at a reduced price.

DIY armchair
Some models of chairs, despite their comfort and excellent appearance, are quite expensive. Not every summer resident of average income wants to fork out for expensive models and the first thought that comes to mind is to build something cozy and practical on their own.


Make original and interesting armchair complex design only a craftsman with experience can do it, and even a beginner can make a simple armchair for a summer cottage. An ordinary wooden chair fits perfectly into natural landscapes, it can be quite durable and practical if made to last.
To get a good result, you need quality materials: hard woods such as oak or walnut are ideal. You will need not only boards and tools, but also special coatings: paints and varnishes for wood, which counteract rotting and getting wet.

Thanks to the processing of the finished product, it will last much longer, but even with a coating, you should not test the chair for strength, leaving it in the rain. Cut out all the blanks according to the diagrams and instructions, treat them with a protective coating and assemble the finished chair.

However, not everyone likes to assemble furniture on their own, it is much easier to purchase finished goods. Because chairs made by furniture companies inspire more confidence and guarantee a certain level of build quality.

In the store you can find a chair that matches the style and color. You can purchase as a set of compact portable chairs and chairs for dining area, and a small cozy armchair for outdoor recreation. There are significantly more variations.

Where to buy a chair for giving?
For people who do not want to mess with boards and waste their free time, there are ready-made designs for every taste. Finding the best solution for favorable price you will enjoy your purchase.


But it is worth remembering that really high-quality products cannot be cheap. It is advisable to purchase quality products during the discount season. In our store, sales of armchairs for summer cottages are held: we offer you to purchase beautiful products at a bargain price.

Photo of chairs for giving


A real master looks with disdain at the wretched plastic chairs placed in the summer cottage. There is nothing more alien than plastic among flowers and plants. In the middle of nature it will look much more natural garden chair with their own hands, made of noble wood, the most suitable for outdoor recreation. In addition, working with wood does not require any special skills, such as welding or forging.
This comfortable garden chair was designed 100 years ago.
- First of all, the chair must be transportable, so that in case of bad weather it can be quickly moved under the roof.
- For garden furniture you need to choose wood hard rock- beech, oak, walnut. Pine, aspen, cedar, and larch are little susceptible to decay. The disadvantage of pine is its sensitivity to mechanical stress. The slightest blow is enough to get a dent, which will not be easy to remove.
- Since country furniture is exposed to the sun for a long time, and it can also get under the rain, measures should be taken to protect the material. The board before work is stacked, under a canopy, pressed on top with something heavy and left to dry. If you managed to get dry quality lumber, even better. The sawn blanks are polished, impregnated with an antiseptic, then with hot drying oil. Dry and varnish for outdoor use.
- The relief texture of a tree depends on the number of knots and undeveloped branches. The more of them, the more decorative the cut. The polished surface of such a board will resemble a flock of strolling grape snails.
- When assembling a chair for a summer house with your own hands, all fasteners must be embedded in wood to avoid scratches and puffs on clothes.
Preparatory stage of work
Materials and tools for making a garden chair
All blanks, except for the inserts, are cut out of a cedar board 20 mm thick. Product detail:
- Rear legs with dimensions 20x254x787 mm - 2 pcs.
- Front legs 20x76x533 mm - 2 pcs.
- Armrest support 20x127x406 mm - 2 pcs.
- Chair back 20x279x914 mm - 1 pc.
- Jumper 20x51x589 mm - 1 pc.
- Rear armrest support 20x76x610 mm - 1 pc.
- Insert strips 12x20x254 mm - 2 pcs.
Consumables
- Hardwood dowels 24x60 mm - 30 pcs.
- Brass screws ∅4.5x50 mm - 20 pcs.
- Brass screws ∅4.5x32 mm - 20 pcs.
- Sandpaper grit 220.
- Polyurethane adhesive.
- Drying oil and furniture varnish.
- Stencil cardboard.
- Masking tape.
Tools needed for the job
- Circular Saw.
- Manual frezer.
- Plane.
- Hacksaw.
- Drill.
- Screwdriver.
- Sander.
- Clamps.
- Roulette, ruler, pencil.
Making a garden chair
Cutting back legs and back
Before us detailed drawing with explanations of how to cut and assemble a country chair with your own hands. Referring to it, we mark and cut out blanks for the chair.

Detailed drawing of a garden chair (click to enlarge)
For the rear legs, backrest, armrests and seat, we need wide panels. We get them by gluing boards, selected according to the texture and color of the wood. We select the grooves for the dowels at the ends in advance, achieving such an arrangement so that the dowels are invisible after the cutting of the parts is completed.
Cutting out the rear legs. The work is done using a stencil cut out of cardboard. We apply the template to the blank for the leg, circle it with a pencil. Having connected and pulled two blanks together with masking tape, we cut out both rear legs at the same time. We cut them out with a small margin. We adjust the parts to size using a planer or milling cutter.
Cut out the back. We cut the workpiece so that the adhesive seam between the boards is in the middle of the panel. We bevel the lower end of the backrest at an angle of 12.5 ° - it must correspond to the profile of the rear legs. We round the entire upper edge along a radius equal to 9 mm. After that, you can start assembling the product, sawing and adjusting the remaining elements in place. Having learned how to make country chairs with your own hands, you can easily open your own business.
Cut out the rest of the parts and assemble the garden chair
Fasten the rear legs to the back using 50 mm screws and glue. We drill holes for fasteners in advance, otherwise the workpieces may crack. The side ends of the backrest are connected to the legs at an angle of 12.5°. We close the gaps between the parts with insert strips, giving them an appropriate profile. The coincidence of the ends of the slats with the opposite ends of the legs will mean that the back has taken correct position. The inserts are also screwed to the back with 50 mm screws.

Garden chair: rear view
The strength of the seat depends on the location of the boards - they must lie in the direction from one leg to another. Using a circular saw, cut out the part in width. We mark the sides of the seat, located at an angle. Now you need to saw off the workpiece from the sides, following the outer marking line. Raw ends are not temporarily cleaned.
We select a groove on the back end of the workpiece. The seat is at an angle with respect to the back, so we tilt the bottom of the groove at an angle of 12.5 ° to the plate, so that the joint is tight. After that, we round the front end of the seat. Having screwed the seat to the legs, we grind its side edges, fitting them flush with the rear legs.
Cut out the front legs. The upper and lower edges are beveled at an angle of 6 °. We screw the front legs to the rear ones with 32 mm screws, reinforcing the connection with glue.
A garden chair with your own hands must be reliable. A significant role in the stability of such furniture is played by a proleg - a jumper between the legs, which gives stability to the product. We cut the jumper to size. Applying it to the front legs, mark the fixing grooves. The bottom of the groove should go at the same slope of 12.5 ° to the face. The depth of the high side of the groove is selected up to 9 mm. We attach the jumper to the front ends of the legs, using 32 mm screws and glue.

Front elements of the chair for giving
We cut out the wedge-shaped supports of the armrests, beveling their upper edges at an angle of 6 °. We fasten the supports to the front legs with 32 mm screws, adding glue to the sockets.
Cut out the armrests and the back support for them. We clean the ends of the parts sandpaper. We cut the ends of the support at an angle of 30 °, and the entire upper edge - at an angle of 31.5 °.
We press the back support part to the back with clamps. We put the armrests in place, loosen the clamps. We set the position of the rear support element according to the level, achieving a strict horizontal armrests. We tighten the clamps and fasten the back support to the back.
Screw the armrests to the back support, wedge supports and front legs using 50mm wood screws and glue.
We close the recessed screw heads with wooden plugs. We grind them flush. Now you can soak the wood with hot drying oil, dry it and varnish it. The garden chair is ready.
The whole family will appreciate this classic design with beautiful texture and simple lines. The convenience of the chair has not been in doubt among summer residents of the whole world for over 100 years.
This garden chair simple design and just as easy to make with your own hands, which is quite suitable for the first experience, even for a person who is not experienced in carpentry. Clear drawings with dimensions, simple materials, possibly left over construction works, And conventional tools will help you make such a chair in just 2-3 hours. Following a simple instruction, you just need to cut the required number of elements to size, mark and drill holes, and then assemble them as a constructor into a single whole.
Now let's get started and get ready to work. the right materials and tools.
Tools
- Circular or Miter saw(a hacksaw will do).
- Electric planer (if you use non-planed boards).
- Drill or screwdriver (with drills and bits).
- Measuring tool (tape measure and corner with a protractor for measuring angles).
- Wrench.
- Pencil.
- Paint brush.
materials
- Edged board:
90x45 mm (6.6 meters) and
90x20 mm (6 meters). - Furniture screws (dowel-head galvanized or chemical-coated against rust):
M10 100-110 mm - 10 pcs. - Self-tapping screws:
40 pcs. with a pot-head 4.5x60-75 mm for fastening elements of the backrest, armrests and seat of the garden chair. - Abrasive sandpaper with grain P40-60, for cleaning corners and splinters. Ideally, apply with a grinder or drill attachment.
- Protective impregnation for wood or stain with varnish.
Further, in the drawings below, the size of the board for the manufacture of a garden chair is optimal, i.e. for example, if you take the standard edged board 100x50 mm, then, process it with a planer and get approximately optimal size 95-90x45 mm or something like that. I think that here a few millimeters plus or minus will not play a big role. After all, we are not building a submarine, so there is no need to be afraid, feel free to take a tool and start working!
And drawings to help you, all dimensions given are in millimeters.
Drawing 1. Elements of a chair from a board 90x45 mm.

Drawing 2. Elements of a chair from a board 90x20 mm (inch).

Drawing 3. Elements of the chair assembly (sidewall).

Chair assembly
1. To begin with, we will file all the elements of the garden chair and drill holes in them in size, with a drill with a diameter of 10 mm.
2. Now you need to process them with abrasive paper to avoid further minor injuries and splinters.
3. We collect two sidewalls of the chair, which, in principle, are a mirror image of each other.

4. We fix all the elements with bolts, washers and M10 nuts. It is better to use furniture bolts with a flat head.

6. Now it remains to apply a layer of impregnation, paint or stain with varnish. Don't forget about intermediate drying.
The chair is ready!Agree, nothing complicated. You should end up with a pretty nice garden chair.
If you make this chair complete with such a garden bench, you can get a very interesting combination.
See photo below various options performance of this chair from different authors, maybe you will come interesting idea how to add some flair to this simple design.Here is such an interesting interpretation of a garden chair with vertical elements of the back along with a small table.


A very original modification of the author is to add additional slats to the seat and back of the chair, as well as a footrest, which at the same time serves as an additional amplifier. The armchair is stained and varnished on top.

Send your creations to me by mail or leave in the comments, and they will be published.
- Edged board:
Do-it-yourself country furniture made of wood (47 photos): making stools, rocking chairs and tables
- Choosing production materials
- The method of making country stools
- Making a rocking chair
- Assembling the table
- Conclusion
In this article we will talk about how to make simple practical furniture for a summer residence from a tree with your own hands. Interest in the independent production of entourage items is always high and this is not surprising. It is enough to go to any supermarket and see what the price of seemingly cheap plastic tables and chairs is and you will see that it will be cheaper to do everything yourself.
The instruction for making a country table of stools or a bench in the yard is simple, the main thing is to decide on the choice of materials.
Chaise lounges are similar in type to armchairs, but lower and more stable. They can be in a semi-lying position, so that the spine and all muscle groups rest.
Another advantage is that the garden chair can be folded as needed, adjusting the angle of the back to a sitting and lying position.
Most best material for the manufacture of a deck chair, it is wood, as it is the most environmentally friendly, economical, and also easy to use material.
They are very good for observing nature, and they are light and comfortable, so they are often placed in their garden or in the country. Such a deck chair is good to take out in the summer, and in the winter to keep it somewhere indoors, for example, in a pantry or in a barn.
In the manufacture of used materials such as:
- plastic;
- tree;
- rattan.

Popular drawings

A rocking chair made of wood, which you can assemble with your own hands, will be very good. This chair is a great option, thanks to it you can relax all the muscles of the back in a semi-recumbent state and at the same time sway (back angle 200).
The rocking chair should have great strength and in no case loosen during rocking. To do this, it is necessary to strengthen the structure of the chair with the help of crosses and corners.
In order to increase stability, the rear legs are best left straight, not rounded. This garden chair has a rather small swing amplitude, and to strengthen it, you need to make the radius of curvature smaller and the runners wider.
You can also add a rocking chair with a pendulum (for this we attach a load weighing 2 kg). You can additionally create a removable table. But still, this type of garden chair is not fully a deck chair, since it is impossible to change the angle of the backrest to a semi-lying state.
But, imagine how amazing the rocking chair looks in the garden and how convenient it is to read a book, smoke a pipe, drink tea and enjoy the surrounding nature around, such a chair will effectively stand by the fireplace in winter - imagine these pictures again and you will understand that this type of deck chair is just a fairy tale.
These drawings with dimensions will help to make a high-quality deck chair with your own hands:
Creative sun lounger with canopy
The drawing shows a creative chaise lounge, which is easy to make with your own hands and which is sure to become a wonderful decoration for your garden.

This lightweight garden chair is designed with flowing lines and radii to completely relax every muscle in your body. But the most important thing is that this deck chair is beautiful - thanks to the roof, a shadow is created that covers from the scorching heat of the sun.
Also have additional amenities such as a small pillow made of natural fabric and a comfortable mattress, it also combines the advantages of a rocking chair.

There are many sun loungers that you can make yourself: like beach chairs or cozy seats. Consider some of the simplest options.
How to build a simple chaise longue to give your own hands:
Fabric armchair on a frame
Consider one of the most convenient options– a fabric seat on a frame that can be moved from place to place and folded almost flat.
In order to make a deck chair, you need to prepare the following details:
- furniture bolts and nuts D8 mm;
- round slats (length - 65 cm, two 50 cm each, two 60 cm each);
- slats of rectangular section (length - 65 cm 25x60 mm);
- a piece of durable fabric 200 x 50 cm;
- round file and fine-grained sandpaper;
- PVA glue;
- slats are best obtained from species that have solid wood: oak, beech, birch.
In order to make a deck chair, you need to use fabrics that have abrasion resistance and increased strength: mattress teak, tarpaulin, jeans, camouflage, canvas.
The process has begun
We cut the slats of the required length and carefully grind.
We make slats desired length and carefully sand the surface with sandpaper.
At a distance of 70 and 40 cm from the corners of the structure, we drill eight millimeter holes, and then grind them with a round needle file. In order to be able to change the position of the backrest, at a distance of 7-10 cm we make 3-4 cutouts in frame B.
Then, stepping back from the two ends of the rails, we drill holes with a diameter of 2 cm in order to equip the seat. Then we take round slats (grease the ends with PVA), and install them in the holes.
After assembling the frame, you need to sew and cut out the seat. The length of the matter depends on the possibility of folding. In order to understand what cut length is needed, you need to fold the deck chair and at the same time measure the fabric, and do not forget to make sure that the fabric is slightly stretched.
Then, a piece of fabric, in which the edges have already been processed, we nail to the round slats, which are located on parts B and A.
We wrap the crossbars with the edge of the cut and fix with small carnations with thick caps. A variant is possible when the cut is attached to the crossbars thanks to peculiar “loops”.
Such a garden chair is very good because it can be used instead of a bed - what else can be for an afternoon rest?
How to make a wooden deck chair with your own hands - video tutorial.
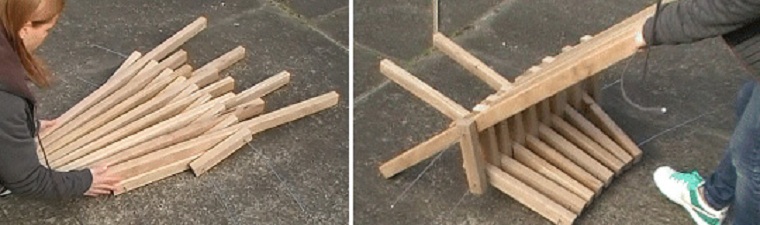
Armchair Kentucky
Consider the original version - the Kentucky chair, which is assembled entirely from bars. If necessary, the chair can be folded at any time and put away where you need it for storage.

In order to make a chair, you will need the following material:
- Galvanized wire with a diameter of 4 mm and 16 galvanized clips to fix the wire.
- Hammer and cutters.
- Sandpaper with fine grain.
- It is also necessary to take 50x33 mm bars, which are obtained by sawing a board into three equal parts of a 50x100 mm board. If all the bars are put together, you should get 13 meters.
Assembly process
When the bars are ready for assembly, they need to be treated for strength (and protection from ultraviolet radiation, moisture, weathering) and give them additional beauty.

To do this, the tree is treated with stain, which is called Beyts. To process a deck chair, you need to buy an outdoor stain, the best of which are based on oils and wax). Among other things, you can use parquet oils, which are ideal for all wooden products.

You can apply a protective coating on the bars either with a brush or with a spray gun (the most the best option).

The diameter of the holes must be made one and a half to two millimeters larger than the thickness of the wire used.

After preparing the required number of bars, it is necessary that the edges are carefully processed sandpaper with fine grain. We begin to assemble the structure.
You can also use galvanized studs (the edges are fixed with eight nuts and washers) instead of staples and galvanized wire.

After assembly, carefully raise the chair.
Wood is the best material for making garden furniture
Garden furniture for the street, made of wood, enjoys the greatest success among summer residents. However, not all types of wood are suitable for these purposes. For example, experts advise abandoning pine materials, due to the fact that this raw material is very delicate and sensitive to external factors. It is better to choose furniture made of oak, ash or hornbeam - their wood is hard, durable and easy to care for.
In addition, a distinctive feature of wooden furniture is that it is an absolutely environmentally friendly product, striking in its beauty and variety of textures. Wooden garden furniture is made quickly enough, the main thing for these purposes is to use high-quality material.


Fit harmoniously into overall design suburban area - dinner table. In the garden, it will show itself perfectly both in brown and in brighter colors. Apart from big table the set should have comfortable chairs, sitting in which you will feel quite comfortable.
To make the seats comfortable, it is worth bandaging them with removable cushions. It is also good when the chair can be folded. When not in use, they will take up less space, and in winter they can be easily hidden in a garage or basement.


The easiest way to make furniture from finished material. Unassembled boards are easier to process, impregnate and prepare for painting. You just have to assemble all the details into a single design, according to the drawing.
There are many ways to make garden furniture. The Internet will help you choose the option that suits you, where in its vastness you can easily find exactly what you need. Stylish chairs, beautiful tables, comfortable sunbeds, swings, chairs - this is just a small list of what you can do with your own hands. Of course, for this you will need some carpentry skills and good tool, as well as the presence of fresh ideas in my head.


How to choose the right style
The most fashionable sets of garden furniture are those made in a modern or French style, hi-tech, country and minimalism are also quite popular. Country is characterized by an uneven, rough structure. Often they combine wood and cast iron, finished with metal-plastic.
Forged furniture is appropriate in romantic gardens french style. If you want to introduce a subtle note of Provence or shabby chic into the green corner, it is best to put whitewashed rattan furniture.


Comfortable furniture is one of the essential items in any green space. It can be a companion of morning coffee or lunch - barbecue. Daily outdoor recreation, especially on sunny days, is a balm not only for the body, but also for the soul!
Leisure furniture
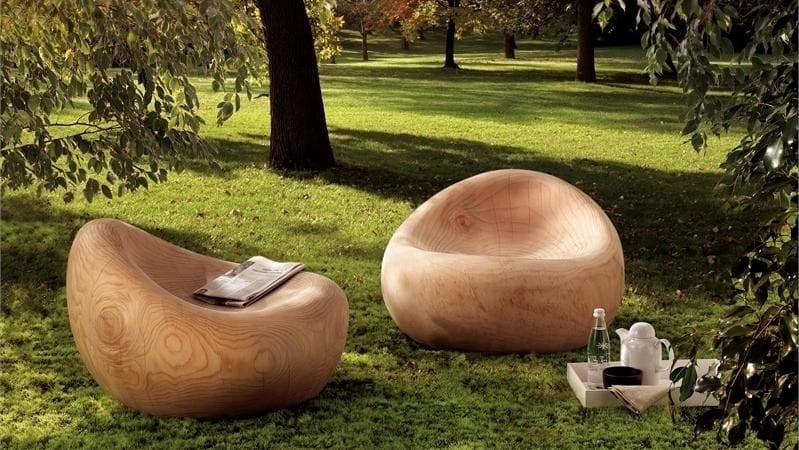
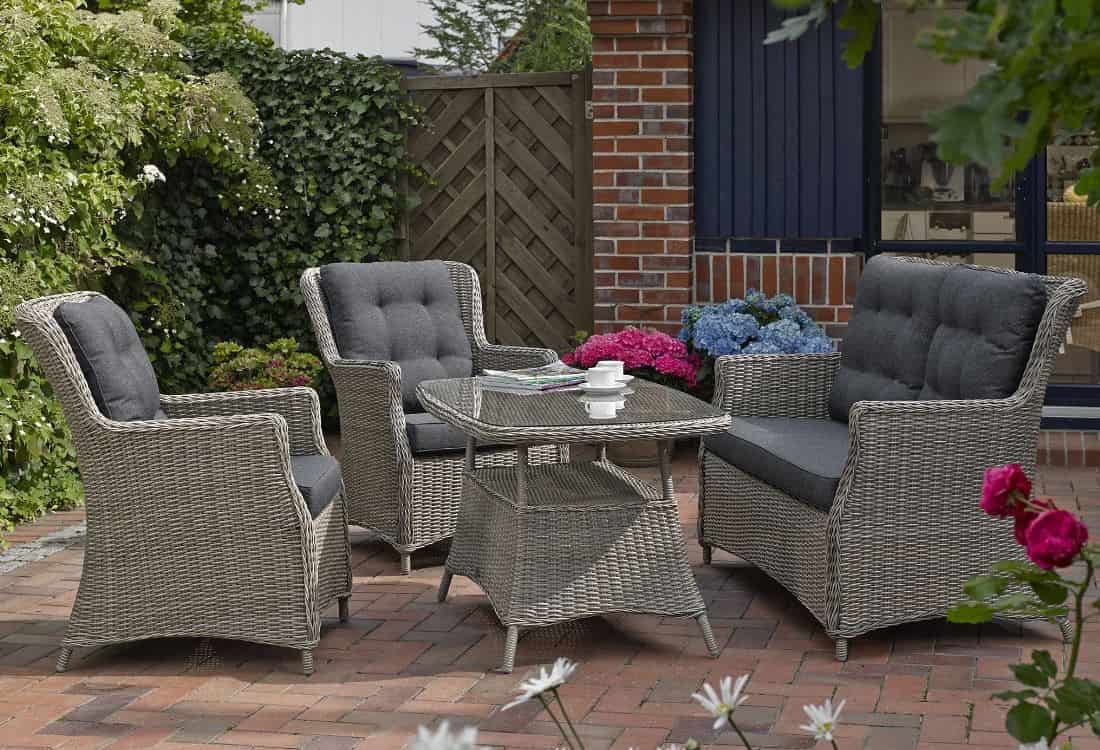
Dining room furniture in the garden is not everything. To fully enjoy a pleasant stay among flowering greenery, you need to buy more and full set furnishings. Sets include a sofa, two armchairs or chairs, plus a low coffee table. The most fashionable are designs made of rattan, strewn with large pillows.
Soft accessories are mostly covered with cotton. Under the fabric of the fluffy cover is a highly resilient polyurethane foam. Armchairs, sofas and chairs are often cubic in shape, making them voluminous and very comfortable.


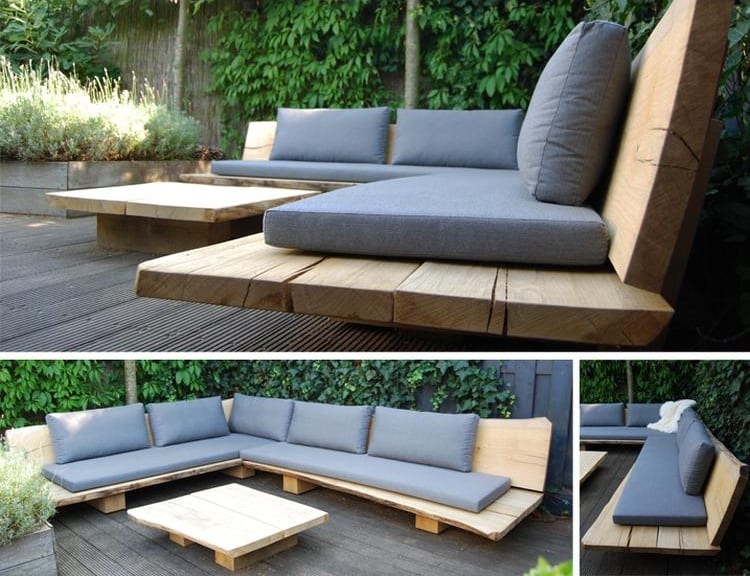
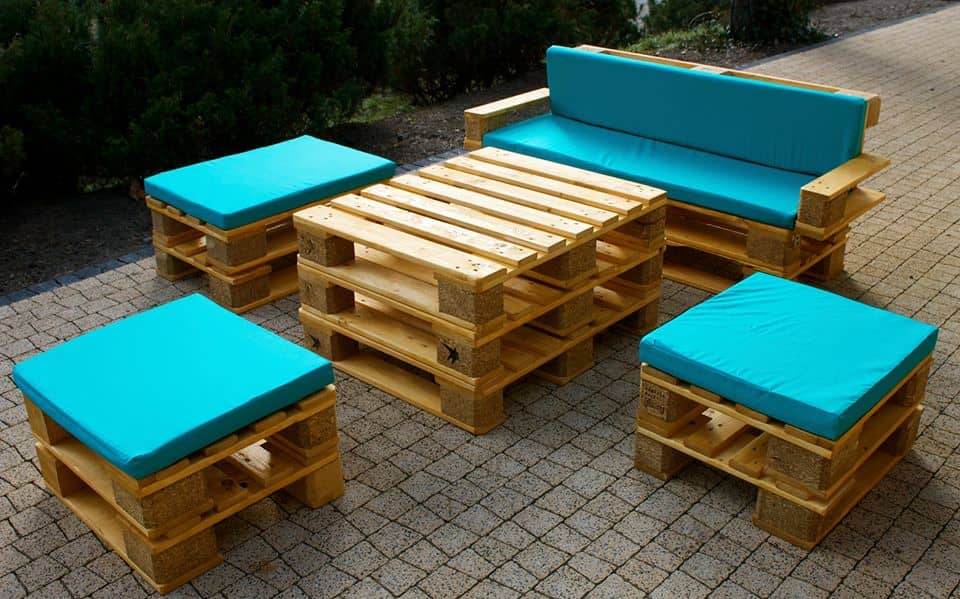
Garden set from pallets (pallets)
Also quite popular is wooden furniture made from pallets. This design is very easy to bring down, paint and impregnate. Pillows can also be sewn on your own or bought at a garden supply store.
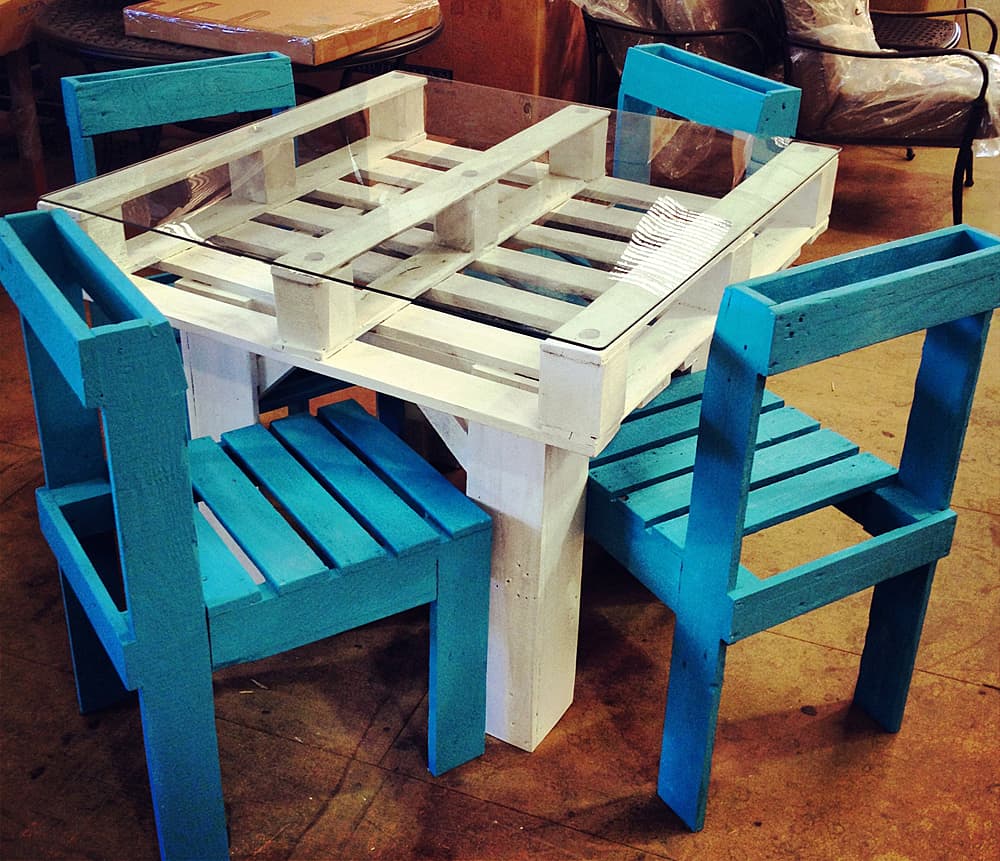
Produce furniture from wooden pallets(pallets) quite simply, and most importantly quickly. Just 2-3 pallets will be enough to fold one by one to get a coffee table. Impact-resistant glass with machined edges is placed on top of the table. Everything - the coffee table is ready, it remains only to make chairs. You can also make them from the same material, only carpentry skills will come in handy here. Using a hacksaw or a chainsaw, cut the pallet into two parts, one of which will serve as the seat, the second - the back.


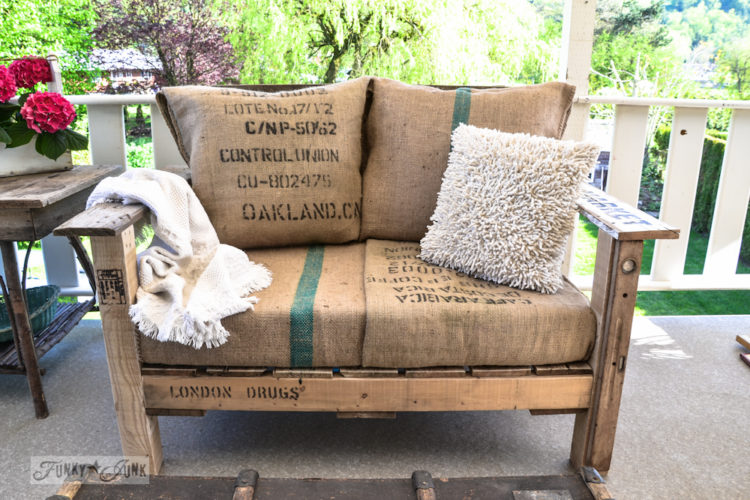
The presence of a sofa, armchair or pallet bed in the garden will emphasize the individuality of the landscape design of your site, create a cozy atmosphere, make it truly unusual and worthy of attention.


If you have a large number of pallets (material can be purchased for a small amount of construction stores), of which you can organize a full-fledged place to relax, where you can relax with a large company. In this case, from the construction of a gazebo or outdoor terrace and you can refuse altogether.
Construction pallets (pallets) can be used both in painted and unpainted form. Their design feature allows you to store something useful between the rows of boards. Also, this space can be occupied drawers, providing them with a special mechanism and beautiful handles

The simplest furniture items that you can do in a day with your own hands
Even if you just knock down a frame for chairs and a sofa from the boards, putting pillows on them, you get good furniture, you can see an example in the photo.

If you think over all the dimensions of the details in advance, you can make comfortable garden chairs:
You will be interested: dark furniture in the interior of the apartment: where to put it, how to zone the room with it 
It is possible to use ordinary hemp as stools or as tables. It will only be necessary to carefully sand them. An example in the photo.


You can also make furniture from different branches and rods, like wicker:


If you dream up a little, you can make furniture from pallets:

You can also make a cinder block bench and wooden beam. Its main advantage is that it is easy to assemble and disassemble for rearrangement to another place. And if there is no longer a need for a bench, it can be easily disassembled and folded in a barn.

If you combine materials for making furniture, such as wood and metal, you can achieve greater strength. It also improves the appearance of products.
Making outdoor furniture: step by step instructions
We need a tool, namely a drill and a planer.
Furniture can be made from a variety of materials such as pallets, tree trunks, twigs, and roots. But we must not forget that the whole tree must be well impregnated protective composition. One of the main factors is that such furniture does not require a lot of money.
Having decided what furniture is needed, it is easy to calculate the required amount of wood and screws. The length of rounds used in the manufacture of legs is in the range from 410 to 760 mm. They are cut so that the edges at the end have a right angle. This angle is easily done with a regular hacksaw.

The edges of the legs are processed on a grinding machine. Further, from two bars is made special mount. Next, holes are drilled in the blanks for the legs for the mounting rod. This part of the manufacturing process is not difficult, but it requires attention.
In order to make it comfortable to sit, the seats are made with a slight slope.
How to make furniture from old pallets
Currently, do-it-yourself furniture made from pallets is very popular. It is easy to make, paint and impregnate with a special protective solution. To make a small table, a couple is enough - a trio of pallets and glass, which is placed on top.
To make a chair, you will need to cut the pallet into two parts. She will be the seat and the other will be the back. 
And if you also decorate with pillows, it will look just great.
You will be interested in: Walnut color furniture in the interior of the apartment: decoration and design 
Furniture made from pallets can create a cozy atmosphere in your home. garden plot. Examples in the photo.

We make tables and chairs from ordinary boards
Making your own beautiful and elegant furniture is much more difficult. First you need to prepare a project for future furniture. You can make drawings yourself, or you can use ready-made ones. The principle of furniture manufacturing different versions same.
Commonly used chair design:
- Four legs. They can be made roundish, and the legs can also serve as bars, as well as boards.
- The frame is the base, the legs are attached to it.
- The upper part - can be either a table top or a chair seat.
Instructions for performing work:
- According to the drawing, the details are shaped. In order to give desired shape details, you can use a regular file.
- Fastener holes are made.
- Everything is assembled according to the selected drawing, while fitting parts.
- The caps of the self-tapping screws are smeared with a special putty.
- The product is sanded with fine sandpaper.
- Next, varnished.
Types of hammocks
If you think that a hammock is a piece of fabric tied to nearby trees on both sides, then this is a big mistake. Modern buildings- real works of art that you can buy in a store, or you can try to do it yourself.
They are distinguished by types of fastening:
Suspended;
Frame;
In the form of an armchair;
In the form of a swing.
By country of origin:
Mexican;
Brazilian;
Colombian.
And now a little more.
Suspended structures- those that are attached to trees or concrete poles.
It is quite easy to make such a hammock with your own hands. You will need a minimum of tools and basic knowledge of sewing.
Frame are convenient both for an apartment and for giving, they can be moved and transferred. In the form of an armchair - you can’t lie down in them, but you can get very comfortable with a book.
Hammock swing - the name speaks for itself. Although almost all designs can be called swings, as they swing easily.
Such devices were called Russian in Soviet times. They were a coarse mesh, which left deep imprints on the body after lying down. Not very convenient, but super cheap.
The Mexican Cottage Hammock is a lightweight but durable synthetic fabric. They are very durable, manufactured in a factory way, so they are cheaper. The colors hardly fade in the sun. The usual decoration for them is various trinkets in the form of national amulets.
Brazil presents hanging beds made of Brazil nut wood (thread) or cotton threads, richly decorated with fringe. They are durable and comfortable. Hammocks without such decoration are much cheaper, in Brazil they are called "beds for the poor."
Wicker hammocks from Colombia (italic) is made from agave vines or the bark of the hamak tree. They are dyed with natural dyes. Nobody knows the production technology!
Is there any benefit from such a device?
The benefits of any of the listed types are simply huge, so you can safely make a device for giving:
Complete release of all types of muscles, including the neck, lower back and shoulders.
In this device you can sleep and rest.
In a large hammock, you can lie as you please - even along, even across.
Can be used not only as an important attribute for giving, but also as an original interior solution in the apartment.
Making your own hammock
In large stores and supermarkets you can buy anything. Therefore, once again analyze your artistic and financial capabilities. It may be much easier for you to buy a finished structure.
So, you thought it over and came to the conclusion that you can buy a hammock, or you can make it yourself. The first option is an expensive pleasure. But having money to acquire a unique design unusual look is quite real. The second option is to develop your design flair, make your garden or apartment interior unique by building a hanging hammock with your own hands.
Suspension
Why suspended? It's simple - any hammock, frame, swing or chair, is suspended. Simply put, it is hung on one or two mounts or on a frame.
For the simplest design(for giving) we need very few materials - a strong natural rope (non-synthetic), two strong wooden bars(sanded, without knots), dense natural fabric with a length of at least 2.5 meters and a width of at least 1.4 meters. Here is the whole set.
Still can't do without sewing machine, awl and thread with a needle. You can do without wooden bars, so the hanging hammock will be more resistant to overturning.
Brief instructions are as follows:
We sew on both sides of the fabric, making a hem of 4 centimeters. It is better to put two lines, for reliability.
Now we will pull the rope into this “drawstring”, and at the ends we will make large knots.
To hang our structure, you need to take up the knots and collect the matter in a bundle. Now it remains only to fix it where we need it.
The described design is one of the most primitive, it is easy to do it yourself without even having a special imagination.
And here is one of the mounting options, if not nearby suitable trees:
We wall up two strong pipes (diameter - 3 cm) into the ground. We install them at an inclination of about 30 ° and to a depth of almost a meter. The distance between them is the length of the hammock plus 0.3 meters.
We take two metal rods and bend them to make something like hooks.
We string our hammock on rings (we tie the rope to the rings).
We thread them into the fold of the rod, squeeze the rod and plant it in our metal pipes. Inside the pipe, the rod expands and firmly fixes our structure.
Now you can enjoy relaxing, swaying in the shade of trees, and knowing how to make a hammock with your own hands.
frame
A frame hammock is easier (but also more expensive) to buy in a store. There you can find both the simplest designs for giving at a fairly reasonable price, and real works of art - single and double hammocks, with a unique design and a chic canopy. But you can try to make such an interesting item with your own hands.
First you need to decide what design you want to see in your country house. You can assemble a fairly simple metal frame, making it also collapsible. Another option is a permanently located hammock on a heavy frame made of wood or welded metal.
The first thing to do is draw a drawing. The second is to order the material. The third is to cut the metal and weld it or saw the wood into the necessary pieces and assemble a frame from them. Everything else is a matter of technique. It can be decorated with carvings or paintings, creating a work of art in your country house.
The part in which you will lie or sit can be made from any dense fabric, decorated with lace or fringe. You can weave a unique thread design (such as macrame), giving it a bright, memorable look.
For a summer house, the garden of which is designed in accordance with the requirements of landscape design, a hand-made hammock would be the best solution. Finding such masters is quite difficult, but the Internet can help in almost any situation.
Hanging Rules
There are several such rules:
The distance between the supports (trees, poles, frame racks) is calculated simply - 0.3 meters are added to the length of the hammock.
If there are two suitable supports, but they are located a little closer than necessary, you can hang the "bed" higher. You also need to consider the possibility of some stretching of the matter from which it is made.
If trees are used as supports, do not be lazy and measure the diameter of their trunk. It must be more than 0.15 meters.
The height of the structure above the ground is from one and a half meters to 1.7 meters (depending on the convenience of the owner and his family members).
Check out others interesting articles:
- How to choose a water filter
- How to choose an air purifier for home and apartment
Now you know how to make a hammock with your own hands. Before you take on this responsible task, watch the video below. Perhaps more for you simple solution there will be a purchase of a finished design in a store or an order for an exclusive handmade model.
Material selection
One of the most difficult questions about which most beginner masters “stumble”. The nuance is that, unlike many other pieces of furniture, there is such a feature in the manufacture of a chair - not every wood is suitable for this. And the point is not in its strength, texture, degree of humidity, but in the specifics of operation. The chair experiences dynamic loads in different directions. This is what it differs from the same cabinet, table, bedside table.
Experienced craftsmen it is not advised to collect coniferous wood for chairs, even of the highest quality. The reason is that it has a straight-layer structure. Constant loads in the horizontal plane (who does not like to “wiggle” on the seat, especially kids) will lead to the formation of numerous chips. As a result, the life of the chair is drastically reduced; it just needs to be repaired quite often. The only one structural element, where the use of such wood is allowed - plywood seats (from sheets, for gluing which coniferous veneer was used).
- Children's - birch.
- "Clamshells" - it is the same or plywood from this veneer.
- For all other models - deciduous species, but only thin-layered and durable. These include mountain ash, walnut, oak, elm, hornbeam, beech.
- When choosing plywood, one should take into account not only the cost of the sheets, but also their toxicity. If you focus on relatively cheap products, then the choice is small - FC or FSF. What is the difference? The main difference is in the composition of the adhesive used in the production. Without delving into the details of the technology and issues of "chemistry", it is enough to note that plywood of the FSF category is not recommended for use for internal works. The reason is the release of harmful fumes when the material is heated.
- The wood for the chair should not have visible defects. For example, for a countertop, some of them (pilosity, oblique) can be turned into an advantage if you know how to process it. But for a chair that experiences a variety of loads that change in direction and magnitude, all this is unacceptable. The same knots that transform the appearance of the table, making its texture original, will fall out of the chair rather quickly.
Tree preparation specifics
- If it is possible to dissolve the array yourself, then making furniture will be much cheaper.
- The moisture content of the blanks is not more than 12%.
- Mandatory impregnation with biocides. Options - water-polymer emulsion, furniture oils (or wax-based compositions), acrylic compounds.
Features of structural parts
General - they are made only from solid wood. At home, it is unlikely that it will be possible to make complex, curly elements. And it's not just the cutting of the material. You will have to change the angles (and before that everything is correctly calculated), under which the connecting spikes should be located. In addition, the exact selection of wood (under the grooves) requires not only special tools and fixtures, but also a lot of experience. Deviations from the dimensions will lead to the fact that the chair will constantly “play”, and from a practical point of view, the benefits of such furniture are zero.
To this end, all elements of the same type should be prepared in this order. First, for example, one front leg. After processing it, it is used as a template for the second. The same applies to the tsarg, the crossbars in the type-setting back, and so on. The meaning is clear - to achieve complete identity of the parts, so that later you do not have to deal with their adjustment.
view more complex options(curly, openwork, combined) does not make sense. The reason is noted above. In addition, if you master the profession of a furniture maker (as well as any other), then you need to start according to the principle “from simple to complex”. Having made your own, albeit not quite a “decorative” chair, in the future you can master more elegant models. The main thing is to understand the design principle and all the features of working with wood.
Chair Assembly Procedure
You will have to do this at least twice. The first one is made “dry”, and its task is to check the fit of all structural parts (whether the dimensions of the jibs, crossbeams, drawers match at the installation site). At this stage, it is still possible to eliminate the miscalculations made, correct something, and so on.
The second assembly is the final one. Here, all the elements of the chair are already fastened tightly, and further alteration, as a rule, is impossible.
Chair assembly algorithm: "apron" - drawers - "apron".
This is in short. Although the whole work is divided into more stages.
Assembling the rear legs and back
- All elements are adjusted in place and tongue and groove joints are made. The fastening of parts is done with wood glue. It is easy to make it at home, who is interested, detailed recommendations will be found here.
- The places of gluing are pulled together with a clamp, and in this position the chair blank is left until the composition is completely dry. It is not necessary to accelerate this process artificially (with a building hair dryer, a reflector, etc.). The result will be negative, since the adhesive mass will begin to dry out unevenly in depth, and the strength of the joint will decrease.
Assembling the front legs
The drawers are inserted into the grooves, the parts are joined, and then everything is the same.
Connecting front and rear legs
At this stage, the side tsargs are installed.
"Screed" chair
What to use, you will have to decide for yourself. If there are no large clamps on hand, a cord will do. The task is to achieve complete drying of the glue at all points where it was applied.
If necessary, to further strengthen the gluing points, you can fasten the parts with self-tapping screws. To do this, “channels” are drilled and a chamfer is removed so that the head of the fastener is completely drowned in the tree. You can disguise it with putty (furniture) composition or decorative plugs (available for sale, and in a variety of shades).
Seat mount
There are several options. For example, attach prepared wooden stops to the side rails, and pull the seat to them (from the bottom side, through a through hole). One of the best options that provide good maintainability of the chair.
All the charm independent work- the ability to realize their own ideas. Therefore, all photos, drawings, recommendations should be considered only as a basis in order to create something of your own, unique. And if the meaning of the main technological operations is clear, it is not difficult to do this at all, as well as to develop your own drawing.
Today, outdoor furniture is an indispensable attribute. suburban area where there is a green corner, even if it is small. Without a comfortable lounger and a comfortable set, you will not be able to fully enjoy outdoor recreation. After all, there is nothing better than having a meal in the shade of an apple or pear tree, and there is little that can compare with a nap in a hammock. Those who have already purchased comfortable wicker furniture for a summer residence, for example, a rattan chair or a comfortable garden sofa, are well aware of this. However, most likely, everyone knows firsthand that buying such furniture is not exactly a cheap pleasure, so not everyone can afford this luxury. Do-it-yourself garden furniture is an excellent alternative for those who are not eager to part with a tidy sum. Yes, and making furniture for a summer residence with your own hands is much more pleasant.
Wood is the best material for making garden furniture
Garden furniture for the street, made of wood, enjoys the greatest success among summer residents. However, not all types of wood are suitable for these purposes. For example, experts advise abandoning pine materials, due to the fact that this raw material is very delicate and sensitive to external factors. It is better to choose furniture made of oak, ash or hornbeam - their wood is hard, durable and easy to care for.
In addition, a distinctive feature of wooden furniture is that it is an absolutely environmentally friendly product, striking in its beauty and variety of textures. Wooden garden furniture is made quickly enough, the main thing for these purposes is to use high-quality material.


Harmoniously fit into the overall design of the suburban area - a dining table. In the garden, he will show himself perfectly both in brown and in brighter colors. In addition to a large table, the set should include comfortable chairs, sitting in which you will feel quite comfortable.
To make the seats comfortable, it is worth bandaging them with removable cushions. It is also good when the chair can be folded. When not in use, they will take up less space, and in winter they can be easily hidden in a garage or basement.


The easiest way to make furniture from finished material. Unassembled boards are easier to process, impregnate and prepare for painting. You just have to assemble all the details into a single design, according to the drawing.
There are many ways to make garden furniture. The Internet will help you choose the option that suits you, where in its vastness you can easily find exactly what you need.
Stylish chairs, beautiful tables, comfortable sunbeds, swings, armchairs - this is just a small list of what you can do with your own hands. Of course, for this you will need some carpentry skills and a good tool, as well as the presence of fresh ideas in your head.


How to choose the right style
The most fashionable sets of garden furniture are those made in or French style, and country style is also quite popular. Country is characterized by an uneven, rough structure. Often combined and cast iron, trimmed with metal-plastic.
Forged French style is appropriate in romantic gardens. If you want to introduce a subtle note of Provence or shabby chic into the green corner, it is best to put whitewashed rattan furniture.


Comfortable furniture is one of the main items in any green space. It can be a companion of morning coffee or lunch - barbecue. Daily outdoor recreation, especially on sunny days, is a balm not only for the body, but also for the soul!

Leisure furniture
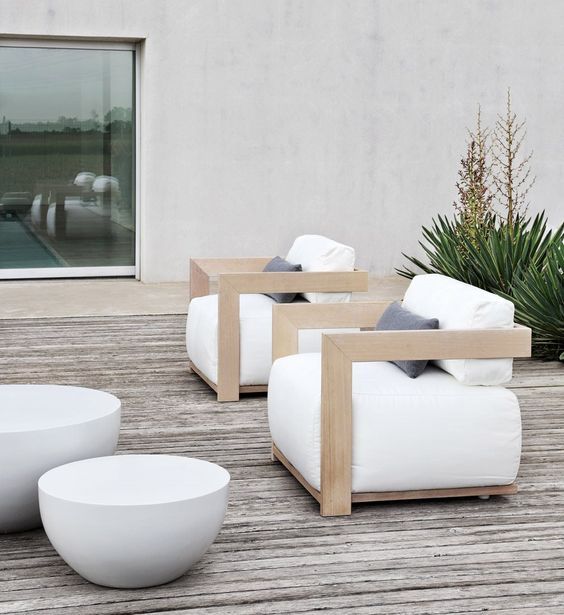
Dining room furniture in the garden is not everything. To fully enjoy a pleasant stay among blooming greenery, you also need to buy a complete set of furniture. Sets include a sofa, two armchairs or chairs, plus a low coffee table. The most fashionable are designs made of rattan, strewn with large pillows.
Soft accessories are mostly covered with cotton. Under the fabric of the fluffy cover is a highly resilient polyurethane foam. Armchairs, sofas and chairs are often cubic in shape, making them voluminous and very comfortable.


Garden set from pallets (pallets)
Also quite popular is wooden furniture made from pallets. This design is very easy to bring down, paint and impregnate. Pillows can also be sewn on your own or bought at a garden supply store.
Producing furniture from wooden pallets (pallets) is quite simple, and most importantly, quickly. Just 2-3 pallets will be enough to fold one by one to get a coffee table. Impact-resistant glass with machined edges is placed on top of the table. Everything - the coffee table is ready, it remains only to make chairs. You can also make them from the same material, only carpentry skills will come in handy here. Using a hacksaw or chainsaw, cut the pallet into two parts, one of which will serve as the seat, the second - the back.


The presence of a sofa, armchair or pallet bed in the garden will emphasize the individuality of your site, create a cozy atmosphere, make it truly unusual and worthy of attention.


If you have a large number of pallets (the material can be purchased for a small amount in hardware stores), you can organize a full-fledged resting place from them, where you can relax with a large company. In this case, construction or open can be completely abandoned.
Construction pallets (pallets) can be used both in painted and unpainted form. Their design feature allows you to store something useful between the rows of boards. Also, this space can be occupied by drawers, providing them with a special mechanism and beautiful handles.


Furniture always like new
Climatic conditions contribute to the fact that both the tree and the vine or rattan burn out, become dull and brittle. Cast iron and metal furniture can be destroyed by corrosion. So, if you do not have umbrellas in the garden, remember to systematically impregnate the furniture. To reliable materials from the harmful effects of external factors, they should be covered with something.
The best way to protect wood is to apply a special acrylic varnish to it. It will not only protect the wood structure from moisture, but also prevent the appearance of blue, mold and fungus on it.
The tree must be degreased without fail. The old impregnation layer should be removed with sandpaper, preferably with a grit of 150 to 320. The thickness of the paper is selected in accordance with the degree of unevenness of the base. Not all types of wood require impregnation. For an exotic wood like teak, this is overkill.


Rattan garden furniture should also be oiled or varnished every 5-6 years. Corrosion on furniture made of metal should be cleaned with fine-grained sandpaper and painted with the selected paint from corrosion.
It is important to remember that to restore old furniture always cheaper than buying a new one. Well-maintained and updated furniture will make your garden elegant and attractive at no extra cost.


Chaise lounge for a summer residence - a comfortable stay in the garden
In ancient times, people loved to relax among the greenery on soft ottomans or deck chairs. Today these are not only comfortable, but also functional sunbeds.
Their streamlined, adjustable design features headrests and armrests. The fabric covers are removable so that the sun loungers can stand in the garden even on rainy days.


Beautiful design and smooth lines - all you need for a summer lounger


To protect from the sun, you can use a shady canopy or an umbrella. The latter will brighten up your time spent outdoors. A bright, colored spot that protects from the sun will bring a touch of freshness and lightness to your garden.
Garden umbrellas must be stable so that they are not turned over by a sudden gust of wind. Therefore, the frame of the umbrella must be strong. The correct base is also very important, and the functional masts and bowl must be made of good quality material.


Rattan is a classic of the genre
Rattan has been used to make furniture and accessories since ancient times. Furniture made of it is characterized by lightness, elasticity and is associated with a romantic elegant garden in the Provencal style.
This material is easy to paint, so you can always keep your favorite furniture in the best possible condition. Rattan looks beautiful in a natural color, as well as a noble shade of bleached oak.


Wicker furniture in the garden looks spectacular and elegant, but it is worth noting that you will hardly be able to immediately create masterpieces that you saw in specialized stores without some practice. Weaving from rattan is a rather laborious process.
To begin with, it is best to practice on small items, for example, weave a small stool or table top. Only after successful practice can you move on to weaving more complex furniture, such as a deck chair or swing.


Rattan in classic style
This calm and elegant will enliven anyone. Rattan is perfect for him. IN classical style accessories are very important. Each piece of furniture should be laid out with soft pillows in delicate pastel colors or covered with a cream-colored blanket or woolen bedspread that will warm you during cold summer evenings.
There are no special requirements for creating an interior in a classic style - absolute freedom of action. Furniture made in this style will look equally beautiful both in the garden and in the house.


Caring for rattan furniture
Rattan is not a moisture-resistant material, so furniture made from it should be protected from rain. Fortunately, due to its lightness, this does not cause much trouble. This material wears out over time, so furniture should be taken care of regularly.


Modern garden furniture
Modern outdoor furniture in terms of shape is in line with two hot trends.
- The first is minimalism and geometric simplicity.
- The second is futuristic forms.


Beautiful and stylish terrace with beautiful modern garden furniture - everything you can dream of
Modern fluorescent furniture looks very interesting. She uses natural solar energy. Absorbs rays during the day to radiate a fabulous glow in the evening. Therefore, she can replace the lamps in front of the house. Modern furniture is worth buying in ready-made sets. They can be kept in one color scheme or bright duets.


Popular materials for manufacturing
Modern garden furniture is most often made of durable and moisture-resistant plastic. The design of such models meets the hottest trends in modern times.
Here are two types of material that have gained particular popularity:
- techno rattan- A great alternative to vine or rattan. The reason is resistance to moisture and direct sunlight. Besides, modern furniture very convenient.
- Polypropylene- a popular polymeric material, characterized by high mechanical strength, well tolerated by adverse weather conditions. By the way, it is also quite plastic in the production process, which sometimes leads to bizarre forms of furniture. The only drawback is that some polypropylene furniture is very light, which means that strong gusts of wind can break its stability.


Outdoor recreation is the best option to relax and rejuvenate

And finally. In the article, we mentioned only the most popular and in demand garden furniture for a summer residence, which you can make with your own hands.
You can try to create something else, no less interesting and useful. The main thing for this is to make a little effort and diligence.


You will probably find this information useful in your creative endeavors. Experiment and create, try to make what is already there a little better.


