Shower cabins for a summer residence are one of those “structures” that are easy to make yourself, but very difficult to do without. There is a huge amount various options shower cabins, each master makes his own improvements to their design. We will not dwell on complex and expensive options; we will consider the most “budget”, but very functional solutions.
Before starting construction, decide what you want in the end, what capabilities and characteristics the shower cabin should have. The specific features of the shower stall depend on:
- the number of people living in the dacha. This indicator affects the volume of the tank for heating water and the need for drainage;
- landscape features of the dacha plot and physical characteristics soils. It is better to install showers on small hills; this will allow you to do without special drainage in most cases. The installation location of the shower stall should be the sunniest, not very far from the dacha. It is advisable that in this place there are garden paths. Another important point– availability of water. If you have any system automatic feeding water – great, we’ll tell you how to make it automatic filling containers. If water at the dacha is obtained in buckets from a well, you will have to fill the tank on the shower stall manually;
- manufacturing materials. The frame can be made from shaped steel, square pipes or wood. Each material has its own characteristics. The walls are sheathed with clapboard, cellular polycarbonate or metal profiles. There are cheaper options - stretch a tarpaulin, opaque plastic film or ordinary thick material over the frame;
- location. The cabin can be free-standing or attached to external wall country house. There are options for a mobile cabin - if necessary, it can be moved to a new location and does not require the construction of foundations. For such options, ultra-light load-bearing structures and cladding materials are selected;
- engineering features of the water heating tank and shower drain control system.
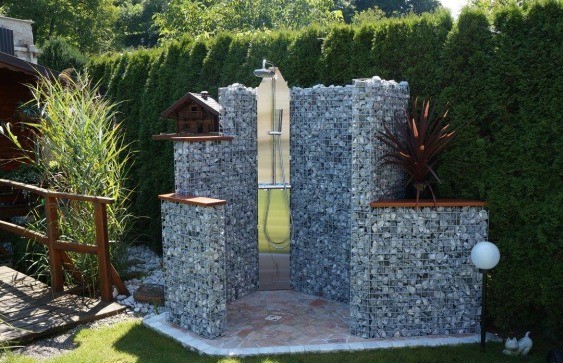 Outdoor showers made of gabions
  Outdoor shower
  Outdoor shower made of brick (stone)
  Large wooden outdoor shower
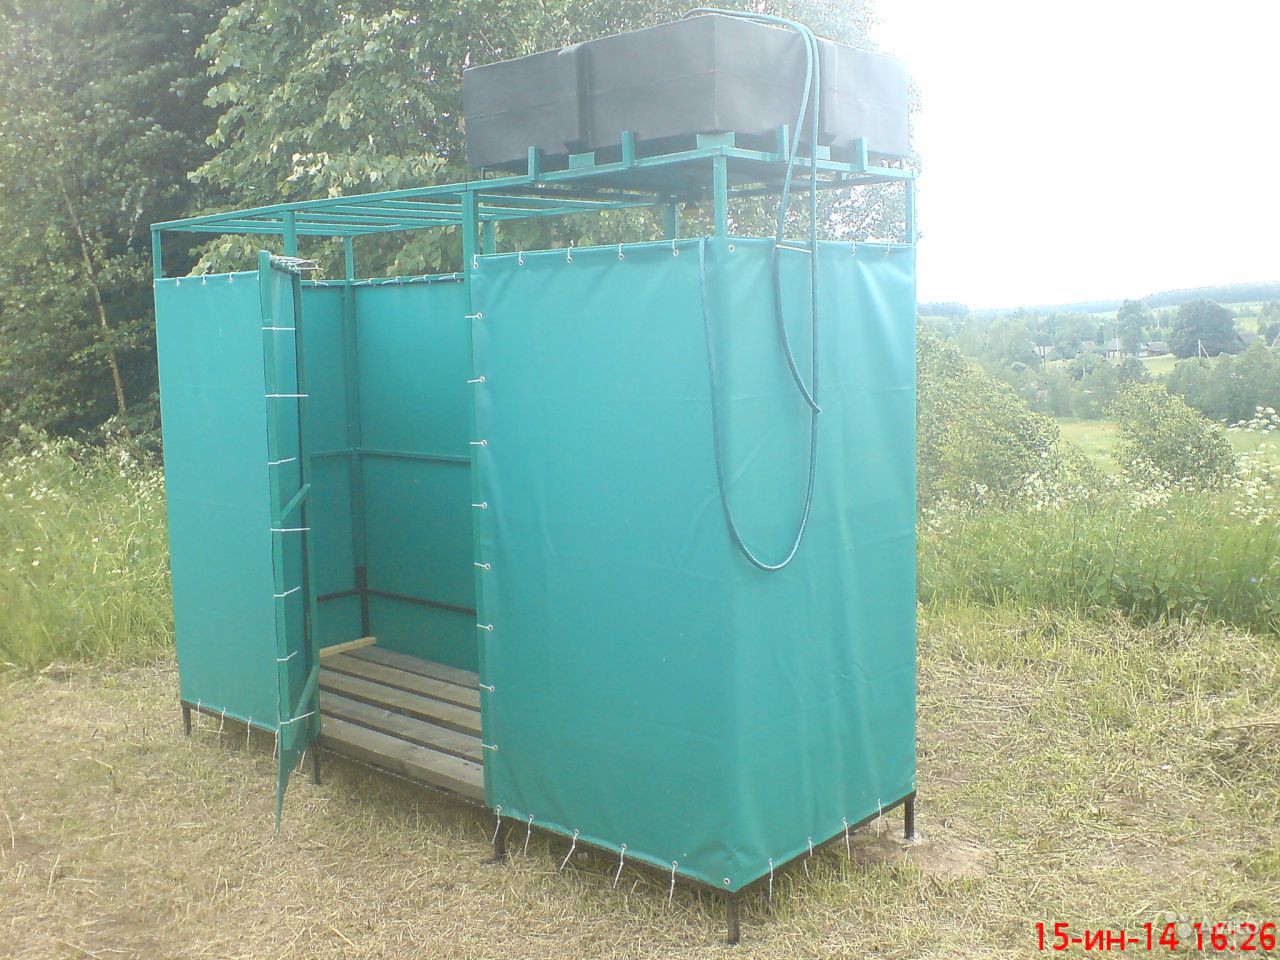
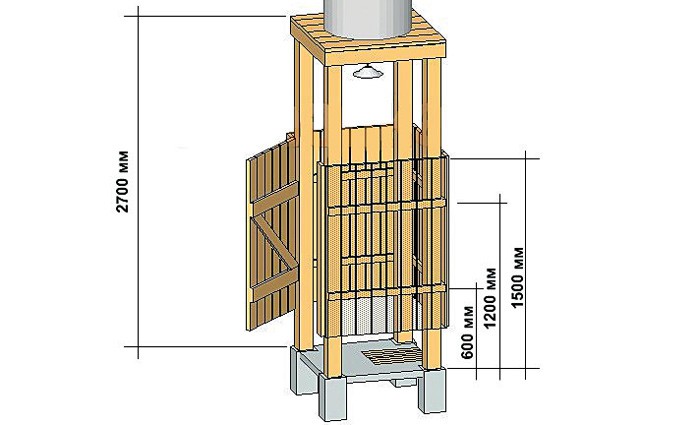
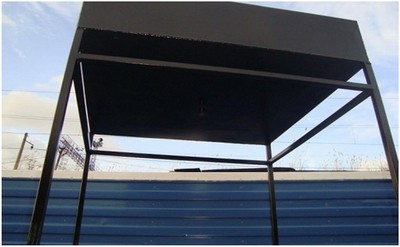
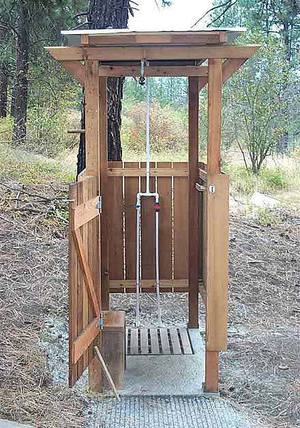
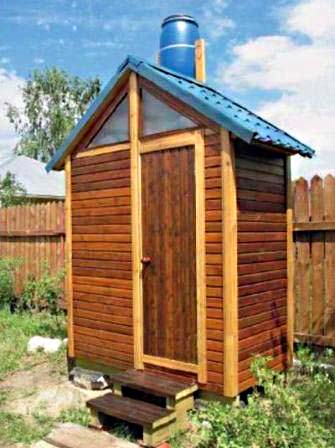
You shouldn’t “save” on the size of the cabins; make it at least 2.2 meters in height, the dimensions of the base are at least 1x1 m. The fact is that the cabin should have space for bath accessories and clothes. Let's consider step by step two options for booths - with a metal and wooden frame.
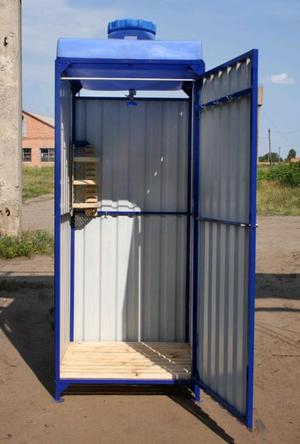
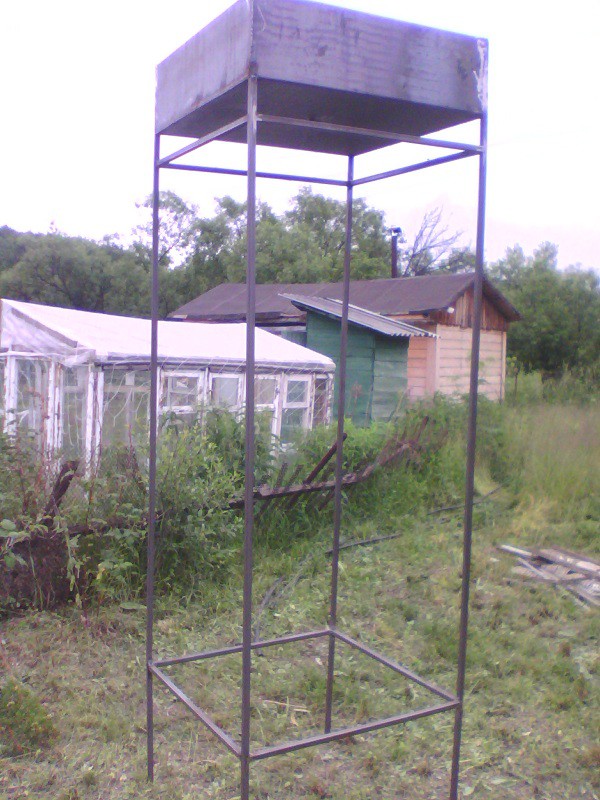
Shower stall with metal frame
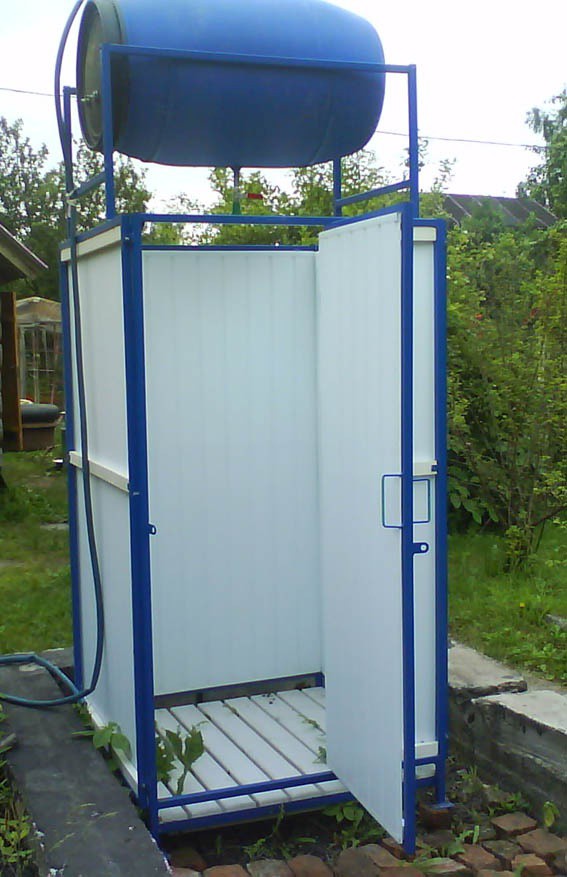 Metal shower cabin
 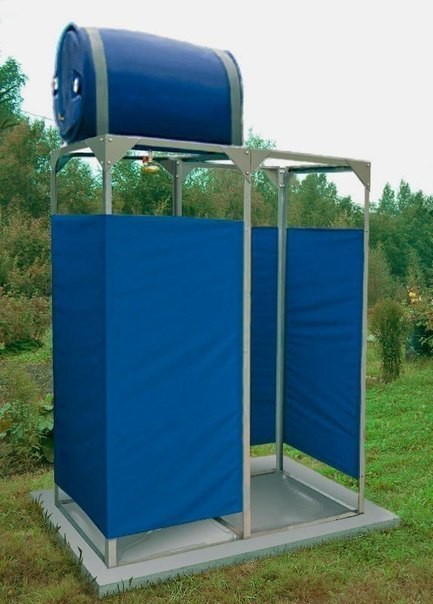 Shower cubicle with metal frame
 Do-it-yourself shower cabin in the countryside photo
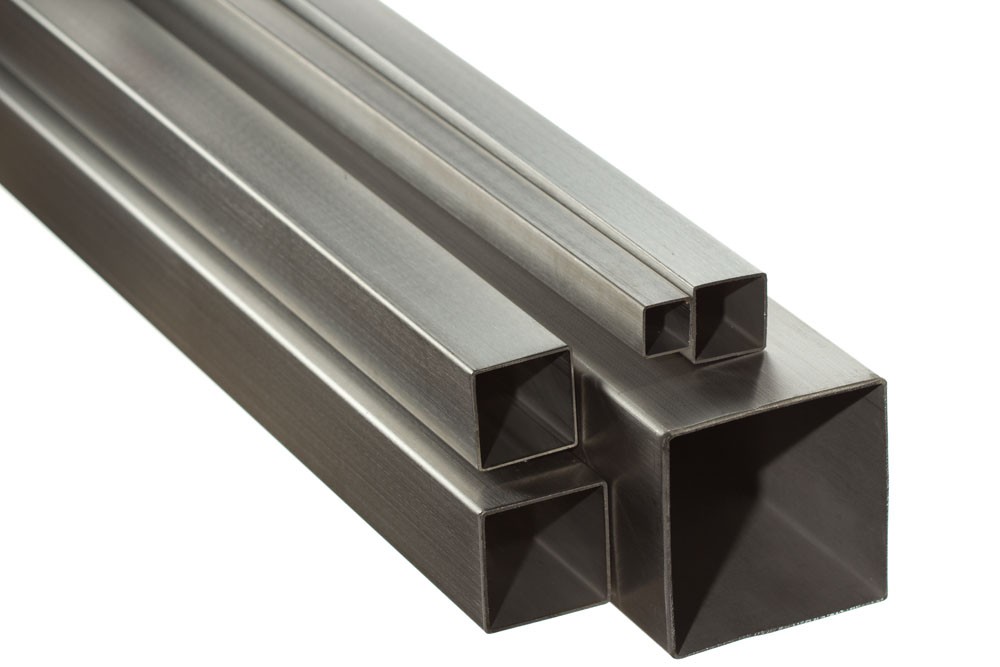
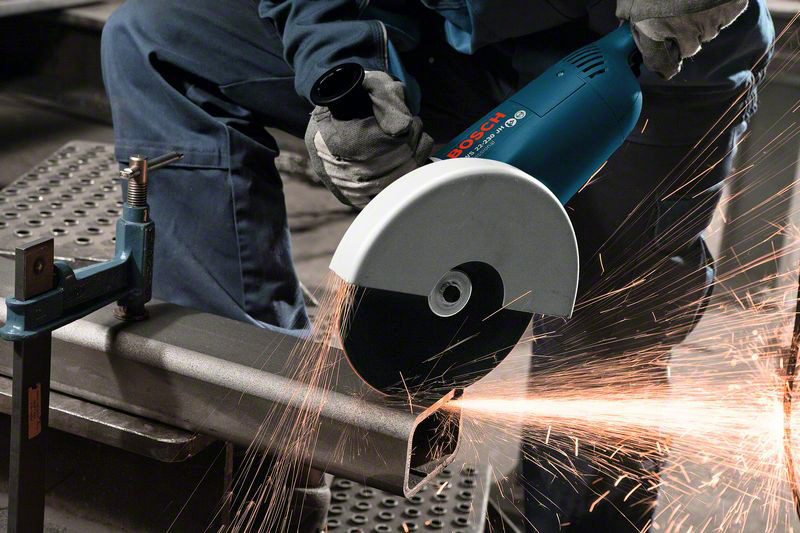
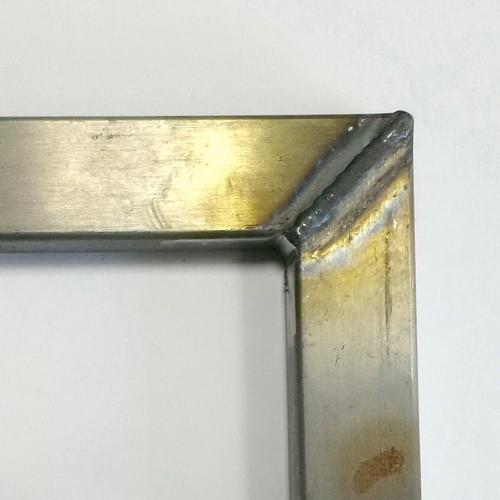
To carry out the work, you will need square pipes with a cross-section of at least 20×30 mm, sheet iron with a thickness of 1 mm and a corner 45×45 mm. Tools – angle grinder (grinder) and welding machine.
 GOST 8639 82 steel square pipes
 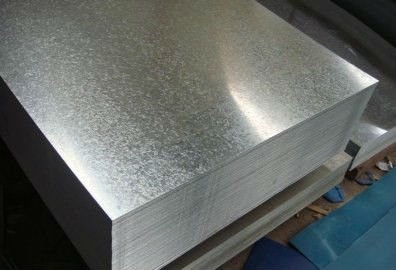 Galvanized iron sheet
 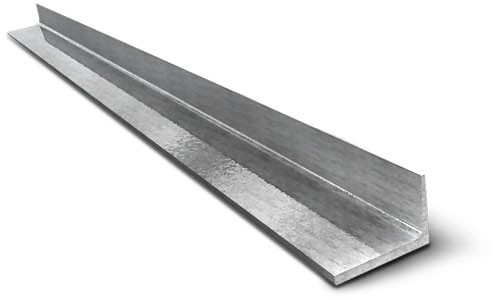 Corner 45 x 45
Step 1. Draw a sketch of the cabin.
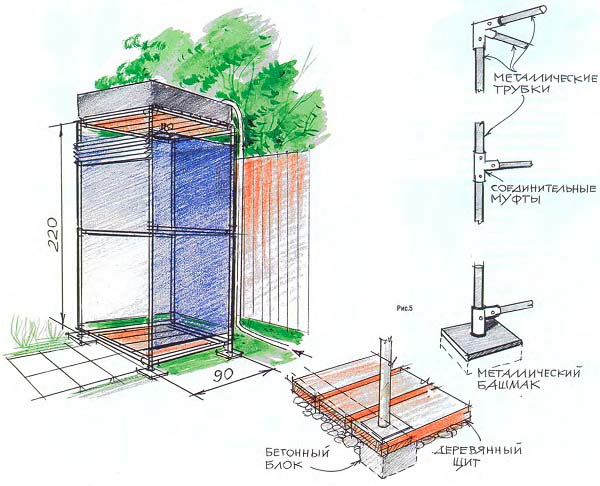
The height of the booth is approximately 2.2 meters, the perimeter size is 1x1 m.
For rigidity, provide three rows of jumpers: at the top, in the middle and at the bottom. For the lower lintels it is better to use a corner; a wooden grid will be installed on its shelves. In the upper part you need to make stops to place the container under water; the specific sizes of the stops depend on the dimensions of the container.
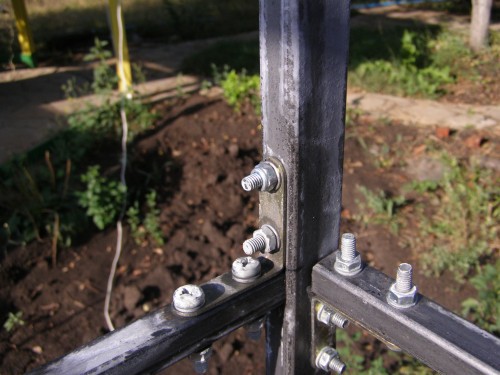
Sheath side surfaces Can metal profile, cellular polycarbonate, plastic or wooden clapboard or covered with various flexible materials. For each material, you need to think about places for fastening. You cannot drill mounting holes in a square pipe; weld metal plates for this purpose.

Don’t get too carried away with cellular polycarbonate for cladding. It is good in many respects, but only for a limited time. One of the disadvantages that manufacturers never mention is that over time, moss will begin to grow in the combs. And no seals will help; the power of nature will overcome any protective measures. The sight of polycarbonate sheets with moss inside will not make you happy, to put it mildly. In general, we recommend covering shower cabins with light and cheap soft materials. They can be replaced with new ones every season, the cabin will always have an attractive appearance without much loss of time and finances.
Step 2.
If you already have an idea about the structure of the frame, you can start making it.
Start by cutting metal elements. Cut 4 pipes 2.2 meters long (vertical supports). If you want to make opening doors in the booth, then you will need to cut two more pieces of pipe for them; the length may already be shorter; the door height dimensions should be kept within 1.5 m.

Under the grille stop you will need four corners of one meter each. The same length should be used to prepare pipes for the lintels of the side surfaces and doors. You will need two of them for each element of the cabin. You only need to cut parts according to the template, all angles are strictly 90°.
Very important: Follow safety precautions when working with grinder, injuries can be very serious. Some "craftsmen" install cutting discs in such a way that sparks fly in the opposite direction from them during operation. This is a grave mistake! In this position, the grinder is undermined with enormous effort; it is impossible to hold the tool in your hands.
Step 3.
Check the cut areas and clean them for welding. You don’t have to make a chamfer; the strength of the weld will withstand the load.
Step 4.
To increase the strength of the structure, prepare metal equilateral corners, the length of the legs is 5÷10 centimeters. It is advisable to install them at all corners of the frame and doors. Square supports ≈20×20 cm need to be welded under the feet.
Triangles to strengthen the structure
Step 5.
Welding the frame. Carry out the work very carefully, never immediately lay a full seam on one side. As it cools, it will pull the metal, making it very difficult to return to its original position. First, attach the adjacent pipes on one side, straighten the structure, and only after that can you lay a full seam on the opposite side. The seam has cooled down - weld the place where you baited.
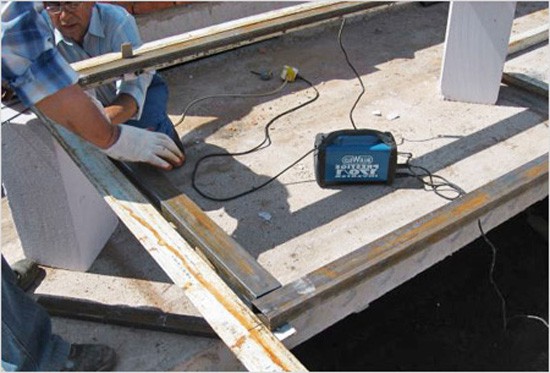
Electrodes can be used for welding AC voltageØ4 mm.
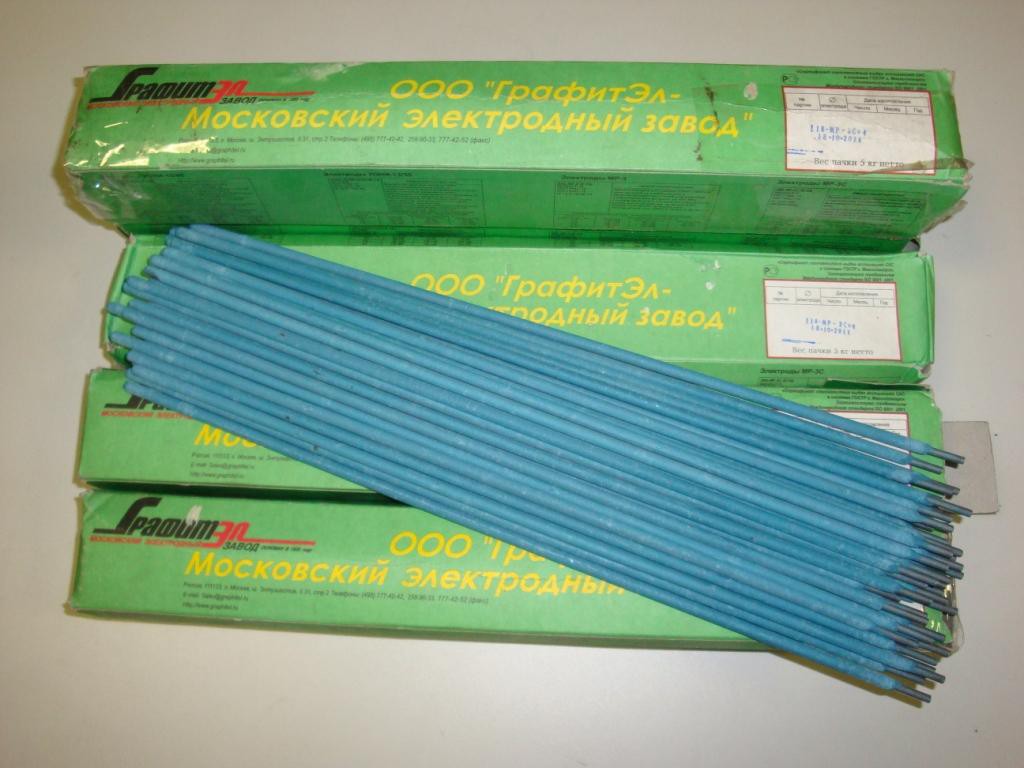
This is the most universal diameter of electrodes; they can weld metal with a thickness of 1÷4 mm. Select the correct current strength; the metal should melt under the electrode to the required depth, but not completely cut through the pipe wall. If you have no experience performing welding work– It’s better to seek help from a professional. This will ultimately cost less than discarding expensive material yourself.
Work must be performed on a level area, constantly monitor the corners of the structure. The frame will stand on metal plates-legs measuring approximately 20x20 centimeters in size. Prepare them and cook them.
Step 6.
Frame assembly. You cannot do this work yourself; you need to call an assistant. Weld individual elements frame in the specified way, constantly check its spatial position. At the bottom, corners are welded on which the wooden grate will rest; on top, make a structure for a container for water.
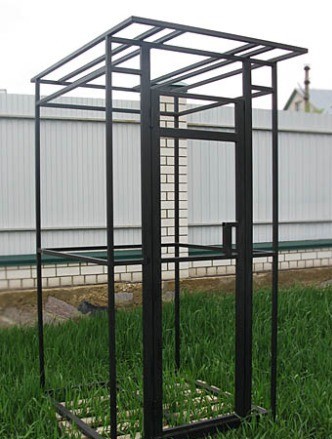
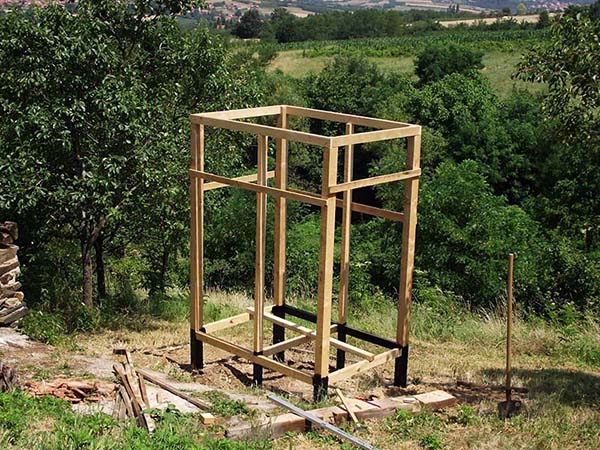
 Summer shower for the dacha - frame
Step 7
Finishing. Carefully remove all burrs and sharp corners, clean metal structures from rust, oil and dirt.

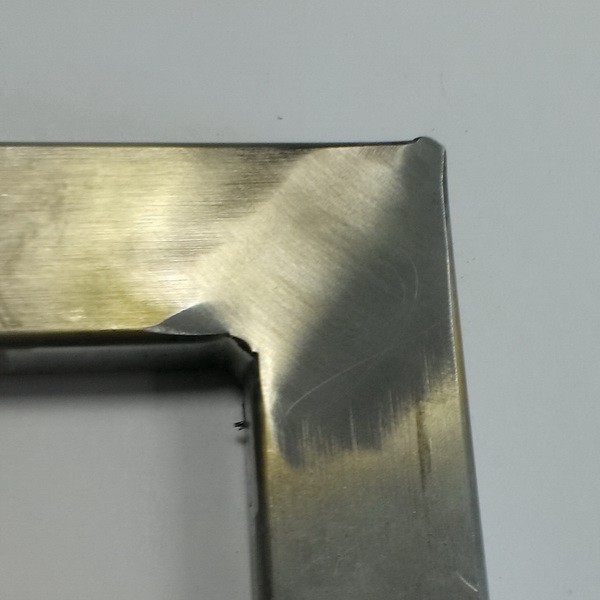 Removing the weld seam At this stage you can stop or continue processing for a better result
For painting, use special paints for metal. You will have to paint it at least twice, after the first time the metal will be visible. Do not use a pneumatic spray gun; it is only suitable for painting large surfaces. In your case, most of the paint will “go” into the air. Paint only with a brush; you will not need more than one to two hours for the entire painting.

In the photo - anti-corrosion compounds for metal
Next, you can make wooden grates for your feet and begin installing a water container. We will tell you how to install the container and connect the shower at the end of the article after describing the manufacture of the wooden frame of the shower stall.
Video - Do-it-yourself summer shower on the site
Shower stall with wooden frame
The linear dimensions can be the same as in the version with a metal frame. Material of manufacture – wooden blocks 50×50 mm, boards 50×100 mm, select specific dimensions taking into account the total weight of the water container. Boards and bars need to be passed through a thicknesser - the size will be equalized and roughness will be removed.
Step 1. Draw a sketch. It will come in handy not only during work, but it makes it much easier to choose best option designs. It's better to correct your mistakes on paper than on finished product. Draw several options on paper, think about the location of the stops, shelves and tank for the container. Compare several designs of shower stalls and choose the one that suits you best.
Step 2. Cut all the blanks for the frame to size; according to the design, it does not differ from the metal one. Once again, pay attention - watch the dimensions, make blanks only according to the templates.

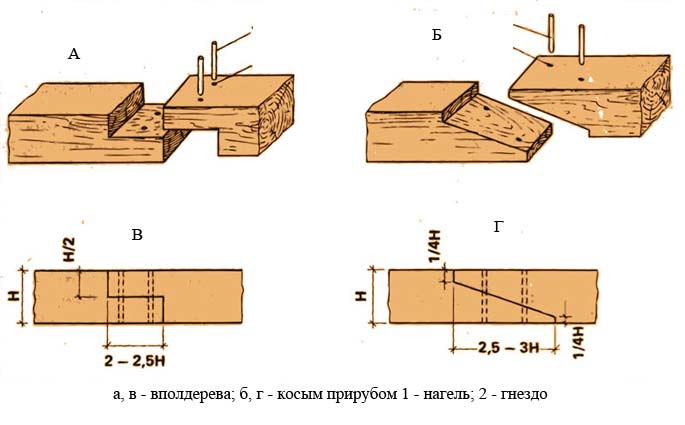
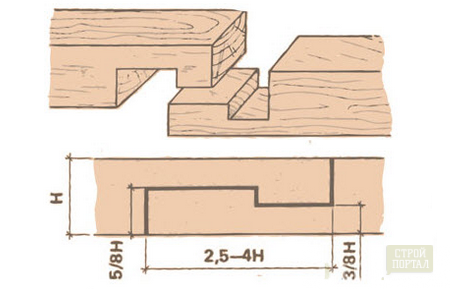
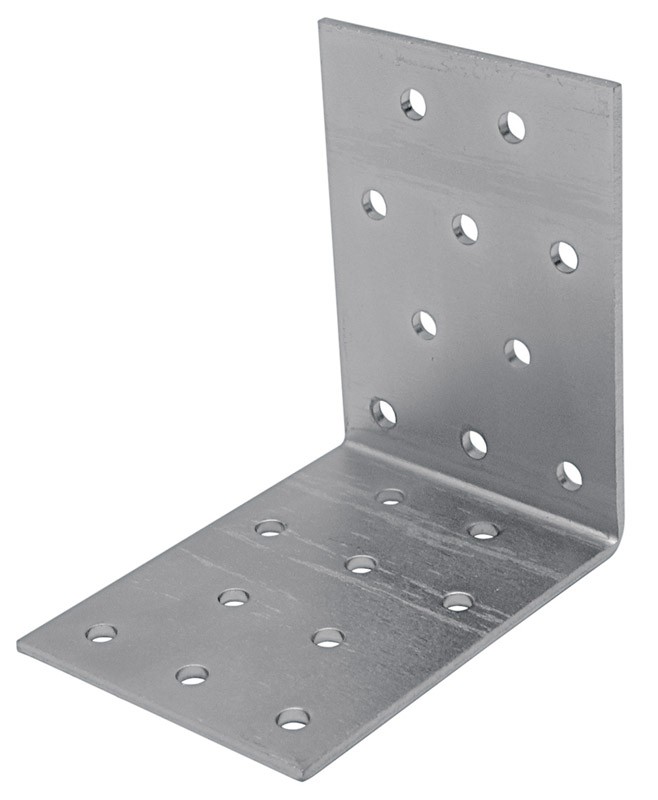
Step 3. On level ground, begin assembling individual structural elements. It is better to make the connection in half a tree. If this is difficult for you, use metal plates and corners with screws.

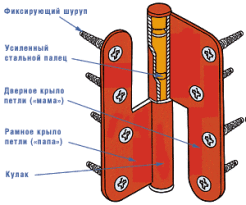
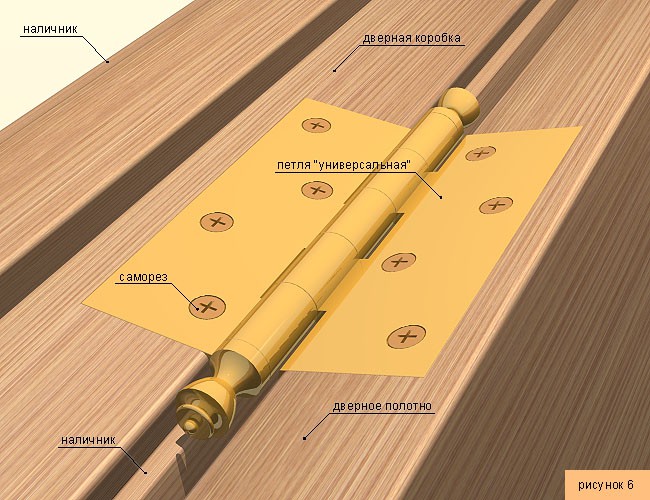
Step 4. Assemble the individual frame elements into a single structure. If there are doors, secure them on hinges.
Instead of doors, you can make an ordinary curtain. Consider a location for installing the water tank.
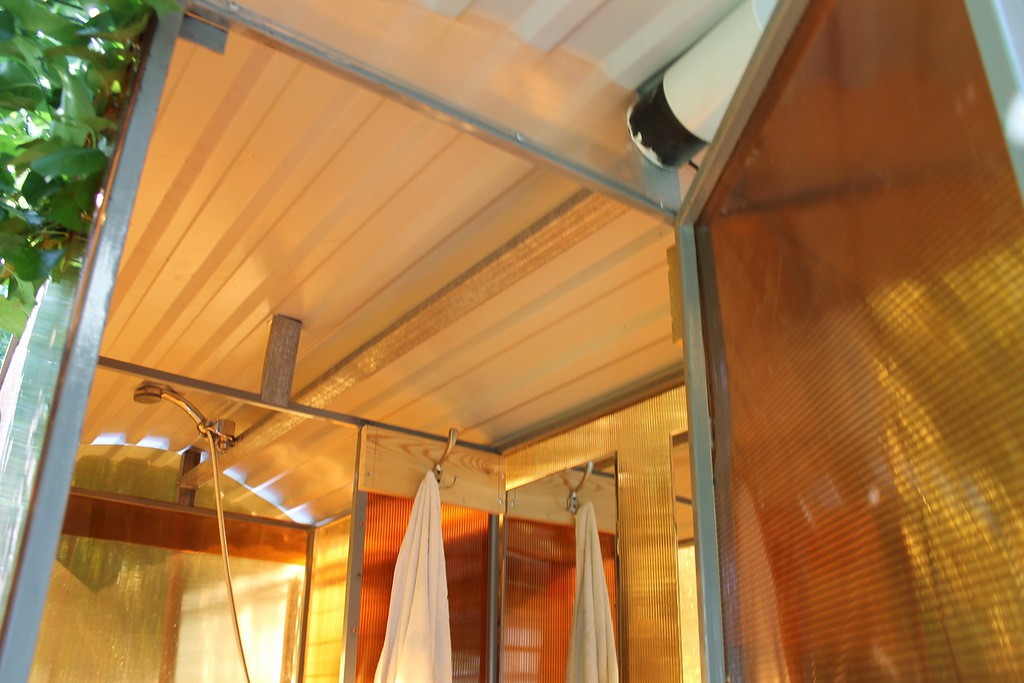
Attach with inside shelves for bath accessories and hooks for towels and clothes. Prepare a wooden footrest.
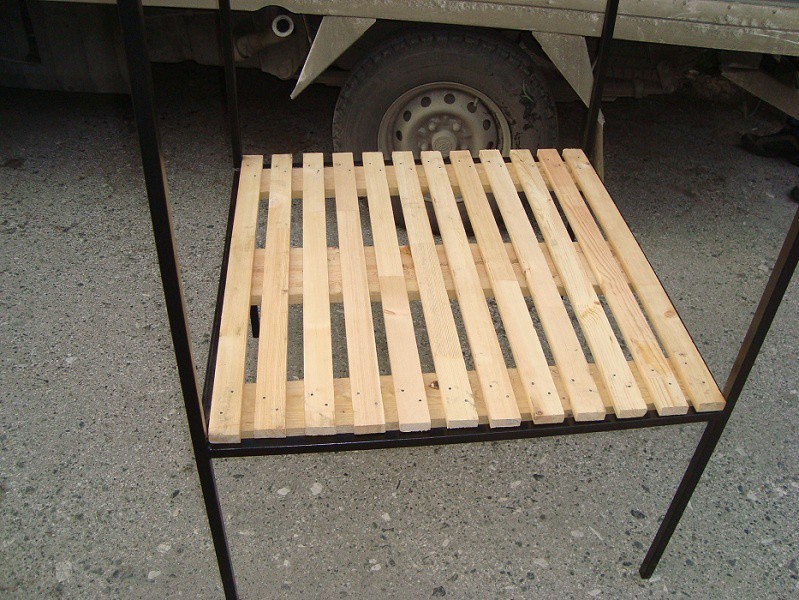 Wooden lattice - example
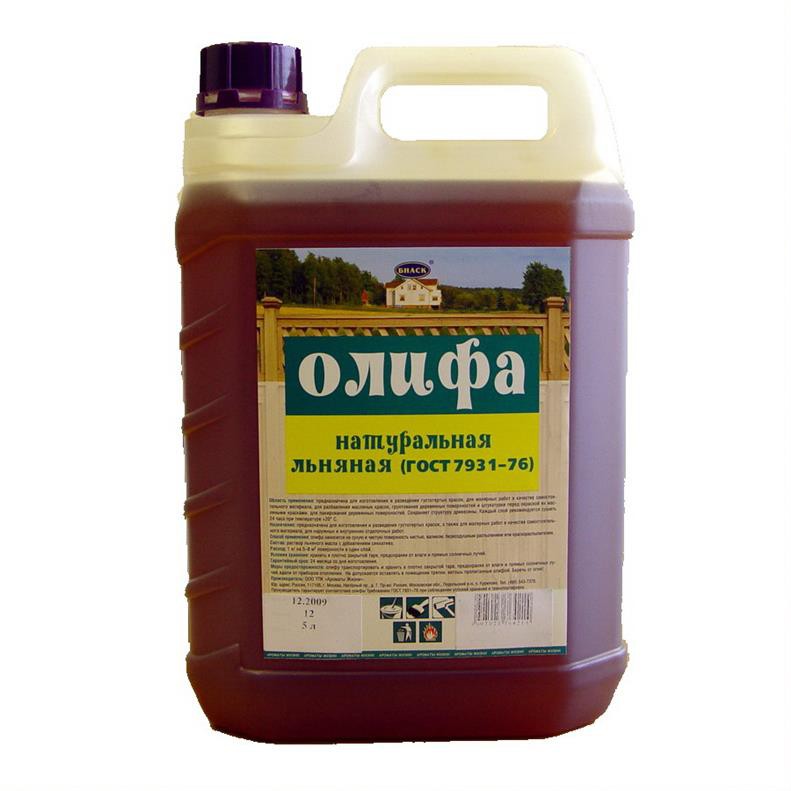
Step 5. Ends vertical racks must be protected from rotting. You can treat them with special antiseptics, or you can soak them several times in drying oil or sunflower oil. By the way, drying oil is unrefined technical oil of oilseeds, including sunflower.
Let's give a few practical advice on the installation of a shower stall.
Foundation
You may find advice to install shower cabins on a screw foundation, pour a concrete platform under them, etc. We do not recommend doing such work for several reasons.
- Firstly, a shower stall is not a structure that requires special foundations.
- Secondly, we can guarantee you that over time you will have a desire to build warm shower, and for this you will have to dismantle the booth.
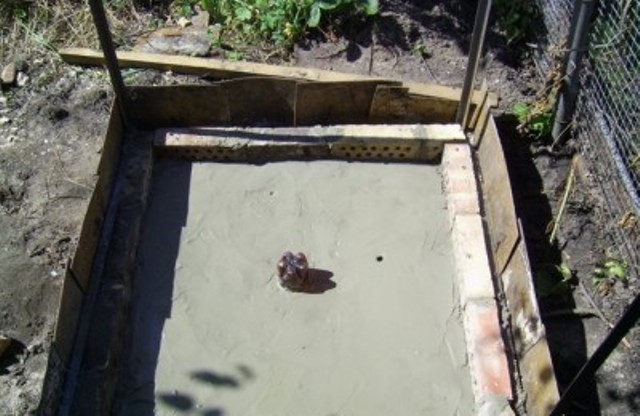
We recommend using it under the foundation paving slabs or wide paving stones. Remove a small layer of soil underneath, level it horizontally and lay tiles in the prepared areas. Tamp it down a little - this will prevent the appearance of distortions while using the booth.
Video - Rules for laying paving slabs
Water drainage
And here you can find tips on arranging a whole engineering system. What does practice show? The volume of the water tank rarely allows more than two people to shower at the same time, the consumption for each is approximately 20÷30 liters. Depending on the weather, the water heating time ranges from five hours. We assure you that during this time the used water will quietly go into the ground. And one more thing - you shouldn’t be afraid that without a sump tank “there will be unpleasant odors", this is not a sewer.
Water tank and shower
You can build the most beautiful and most reliable shower stall, but it will be very inconvenient to wash in it. The reason is incorrect installation of the water tank and shower. How to avoid such trouble? Let's give some practical recommendations.
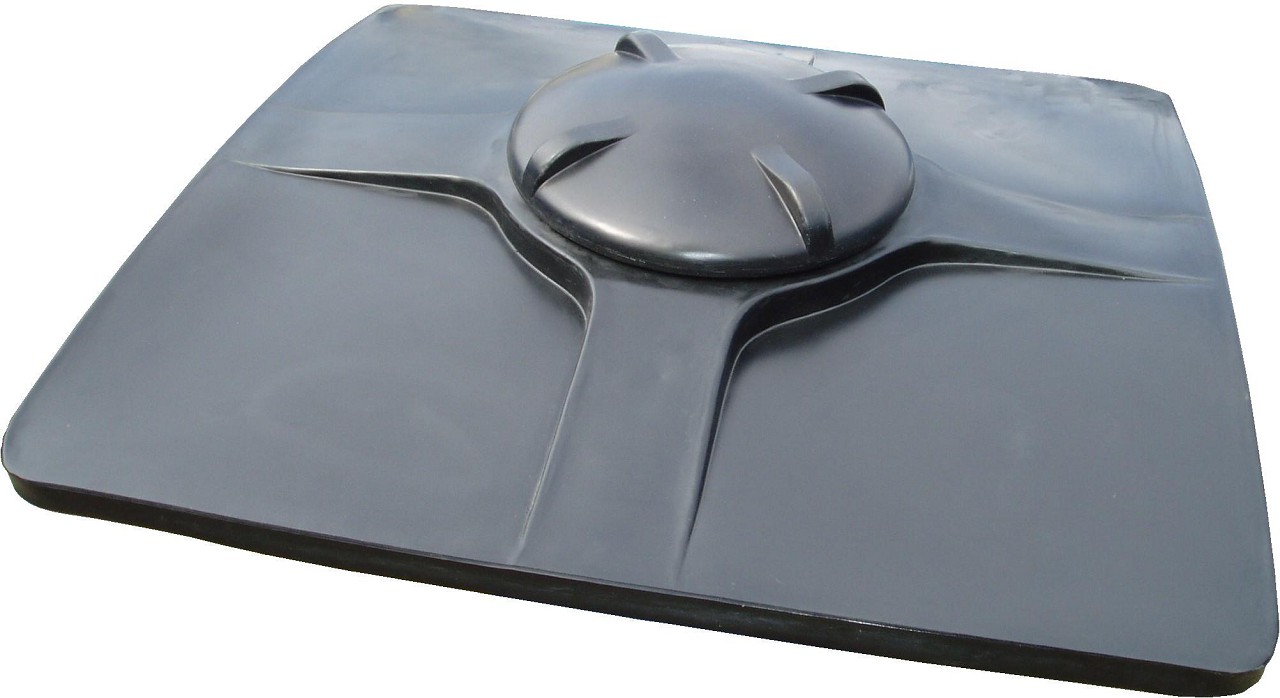
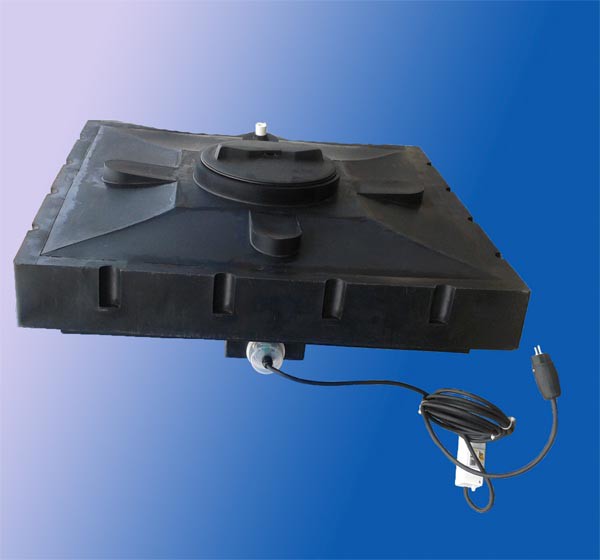
Water container. You can use two options: plastic and metal.
Plastic containers
Advantages: relatively low price, wide choose in capacity, ease of installation.
But there are also significant drawbacks.
- Firstly, to increase heating efficiency, it is recommended to use black plastic containers, and this option is difficult to find and, moreover, to choose the optimal option in terms of capacity. It is almost impossible to paint a white container black.
- Secondly, the physical strength of the plastic does not allow you to reliably fix the shower connection point. Constant vibrations of the outlet pipe violate the tightness of the connection, and leaks appear. In addition, due to frequent bending forces in these places, the effect of material fatigue occurs. And this can lead to a complete separation of the shower with all the consequences.
Metal containers
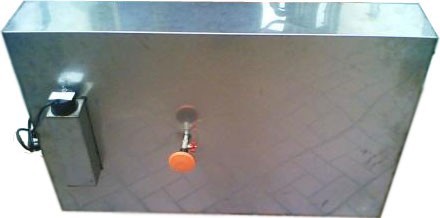
Advantages - the high strength of the metal guarantees the tightness and reliability of the shower connection. The metal is easily painted black, and this color significantly increases the efficiency of water heating sun rays.
Disadvantages: weight increases. You can ignore corrosion processes; a thick-walled barrel will last for decades. Moreover, a barrel filled with water corrodes much more slowly than an empty one. We recommend using metal barrels: cheap and reliable.
Construction and operation
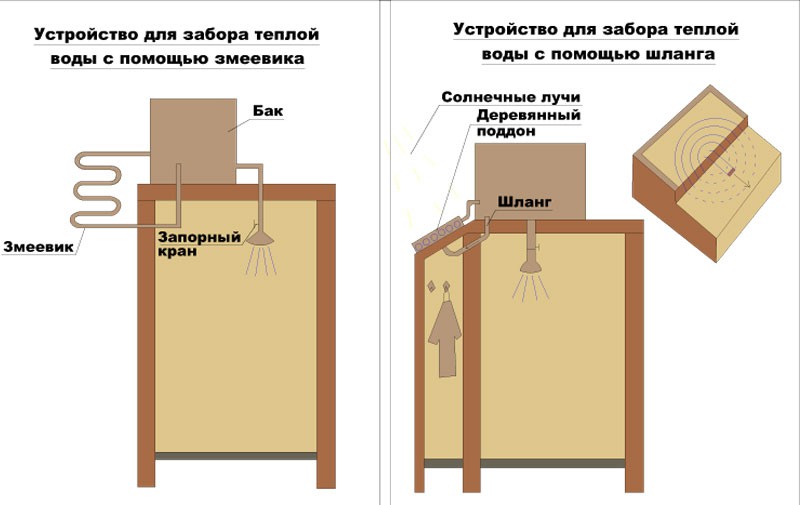
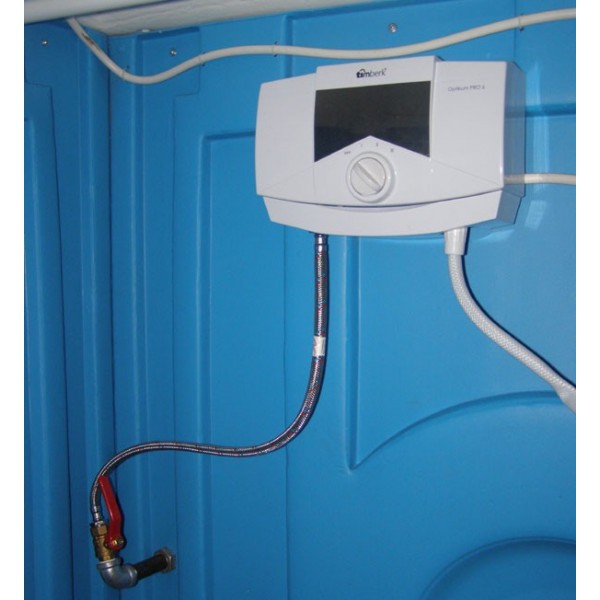
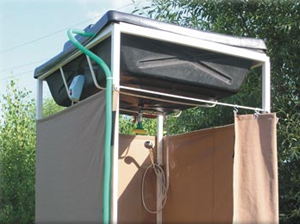
Another important question is how to fill containers with water. Filling in buckets is not the best the best option. We strongly advise you to take all measures to ensure that water is filled with a hose. If your well or borehole is located at a great distance from the cabin, then you can make a temporary line with a flexible hose from the dacha. We will also tell you how to make water filling automatic. To do this, you can use an ordinary float made of cistern toilet. Adjust it to a response difference of approximately twenty liters of water, taking into account the size of the container. This will make it possible to constantly keep the barrel fully “filled”, the water will constantly heat up, and you will not have to prematurely end the shower process due to lack of water. Another advantage of “automation” is that the possibility of water overflow is eliminated. Overmoistening the soil near the shower stall is undesirable.
You may come across a proposal to take shower water from a container using a float. The end of the flexible intake hose is fixed on the float (you can take a piece of foam plastic of the appropriate size), as the water is consumed, the float will lower, the intake is always made from the top, warmest layer. This device has an effect, but it is insignificant. The fact is that the water in the containers heats up from the walls, the hot water rises, the cold sinks down. The movement of water through volume occurs almost constantly, which means that there is no big difference by water temperature depending on altitude.
Another improvement is to make electric heating, which will allow you to have warm water regardless of weather conditions. Yes, the water will be hot, but who would dare to take a shower if the temperature outside is low? But this is not all the problems. During the device electric heating the rules of the PUE must be strictly observed, and they impose very stringent requirements for such work. In addition, you will need to install automatic switching on/off of heaters. Do you need such “complexities” in an ordinary outdoor shower stall? If there is a need to use a shower stall in cold weather, make a shower room in the dacha room. This decision will have to be made in case of a long stay on the site.
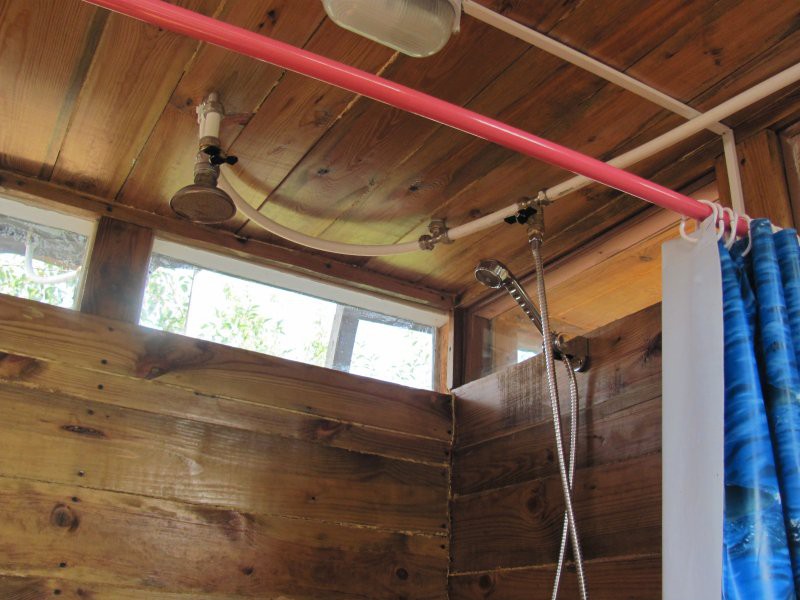
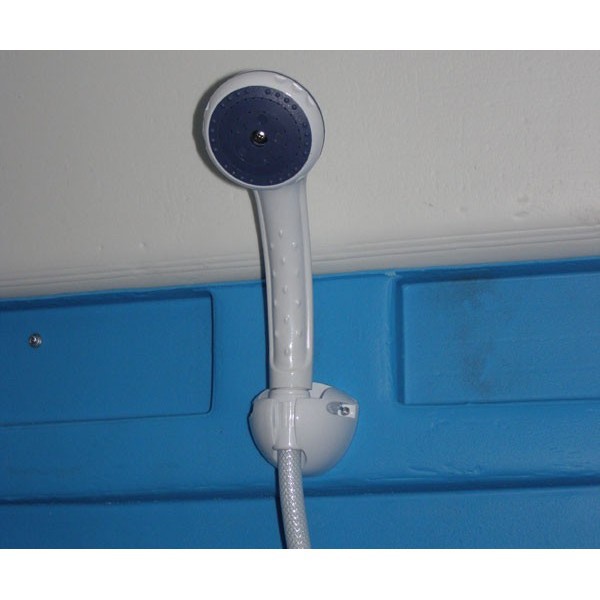
If you have a shower attached directly to the container (there is no shower hose), then you should take the complex additional measures for its secure fixation. Using stops (wooden or metal), secure the pipe, eliminating even the theoretical possibility of vibrations while using the tap. It is better to install the faucet of the valve type. It has a much easier rod stroke, the water pressure is gradually regulated, the working surfaces do not oxidize - the smoothness of the stroke does not change over time.
During the construction of the shower stall, consider the possibility of adding small additional rooms to it. They can be used both for extensions of the shower room or the installation of another one next to it, or for a separate dressing room.
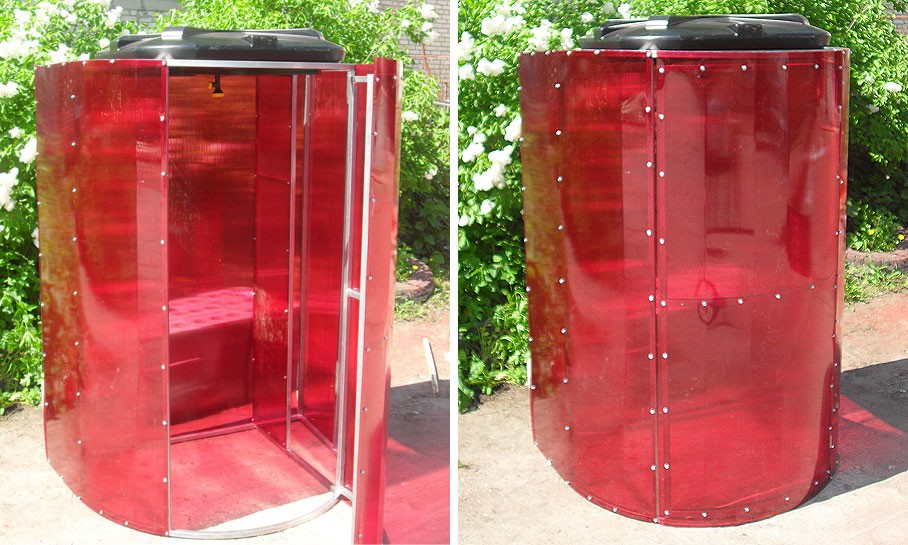
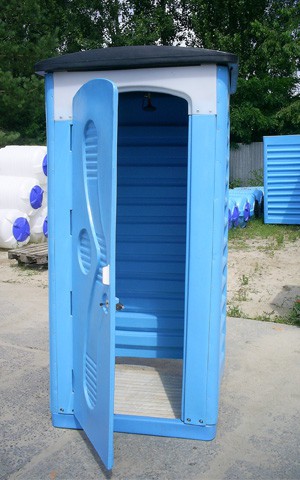
Industrial shower cabins
A wide selection of both price and performance characteristics allows you to choose the best option, taking into account your own preferences and individual characteristics summer cottage plot. Industrial shower cabins can be completely plastic, metal with lining various materials or tented. They are equipped with water tanks, cabins (metal or wood), pallets and cladding materials.
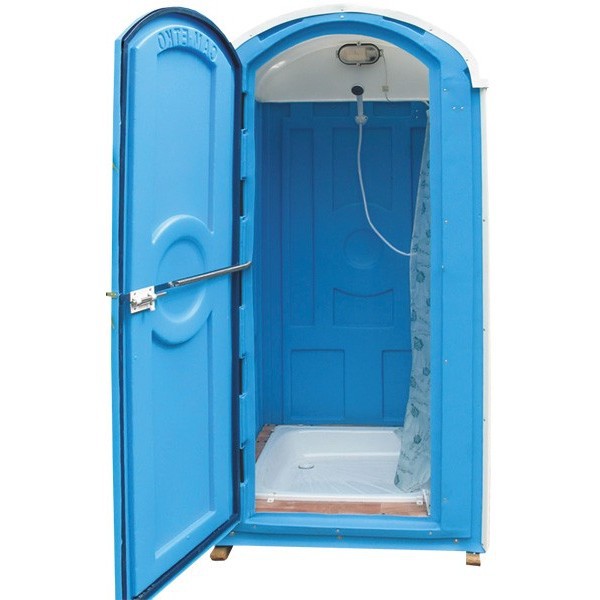
 Shower for a summer residence, plastic
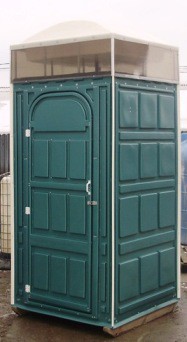

According to consumer reviews, using the booths is quite convenient, but there are several significant drawbacks. Plastic cabins do not meet the required strength indicators; if there are children at the dacha, then a season of work without repairing such a structure will be a great success.
The second disadvantage is the high price. A do-it-yourself shower stall will cost an order of magnitude cheaper. There are also quite cheap options for industrial booths, but in terms of strength they can be classified as “single-season”. Don’t waste your money; for this money you can build a wonderful, durable and reliable shower stall yourself.
 Outdoor shower cabin "Economy"
The third disadvantage is that mass production is designed for the average user. This is natural, everyone works according to this scheme manufacturing enterprises. By creating a booth with your own hands, you can make all the calculations for yourself, change the location of the shower, its height, the diameter of the drain holes, adjustment mechanisms, etc. In addition, there are no restrictions on installing additional equipment, changing dimensions in height and width, devices additional elements decor. There are craftsmen who make very original shower stalls.
Video - Country shower cabin with tent
Conclusion
Every suburban area requires constant improvement, do these things. You can start with a shower stall, then build a gazebo, then a bathhouse, and so on, from simple to complex. You will see personal experience- No better than that, which is made with your own hands.
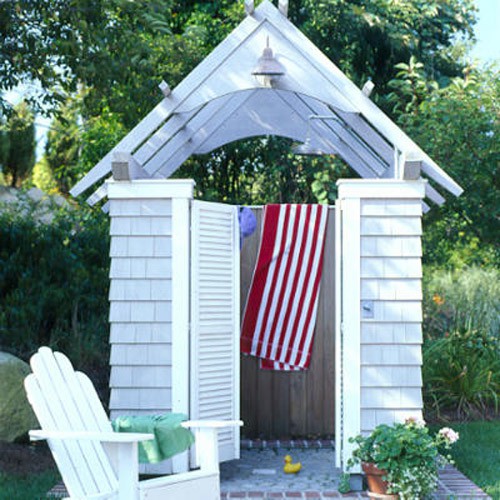
Just recently the shower summer cottage was associated exclusively with an unattractive building somewhere in the depths of the site, hidden behind garden trees. They built it with their own hands and only from the remnants of the cheapest building materials. Today, structures of this type are treated completely differently. The shower in the country has become very important and necessary element for country life, and therefore it must be equipped with comfort and at the same time have an aesthetic appearance.
Types of summer shower
The easiest way to make Summer shower at the dacha - this is to cover a rectangular structure with polyethylene and use a small storage container for water. Such a washing complex can be moved from place to place, and although such structures are a relic of the past, some summer residents still use this washing option after gardening work. Depending on the type of structure, there are several shower options for summer cottages:
Materials for production
The material for an outdoor shower can be any depending on the type of design chosen and the imagination of the builder. For more substantial shower designs, you can use wood, translucent polycarbonate panels, natural and fake diamond, plywood, metal pipes. The walls of the shower stall can be sheathed clapboard or veneer tiles.
The floor can be river pebbles, artificial porcelain tiles or other stone. Such a floor does not splash water and will protect a person from slipping on a wet surface. This flooring option is suitable For open options outdoor shower. Great option A wooden grate can also be used for the floor - it is an environmentally friendly and non-slip material.
Atypical summer shower options
 A person with a vivid imagination and a certain amount of money can afford to make not just an outdoor shower, but also build a masterpiece of construction art or bring it to life a little piece from a fairy tale.
When building a closed summer shower, one of the walls can be made from colored bottles, and a wooden beer barrel will serve as a water tank. A person’s imagination has no limits: every summer resident makes a summer shower to his own taste and following his preferences. For example, some people like to decorate the walls of the shower stall bamboo stalks, straw or sunflower.
The easiest way to build
The design of the simplest summer shower consists of a tank, a tap, a shower head, a rubber mat, 4 racks and a moisture-proof material. In order to build the simplest version of a summer shower in the country, you need to adhere to some advice:
- First of all, you need to choose a place or site to build a shower. It should be under constant exposure to sunlight, since the water tank of the future shower must heat up naturally. If you build a shower structure in the shade of trees or another building, then the problem of heating the water will arise.
- Necessary dig 4 pillars into the ground so that the structure is stable. A metal or plastic water tank is attached to the top, preferably black: for better heating.
- A hose is connected to the tank to supply water and watering can is attached.
- You can put a rubber mat on the ground and cover the shower frame polyethylene or other material.
After about 2 hours of operation, the outdoor shower is ready for use. Such a shower is mobile, it can be easily moved to another place, and can be easily removed for the winter.
Another option for building a summer shower
More difficult option building a summer shower at the dacha requires some effort, but it’s still manageable absolutely any summer resident.
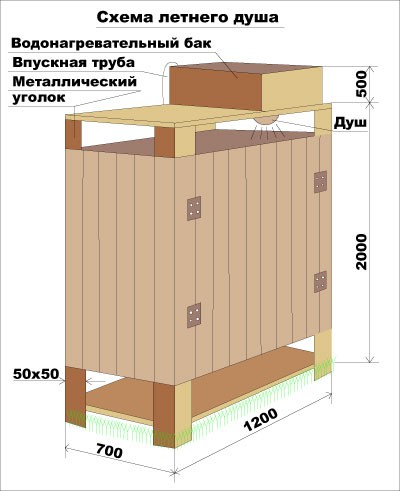
Before the initial work on building a shower, you need to make a drawing or drawing of the project. First of all, you need to decide on the size - width and height. Enough for the locker room small area- 0.6×1m. The shower stall, as a rule, is also small - 1 sq. m., the cabin height is made no more than 2.5 m.
Taking into account the thickness of the material, a rectangle is marked on the ground along which the pillars of the structure will be dug. The size of this rectangle is 110x170cm. By the way, the pillars need to be processed by special means against rotting.
For construction gender you need to follow the instructions:
- Internal dressing serves as lags for flooring. Between load-bearing pillars slopes are placed in the thickness of the wall, and logs are attached to them.
- In the summer shower room, you can install a tray or make a wooden floor with slots , into which the water will flow. In the first case, drainage will occur through a hose, and for the second type of floor it is necessary to lay a waterproof layer.
- The most common material used for shower walls is waterproof and moisture-repellent materials. Typically this is plastic panels, varnished wood or plastic film.
- The outside walls are finished with clapboard, plastic or chipboard. To ensure that the landscape looks in the same style, it is better to use the same material for neighboring buildings.
- If you plan to use the shower in the fall, then you need insulate the walls with a special agent- polystyrene foam or polystyrene foam. The insulation layer must be covered with a moisture-proof film.
- The space between the wash room and the locker room is separated by a threshold and curtains or sliding doors.
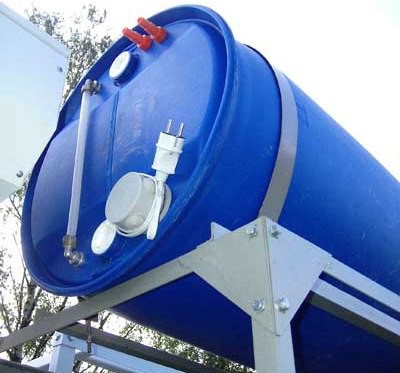
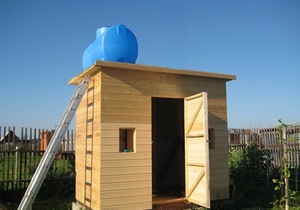 The water tank is mounted on the roof. Water is supplied from a tap or pumped when using a pump. The tank must be equipped with a special
The summer shower provides water treatments without connecting a heating device. You just need to ensure the tank is filled cold water, and the sun will heat it. Any summer resident can build a summer shower with his own hands, even if this is the first building in his life. You just need to follow the rules for foundation construction and water drainage if you plan to use the shower frequently.
What will a summer shower be like?
The design can even be a simple screen made of waterproof fabric. In this case, the tank is located separately. Classic version summer shower is a cabin built according to frame technology without insulation. The frame is assembled from timber, steel angle or profile pipe. Both metal and wood have disadvantages, so, as a rule, they focus on what material can be obtained.
Materials rating:
- wood absorbs water, then dries quickly, which leads to cracking; It is advisable to soak the timber with an antiseptic before use;
- metal is susceptible to corrosion, installation takes longer, connecting elements is more difficult; however, it cannot be denied that metal structure stronger.
 In essence, a summer shower for a summer house has a simple device consisting of several elements. The degree of comfort is increased by installing additional structures (compartment for clothes, special shelves for shower products). However, the main ones are the following:
- frame,
- tank with tap and watering can,
- curtains and frame lining,
- pallet or wooden ladder.
Foundation for a reliable building
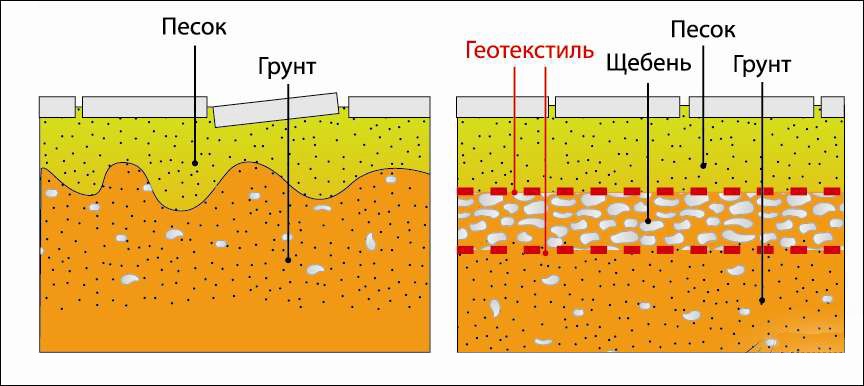
If a decision is made to install a summer shower securely fixed in the ground, a pipe (column) foundation is installed. This type of base is the most economical and lightweight for independent work. Using a drill, they dig holes 1.5 m deep and 25 cm in diameter. Sand and crushed stone are poured onto the bottom and installed steel pipes d=100 mm. The pipes should rise 25±5 cm above the ground. Then roofing felt formwork is installed in the holes, and the pipes are concreted. After the solution has hardened, a 100x100 mm beam is placed in them, and in order for it to fit tightly, its edges are trimmed.
Dimensions of a summer shower
 The following are considered optimal cabin sizes:
- height 230-250 cm,
- width and depth 110 cm.
These numbers do not have to be strictly followed. Each owner can build a summer shower for a summer cottage that is more spacious or smaller. You just need to ensure comfort so that the cabin is not too cramped and low. The width and depth of the building can be increased to 140-170 cm, and the height - up to 3 meters. You should also take into account the configuration and dimensions of the tank, which will be installed on the roof.
Draining
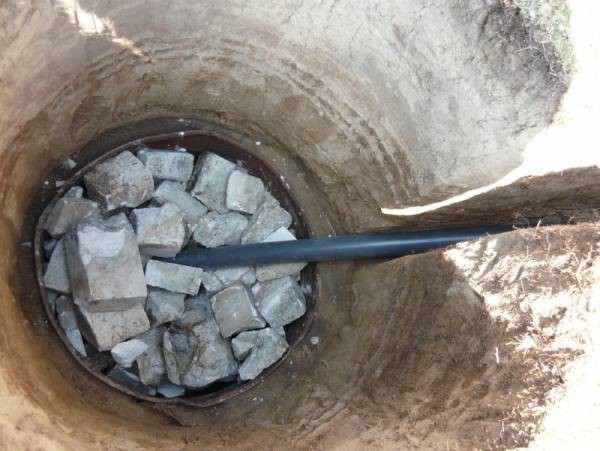
The drainage option is thought out in advance and arranged immediately after the installation of the pipe foundation. For high-quality water drainage, it is better to dig a trench leading to the drainage ditch. A pipe from the shower is connected to it. It is important to strengthen the walls of the trench, for example, concrete them. You can also lay a pipe from the cabin directly into a gutter or drainage well.
Other options for discharging used water:
- septic tank
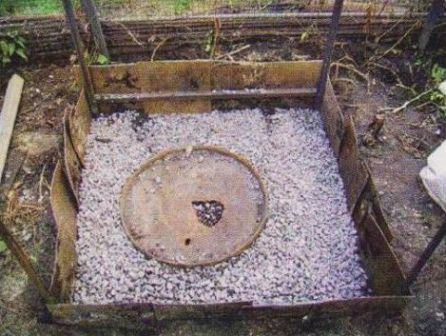
Both the pit and the septic tank are installed at a distance of at least 6 m from the summer shower. The pit is cemented to avoid soil collapse. If you rarely use the shower, you can do without draining. In this case, the water should go into the ground, so it is important to do correct design floor.
Frame and floor construction
After installing the drain and support pillars, bandaging is done. The lowest row should be located above the ground, since the summer shower must be built so that the floor rises at the level of the pile pipes. This will ensure ventilation and quick drying of the floor, especially if a wooden grate is used for it. It is also important that the soil under the cabin dries quickly if there is no drain. For convenient water drainage, you can use a shower tray to which a hose or plastic pipe is connected.
Bandaging work begins from the top, controlling the exact distance between the supporting supports. Connections are made by bolts or welding if the elements are steel. For the tank, jumpers are attached to the upper part of the frame, on which it will be installed if it is cylindrical in shape.
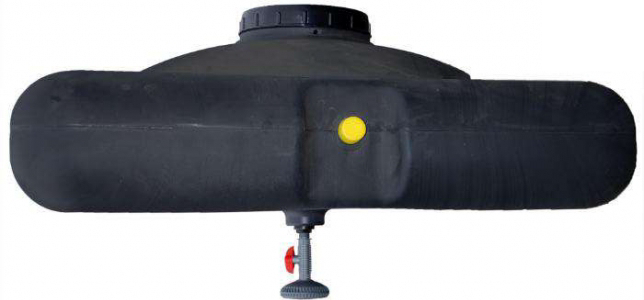
It is better to think over the design of the tank before building a summer shower, because the load from it should be distributed across support pillars. To do this, it is better to take a rectangular, flat plastic tank, the dimensions of which coincide with the dimensions of the cabin. Important: The black color of the water container helps it heat up faster.
Shower cabin trim
 The following materials are standardly used:
- lining,
- OSB boards,
- corrugated sheets,
- polycarbonate
The frame is sheathed on 3 sides, and attached to the 4th door frame. You can do without it by hanging finished door on hinges attached to the support post. Another option: an outdoor shower can be installed without doors. It is enough to attach a small diameter metal pipe at the top and hang a shower curtain from it.
Water supply
 It is necessary to provide a hole in the roof through which the faucet and watering can are installed. They, in turn, are connected to the tank through a pre-made hole. Filling with water is carried out using a hose with a fastening clamp, which is connected at the other end to the water supply system. You can also fill the tank with water using a well-mounted submersible pump. A more difficult option is to carry water in buckets up the stairs. It is advisable that the container has a lid, otherwise the water in it will become clogged with dust and leaves.
Add to bookmarks
How to make a shower for your dacha yourself?
In the summer, most Russian residents prefer, whenever possible, to leave stuffy city apartments for a dacha, breathe fresh air and enjoy nature. However, the absence of such a familiar convenience for a city dweller as a shower can ruin even the most best vacation In the countryside. Especially after working in the garden on a hot summer day. Therefore, many people decide to install a summer shower on their site. It can be either purchased or made with their own hands. It will not take much time to build it.
A profile pipe is a metal pipe with a square or rectangular cross-section.
To build a summer shower from a profile pipe with your own hands you will need:
- profile pipe;
- iron sheets;
- press washers;
- white, galvanized self-tapping screws;
- welding;
- cement;
- fitting;
- dye;
- awnings;
- wires;
- saw;
- nails;
- hammer.
Where will the future shower be located?
For racks and lintels in the shower, it is better to use a profile pipe with a cross section of 50/50 mm.
It is better to give preference to a place on a small hill. This will ensure good water flow. If there is no such place on your summer cottage, before building a shower, you need to dig drain hole. Once the shower is functioning, it will be too late to drain. Plums are made with a slope concrete screed in relation to the back of the shower cabin or to its center when a sewer drain pipe is installed in the floor. The depth of the drainage hole is usually half a meter. Its walls are lined with stone, and sand and gravel are placed on the bottom. If desired, you can cover the screed with ceramic tiles on top. Typically, the size of a summer shower is approximately 2 meters in height, the base is 1-1.5 meters. A partition is made inside to prevent splashes of water from entering the locker room. You can make a door, or you can limit yourself to a curtain over the doorway, which is used in city baths.
Material for shower construction
For racks and lintels in the shower, it is better to use a profile pipe with a cross section of 50/50 mm. This strength is quite enough to hold a water container with a volume of 200 liters. If you choose a smaller section, the building will not be strong enough. If you lean towards a larger cross-section, then the price will be higher.
The optimal thickness for iron sheets is 0.5 mm.
Scheme for assembling a shower frame from a profile pipe.
If you choose galvanized sheets for the construction of a shower, then you can take sheets with the minimum thickness. They need to be secured with press washers, in increments of 20 cm. Metal sheets can be painted any color. But it’s better to degrease them first. If galvanized sheets are used, it is better not to paint them, as the paint can come off very quickly. The lining of the future shower can also be made from an inch board. It needs to be planed, impregnated with an antiseptic, protective decorative impregnation and stain. Then screw it to the screws.
In the shower, a homemade wooden slatted grate is placed on the floor. When choosing wood, it is better to give preference to aspen or linden. It is better to build it using white galvanized screws. They are less susceptible to corrosion and are quite convenient to assemble.
The door can be made of either wood or metal.
Additional accessories for summer shower
For clothes and towels, several hooks are attached to one of the shower walls in the upper part. At the bottom of the same wall, you can mount a bench at a height of about half a meter from the floor and approximately 15 cm wide.
Inside the shower cabin made of a profile pipe, in the washing area, there are also hooks for washcloths and a shelf for soap and shampoo with a drain hole.
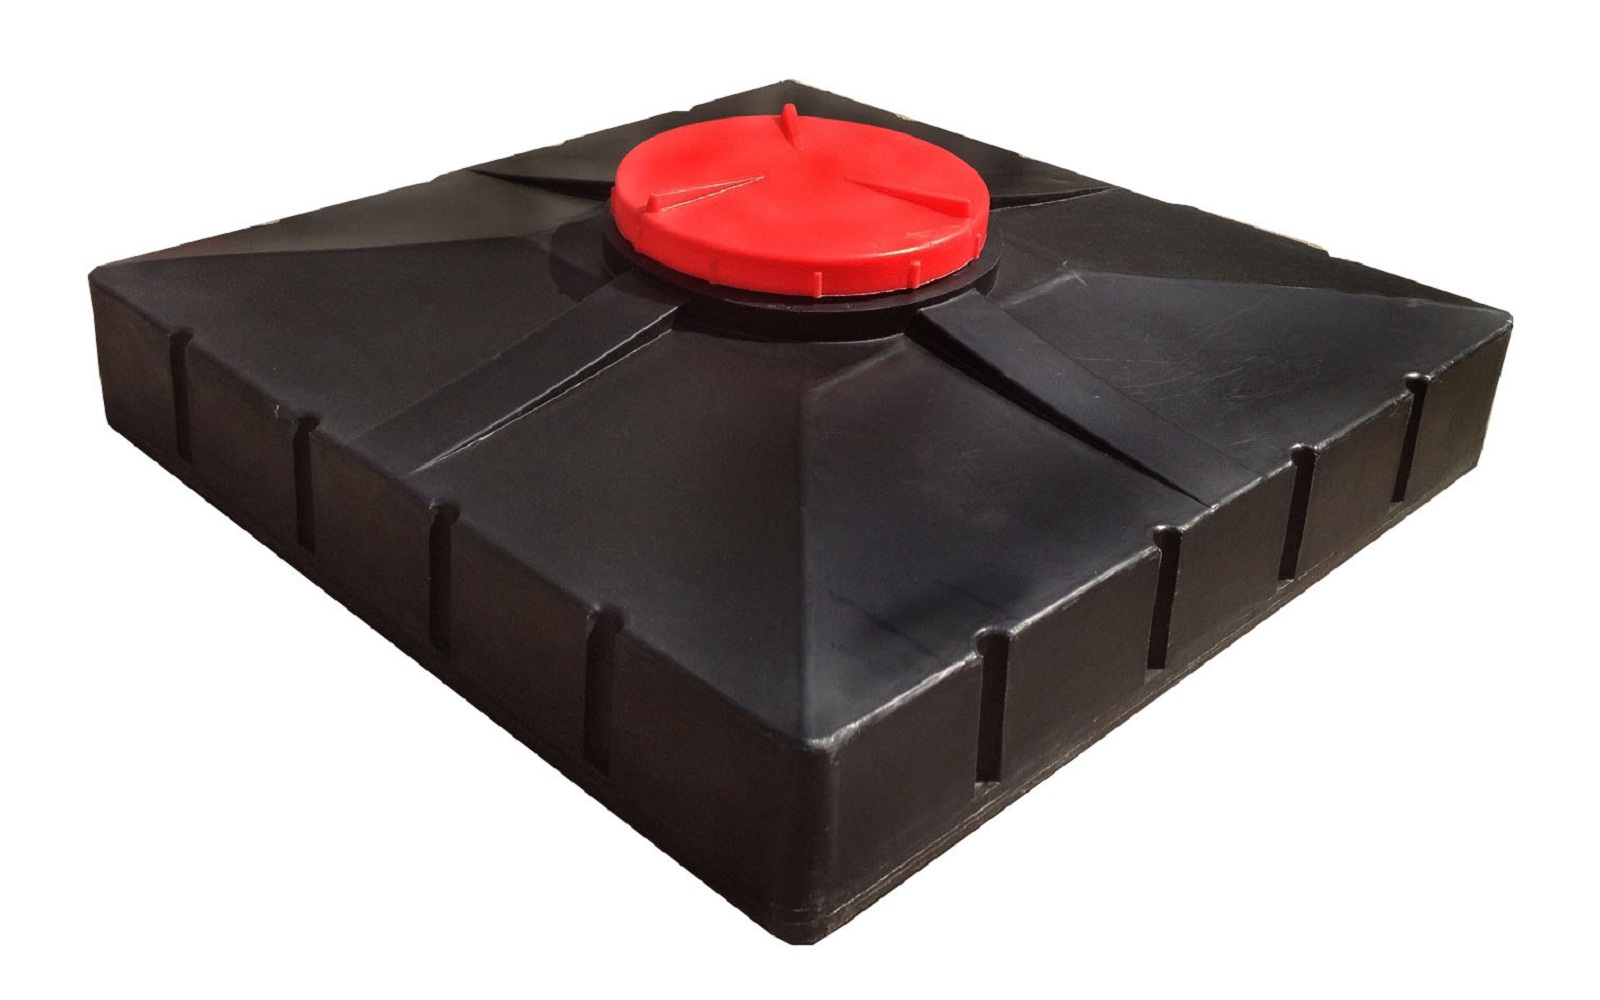
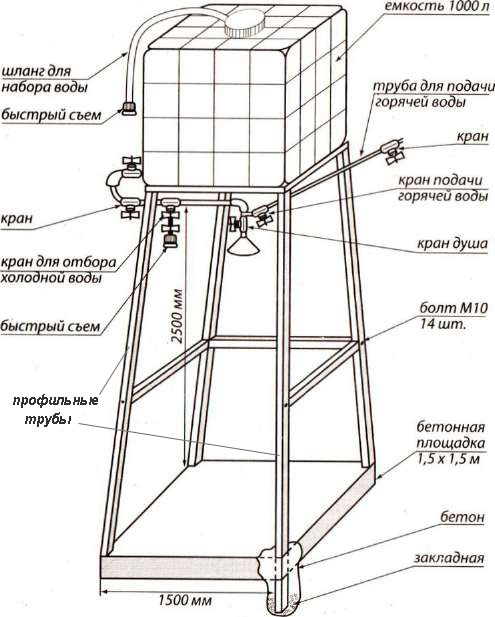
When choosing a container, it is better to give preference to a black tank with a removable lid.
There should be a small space outside the cabin so that a ladder can be placed. You will need it to look inside the barrel and see the amount of water. If water will be poured into the barrel using buckets, then the ladder must be strong. The width of the steps should be at least 10 cm, but it is more convenient and safe to fill the container using a hose or pipes. To do this, you will need to make 3 holes in the barrel with ½-inch fittings. Two of them are placed in the upper part (water is poured through one, water is drained through the other when the barrel is overfilled), and the third is at the bottom. This is done by welding. A funnel is attached to the lower fitting. A shut-off valve is placed between them, which is recommended to be removed for the winter.
With the arrival of the next summer season, many owners of summer cottages and private estates are thinking about building a summer shower. As a rule, for the construction of such a structure you can always find material left over from previously carried out repairs and construction work. The missing building materials for constructing the frame and a plastic container for water can be purchased additionally in specialized stores or markets. Any man who has a little knowledge in construction and knows how to hold a tool in his hands can make a summer shower with his own hands.
There are many options for making a summer shower. One of them is presented in a video that you need to watch to be convinced of your abilities. You can take some ideas on board or completely use the recommendations of the author of the story and build an outdoor shower in one day.
Basic structural elements of a summer shower
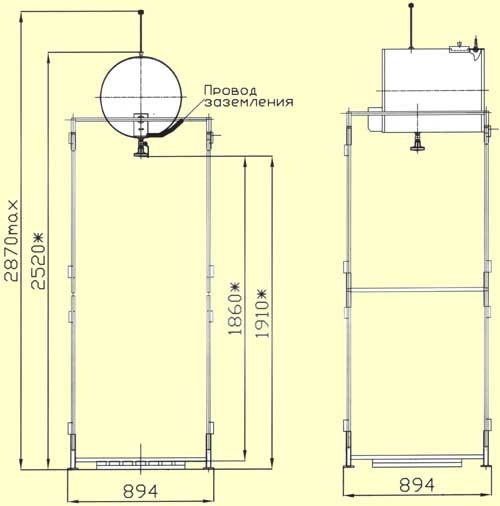
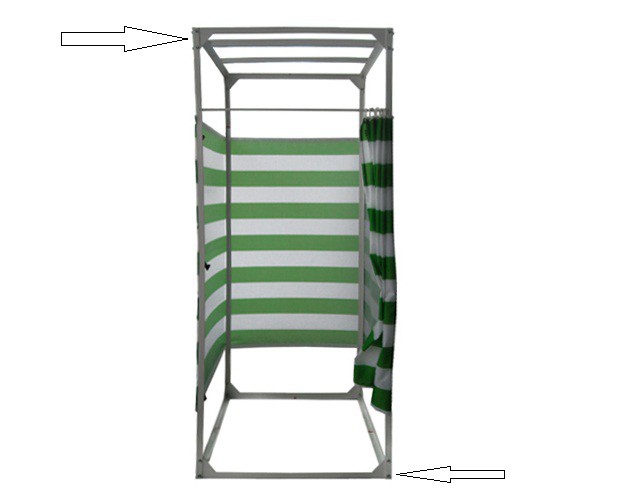
The simplest design of a summer shower consists of a rectangular cabin, the length of the sides of which is selected taking into account the size of the people.
The booth should not be too crowded. Optimal dimensions The cabins are shown in the diagram.
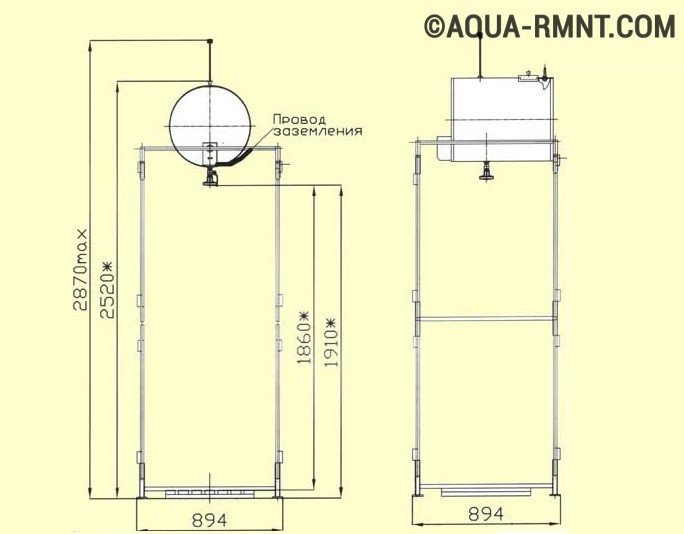
It is necessary to provide extra space, protected from splashing water, in which personal belongings and hygiene items will be placed
As you can see, the width, like the length, of the cabin is 894 mm, the height to the shower head is 1860 mm or 1910 mm. The height of the entire structure, taking into account the water tank located on the roof of the building, is 2520 mm or 2870 mm.
Important! If there is free space on the site, you can increase the width or length of the booth to at least 100 mm in order to slightly expand the usable area of the structure.
How to make a small structure stable?
In order for a frame for a summer shower built from timber to stand stable, it is necessary to place a pile foundation. To do this, use a garden drill to dig holes in the ground to a depth of a meter and a half and lower pipes there so that their ends stick out 25-30 cm above the ground surface. Asbestos-cement pipes with a diameter of 100 mm can be used as piles. Metal pipes of the appropriate diameter are also suitable for the foundation.
Important! In order for the frame to withstand the weight of a tank filled with water, it is necessary to take a 100 by 100 mm beam for its construction. Wooden frame It will last longer if it is impregnated with special water-repellent agents.
A well-hewn beam is installed on the foundation, and they begin to bandage the pillars, starting from the top. In this case, the frame, of course, is assembled on the ground, and then secured to the posts using bolts of sufficient length. Afterwards, the dressing is performed inside the frame of the shower stall. In this case, the lower dressing will be used as a log for installing a floor in a summer shower. Previously, the floor in the summer shower was made of boards, between which wide gaps were left for water drainage. Now, along with this option, they use the installation of a tray, from which water is drained onto the grass using a hose. Adjacent pillars are fastened with bevels - rigid elements that are not installed in the overlay.
Installation of a septic tank for collecting wastewater
When planning to install a summer shower in a country house with a septic tank for collecting wastewater, you must remember that it cannot be placed directly under the cabin. If you ignore this recommendation, an unpleasant, rather specific smell may appear in the shower stall. In addition, more serious problems may arise associated with the destruction of the soil and foundation. Therefore, the septic tank is located a few meters from the installation site of the shower stall. Discharged to a septic tank drain pipe or a drainage ditch, which is equipped with waterproof material (roofing felt, PVC film, hydroglass insulation).
What materials are used for finishing?
For one season, you can cover the frame with opaque plastic film. However, this is a very budget option.
Typically the frame is sheathed with one of the following materials:
- moisture-resistant plywood;
- slate sheets, both wave and flat;
- clapboard;
- siding;
professional sheet, etc.
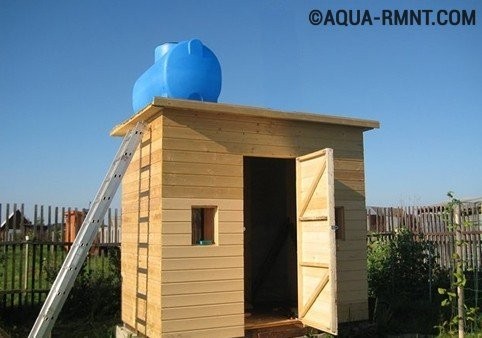
Any man can make a summer shower at the dacha with his own hands and install a container on the roof to heat water
Important! To maintain the unity of style in the design of a dacha or personal plot It is recommended to sheathe a homemade summer shower with the materials that have already been used in nearby buildings.
Instead of a door, you can use a waterproof curtain that can be easily moved to the side after finishing water procedures. However wooden doors give the structure a more aesthetic and reliable appearance. You can close yourself and take a shower in peace, without worrying that someone will accidentally or deliberately disturb the ritual.
How to properly attach a watering can?
A barrel or other container for water is installed on the roof of the summer shower. For better and faster heating of water by sunlight, it is recommended to paint the surface of the tank black. The container is filled with water manually or using a pump. At the same time, a plumbing valve is installed that allows you to turn off the water in time after the barrel is completely filled.
A pipe with a tap and a watering can is removed from the container, which has a special hole. If there is no hole in the barrel, then make one and insert a pipe with a shower horn at the end. The flow of water is regulated using a tap or a special foot device, which allows you to economically use water heated by the sun.
Important! In order not to depend on weather conditions and the number of sunny days per month, you can build a summer shower with heated water. An electric heater is used for this.
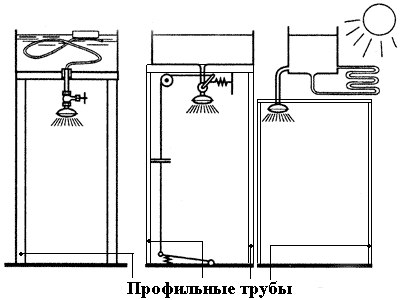
When we build a summer shower in the country, we use the following tricks:

Some tricks for creating a summer shower at the dacha with your own hands
- a) The float intake allows you to use warm water from the top layer, which is most heated by the sun.
- b) Foot-operated faucet, which allows you to save water. The line from the foot pedal passes through the block and is connected to the release spring and to the tap, the opening angle of which is 90°.
- c) An improved scheme for connecting the heater to the tank, facilitating uniform heating of the water by the sun.
You see, building a summer shower with your own hands is really not that difficult. To a great desire, you need to add a little imagination and spend a little time to implement your plan.