Asian tandoor is an oven of remarkable qualities. You can cook everything that you love so much in it: barbecue, poultry, fish, flatbread, samsa, belyashi, as well as all kinds of dishes from mushrooms and vegetables.
In order to enjoy oriental cuisine, it is not necessary to buy an expensive brazier in the store, look for a craftsman or build a bulky stationary structure Location on.
From our article you will learn how to make a portable tandoor with your own hands. You can use it anywhere: at the dacha, picnic, halt while traveling, by car.
The press release was prepared by the Shelkoviyput.ru website - a store of real Uzbek tandoors and accessories.
Five reasons to get a portable tandoor
Unfortunately, portable tandoors have two disadvantages:- the walls are not thick enough, so the oven cools down in 3-4 hours. However, for hiking option this is not such a terrible drawback;
- limited functionality. Due to the small size of the brazier, you can only cook kebabs and pastries in it.
How to make a portable tandoor with your own hands?
The easiest option for a homemade portable brazier is from three terracotta pots of different sizes. For convenience, we denote them by numbers: large will be (1), medium (2) and small (3). In addition to them, you will need a steel disk with a hole in the middle (for example, from a dumbbell or barbell), small pebbles such as gravel, a hacksaw.- First place the pot (1) on the ground. He must stand straight.
- Place a pot (3) in the bottom of which holes are made. If they are initially missing, drill them with a drill.
- Place a metal disc into the pot (3). This is the future furnace. Try to loosen the resulting design. If she "dances", then you should take a heavier disk.
- Saw off the bottom of the pot (2) with a hacksaw. Just do not throw it away or break it, it will be a lid.
- Turn the pot (2) upside down and place it evenly in the pot (1).
- If you did everything correctly, there will be free space between the walls of the pots (1) and (2). It needs to be filled with stones.

Do-it-yourself tandoor stand
The oven, although it is considered mobile, still weighs decently. In order not to tear your back, make a tandoor on wheels.- Weld the steel frame and wheel axles if you don't have a base ready.
- Lay in the frame cement mortar bricks and let dry.
- Put on the wheels. Since the weight is large, the wheels should only be metal with a rubber coating.
Installing a tandoor on the street: what rules do you need to know?
The platform for the tandoor must be perfectly flat and have a refractory coating. It is advisable to lay it out of brick or tile in advance. If you have a parking space equipped, then a portable brazier can be installed there.To avoid fire, follow the safety rules:
- Clear the site of dry foliage, flammable debris.
- Gas pipes and electrical wiring should be far enough away.
- The distance between the stove, trees, shrubs, wooden buildings and living quarters should be at least 7-10 meters.
In the East, it is customary to place a tandoor in the eastern part of the site, but, of course, it is not necessary to follow this rule, the main thing is that it is convenient and safe to use it.
Tandoor do it yourself. Step by step instructions with photo
It is not an easy task to create a miracle oven called tandoor, common in Asia, in your yard or on a site. But if you follow step by step detailed instructions, then you will get a reliable and durable unit.
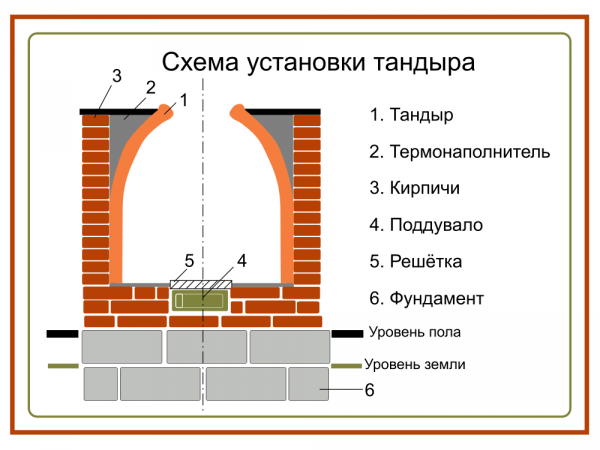
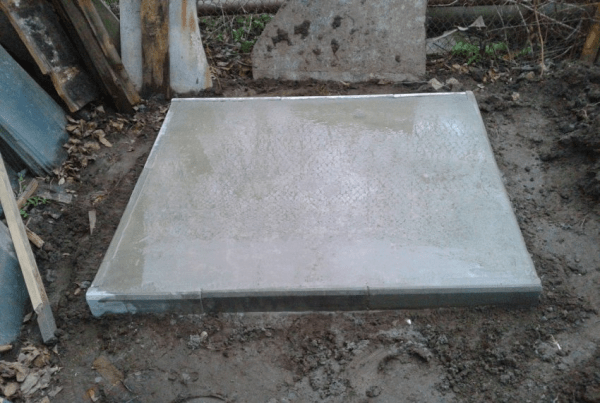
Laying the foundation, like foundations.
The first step is to dig a hole for the foundation of a small depth. The finished pit is filled with 10 cm of sand, which will retain the heat. A metal mesh is installed on top of the sand, which will need to be poured with concrete. The concrete surface is leveled and checked building level.
Advice! Carry out the first stage in advance, since it will take about a week for the concrete to completely harden and gain strength.
The construction of the walls of the tandoor
To build walls for you you will need a large sandstone stone, an arch-blower, roofing material and cement. You can build a tandoor with your own hands from brick or other stone of your choice.
From roofing felt several rectangular pieces are cut out and attached to cement, forming a circle, as in the photo;

Ready-made is attached to the cement arch;

Arm yourself with a spatula and start laying on the cement in a circle stones;

Check with construction level uniformity of upper sandstone stones. If necessary, level with cement;

how to make a tandoor with your own hands from brick. Photo
When laying between some stones, place pieces wire. They will help in the future to better hold expanded clay with cement.
Lining from the inside:
Dilute in a separate container expanded clay With cement in a ratio of one to one;

Take a leaf roofing felt or PVC 5 mm thick and the same height as your future oven. Roll it into a cylinder, secure it with tape and place it inside the oven;

The radius of the cylinder must be significantly smaller than the radius of the furnace in order to have a distance between them;

Fill temporarily the cylinder stones that they keep his form;

Start pouring the empty space between the walls of the cylinder and the furnace prepared cement-claydite mixture;

After it dries, first remove the stones, and then the cylinder itself from the structure;

If necessary, trim the surface of the walls inside with a spatula or trowel;
Build a small ledge in a circle at the bottom of the tandoor, avoiding the place near the arch. Pay attention to the photo, bricks are used there as a temporary support for the tape holding the mixture;

Install the plate from marble over the walls.

Clay cover:
Clay, straw and sand are mixed in equal parts.

Advice! Chamotte clay is perfect for finishing a home tandoor.

With the finished mixture 3-5 cm thick, you need to evenly cover the entire inner surface until it becomes smooth;


It is necessary to wait for the clay to dry completely naturally or help it with a lamp, a fan.


Closing holes
Buy a metal door for the arch and a cover for the top opening.


tandoor in the country with their own hands. Photo

Checking the oven in operation
Do-it-yourself tandoor is ready. Throw in some firewood to check if the stove is working. The temperature will quickly reach 111°C. If you add more firewood, the temperature will rise to 345°C and higher, which will allow you to cook your favorite dishes in the brand new oven.


Brick tandoor for giving. Master Class
There are many ways to create a tandoor in the country with your own hands. Basically, all tandoor ovens are vase-shaped. They are built from various materials, they have distinct designs. Unites them all ability long time keep warm inside, which makes it possible to cook delicious food. Those who have ever tried delicious dishes piping hot, I'm interested in the question of how to make a tandoor with your own hands from brick.

The task before those who wish will appear difficult, but doable. The drawings of the tandoor will help to better understand the essence of the design.
You will need:
- Natural stone (you can take raw);
- Chamotte clay;
- Refractory brick;
- Finished reinforced concrete slab for foundation or cement;
- Metal pipe and cap.

do-it-yourself tandoor drawings. Photo
Step 1. Foundation
A round pit is preliminarily dug, the diameter of which will be equal to the value future furnace. Laid in a hole reinforced concrete slab.


Advice! If you decide to pour the foundation yourself, then place a steel grate at the bottom of the pit. When you pour the cement, it will give additional reinforcement to the future foundation.
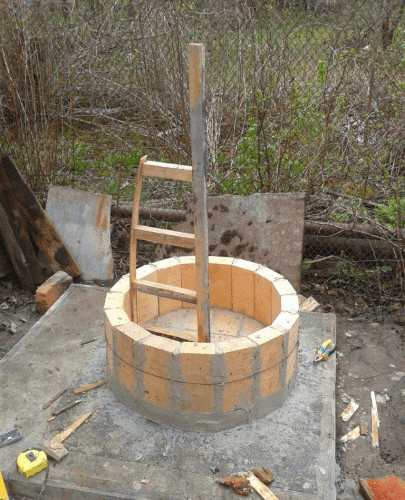
Step 2 Walls
While the foundation hardens, and this is from 1 to 2 weeks, you can start creating wooden template for the walls of the tadyr.
Important! The template is wooden frame, which is temporarily attached in the middle of the structure and, when rotated, exactly repeats the shape of the planned furnace.
Wall laying is carried out in a circle. Bricks are laid out in a vertical position. After completing the first row, it is necessary to fix the pipe that will regulate the movement of air.

how to make a tandoor with your own hands. Photo step by step


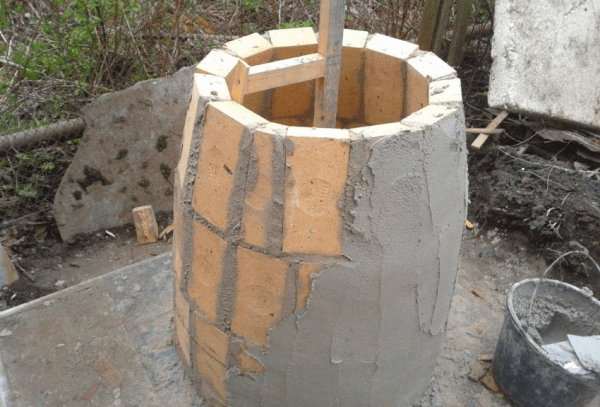
Advice! To make the tandoor with your own hands a tapering shape, when laying each layer, place the bricks at an angle. This can be done by adjusting the thickness of the cement layers.
Step 3. Covering with clay
When the brick tandoor has reached the height you need, it's time to move on to the next step. Replace the solution of clay and sand in a ratio of 4 to 1 in the container and add a pack of salt to it. Carefully outside and inside the future oven must be lubricated with a clay consistency.

Advice! It is better to wait not only for the complete drying of the clay, but also to burn it. Put firewood inside the stove and just fire it up.
Step 4. Facing
To improve appearance and thermal insulation properties tandoor is lined on the outside natural stone. Cover the finished structure with a pre-purchased lid. The oven is ready for use.


how to make a tandoor with your own hands. Video step by step
Do-it-yourself large stationary brick tandoor
If a small, budget do-it-yourself tandoor is not for you, then pay attention to the example of a massive oven. Brick is already very familiar as the main material, but the design is not so ordinary.

Advice! When designing such a tandoor, be prepared for high costs of materials, and during operation - fuel.
You will learn how to build a tandoor with your own hands by studying the following steps.
The basis for the construction of the tandoor was chosen concrete pad. Since the furnace is quite large, which means it will give more heat, there is no need to heat the entire foundation with it. To do this, the bottom of the oven is laid out refractory brick.

To make the walls even, a homemade plywood template on the axle.

The first layer of brick is laid out in such a way as to place a special blew.

The inner wall is laid out in layers in half a brick.

When the design is completely dry, it must be wrapped basalt wool in 2 layers and proceed to the outer masonry.

Can be placed on the neck metal corners, which will serve as nests for skewers and other devices during cooking.

The builder of the oven in the photo used an ordinary one as a lid for the tandoor manhole . You can repeat after him, or you can purchase a lighter cover that will simplify the operation of the oven.

Thanks to its even masonry, such a brick tandoor can look beautiful and dignified even without exterior finish. And thanks to its size, it is possible to cook even the largest dishes in it.
DIY brick tandoor on a mobile platform
An excellent option for giving would be a do-it-yourself tandoor made of bricks on a mobile basis. Its design is not a large number of materials, but in shape it will look like any massive tandoor. Its walls are a quarter of a brick thick. And the entire height will be only 3 bricks. You should first purchase a metal platform with wheels or attach them yourself.
Brick rows, as they are laid, must be tied with wire, and then covered with a pre-made clay mixture. Chamotte clay - best material for these purposes.
Do-it-yourself tandoor oven is compact and convenient. But some dishes can not be cooked in it because of its size.
how to make a tandoor with your own hands. Video
Do-it-yourself earthen tandoor
With construction different types you are already familiar with the tandoor, but you just have to find out how to make a tandoor with your own hands from brick underground. The advantages of such a furnace include the possibility of using improvised materials, as well as saving space.
To build his underground tandoor, the master used:
- Red brick;
- red clay;
- Neck from a large ceramic container;
- Lid
- Convenient place to park your car.
Step 1. First of all, you need to dig pit about 1 meter deep. Such a do-it-yourself tandoor oven without fail needs a pipe through which air will flow. For the pipe you need to dig channel inclined.

Step 2. For laying the bottom is used brick. The seams are filled with ordinary clay.

Step 3 Pipe should be of such length that it reaches from the bottom to the surface of the earth. It must be installed at a 45° angle.

Step 4. Laying out the walls is carried out bricks upright. In the first row, which took 24 bricks, no bonding mortar is needed. The diameter of the future tandoor is approximately 50 cm. In total, 3 rows of vertically placed bricks should be obtained.

Step 5. All seams should be carefully sealed. clay.

Step 6. Go to cooking clay mixture. To do this, dilute the clay with water to a creamy consistency and hang it to be filtered through a special plaster mesh. Leave the clay for 1 day to infuse and separate from the water.

Step 7. The internal surfaces of the future furnace are covered with ready-mixed clay through a plaster mesh with fiberglass. The thickness of the clay layer turned out to be 1 cm.

Step 8. To create throat the master approached creatively. He carved the bottom of a large flat clay vase and used the container in construction.

Step 9. The vase is installed on the brickwork upside down. To fix it, you need to carefully coat it with clay.

Step 10 Cast Iron or Other lid, which you can find in your arsenal, will be able to close the brick tandoor.

Step 11. To secure the entire structure, the free space around the vase is filled up. expanded clay. And the protruding part of the furnace is coated with cement.

Step 12. To recreate the integrity of the floor, the place around the tandoor is poured concrete, and then put tile.

Do-it-yourself tandoor in the parking space is ready.

Do-it-yourself tandoor, a budget option
If you decide to build a tandoor in the country with your own hands and do not want to invest a lot of money in it, then pay attention to the following example.

First of all, an Asian oven needs a quality foundation. The standard for it is 100 * 100 cm. The thickness of the plate is 10 cm. It is necessary to dig a hole 15 cm deep. Use sand at the bottom, and fix a reinforcing mesh at a distance of 5 cm from it. For formwork, 15 cm roofing boards were taken (10 cm should remain in the ground, and 5 should rise above the ground). Concrete is poured only when everything is level. It will take at least 72 hours to dry.

For the base and walls was chosen refractory brick.
Important! Fireclay brick is ideal for tandoor, as it is not affected by temperature changes and does not collapse.
The base of the oven will be round, so you will need blueprints tandoor to cut a pattern 75 cm in diameter.
Advice! Extra parts of the bricks for the circle can be removed with a cutting wheel.
Brick is laid on the roofing material and fastened to the refractory furnace mix.

To make the walls smooth and beautiful, you will need a template for their construction.
Important! According to the rules, the tandoor has a height equal to the width of the base, and its neck should occupy 2/3 of the size of the base.
Brick laying is carried out in a vertical position. All seams are coated with a solution. The first row is stretched wire.

The second and third row are laid out similarly. Inside, the edges should fit as tightly as possible, and on the outside they should be carefully smeared with a solution.

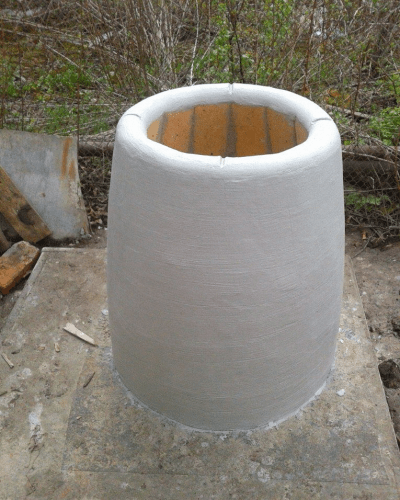
DIY tandoor a budget option. Photo

The finished barrel is plastered outside furnace mixture. The layer should be 1 cm.

Advice! While the budget tandoor is drying with your own hands, cover it from exposure to the sun or bad weather.
When the solution is completely dry, the tandoor is covered with a refractory acrylic paint.

It remains to clean the finished oven inside from dirt after construction and dust and use it for your own pleasure.


Anyone who likes to relax in the country cannot but love barbecue. What could be tastier than meat roasted on coals, poured with fragrant sauce, and flavored with a pinch of oriental spices? The answer is simple - only meat baked in a brick tandoor.
A brick tandoor is a Turkish oven that allows you to cook simply incredible kebabs. The secret is that the meat is baked as evenly as possible. A similar effect can be achieved due to the balanced distribution of heat.
You, probably, more than once had to deal with a situation when some pieces in a barbecue were fried to a black crust, while others were almost raw. The fact is that the coals under the skewers are located unevenly and, moreover, have different temperature. The result of such baking is obvious.
A completely different thing is a brick tandoor. The unique design of the oven allows you to forget about undercooked meat. Each piece will be exceptionally tasty and crispy. Moreover, in the tandoor you can not only bake lamb, veal or pork. You can make delicious oriental cakes in it. Which will not only pamper your family and friends with exquisite taste, but will also be beneficial to health.
What is a tandoor

This oven is similar to most structures of this type, but has some differences. main material inner surface is ceramics. Coal, brushwood or wood can be used as fuel.
In my own way appearance tandoor made of bricks, reminiscent of an earthenware jug lined with bricks. The fuel is placed directly inside and ignited. As soon as the tree turns into coals, kebabs are laid inside the tandoor. They can be placed with a sharp end on the foundation or hung by a hook on a prepared perch.
Important ! The indisputable advantage of a brick tandoor is the long-term preservation of heat. This allows you to make more than one batch of delicious baked meat.
This stove came to us from distant Mesopotamia and later became extremely popular among the peoples of Asia. As a result, many oriental cuisines are hard to imagine without this miracle machine.
How does it work

Consider an example of a classic Uzbek brick tandoor. In appearance, such a furnace can be compared with a clay cauldron. That's just it turned upside down, changing the bottom and top places.
At the bottom there is a special hole, it is also called blowing. The clay base is traditionally lined with bricks. A small layer of air forms between the clay base and the brick. It must be filled with salt or sand. The first option is preferable.
Coal is placed inside through the top hole. There are also variants of a brick tandoor with a side hole, but in the traditional Uzbek version, this design is practically not used.

Important ! Do-it-yourself brick tandoor has one significant drawback. Ash has to be removed through the top hole, and this is not very convenient ( portable structures it does not apply).
For greater convenience of cooking barbecue in the Uzbek version, there is a special grill. Of course, you can just as well put vegetables or pieces of fish on it. Equally good baking is guaranteed.
Attention ! If you make a brick tandoor with your own hands, then you can cook food in it for 6 hours after one kindling.
The secret of such incredible heat-saving characteristics lies in the materials used to create the structure. All of them have phenomenal properties for the accumulation of heat. With due diligence, the oven walls can be heated up to 400 degrees Celsius.
If you are cooking cakes, not meat, the walls will first need to be cleaned of soot and ash that could have accumulated from previous kindling sessions. It is in a brick tandoor that you can cook Uzbek flatbreads that are so popular now.
Types of tandoor

The type of tandoor primarily depends on the place of its installation. Depending on this parameter, the following varieties are distinguished:
- pit tandoor,
- portable tandoor,
- ground tandoor.
We will consider the process of building a ground-based brick tandoor. The fact is that the pit tandoor is mainly used for space heating, and the portable one is a kind of variation of the usual barbecue.
Step-by-step instructions for building a tandoor
Preparation

Any important project begins with preparation. Of course, from the point of view of building science, a brick tandoor cannot be called a complex structure. However, to create a durable and easy-to-use oven, you need to carefully prepare.
The preparatory process begins with the collection the right materials. Since there are several brick tandoor designs, the basic set can be very different. In our case, it includes:
- one hundred and fifty kilograms of sand and gravel;
- cellular grid (each cell 5 cm) - two square meters;
- six or seven kilograms of cement M40050;
- asbestos fiber - six kilograms;
- fireclay bricks 50-70 pieces;
- refractory paint 1 liter;
- fiberglass reinforcement of six millimeters in cross section (at least 15 meters);
- refractory mixture for masonry - 20 kilograms;
- steel wire with a cross section of 3 millimeters -15 meters.
When the entire set of materials for creating a furnace is assembled, you need to take care of a set of tools. Most of them can be found in the back room of any country house, but some will still have to be purchased. To build a brick tandoor with your own hands, you will need:
- plaster rule,
- a container in which concrete will be mixed,
- putty knife,
- Bulgarian,
- diamond wheels for ceramic work,
- paint brush.
As you can see the list necessary tools not very long. Assembling this kit is not difficult.
Foundation
The brick tandoor will work in the open air. Therefore, he needs a reliable foundation that can provide a stable position for the structure. A lot depends on the soil on which the building will be built. If the soil is clayey, you will need a reinforced foundation.
The best option for working on heavy soils is a columnar foundation. If the soil is light and consists mainly of sand, just cast a monolithic concrete slab. This will be more than enough.
The area of the brick tandoor will be 100 by 100 centimeters. To withstand such a design, the thickness of the plate must be at least 10 centimeters. Along the entire perimeter of the foundation, you need to remove the soil 15 cm deep.
Important ! In the corners of the future plate, you need to make recesses of 70-90 cm. Their diameter should be no more than 12-15 cm.
After the holes in the corners are drilled, it is necessary to reinforce them. Here we need a diameter of six millimeters. At the end steel structures filled with concrete.
The recipe for creating concrete of the desired consistency is as follows: take three parts of sand, pour one part of gravel (fraction size up to 1 cm) and the same amount of cement with a grade of no worse than PC 400. As a result, the batch will resemble thick gray sour cream.

It is very important to correctly calculate the amount of solution needed for pouring. It is best to focus on the pit. To prevent discrepancies in levels, use formwork. Lay it at the bottom of the pit five centimeters high. To avoid wasting time slicing wooden structures take tare tape.
At the bottom of the pit you need to pour sand. The height of the layer cannot exceed the height of the formwork. Sand is watered. This prevents the formation of cavities. Only then can the formwork be laid for monolithic slab.
Important ! The layer of sand in the foundation plays the role of a damper cushion.
Do-it-yourself formwork for a monolithic slab under a brick tandoor is best made from ordinary roofing boards. Their width should be exactly 15 centimeters, ten of which are buried in the ground, and only five rise above it. A reinforcing mesh is laid on the sand.
Important ! Before pouring concrete, everything must be leveled with a level.
The concrete setting time is at least 72 hours. Ideally, you should wait seven days before installing the tandoor oven on a new foundation. If the pouring takes place in the summer, then the foundation must be moistened with water from time to time to prevent drying out and, as a result, the formation of cracks and chips.
Base

For the base you need fireclay bricks. Please note that the combustion temperature of coal is very high and ordinary red fired clay blocks may simply not withstand such a load.
Fireclay bricks not only have outstanding refractory properties, they also do not absorb moisture and are dense enough to support the weight of a tandoor.
Another important advantage of fireclay bricks is its resistance to temperature extremes. That is why it is ideal for creating an outdoor tandoor oven. Such a brick perfectly tolerates frosts and does not crack with the advent of warming.

The base of the furnace must be made in the shape of a circle. To do this, take a suitable template and outline it with chalk. The diameter of the pattern is exactly 75 centimeters. Lay out the bricks in order. And only at the end, using a cutting wheel, cut off unnecessary parts and corners, forming an ideal base.
Attention ! On concrete base necessary to put the roofing material. It will provide reliable waterproofing.
Take a refractory kiln mixture for fireclay bricks and mix it thoroughly. Then, using a spatula, apply it to the roofing material.
rule
The rule for masonry is made with the expectation that the base of the brick tandoor should correspond to its height. The ratio of the neck to the base is 1/3. To assemble the rule, you will need a pole at least one meter high. Base length 30 cm.
Attention ! The step between the guides should be 25 centimeters.
To make a pattern, take a piece of plywood. Ideal bed slat. The part on which the mattress is laid.
We make the walls of the tandoor
Bricks must be laid vertically. Therefore, you need to spend a sufficient amount of mortar so that the structural elements are firmly held together. The inner edges of the tandoor bricks should go close to each other.
Important ! All seams must be carefully coated with a solution.
The first row of brick tandoor is pulled together with steel wire. After the structure is fastened, the ends of the wire are twisted and hidden in one of the seams. Do the same with the second and third row.
In the second row of a do-it-yourself brick tandoor, the bricks are cut into a wedge. In this case, the inner faces are stacked as tightly as possible, the outer ones, in turn, are carefully smeared with a solution.
After the construction of the main brick tandoor structure is completed, you can start plastering. To do this, you will need a special oven mixture. Its thickness should not be less than 10 mm. The top edge is made in the form of a roller.
Wait for the layer of plaster to dry. For this entire period, the brick tandoor is covered with a cellophane film. This precaution is necessary to protect the structure from harmful external factors such as rain and direct sunlight.
Important ! Excessive heat can harm an unfinished brick tandoor just as much as high humidity.
After the plaster has hardened, it will be necessary to cover the surface with acrylic fireproof paint. You can also use whitewash. Before use, it is necessary to clean the interior of the brick tandoor from dirt and sagging. For this work, a special broom is ideal.
Unlike the traditional country house hearths of barbecue and barbecue tandoor made of bricks with your own hands allows you to additionally bake cakes, boil water or cook pilaf in a cauldron without accessories. It has the shape of a cylinder, ideally a barrel or a large jug.
The main advantage is the high efficiency from fuel combustion, high temperature regime product processing and high service life. However, the unusual placement of kebabs (vertically, not horizontally) did not allow this hearth to gain sufficient rating, like a barbecue and barbecue.
To build a tandoor with your own hands on the site, you need to know what kind of dishes this hearth is intended for, the temperature regime and design features. There are tandoors buried in the ground and structures raised above the surface. 
Depending on qualification home master and the presence of a power tool in its arsenal, a cylindrical “barrel” or a jug-shaped structure is being built. Usually they choose a simpler version of the classic barrel with arched sides.
Assortment of dishes
The main task of the outdoor hearth is to prepare meals during the reception of guests or family vacation on suburban area. However, the tandoor is quite suitable for regular baking of bread / cakes, cooking mass dishes, side dishes, boiling water. Therefore, it is considered a full-fledged summer kitchen.
Information on how to build a brick tandoor in the yard should begin with an assortment of dishes:
- cakes - require the skill of fixing the formed dough on the inner surface of the hearth;
- shish kebab - skewers are arranged vertically in a circle, so special devices are needed to fix them in a “pot” or “barrel”;
- barbecue - by analogy with the previous dish, the grate somehow needs to be placed in the “well”, and then safely removed without getting burned;
- first courses - cooked in a large cauldron, mounted on the neck of the tandoor;
- barbecue, roast - are also prepared in a cauldron in a similar way.

If necessary, you can boil water for tea in a large pot on this hearth.
Temperature regime
Using different sizes and the shape of the inner surface of the hearth, it is possible to provide a temperature inside it of 250 - 400 degrees, which is unattainable for barbecues and barbecues by default due to significant heat losses.
Initially, the earthen tandoor looked like a pit, in which firewood turned into coals, and the wind could not blow out the flame. Then the walls began to be made of clay, which turns into ceramics during high-temperature firing.
There are vertical and horizontal tandoors, however, it is the first designs that are considered multifunctional. The horizontal hearth-barrel is more suitable for industrial baking of cakes.
External and internal dimensions
For the above reasons, the construction of a tandoor should take into account the following factors:
- ease of maintenance - firewood and products are loaded inside, and the ash is taken out through the same neck;
- dimensions - the standard for the tandoor is 1 - 1.5 m in height, 1 m in diameter in the middle part of the barrel and a hatch 0.4 - 0.6 m in diameter, reinforced with a metal ring.

To preserve heat and increase efficiency, additional masonry is usually erected around the tandoor (a well or a square of 4 walls), the space between them is filled with refractory material (expanded clay, slag).
The quality of the combustion process can be improved by a blower from below, and operation by a chimney on the side and an ash chamber under the grate (only for ground structures of the tandoor). From bad weather, the neck is closed with a sealed lid. 
Even with the occasional use of the hearth, extreme temperatures affect the brick. Therefore, it is better to use refractory fireclay, and outdoor structure made of ordinary or facing ceramic bricks.
Brick tandoor technology step by step
Any brick structure erected on the ground is subject to the forces of frost swelling and shrinkage, since it has a solid weight and is made of small-format structural elements. Therefore, the brick tandoor must be based on an individual monolithic slab foundation.
There are several masonry options, each will be discussed in detail below. Then, internal walls structures are necessarily coated with clay. Outside, it is also better to plaster the tandoor with clay and fill up the space between the decorative outer masonry and the refractory material that is not subject to frost heaving. Therefore, clay is not suitable for this, slag or expanded clay of a fine fraction (sand) is used. ![]()
The tandoor is decorated at the discretion of the owner. If necessary, a chimney, a cutting table, a washbasin / sink are attached to the hearth, the structure is equipped with a canopy from the weather.
With an uneven increase in the volume of clay soil, which has absorbed moisture in autumn, frozen at negative temperatures, the masonry will inevitably crack. In addition, organic matter in the fertile layer of chernozem / gray soil will rot under it, the heavy structure will sag. Therefore, the foundation of the tandoor is made according to the technology:
- soil extraction - the topsoil is removed entirely (usually 0.4 - 0.6 m deep), can be used in landscape design or in beds, ideally it is better to dig a pit 20 cm more along the perimeter of the outer masonry to a depth of 0.6 m;
- separating layer - the bottom of the pit is lined with geotextile, which prevents the mutual mixing of soil with non-metallic material poured on top of it;
- the underlying layer is a “foundation cushion” of a layer of crushed stone with a fraction of 5–20 mm, each 10–15 cm layer is compacted with a manual rammer or vibrating plate;
- waterproofing - crushed stone is leveled with a thin layer of sand, on which a waterproofing membrane or pieces of rolled bituminous material are laid in one layer with an overlap of 10 cm along the edges of the sheets;
- reinforcement - since the structure is mounted on a shallow foundation and has a large weight, two lattice reinforcing belts made of bars of a periodic section ("corrugated") with a diameter of 6 mm, a cell of 20 x 20 cm should be used;
- concreting - a layer thickness of 8 - 15 cm, depending on the budget, the formwork should be 10 cm higher than the concrete mirror so that the structural material does not spill over the edge when compacted with a deep vibrator or a piece of reinforcement;
- concrete care - the surface is covered with a polyethylene film or sawdust / matting, periodically moistened from a watering can for at least two days.

Attention: To provide a protective layer of reinforcement, the lower grating is laid on waterproofing, on polymer or concrete pads 2–4 cm high. It is forbidden to use trimmings of reinforcement and pieces of crushed stone.
If the external decorative masonry is designed in the form of a square, the classic panel formwork is used on 4 sides. For masonry of an annular shape and a foundation under it of a similar configuration, the boards will not work. Therefore, the formwork is constructed from thick fiberboard or sheet steel strips.
To increase the operational life of the masonry, it is better to raise the upper edge of the foundation above ground level by at least 5-10 cm.
Brickwork
The main mistake of the home master is the manufacture of the annular first row of the tandoor for the following reasons:
- the foundation, in principle, is not intended for high-temperature exposure;
- making refractory concrete at home is very difficult and not economically feasible;
- therefore, the annular masonry of the first row should be filled with bricks entirely, and the seams should be clogged with masonry mortar;
- “Under” brick ovens will last much longer than concrete, it is easier to remove accumulated ash from it.

Depending on the budget of the home master and the skills of the mason, masonry is carried out in several ways using various devices. Regardless of this, an opening is left in the second row for the ash pan door, through which the corresponding combustion products will be removed. The “blower” hole is located a little higher, but under the grate of the grate. The metal hoop is mounted on the neck of the last row of masonry.
First, the tandoor itself is laid out, then erected decorative wall of the required configuration, expanded clay sand or slag is poured between the two structures.
Attention: Instead of a cement-sand masonry mortar, it is better to use special mixtures for furnaces or clay packaged in bags containing special additives to increase plasticity.
Cylinder
The easiest way to make a tandoor is in the form of a cylindrical well. However, with a diameter of 1 m, a whole brick with a spoon is unsuitable for this. It will be difficult to cover the inner surface with clay, which is later fired to the state of ceramics. When laying with a poke, the material will take twice as much, which is very expensive for the construction budget. 
Therefore, a brick split in half or its vertical installation spoon, poke. hearth cylindrical shape easier to maintain, but the heat in it is retained worse.
Barrel
It is more difficult to make a brick tandoor in the shape of a classic barrel with convex sides, narrowing at the bottom and top. But the temperature inside such a hearth is higher, it lasts longer, the internal volume and the area of \u200b\u200bthe walls for attaching the cakes increase. 
The arched shape of the vertical walls of the tandoor is considered more durable, which allows to increase the operational life of the structure. For laying furnaces of a similar configuration, the use of devices is recommended, since it is impossible to control the arc with a plumb line and a rule.
For a home craftsman, it is recommended to pay attention to the domed fireclay brick tandoor, which is easy to make. on your own. Since refractory bricks are easily cut with an abrasive angle grinder, such a design is quite affordable for self-production. 
From halves
In principle, the ordering scheme for the tandoor is not needed, even if it is supplemented with a chimney. When using halves of a standard brick, they are stacked with a poke, taking into account the following nuances:
- on the inner diameter of the masonry, the width of the joints is 1 cm maximum;
- seams of outer diameter are filled with mortar additionally;
- depending on the configuration of the inner surface of the brick tandoor, do it yourself with the help of the following devices.

Attention: In this version of the masonry, it is easier to choose the sizes of the holes for the ash door, the hole for the blower and the chimney. 
You can watch more related videos:
vertical spoon
When using any masonry from a brick standing on the edge, it is recommended to use 4 full rows in the tandoor. This corresponds to 1.04 m in height, when choosing the “well” shape, the bricks are absolutely parallel to each other, the two lower rows of the “barrel” expand outward, the upper ones narrow inward.
For these technologies, ordering drawings are needed in order to correctly place the grate, the chimney and blower holes, the ash pan door in the internal space, as in the bottom photo. 
A vertical spoon is called masonry in? brick on edge. This is a budget version of the tandoor, practically unsuitable for the cylindrical shape of the hearth. In the "barrel" such masonry is reinforced due to the self-wedging mutual arrangement individual elements in space and relative to each other.
Here is a video on how you can also make a portable design:
Vertical poke
For this technology step-by-step instruction looks like:
- trimming the ends of the bottom row - a wedge of 1 - 2 cm is cut off from one corner;
- installing a brick on an edge close to each other - the last brick should jam the ring, so it should be cut, giving the appropriate shape;
- masonry of the second row - the upper and lower ends are cut with a wedge.

When installing the third and fourth, last, rows, the operations are similar to the previous ones, but in a mirror image. In principle, it is not necessary to cut the brick, laying the mortar with a wedge for each row. In this case, use a special device - a template is a must.
Devices for ring masonry
Before making a tandoor on your own for a novice bricklayer, it is recommended to study devices that drastically reduce the labor intensity of work and increase the quality of masonry to professional level. The main ones are:

The last fixture freely rotates around the circumference, allows you to control the geometry of the masonry at all its levels.
More simple option tandoor is a dome design inside a well. The lower part of the dome is laid out in an annular masonry of halves to a height of 0.5 - 0.6 m. Then, with each row, the ring rows are narrowed until a neck of 0.5 m is obtained. 12 - 25 cm recede from the finished structure, lay out a cylindrical well without constrictions. The gap is filled with refractory material, a chimney pipe and an ash door are mounted. 
Reinforcement and coating
When placing a tandoor in the ground, only its inner surface is coated with clay mortar. 
At the ground structure, the outer surface should also be coated, as in the lower video.
Reinforcement is made with a soft mesh, which can be bent according to the configuration of the hearth:
- on brickwork a spray is applied without leveling the solution;
- after 5 - 7 minutes, the mesh is pressed into this layer;
- then the next layer is applied with surface leveling.

The photo can be enlarged by clicking on it.
Backfilling the space between the main hearth and the decorative masonry is possible after the solution has completely dried.
Earthen (pit) tandoor
When constructing a homemade brick tandoor below ground level, the following nuances should be taken into account:
- the diameter of the pit must be at least 80 cm larger than the design size of the furnace;
- for convenient maintenance, it is better to raise the neck above the ground by 15 - 20 cm;
- refractory bricks for the tandoor will dramatically increase the service life, since the design of the underground hearth is practically beyond repair;
- the grate is not used here, the ash is removed through the top, the blower is mandatory;
- external masonry of a square, annular or rectangular shape is not needed, these walls are replaced by the soil itself.

After coating and reinforcing the outer walls, all layers of clay mortar and concrete should dry out within a half month. Then the clay is fired for 3-8 hours. Ideal for tapping inside hearth should be heard ringing sound.
Only then can the pit be backfilled. Moreover, not with excavated soil, but with non-metallic material, in which the forces of frost swelling cannot arise. 
Sand, slag and crushed stone are suitable for these purposes. However, the first material has capillary suction at negative pressure, so crushed stone is used in 90% of cases. Non-metallic material is compacted with a manual rammer.
Attention: Waterproofing of the tandoor from the outside is not needed, since with intense heating it will collapse and provide an unpleasant bituminous smell.
Hearth decoration
Decor outer surface will allow you to make the tandoor with your own hands attractive when receiving guests or satisfy the aesthetic needs of family members. Facing bricks do not need to be decorated, however, ordinary ceramic stone is often used to reduce the construction budget.
Its surface can be revetted in several ways:
- coat with a refractory solution and drown a decorative natural stone any format;
- putty and cover with acrylic paint, not afraid of moisture and ultraviolet;
- veneer with tiles or porcelain stoneware.

Decorating a pit tandoor does not make sense, since the design is recessed into the ground by default.
To improve the comfort of use, additional functions are used:
- canopy - protection from precipitation;
- countertop - cutting products;
- washing - ensuring hygiene;
- woodpile - storage of fuel in the immediate vicinity of the hearth;
- ring with slots for placing skewers.

Thus, the construction of a tandoor is much more complicated than a brazier and a barbecue oven. However, the temperature regime of the hearth ensures a high speed of cooking and a wide range of dishes, which is not inferior to a full-fledged summer kitchen.
Many peoples have their own types of ovens for cooking everyday and festive meals. The most famous of these fixtures - barbecue, grill, barbecues, but not many people still know such a stove as tandoor, which is used for cooking national dishes in Central Asia.
Build a tandoor with your own hands on suburban area or in the courtyard of a private house - it is quite possible if you know what it is and step by step follow all the stages of its construction.
What is a tandoor, and what can be cooked in it?
The tandoor oven in Asian countries is used for cooking, one might say, literally everything, from baking bread to roasting meat. Therefore, this building can be found, probably, in every courtyard of a private house in those parts. The amazing taste of dishes cooked in the tandoor was also appreciated by Russian lovers of oriental cuisine, so more and more often such stoves appear in the territories of suburban areas and in Russia.
 From the point of view of cooking, the functionality of the tandoor is huge.
 Fragrant Uzbek cakes various kinds, baked vegetables, barbecue, fried chicken - all this can be cooked in this relatively small but very versatile oven.
In the Central Asian countries, firewood for firewood has always been in short supply, since these territories do not have significant forest areas and even rare plantings. Mostly grow low shrubs, solitary trees and herbs that do not require a lot of moisture. It was they who were traditionally used to fire the tandoor. It has a design that can be heated with a bunch of simple saxaul - a shrub that grows on sandy soils and, when burned, gives a short-term strong heat. The oven stays hot for a long time, which allows you to bake a large number of bread products, and therefore it can be called a very economical device for cooking.
Flatbreads baked in a tandoor are called "tandoor-nan" in Asian countries, which means tandoor bread in Turkic.
Tandoor design
The design of the tandoor is quite simple. The task of building it is quite feasible for a beginner, and having instructions for completing each step in the construction will not allow you to make any mistakes.

In order not to think about the correct composition of the mortar for laying walls, you can purchase at hardware store a special heat-resistant mixture for the construction of stoves and fireplaces. Instructions for preparation can be found on the package, and if you follow the manufacturer's recommendations, the solution will turn out to be plastic, and when dried, it will not give tons of cracks.

It should be immediately noted that this model is designed for cooking meat, fish and vegetable dishes, but it will not work to bake bread on its walls. If you are thinking about baking cakes, then the walls from the inside must be coated with clay, and the surface should be well smoothed.
When erecting this option, work also begins with the preparation of the foundation. But in this case, according to the builders, three layers can be used as a foundation. silicate brick laid in a dug pit. And, the laying of the first layer is carried out along the pit, the second across, and the third - again along.
The first row of masonry of the tandoor itself should be continuous, and in the second layer, from the middle to one of the sides of the resulting platform, a horizontal channel is left, which will serve as a blowing chamber. The third row is laid out completely, blocking the blower channel, but a hole is left in the middle of the site, around which a tandoor will be installed.
The lower rows of bricks in the foundation are laid without mortar, but tightly pressed against each other, the pit will not allow the rows to move in one direction or the other. IN top layer it is better to fasten the brick together with a mixture of clay and fix it on all sides with pieces of reinforcement, 400 ÷ 500 mm in size. The reinforcement rods are driven into the ground, and on top there is a section equal in height to the top row of masonry.
If the base for the tandoor is laid out from only one layer of brick (as shown in these photos), then a hole is dug under it, approximately 200 × 200 mm in size, and a pipe is installed in it. But, it should be noted that this method of blowing the device is not very reliable, since during the rains the earthen chamber will be washed away by water and over time the structure may sag.
A circle is marked on the site around the blower hole, within which a tandoor will be installed.

Having installed the first row of bricks, it is tied with two rows of steel wire, the ends of which are twisted and hidden in the gaps.
 For reliability - fixed with wire
 Next, two more rows are installed on the first row in the same way. In total, 57 bricks will need to be found for the construction. Each of the rows is fixed, like the first, with wire ties. The total height of the tandoor, after its installation, will be 750 mm.

The next step is to cover all the gaps between the bricks with a mortar made from a fire-resistant mixture. Before applying the mortar, it is recommended to moisten the brick so that the water from the mixture does not soak into the dry bricks too quickly, and the drying takes place evenly and gradually.

After all the gaps are sealed and the mortar in them has dried, the structure is “plastered” over its entire surface.

Next, you need to coat the entire structure with a layer of clay, to which finely chopped straw is added. There should be two such layers with a thickness of 15 ÷ 20 mm, and the second is applied after the first has dried, approximately two to three days later. They should dry evenly, without rapid evaporation of moisture, and for this, the structure is covered with plastic wrap.

These layers should be applied evenly, but it is not necessary to smooth their surface, as they will still be covered from above.

Then, the clay walls are wrapped with a reinforcing layer consisting of a metal mesh with cells of approximately 50 × 50 mm.
 Then the structure is reinforced with a mesh ...
 A metal ring is installed around the furnace opening, which will separate the cover installation area from the rest of the surface. This part should have a height of 30 ÷ 50 mm. From its outer side to the edges of the walls, a layer of clay is applied, equal to the height of the hoop.
 ... once again coated with clay with the installation of a hoop on the inlet ...
 After that, the metal mesh on the walls is completely covered with another layer of clay and left to dry.
 ... and after drying, it is plastered with cement mortar.
 Further, when the surface is ready, a layer is applied to it. concrete mortar, consisting of sand and cement, in a ratio of 3: 1. Masters who build tandoors recommend adding one or one and a half teaspoons to the concrete intended for coating detergent- it will not allow the solution to shrink when dried.
Drying of the surface of the structure takes place within a week. During this time, you need to make a wooden lid with handle will allow for a long time to keep warm inside the tandoor when it is fired.

In addition, to hang the skewers, you will need to make a metal crossbar, which is placed on the sides of the tandoor hole under a wooden cover.
I must say that if desired, the entire surface of the tandoor can be decorated decorative coating– for example, mosaic-laid flat natural stones. This layer, by the way, will become additional insulation for the oven, which will help keep the heat inside it.
Video: building a tandoor according to a simplified scheme
Refractory brick prices
Refractory brick
Finished tandoors
On sale you can find ready-made tandoors of various sizes, and in order not to do unfamiliar work, you can simply buy such a stove and even firewood specially designed for its firebox.

In addition to the wood-burning tandoor, even electric models are sold that do not require fuel, since heating is carried out by a heating element installed at the bottom of the furnace.

Any of the ready-made factory products will allow a variety of any dishes, from baking cakes and pizza to roasting vegetables and roast meat. However, it must be warned that the taste of dishes cooked in electric ovens, is significantly different from those that are fried or baked in a tandoor heated with firewood. This is because the TEN , Although and heats the surface, but it dries the air very much, and therefore the products that are in the heated space. Firewood, by heating the walls and giving off its own moisture, which is absorbed into the porous clay surface, creates the necessary balance of heat and humidity. In this favorable microclimate, products remain juicy, well fried and baked.
How is it prepared in a tandoor?
- In addition to cakes and shish kebab, barbecue and pizza are baked in the tandoor. But for the preparation of these dishes it is necessary additional element- this is a grate, which is fixed on the neck of the furnace on special mounts and descends to about the middle of the tandoor.

- On the same grate you can put a cast iron or a pan with necessary products and get fragrant pilaf or stewed cabbage soup.
- When cooking fatty meat, for example, lamb, a grate is installed over the coals, and a container is placed on it, into which juice and fat will drain from a piece suspended above it - these components are necessary for making shurpa.
- When cooking kebab or barbecue in the Uzbek version of the tandoor small size, skewers are simply installed in the oven opening or hung on an iron cross rod. At the same time, the neck is closed with a lid from above.
- All dishes are cooked in the tandoor much faster than in ovens or on. For example, lamb and pork will require 18 ÷ 25, beef 30 ÷ 35, fish or poultry 8 ÷ 12, and vegetables altogether 5 ÷ 7 minutes.
- Oriental culinary specialists advise: in a not completely cooled down tandoor, place a pot with hard meat, which has many veins and, during normal cooking, will be cooked until soft for several hours. The pot, covered with a lid, is left inside the tandoor until the next morning, and then any dish can be prepared from this meat in which it will “melt” in the mouth.
In addition to the stove models presented above, there are other options, but the most affordable design for construction is the modern simplified tandoor. Even an inexperienced builder can make such an oriental stove, if he makes the foundation correctly, calculating the load, and follows the construction instructions.
Having a tandoor in the country, you don’t have to worry that someone will remain hungry, since almost all dishes can be cooked in it. And most importantly, you don't have to stand above them. Having heated the tandoor and put prepared products in it, you can go about your business, periodically checking the readiness of the dishes, and then it remains to serve them to the table in right time hot.


