Publication date: 06-04-2015
Bulk polymer floors are made from 3 different polymers. These include methyl methacrylate, epoxy resin and polyurethane. Methyl methacrylate is used in construction quite rarely, as it has a considerable price..
You can pour any polymer floor on your own, the main thing is that the correct technology is observed during the work.
The choice of polymer composition
Polyurethane floor
Such systems were originally intended exclusively for industrial premises. Basically, polymer coatings with epoxides were used for this purpose. These coatings are:
- moisture resistance;
- Good chemical resistance.
Back to index
Polyurethane coatings
One type is polyurethane flooring. Filling systems of this type can withstand strong mechanical and shock loads, as well as constant vibration effects for a very long time.

polymer floor with decorative ornament chips
Polymer coatings using polyurethane are mainly poured in kitchens, showers, bathrooms, as well as in hallways. In the latter case, the choice with epoxy is due to the fact that the floors in the corridors are quickly erased by street shoes.
Polyurethane coatings can also be poured into living rooms. Self-leveling floors made of polyurethane have a lot of advantages. For example, such polymeric floor coverings have a composition in which there is one component, due to which the flooded floors dry quickly.
This distinguishes polyurethane coatings from epoxy coatings. Self-leveling floors made of polyurethane also have disadvantages. These include an unpleasant and pungent odor that appears during pouring. Over time, after drying, such a "flavor" disappears.
Polyurethane floors are in the form of a liquid suspension, which is somewhat reminiscent of oil dyes. Such self-leveling floor coverings harden at a temperature of plus fifteen degrees Celsius.
The average consumption of a substance is three hundred grams per one square meter surface area. It all depends on the base that is being improved. Full hardening time is from twelve to twenty-four hours.
If necessary, the polyurethane mixture can be diluted and made into a two-component mixture. In this case, the resulting suspension can only be used within forty minutes after preparation.
Back to index
Epoxy coatings
Epoxy polymer floors are a mixture of two components of organic origin. The composition itself is sold in a dry state in briquettes of at least twenty kilograms. The color of the mixture is grey. Such a substance is quite suitable for creating the main coating layer.
The composition of the mixture includes a hardener and the polymer itself. Before diluting the dry mixture, it is first necessary to thoroughly mix the polymer so that its particles are distributed as evenly as possible.

Paint step for walking on the bulk layer
After that, a hardener is added to the powder, and everything is mixed for at least three minutes.
The resulting suspension can be used within the next forty-five minutes after preparation. For a given period of time, it is necessary to distribute the composition over the floor covering and roll over its surface with a roller with needles. P The last procedure is necessary to remove air particles from the composition.
The production technology should be such that the average consumption of a polymer substance per square meter is one and a half kilograms. The resulting self-leveling floors seize within one or two days.
Epoxy polymer floors dry at a temperature of fifteen degrees Celsius. Separate mixtures are able to harden at a temperature of five degrees Celsius. It is worth pouring such floors only in a well-ventilated area, and use goggles and gloves for this work.
Back to index
Technology for pouring polymer floor coverings
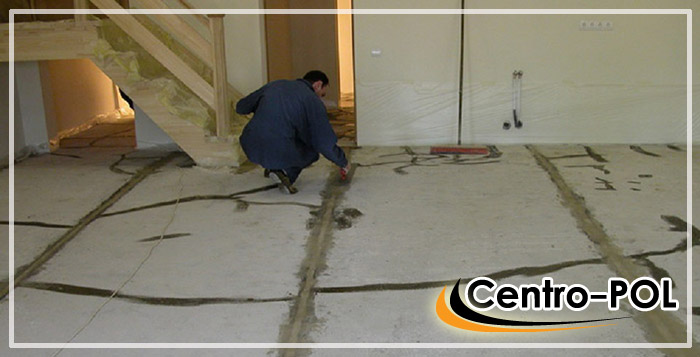
In order to fill polymer floors of any type, you must first prepare work surface. It must be flat and clean. The quality of the floors in the future directly depends on the quality of the foundation.
Back to index
Preparation of the wooden base
The basis can be not only concrete surface but also the surface of wood. The main thing is that the base satisfies certain requirements. First of all, wood should have a moisture content of no more than ten percent.
On its surface there should be no remnants of old coatings, oil and grease stains. The floor must be absolutely clean. There should not even be dust on it, so it is better to vacuum it first.
Before pouring wooden surface it needs to be skinned. The resulting rough structure will help the polymer better grip the base.
In this case, you don't even need a primer. It is also important that wooden base did not have strong depreciation. Otherwise, flooded floors with constant walking may crack.
Back to index
Preparing the ceramic tile base

Pouring a polymer floor
As a base for pouring polymer floors, a coating of ceramic tiles. This surface will also need to be properly prepared. To begin with, tile floors are tested for strength.
Falling off tiles are removed, and the resulting voids are filled concrete mortar. After that, the resulting surface is washed, and grease stains are removed from it.
For the implementation of such work, a conventional solvent is well suited. Next, a primer liquid is applied to a clean base. It should increase the adhesive strength of the polymer coating with the tile.
planning independent arrangement polymer floor, you need to remember that the work must be done with the highest quality so that the coating lasts as long as possible. The topic of today's article is the technology of pouring polymer floors, the procedure is complex and time-consuming.
Bulk polymer floor is the most common type of polyurethane and epoxy coatings, characterized by increased decorative properties.

The thickness of the fill in this case ranges between 2.5 mm and 5 mm. It is not advisable to make the layer thicker, because this will significantly increase costs, and the functional and decorative parameters of the floor will remain the same. Scope of application - residential and public buildings.
| Types of self-leveling floors | Characteristics of self-leveling floors | Application |
|---|---|---|
| Thin layer floors | thickness 250-300 microns | Thin-layer coatings are used for industrial floors subjected to medium mechanical stress, protection of concrete floors from aggressive environments and dusting, giving a decorative appearance. |
| thickness up to 4-5 mm, filling with sand by weight up to 50% | Self-leveling self-leveling floors are arranged in rooms with medium and high mechanical loads, where special, increased requirements are imposed on the floors. Such floors have a smooth surface (glossy or matte) with dirt-repellent properties, decorative, hygienic, easy to maintain, repairable. | |
| Highly filled floors | thickness - 4-8 mm, filling with sand by weight - up to 85% | Highly filled floors suit in conditions with high humidity and extreme temperature conditions. These floors are characterized by particularly high impact and wear resistance. By properties they are close to polymer concretes. |
| Self-leveling, colorless epoxy | Density 1.10. Ratio A:B - 100:60. Life time 35 min Dry residue 100%. | A two-component, colorless, solvent-free epoxy system for high strength decorative topcoats. |
| General purpose epoxy filler | Density 1.50. Ratio A:B - 100:10. Lifetime 25 minutes. Min. application temperature +10. Dry residue 100%. | Two-component, colored epoxy mortar for leveling and finishing polymer coatings on concrete, both under other ESP® coatings and as a stand-alone coating. |
| Conductive epoxy grout | Density 1.65. Ratio A:B -100:10. Lifetime 20 minutes. Min. application temperature +10. Dry residue 100%. | Current-carrying device protective coatings on concrete bases in warehouse, production, installation and other premises with requirements for electrical conductivity. |
| Polyurethane floor | Density 1.45. Ratio A:B - 100:20. Life time 30 minutes. Min. application temperature +10. Dry residue 100%. | These coatings, which are based on a heterochain polymer, are hard-elastic, that is, with high mechanical strength, they have a sufficient resource of elasticity. They arrange polyurethane flooring in a wide variety of premises - industrial and industrial, residential and public, in children's and educational institutions, in parking lots and in freezers ah etc. According to the layer thickness, the polyurethane floor can be thin-layer (up to 1 mm), self-leveling or quartz-filled, with increased resistance to abrasion and impact loads. The polyurethane coating can be given various special properties (anti-static, anti-slip). |
Among the other advantages of polymer floors, it is worth highlighting:
- wear resistance;
- dustlessness;
- immunity to aggressive chemical compounds;
- a wide range of colors - the coating can be both colored and transparent;
- no smell when laying;
- the possibility of drawing 3D-drawings.
Note! The quasi-3D image is made possible by the decorative polyurethane component. In such cases, the floor is poured in two stages - first, the polymer mixture is poured, then, after it dries, the finish coating is applied (more on this at the end of the article).

Due to the high aesthetic level, polymer floors allow you to create full-fledged compositions using marble chips or colored sand. The filling procedure has its own nuances, we will consider them in more detail.
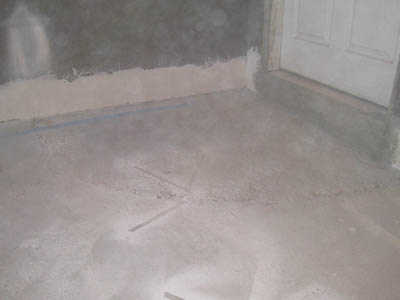
Stage 1. Preparation
The arrangement of a self-leveling floor made of polymers begins with preparatory work.
wooden base
Step 1. First, the room is cleaned of debris and dust, furniture is removed, decorative elements (such as skirting boards, cornices) are dismantled.

Step 2. Then everything necessary for work is prepared. To remove small debris, you can use a vacuum cleaner, and to remove glue and remnants of the old coating - grinder. By the way, the reliability and durability of the future floor largely depends on the quality of cleaning.

Step 3. Next is preliminary preparation grounds. At the same time, it is very important what material was used for the previous coating, because if it is, for example, a tree, then the base should be pre-sanded, all cracks puttied, treated with a degreasing compound - all these measures will improve the adhesion of the polymer to wooden planks. For degreasing, you can use gasoline, acetone or any other organic solvent.

If there is no difficulty in disposing of solvent residues, a surfactant or KM alkali solution can be added. Although today you can buy special means for degreasing wood (for example, Mellerud), which simultaneously protect the surface from fungus formation.
Step 4. The moisture content of the floor is measured using a moisture meter. It should not exceed 10%, otherwise the polymer fill will come out of poor quality.


The concrete floor is prepared for pouring in a slightly different way.
Step 1. The moisture content of concrete is estimated, if it is above 4%, then the surface is dried. To determine the humidity (in the absence of a moisture meter), you can use one old method: a rubber mat is placed and pressed tightly on the floor, and if the surface under it has not changed color after 24 hours, then the base is ready for pouring.

Moisture meter for concrete floor
Step 2. The compressive strength of the floor is also checked (the norm is 20 MPa and above). To do this, a chisel installed perpendicular to the surface is struck with a hammer. If the concrete did not crumble, and the chisel left barely noticeable traces, then the strength of the base is within acceptable limits.

Step 3. The presence of waterproofing is checked. If it is not there, then further work on creating a self-leveling floor is impossible, because the concrete will begin to flake off, which is especially important in the bathroom or kitchen.

Moreover, with poor-quality insulation, moisture will rise through the capillaries into concrete pavement to the polymer layer and sooner or later destroy it.
Note! Otherwise, the preparatory measures for a concrete base are practically no different from those for a wooden base.

If the polymer floor will be poured onto the tile, then its voidness is first checked (it may appear after the tile adhesive dries). All components that have lagged behind the surface must be removed, and the voids formed must be puttied.
After that, the surface is degreased.
Stage 2. Level difference

This concept is used to denote the difference in height between the highest and lowest points of the floor surface. If the difference is 0.5-2.5 cm, then before applying the primer, the floor is poured with a mounting leveling mixture (sand and polymer self-leveling mixture in a ratio of 1: 2). A trowel is used to apply the mixture.
If the difference exceeds 2.5 cm, then the surface will need to be filled with a corrective mixture (sand with cement in a ratio of 2: 1).
Note! In both cases, instead of building mixtures, you can use a special leveling mortar intended for this thickness.
Stage 3. Materials and tools
After preparing the surface, you need to take care of everything you need. For work you will need:
- polymer leveling mixture;

- deep penetration primer mixture;

- putty knife;
- building level;
- doctor blade;

- electric drill with mixer nozzle m;
- needle roller;

- container for preparing the solution.
Stage 4. Primer
For applying the primer layer, it is better to use a roller. If the surface is porous, then the primer is applied in several layers and after each of them a short pause is made to dry the mixture.

Here are the main functions of priming:
- improving the spreading of the polymer composition;
- improved adhesion to the base;
- preventing air bubbles.
If the floor will be poured in several layers, then the primer must be applied before each of them.
Note! In a room with a high level of humidity, the primer layer is covered with a waterproof compound.

You also need to remember that primers are toxic, so you should take care of high-quality ventilation of the room in advance. Moreover, the temperature should not be allowed to drop - if it drops below + 15ᵒС, then the adhesion efficiency of the primer will noticeably deteriorate.
A minimum of 24 hours is required for the primed surface to dry completely.
Stage 5. Thermal compensation

One of the most important elements of the filler floor is a thermal expansion joint, which should be applied around the entire perimeter of the room. For this, they take wooden slats(required from hardwood). These seams will prevent deformation of the floor during significant temperature changes.
Stage 6. Solution preparation
The preparation of the solution must be taken seriously, since the poor quality of the fill will hopelessly ruin the polymer coating. It is characteristic that after preparation the solution must be poured as soon as possible, because it solidifies in a few minutes.
Note! Humidity in the room during pouring should be no more than 70%, otherwise moisture will condense on the surface.
All components are poured into the container in the ratio specified in the instructions for the polymer mixture. To avoid too rapid heating of the solution, the container can be placed in another bigger size filled with cold water.


All components are mixed with an electric drill operating at low speed (no more than 400 rpm) until a homogeneous mass is obtained. To determine the readiness of the solution, you can use one simple method:
- a small ring is cut out of the deodorant cap and placed on flat surface(for example, a piece of sheet steel);
- the ring is filled with a solution and rises;
- with a uniform spread of the solution into a spot with a diameter of 3 cm, you can start pouring.
Note! If the mixture is too thick, then it will not be able to level out qualitatively, and if it is too liquid, then you will need to add a little more dry polymer.

Stage 7. Filling the polymer floor
Do-it-yourself polymer floors are poured in the same way as ordinary self-leveling ones.
Step 1. The first portion of the solution is poured along the wall farthest from the entrance with a strip 45 cm wide. Then, for better distribution, the solution is leveled with a spatula.


Note! The whole room is poured immediately, otherwise there will be drops.
Step 2. After leveling, the surface is rolled with a needle roller - this is necessary to remove air.

Step 3. After that, a new strip of solution is poured and leveled. The procedure is repeated until the entire room is filled.
Step 4. 48 hours after pouring, a polyurethane coating is applied. For the entire drying period, the floor must be protected from the sun, drafts and temperature fluctuations.

Note! If a "warm floor" is used to heat the room, then the first start of heating can be carried out only seven days after pouring. In doing so, you need to start with room temperature, gradually increasing it - by about 2-3ᵒС per day.
Also read the article on our website - do-it-yourself jellied floor.


There are two ways to create a decorative layer:
- put the finished image in advance;
- make a drawing on the cover.
In the first case, you need acrylic paints resistant to prolonged exposure to ultraviolet radiation. It's more simple and cheap way, because today you can purchase the image you like in the form of a printout on a plotter (in this case, a banner fabric is taken for the base). When arranging, the fabric is covered with a thermally insulating vinyl film to increase the service life.

The dimensions of the image should exceed the dimensions of the room, because it is always easier to cut the fabric than to glue it.
Video -
The technology for creating a 3D image is as follows.
Step 1. First, the base is carefully primed. For this, the same leveling solution is used, but diluted with water just enough so that its concentration is halved. It will take a day to polymerize the primer layer.
Step 2. The image is glued to the primer and rolled with a dry, clean roller. It is characteristic that you can only move on the floor in special studded shoes.


Step 3. A transparent polymer layer 4-5 mm thick is applied. This happens in the same way as described above. After half an hour, the fill dries up and can be treated with a transparent varnish.
The complete readiness of the polymer floor for operation is determined by the drying of the varnish.
Video - Pouring polymer floors
Floor - the most important component of any room, which must meet a number of requirements. Each of us, thinking about the device of the floor, wants it to be durable, practical, unpretentious in maintenance, resistant to different kind influences. Polymer floors are a popular trend of our time, which, in addition to listed properties has many additional benefits.
The phrase “self-leveling floor”, or “3d floor”, perhaps, has been heard by many, but not everyone knows what it is. What is the arrangement technology, how environmentally friendly is such a coating, is it possible to do the work yourself, polymer floors: price - this is not a complete list of issues that concern those who decide to equip the floor with the latest progress.
Polymer floors as part of the interior
Polymer self-leveling floors: pros and cons
It is widely believed among the inhabitants that polymeric materials are ideal as floor coverings. This is not entirely true: the self-leveling floor has both advantages and disadvantages.
Advantages
- elasticity, high strength;
- absolute resistance to the effects of chemicals and water;
- fire safety;
- ease of installation, the possibility of self-laying;
- dirt and dust repellent properties;
- undemanding care;
- long service life;
- despite the smooth surface, 3d polymer floors are anti-slip;
- numerous performance variations.
It is important!
Self-leveling floors in an apartment can imitate tiles, pebbles, luxurious parquet, a natural stone or water surface. Everything will depend solely on your preferences.
Flaws
- a high-quality self-leveling polymer floor, the price of which can go off scale, will require significant financial investments, but the result is really worth it. Deciding to save money and buying cheap materials, you run the risk of losing floor beauty pretty soon - under the influence of ultraviolet light, the floor will quickly turn yellow and irrevocably lose its original appearance;
- for the arrangement of the self-leveling floor, you need a perfectly even and very solid foundation;
- add another if you wish flooring difficulties may arise, which is explained by high adhesive qualities. Dismantling the 3d floor is hardly possible: you will have to lay tiles or laminate on top of the existing coating;
- decorative floors during laying are very sensitive to the moisture content of the base: this figure should not exceed 4%. Temperature differences are no less significant - the amplitude of fluctuations should be no more than 2 degrees.
Varieties and scope of self-leveling floors
The classification of polymer floors is quite extensive and can be carried out according to several criteria. So, depending on the materials used, they distinguish:

The thickness of the polymer floors are different:
- high-strength. Designed for installation in industrial premises, such floors can withstand any load.
It is important!
High-strength floors are the most reliable, their thickness can reach 6 mm.
- floors of medium thickness (1.5-3 mm);
- thin floor coverings are used in areas where the floor will not experience significant physical stress, for example, in an apartment. The layer thickness usually does not exceed 1.5 mm;
- dust-removing coatings are a thin film applied over a concrete base, which serves as a protection against dirt and dust;
- coloring floors. In this case, the polymer is applied in order to give the desired shade. Layer thickness - 0.4 mm.
But the classification does not end there. Depending on the filler content, the polymeric floor covering can be with a smooth or rough surface, textured, self-leveling (contains particles of mineral substances), highly filled (includes large particles), combined.

The applied mixtures may consist of one or more components. One-component instantly ready for application, contain only the foundation. Two-component consist of a base and a hardener, which should be mixed before starting work. Three-component ones include, in addition to the base and hardener, various additives.
Scope of self-leveling floors
Polyurethane compounds are used in various areas of construction:
1. Household construction (bathrooms, swimming pools, kitchens, toilets).
2. Industrial shops (with the exception of "hot" production);
3. Food industry.
4. Exhibition, trading floors, parking lots, parking lots, terminals, warehouses.
5. Industrial freezers, refrigerators.
For sports facilities, polyurethane rubber floors are used, applied by pouring in 2 layers. The thickness of the lower layer is 5-13 mm, the upper one is 2 mm.
It is important!
On the floor for gyms, rubber crumb is often additionally poured, which roughens it.
You should be aware that they are not as durable as polyurethane, so it is not recommended to equip them in places where the floor is under heavy load.
Do-it-yourself polymer floors: the initial stage
First you need to decide on the type of bulk coating. The choice will depend on several points:

- the type and quality of the base;
- purpose of the premises;
- forces of mechanical loads on the floor;
- need decorative elements;
- desires for additional properties (anti-static, anti-slip, etc.);
- financial freedom.
Required Tools
To equip the self-leveling floor, you will need the following:
- a container with a capacity of at least 20 liters for the preparation of the solution;
- low speed electric drill. Please note that the nozzle should be slightly longer than the depth of the mixing container;
- a conventional spatula for distributing the mixture in hard-to-reach places;
- spatula-squeegee for leveling the surface;
- needle (aeration) roller to remove air bubbles;
- soles with spikes - "paint shoes" to easily move on a freshly poured floor;
- solvent for cleaning tools.
In order to calculate the consumption of materials, it is necessary to know the thickness and density of the coating. Floors can be made with or without quartz sand.
1. Without filler. The calculation is simple: for 1m2 of coating, 1 liter of solution will be needed (with a required thickness of 1 mm). We multiply the resulting figure by the density, which is indicated by the manufacturer on the package.
It is important!
Most often, the density of polyurethane self-leveling floors is 1.25-1.40 kg / l, but some manufacturers introduce heavy aggregates into the composition (to reduce the cost). Then the density can reach 1.70 kg/l.
2. With a filler, the consumption of 3d floors is reduced by 2 times, while remaining as appearance and mechanical and physical characteristics.
The quality and appearance of the self-leveling floor largely depends on compliance with the technology of its manufacture. The first stage is the preparation of the base for the future polymer floor.
Foundation preparation
- we remove furniture and unnecessary items from the room, dismantle the baseboards and the old coating. The old screed should be removed, especially if it shows signs of wear;
- using an industrial vacuum cleaner, we clean the base from dust and construction debris;
- we embroider the detected cracks and seal them with an epoxy mixture;
- for an old concrete base, we equip a screed from leveling solutions;
- the porous base must be strengthened with a penetrating impregnation - siling, which covers the pores and eliminates the occurrence of voids in the thickness of the filler floor.
Floor primer
After the screed or impregnation dries, proceed to priming. We use a one-component primer, for example, "Primer 1101". Such a composition, penetrating deeply into the thickness of the base, provides excellent adhesion of concrete to the polymer.
It is important!
To obtain the best adhesion, fine quartz sand is added to the primer, which forms a rough surface for fixing the polyurethane component.
The primer composition is more convenient to apply with a roller with a short pile. If the area of \u200b\u200bthe room is small, a flat one will fit perfectly for application. paint brush. The primer is applied in 2 stages. The second layer - after the final polymerization of the first.
Weak foundations should be primed using the combination method. First, we apply a thick primer (“Primer 1101”), and then a more viscous one, for example, “Primer 2005”. Distribute the contents evenly across the floor. We start laying polymer floors 4 hours after priming.
The polymer components are mixed in a clean container at a temperature of 20 degrees. A colored opaque solution is mixed in the factory container, then a transparent component is added to it in small portions. To obtain a homogeneous composition, mix with a drill with a special nozzle.
Please note that the prepared material must be used immediately after mixing, because. polymerization is very fast. Pour the solution onto the base and level it using the rule, the layer should be uniform. Remove air bubbles with a spiked roller. In order not to damage the floor, move along it only in “paint shoes”. Rolling is carried out continuously for 30 minutes, until the first signs of thickening.
It is important!
If you are laying decorative 3d floors with a pattern, then a pattern or decorative elements (shells, mosaics, stones, etc.) are applied over the polyurethane base layer, which are fixed with a layer of transparent high-strength polyurethane.

Arrangement of expansion joints
To exclude deformation of the polymer floor, it is necessary to equip expansion joints. They are cut to a thickness of at least a third of the polymer coating, dusted with an industrial vacuum cleaner and sealed to prevent moisture and dust from entering. You can use emphimastic PU-40 for this.
Whoa and all! The task called polymer self-leveling floor is done with your own hands! Depending on the temperature in the room, the floor is ready for pedestrian exposure in a day or two, but the full working load should be given only after a week.
Floor coverings based on various polymers are widely used in all areas of industrial and civil engineering. The technology of polymer flooring, shown in the photo, clearly demonstrates how in a short period of time it is possible to obtain a high-quality wear-resistant coating of any floor from small room before production premises significant sizes.
Types of polymer floors
In the manufacture of floor coverings, three types of polymers are most often used, which make it possible to obtain excellent performance characteristics of the coating at a relatively low cost:
- Polyurethane coatings based on liquid polyurethane mass, which polymerizes to a solid state at a temperature of 15 ° C and is able to withstand strong shock and vibration loads;
- Epoxy compositions with various plasticizing additives with high strength, abrasion resistance and chemical inertness;
- Methyl methacrylate compositions that can be used to cover outdoor areas and rooms with negative temperatures.
How to arrange polymer floors for various purposes
Initially, polymer floors were intended mainly for industrial premises, trade facilities and entertainment complexes. The application of a polymer floor made it possible to obtain a high-quality seamless coating over large areas, which was simply impossible using other technologies. Polymer self-leveling floor from various compositions differs only in the presence or absence of some specific properties, and the pouring technology does not differ significantly.
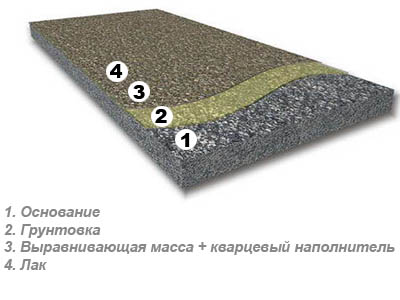
Before making a polymer floor, it is necessary to prepare the appropriate equipment and materials that will allow you to qualitatively arrange a floor system of a selected thickness and required properties. It is a system, because a polymer coating is not only a thin layer of polymer poured onto an unprepared base, but also specialized repair and primer compositions that improve the mutual penetration of materials, increase adhesion and appearance of the finished coating.
Preparation
The technology of applying polymer floors implies high-quality preparation of a concrete base, although self-leveling floors can also be applied on wooden coverings, which in modern construction are quite rare. It is necessary to start the manufacture of any floor with measurements. If the floor level differs from the required by more than 10 mm, it is advisable to fill cement screed By concrete base in order to avoid overspending a rather expensive polymer.
Reference: The base for the polymer floor is made in accordance with SNiP 2.0.13-88 "Floors", SNiP 3.04.01-87 "Insulating and finishing coatings”, where all the requirements for this type of coating are indicated. After the poured base has gained the necessary strength, usually 28 days, you can begin to treat the surface with a special primer that is part of the polymer flooring system. It is better to use formulations recommended by the manufacturer, as having passed the necessary tests and certified for a particular type of polymer. After all the requirements for the base are met, you can start applying polymer coatings to the floor.
Technology

Modern technology pouring polymer floors requires highly skilled workers, since the setting time of the composition is rather limited, and it takes no more than 4-5 hours until complete polymerization of some compositions. The most common polymer compositions lose mobility after 6 hours, and complete polymerization occurs in a time interval of 12 to 24 hours.
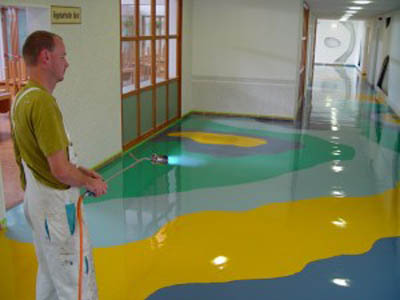
To get quality coating it is necessary to have time to apply and level the coating about an hour before the loss of mobility of the composition in order to allow time for the remaining air bubbles to escape. Filling a polymer floor, the device technology of which implies the presence of an additional decorative layer, is different in that the application finish coat is made after polymerization of the base and all decorative elements, whether they are drawings, sparkles or inclusions of minerals, are located between the polymer layers, causing the volume of the resulting pattern.
After the primer dries, it takes about a day to make polymer floors using bulk technology, when the mixture prepared in the required amount is evenly poured over the floor surface, starting from the corner of the room farthest from the exit. The mixture is prepared exactly in the required amount in order to avoid a pause when pouring the floor and to obtain a uniform polymer coating. The technology of polymer flooring is based on the fluidity of the prepared mixture, which should itself cover the floor with an even layer. required thickness, however, one should not rely on the declared fluidity of the material.
To have time to equip the floor before the mixture hardens, you must proceed as follows:
- Pour a small amount of the mixture, distributing it in the form of puddles or stripes on a small floor surface;
- Using a special squeegee with adjustable coating height, we evenly distribute the mixture over the floor surface;
- Adding required amount polymer on new areas of the floor;
- We stretch the polymer with a squeegee until it comes into contact with the previous part of the coating;
- We completely fill the polymer floors and roll the surface with a special spiked roller, which helps to get rid of air bubbles and further leveling the poured polymer.
All work on polymer floors is carried out on special needle soles that provide free movement on the spilled mixture without damaging the coating.
3D coating

And if the polymer coating is the finish, and even arranged in a public place? How to make polymer floors, which provide for the laying of additional decorative elements or three-dimensional drawings or photographs? In this case, special attention must be paid to preparing the base for the future floor. Most often, a simple, even very high-quality screed is not enough here. The 3D polymer floors shown in the video are especially critical to the base. When arranging 3d polymer floors, it is not enough to comply with all SNiP and the recommendations of the mixture manufacturer. Here you need the utmost care in applying the polymer and the utmost care when handling the tool.
How are polymer floors with decorative compositions or patterns made? Having completed the preparation of the base, before pouring the main layer of the polymer, it is necessary to carefully, without folds and bubbles, stick the pattern applied to any type roll materials. After the glue has completely dried, pour the finishing layer of the polymer. If the drawing is applied with paints, then the surface must be primed with transparent primers before applying the polymer. If necessary, to give additional volume and deep gloss, the surface can be covered with special protective varnishes.
In the process of pouring a polymer floor, the correct technology must be observed. The technology for installing self-leveling floors is considered very complicated, but, however, it is through certain actions that you can achieve an excellent result in the form of an excellent coating that can last more than one year. The floor is regularly exposed to mechanical stress, and therefore you need to make sure that it is of the highest quality, durable and wear-resistant.
Polymer floors: advantages of device technology
Before arranging a self-leveling floor with your own hands, you first need to familiarize yourself with the advantages and disadvantages of this technology, so as not to be disappointed later and not get a negative effect.
The self-leveling floor has both pros and cons:
- Elasticity;
- Strength;
- Complete resistance to chemicals;
- fire safety;
- Ease of installation;
- The presence of dirt-repellent properties;
- moisture resistance;
- The ability to carry out installation without the help of specialists;
- No special care required;
- Smooth surface;
- Anti-slip coating;
- There is a huge variety of varieties, so it is possible to choose the most creative design.

The polymer floor has many advantages, one of which is long term operation, which is not unimportant for this technology
As for the disadvantages, self-leveling floors, against the background of positive aspects, have a lot of negative ones, but they all overlap with the fact that the floor will last for many years and will be able to pay for itself more than once. When arranging a self-leveling floor, you can not save on materials, as this will affect the aesthetics of the room, as well as strength, quality and service life.
Poor quality floors turn yellow very quickly.
To equip a quality floor, you must first prepare a solid foundation. It is not too easy to dismantle the self-leveling floor, and the use of powerful special equipment will be required. If it is necessary to change the flooring, it is best to lay the canvases on the self-leveling floor, which will reduce the height of the walls.
Related article: How to decorate the living room and create a decor with your own hands?
How the self-leveling floor is made according to technology
For the manufacture of self-leveling floor, you will need to familiarize yourself not only with the technology, but also with its variety. It is worth noting that such a coating has a far from simple classification. To be more precise, by what materials are used to make the floor.
Materials:
- Epoxy stands out for its special strength, due to which it is used more often than other coatings.
- Epoxy floor with coins and polyurethane coating has a long service life and increased durability.
- The methyl methacrylate base floor dries quickly and is very durable. It is mainly used for industrial premises.
- An industrial floor made of urea, which is formed by spraying, and for its installation it is not necessary to stop the workflow.

Polyester mortar is considered the cheapest and lowest quality type of polymer floor, the service life of such a coating will be very short.
Polymer floors can be with different thickness. High-strength floor, up to 6 mm thick, designed for indoor installation industrial production. Such coatings can withstand any kind of load. Floors with an average thickness are 1.5-3 mm.
A thin floor covering, the thickness of which does not exceed 1.5 mm, is used in rooms with minimal traffic.
The dedusting coating can have a minimum thickness of 0.4 mm and is used to protect any concrete floor from dust and dirt. In some cases, such coatings are used to give the floor a certain shade.
Scope of Praspan and other types of polymer floors
Floors based on polyurethane can be used in the most diverse areas of construction - in the industrial construction of workshops, Food Industry, in the arrangement of an exhibition, trade or parking hall, in the construction of freezers and refrigerators, including for sports grounds.
Related article: Cutting ceramic tiles

Praspan polymer coating has high strength and excellent wear resistance
In domestic construction, it is used in the arrangement of:
- Bathroom;
- Basin;
- Kitchens and toilets.
As a rule, for the arrangement of the floor in sports halls, the formation of a bottom layer thickness of 15 mm and a top layer of 2 mm is required, and an epoxy base is used. In addition, on the floor in the gym should be present rubber crumb, which creates a rough coating with an anti-slip effect. It is important to remember that epoxy flooring is not as durable as polyurethane and should not be placed where there is a strong mechanical impact on the floor.
Proper application of polymer floors
Before applying the polymer to the floor, you need to choose a certain type of coating. As a rule, floors are selected according to certain criteria. It is necessary to take into account the quality of the old foundation. Be sure to pay attention to the strength of the expected mechanical load. Will it be required decorative coating. What properties should the future floor have, for example, anti-static, anti-slip and the like.
To carry out the installation of the self-leveling floor, you will need to prepare all the necessary tools:
- A container with a volume of at least 20 liters in which the solution will be prepared.
- Low speed drill and electric whisk. The nozzle must be chosen in length greater than the depth of the container.
- Spatula for spreading the mixture in hard-to-reach places.
- Spatula-squeegee to level the surface.
- Needle roller to remove bubbles.
- Sole with spikes or paint shoes for easy movement on freshly poured surfaces.
- Solvent.

Mixing of polymer components is carried out at a temperature of + 20 ᵒС
Dilution of the color solution must be carried out in a container from the factory. Next, you need to gradually add a clear solution to them in small portions. To obtain a homogeneous composition, a special drill and a specific nozzle are used.
It is worth considering the moment that the material must be laid out on the floor immediately after kneading, so that it does not begin to dry out, which will worsen its performance properties.
In order to exclude the formation of floor deformation in the future, it will be necessary to first make an expansion joint. Seams are cut into a third of the coating, and you also need to remove dust with a special industrial vacuum cleaner. Next, sealing should be carried out to prevent the penetration of moisture and dust into them. Emphimastic is perfect.


