Wall blocks have long become one of the most common building materials. When constructing a garage, residential building or other outbuildings for the construction of walls, the cheapest building material is cinder blocks. They are made from almost any waste material. At the same time, cinder blocks are laid in walls not only on sand-cement mortar, but also on clay mortar, which further reduces the cost of construction. Unlike brick, building blocks It’s much easier to do it at home with your own hands. The process of making cinder blocks and the technology is quite simple and accessible to anyone who wants to save money and who likes to do it themselves.
Briefly, what is a cinder block?
According to the prevailing opinion, cinder blocks are usually understood as blocks made by vibrocompression (vibroforming) from concrete mortar, the main components of the solution are slag and cement as the main binder. However, today cinder blocks are conventionally called any building blocks obtained by vibrocompression (vibroforming) from concrete mortar. The presence of slag is not necessary - the components of the concrete solution can be: slag, granite screenings, granite crushed stone, river crushed stone, gravel, broken brick and concrete, broken hardened cement, broken glass, expanded clay and even sand.
Typically, the size of a cinder block is in the range of 200 mm by 200 mm by 400 mm or less. There are two types of cinder blocks - hollow and solid. There are a great many varieties of blocks: these are ordinary wall blocks(for example, cinder block, smooth block 140), wall blocks (used for the construction of partitions indoors, has a thickness of 90 mm), decorative blocks for walls (decorative block 190), blocks for fences (decorative block 140, decorative corner block), blocks for finishing facades (facade stone), etc. At home, you can also make bricks from clay - the choice is yours.
To make cinder blocks you need two things: a form and raw materials.
Mold options for cinder blocks
Shape from sheet metal 3 mm thick. Together with your assistants, using a concrete mixer, you can easily “produce” up to 300 blocks per day without much effort. Is it a lot or a little? Judge for yourself: a garage measuring 6x4 m will require 450 of these blocks, and one floor of a house measuring 6.5 x 8 m will require 1000 pieces.

Mold for concrete blocks (all sizes are internal, welds are external).
Block making solution prepares like this. Mix the slightly moistened mixture (the amount of water is determined experimentally) in the proportion: cement - 1 part, slag or expanded clay - from 7 to 12 (the proportion is given for M400 cement). Having placed the form on a flat area, fill it with solution, tamp it with a hand tamper and, aligning it along the top edge, cut off the excess with a metal strip. Now carefully remove the mold (it has no bottom) - the block is ready.
Place the form next to it and repeat the process. At the end of the work, do not forget to thoroughly wash the mold with water. After 24 hours, the blocks can already be stored (no more than three in height), freeing up space for the next batch. The size of the form is given in case you plan to lay walls with additional cladding of 1/2 brick. If your building has walls plastered on both sides, then you can take arbitrary dimensions - as long as you can then lift such a block with your hands. And when laying walls 50 cm thick, do not forget to “bandage” every two rows of blocks with a jointed brick row.
You can choose the sizes of homemade cinder blocks to suit your needs.
Most simplest form, which satisfied me most, I made as follows. I selected planed boards with a width equal to the height of the cinder block (140 mm). The length of the boards should be no more than 2 m, since working with a longer form is more difficult: you have to make a lot of unnecessary movements. Next you need cross members. The two outer crossbars are connected to the longitudinal boards “on sliding grooves” (Fig.).

Form for three cinder blocks
WITH inside longitudinal boards(between the crossbars) every 140 mm, a cut is formed with a hacksaw and a chisel, transverse grooves with a depth of 7...8 mm. The width of the cut depends on the thickness of the separating plates made of sheet iron, textolite, and getinaks. Plates made from other durable materials are also suitable. sheet material, as long as it is smooth enough. From Fig. 1 it is clear how to make a mold. It takes a long time to describe it and there is no point in it, I just want to say one thing: before pouring the solution into it, the finished form is placed on absolutely flat surface. It is advisable to paint all mold parts made of wood. oil paint, which will ensure easier removal of cinder blocks from the mold. Each time before pouring the solution into the mold, all of it internal surfaces wipe with diesel oil (diesel oil) or used machine oil. Wipe lightly, not copiously. To reduce solution consumption, and cinder blocks turned out to be light and with voids, - and this is additional heat in the room, - the molds are filled halfway with the solution, after which champagne bottles are pressed into the solution.

Form filled with solution
If after installing the bottles the solution level does not rise enough, required amount solution (to the top of the mold) is added with a trowel. After 2...3 hours, the solution will settle significantly and become stronger, then the bottles are pulled out, carefully turning them around their axis, and immediately washed with water, otherwise the solution will stick firmly to them and further use the bottles will be unusable.
The process of removing cinder blocks from the mold is very simple. Just lightly tap the mold around the perimeter with a hammer and disassemble it. The side boards are easy to separate, but removing the divider plates is a little more difficult. You will have to carefully hit the protruding plate from above and slightly to the side with a hammer.
Every day, that is, after 24 hours, I took the almost hardened cinder blocks out of the mold and poured the solution into it again. I did not use any compaction of the solution with a tamper or vibration. A few words about the solution. Despite the fact that it was quite liquid, the cinder blocks, after appropriate exposure, acquired such strength that they were the greatest work it was then possible to split or trim.
For one part of “400″ grade cement I took 9 or even 10 parts of slag. There were no defects. Why did I tell you this? Yes, in order to quickly make a significant number of cinder blocks of excellent quality with just a few molds. I made cinder blocks in the evening after work every day, and I will say that this work was not a burden for me. I don’t have a concrete mixer and I mixed the solution by hand in a tray with a capacity of 300 p. Well, if you work together, everything will turn out effortlessly. Alternatively, you can make foam blocks with your own hands .
And another option for making blocks yourself. Sheet iron mold.
I chose the block sizes 510x250x215 mm (volume of 14 bricks). From scrap sheet iron I welded 11 molds without bottoms. I welded 2 handles on the sides.

I spread the roofing material right on the ground and place the form. To prevent the mixture from sticking to the walls of the mold, I wipe them from the inside with a rag moistened with waste oil or diesel fuel. I pour hard expanded clay concrete there. I don't tamp very hard. I remove the first form after filling the 11th - this is about 10-12 minutes. The blocks remain in place for 12 hours. Then I move them under the canopy. They harden at above-zero temperatures for 24 days. I make a canopy from roofing felt, tarpaulin or polyethylene film. Under it, the blocks will be protected from rain and sun.
Tried it make blocks and with voids. He inserted two wooden round timbers, turned into a cone and wrapped roofing iron. Void formers can be round, square, rectangular... Depending on how the blocks are laid, the wall thickness is 215, 250 or 510 mm.
For thick walls it is better to make blocks hollow, for thin walls - filled. Conventionally, walls with a thickness of 215 mm without voids can be called cold, 250 mm - semi-warm, 510 mm with voids - warm.
To make half blocks, I insert a sheet of iron into the mold in the center. In the blanks that are used to form openings in the walls of the house, you have to insert wooden plugs to secure the door and window frames.
Tried it make building blocks, using a vibrator, but the solution goes to the bottom of the mold and the expanded clay does not bind. To prevent this from happening, I cooked general shape for several blocks. The vibrator was attached to the side. I made the walls of the mold higher by 1/3 - this is for concrete shrinkage during vibration.
Fillers can be local materials that are not in short supply: expanded clay, slag, sawdust, etc. To prepare the mixture, I used cement, expanded clay and sand in a ratio of 1:4:1.
The hardest work is preparing the concrete. It is advisable to use a simple homemade concrete mixer or a ready-made commercial one.
Cinder blocks were and are one of the most popular materials for construction. various designs in construction. Their characteristic strength, as well as good thermal insulation properties make it possible to build quickly and relatively easily and quite cheaply. Both a professional and an inexperienced mason can build from them.
Maxim, St. Petersburg asks a question:
Good afternoon, please tell me how to make building blocks with your own hands? I am also interested in making adobe. Thanks in advance for your answer.
The expert answers:
Making building blocks with your own hands is not as difficult a task as it might seem at first glance. First of all, you need to take care of the shape, it is a kind of box without a bottom, it can be knocked down from wooden planks or welded from metal. The length of this form is 40 cm, width - 19 cm, height - 20 cm. For convenience, handles are attached on both sides.
The most common building materials are expanded clay concrete blocks. To make them, you need to take 1 part of cement, mix it with 3 parts of sifted sand, add 5 parts of expanded clay, dilute with 2 parts of water. The solution is stirred until homogeneous, poured into a mold, leveled with a cutter (flat board), and thoroughly compacted with a special tamper. After about 12 hours, when the cement has set, remove the mold. Dry the blocks in a place protected from the scorching sun and exposure to moisture. It takes approximately 3-4 weeks to dry.
Our ancestors made building blocks from scrap materials, using clay, straw, river sand and water. The technology for making adobe has successfully survived to this day, but making it with your own hands is not so easy; you need a certain skill in working with clay, without which the job can go down the drain. Clay is prepared in the fall, covered with film, and left for the winter, so it will become more plastic and pliable. Only fresh straw is taken; last year’s straw is of little use for this purpose, since decomposition processes have already begun in it. The sand is taken from the river and must be sifted through a construction sieve. The number of components is determined only by trial; it all depends on the quality of the clay; if it contains sand admixtures, then the proportion of the latter is reduced. The approximate proportions will be as follows: per 1 m³ of clay there are 20 kg of straw and 25% sand.
First, make a test batch, roll out a clay ball, leave it in a sunny place for 1 hour, then throw it from a height of 1-1.5 m. If all the components are selected correctly, the ball will remain intact. Excess sand will cause cracking or failure. If there is not enough sand, the clay will simply blur. In the old days, a wide hole dug in the ground was used to mix the mortar. They do exactly the same thing now, only they line the hole with film, pour the solution into it, then put on rubber boots and knead it. The previously prepared forms are taken out to a sunny place, filled with clay mortar, leveled with a board on top, tamped thoroughly, and left to dry. outdoors, in about 2 weeks the adobe will be ready.
You can do it at home arbolite blocks. To do this, you need to purchase cement from M 300 and above, sawdust, river sand and not slaked lime. First, cement and sand are mixed, lime is added, mixed, after which it is the turn of the previously sifted sawdust. The mixture is diluted with water to make it more plastic, alumina sulfate or calcium chloride is added. The quality of the solution is determined as follows: roll a small ball, hold it in your fist, if water flows, you need to add cement and sand. If the ball crumbles, this means that there is not enough moisture in the solution. The mold is covered with film, the solution is poured, compacted, left for about 5 days, after which the blocks are removed and sent to dry (40-90 days). Using the expert recommendations outlined above, you can make building blocks at home.
Each of us needs a family and our own comfortable place For permanent residence. Some people want to have an apartment in a big city, while others dream of living in a place where they can grow vegetables and fruits, keep pets, have a house suitable for habitation, and all the necessary outbuildings. But not everyone can afford to build all the necessary premises from purchased building materials. In this case, we think about whether it is possible to build a house from self-made material.
Aerated concrete blocks - lightweight construction material, so when building a house there is no need to strengthen the foundation.
All generations before us have asked this question, so a sufficient number of ways to obtain building materials from improvised means have long been known.
The best solution in this case is to build housing on your own from what can be obtained directly on the spot.

Elements of the supporting frame: 1 - the first row of blocks based on mortar; 2 - additional cellular blocks; 3 — ring reinforced belt; 4 — reinforced concrete floor slabs; 5 — heat-insulating gasket; 6 - monolithic reinforced concrete distribution belt; 7 - lintel reinforced from concrete; 8 — lintel made of concrete; 9 - waterproofing; 10 - base.
The most accessible material that can be found everywhere is earth, or rather, the soil that is located under the fertile layer. Since ancient times, residential buildings and other buildings were built from soil, but more often in areas where there was little forest. Blocks were made from this material using plastic molding or compaction, as well as using formwork (soil was simply packed into it very tightly).
For example, if work on building a house with your own hands is planned without a basement, then the soil that was removed for the construction of the future foundation will be enough to build the walls of a one-story house. If you make a basement, then the house can already be made two-story. The soil that was removed during the construction of a pool, drainage or well is also suitable for walls.
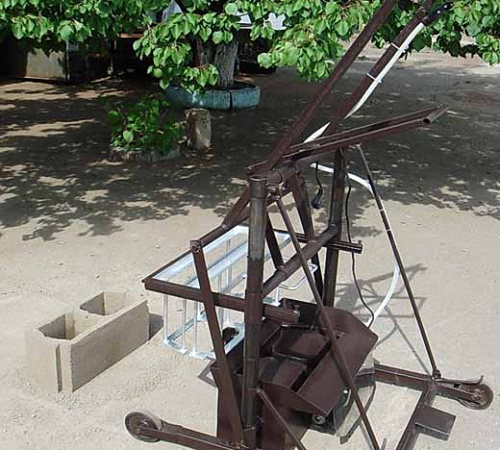
Previously, it was not possible to mechanize at least some part of the process of manufacturing such building materials, but in our time, of course, you no longer have to mix the necessary ingredients with your feet, because special mechanized devices have been invented for this.

With the advent of special mechanisms, the situation with construction using scrap materials has changed significantly for the better. Using an electrified tool, you can make material - mix it and compact it. And the result is no worse than in ancient times, but it takes much less time and physical effort.
The authors of the equipment in question managed to create a tool suitable for compacting concrete and other low-moisture construction mixtures and materials, as well as soil masses. And this invention, affordable for many, will make it possible to produce most building materials and parts directly at the construction site.
Soil manufacturing technology

Using such a machine, you can form wall blocks from local raw materials, incl. from soil using the “zone injection” technology.
The production process of this device is based on the reproduction of a natural effect called “flowing wedge”. home technological feature consists in the fact that the mold, the molding powder mass and the supercharger simultaneously move in it. And all this without any vibrations or noise. At the same time, such traditional processes as mass dosing, control of product size and pressure that is applied to the punch in similar molding factory installations are not needed.
In the molding apparatus called “Mini-supercharger” MH-05, a dense and uniform structure is formed throughout the entire volume of the mold, and the dimensions of the product always correspond to the shape in all respects. When switching to another material, no equipment readjustment is required. And in the process, the effects of elastic aftereffects, air entrapment and over-pressing are eliminated.

Sequence of laying blocks: a – single-row ligation system; b – multi-row dressing system; c, d – multi-row ligation system using a mixed method (numbers indicate the sequence of masonry).
MH-05, which has no analogues in the world, is intended not only for the production of single-format blocks for construction needs, with its help it is possible to independently produce bricks, and various racks, blocks, slabs for window sills and much more necessary when building a house with your own hands. The raw materials for MH-05 can also be different kinds soils, and industrial waste, and other materials.
This molding kit is indispensable for garden and garden owners. summer cottages, cottages, farmers, landscape designers and architects, as there are endless opportunities for individual creativity both when building a house and when landscaping any areas, be it personal plot or a park.
Everyone has the opportunity to work with this device. There is no need to do anything complicated. And at the same time, the cost of building a house is several times lower than usual. Here are some parameters of products that can be made on the MN-05 (name, size in millimeters and one-time quantity):
- raw brick from soil block - 65x120x250 - 4 pcs;
- concrete block for paving - 65x120x250 - 4 pcs;
- paving slabs 250x250 - 2 pcs;
- concrete gas stone - 65x120x1000 - 2 pcs;
- flat tiles -120x250 - 4 pcs;
- window sill plate - 50x250x1500 - 1 piece;
- window lintel - 50x250x1500 - 1 piece;
- concrete facing tiles— 250x250x15 — 2 pcs;
- reinforced concrete pillar rack - 65x65x100 - 3 pcs;
- concrete tray - 65x250x100 - 1 pc.
The “flowing wedge” phenomenon makes it possible to obtain unique properties of the material: its density reaches 99%, which prevents elastic stress, transverse delamination and expansion of compacts from occurring, since air is not pinched.
Production in block form

It is better to make a mold for making blocks with a removable bottom, this will make it easier to remove the finished blocks.
There are other technologies for making blocks for construction and other building materials for the house with your own hands from scrap materials (clay, sand, lime, sawdust, earthen) and from cement.
The technology that will be discussed now is similar to the technology called “tise” (technology + individual construction+ ecology), but this one is modified and universal, since it can be used to make building blocks with voids (sand and cement mortar) and without them (clay, sand, sawdust, cement, lime, earthen).
The durability of structures made from blocks using this technology is greater than those made using traditional methods - up to 100 years or more. With the help of such blocks it is possible to construct buildings up to 4 floors.
The process of making a block with your own hands:
- preparing a solution (sand-cement or other);
- placing the block mold in an exactly horizontal position;
- pouring the solution into the mold (and, if necessary, compacting it);
- after 5-10 minutes, the pins and internal structures are removed to form voids;
- removing the mold from the manufactured structure, further drying the block.
In this way, you can make up to 40 blocks per day with your own hands. And building blocks made in block form receive significant advantages over panel or brick blocks:
- very significant reduction in construction costs;
- use of economical equipment;
- no need for heavy lifting and transport equipment;
- availability of building materials;
- minimal waste;
- ensuring high strength of the structure;
- high thermal insulation of the house;
- environmental safety and high level comfort;
- There are no high maintenance and repair costs during operation.
Wood concrete building blocks

The main composition of wall blocks includes wood chips and concrete.
Wood concrete blocks are lightweight building wall blocks that are made from wood chips (usually from trees coniferous species), water, sawdust, chemicals and cement. In the sixties of the last century, the production of such blocks was carried out by more than 100 factories throughout the country. But after panel construction was approved, production was discontinued.
Nowadays, it is possible to make wood concrete blocks for building a house with your own hands, subject to strict adherence to all technological requirements. The requirements of GOST, according to which wood concrete was previously manufactured, require the use of wood particles whose size is strictly 40x10x5 mm. The amount of leaves and needles cannot exceed 5% and there should be no more than 10% bark.
Manufacturing requires a considerable amount of cement, which impairs the thermal insulation properties of the material. It is because of this ideal option Wood chips are considered the main raw material.

Wood concrete is an ideal material for making walls of a bathhouse or sauna.
Experts recommend using sawdust and shavings, because wood shavings can serve both for heat and for reinforcement. The ratio of sawdust and shavings can be either 1:1 or 1:2. Before use, in order to avoid rotting, sugar must be removed from shavings and sawdust, and this requires keeping the material outside for 3-4 months. Without this procedure, the blocks may swell in the future.
During aging, it is necessary to periodically shovel the shavings and sawdust, but if this is not possible, then the mixture must be treated with calcium oxide. A solution is prepared at the rate of 150-200 liters of 1.5% solution per 1 m² of raw material. The treated mixture is left for 3-4 days with stirring several times a day.
For the manufacture of wood concrete it is necessary. Experts recommend using Portland cement 400 grade, and as additives - liquid glass, slaked lime, aluminum sulfate and calcium sulfate.
Additives are prepared in an amount of 2-4% of the cement mass. The best combination of additives is considered to be a mixture of 50% calcium sulfate and 50% aluminum sulfate or in the same ratio liquid glass and calcium oxide.
Process Features
If possible, you can prepare both shavings and sawdust with your own hands using special machines and processes, but you can also purchase these raw materials in finished form and already processed.
This material is soaked in water with the addition of liquid glass. And to speed up the process of hardening and mineralization of the material, calcium chloride is added to the mass. In order to carry out disinfection, you need to introduce slaked lime.
And only after all these preparations is the mass mixed in a concrete mixer along with cement and other necessary ingredients. Next comes the filling of special forms with the resulting material, and it is necessary to compact the mixture using a manual tamper, a vibropress, or pneumatic or electric tampers.
Material Formation
Experts recommend making molds for blocks from boards and covering their walls with linoleum to make it easier to remove the building blocks. When manually tamping, it is done in layers using a tamper made of wood and lined with iron. Afterwards the block is kept for a day and then removed. Then it is left under a canopy to be fully refined to the required strength. In this case, it should be covered while still wet to allow hydration to occur.
The optimal temperature and period for this is 15 degrees and 10 days. Lower temperatures will require longer soaking time. It is important not to allow the level to fall below zero and do not forget to periodically water the blocks with water.
Expanded clay blocks
You can do it yourself. First of all, to make expanded clay blocks you need to prepare a special mold. You can do it from a regular board. The form is made from a pallet and two halves resembling the letter “G”. The inside of the boards must be either treated with machine oil or covered with tin. Special closures must be installed at the ends to prevent the mold from falling apart or changing size.
It will be a little more difficult to make a mold with void formers for an expanded clay block with voids, but this is compensated by the economical consumption of the expanded clay mixture. If desired, diagrams for them correct production can be found in articles on this topic.
The size of the form can be arbitrary and depend on the assigned construction tasks, but the following sizes are more often used:
- 39x19x14 cm;
- 19x19x14 cm.
In addition to the form, you will need the following tools:
- Master OK;
- shovel;
- buckets;
- container for primary mixing of components with water;
- metal plate for final mixing of expanded clay concrete mass;
- water, sand, expanded clay.
Component ratio

To make a high-quality mixture, you need to take:
- 1 part of the binding material - cement of a grade not lower than M400;
- 8 parts of expanded clay (approximately 300-500 kg/m³). It should be added that about 5 kg of expanded clay of a fraction from 5 to 20 mm can be placed in a 10 liter bucket;
- sand - 3 parts without admixture of clay and other components;
- 0-8 - 1 part water.
Experts advise adding a teaspoon of any washing powder to the solution to make the solution more flexible.
Correct casting of the mixture
Using a trowel or shovel, you need to carefully pour all the components into a container of water and let this mass sit for some time. Next, it is transferred to a metal sheet and brought to the desired state by thorough mixing.
Afterwards, the finished mixture is placed in a mold and subjected to vibration using a special device that creates vibration impulses. You can also get by by tapping the sides of the mold with a shovel.
After two days, the compacted block must be carefully released from the mold by unhooking the closures on it, and in this form it must be left to harden for another 26 days.
A standard block of expanded clay weighs from 16 to 17 kg and requires about 1.5 kg of cement, 4 kg of sand and 10.5 kg of expanded clay. Having made some simple calculations, we find that each block costs about 25 rubles, with the average cost of finished expanded clay being 30 rubles without delivery.
Aerated concrete blocks

To prepare aerated concrete blocks, you need the following components:
- Portland cement;
- quicklime;
- sand;
- water;
- a small amount of aluminum powder.
You will also need:
- concrete mixer;
- block molds;
- metal strings to cut off excess mixture from the top of the molds;
- shovel;
- measuring utensils;
- buckets;
- individual protection means.
The components are taken in the required proportion: quicklime and Portland cement - 20% each; quartz sand - 60%; aluminum powder - less than 1% and a little more than 9% - water. All this is mixed in a mixer until it reaches the consistency of sour cream.
Experts advise purchasing molds for casting aerated concrete ready-made, giving preference to metal and plastic forms. And the finished mixture is poured into such forms, filling it halfway, since gas formation will raise the mixture to the rest of the part over some time. And if the mixture rises above the edges, then the excess is cut off with strings.
The mixture is kept in the molds for 6 hours. In this state, the blocks will be ready to be cut into smaller pieces after the formwork is removed from the precast forms. When cutting, it is necessary to form grip pockets and grooves for the fingers.
Further, in industrial conditions, the blocks are placed in an autoclave to gain strength, but these installations are very expensive, so when self-production the blocks will gain strength in natural conditions.
The extracted and cut blocks are kept indoors for another day before they can begin to be stacked on top of each other. Such material can be used to build a house only after 28-30 days, when the blocks have reached their final strength.
Whatever method you choose to prepare the material for building a house with your own hands, in any case, the construction of buildings from it will be cheaper, and in some cases also much more environmentally friendly, stronger and more comfortable than using industrially produced material.
Cinder block is one of the most popular materials for the construction of walls of one-story buildings. It is distinguished by its low cost and the possibility of producing it independently at home.


Cinder block - wall stone
This building material is intended for low-rise construction. There is an opinion that if you include “high” grade cement in the mix, then you can make homemade blocks solid foundation for a bathhouse or a house. However, foundation blocks must withstand enormous loads, so the blocks should be purchased at the factory rather than made independently.

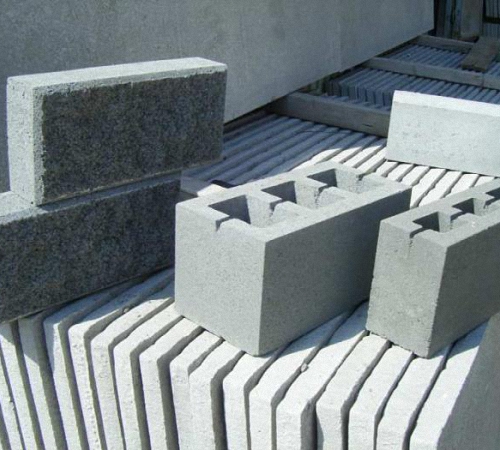
Cinder blocks are:
- hollow;
- full-bodied.
Due to sufficient strength characteristics, solid cinder blocks are used for cladding and construction. load-bearing walls, as well as partitions. At the same time, hollow products have good heat and sound insulation. Due to voids, raw materials are significantly saved, which means the cost of production is much lower.
Cinder blocks are also used as additional insulation when constructing frames.
How to mix a solution to create a cinder block?
The name of the building material “cinder block” speaks for itself. This means that the main component of the solution will be the slag obtained in the blast furnace, which should be sifted through a special sifter (sieve).

We will need:
- 7 parts of the main filler (slag will serve as this);
- 2 shares of gravel having fractions of 5-15 mm;
- one and a half parts of cement (it is best to take grade M 400, 500);
- about 3 parts water.
In addition to slag, other components can act as the main element: clay, expanded clay, sand, gravel, crushed stone, gypsum and many others. It should be noted that if you choose blast furnace slag as a filler, then other additives must not be used. If you want to get a colored cinder block, then you can add chalk or red bricks reduced to fine crumbs into the solution (they should be crushed).

In addition, during the production of cinder blocks, make sure that the solution does not spread.


| Component name | Qty components | Density, kg/m3 | Water absorption,% | Mrz, cycles not less | Compressive strength, kg/cm2 |
|---|---|---|---|---|---|
| Cement, kg Sand, kg (m3) Crushed stone, kg (m3) Water, l (depending on the moisture content of the components) | 500 900 (0,52) 900 (0,52) 100...200 | 2350 | 4 | 200 | 410 |
| Cement, kg Screenings, kg (m3) Sand, kg (m3) Water, l | 500 920 (0,54) 1150 (0,7) 100...200 | 2160 | 4,5 | 200 | 400 |
| Cement, kg Sand, kg (m3) Water, l | 600 1550 (0,9) 100...190 | 2200 | 5,3 | 200 | 436 |
Tip for obtaining durable blocks: you need to add a plasticizer to the solution (you can buy it at any hardware store). Then you will receive not only durable, but also frost-resistant and waterproof blocks.


When you are going to set up the process of creating cinder blocks yourself, you should understand that there is no universal solution recipe. Each master selects his own unique formula through trial and error. If you are a beginner, you can use the standard one.
Cinder block production methods
There are two ways to obtain such blocks on your site.
- Using formwork, that is, a form made of lumber or steel sheets.
- Based on the operation of a special machine.
Video - Making cinder blocks by hand
Video - Cinder block walking mobile machine
Video - Machine for making cinder blocks
Tools and materials for block production:
- molds (wood or metal), or vibrating machine;
 2,3,4 - pallet blanks. 5,6,7 - frame of the matrix from below (corner 25x25). 8 — bar for fastening void tanks. 9 - emptiness. 10 — upper void plug. 11 — lower void plug


- concrete mixer;
- leveling spatula;
- shovel for pouring mortar;
- solution.
Instructions for making your own mold
The design of the form has the following form: bottom and side walls. Between a pair of transverse boards or sheets of metal, you should fasten the crossbars at the required distance for you. Maintain a step that corresponds to the size of the required cinder block.

Since it will be difficult to remove the finished product from the mold, the design of the container should be collapsible. For production efficiency, make formwork designed to produce 4-6 cinder blocks.

To make a mold to create cinder blocks you will need:
- iron sheets 3 mm thick;
- 5 mm iron strips (several pieces);
- cylinders, 4 cm in diameter;
- welding machine;
- Bulgarian;
- chalk for marking.
Stages of manufacturing a single split metal mold
Step 1. We mark the sheet according to the size of the blocks: we will need two longitudinal sides and two transverse ones. We cut out our plates with a grinder.
The width of the longitudinal plate is 210 mm, the length is 450 mm, the transverse plate is 210 by 220 mm.

Step 2. Wings 3.5 cm high should be welded to the bottom of the cinder block mold so that the mold does not move, and a handle to quickly release the poured solution from the mold.
Step 3. Notches are made along the contour of the transverse and longitudinal walls in order to hook the mold onto the longitudinally installed walls.

Step 4. Let's assemble our form.

Step 5. To create voids in the cinder block, we make hanging cylinders. They must be welded to a plate 3-4 mm thick, which should seem to penetrate the cylinders closer to the top. We make notches on the end walls of our container to hook them.

Video - Do-it-yourself mold for cinder blocks
Production of cinder blocks using a split mold
Forms have any dimensions. The standard dimensions of the structure are 90x190x188 mm; in private construction, other sizes can be used, for example, 40x20x20 cm. In order to save material, it is better to use forms with cells of 4-6 blocks and cylinders (squares) to create cavities.
A homemade metal form (detachable) looks like this.


Let's consider step by step process production of cinder blocks.
Step 1. Mix the solution in a concrete mixer.

Step 2. Pour the mixture into our mold with a shovel. In this case the mixture is thick. You can also use a liquid solution.


Step 3. Be sure to ensure that the solution fills the container evenly. To do this, compact the filled solution. We control the filling of the form to the brim. Align upper layer using a spatula.

Step 4. If the solution is dry, then you should use a special lid, the holes in which will block the bayonets in the mold. This device will help compact our cinder block. This type of lid is not used for liquid solutions.


Step 5. We are moving our unit to an open area for further storage. After 30-40 minutes, remove the bottom, sides and top cover. To better remove the cinder block, we use a regular hammer to hit the top of the wall and a longitudinal strip with cylinders.


Step 6. It will take us at least a day to dry completely.
Production of cinder blocks using a vibrator machine
Step 1. We mix our solution, taking into account the proportions. Particular attention should be paid to the right amount of water, because the cinder blocks should not spread when you remove them from the mold.

Kneading

To find out the correct consistency of the mixture, carry out small test. Squeeze the solution in your hand: if it connects in it and does not spread when it falls to the ground, it is a good and correct solution.
Step 2. We fill our form with a solution, with a slide.


Step 3 . We turn on the machine for 2-4 seconds, after which the loaded composition will be compacted. We level the mixture with our hands so that the iron pins (cylinders) are visible.

Step 4. If there is not enough mixture in the form, it needs to be replenished, insert the clamp and turn on the vibrator again. The completion of formation is indicated by the settling of the clamp on the stops.
Step 5 . Our vibration form should be turned on again for 6-10 s.
Step 6 . Close the top with a lid with holes for the cylinders. And we do another tamping by raising and lowering the lid 4-5 times.
Step 7 . Then, without turning off the machine, the uniform is removed - just take the machine to you.
Using a vibrating machine, you can produce up to 500 cinder blocks per shift.

Step 8 . We dry the blocks for 5-10 days. Complete hardening of the resulting building materials will take place after a month, while the humidity should be high and the air warm.

Step 9. After a day, the blocks can be moved to storage locations (they will not be broken), but they can only be placed together after a week. And if you do add a plasticizer to the solution, then after 6-8 hours they can be moved and stored.
Of course, you shouldn’t purchase a vibrating machine for a single production, but you should pay attention to compaction when creating cinder blocks. Special attention(the quality of the product depends on this process). In this case, you can use a regular vibratory grinder, on which you just need to place our mold with the mixture.
Video - Production of cinder blocks using a vibrator machine
Features of storing cinder blocks
The resulting products are stored in pyramidal stacks, one hundred pieces at a time.
At the same time, they are stacked at small intervals. All you have to do is dry the material for a couple of months, then you can start building a bathhouse, an extension or a shed.

What are the features of cinder block production?
When producing cinder blocks, special attention should be paid to drying. For example, any dent or unevenness will ruin the building material. Another requirement for material quality is geometry. A large number of irregularities and defects are a prerequisite for increased costs for finishing the constructed walls. Therefore, in order for the product to turn out smooth, you should fill the mold or vibrating mold to the brim. Do not skimp on pouring the solution in heaps, because the vibration will shake out your mixture.

For better plasticity, when mixing the solution, do not forget to add plasticizer at the rate of 5 g per block. This will save the product from possible cracks, increase strength and frost resistance. To build a small bathhouse, you can mix the solution manually, but a concrete mixer will help speed up the process. You just need to buy or borrow a small unit with a capacity of 02-0.5 cubic meters. m.
Video - Homemade concrete mixer
Before preparing the mixture, the slag is moistened 5-6 hours before. This will allow better binding of cement grains and filler fractions. It should be noted that if you are filling wooden or metal forms without the possibility of vibrating, the mixture should be liquid.
Pros and cons of using cinder blocks
The advantages of cinder block include:
- possibility of production at a summer cottage or in a private house;
- drying of the material can take place in an autoclave ( industrial production), and outdoors (with self-production);
- the cinder block building carries minimal losses heat;
- the material is inexpensive;
- construction of the building is carried out quickly, taking into account big sizes blocks;
- when mixing the solution, you can, by changing the proportions, give it certain qualities;
- You can produce cinder blocks of any size.


Disadvantages of cinder block:
- low frost resistance, but with the use of a special additive they can be increased;
- there are doubts about environmental friendliness, especially for products made from blast furnace slag;
- As for the liquid absorption characteristics, the material has strong moisture absorption and requires special protective coatings;
- fragility (this material is clearly not suitable for the construction of high-rise buildings).

- Blocks made with the addition of cement have the highest strength. The next place is occupied by lime blocks.
- If small granules are replaced with part of the sifted sand, the strength of the products will increase slightly.
- A combination of cement and lime (or clay) in a 3:1 ratio will allow you to save money, which will not affect the quality at all.
- Before you start pouring the solution, the molds should be cleaned and wiped. This will prevent the resulting blocks from sticking to the bottom and walls. For such wiping, diesel fuel, used oil or similar products are used.
- The density of the solution is a direct indicator of the rate of hardening. The thicker it is, the faster the block can harden. The main quality characteristics of cinder blocks depend not only on the production technology, but also on the choice of solution. Below are Various types mixtures, the use of which demonstrates certain characteristics required of the material.
Video - Cinder block. Instructions for a beginner
The use of cinder blocks in construction can reduce the cost of constructing walls several times. For the manufacture of of this material Special equipment is required, the purchase of which is quite an expensive process. We suggest you study the recommendations on how to make a machine for cinder blocks with your own hands.
Cinder block - features of the material and its purpose
Cinder block is called a building material, according to appearance similar to stone, which is made using the vibration press method. For its production, a filler in the form of slag is used, and the binder is cement mortar.
There are two options for producing cinder blocks:
- industrial;
- independent or home.

To make cinder blocks with your own hands, small-sized vibrating machines are used, which are capable of producing small batches of this material.
In relation to the main components of the cinder block, namely slag, it contains one of the materials in the form of:
- slag;
- volcanic ash;
- granite screenings;
- crushed granite;
- river crushed stone;
- sand;
- brick stone;
- cement;
- expanded clay, etc.
The material, the manufacture of which we will discuss further, has lower quality characteristics and durability. It is perfect for the construction of utility buildings, sheds, and storage buildings.
Making cinder blocks at home does not allow you to carry out the entire technological process in relation to all the requirements that are placed on it.

In order for the cinder block to acquire the necessary rigidity, it is necessary to withstand steaming, through which it is saturated with moisture and heated to a certain temperature, which increases the strength of the cement. Although, with the help of blocks made on a home vibrating machine, you will get an excellent one-story building, the service life of which will be at least 25 years.
Machine for cinder blocks: manufacturing features
To build this kind of machine, you should have the skills to work with welding machine and metalworking tools.
As the main detail homemade machine for the cinder block there is a matrix that has a shape for installing the solution. The matrix has the form of a metal box in which there are certain elements that provide voids in the already manufactured product.
It is the matrix that is a kind of machine, the manufacture of which will require the presence of:
- welding machine;
- Bulgarians;
- vice;
- metalworking tools.
The materials you will need to purchase are:
- sheet of metal, 3 mm thick, 1 m² in size;
- one meter steel pipe, diameter from 7.5 to 9 cm;
- steel strip 3 mm thick and 30 cm long;
- electric motor, power up to 0.75 kW;
- fasteners in the form of bolts and nuts.

Instructions for making a cinder block machine with your own hands:
1. First, decide on the dimensions of the product that is needed for construction. It is possible to measure a ready-made industrial cinder block.
2. From metal sheet cut out the side sections of the machine, there should be two of them, and there should be a partition between them. The result is a box having two equal parts.
3. A bottom wall remains in the voids, the thickness of which is at least 3 cm. Thus, it will be possible to determine the height of the cylinder that will limit the voids.
4. Cut the pipe into six pieces, the length of which will be equal to the height of the void.
5. To make each of the cylinders cone-shaped, it is necessary to make cuts in each of them to the center, and then compress them using a vice and weld them together by welding. In this case, the diameter size will become two millimeters smaller.
6. Weld the cylinders on both sides and connect them together on the long side of the block. They must be located in such a way that the voids that will be formed exactly copy the voids of industrial production.
7. A plate 3 cm in size is added to the extreme sections. It must have a hole that will ensure its fixation on the surface of the eyes.
8. On the central part of each matrix compartment, saw through the surface and weld lugs to it. They will help provide the ability to temporarily attach restraints to create a void. The result will be a mechanism with the help of which cinder blocks will be produced as a monolithic or non-monolithic type.
9. Select one transverse wall onto which to weld four bolts. They act as fasteners to secure the motor.
10. On the side of loading the mixture, parts in the form of an apron and blades should be welded.
11. Clean and polish all components for further painting.
12. Make a press, the shape of which will be exactly the same as the mechanism itself. To construct it, you will need a plate, the holes of which will be larger diameter cylinder by four millimeters. It should easily fit into the box to a height of at least 5 cm.
13. To ensure ease of use of the press, weld parts in the form of handles to it.
14. Cover all components of the mechanism with an anti-corrosion primer, and after it dries, install the motor.
In order to from the standard electric motor To make a vibration motor, install welded bolts in the form of eccentrics on its shaft sections. They must coincide in axial space. Nuts are installed on the bolts, the amount of tightening of which determines the speed and type of vibration.
Drawings of a cinder block machine:

Using such a matrix, both walking and remote type machine To improve it, you need to have a good mechanic's tool and experience working with it.
Any material in the form of clay, sawdust concrete, expanded clay concrete, etc. is suitable for the manufacture of this kind of blocks. The standard mixture should consist of one part sand filler, one part cement and three parts slag waste.
Very important role plays the coefficient of moisture contained in the finished mixture. To optimally determine it, it is enough to inspect the composition; it should not fall apart, but at the same time it should be elastic and hold its shape well.
It is this kind of workpiece that is placed in the matrix to obtain the finished cinder block. To create voids, it is recommended to use glass bottles, broken bricks or sharp-angled stone.
Please note that before starting work on the machine for producing cinder blocks, all parts should be lubricated with oil, this will prevent the finished mixture from sticking to the metal. Turning on the vibrator is possible at any stage of production, but it is best to do this before pressing finished block. In addition, the electric motor should be reliably insulated, using an apron to prevent the solution from getting on the surface of the motor.
Ready-made cinder blocks should be kept outdoors, in summer, at temperatures from +12 to +30 degrees. To prevent the blocks from drying out, they are covered with plastic wrap.

Equipment for the production of cinder blocks and their manufacturing technology
The production of cinder blocks begins with the preparation of a concrete solution, which consists of cement, water and slag. All components are mixed together using a concrete mixer or mixer. Manual mixing of the solution takes longer and requires enormous physical effort to carry it out.
All work is carried out exclusively at above-zero air temperatures, since frost causes water to solidify. When the solution is ready, it is poured into a mold, which can be hollow or monolithic. Standard size each block is 39x19x18.
When the block already has a compacted structure, the mold is removed from it, and the block itself is installed on the floor or on a pallet. The cinder block drying procedure lasts at natural air temperature, which should not be less than twenty degrees. In this way, it will be possible to obtain material suitable for further construction. To avoid drying out of the material, ensure maximum air humidity.
After the cinder blocks dry, they acquire additional strength and are stored in a dry place in the form of a warehouse.
Materials of various compositions are used as raw materials. The choice of one or another raw material is influenced by the capabilities of the equipment on which the cinder block is made and the type of structure that will be erected from it.
The most common options for fillers for making cinder blocks with your own hands are materials in the form of:
- brick waste;
- sand;
- crushed stone;
- ash;
- expanded clay, etc.
The amount of a particular ingredient depends on the requirements for the final product.
A fairly common component for the manufacture of cinder blocks is a plasticizer, which improves specifications finished material. In addition, the use of plasticizers increases the strength of the finished building and its resistance to frost and moisture.
After the production of cinder blocks, the process of construction and the actual construction of walls from cinder blocks awaits. Another important factor, affecting the quality of cinder block construction - finishing and insulation of the finished building.

The standard composition for preparing a mixture for cinder blocks consists of:
- one part of cement;
- nine parts of slag;
- 50% of the amount of cement is water.
Another option for making cinder blocks involves using:
- four parts of fine screenings;
- four parts granite slag;
- one part cement to 50% water.
Production of cinder blocks - general requirements for the work
To make a high-quality cinder block, you should adhere to the following rules:
- know the exact recipe and composition of the mixture;
- follow the technology of making cinder blocks;
- have sufficiently professional equipment.

In addition, the key to a high-quality cinder block made at home is the use of coarse sand, blast furnace slag, and high-quality cement with a minimum grade of 400. In addition, special equipment is required, including a brick press.
Burnt coal, which is used as a filler, is excellent for making slag. One of the important requirements for the production of cinder blocks is compliance with a symmetrical and even geometric shape. finished product. Since the amount of mortar required for the construction of the finished building depends on the number of irregularities and flaws in the cinder block. To avoid the appearance of this defect, the mold should be filled to the top and even more, since when vibration is carried out, the finished mixture is compacted and reduced in size.
The vibration form is turned on every time with an interval of 6-15 seconds. Next, vibration is stopped and the finished product is evaluated. If the solution is lower than the outermost line of the matrix, then a pressure cap is installed on it and the vibration is turned on again. Next, the clamp rests against the limiter, the vibration is turned off, and the form is pulled out from the device.

DIY cinder blocks: manufacturing instructions
When making cinder blocks yourself, you should select the composition of the mixture based on the type cinder block machine. Since the quality of vibration directly determines the properties of the final product.
We offer a variant of the standard recipe for making cinder blocks:
- seven buckets of slag filler;
- two buckets of sand;
- two buckets of gravel;
- one and a half buckets of cement;
- from one and a half to three buckets of water.
Please note that the amount of water affects the structure and quality of the blocks. The solution should not spread after pressing. If you throw the finished mixture on the ground and at the same time it spreads, and in your fist it comes together again, then this type of solution is suitable for making cinder blocks.
If a room is used for making cinder blocks, then it must have a flat floor and good ventilation, but still, it is recommended to produce cinder blocks outdoors.

Homemade machines for cinder blocks involve the production of this material according to the instructions below:
1. Pour the solution into the cinder block mold. Turn on the vibrator for five seconds. If the amount of solution is insufficient, add a little more mixture. Set the clamp and turn on the vibrator again. When the clamping device is on the stops, the manufacturing process is considered complete.
2. The vibrating mold is turned on for another 8 seconds and then the mold is removed without turning off the vibrator.
3. Drying the blocks takes a period of four to nine days. Full strength is achieved after a month. The main conditions for their storage are high humidity and temperature.
4. Transportation of blocks to the premises occurs at least a day after their manufacture. If there is a plasticizer in the composition for preparing cinder blocks, their transportation occurs six hours after production.
5. Cinder blocks are stored in the form of a pyramid. After a few months, they become suitable for construction.


