Irises are a viable, unpretentious garden culture, which is represented by a variety of colors and shades, varieties. This perennial is grown almost everywhere, it has no special requirements for the composition of the soil, lighting and care. Flowers look spectacular in flower beds, along fences. To achieve high results and enjoy beautiful flowering, you need to know how to properly plant and care for irises in open field autumn.
Benefits of autumn planting
In general, flower culture is allowed to be planted in open areas from early spring to October. But when planting irises in autumn, the process of adaptation and rooting is much faster and more efficient, since the plants are in a dormant state that occurs after the flowering phase. The best time for planting or transplanting flowers is August (second half of the month) and September. If you adhere to these terms and basic agricultural practices, then you can expect the appearance of flowers next spring, more lush bloom- for the second year.
Among the positive aspects of the autumn planting, experienced gardeners note:
- the formation of a strong root system;
- lignification of emerging buds;
- painless for the plant, the division of the bush occurs;
- plantings are easier to carry sub-zero temperatures;
- in the spring they start growing early.
Timing of the procedure
At the end of the flowering phase, when the arrows of the irises have already drooped, they begin planting. It is better to plant a crop in the fall in the first half of the season, while the weather is still warm, and at least 1-1.5 months before the first frost. This is especially important for the Moscow region and adjacent regions.
If you plant irises at a later date, the rooting process will be very slow, and there is a high probability of freezing in winter.
The technology of planting horticultural crops in open ground has no significant differences from spring planting. Flowers with a strong root system are removed from the ground, inspected, selected, and the rhizomes are divided into parts, after which they are determined for the prepared area. In order to avoid negative consequences during wintering, shelter is required: dry hardwood, a layer of peat (5-10 cm), sand. With the advent of spring, plantings are freed from additional shelter.
Preparatory stage
Before planting irises in open ground, one should not only prepare well planting material but also to cultivate the territory allotted for these purposes.

Selection and preparation of planting material
To grow healthy and flowering plants, it is necessary to stop feeding bushes that require transplantation in August. The process of preparing planting material includes the following steps:
- The plant should be carefully dug with a garden pitchfork around the entire perimeter.
- Carefully remove the rhizome from the soil.
- Dry in the sun for 2-3 days - this way it is possible to increase the germination and resistance of the crop to adverse factors environment, diseases.
- Using a sharp knife or scissors, separate the seedlings for seedlings. Each should have leaf plates and part of the rhizome up to 10 cm.
- The sheet mass must be cut in the form of a house, leaving only a third of the entire length.
- The roots are also cut to 10 cm.
- Perform disinfection of plants. To disinfect all sections, crushed coal or ash should be used. A solution of potassium permanganate (1%) is highly effective; planting material is immersed in it for 10-15 minutes.
If not a single variety of horticultural crops is planted, then the divisions are signed.
If it is necessary to plant the desired variety, floriculture lovers use the following method: rhizome fragments with a bud, without green mass and small roots, are kept in wet sand until the buds awaken and the root growth point. To plant new bushes, you should not remove the entire rhizome from the ground, you can only take its young segments containing leaves.
It is mandatory to inspect the planting material, it should not show signs of disease, traces of mechanical damage. These should be completely healthy delenki.
Site preparation
When planting in open ground, a number of points should be considered:
- The clearing allotted for planting horticultural crops should be well lit and protected from through winds.
- Groundwater should not be close to the surface, otherwise in the future the flowers may have problems with the root system, they will be affected by rot. If necessary, you need to make an embankment, lay out drainage in the form of fine gravel, brick battle.
- Best of all, irises grow and develop on loamy soils with the addition of sand and a low degree of acidity. It is not advisable to choose areas with sandy soil, there is a high probability of drying flowers. You can save the situation by adding 1-2 scoops of clay, which will help attract water. When growing capricious varieties, it is good to add ripe compost or humus to the soil. Superphosphate and potassium compounds also give positive results.
- To reduce acidity, it is effective to use wood ash, dolomite flour, lime, chalk.

Technology and landing scheme
When planting irises in the autumn, certain rules should be observed, only with this approach will it be possible to see their flowering in the spring.
bulbs
Planting prepared material is planted in a special basket for bulbs. The device is a plastic container with small holes made at the bottom through which excess moisture will leave and air will enter. It is relatively inexpensive and is sold in every specialized store.
Having decided on the landing site, they put a basket on the ground and circle it. According to the resulting marks, it is necessary to dig a hole 16 cm deep, then add a nutrient mixture and place a basket on top. The selected land for planting mixed with the organic composition is placed inside a plastic container. The planted bulbs are covered with a layer of fertile soil. At the end of the flowering phase, the plants should be dug up. When the bulbs ripen in a secluded place, they are removed for storage.
It is more efficient, according to experienced gardeners, to plant irises in a greenhouse in the fall. Then in November there will be flowers suitable for pruning.
Optimal timing for distillation when planting bulbs - the first days of February. It is possible to accelerate the process of bud formation and growth of vegetative organs by maintaining a constant temperature of 15 degrees. In this case, the plants will need bright lighting, saturation of the soil with useful components and moderate watering.
Delenki
For planting rhizome segments, it is not necessary to dig too large planting nests, pits according to the size of the absorbent roots are quite suitable. Planting material is placed in the center, on a hill (mound) made of earth. The roots are sprinkled with a layer of fertile soil and watered.
If everything was done correctly, then the leaf fan will be located vertically, the basal neck above the ground. After two weeks, you can slightly lift the plant by the leaves, well-rooted specimens will be confidently held in the ground.
Subtleties of care after planting and preparation for winter
If you properly care for irises after planting in open ground, you can grow a luxurious plant with bright colors that will decorate garden paths, flowerbeds. The next watering after determining the culture for a permanent place is carried out after 3-4 days, after which it is sprinkled with dry soil mixture to preserve moisture. IN further care for planting irises in the fall consists of measures to remove weeds. But this should be done carefully, otherwise it is easy to damage the root system of a garden crop, which is located in top layer earth. Before wintering, the leaves growing in the form of a fan must be cut off.
Adult plantings do not require additional shelter for the winter. But young plants are recommended to be mulched with leaves, peat, and laid on top fir branches. The main thing is not to forget to clean everything with the advent of spring.
Planted irises do not need additional feeding procedures. In no case should you use manure, which has a detrimental effect on them.
Common Beginner Mistakes
Often, inexperienced gardeners ignore preparatory measures and do not disinfect planting material, which leads to disease. In addition, bulbs and delenki are deeply planted, which is reflected in the ability of the plant to form buds. If you choose a poorly lit area for planting, then it is likely that the irises will not bloom. Ignoring measures to arrange additional shelter is fraught with freezing of flower buds. Excessive moisture in the soil contributes to the development of putrefactive processes on the root system. Violations in agricultural technology also lead to negative consequences.
Irises, despite their unpretentiousness to growing conditions, still need proper care. Only high-quality planting material and compliance with basic agricultural practices allow you to get healthy plants.
The variety of irises is so great that it impresses even specialists who admire endless variety forms, color of flowers and the prevalence of varieties in different climatic conditions. We will discuss the varietal characteristics of the plant, planting methods and care features. What is the difference between planting irises in the fall from other periods, you will find out here.
Best planting period
Beginners may wonder if the best time to plant irises is spring or fall. Many gardeners claim that planting dates begin in early spring and end in autumn. Even in summer, you can plant this culture, and it will grow well. But still, experienced gardeners believe that planting irises in the fall has the best effect on the adaptability of young growth to new soil.

In view of the fact that the survival rate of the roots is 1.5 months, the autumn air humidity ideally contributes to this process. And the transplantation of irises from early September to early October allows the plants to get used to the new place even before the onset of frost.
In the Leningrad region, planting and care can begin as early as August. In Siberia and the Urals, due to an early cold snap, you can not wait for the onset of autumn, and from spring, throughout the summer, start planting flowers. When to plant a culture, a faded peduncle (shoot) will tell you. Immediately after flowering, it is already possible to engage in the division of the roots, and then the planting of irises in the fall will smoothly transfer to June, July, based on the varietal affiliation.
For example: the Kasatik variety fell in love with flower growers for its exceptional vitality, winter hardiness and lush flowering in the stone and swampy expanses of Siberia. In addition, it is rich in a variety of colors and shades, which proves the name itself. After all, iris in Greek means "rainbow". Having the appearance of an orchid, the killer whale does not require special care.
Famous varieties of irises
Choosing planting material
Planting in the spring means, first of all, the reproduction of bulbous species. If you purchased bulbs in a bag with a picture, then you have the opportunity to see the seedlings and touch them with your hands. In order for the bulbs to give healthy shoots, they must be elastic to the touch and without rot.
The note! "Some primrose lovers plant bulbs in a pot to decorate arbors."
Features for the care of bulbous plants is that they need:
- planting in the spring;
- low humidity implies shelter from rains after disembarkation (roofing material or plastic cover);
- sunny areas and dry soils;
- digging immediately after flowering, as they tend to die in wet soils.
If you decide to breed a root plant and bought a seedling with a peduncle, then the old peduncle is removed, and the neighboring children are divided in half. The root should be juicy with a bunch of several roots. You can independently propagate your favorite species and transplant the children to different areas. To do this, in early September, a bush is dug up and divided with a shovel into several plots between groups of leaves. Sections of the roots must be sprinkled with ash containing potassium, and thus protect the sections from the penetration of fungal and other diseases.

Iris seeds are placed in moist soil as early as February or March. Seed germination takes place at home in a container under the film. The container is placed in a shaded place, and after the seeds germinate, it is moved to the windowsill from the sunny side. Transplanted into open ground with the onset of heat without recurrent frosts.
preparing the ground
When planting in open ground, it is worth considering that the vast majority of culture loves bright places at least in the morning. It is desirable that heavy rains can drain elsewhere. To do this, it is preferable to build a small mound with a slope. With a close location of groundwater or fluid stagnation, drainage is laid out at a shallow distance. After all, the root system of "bearded" (bristly) species is horizontally flush with the ground. The remaining varieties germinate a little deeper, but do not go too far into the ground.

Loamy soils with the addition of sand and a slightly acidic environment are ideal conditions for growing. Sandy soils can create a danger of the plant drying out. Then, when digging, you can add a scoop or two scoops of clay, as it attracts water. If you are breeding a capricious variety, then it will not be superfluous to add humus to the soil, as well as superphosphate and potash fertilizers when digging. Ash, dolomite flour, lime or chalk will significantly reduce the acidity of the earth for successful transplants.
Advice! “During planting, do not put manure, then you will create a barrier for the growth and development of seedlings. Nitrogen fertilizers cause active growth and flowering, so nitrogen is applied as a top dressing only in the spring for the growing season.
planting process
If root crops are planted in the spring, then this should be done during the appearance of sprouts before flowering almost immediately after the snow melts. Closely spaced roots can be gently pry with a pitchfork, after loosening the soil along the edge of the roots. However, you won’t have to expect flowers this year, because the plant gives strength to survival.
We dig a hole for planting half a meter deep for tall bushes, and less than a meter (30 cm) for border or dwarf ones. If you set out to dig deeper roots, the plant will either die or push them to the surface. When to plant flowers in the summer, you will be prompted to fade the buds. The hatched flower stalks are removed and thrown away, and neighboring children are planted in a hole. The root neck has a slight bend. It is the convex bend that we turn to the south and, after falling asleep with earth, we water well seat. Before planting, it is preferable to hold the seedlings in the sun for 2-3 days in order to neutralize it from diseases and increase germination. In autumn, we do similar machinations, not forgetting to cut off not only flowering shoots, but also leaves with an angled incision from the edge to the middle. Thus, keeping vitality roots. So you learned how to plant irises correctly.
Care after planting
After 3-4 days after planting, the plants need to be watered and covered with dry earth. Weeding from weeds will create room for the roots and conditions for vegetation.
Growing irises is not complete without protecting the young from frost. After autumn plantings, all planting holes are mulched with spruce branches, peat or sawdust in anticipation of frost. Groups of leaves in the form of a fan are cut into a "house" and the trimmings are burned in order to disinfect from pests and infections. Additional top dressing before winter is not required. If, with the right approach, the plant still blooms, then you have a capricious variety. Do not rush to throw it away, but with patience, wait 2 or 3 years, and then the bush will bloom profusely every year for a long time.
Pests and diseases
As you may have guessed, your plant does not require additional care, but sometimes due to high humidity or transmission of infection by other plants, it can become infected.

The more unusual the variety, the more susceptible it is to disease. There are few of them, but future gardeners need to know about them:
- rot can affect the root or part of it. In case of partial damage, carefully cut out the infected area, sprinkle with ash and fry in the sun. With complete rot damage, we throw out the root in order to avoid the transfer of decay to other plants. We treat the soil and other roots with a solution of foundationazole in a 2% ratio;
- rust and leaf spot is removed by spraying 1% Bordeaux mixture. The procedure is carried out in the spring before the appearance of shoots, and in the fall after cutting the pedicels and leaves before wintering;
- the scoop is able to settle at the base of the pedicel and prevent it from developing. A solution of karbofos in a 10% ratio will perfectly cope with the pest. The treatment is carried out at the beginning of the growing season twice with an interval of 12–15 days;
- thrips start up in leaves and buds, preventing them from fully blooming and blooming. Leaves turn brown and dry. Spraying with a solution of karbofos 10% will relieve the disease;
- slugs disappear on sandy soils. If they overcome - add sand to the ground (or pour it) and the slugs will become much less, because they do not like dry places. You can put a board or a wet rag, and then they will climb under them, and you will take it and throw it away or scrape the slugs with snails from the board;
- Medvedka is afraid of a solution of chicken manure. It is poured on a dry day around the flower bed or along the paths. The smell of marigolds repels this beetle, or they use pesticides intended directly from the bear;
- the wireworm is not found in soil with a normal pH level, therefore, in acidic soils, neutralization is done in the form of the introduction of ash, chalk, dolomite, lime. Ammonium nitrate or ammonium sulfate will get rid of the wireworm if you make them 20-30 grams each. on m 2. Loosening with weeding contribute to this procedure.
Video
Irises are of genuine interest to both experienced flower growers and beginners. Flowers attract with unusual colors, bizarre forms of inflorescences and a variety of heights, which are for every taste - from dwarfs to giants.
anneheathen / Flickr.com
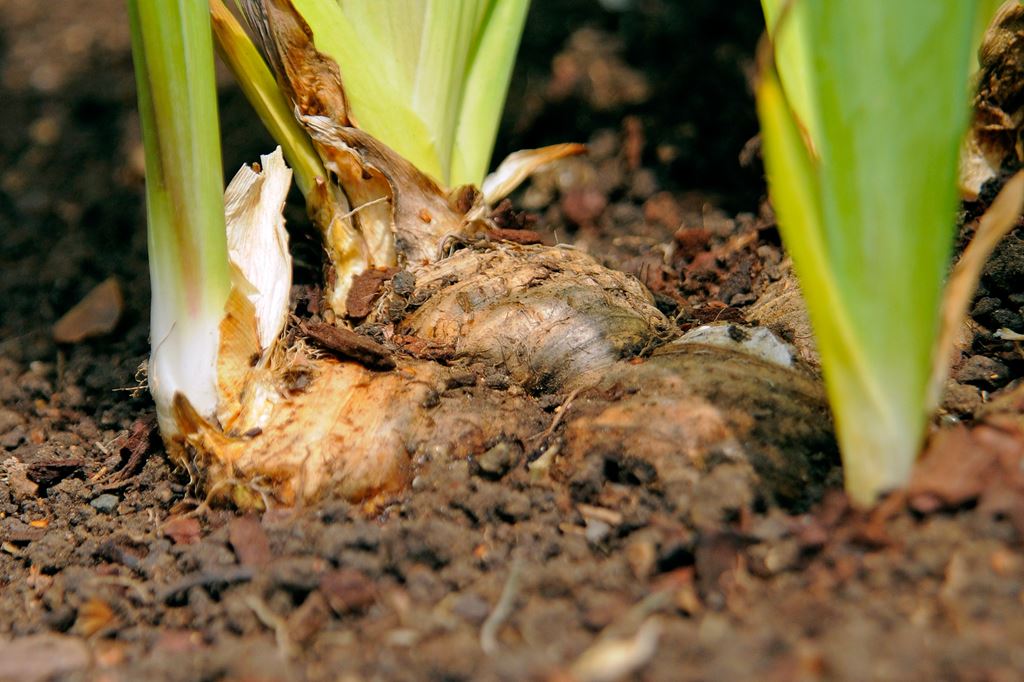
Autumn - best time For landings. It is difficult to name the exact timing of these works, they depend on the region of residence. But the landmark, dried leaves, is the same for everyone. As soon as it became noticeable that the leaves withered, the irises are dug up, cleared of the ground and dried. In the bulbous, the babies are separated. Rhizomes are divided into divisions with developed rosettes of leaves.

mjs_2009/Flickr.com
Planting material should only be healthy - no damage, rot and disease.
Purchased irises are best planted in September or October (depending on the region). It is important here that before a steady cold snap they have time to take root (this will take a month and a half), but do not have time to grow. Therefore, we listen carefully to weather forecasters and focus on forecasts. The current weather sometimes makes significant adjustments to the landing time.
To avoid the appearance of pathogenic microbes, before planting rhizomes and bulbs disinfected(It does not hurt to disinfect the purchased material). Try chlorhexidine treatment. This is one of the most effective active drugs. Processing and dusting with ash is welcome.
plant irises better in the sun, shade plantings they are contraindicated. Plants do not bloom in the shade.
Irises are different relation to moisture. Some varieties - swamp irises, smooth, bristly, etc. like to grow in humid places. But still, most varieties are drought-resistant, do not tolerate excess moisture in the soil.
soil for irises preferably with a neutral pH level, light, not burdened with organic matter. In addition, the soil must be with good air and moisture permeable qualities.
With a close location of groundwater, it is worth laying a drainage layer.
The soil is prepared in advance: dug up, fertilized if necessary, spilled with water.

Mpopp/Flickr.com
root system rhizomatous irises practically located on the surface, therefore, when planting, you should not dig it deep into the soil. Bearded irises are planted like this: sand is poured into a mound, a rhizome is laid on top. The kidney should be flush with the soil surface. Beardless, on the contrary, go deep a couple of centimeters into the soil.
Tall varieties are planted half a meter apart, between undersized varieties you can give a distance of 15 cm.

Sidorenko Olga / Myproplants.com
bulbous varieties it is more convenient to plant in some containers. It can be a basket, pot, bucket, plastic box. Don't forget the drainage holes. Very convenient - the bulbs are easy to detect after withering, there is no uncontrolled growth, and it is harder for rodents to get close to them.
The depth of planting is determined by the size of the bulb. The bulb is buried in the soil by an amount that is equal to three of its heights.

choking sun / Flickr.com
winter hardiness plants are different, depending on the species and variety. Most irises are sheltered for the winter. Most Vulnerable- bulbous irises of Dutch, Spanish and Japanese varieties. As well as rhizomatous varieties: nameless, lake, comb and tall bearded irises. Their shelter should be approached more responsibly.
Huge Advantage autumn planting lies in the fact that next year the irises will show themselves in all their glory, surprising with bright and unusual flowering.
Bulbous Dutch iris is able to decorate with itself any design - it is suitable for flower arrangements, decoration of flower beds, making bouquets. The decorativeness of irises is highly valued by both gardeners and those who grow picturesque plants at home. Correct fit Dutch Iris provides easy care that even novice gardeners can afford. If you follow the basic rules for growing a flower, you can get an excellent result 2-3 months after planting.
Most of the class groups of this culture are suitable for creating garden compositions. But, it is the Dutch irises that often become pets in indoor phytodesign. Unlike other representatives of the Iris family, they have a bulbous root system, which makes it easier to grow and reproduce in any conditions. In this issue, we will get acquainted with the class in more detail, see photos of the most popular garden and indoor varieties, and also discuss the aspects of planting and caring for the crop. 

Botanical description of Dutch irises (with photo)
Let's start the botanical description with the fact that the class Dutch irises are plants with a bulbous root system, which looks like a small bottle, 7 cm high. Every year, filamentous root shoots are formed from the tuber, dying off before the dormant period even at home. From the upper part of the bulb, leaf plates are formed, narrow and xiphoid in shape with a sharp tip and a smooth edge. Before the start of flowering, the plant throws out a long peduncle up to 80 cm tall, on which single flowers of bright colors are located. Varietal groups are divided according to the color of the buds: blue, white, purple, yellow and mix. There are plants with two-color flowers - bicolors.
Flowering occurs in May or June, it is not long, but very spectacular, as we can see in the photo below: 


Popular varieties of bulbous irises
In nature, Dutch irises are not found, as it is exclusively garden hybrids bred in Holland. In Russia, they are often used to create garden and indoor flower arrangements, since the height of plants is not more than 50-60 cm in the active vegetative phase. Of the most popular varieties of bulbous Dutch irises, the following can be distinguished:
- "Blue Magic" (a series of Blue varieties) - blue irises with a beautiful abundant flowering, culture growth no more than 60 cm, is actively used in front gardens and gardens. A distinctive feature of the culture is the bright yellow veins on the petals of the corolla. No less famous is the Silver Beauty variety with bluish-blue flowers with yellow veins.
- "France Hols" - bluish-yellow bicolor flowers of a pastel color.
- "Yellow Series" - not large irises with yellow flowers in various different shades.
- "Ash" (in some sources, Ash or Purple) - plants with purple and lilac corolla petals, meet terry varieties. The Dutch iris Sapphire is very famous. "Beauty" - purple buds adorn unobtrusive yellow spots and streaks.
- "White" - groups of varieties with white buds, most often fragrant.
Irises of mixed varietal groups - mixes - have gained great popularity as horticultural crops. They bloom in numerous single buds of various shades. Cultivation of Dutch irises mix - very fascinating process and always with unexpected results. It is difficult to predict how beautiful a plant of this varietal group will be. 


Planting and propagation of irises of this varietal group
Before you start planting Dutch irises, pay attention to the choice of planting material. Seed (generative) propagation is not recommended for this group of varieties, as these are hybrids that, when grown in a similar way may not sprout or bloom only for 3-5 years of life. For this reason, Dutch irises are most often sold in gardening stores as bulbs or rhizomes for planting. In order for plants to grow healthy, pay attention to the condition of the planting material and its appearance. Let's try to figure out how to choose it correctly. 


Choosing bulbs for planting
When buying a part of the rhizome of the Dutch species, pay attention to the fact that it should be a healthy, slightly dried delenka, most often they sell annual root growths that are cut off when transplanting or dividing a bush. Leaves must be present on the rhizome. The middle plate should be a rich green hue, the outer ones may have a slightly brown or yellowish tone, since after cutting the delenki are dried. A cut of a rhizome with a uniform texture indicates that mother plant was healthy. Axillary roots, just like foliage, are cut to 10-15 cm. Pay attention to the presence of recovery buds - they are most often, like in, formed under leaf fans or in axillary root zones. 


When choosing bulbs look at its size. In height, it should not exceed 6-7 cm. If it is larger, then the plant was overfed with fertilizers with high content nitrogen. Such planting material is not recommended for growing irises, as adult plants will be deprived of the necessary immunity to diseases. 


landing period
For planting Dutch irises with the help of rhizome divisions, a period is chosen when the plant is at rest. The beginning of autumn is optimal - the first days of September and until the middle of the month. Before planting, prepare the soil in the area where the irises will grow. If the soil in this area is heavy and clayey, then it is dug up with the addition of sand of the middle fraction and peat. Too light sandy soils are weighted with river clay. On swampy and waterlogged soils, iris will also not be able to grow. They need to be drained and have good drainage. Nutrient organic matter should also be applied before planting irises - mullein and other fertilizers work well. When digging the site, remove all rhizomes, even small ones, because when they grow, they injure the root system of irises and take away nutrients.
The hole for planting rhizomes should be about twice as wide as the division. The soil is well moistened with soft water, a mound is poured into the center and the rhizome is placed with the leaves up. When planting, make sure that the axillary roots do not intertwine with each other. The rhizome descends to a depth of no more than 15 cm, so that there is 3-5 cm of earth to the surface of the soil. If you lower it deeper, the plant will rot. After work, mulch the planting with a layer of leaves, bark or peat. It is this layer that will retain moisture and coolness in the soil next season and keep planting in winter time. Approximately also planted for lush flowering. 


Planting bulbs
It is even easier to plant Dutch irises with bulbs. Before planting, the material is soaked for several hours in a fungicide solution. This is necessary to prevent the tuber from rotting underground. The dug up soil permanent place need to be disinfected. To do this, use a solution of manganese, which sheds the soil a few hours before planting. It will kill all unwanted germs and harmful bacteria. Bulbs of Dutch irises are planted in loose, slightly moist soil at a distance of 15-20 cm from each other. Then it is covered with a small layer of soil so that the neck, like y, peeks out above the surface of the earth.
To grow Dutch iris at home, you can use the same planting material. Some flower growers, to obtain houseplant Kasatikov families resort to generative reproduction. The fact is that with proper care, the plant blooms in a pot faster and no less decorative. But, it is still easier to grow iris at home with the help of bulbs or cuttings. The perennial has a compact root system that can do with a standard pot. If it starts to grow, then you can transplant the culture into a new, more spacious container. To grow iris, you will need a peat-based nutrient substrate in which we will root the planting material. The plant is transplanted into a pot only when leaves appear. To do this, use deep containers with good drainage. 

Caring for indoor and garden Dutch irises
A plant like Dutch irises is a low-maintenance crop. True, when they are launched, they quickly lose their neat appearance, growing and forming fruit ovaries to the detriment of flowering. Perennial horticultural crops rarely propagate by self-sowing, since this classification consists mainly of instances of artificial hybridization. Both at home and in the open field, the plant feels good in a well-lit place. But, frequent sunbathing strongly affect decorative flowering. When exposed sun rays the flower dies faster. For this reason, flower growers recommend placing plantings so that they are in openwork shade for most of the day.
As for irrigation, dutch varieties irises easily tolerate drought without visible damage, but it is required during the budding period. Waterlogging the soil can lead to the appearance of fungus and rotting of the bulb. To fertilize these, organic fertilizers are used - compost, humus and others. Some growers feed their plants with wood ash. 

Numerous varieties winter quite calmly in open ground under covering material. Florists, in order to preserve plant bulbs, cover them with spruce branches, less often with polyethylene until the shelter begins to interfere with the growth of the green mass. House plants also require a dormant period, which starts from mid-October and lasts until April. At this time, Dutch irises are transferred to a cool room (temperature not less than 5-7 degrees) and left to winter without watering. Just like garden crops, they need to be cut - remove 2/3 of the green leaves. 

garden plants, experienced growers if the iris is grown from the bulb, it is transferred to a cool room for wintering. But, many of them winter quite calmly under a layer of snow and mulch.
Categories:/ / by
This is a perennial, and, it would seem, caring for it does not involve much trouble. However, our readers have a lot of questions: how to plant an iris and how to care for it? What are the features of caring for individual varieties? What causes irises and how to treat them? We decided to answer all questions regarding planting and caring for irises in one article.
Part 1. General rules for planting and care
Despite the fact that iris is considered unpretentious culture, you will need to follow the simple rules of planting and care. It is also important to consider the variety and variety of the plant, since each species has its own characteristics.
Landing
How, when and where to plant irises?
Before planting irises, you need to choose the right place for planting. The groundwater level in the area should not be too high. If ground water are still too close to the soil surface, you will need to make a drainage layer or add a layer of soil, raising the area by about 15 cm.
The plant prefers the sun, so the site should be open and well lit. In the shade, the iris blooms not as intensely and for a long time as in the sun.
It is also important that the site is protected from the winds. If such a place cannot be found, then it will be possible in the future to use supports for tying tall plants.
It is possible to plant irises with bulbs in the spring in the ground. In this case, we are talking about bulbous irises. As you know, irises are rhizomatous and bulbous. Planting dates in spring are from March to May, the main thing is that the soil warms up to at least 10 degrees Celsius. Flowering is probably already in June, but very often irises bloom only the next year or flowering is rather weak.
Planting irises in autumn should come true a few weeks before frost . Better - for a month. The main thing is that the plant has time to take root before the cold comes. Otherwise, freezing or even death of the culture is likely.
But most often landing is carried out in the summer, starting from its middle. Experienced gardeners recommend landing. just in the summer, because before winter, irises will have time to lay buds, and already at the end of spring of next year they will begin to bloom successfully without the risk of freezing in winter.
Video on the topic "Planting irises with bulbs in the ground"
What kind of soil do irises like - acidic or alkaline? Not that and not that. irises prefer neutral or slightly acidic soil. On acidic soil, the plant will not please with its flowers, and is also subject to a bacterial disease. Therefore, if the plant has already been planted on such soil, it will be necessary to add lime, chalk or ash to it to neutralize the soil.
In addition, the plant does not like heavy soils. It is recommended to add sand, peat or compost to such soil. If there is an excess of peat in the soil, then organic matter will be required.
What is correct and incorrect landing? When landing incorrectly, excessive deepening of the root system in the ground which hinders the process of cultural development. This will negatively affect flowering. It can also cause the plant to die.
 Stages of planting rhizomatous iris:
- Dig a hole and make a small earthen mound in its center;
- Put the central root on this hill and distribute the lateral roots along the sides of the hole;
- When planting rhizomatous iris, it should be remembered that the rhizome should be almost level with the ground;
- Sprinkle the lateral roots with earth and compact, and cover the central root with sand, the layer of which should not exceed 2 cm.
Stages of planting iris bulbs:
- Make a hole and put the onion in it. The bottom of the bulb should be at the bottom;
- Cover the bulb with soil. The planting depth of an iris bulb is three bulb diameters. Usually it is about 10 cm. This is very important, otherwise the bulb located close to the soil surface may freeze in winter. This is especially true for heat-loving species. The deeper the bulb is, the higher the chances of its successful germination;
- The distance between the irises during planting is required to be about 10 cm.
If the bulbs were purchased too early, then planting irises in pots is possible in early spring. When the soil warms up, the iris can be transplanted to the garden plot.
When will iris bloom after planting?
If the plant was planted in autumn or summer, then flowering can be seen next spring. If the planting was carried out in the spring, then it is likely that flowering will come only after a year, although you can often enjoy flowers in the summer.
Growing from seed

Bearded iris seeds.
How to grow irises from seeds? There are two methods of growing iris from seeds:
- Sowing seeds in September;
- Sowing seeds in March.
When sown in September, there is a risk that frosts will start late, when the seeds have had time to germinate. In this case, the seedling is likely to freeze.
How to store seeds until March:
- Wrap the seeds in a damp cloth and put in a container;
- Keep the container under the freezer;
- After a month, transfer the container to a warm, but not too hot place;
- As soon as the seeds hatch, they need to be planted in light soil with mandatory additional illumination;
- In May, it is already possible to transplant seedlings into open ground.
Important! Growing from seeds is possible only for species irises, since they retain the qualities of mother crops.
Is it possible and how to grow irises from seeds from China? The process itself is the same as when growing from collected or purchased seeds. However, the success of growing Chinese seeds is being questioned. Most flower growers failed to grow plants (not only irises, but also other crops) from seeds from China.
Basics of care
How to care for irises? What kind of plant care do you need after winter? How to create a culture favorable conditions growth?
Caring for rhizomatous irises is minimal. After planting, it is required to carefully remove weeds by hand, as well as carefully loosen the soil, since the root system of the plant is located close to the surface of the earth. Subsequently, when the plant grows, weeding and loosening the soil are optional.
It is required to follow a number of rules for care:
- Watering the plant is required in dry weather every day, and in normal weather - about 3 times a week. Watering must be done in the evening and controlled so that drops of water do not fall on the leaves of the plant;
- So that the wind does not break the stems of tall irises, they need to be tied to supports;
- In bulbous species, it is necessary to remove the old, wilted leaves, as well as cut flower stalks at the end of flowering;
- It is necessary to apply fertilizer three times:
- In springtime;
- During the budding period;
- Within a month after the completion of flowering - for bulbous plants, and for rhizomatous plants - in August.
Top dressing in spring should be in the form of fertilizers with a high content of nitrogen, potassium and phosphorus. During the budding period, the same fertilizers are required, but the amount of potassium and nitrogen must be increased. After the end of flowering, fertilizing with a content of phosphorus and potassium is introduced.
Important! There is no need to apply fertilizer during the flowering stage.
Care of irises after flowering includes the following steps:
- Shelter for the winter;
- Soil fertilizers with mineral top dressings;
- Pruning peduncles and stems.
What should be the wintering of irises?
Young specimens are recommended to cover for the winter. This also applies to heat-loving varietal species of iris. Spruce branches or dry foliage are suitable as shelter. With the advent of spring, do not hesitate to remove the shelter, but do it as early as possible. You can also dig bulbs of heat-loving species for the winter.
Adult specimens tolerate frosts more easily, it is not necessary to cover them.
pruning
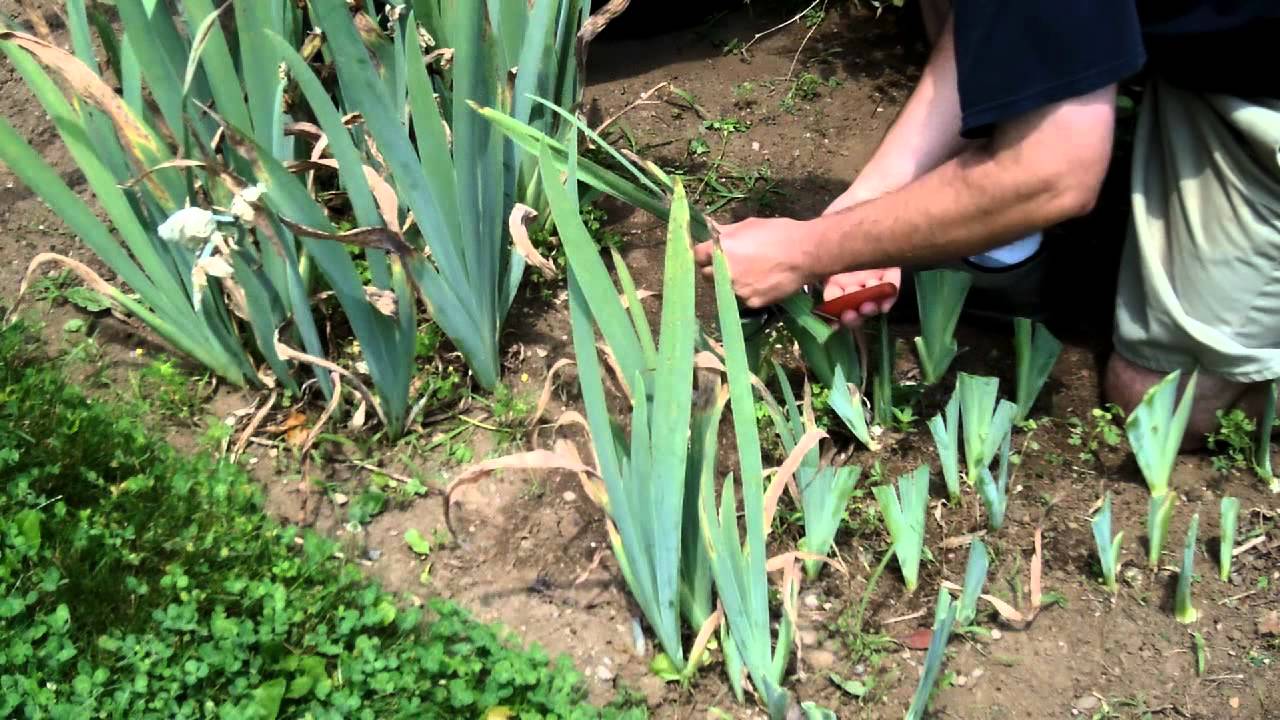
Pruning Germanic or bearded iris.
How to cut:
- Pruning is done at the end of flowering;
- Faded flowers are removed along with the green receptacle;
- You can also remove the flower stems. At the same time, it is important to save the leaves;
- Also in the spring after winter, you can remove old, withered leaves;
- All manipulations are carried out manually or with the help of sharp scissors.
Caring for irises in the spring in the country includes:
- Removing shelter when the threat of frost has passed;
- Top dressing - immediately after removing the shelter and during the formation of buds;
- In the spring treatment for diseases is required.
Is it possible to grow irises at home?
It is possible, but for home growing better use dwarf varieties. In this case, a number of rules must be observed:
- Prosperity sunlight, especially during the flowering period;
- The temperature of the content should be no higher than 20 degrees;
- It is required to water the iris once a week, and during the flowering period, increase the frequency of watering up to 3 times a week;
- Top dressing is required to be applied two weeks after planting, during the budding period and at the end of flowering;
- The air must be dry.
Part 2. The nuances of growing
Iris includes 800 species. Some of them are successfully cultivated all over the world. All varieties are different. For example, Dutch iris is a bulbous crop, while Siberian and bearded irises are rhizomatous plants. Planting and care of all varieties have their own characteristics.
Siberian
This variety is considered the most hardy. It has a root system. The cultivation of this crop is possible not only in middle lane Russia, but also in the northern regions.
The nuances of caring for Siberian irises:
- Sufficient sunlight and heat. Sunlight is especially important when grown in northern areas;
- Permeable soil that does not retain moisture with a neutral or slightly acidic reaction;
- Twice top dressing: in early spring and during the formation of buds;
- Trimmings of old leaves and withered peduncles.
The planting of Siberian irises is different. Their roots need to be buried about 7 cm into the ground.
Japanese or xiphoid

Japanese irises
thermophilic and quite undemanding plants are Japanese irises. The rules for planting and caring for this plant as a whole do not differ from the agricultural technology of other varieties.
Sword iris care includes:
- Sufficient sunlight;
- Feeding two or three times a year. It is recommended to give preference to mineral fertilizer, but organic substances should not be neglected either;
- Shelter for the winter is mandatory when growing a crop in central Russia or in the northern regions;
- Autumn pruning of leaves.
When planting, the root system needs to be buried about 6 cm into the ground so that the rhizome does not freeze in winter.
Mesh
These are bulbous crops. It is advisable to plant them at the beginning autumn period. The bulb deepens general rules planting bulbous plants.
Features of caring for net iris:
- Nutritious, permeable and light soil;
- Sufficient sunlight;
- Proper watering. There should be no stagnant water in the soil. Watering is required only in dry weather, and during the budding period, the soil should always be moist;
- Used as a feed mineral fertilizer and compost.
Dutch
Dutch iris is a bulbous plant. Their bulbs are small in size. It is recommended to plant them at the end of summer, since the bulbs do not tolerate autumn cold snaps.
Caring for bulbous Dutch iris includes:
- Excess moisture in the soil is fraught with diseases up to the death of the plant, watering is required only during a period of prolonged drought;
- Sufficient light;
- After flowering, the bulbs are recommended to be dug up.
marsh
It differs from other types of marsh (water) iris, it has its own characteristics of care. This look is perfect for decorating ornamental ponds on garden plots. It is recommended to plant a variety in early autumn or at the very end of summer. At the same time, it is recommended to choose moistened, even flooded areas for planting. This is the most common wild iris.
The nuances of caring for marsh iris:
- Do not allow the soil to dry out;
- Sufficient sunlight;
- Wind protection;
- Top dressing, including in the fall before preparing for winter;
- Autumn pruning of leaves.
It is not necessary to cover the swamp iris, they are resistant to frost.
bearded

A popular variety of bearded iris Gypsy
This is one of the most popular and beautiful varieties of culture. Planting such an iris should be carried out in the summer, preferably in the middle of the summer period. It is important to choose the right site for landing. The soil must be permeable, since the plant does not tolerate stagnant moisture. Soil reaction - alkaline or slightly acidic. Heavy and clay soils are not suitable for bearded iris.
Caring for the bearded iris includes:
- Watering only in dry weather;
- Sufficient light;
- Pruning old leaves at the end of summer;
- Shelter for the winter. It is especially necessary for tall varieties;
- Fertilizing three times a year: in spring (nitrogen fertilizers), during budding (potassium-phosphorus fertilizers), in autumn (potassium-phosphorus fertilizers). Also bearded iris well responds to the introduction of humus and compost.
Germanic
One of the favorite flowers of gardeners is the Germanic iris, planting and caring for which is similar to the bearded iris. It can be planted from spring to autumn. The soil should be permeable, slightly acidic or neutral. Top dressing - three times a year, watering only in drought. The video below shows the planting of German iris in pots, the video is not in Russian, but everything is clear.
Undersized
Low-growing (dwarf, curb) species - this is a form bearded irises. They differ only in the difference in growth. Their height does not exceed 40 cm, but on average they grow no higher than 20 cm. For framing flower beds and paths, for mixborders, borders, border (undersized) irises are perfect, planting and caring for which is simple.
Features of planting and caring for dwarf irises:
- Plants should be planted in a sunny place, in nutritious, neutral or slightly acidic soil without stagnant moisture;
- When planting, it must be remembered that the root system of such an iris should be close to the surface of the soil, it does not need to be deeply buried;
- Feeding three times a year.
Thin-leaved
This is an easy-to-care culture. It is drought and frost resistant.
Features of planting and caring for thin-leaved iris:
- The plant needs watering only during the drought period;
- Planting from spring to autumn;
- Application of fertilizing according to the standard scheme;
- Sufficient sunlight.
If bouquets of irises were donated or they were cut with your own hands to decorate the apartment, then you will need to follow a few rules so that the plants stand in a vase longer. Caring for cut irises includes:
- Daily change of water in a vase;
- Periodic washing of the vase in hot water;
- spraying plants;
- Keeping in a cool place;
- Distance from radiators and heaters.
Part 3. Complexities
Iris, like any other culture, can bring a lot of trouble to its owners. Usually the reason for this is improper care for them.
Diseases
The most common diseases in bearded and other iris species are viral and fungal infections. What should be the treatment and control of iris diseases?
Mosaic is a viral disease. It appears in the form of stripes and spots on the leaves. The carrier of the virus is the aphid.
To date effective methods treatment of viral mosaic has not been found, therefore, it is required to observe preventive measures:
- Immediately remove infected seedlings;
- Observe the irrigation regime, fertilize, and also treat the plant from insect pests and diseases. Suitable drugs such as "Aktellik", "Confidorm" and others).
bacterial rot found in spots Brown on the leaves of the plant. The disease can be detected already in the spring after wintering. It will be necessary to remove the affected areas, then treating the places with a solution of potassium permanganate. If the disease has gone too far, then it is better to destroy the affected plants, and treat the soil with antibacterial agents.
The causes of bacterial rot are:
- Freezing of the root system;
- Excessive soil moisture;
- dense landings;
- Lack of calcium and phosphorus in the soil.
The material in the video below is about bacterial rot and how to deal with it.
Gray rot can affect either the stems and leaves, or the root system. The main reason is the stagnation of water in the soil. Therefore, you need to plant iris only on well-drained soil. The exception is marsh iris. Also, the cause may be a lack of phosphorus and potassium in the soil. It is required to treat the disease with fungicides, and if the plants are very affected, then it is better to destroy them.
Pests
The most common pests include:
- scoops;
- Iris fly;
- thrips;
- Medvedka;
- Slugs.
scoops- this is an extremely dangerous pest for a flower. Firstly, they eat away the base of the peduncle, as a result of which the plant turns yellow and may even die, and, secondly, the activity of the scoop leads to the development of bacteriosis. As preventive measure it is necessary to treat the plant with karbofos.
Iris fly (iris flower girl) visually similar to an ordinary fly. Because of this pest, bud diseases develop. It feeds on the yet unopened buds of culture. As a result, the bud begins to rot. As a preventive measure, it is necessary to treat the iris with insecticidal preparations (Aktellik, Aktara) even at the stage of bud formation.

Iris buds infested with iris fly larvae.
About the iris fly and the fight against it - on video
thrips- Very dangerous pests despite their miniature size. Initially, these pests settle on the leaves, which leads to their gradual drying and yellowing. Then they move on to the buds. Subsequently, the buds are damaged and do not open. You can treat with karbofos with the addition laundry soap. You can also use insecticidal preparations ("Aktellik", "Aktara").
Medvedka- a very common pest, especially in the southern regions of Russia. It can cause irreparable damage to irises. The pest damages the root system and bulbs. You can fight with a bear by adding crushed eggshell dipped in vegetable oil. It will also be effective to flood the moves of the pest soapy water or a solution of washing powder. Marigolds planted nearby help in the fight against the bear.
Slugs affect iris leaves, and are also a distributor of bacterial rot. They are harvested by hand, and the soil is also treated with superphosphate. For prevention, it is recommended to remove weeds around plants in time.
Problems
Often, iris owners face such problems:
- The appearance of spots on the leaves of brown or yellow color . The reason is waterlogging of the soil or frequent precipitation. Damaged leaves must be cut off. As a preventative measure, it is necessary spring period a month or two before flowering, treat the culture with fungicides;
- If the flower blooms sparsely and sluggishly means it doesn't get enough sunlight. Also possible reason is the excess acidity of the soil;
- Wrinkles on leaves is a temporary phenomenon caused by bad weather conditions. Does not harm the plant;
- Suspension of flowering can be called: strong growth of the root system, soil depletion, freezing of flower buds, crop damage by pests and diseases, lack of watering in drought.
This is not all the difficulties in growing irises, we will be glad to see your other questions and comments.


