Own cellar will be useful in almost every private household. In the cellar you can store vegetables, preservation and other things. At the same time, such storage will be as convenient and high-quality as possible, because. the cellar is underground and does not take up useful space in residential premises, and temperature conditions in the basement provide the longest possible storage of various food products.
The cellar can be equipped both at the stage of construction of the building, and in a ready-made private building. In the second case, the work is complicated by the fact that you will have to dig a hole for the cellar by hand and take the earth out of the room yourself. Otherwise, the procedure for arranging the cellar for both situations mentioned is practically the same.

The cellar in the underground of the house should be buried at least 150-180 cm. With a smaller depth, the temperature in the basement will exceed +8 degrees, which will not be the best effect on the conditions and shelf life of vegetables.


Before starting work, you need to establish the depth of the passage of groundwater specifically on your site. This is easiest to do at the stage of arranging the foundation of the house, because. geodetic research is included in the list of mandatory preparatory activities.
If the house has already been built, but you just now decided to start arranging your personal cellar, determine the point of passage of groundwater will have to do it yourself.
This can be done according to the following methods:
- dig a hole with a depth of 250 cm and monitor its condition for several days in terms of filling it with water;
- determine the depth of water in wells on adjacent land plots.
You can also contact a specialized well drilling company.
Checking the groundwater level should be done during the spring flood or autumn long rains. It is during these periods that the ground aquifers rise to the maximum level.
If groundwater is closer to the soil surface than 100 cm, you will have to refrain from constructing an underground basement, preferring a remote cellar in some other suitable area.
If the groundwater level is in the range of 100-150 cm, you can try to reduce it using a drainage system laid along the perimeter of the building below the floor of the future basement. In this case, the waterproofing of the basement walls will need to be given special attention.
Ideally underground cellar should have a depth of 200-230 cm. With such depth indicators in the underground room, it will be comfortable to go about your business, and the air temperature will be set at about + 4-5 degrees, which is best indicator for long-term storage of conservation, vegetables, etc.
Before starting the arrangement of the cellar, you need to select suitable building materials. The walls of the room can be built of concrete, natural stone, concrete blocks, ceramic bricks. silicate brick And cinder blocks better not to use.

Determine best option entrance to the cellar. The simplest option is to arrange a hatch in the field of the room with the installation of a ladder for descending into the cellar. If possible, the descent can be made from full-fledged concrete steps- it is more comfortable. An inclined trench for arranging the descent must be provided for even at the stage of digging the foundation pit.
A step-by-step guide to building a cellar

Independent arrangement of the cellar under the house is carried out in several simple steps. Do each one in sequence.

Video - Cellar under the house
The first stage is the definition of dimensions
Start by determining the dimensions of the cellar that are convenient for you. As a rule, the cellar area under the house is at least 5-8 m2. With such dimensions, it will be possible to place racks with preservation in jars, and containers with various root crops. Otherwise, be guided by your requirements.
Make the size of the pit at least 60 cm over size cellars on each side. From this stock, about 30 cm will go to the walls. The rest of the place will be filled with waterproofing material and a clay castle.
Video - Cellar construction
The second stage - earthworks
Start digging a pit. If the house is just being built, use special equipment. In the case of arranging a cellar in an already finished house, you will have to dig manually. To side walls the pits did not crumble, strengthen them with temporary supports, for example, from plywood or boards.
Make the depth of the pit such that its bottom is about 30 cm below the bottom of the future cellar under the house.

The third stage is the foundation
Fill the bottom of the pit with gravel of different fractions. Tamp the backfill and lay the reinforcing mesh on it. Pour concrete. Allow 2-5 days for the pot to dry initially. After that, you can start arranging the walls of the future cellar.
Fourth stage - walls
It is better if the walls of the cellar are made of monolithic concrete. To increase the moisture resistance of the filling, it is necessary to add a special mixture to the solution to create a penetrating moisture insulation.

Assemble formwork for pouring concrete walls. To do this, use boards, bars, ties and nails. It is better that the formwork boards are planed - they are easier to dismantle in the future. Make the formwork about 30 cm wide. Lay 2 reinforcing bars along the future walls with a connection at the joints of the walls. Use soft wire to connect the bars.
At the stage of arranging the formwork, provide places for placing ventilation pipes.
Pour the concrete into the formwork. It is best to pre-order ready-made concrete, because. on self-cooking the required amount of solution will take a very long time.

After pouring in several places, pierce the concrete with a metal rod to remove excess air from the material. The solution will dry for about a week and it will take another 3-4 weeks to set strength.
Let the walls dry and remove the formwork.
Fifth stage - waterproofing
Proceed to outdoor waterproofing cellars. For this, it is best suited bituminous mastic. Apply 3-4 layers of waterproofing material to the outside of the basement walls with a roller, and then stick a layer of roofing material over the mastic. Let the insulation dry and fill the space around the walls with earth or make a clay castle.

If there is a risk of flooding the cellar, a clay castle must be done without fail. Mix clay, clean sand and water until a homogeneous mass resembling plasticine is obtained. Layer-by-layer fill the hole with the resulting mass and carefully tamp.

Inside, both the walls of the cellar and its floor are waterproofed. The floor is best filled with hot bitumen and pasted over with roofing material. Can be used to insulate walls polymer mastic or penetrating waterproofing. The second option is more preferable.
During the installation of the floor, remember the required 1-2 degree slope of the surface in the direction of the technical pit. Thanks to the slope, the cellar will remain dry even during the rainy season and floods.


Stage six - finishing
At the stage finishing you have to make a ladder, a manhole cover and ventilation.
If you decide to go with a simple wooden stairs, soak the raw materials with an antiseptic beforehand. Place the stairs with a slope that makes it easy for you to go up and down.


The hatch cover must be hinged. Otherwise, at this stage, be guided by your preferences.
Video - Ventilation in the cellar
Insert the ventilation pipes into the holes that you made at the stage of preparing the walls for pouring concrete. The exhaust opening should be located under the ceiling of the cellar above the pit, the inlet should be located almost near the floor in the opposite wall. Bring air ducts outside. On ventilation holes put on protective grids(grids).

The procedure for arranging the ceiling depends on whether the cellar is created at the stage of building a house or whether it is equipped in an already finished building. In most cases, the ceiling of the cellar is an ordinary floor slab with a pre-prepared hole for the hatch. The procedure for arranging such an overlap depends, as already noted, on the circumstances under which a cellar is created under the house, so be guided by the conditions of your particular case.
This completes the construction of the cellar under the house with their own hands. Install the planned racks and shelves, and you can start using your own equipped cellar.

Successful work!
Video - Do-it-yourself cellar under the house
It is rather difficult to imagine any personal plot without such a type of building as a cellar. It helps a lot in storing food products, providing optimum temperature and humidity.
At the same time, not everyone knows how to properly build a cellar on the site so that it correctly performs all the functions that are assigned to it. It is not very difficult to build this structure, given all aspects and features of this process.
In order to dig a detached cellar, on a plot or in a garden, it is best to use environmentally friendly, natural materials. They will not be toxic to the products stored in the facility.
If this is not terrible for preservation, then this factor can serve very unfavorably for vegetables and fruits in open boxes. They are able to absorb certain odors, as well as some substances. Experts also do not recommend using metal when building a cellar. It can serve as a conductor of cold, which violates the optimal temperature for storing food in the winter season.
In order to build a cellar with your own hands, you will need the following materials:
- To build walls, you will need either brick or foam blocks. If possible, concrete slabs can be used.
- The floor is filled with cement mortar. For neg, the cement itself, sand, water, crushed stone and reinforcement are used directly.
- Either ready-made concrete slabs are used as the basis for floors, or they are poured. For it, you will need the appropriate wooden formwork, reinforcement and concrete itself.
- As you can use, geomembrane, and roofing material attached to the walls with mastic.
- For the roof, you will need both the appropriate wood (bars and boards) and roofing material.
- inside the cellar can be equipped with two plastic pipes.
- For openings in the form of a hatch and a door, they are most often used Various types lumber, or buy finished products.
- As interior decoration walls, experts recommend using either plaster mixtures, or wooden planks. They can sheathe both the walls themselves and the ceiling.
The internal structure of the cellar is equipped with the appropriate elements - shelves, racks, drawers, etc. For their manufacture, wood is most often used. In certain cases, the structure is made of metal, after which it is sheathed with boards.
It is worth being prepared for the fact that all wooden elements will need to be handled accordingly. For this, various antiseptics are used that protect the material from various microorganisms, mold, decay, etc.
Pit preparation and foundation pouring
The bottom of the pit itself should be compacted and dotted with sand and gravel. This is necessary so that the structure itself does not sag. The drainage pad should be about 30 centimeters thick. Sand occupies 20 centimeters, while gravel must be laid on top of it. This material should be tamped very hard on top so that it penetrates deep inside. (About drainage on the site)
Reinforcement should be laid on top of the sand and gravel layer. It is best to use rods with a diameter of about 8 millimeters. They can be connected to each other, both with wire, and connected using welding equipment. From above, the resulting layer must be poured with concrete. To prepare it, it is not necessary to use any special formula - sand and cement should be diluted in a ratio of 3 to 1. This part of the cellar should harden for about one week, after which you can start laying the walls.

Near the foundation, you can dig a few tens of centimeters across the structure. This space will make it easier to build a cellar. After completion of work, it should be filled with soil.
Waterproofing device
In fact, just digging a cellar is not enough, as other types of work must also be paid attention to. First of all, it concerns waterproofing and foundation. As for the isolation from water that is in the ground or can penetrate into it, special materials are used for this, which do not allow the liquid to come into contact with both the floor and the walls of the structure.
The cheapest and most common waterproofing material, which is used to equip the cellar, is a rolled roofing material. Glue it in several layers, going in opposite directions from each other. For good adhesion, a material such as tar is used. If this is done qualitatively, the underground part of the cellar (or rather, its floor) will be well protected from water leakage.
Instead of roofing material, you can use modern material for waterproofing - geomembrane
Since the walls are also exposed to liquids, they, like the bottom of the cellar, should be covered with waterproofing. But it is worth starting this work after the erection of the walls. It is worth remembering that the roofing material is necessary in this case to bend a little on them. Walls are covered from above due to the fact that these places are quite vulnerable, often being directly at ground level.
cellar wall construction
How to make walls correctly, many people, when building cellars, do not know. This is due to the fact that a wide variety of materials are used for this part of the structure, which implies certain differences in the implementation of the entire process. Most often, either concrete, or brick, or foam blocks are used for walls.
For those who are interested in the question of how to build a concrete cellar, there is a fairly simple answer. First of all, it is worth building a reinforcing cage. For it, two vertical rows of 10 mm reinforcement are used, interconnected by wire in a three-dimensional structure. On both sides around it, it is necessary to build a wooden formwork. 
When it is created, you can start pouring this limited volume with pre-prepared concrete. In order to avoid any voids in it, you need to use a special construction vibrator.
It is worth noting how far the elements of the wooden formwork of the walls should be from each other. A width of 10 centimeters is sufficient. Such a layer allows you to create a good microclimate in the food storage room itself.
Concrete walls should take about 2-3 weeks to gain strength. Only after that you can remove the wooden formwork and proceed to further work.
If a cellar near a private house is built using bricks, then cement of the M200 brand should be purchased for the solution. It is best to equip two layers of walls. For them it is necessary to use only solid brick. When the walls are built, do not forget about the waterproofing layer.
To do this, you can use a special substance with which the outer side is coated from the foundation to the very top. Ruberoid should be glued on top of it. It is better to do just that, spending more money than to redo the entire structure in just a couple of years due to leaks, mold and fungus.
The outer side of the walls can be additionally lined with clay. It is a rather dense material that can retain liquid. A total of 10 cm layer protects the cellar well from negative impacts. ground water.
Arrangement of the entrance
There are quite a few different entrances that can be used for a cellar. Most simple option is an ordinary hatch with a manhole. Most often, they resort to this method of organizing an entrance in cases where there is a limited space, or as a result of the fact that the depth of the structure is very large.
It is worth noting that from the hatch cover to the ceiling directly interior must be at least 1 meter. Often, two types of coverings are equipped: one is external, the second is internal between the manhole and the cellar. To descend into basement use the usual stairs for basements.
More complete is the entrance, equipped wide door coming out to the surface. Behind it is a gentle staircase that allows you to gradually descend into the underground storage. Such an entrance to the cellar from the street can be appropriately ennobled, making it quite attractive and interesting.

It is worth remembering that the door must also be lined with waterproofing material from the inside. It is best if there is a vestibule behind it - a room into which street temperature air can enter without directly entering the room where food is stored. In this case, the underground part of the structure will be quite large, but more convenient and functional. In addition, in this case, you can make a full-fledged staircase of concrete or bricks with an inclination angle of about 45 degrees.
Roof installation
Before you make a cellar in a private house or on the street, you should think about how all its elements will look like. First of all, this concerns those parts of the structure that will be visible to all people, that is, the exterior itself. You can cover the cellar different ways, each of which has advantages and disadvantages. It can have the form of a single-pitched or double-pitched roof. From above, it can be covered with turf or soil, thereby additionally creating thermal insulation for the room.
To equip the roof for the foundation is quite easy. Initially, the beams should be laid, after which the floor itself in the form of boards should come directly to them. You have to put it on top truss system. It needs to be covered with a roof. For it, a waterproof material should be used. In this case, the cellar will look like small house. If you cover it with natural elements (soil, stones, landscape decorations), then it can dissolve quite easily in this setting. 
Can be done without a visible roof. For this, a slab is used. It should be laid in such a way that the flat side is at the bottom. It must be covered with plaster, and then whitewashed with lime. From above, the structure is closed with roofing material. A straw-clay mixture is laid on top of it, on which the soil is poured along with the turf. It is best if you cover everything with grass on top.
Do not forget that in the roof it is worth providing a place for two pipes. Their diameter should be 100 millimeters. One hole should go outside directly from the cellar ceiling itself. Another pipe should be placed so that it does not reach the floor by 30 centimeters.
An excavated cellar, separate from the building, is not only a functional room, but also a rather stylish and beautiful element of the courtyard, which should not only be properly equipped, but also rather well ennobled.
Video: Basic principles of laying a cellar
Conclusion
Before you make a cellar on the street (in a private house), you need to carefully prepare. This includes buying necessary materials, creation of an appropriate plan, approximate scheduling of work. In this case, you can be ready for all the nuances of the construction itself, carrying it out as quickly and correctly as possible.
Built cellar in full compliance with all recommendations experienced craftsmen, will long time function properly, extending the shelf life of food by personal plot.
Currently, almost every family has a personal plot in the form small dacha where, for their own pleasure, the townspeople plant vegetables, take care of fruit trees, grow flower crops.
However, in the fall, many owners begin to think about where to store all the vegetables and fruits collected in the garden.
The ideal option for this is a cellar in which all year round maintains the optimal temperature for storing blanks and vegetables.
In this article we will talk about how to build a cellar without extra costs what requirements and recommendations must be observed during construction.
The device of the cellar and its differences from the basement
Between the cellar and the basement there are serious differences.
Materials needed to build a cellar
For the construction of the cellar, materials such as concrete, cinder block and brick.
Porous materials such as polystyrene foam, will easily let air and moisture into the room, so additional costs may be spent on waterproofing and ventilation.
To build a cellar with our own hands, we need:
- rubble and gravel;
- river sand;
- clay;
- ruberoid;
- cement;
- bricks;
- ceiling boards.
The main stages of the construction of a buried cellar
Preparation of a foundation pit and a solid foundation for the cellar
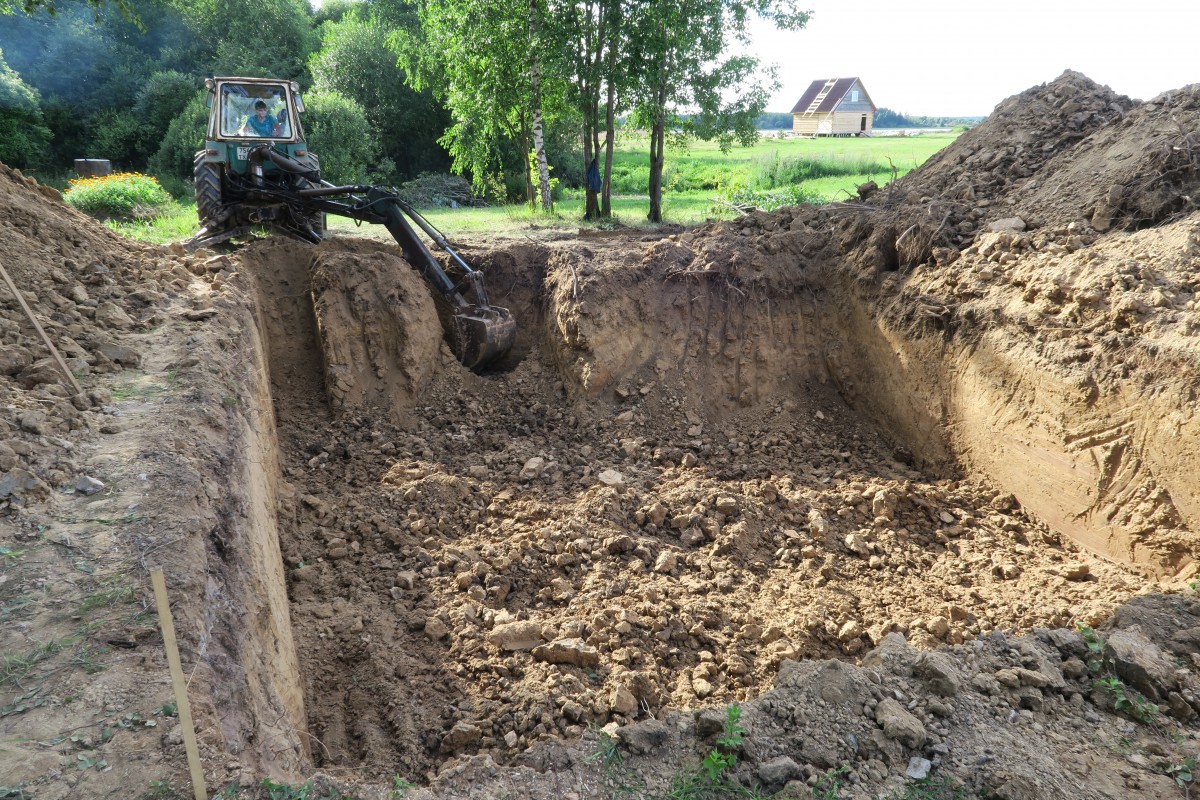
 Having chosen a place for the construction of a cellar, and having decided on the size of the structure, it is necessary clear the surface of the soil from vegetation, stones and sticks.
In order for the cellar to be durable and serve you for many years, it is important to properly dig a pit and prepare the base for pouring the floor and mounting the walls:
- First you need dig a hole of a certain depth, depending on which type of cellar you have chosen. In our case, the height of the structure will be about 2.5 meters. In addition, it should be borne in mind that part of the space will take up space for an entrance or a hatch, stairs and shelving, so it is worth digging a pit with a margin that will depend on your preferences.
Helpful advice! Before digging a pit, you should clarify the meteorological forecast for the next week, since the presence of precipitation can significantly complicate the construction process.
- After preparing the pit, it is necessary to process the base of the cellar, level and compact the top layers of the soil. The floor in the cellar must be stable and level. To get rid of excess moisture, we need to fill the bottom of the cellar with a layer of crushed stone or gravel up to 30 cm.
Filling the floor with clay and concrete
 For the construction of the floor in the cellar, you need mix the clay with a small content of quartz sand (no more than 10% of the total amount of clay) with water.
You should get the consistency of thick sour cream. With the resulting mass, pour the gravel in an even layer to a height of about 3 cm.
For the building to serve you for many years, a clay floor will not be enough, so many strengthen it and pour concrete. To do this, a reinforced mesh is installed on the dried layer of clay to strengthen the floor covering.
On top of it, it is necessary to pour a layer of concrete mortar to a height of approximately 5 cm.
To prepare concrete mortar, you need to take five parts of river sand and one part of high-quality cement. For example, on 1 kg cement we should take 5 kg sand.
Most often, the proportions of the necessary materials are indicated on the cement packages, so it is better to follow these recommendations. Filling the base of the cellar with a solution of 5 cm, it is necessary to level it and allow a couple of weeks to dry completely.
Building walls in the cellar
 An important step in the construction of the cellar is walling. Consider the rules of construction brick walls step by step:
- Before you build walls, you need to level with a shovel or trowel to ensure that the laying of bricks is as even as possible
- A prerequisite for laying bricks is foundation cleared of earth and pieces of clay on which the first layer will fall. The foundation is necessary for the stability of brick walls. For its construction, the remaining concrete solution is used, which was used when pouring the floor. The width and height of the foundation depends on what load will be placed on it in the future. Usually the width of the walls is made from 1 brick, therefore, we fill the foundation in such a way that it protrudes above the floor level by 15 cm and let it dry
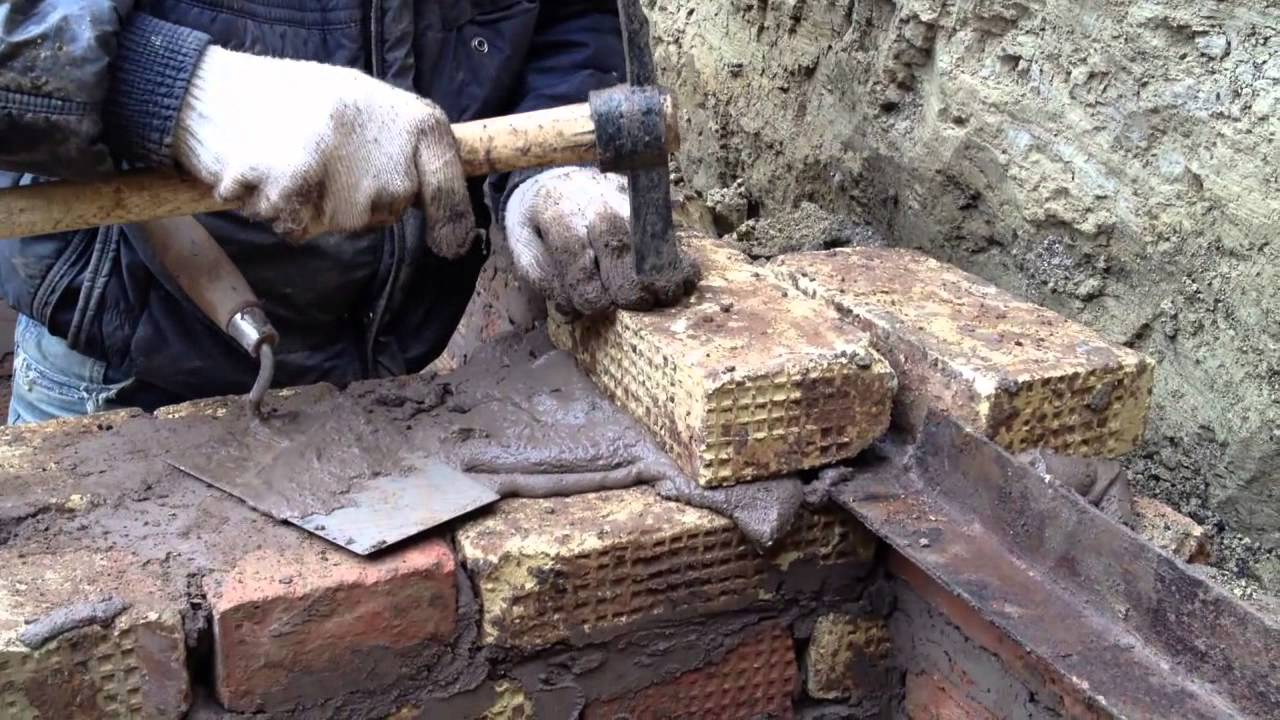
- The beginning of laying should begin from the corner of the wall where the doorway will be. Laying must be carried out in a checkerboard pattern, that is, starting from a whole brick, the second layer will start from half a brick, the third from a whole, and so on.
- When laying a brick on the foundation, it is necessary every time tap trowel handle for better bonding and for excess mortar to come out. In order for the walls to be even and strong, it is necessary to check each row erected using the building level.
- Cement mortar for bonding bricks is prepared in the ratio 4 parts sand to 1 part cement powder
- Simultaneously with cement, experts recommend preparing a thick clay solution by mixing clay and water in the ratio 2×1, which need to fill the free space between the earthen wall and the brickwork. This will serve as an additional layer of waterproofing.
After the construction of the walls, it is necessary to allow the mortar to harden for about for a week, after which it is possible to arrange ceiling ceilings with a ventilation system and waterproofing.
Waterproofing
 Availability waterproofing layer is necessary requirement during the construction of the cellar.
The most popular wall insulation materials are ruberoid or hydrostekloizol. In addition, experts advise treating walls and floors with a special waterproof compound.
So, after we have processed the brick water repellents, it is necessary to waterproof the walls with roofing material and cement.
Attached to the walls 2 - 3 layers of roofing felt using heated bitumen, after which they must be plastered cement mortar.
Hot bitumen is a molten bituminous mastic from hydrocarbons and their derivatives. It is a bonding material that has water-repellent properties.
Floor construction
 Covering in the cellar should be as strong and reliable as possible.
For the construction of the ceiling in our cellar, we use metal channels , representing metal constructions U-shaped.
Due to the fact that the weight of the ceiling is very large, you should independently build supports supporting the ceiling. First, a base is made of four boards fastened together, wooden supports are installed on them.
This whole structure is installed on the floor base and supports concrete ceiling until it is completely dry.
For the construction of the ceiling, we put on upper layer brickwork reinforced mesh, fill with cement mortar and wait for drying.
After that, you can start laying the channels at a distance of about half a meter from each other. At the same time, it is necessary that the channels go perpendicular entrance opening.
When making floors in the cellar, you need to leave holes for the ventilation pipes, each of which is approximately 15 cm in diameter.
Cellar ventilation
 Ventilation in the cellar is an important point when designing a cellar in the country.
If there is not enough fresh air in the room, it can cause serious harm to human health.
The most popular type of ventilation is supply and exhaust. To organize it, you need to take two plastic pipes and place them in the openings of the floors.
One pipe is placed at a height half a meter from the floor. Fresh clean air will pass through it into the room.
Another pipe is needed to remove musty and harmful air outward, it should be located above the ceiling, protruding down on 10 - 15 cm.
Installed on pipes plugs and protective caps protecting from excess moisture.
Decoration of shelves and racks in the cellar
 The design and decoration of the premises should be dealt with after the completion of all construction work.
Many owners prefer to build a full wall wooden shelving with shelves of different sizes.
Some are attached to the walls of metal hanging shelves that can withstand the heavy weight of stored products. metal corners fastened to the wall by welding in selected places.
When choosing certain designs in the cellar, one should proceed from what products will be stored there.
The most popular option among summer residents is prefabricated racks, which are simply attached to the entire wall. The advantage of such shelves is their mobility, that is, in dry sunny weather they can be taken out to dry.
Attention! It is desirable to cover all wooden elements in the cellar special tool against eating by insects, which will save the building from cockroaches and beetles.
So build a cellar on your own each owner can, most importantly, follow the advice of experts and not save on building materials.
Detailed information about the construction of a cellar in the country with your own hands, you can see in this video.
For the safety of vegetables and blanks on your personal plot, it is recommended to build a cellar with your own hands.
Building a cellar with your own hands (step by step)
Preparation. First you need to decide on the place where the construction will be carried out, the material of construction and the size of the structure. In our case, the project of a bulk cellar made of expanded clay concrete was chosen, which well protects the room from moisture and keeps a constant temperature regime in room. For such a structure, the optimal depth of three meters was chosen.


Tip: for the construction of the cellar, it is best to choose elevated places so that there are no problems with flooding the structure with groundwater.
Let's start digging excavation. To make a comfortable descent into the structure, it is necessary to dig a hole in the shape of a rectangle. Next, the floor and walls should be well tamped. After that, the floor is covered with rubble or gravel and poured with a solution of clay. If there is a threat of flooding, then instead of a clay solution, it is better to use concrete, which is poured onto a pre-laid steel mesh.


For building walls may apply various methods which depend on the raw material used. For example, you can build concrete walls. To do this, formwork is installed, longitudinal reinforcement is laid and poured with a concrete mixture. The formwork is removed after a few days. It is much easier to build walls from reinforced concrete or expanded clay concrete blocks. The masonry process can be compared to brickwork. Also at this stage, it is necessary to provide places for a doorway and ventilation.

After the construction of the walls, it is necessary to install overlap. For these purposes, a chipboard formwork is installed. To keep the sheets, they are laid on supports. Formwork is laid on top reinforcing mesh and fill them with concrete.


In order for the walls not to let moisture through, it is necessary to make a coating waterproofing cellar walls from the inside and outside. For these purposes, bituminous mastic is suitable. On top of the ceiling, a layer of waterproofing made of roofing material is laid on the mastic.


The penultimate stage of building a cellar with your own hands is backfill concrete floor and backfilling the pit with soil.
Tip: when backfilling the pit and ceiling, make sure that there are no sharp stones in the ground. They can cause damage to the protective waterproofing layer.
Works on improvement storage. At this stage, doors, stairs are installed and perform electric installation work. Shelves are made and installed for storing blanks for the winter, and special places for storing vegetables.


Cellar in the country with their own hands made of bricks. Step-by-step instruction
For country house you can build a cellar with your own hands from bricks. To make such a structure, you can follow the following instructions:
After being selected appropriate place for erection, you can start digging excavation required size. In our case, the size of the cellar is 2x2 meters.
After the walls and floor are rammed, proceed to the device concrete slab for the floor.
For erection walls brick was used in this project. The masonry was one brick thick.


Tip: during masonry work, you must constantly monitor the evenness of the walls. For this, it is recommended to use a plumb line and a level.
Next, you need to do otolok. For these purposes, wooden logs are installed, pre-treated with an antiseptic solution. Next, the flooring is laid and covered with a layer of sawdust on top. The layer thickness is approximately 25–30 cm.
Above should be built wooden structure in the form of a house with gable roof, in which an opening for ventilation should be provided and an entrance door should be installed.

Around the ground part of the structure was dug groove for water flowing from the roof.
For ventilation two pipes with a diameter of 50 cm were used. One was installed at a distance of 20 cm from the floor. The second - diagonally at a distance of 20 cm from the ceiling.
Do-it-yourself red brick cellar construction
The construction of such a cellar begins with digging excavation 3.5 meters deep. The finished cellar will consist of two rooms, a vestibule and a staircase.
After the foundation pit is dug, it will be necessary to seal the walls, floor and stairs.
After the concrete has hardened, you can start laying walls.
We lay on the finished walls rolled metal, which will be the basis for the overlap.
Formwork is installed under the metal frame and the ceiling is poured concrete.
After the concrete has hardened, you can start laying ground parts of the cellar made of red brick and roofing.
Construction of a cellar in the country
Before the construction of the cellar, it is necessary to draw up drawings of the future structure, calculate the amount of material needed and sketch out an approximate work plan. It should also be remembered that the cellar must meet the following conditions:
- it should be cool;
- the temperature in the storage should not be too low;
- adequate protection of products against rodents must be provided;
- in the underground room should be provided autonomous system electricity;
- the cellar should be well ventilated.
Do-it-yourself step-by-step instructions for repairing an old cellar in a country house
First you need to release underground covering. After that, you can start cleaning the earthen and deciduous layer and dismantling knurler. All work is best done in the direction from the edges to the center.


Device foundation. To do this, prepare the bottom of the pit and install formwork on it. To avoid freezing, it is recommended to make the wall thickness equal to one brick. According to the project, the height of the foundation is 150 mm.

Next, you need to install fittings in three rows. For these purposes, rolled products with a diameter of 16 mm were chosen. Metal strips are welded to each row. Next, the structure is poured with a concrete mixture and left to harden. Formwork can be removed after a few days.

Tip: to prevent grounding problems, it is recommended to weld a figure-eight bar to the reinforcement.

Wall masonry from brick. First you need to lay the zero row on the surface of the hardened concrete foundation. This row is laid with a poke. On top of it in the middle, it is necessary to fix the steel strips on which the embedded parts are welded. In this way, reliable grounding can be ensured. All subsequent rows are made in half a brick. It is recommended to lay steel strips through each row. They will help to give strength to the walls of the basement. There is no need to fasten the strips together.

Tip: when building walls, make sure that between artificial stones there were no gaps and voids through which rodents could enter the room.

When the brickwork reaches a height of one meter, you can proceed to the supply air device ventilation. For these purposes, sewer pipes were selected.


For waterproofing cellar walls, roofing material can be used.

The device of the upper strapping and overlapping. The binding of the upper part with metal elements can be installed after the 21st row is laid out. For these purposes, it is necessary to lay a layer of roofing material on the last layer of brickwork and fill it with soil. For strapping, I used an I-beam No. 12, which was sawn in the middle and 2 profiles. A piece of rail is well suited for the role of a beam.


Reinforced concrete device floors 100 mm thick. For these purposes, we install the formwork, lay the reinforcement and fill it all with concrete mix.


After that, you need to install the hatch, make warming overlap and pour the screed. For insulation, you can use foam plastic 5 cm thick. For the screed, crushed stone of the smallest fraction was chosen.


Device electricity supply in the basement.


Holding finishing works. At this stage, it is necessary to make a visor over ventilation pipes. The walls inside the room can be whitewashed.


Differences between a cellar and a basement
A basement is a room that is located in a building, below ground level. The basement can be used to store summer equipment, as a workshop, etc. The main purpose of the cellar is food storage. In addition, the cellar can be built as a separate room.

How to make a cellar from the basement
If the building has a basement, then it can be converted into a cellar. To do this, it will be necessary to divide the basement wooden partition and install food storage racks. Also, lighting should be brought into the cellar, fans should be installed and a staircase should be made.

Tip: the stairs to descend to the basement should be comfortable. It should not have steep steps.
In the event that the temperature in the basement during the cold season drops below zero degrees, then it is necessary to perform warming walls. Before installing thermal insulation, it is recommended to treat the surface with an antifungal compound or slaked lime. Walls can be insulated using rolled roofing material, glass isol or ordinary foam. On top of the heat-insulating layer it is necessary to lay plywood or fiberboard sheets.

It may also be necessary to insulate the floor. To do this, you can lay a solid polyethylene film, on top of which the timber is laid. If this is not enough, then you can fill the floor surface with bitumen. On top of this material, a layer of sawdust 5–6 cm thick and wood flooring are laid.
Construction Materials
Petr Kravets
Reading time: 3 minutes
A A
On suburban area you can build a room that will be cool and keep the products for the whole winter in the right condition.
Having made a mini-cellar in the country, you can store vegetables and fruits grown on the site, processed crops or harvesting and conservation there. In some cases, you can do all the work yourself by making a cellar with your own hands.
In order for it to function properly, it is necessary to follow all the rules for the construction and arrangement of the premises, then it can be used for many years.
As a rule, a cellar is built either under the house in which they live, or on a plot in the form of a separate structure. Its main purpose is to store food supplies in winter time year, and in summer, when the temperature is quite high, the remnants of provisions should be cool.
 If you correctly make racks and distribute stored products in the underground storage space, you can significantly increase the functionality of such a room.
Cellars can be of several types depending on the level of their penetration into the ground:
- In dry places, an underground structure is being made;
- In humid places, where the level of water flow in the soil is at an average level, a semi-underground cellar is made;
- If the soil is waterlogged and the groundwater level is high, an above-ground building is made, equipped as a cellar.
In areas where the soil is too wet and groundwater passes close, it is imperative to make a pillow from a mixture of sand and gravel. Then the basement structure will be separated from the ground and protected from the penetration of groundwater during their seasonal rise.
To build a cellar, it is not required to obtain special permits from regulatory authorities, but each owner of a private house must independently determine the place for its arrangement, taking into account some features.
Experts recommend choosing a dry site, preferably on some hill, away from trees and forests. This is due to the fact that the roots of mature trees can damage the underground room when it is close.
These requirements do not apply to shrubs, their shallow root system will only braid the structure, even if it reaches so deep into the ground in its development.
Once the site has been chosen, preparations for the construction of the winter storage can begin. All these stages of work refer to semi-underground and fully underground premises.
As for above-ground buildings, a different technology will be applied to them, which has much in common with the construction of houses and other structures of this type.
Pit preparation
The construction of the cellar begins with the arrangement of the foundation pit for the future building. It is necessary to take into account the following requirements for a pulled out hole:
- The depth of digging a pit is calculated based on the design features of the future cellar - its functionality and dimensions;
- The area of the pit should exceed the planned room, but not by much. The walls of the room and its floor also occupy a certain space;
- In order to prevent the soil from crumbling, temporary formwork is made along the edges of the pit, its walls;
- All the soil that is removed must be left nearby, as it will be required for the installation of the formwork and the further arrangement of the storage.
If the cellar is made under the house, then there will be no need to arrange floors, since the floor at the level of the first floor will perfectly cope with this problem.

Floor base device
by the most suitable option the basement of the cellar will be filled with concrete mix. To do this, garbage and other foreign elements are removed from the pit.
The entire surface must be carefully leveled and compacted, after which a layer of 15 centimeters of sand is poured. A waterproofing membrane is placed on top, a reinforcing mesh that will strengthen the subsequent layer of poured concrete.
Thus, when choosing options for the base for the cellar, you should pay attention to the concrete sole because of its strength and reliability.
The walls in the mini-cellar in the country should, with their compactness, withstand all the pressure that the soil exerts on them. For construction use concrete mix, blocks, wood or brick. Each of the materials has its own advantages and disadvantages, features of application and installation technology.
But the limitation in the estimate also plays a role, due to which it is possible to use those materials that are available, for example, after the construction of the main residential building.
Floor laying
One of the cover options is wooden beams. The elements that will perform the supporting function are stacked with their ends on opposite walls, on top of which the covering of the boards is sheathed. A membrane is placed on top to protect against water penetration and prevent condensation.
An alternative could be reinforced concrete slabs already prepared and purchased from the manufacturer. They are much stronger and will last longer than wood, which is why they are so widespread in construction. Plates are placed on the ends of the walls and covered with earth.
This method is very simple to arrange and is recommended by specialists.
Creation of high-quality ventilation
Proper air circulation in the room will avoid the appearance of mold lesions and fungal infections, which are in a dormant state in any room, and when high humidity begin to multiply, covering all surfaces of the cellar.
Also, competent ventilation will maintain the optimum temperature in the room throughout the year.
To do this, they put two pipes, one of which is called the supply, and the second is the exhaust. Can be used plastic pipes medium diameters. But the size will depend directly on the dimensions of the room.
The supply pipe is installed in one of the corners of the cellar at a distance of 20 centimeters from the floor, and the exhaust elements are placed in the opposite corner at a distance of 40 centimeters from the ceiling. Due to the difference in levels, there will be an influx of fresh air and an exit of the exhausted moist cellar air to the outside.
Features of the construction of the cellar at a high level of groundwater
If the water in the soil passes very close to the surface, then the problem of arranging the cellar arises. It should be noted right away that this is quite possible, you just need to take care of drainage around the perimeter of the entire structure.
Advantages of the drainage device
For arrangement drainage system for the cellar, perforated elements are installed at the bottom of the pit around the entire perimeter. Installation is done at a slight slope, about 2 centimeters per running meter, directing towards a collection well or a special pit for water drains.
All pipes are covered with rubble, previously wrapped with layers of geotextile. Such an arrangement will protect the surfaces of the pipes from corrosion, and the drainage holes from the ingress of dirt, gravel or other debris.
If the floor is made of reinforced concrete, then high-quality waterproofing is necessary both from the inside and outside. You can make the room airtight by using a large plastic container.
Such a caisson is buried in the soil, and due to the solidity of its design, it does not allow moisture to penetrate inside. The arrangement of this option requires a special sequence of work in compliance with all the rules and regulations of construction.
Recommendations for arranging a mini-cellar in the country with your own hands
For comfortable use of the cellar, you need to make comfortable descents and ascents into the room. This will help a wide and comfortable staircase with a width of 40 centimeters. Its slope can be made up to 75 degrees, otherwise the main requirement will be violated - safety for the descent of a person. All stairs are made of wood, metal or concrete.
To store products correctly and accurately, it is worth making racks and shelves in the cellar, as a rule, from a bar with a diameter of 100 * 100. The height of such storage devices is limited by room height and common sense.
Having completed the arrangement of the cellar on the site, it is worth thinking about lighting it, even in such an underground space you can make safe switches and wiring.
They must be protected from moisture, since even waterproofing made can be damaged at any time due to insurmountable circumstances.