Repair work of the window opening does not end with the installation of a new double-glazed window. At the next stage, the question arises of choosing the material for the formation of slopes. Among options you will have to choose between plastering, finishing with plastic or drywall. The latter method is available in terms of financial costs and is distinguished by a simple installation process. Having become acquainted with the characteristic properties of the material and the features of the formation of slopes from drywall, you can do the procedure yourself without much difficulty.
Drywall properties
The decision to decorate slopes with drywall sheets has several advantages. First of all, it is an opportunity to do all the work yourself, without the involvement of specialists. As a result, you will receive a window opening with slopes, which has an aesthetic appearance and meets all the requirements for carrying out repair work. This is due to the properties of drywall, which include:
- High level of sound and thermal insulation. If you want to enhance the protective properties, the slopes are formed by double sheets of drywall with an additional installation of insulating material.
- Drywall slopes are characterized by light weight. To mount the structure, you will need to make only a frame profile without reinforcement.
- It is much easier to create a perfectly flat slope surface with drywall sheets than when plastering a window opening. This helps speed up the finishing process.
- Due to air permeability, drywall slopes do not deform when changing temperature regime or indoor humidity levels.
- Even with additives, the material is different environmental safety, drywall slopes do not emit harmful substances.
- When working with drywall, there is no problem of a large amount of debris.
Numerous advantages of the material are accompanied by minor disadvantages, which should be taken into account when installation work ah with slopes:
- A fragile product requires careful handling during installation, so mechanical damage should be avoided.
- Even moisture-resistant drywall needs protection from water ingress, its effect in in large numbers or for a long time will provoke the destruction of slopes.
Depending on the room where the slopes will be installed, drywall is selected with the addition of certain additives:
- Good for normal environment standard material, maintaining the level of humidity up to 70%.
- Exceeding the established limit will require the use of moisture-resistant drywall with an admixture of antifungal and hydrophobic additives.
- If there is a risk of fire, it is better to make slopes with fire-resistant drywall sheets containing mineral wool or fiberglass particles. This type of finishing material is rarely used, but its additional advantage is increased mechanical strength.
The breathable properties of drywall ensure the absorption of excess moisture or its release in case of a lack in the surrounding atmosphere without mechanical changes to the entire structure of the slopes.
Preparatory stage
Preliminary preparation for the installation of slopes will require the following Supplies and tools:
- screwdriver;
- tape measure and mounting knife;
- building level to control the even fixation of slopes;
- rule;
- graters for drywall;
- fasteners;
- liquid nails;
- building whisk and water containers;
- rags and additional waterproofing material;
- coatings in the form of primers and paints for finishing finishing works.
You can fix the slopes of drywall adhesive method or mount on profiles. The surface to be covered with slopes needs the following treatment:
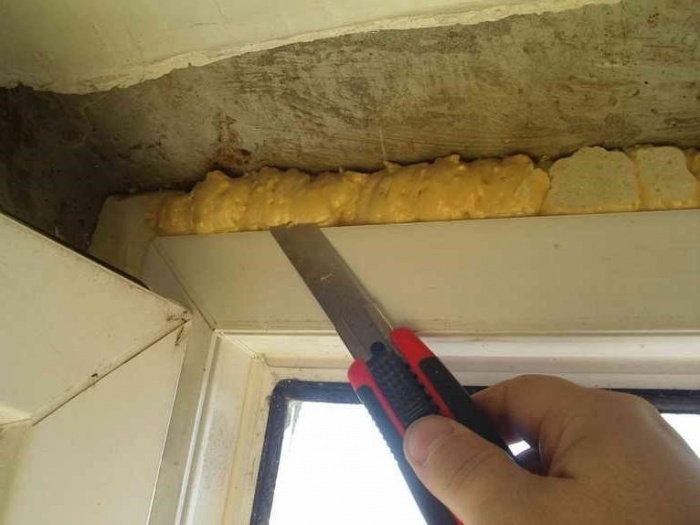
- surplus polyurethane foam, which have arisen in the process of sealing new window frames, are removed with a knife. Trimming is recommended to be carried out under the condition of complete drying of the foamed areas, usually this action is performed a day after the installation of the double-glazed window.
Remark! The opening needs to be treated with a primer in order to prevent mold or fungal formations.
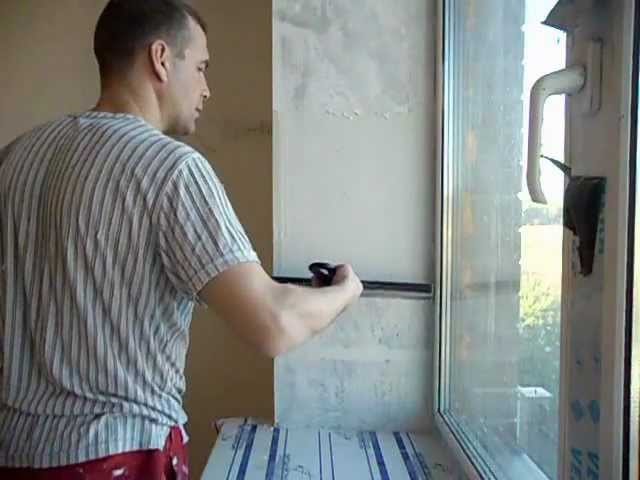
- To isolate the foam from contact with air and prevent its premature destruction, pre-finishing of future slopes will allow cement mortar prepared in proportions with water 1:4.
- Warming and waterproofing will extend the period of operation of the slopes, since the basis of the gypsum material is subject to gradual destruction during the formation of condensate. Lack of recommended protective measures will provoke the destruction of slopes within a few years.
- To maintain the exact level along the perimeter of the window opening, where the installation of slopes is provided, a special corner is attached, directed towards the window with the smaller side.

Slope installation
The installation process begins with measurements and cutting drywall. Using the following tips from experts, cutting off the part exactly is not difficult:
- The rule is pressed tightly against the outlined contour of the part and is carried out with such force that the upper part of the drywall is cut through to the gypsum layer.
- Turning the sheet over to the opposite side, carry out a similar procedure.
- In conclusion, the rule is pressed against the notch line, and the second edge of the sheet is lifted up, as a result of which the material will break perfectly evenly along the intended border.
Advice ! The formation of slopes from drywall is carried out using a special glue with a thick consistency. This will ensure a secure fixation of the material.
Installation begins from the top of the window with subsequent finishing of the side surfaces and consists of the following steps:
- The fastening of the material on the sloping corner is carried out using self-tapping screws for metal. It is convenient to use supports to temporarily hold the strip during fixation.
- In the space between the slope detail and the window opening, a filler is placed that performs insulating functions. Perfect for these purposes mineral wool, capable of insulating the structure and preventing the formation of condensate.
- The front edge of the window opening is processed with glue to a depth of 0.1 m (depending on the thickness of the wall). It is recommended to apply the composition at short intervals so that there is room for an even distribution of the adhesive.
- The edge of the drywall part is pressed against the slope. At this stage, you will need to use the building level to check the horizontal line.
- Excess adhesive mixture from the edge drywall slope removed with a spatula, after which a break is necessary to dry the composition.
Similar procedures must be done when installing the side panels and the bottom part.
Remark ! You can remove the spacers and continue finishing an hour after the completion of work.
Finishing process

Finishing is necessary to give the drywall construction a complete look. For these purposes, you will need putty and paint. To prevent premature damage to the outer corners formed from drywall, the installation of a profiled metal corner is capable. To do this, perforated protective elements are glued to the sloping corners. As in working with drywall slope details, to avoid voids and bumps, the glue is evenly distributed over the entire surface. Next, the following steps are taken:
- Metal protective element is pressed all the way into the fixing mixture. In its role can be putty or glue. Excess composition that has come through the holes is carefully removed with a spatula.
- Be sure to follow the horizontal and vertical lines by regularly using the building level. After installing the profiled corners, they are puttied. Protective covering drywall slopes are formed in two layers, with regular leveling of depressions and mounds.
- Minor defects can be removed with a fine-grained emery cloth or grinder.
- After the putty has hardened, surface treatment with a primer in two layers with intermediate cleaning with a fine abrasive mesh will help to mask the scratches.
- In conclusion, plasterboard slopes are covered water-based paint.
Advice ! For finishing it is appropriate to use rubber paint, which will provide the possibility of washing the slopes and additional protection drywall from mechanical damage.
The nuances of the installation process
Compliance with all recommendations will prevent the manifestation of defects not only upon completion of finishing work, but also during further operation. However, often at the initial stage, when measurements are taken and drywall is cut, mistakes are made that spoil the aesthetic appearance designs. The most common problem is the formation of a noticeable gap between the docked panels. To correct the oversight, they resort to the use of liquid plastic, but the end result does not benefit from this, since drywall and plastic have significant differences in texture.
In this situation, professionals advise making out the side and bottom part of the drywall construction plastic profile. Its use contributes to the concealment of the problem of a loose fit or the resulting irregularities.
Finishing slopes with drywall is quite easy to do with your own hands. The method refers to the most popular type of design for the entrance, interior doors, as well as for the window.
Installation is simple, and after installing drywall, the openings are beautiful, even and strong. There are other design methods, but the use of GKL is easier and cheaper, especially if the seam is on the window. doorway big.
Drywall properties
If you are going to make window slopes from drywall with your own hands, you need to learn about the advantages and properties of the material. The first thing to notice is the ability to do the work with your own hands, without the help of craftsmen. The final result will please, and meet all the requirements of the repair.
After cladding, the material can be sheathed, the opening can be decorated with tiles and other finishing materials, for example, using staining or wallpapering. The main properties of drywall when making slopes are presented in the table:
| Properties: | Description: |
|---|---|
| Decent level of sound insulation and thermal insulation: | If you need a window opening and a window sill, you can not only sew up drywall, but additionally lay a layer of insulating materials to enhance the design and insulation qualities. |
| A light weight: | Due to the small mass of drywall for installation, it is not necessary to use special technologies; installation is carried out on a metal profile from which a metal frame is created or on adhesive mixtures. |
| Ideal plane: | Drywall sheets are perfectly even, due to which the slopes on the windows and doors will be even, which greatly facilitates the process of finishing with putty, and also speeds up the creation of slopes. |
| Breathability: | The slope, due to its property, does not allow deforming, even if there are strong temperature changes or there is high humidity in the rooms. |
| Environmental friendliness: | Although drywall sheets may be with additives, the material is environmentally friendly and slopes can be made in children's rooms. Drywall does not emit toxic substances. |
| Minimum waste: | During the installation work, there is almost no waste, dust and other debris from drywall material. |
For window slopes from drywall, it is necessary to choose the right sheets that will have certain types of additives and other additives:
- For the design of slopes in a normal environment, in a residential building or apartment, standard drywall is used, which can withstand humidity up to 70%.
- When using drywall on the side of the street or in the bathroom and other wet places, a moisture-resistant type of drywall is used, the material additionally includes antifungal and hydrophobic impurities.
- To reduce the likelihood of fire, for slopes of windows and doors, it is used flame retardant material, in which there are already impurities of mineral wool and fiberglass. This type of drywall sheets is rarely used, but it is very durable in itself.
Important! Drywall is a breathable material, due to which it can absorb moisture and, if necessary, release it into the atmosphere without changing its shape.
Finishing the window slope with drywall (video)
Advantages of plasterboard cladding
The material has been used for slopes of windows and doors for a long time. This is not surprising, because it has a number of advantages:
- Environmental friendliness and safety for human health.
- Low material cost.
- Ease of installation.
- Minimal care for already finished slopes.
- Stylish look.
- The ability to make an arched opening and other complex shapes.
- Long term use of drywall slopes.
- Possibility to additionally insulate windows or doors.
- Versatility: not only used for windows and doors, it is used to level the ceiling, walls.
Important! Although drywall material has a number of advantages, there is also a drawback, the sheets are easily damaged mechanically, even a material protected from water can be destroyed due to prolonged contact with it.
Finishing preparation
Before making slopes from drywall, you will need to prepare a window or door. The plasterboard door slope and the window slope, in terms of preparation, are almost the same, but the following is taken into account for doors:
- presence of communications. For example, wires for the Internet, electricity or a call. The laying is done before the start of the installation of the doorway.
- Possibility to install a second entrance door. The need arises if the insulation of the first door is not carried out, and the sound insulation of the doors does not matter.

The opening preparation is as follows:
- When the old window or door is dismantled, a new product is installed, the foam remains, its remnants are cut off.
- A hammer or other device removes plaster and other protruding parts on the window, doors. Often under the plaster there may be a metal pin and other elements, they are cut off.
- The gap, pit and other defects of the opening must be puttied.
- The joints that appear between window frame or interior doors must be sealed with sealant.
- After the putty and other mixtures have dried, a primer is applied in two layers along the perimeter of the opening.
At the end of the preparatory work, the opening is completely cleaned of dirt. Everything is swept and wiped. In order not to damage the window or door frame, it is sealed with masking tape and cardboard.

The frame design method is convenient and practical. True, the installation of the material is somewhat more complicated, because the p-profile must be fixed with self-tapping screws, which is more difficult and takes longer. Fixation is carried out reliably, everything is screwed flush with drywall, so that the frame is strong. Step by step, you can independently make the crate of the opening as follows:
- Wooden planks or a metal profile are used for the frame.
- The material is cut to size. It is necessary to install rails around the entire perimeter of the slope, on the inner and outer corner. For reliability, cross bars are attached.
- At will, a heater is placed in the frame, in the form of mineral wool, it is installed in ready-made cells.
- Now the plasterboard sheets cut to size are fixed. Trimming is carried out only when the frame is finished.
- At the end, sheathing is carried out with plasterboard sheets directly to the profile or rails.
The advantage of this method is the need for facing the slope and adjacent walls. The disadvantage of the method is to reduce the space in the opening, especially when it comes to the door.
Adhesive method of finishing slopes

There is an option to design a slope using an adhesive solution or putty. Instructions on how to glue drywall are presented below:
- Put putty or glue on the cut parts. When using putty, it is better to use a finishing composition. The material is applied around the perimeter and a little in the middle.
- Prepared slopes are wetted with water and drywall can be glued to the slope. Initially, the top element is installed, and then the side parts.
- When the wall and drywall are connected, you can press down on the sheet and shake it a little to the sides so that the glue spreads and the drywall itself sticks.
- If the sheet is fixed tightly and does not move, then everything is left until it solidifies completely. On the advice of the masters, it is better to wait about a day or even two. In case of unreliable fixation of drywall, it is recommended to support it with planks at the edges and in the middle. When the mixture dries, the strips are removed.
The disadvantages of the method are similar frame technology, but here are the pluses on the face: the work is done faster, not so expensive, and as the reviews show, established slope serves for 10 years, nothing lags behind the walls. Outside, the glue is immediately removed if it has crawled out, until it hardens.
Foam mounting

You can close the slope by fixing the drywall with mounting foam. The seal is very simple, but it is used if there are few defects on the slopes and small pits, up to 3 cm. large sizes, defects must be sealed with foam before installation, the correct method for sealing potholes is using cement mortar or a starting type of plaster. You need to sew like this:
- Dismantle the old coating, the remains of plaster and foam. Next, large potholes are filled.
- When the pits are dry, the mounting foam is applied to the drywall from the back of the material. The foam layer is not more than 1 cm. The material is applied in the form of a snake.
- Plasterboard material is placed on a slope and pressed against it. Pressing drywall must be strong so that the foam grabs the slope.
- After that, the drywall comes off, and on the slope and finishing material foam remains. After 10 minutes, the foam will increase in size.
- Drywall is again mounted in a slope and pressed against the wall. If necessary, the material is fixed with spacers and left for up to a day without continuing work.
- The next step is to seal the drywall seams on the slopes with plaster.

The disadvantages of this design of the slopes of doors and windows are quite large. The biggest disadvantage is that the surface will first need to be leveled, otherwise the drywall sheet will not. Drywall on slopes can bend during installation. There are voids on the door / window slope, due to which the fixation is not very reliable. But this is the fastest method for finishing slopes with drywall. When a window or doorway is sewn up with drywall, according to any method described, the opening is finished various materials. But before you finish the slopes, you need to do the following:
- The slope is puttyed with a thin layer.
- On the outside of the opening, protection is placed and a corner is formed using a plastic perforated corner, which is closed with putty.
- Another layer of putty is laid down to finally level the surface.
- Finishing material is selected.
Advice! Coloring is used for decoration, you can paint it in any color, for example, in the color of a door or window, wallpaper in a room, use standard white paint. Make a choice, photos on the Internet will help, the bay window in the apartment looks very nice in different colors.
The painting is not durable, therefore, for the slopes of the part, a panel type of material is used, for example, plastic for slopes, instead of drywall, PVC panels and other materials, this good material, made in accordance with GOST, is distinguished by its durability. The video shows step-by-step work with drywall, you can use the method for doors and windows:
Photo gallery of finished works

Drywall is interesting stuff. It is easy to install and use, it is distinguished by its durability and practicality. In addition to the manufacture of interior walls and partitions, drywall is often used for exterior finish installed plastic windows.
Finishing work is carried out using different materials: plaster, plastic and drywall. Each method has its adherents. It is worth considering why drywall is so good and what are its advantages over other materials for slopes. With proper knowledge of the theoretical part, the question of how to make slopes with drywall will not become an obstacle even for beginners.
What is drywall and what qualities does it have
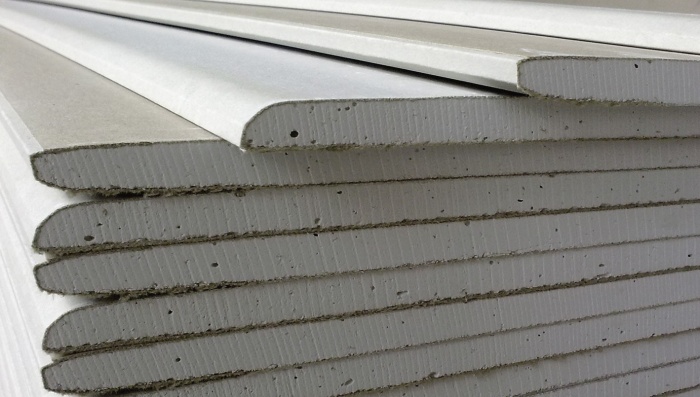
Drywall is a combination of a layer of gypsum building paste and cardboard cladding on both sides. This material has already been used on the market for quite some time. long term. In the form in which drywall is now known, it has existed for more than a hundred years.
Like any material, drywall has a number of advantages, but at the same time it is not without drawbacks:
- Drywall is able to provide sound insulation, showing a sound absorption coefficient of 35 decibels. However, it is recommended to use double laying of the sheet, inserting between them insulating material to improve sound and heat insulation.
- Drywall is lightweight construction. Square meter a sheet 6 mm thick weighs 5 kg, 12.5 mm thick - 9 kg. Thanks to this, the lining drywall constructions requires only frame profile for mounting. Additional reinforcement of the structure is not required.
- An important advantage of using plasterboard finishes compared to traditional plaster is the perfectly flat surface of the sheet. This greatly speeds up the process of sheathing the window profile.
- Drywall good quality has vapor and air permeability. Thanks to this, a constant temperature and humidity regime is maintained in the room. When absorbing or releasing moisture, drywall for slopes does not change its shape and physical characteristics which is another notable benefit.
- When installing slopes and sawing drywall sheets, a significant amount of construction debris is not generated.

Despite the advantages listed above, drywall window slopes have their drawbacks:
- The material itself is fragile, so it requires careful handling during installation.
- Drywall does not have increased strength compared to plastic panels so even falling on a sheet construction tool capable of causing mechanical damage.
- The material, including moisture-resistant varieties, is still not highly resistant to water. In the event that moisture directly affects it, this can lead to the destruction and soaking of drywall slopes.
What types of drywall are used for slopes
There are several types of drywall, depending on the additives and additives used in the base:
- Standard drywall is used for slopes when the humidity in the room does not exceed 70%.
- Moisture resistant drywall contains hydrophobic and antifungal additives. Due to this, it finds its application in rooms with high humidity, more than 70%.

- In rooms with an increased risk of fire, fire-resistant plasterboard sheets are used, the gypsum panel in which contains additives in the form of fiberglass or mineral wool particles. Such varieties are less commonly used for slopes, but due to their structure, the sheets have greater mechanical strength.
- Drywall is initially good because it is a simple and environmentally friendly finishing material. It does not contain impurities that affect human health and does not affect the environment.
The main advantage of drywall compared to other materials is its ability to "breathe". This is especially valuable for those conditions when there is no well-established opportunity in the room. natural ventilation. With high humidity in the room, drywall absorbs excess moisture, with excessive dryness - gives. At the same time, its structure and geometry do not change, which allows not to violate the integrity of the mounted finishing structure.
What tool is needed for the job
Before starting work, you need to take care of the availability of everything the right tool and consumables. In order to install as soon as possible good slope, you will need to provide the following positions:
- screwdriver with a set of drills,
- bit for screwing screws,
- mounting or shoe knife,
- drywall grater,
- rags,
- water container,
- building whisk,
- fastening elements of plasterboard panels to the window opening,
- liquid Nails,
- primer and paint for finishing decorative work,
- starting strip or rail for visual control of the evenness of laying slabs,
- the presence of insulation and waterproofing material.

After the list of positions has been prepared, it is worth starting the preparatory work.
Drywall slopes: preparatory stage
Each of the stages of work is important in its own way. Violation of the installation technology can significantly reduce the aesthetics of the finished structure and lead to the formation of fungus or mold due to the penetration of moisture into the material. Therefore, it is important to adhere to the basic subtleties in order to avoid problems with slopes in the future. The manufacture of window slopes, drywall or plastic, requires due care:
- With the help of a shoe or mounting knife, excess mounting foam, which was formed during the sealing of the window frame, is removed from the window opening. After that, the opening must be treated with a special primer, which prevents the formation of fungus and mold.
- Mounting foam is sealed with a cement mortar prepared in the proportion of 1 part of cement to 4 parts of water. Applying the solution will close through holes formed in the foam due to its porous structure.

- Attention should be paid to careful insulation and waterproofing. Gypsum with prolonged exposure to the condensate formed during the temperature difference gradually collapses. In just a few years, drywall and slopes from it will come into complete disrepair.
- To maintain an accurate level, to window frame with the help of texas or self-tapping screws, a sloping corner is screwed. Its smaller side should be directed towards the window in order to reduce the window frame area used for slopes. Corners are applied around the entire perimeter where slopes are planned to be installed.
Installation of drywall slopes: video and step by step instructions
Initially, measurements and cutting of the material are made. The horizontal part of the slope is located above the window opening and, if necessary, cuts are made along its sides for subsequent installation. Cutting drywall is quite simple: at the cut-off point, an incision is made with a mounting knife, after which the drywall plate is cracked from the reverse side with a neat blow. When the upper blank has been made, it is tried on to the window opening and the level is set. After making marks with a pencil, the remaining side and bottom panels are prepared in the same way.
For fastening drywall to slopes, it is better to use a special glue with a thick consistency so that the composition "grabs" securely. Installation is carried out step by step:
- With the help of self-tapping screws for metal, drywall on the slopes is fixed on the sloped corner. When working, it is advisable to use supports to hold the strip during fastening. This is necessary in order to avoid tearing off the strip with damage to the gypsum layer under its own weight,
- In the free space between the window opening and the gypsum board, a filler is inserted that can provide thermal and waterproofing. More often, mineral wool is used, which can isolate heat from the inside from the cold outside. Thus, the insulation prevents the formation of condensate that can compromise the strength of the structure.
- Drywall adhesive is applied to the front edge of the opening with a spatula. The glue is applied in an even thick layer, extending to a depth of 10 cm.
- After that, the edge of the slope is pressed tightly against the slope and leveled using the building level. As a rule, all adhesive mixtures for drywall are characterized by good adhesion, so additional fixing of the sheets is not required.
- Using a spatula, excess glue is removed from the edge of the installed strip, after which the mixture is allowed to dry.

In a similar way, the side and bottom panels are mounted. The mixture needs to be allowed to cool for an hour, and the do-it-yourself plasterboard slopes are ready.
Finishing drywall sills
No post-finishing finished slopes it still looks like it's under renovation. Therefore, with the help of putty and paint, they need to be given a complete look.
- To protect against abrasion and damage, the outer corners of the slopes are covered with perforated corners, which are made of profiled metal 1 mm thick. With the help of drywall glue, perforated corners are glued to the corners of the window opening. As with gluing finished strips, when gluing the plates, it is necessary to distribute the adhesive over the surface, leaving no gaps or voids. Otherwise, this will lead to bending of the perforated metal, which will negatively affect the decorative effect.

- The perforated corner is pressed into the mixture of glue or putty until it stops, while the excess mixture that protrudes through the holes is carefully removed with a spatula.
- To set the level, it makes sense to use the building level to ensure the evenness of the surface. After all the profiled corners have been installed, they are carefully puttied in places where they fit to the window frame and plasterboard panels. The coating is carried out in two layers, while it is necessary to level the bumps and depressions in the putty in a timely manner.
- In the event that defects still form on the surface, it makes sense to use a grinder or a fine-grained emery mesh with number 160. You do not need to exert excessive force so as not to damage the structure - the putty is easily cleaned off anyway.
- After the putty has hardened, the applied coating must be primed to hide all scratches and other defects. After the primer layer has dried, a fine abrasive mesh is passed over it and primed again.
- The final stage will be painting with water-based paint. Rubber paint works great for this. This type is more expensive, but due to its structure, it is able to wash and stretch a little when heated. At the same time, flaws and defects are invisible, and the surface of the plasterboard slope itself will acquire an additional protective layer against scratches and minor mechanical damage.
How to avoid installation errors
To avoid errors during the installation of slopes, it is necessary to perform all stages of work with due care. Careful preparation during preliminary work and accurate measurements and cutting will avoid most problems.
As a rule, mistakes are made at the initial stage. For example, inaccuracy in measurements will lead to the formation of gaps between joined panels. More often they are closed liquid plastic, but in this case, the cut still looks carelessly, since plastic and drywall differ significantly in their texture, which can be seen with the naked eye.
The influence of European standards on the life of the population of the post-Soviet space has recently become increasingly felt in the construction industry. Real estate owners are trying to transform their property. For this, technologies and materials imported from the West are used. It has become a common occurrence. But this process is accompanied by a violation of the integrity of the structure. window openings and requires restoration of slopes. In an article with detailed photos presented step-by-step instruction how to make plasterboard slopes on windows with your own hands.
Preparatory activities

As for drywall, it is better to immediately prime the entire wrong side sheet. This will not let us then be distracted by the processing of each individual detail. Moreover, it takes time for the primer to dry.

Measures to reduce the size of the window opening with a large width of the foamed space
Often measurements of window openings are performed by non-professionals. Because of this, the width of the foamed space after installation plastic window can reach 10 cm.
In accordance with the recommendations of the technology in question, the drywall slope boundary should overlap the edges of the frame, leaving the foam out of sight. Therefore, the distance between the drywall and the base surface can be quite large. This will require the application of a thick layer of mortar, which will make it difficult to get the drywall pieces in the correct position.
How to close the extra space between drywall and foam?
To solve this problem, in the process of preparing the window opening, you can include the fastening of a kind of lining from drywall strips. They will reduce (depending on the need) the width or height of the opening. To do this, from the part of the drywall sheet that will not be used for the manufacture of the main parts, or remained after the installation of the plasterboard ceiling, strips about 5 cm wide are cut with a construction knife.

A gypsum adhesive mixture is kneaded with a mixer or a drill with a special nozzle. As a result, it should have the consistency of thick sour cream.

Application of the adhesive mixture

The layer of adhesive should be sufficient to achieve the desired result after the installation of these strips. The goal is to raise the level of the base surface. To make it easier to work, the mixture can be applied not only to the glued drywall, but also to the wall of the opening.

In this way, a higher level of the base surface can be achieved. After applying the putty, the part is installed in the prepared place.

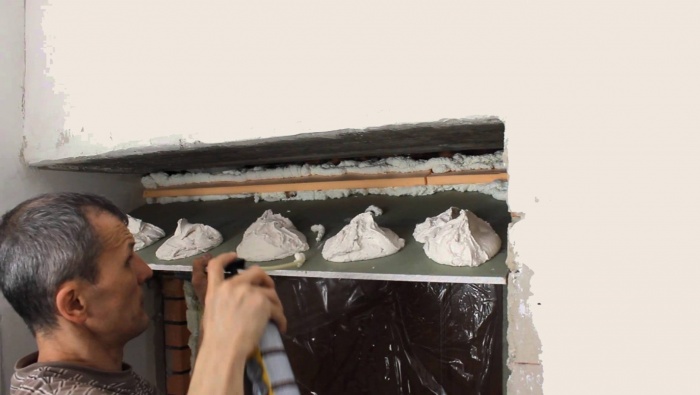
As can be seen in the previous photo, the adhesive mixture is not applied in a continuous layer on the concrete base, but only in the form of two strips along the edges. We do not need the plasterboard slopes inside to be monolithic (although you can add a couple of “bloopers” in the central part).
The main thing is to create a support for the workpiece to be installed so that its edges do not hang in the air. This approach provides significant savings in the adhesive mixture. In the end, the window opening will look like the one shown in the photo below.

If the layer of foam resulting from installing the window is no more than 2-3 cm, then the entire lining procedure described above may not be necessary. In this case, you can immediately proceed directly to the installation of drywall slopes.
Installation of plasterboard elements of window slopes
First of all, the top part is installed. To do this, it must be prepared in advance by cutting off from a whole sheet of drywall. But first, make the necessary measurements so that the gypsum board is sufficient in length and width.

The established dimensions are transferred to the surface of the sheet, and, focusing on them, are marked with a ruler and a cut line pencil.


With a construction knife, a drywall element for the upper slope is cut along the marked lines.

Starting to install the cut blank, you should prepare everything necessary tools and materials. To complete the task, you will need:
- level-bar, the length of which is comparable to the size of the installed panel;
- spatula for applying the mixture to the surfaces to be joined;
- cut-to-size plasterboard slab;
- ready adhesive composition mixed in the manner described above.
When everything is prepared, proceed to the application of the adhesive mixture. It is better to place it around the perimeter, adding a few "blunders" in the central part. To simplify the workflow, it makes sense to apply part of the mixture on base surface closer to the frame. And the second part is on the edge of the drywall slab, on that side of it, which will be removed from the window.

The next step is to set the plate in the desired position. Focus on the lines drawn during the preparatory activities.

How to achieve horizontal top slope?
To achieve a strict horizontal position of the upper slope of drywall, it is necessary during installation to check its location using a level in two directions.


If any place needs to be brought closer to the wall of the opening, then this can be done with light blows on the drywall. But pulling the plate in the opposite direction is not worth it. The mixture does not have the properties of rubber and will not return to its previous state. Therefore, it is better to apply a layer of the mixture with a margin, and the excess substance will spontaneously distribute between the surfaces to be joined, partially filling the voids.
Some craftsmen for the top slope of drywall, come up with props or use dowels to fix the slab in position. In most cases, this is not necessary. Surface tension forces can easily hold drywall, preventing it from changing its spatial arrangement.
Installation of side slopes
As for the drywall side slopes, their installation can begin after the adhesive mixture that holds the top plate has solidified. This procedure follows the same procedure as described above for the top bar:
- a part is cut out of drywall;
- the glue mixture is mixed;
- the finished composition is applied to the surfaces to be joined;
- drywall part is installed in the place intended for it;
- the position of the plate is adjusted along the marking lines and using the level.
The only difference is that the level check is done vertically in one direction.

Covering cracks with glue
When all the drywall elements have taken their proper position and the adhesive mixture has hardened, it is necessary to cover all the cracks between the drywall and the walls of the opening with the same composition.

After that, you can start last stage- puttying drywall.
Finishing work
In accordance with the rules for installing drywall slopes, for, it is important that the corners are perfectly even. Therefore, a perforated corner is installed on them. It will strengthen them, protecting them from possible mechanical damage. The corner must be measured to size and cut with metal scissors.

Installing a perforated corner
Then you need to mix a little finishing putty(it is better to use Knauf multi-finish, which will allow more time to work with the mixture). Putty must first be applied to the slope angle.

After that, the corner is set.

Application to drywall surface
Next, use the same gypsum mixture. Then proceed to apply it to the surface of the drywall. It is important not to forget that this surface must be primed in advance. The leveling of the slope surface is carried out in two stages.
The first stage is applying the mixture in sufficient quantity with a spatula. It must be applied perpendicular to the drywall element.

The second stage is the tightening of the putty with a wide spatula along the slope.
Preparation of slopes for painting
If the slopes will be painted, it is better to apply putty in two layers. With a drying period in between. After the surface of the drywall window slopes takes on an aesthetic appearance and dries sufficiently, it remains only to sand it. This is done using a special abrasive mesh. After sanding, remove the sags. Then comes the painting.
As can be seen from this story, it is not difficult to make slopes from drywall with your own hands. It is important to carefully measure everything and follow the technological order. This should be observed during preparatory work, and during the installation and finishing of the main parts. Do not forget to prime hard surfaces before applying mixtures. And also, do not knead a lot of glue in order to have time to produce it before it hardens.
Watch a tutorial video on how to make drywall slopes with your own hands:
Good luck with your repair!
A good and well-groomed window is a guarantee of comfort in the room. A modern double-glazed window, paired with high-quality slopes, is able to effectively retain heat and provide decent sound insulation. Drywall slopes are the most common finishing option. Therefore, it will not be superfluous to learn how to make slopes from drywall with your own hands.
Finishing window slopes with drywall - reasons for popularity
It is a practical, versatile and environmentally friendly material. It is used everywhere - for leveling ceilings and walls, for the construction of partitions and various elements, as well as for finishing slopes. Its versatility is due to a number of reasons:
- thanks to drywall, you can get a perfectly flat surface;
- finishing window slopes with drywall occurs quickly and without unnecessary dirt;
- has heat and sound insulation properties;
- strong, reliable and durable;
- allows you to create various designs and implement the most daring design ideas.
Due to these qualities, the installation of drywall slopes can be done by hand. To do a good job, you need some knowledge and a little skill. Installation is done carefully, without haste. All stages of work are accompanied by measurements and a mandatory level check. If you do the job correctly, clearly adhering to all technological processes, you can get not only flat surfaces, but also reliable protection from cold, noise and condensation.
Slopes for plasterboard windows - we plan and calculate with our own hands
To learn how to make drywall slopes, you need to understand the specifics of the material and the upcoming work. Drywall is moisture resistant and ordinary. For finishing window openings, it is better to choose a moisture-resistant material, since this zone has high humidity and is often subjected to temperature fluctuations. It is the savings on the choice of material that often leads to problems in the future, when you have to redo all the work.
Drywall is fixed in two ways:
- For glue. simple and fast way. A prerequisite is high-quality thick glue and smooth surfaces.
- Screwing to profiles. For this, a frame is made of metal profiles. The method allows you to level even very curved surfaces, which would take a lot of plaster or glue.
Depending on the option chosen, you need to purchase necessary elements. Of course, this is the drywall itself. If you attach it to glue, then in addition to the adhesive mixture, you will need a good primer, which will increase the adhesion (adhesion) of materials. To apply the primer, you will need a wide paint brush or a roller with a long nap.
In the case of fastening to metal profiles, you will need the profiles themselves, as well as galvanized self-tapping screws, a drill. In both cases, purchase a construction knife, a drywall saw or a jigsaw, putty, spatula, masking tape, paint (if you plan to paint the surface).
How to finish the slopes with drywall - preparatory work
As with the beginning of any other work, you need to prepare for the installation of drywall slopes. First of all, we clean the window opening. Carefully cut off the excess mounting foam with a knife. We remove all dust and debris. If necessary, you need to remove the old coating - plaster, paint, wallpaper, whitewash.
When all excess is removed, the surface is treated with a primer with antifungal properties. This will serve as an additional barrier to the penetration of mold into the room. After treatment with a primer, it is necessary to wipe the mounting foam with cement mortar. Thus, the path to drafts is blocked, and the cement will prevent the destruction of the mounting foam. Lastly, if necessary, the base for drywall is leveled.
When all the preparatory work has been completed in the opening, it's time to start preparing drywall sheets. It will not be difficult to make slopes from drywall with your own hands if you make the right measurements. For this we need a roulette wheel. Having accurate data, it remains only to measure and cut the sheet evenly. It is better to cut drywall with a special hacksaw with small tooth, or electric jigsaw.
Installation and installation of slopes from drywall - glue sheets
After completing all the preparatory work, it's time to install drywall slopes with your own hands. If glue was chosen for the work, then according to the instructions, make a batch sufficient to finish one slope. Glue is applied both on the surface of the base and in a small layer on the drywall itself. It is better to start from the upper slope, so that later the side sheets seem to support the upper one.
While pressing the sheet against the surface, lightly press on it to squeeze out the excess. Check with a level to see if it is level. Lightly tapping with your fist, if necessary, adjust its position. Then fasten the side sheets in the same way.
Domestic and outside corners it is best to close it with a metal profiled corner, which will prevent mechanical damage to the soft drywall. Corners are attached to a small amount of putty. When the glue hardens properly (from 12 to 24 hours), putty the slopes with a thin layer of putty, which will hide the corners, bumps and roughness. After the layer has dried, you just have to process it with a fine-grained sandpaper.
Beautiful, but you can make it even more beautiful if you apply a pretty pattern or give the surface some interesting effect. The simplest is stripes of different colors or shades. More complex - "antique" coating. In this case, paint is applied paint brush with a long pile, performing circular movements. In places, apply more pressure with the brush to make the paint layer uneven. Then wipe the slightly dried paint with a regular sponge or the same washed brush - there you go!
Quick installation of plasterboard slopes - fasten to profiles
If you have to tinker with the adhesive option for a long time, then installation on metal profiles will take significantly less time. Difficulty depends only on the level of unevenness of the base. Sometimes, under the profiles, you even have to make a semblance of a wooden crate, which is securely attached to the wall. The thickness of the rails depends only on the degree of unevenness. It is desirable to treat the tree with an antiseptic so that in the future there will be no problems with wood decay.
For work you will need special self-tapping screws on drywall, which are well fixed in metal profile and do not damage the sheets themselves.
It is not difficult to set the drywall evenly with the help of a level. Before you finally install the sheets, you can carry out additional, as well as their waterproofing. As a heater, you can use expanded polystyrene or mineral basalt wool. Lay a layer of waterproofing over the insulation, and then screw the drywall. The processing of the corners is identical to the previous version with glue. Ways to decorate the slopes depend only on your imagination.
It is worth noting that drywall sheets are not designed for heavy loads, that is, lay a heavy load on top of them. ceramic tiles or solid wood is not worth it - the durability of such a design leaves much to be desired. For heavier coatings, it is best to carry out.


