Taking on the arrangement of the interior space, it is important to think through every little thing. After all, we all subconsciously strive for comfort and that is the smallest details are able to create a special atmosphere, convey the general idea, mood and character of the room. Professional designers claim, and the interiors clearly prove that right choice Chandeliers can not only decorate the interior of the room, but also make life brighter, more fun. They give special grace and gloss to the lamps beautiful shades for chandeliers with original design. About how to make them with your own hands and what materials it is better to use for this, you can find in this article. Detailed, step by step master class, and visual photo will be a great help to you in this exciting process.
Material selection
In the manufacture of a chandelier, it is difficult to single out any one material that would meet all the requirements. Each of them has its own individual characteristics and features. For example, paper, which is the most simple and available material, lends itself well to transformation.
Lamps made of glass fragments and strips of metal have a dazzling brilliance and a beautiful appearance. Wood and fabric add warmth and comfort to the interior. Lace lampshades are distinguished by their special beauty, captivating everyone at first sight.
In a word, you can make a chandelier with your own hands from anything, the main thing is to be smart in time and turn on your imagination.


A paper napkin chandelier is a bold enough but justified experiment.
We will describe in detail in this article how in an ordinary object you can see its creative potential for creating an exclusive decor element.
Step-by-step instructions, with a description of each action, will help you make improvised, incredibly beautiful and unique lamps that will be a great addition to your favorite interior.
What you need to pay attention to before making a chandelier
Many are interested in how to properly make a chandelier in, and other rooms. After all, I want this element of the interior to be not only beautiful, but also functional.
On the one hand, the chandelier is lighting fixture, capable of providing the proper level of lighting in the apartment. After all, a lot depends on the choice of light in the room, including the safety of the eyes. On the other hand, I want the ceiling structure to complement the interior design, creating a special atmosphere of warmth and comfort.
When making a chandelier, the first thing to consider is the height of the ceiling. For example, a chandelier with a bar mount is suitable for low ones. So, the ceiling will look visually higher. If the ceilings are high - 3 m and above, then it is better to make your choice in favor of a pendant lamp with a hook mount.


Lamp selection
For any room you need to individually approach the intensity of its lighting.
For a small bathroom, 80-100 watts will be required.
Kitchens need a lamp power of at least 120-150 watts.
The living room and the hall cannot do without light bulbs in the range of 150-300 watts.
The number and power of lamps is calculated based on established standards - 20 watts are required per 1 m². electricity. It is also necessary to take into account the parameters of the room, its dimensions and reflective properties.

Edison designer lamps - look beautiful and unusual
Plafond design
The appearance, decor and design of the ceiling occupies an important place in the design of the chandelier. It is selected for the interior of the room, depending on the style. Crystal for classics, metal and glass for, wood will fit perfectly into country or chalet style, fabric and silk will perfectly suit Provence style.
To illuminate a room on several levels, you can additionally make wall sconces or floor lamps.


Step-by-step master class on making
To make a beautiful ceiling decoration, it is not necessary to start everything from scratch. Take a look around, you probably have something in your house that you have not used for a long time. And who knows, maybe it will become the main subject in the manufacture original lamp. Moreover, there are more than enough ideas and inspiration for creativity on the Internet.
Important! It is best to start searching for the necessary things from the kitchen or balcony. It is there that we store all sorts of rubbish that was once so necessary for us and which, as often happens, is so difficult to part with later.
Spectacular chandelier from mugs
No matter how strange it may sound, but it is from dishes and other kitchen utensils, the most unusual and interesting models lamps. For example, tea mugs are an ideal material for making a spectacular lamp.
For work we need:
- Mugs
- Saucers
- Drill
- Porcelain drill with special hole

Mastering quickly and easily
- At the bottom of the mug, with a drill, we make a small hole for the wire, fasten the electric chuck and bring the wire out. It is desirable to seal the hole with a gypsum mixture.
- Next, the mug must be glued to the saucer, where there should also be a hole, insert a light bulb and hang the newly made lamp in the right place.
As you can see the original fashion design can be obtained from completely ordinary items.


Fascinating yarn chandelier
Since it's pretty a simple product, for its manufacture we need a minimum of things, namely:
- Wire with a section of 4-5 mm.
- wire cutters
- Fine thread
- colorful yarn
Manufacturing instructions:
- A ring is made of wire, the diameter of which will correspond to the future size of our chandelier. To get perfect even circle, it can be wound on any object that has a cylindrical shape.
- We bite off the excess wire with wire cutters, leaving 2-3 cm in reserve on each side. We tie the ends with a thin thread.
- It remains to decorate our chandelier beautifully and brightly. To do this, we cut the threads of yarn in such a way that the length of each segment is twice the height of the ceiling.
- Alternately, on a knot, we tie the resulting threads until we hang the whole ring with them. From the same yarn, we make a hook mount.
You can use such a lampshade both in the form of a chandelier and in the form decorative element decorating the interior of the room.


By combining the skills of macrame and papier-mâché, you can get a stylish chandelier for the bedroom
Important! To make such a lamp, instead of woolen yarn, you can use any other thread. The main thing is that it harmoniously fits your interior.
Unusual teapot lamp
You will learn how to make a chandelier from an ordinary teapot yourself from this master class. Here's what we need for this man-made masterpiece:
- Kettle
- The wire
- Electrochuck
- metal chain
Step by step guide to making
- First of all, the bottom of the teapot is cut out. This is done in such a way that the resulting cutting edge is not sharp, otherwise you can get hurt on it.
- Next, an electric cartridge is fixed to the lid of the kettle, the wire of which is led out through a small hole drilled at the top.
- A chain is attached to the handle of the kettle, through the links of which a wire is threaded. The lamp is ready.


Breathe new life into bottles
Glass bottles, especially if they have beautiful shapes, can be used to make a wonderful chandelier. Required material:
- thin rope
- Flammable liquid (alcohol or gasoline)
- Glass bottles (preferably colored)
- Edison lamps (having a beautiful spiral)
- Wire and electric socket
Do it yourself
- We wind the rope on the bottom of the bottle, after wetting it in a flammable liquid. Then we set fire to it and let it break, and we begin to slowly rotate the bottle around its axis until the rope burns to the end. After that, we lower the bottle into a container with cold water, wrap it with a towel and, with a little effort, break off the bottom.
- So that the cut edge is not sharp, it must be sanded. To do this, it will be enough to twist the bottle in sand or small gravel for a couple of minutes.
- It remains to properly mount the electric cartridge, stick the wire through the neck, screw in the light bulb. From the remaining bottles, the rest of the shades are made in a similar way.
This chandelier will perfectly fit into the interior made in any, especially if you hang it over the bar counter.


Can decor
No less beautiful are lamps made from cans. They are made in the same way as from bottles. The only difference is that the bottom of the jar does not need to be cut off, as clear glass is usually used for shades.
We need:
- Beautiful thick-walled jars (preferably with a relief pattern)
- Hammer and nails
- Wire, electric chuck
- Paint can
- Edison lamp
How to do it right
- To begin with, using a nail and a hammer, holes are stuffed in a circle in the lid, after which inner part squeezed out gently. The diameter of the circle must match the diameter of the socket in the chuck.
- We insert the cartridge into the cover, mount the wire.
- Next, paint the lid along with the cartridge in the color we have chosen. Metallic paint with a golden tint will look best.
- It remains to screw the light bulb, close the lid and install the lamp in its place.


We all know what a globe is, but not everyone knows what amazing things can be done from it. For example - a nice lampshade for a chandelier that will perfectly fit into the interior of a children's room.
Here is everything we need:
- globe
- Bulb
- Electric chuck with holding element
Step by step master class
- Usually the design of the globe is not solid, so in order for us to get the desired element, we need to divide it into equal two parts (hemispheres).
- Next, at the top of the hemisphere, you need to make a hole for the cartridge. For this, it is best to use a drill with a crown.
- The electric chuck is put into place and securely fixed by the retaining element. Congratulations, your chandelier is ready!


Suspended antler structure
Making a unique lighting device from deer antlers is quite simple, the main thing is to have the necessary material at hand.
Such designs are famous for their special sophisticated look and are best suited for rooms with high. Such chandeliers are used in many interiors, but they look especially attractive in country, chalet or rustic style.
As a rule, the shades of such chandeliers have various forms and only natural materials are used for their production.
We will need:
- Antler
- Rope
- Copper wire
- Electric chuck and wire
- Bulb
Make a chandelier like this
- Observing the precautionary rules, according to the diagram, we connect the wire to the electric cartridge.
- Next, the wire must be beautifully wrapped with a decorative rope. For better fixation, you can use a universal transparent glue.
- By using copper wire, in the lower part of the resulting rope, horns are attached, placing them 2 cm above the cartridge.
- We repeat a similar procedure with the rest of the shades, then combining them into a single composition.

Chandeliers and lamps in the premises of the house, apartment, cottage play special role. They give each room its own style and are an interior decoration, especially if they are. Although such chandeliers are expensive, as they are made by hand.
DIY wooden chandelier with energy-saving lamps
If you want, then with a little effort and turning on your imagination, you can make something special, individual, something that will give the room a special originality. This will not only save cash, but also make the chandelier exclusive. Households and guests will admire her, you can also earn money on this.
They will help to make a chandelier from improvised materials master classes that are available on the Internet at in large numbers, own ingenuity, as well as the desire to create with their own hands. There are no restrictions in design, as well as in the materials used.
Chandelier materials
Before proceeding to the manufacture of a chandelier with your own hands, you need to decide:
- for what room it will be made (kitchen, bedroom, living room, hall, etc.);
- with the style in which it will be performed (business, romantic, classic, rustic, etc.).
These factors will help you choose the right material. It can be very different: fabrics, wood, plastic products, threads, lace, beads and much more. The first question concerns the foundation. There are many options here too. Old unfashionable chandeliers, metal and wooden hoops and frames, wire. Fantasy should not be limited. Everything will do, the main thing is to make the lamp carefully. Its appearance depends on it.
Chandelier for living room
Chandelier for the living room should be elegant and solemn. The figure shows one of the manufacturing options, made of beads. A master class for making such a chandelier begins with the selection necessary materials and tool. In this case, you will need:
- hoop;
- beads;
- strong threads or easily bending wire;
- nippers or scissors;
- spray;
- glue gun.
The hoop can be used plastic, metal or wood. It is better to wrap it with fabric or ribbons in the color of the future chandelier. You can combine fabrics - this will only make it more original.

Elegant chandelier made of beads with your own hands
You can buy the cheapest beads in the store or use the old ones available at home. It's okay if they are different colors. Then you can use the spray to give them the desired color.
Beads are strung on a thread or a thin wire and then intertwined with each other. The pattern may be as shown in the photo, or may be made in a different style. It will help to fix the beads in the right places glue gun. The strung threads are attached to the hoop with a thin wire. This is how a lamp design is created using beads. Other products can be additionally used in the decor, but this is already the taste of the manufacturer.
Currently, many lovers of making chandeliers with their own hands use material such as LEDs. Particularly popular led strip. It turns out economical and very effective lamps.

LED strips for chandeliers
The following types of tapes are used:
- SMD 3528 with 60, 120 and 240 lamps;
- SMD 5050 with 30, 60 and 120 lamps.
LED strips are produced with a length of 5 m, with varying degrees of protection, which allows them to be used in rooms where humidity is high (IP44).
When creating a chandelier with your own hands from several colors, you must observe the polarity when soldering and install the controller. It will allow you to use the remote control to adjust the brightness and switch the light.
Chandelier for nursery
Making a chandelier for a child's room is not difficult at all. It must be remembered that in this room there should be an atmosphere of childhood, and it is connected with the flora and fauna. Therefore, most often such a chandelier is made with butterflies, fish, flowers, various plants and also use fabrics with children's patterns.


Original DIY chandeliers with butterflies
The work begins with thinking through the design. The photo shows what you need to have to make such lamps:
- frame;
- thin strong threads;
- white cardboard;
- pencil;
- scissors;
- sharp knife;
- butterfly stencils of different sizes;
- glue;
- screws for fastening the structure to the frame or ceiling.
To make a white chandelier, it is necessary to draw the silhouettes of butterflies on cardboard of the appropriate length using stencils, cut them out and then connect them to the frame, securely glue and fasten them. Inside the lamp at different lengths, hang on thin threads butterflies. If you add beads to these threads, then the chandelier in the nursery will have quite original design. When you turn on the light, moving shadows will be cast on the walls of the nursery, which kids really like.
A chandelier designed for the bedroom should have an unusual decor. The design of such a lamp should be conducive to coziness and comfort. It is appropriate to use fabrics, napkins, threads, etc. The photo shows a small chandelier in the bedroom, made by hand using lace napkins. The master class consists of the following steps:
- inflate balloon to the required size;
- lubricate with vaseline;
- then grease with PVA glue;
- apply napkins;
- let the structure dry;
- blow off the ball.
It remains only to put the chandelier on the cartridge, insert a lamp into it, best of all energy-saving or LED, and run the wire from the switch.

Chandelier from napkins for the bedroom
The photo shows a handmade chandelier made of flowers. The manufacturing technology is similar to the manufacture of a chandelier with butterflies. Only here it is necessary to make a more complex framework. This lamp looks great in the bedroom. Subdued light and glare on the walls will create a unique atmosphere.

Flower lamp in the bedroom
Chandelier in the kitchen
It is impossible to imagine the interior of the kitchen without the original lamp. Here the flight of the manufacturer's imagination depends on the materials used.

DIY twine chandelier for the kitchen
This original lamp is made of twine. Suitable for a country-style kitchen. Its master class on its manufacture consists of the following steps:
- make a frame consisting of 3 hoops located at some distance from each other. Install thick wire partitions between them (it is best to weld);
- then, taking the twine, wind it up and down, as seen in the photo.
It will not take much time to make such a chandelier with your own hands, and the cost of materials will be minimal. But with its design and originality, it will outshine purchased items.
Another type of lamp in the kitchen, which you can do with your own hands, deserves close attention.

DIY thread chandelier
The manufacture of such a chandelier is described by many masters in master classes posted on the Internet. The step by step steps are as follows:
- inflate a balloon;
- lubricate with vaseline;
- grease with PVA glue;
- wind the threads (you can use multi-colored ones);
- grease with PVA glue;
- let the product dry;
- release the air from the balloon and take it out.
It remains only to insert a cartridge with a light bulb, conduct wiring in the right place and install a switch so that it is convenient to turn the lamp on and off.
In the distribution network you can buy various chandeliers and lamps that have standard dimensions. The handmade market offers a wide variety of ready-made modules. At home, you can, rummaging through old things, find materials and designs that are suitable for making chandeliers with your own hands. They are easy to assemble original design. Master classes that are easy to find in the literature and the Internet will help in this.
How to do. Video
Video share useful tips how to make a quality chandelier with your own hands.
By adding your imagination, you can create an original, one-of-a-kind chandelier that will become an exclusive design element of your home. The premises of an apartment, house, cottage will be the personification of comfort and originality, and all thanks to the chandeliers and lamps made by the master with a soul, in an atmosphere of creative inspiration.
It takes ~3 minutes to read
 Each piece of interior, which is made by hand, is able to fill the house with special comfort and warmth. In addition, such crafts will not only look great in any room, they will become a completely exclusive thing. Chandeliers that are made on their own with the help of improvised materials will look very original in the house. This is a wonderful idea!
To create such a beautiful product, discover the inimitable design talent that exists in every person. It is this revealed quality that will bring into the house not only bright light, but also a cozy atmosphere.

DIY kitchen chandelier
Such a product of needlework will look very elegant and graceful in the kitchen. And when guests come to the house, they will not even be able to guess that such a chandelier was made by hand, and not purchased in an expensive designer store. Imagine their admiration if they find out that it was you who could create such a masterpiece as a chandelier with your own hands. In the kitchen with such a product is always fabulous.

You will need the following materials:
- A leg that can be removed from an old chandelier.
- Hemisphere, which is made of metal.
- Any light fixture that has been used in the home in the past. Can be taken apart and removed required part. If this is not available, then an old school globe, previously cut in half, will do.
- Sandpaper. It may not come in handy, but it should still be available just in case you need to do some sanding to get the surface perfect.
- Wallpaper glue. Use this particular type, because, after drying, it will become completely transparent.
- Ordinary sponge.
- Dye. For the manufacture of a chandelier, you can take a matte one, which is also used for painting walls.
- The fabric is white.
- Artificial leaves as well as flowers.
- Half beads.
- Beautiful tape.

So everything the right materials are at hand, you can come directly to the manufacture beautiful chandelier for kitchen.
- First, dilute the glue and lower a piece of fabric there. All material must be completely saturated with glue. Now you can lay out a sticky piece of fabric on the previously prepared hemisphere - this is the future ceiling. In order to make it more convenient to make folds on it, you can use any sharp object to make small cuts. Everything that remains to stick out, wrap it inside the product. The lamp must be glued absolutely completely.
- Give the product time to dry.
- We take a sponge and paint the surface with it (inside and out). As soon as the paint is completely dry, it is better to apply another layer for reliability. Now you can attach the resulting product to the leg.
- The next step is to decorate the lamp. But first, think carefully. Decide what the final product should look like. You can make several sketches on paper with different options design. When you have decided, you can proceed to further work on the lamp. First glue the decorative leaves in random order. Then comes the layer of flowers. If you have figurines ladybugs, for example, you can attach them.
- To complete the composition, you can decorate everything with a beautiful ribbon. But fasten it in such a way that it is under the leaves, it is more beautiful.
- At the end, you can add half beads to the composition. The lamp is ready.

Chandelier made from old plastic cups
 Many people are involved in creating amazing and beautiful things that are perfect for decorating the interior of the house. But often everyone forgets about chandeliers and lamps. Or maybe there is simply no idea for creativity ... That is why people so often ask the question: is it possible to make a chandelier with your own hands using what is at hand? Yes of course!
Necessary materials:
- Plastic glasses (about 300 pieces).
- Staples and stapler.
- Bolts.
- Washers (one large and small).
- An energy-saving light bulb (it is this type that is taken, since the usual one is very hot).
- Cartridge with wire.
We proceed to the manufacture of the chandelier:
- Use a stapler to staple three glasses together. It is best to start the connection from the bottom, and then go to the very top. What happened is the basic design. The resulting product is attached to the rest of the cups. The conical design provides a sphere. And we must not forget that when everything is ready, you need to leave one hole for the cup empty. It is in this last glass that you burn a small hole. Put a large washer inside.
- The electrical wire is tied in a knot and then pushed through the holes to the outside.
- Now attach the cup with bolts and small washers. If there is any breakdown, then you can easily disassemble it all. Using the same technology, you can also make a floor lamp by finding a suitable and beautiful stand.

Openwork sconce or floor lamp
Chandeliers (lamps) and sconces, which are made from improvised materials with their own hands, always look very beautiful. Any glass jar can be used as a ceiling lamp, and a container for bulk products is also suitable. Knitted openwork lace will be used for lampshade decoration elements.
 To make a lamp, you will need the following materials:
- Glass container and tin lid.
- Hex nut.
- Drill with drills.
- Electric wire.
- Bracket and cartridge.
- Electric lamp.
- Napkin or any lace product.
- Aerosol glue, as well as paint.
You can get started:
- It is necessary to drill a hole in the very center for fastening. And also you need to make four holes in a circle to avoid overheating.
- Now we fasten the bracket, nut and cartridge, and then install the light bulb.
- A layer of glue is applied to the surface of the jar, and then lace is applied. They can be applied to any part. Everything depends on the imagination.
- If you plan to make a sconce, then an openwork napkin can be attached with ordinary tape. After that, everything is painted with spray paint. When the product dries, the napkin can be removed, and the painted form will be preserved.

Chandelier of rose petals (pendant lamp with your own hands)
 This is a very romantic version of the pendant lamp.
stock up the following materials before starting production:
- Wooden hoop (you will need 3 pieces of various sizes).
- Rose petals (you can buy them in a special store for decoration or make your own by cutting them out of thick white fabric).
- Silk thread.
- Starch for paste.
- White acrylic paint.
- Fishing line.
Let's get to work:
- We cut out white circles from the fabric, and then glue them with a paste in pairs. Lay a white thread between them. The length should be approximately 40 or 50 cm.
- Now let's move on to coloring the hoops. You need to use white paint. Then we hang them on the fishing line in the following sequence: the largest ring comes first, then the middle one, and the smallest will be the last.
- Now tie the threads with the petals to the hoop. In the place where the binding is made, stick a circle of fabric. This process is very labor intensive. But the result will be excellent.

Wire butterfly chandelier
This is very original chandelier which will bring to the house a constant feeling of summer and warmth. Flocks of butterflies will literally come to life after a slight breeze blows. And the best part is that such a chandelier is very easy to make. with my own hands. The idea of using a beautiful butterfly when making a lamp is very good.
Necessary materials:
- A lampshade that has two rings.
- Chains are decorative.
- Scissors.
- Silver paint (preferably in the form of an aerosol).
- Very thin marker.
- Transparent plastic.
- Pliers.
- Silver wire.
Completing of the work:
- The lampshade is painted with silver paint.
- A stencil is made in the form beautiful butterflies. Here you can use your imagination and do everything yourself or find ready-made samples on the Internet.
- We cut out butterflies from plastic according to stencils.
- Several butterflies need to be painted silver. The rest should remain transparent.
- You need to cut chains 10 cm long. Now you need to put transparent beads on them. So, the product can be given very beautiful view, because the beads will shimmer every time the sun hits them.
- Next, attach the butterflies with pliers and wire. We attach the remaining end of the chain to the lampshade.

Making from disposable spoons
 Such a simple item as a plastic spoon can become a real masterpiece in skillful hands. Consider how to make a chandelier from such material.
Necessary materials:
- One plastic bottle with a volume of 3 liters.
- Glue.
- Wire cutters.
- Plastic spoons (one large package).
Chandelier assembly:
- Using wire cutters, separate the heads of the spoons.
- Next, cut out the bottom of the bottle.
- Starting from the very bottom of the bottle, we proceed to sticking the heads of the spoons over the entire surface of the bottle. Each new row must be glued so that it goes on the previous one. Arrange the spoons in a checkerboard pattern.
- When you come to the neck of the bottle, you need to stop. In this place, a ring is made that resembles a bracelet. We make it from well-glued spoons.
- For this chandelier, only energy-saving light bulbs should be used, as ordinary ones get too hot. And this will ruin the design.

Original idea: thread lampshade
 Threads are another very beautiful and simple material at hand that can be used to make a beautiful DIY chandelier. You will get a very unusual ceiling. You need to prepare the following materials:
- Balloon.
- Knitting.
- Starch glue.
- Lighting fittings and wire.
- Foam brush.
- Yorshiki.
- Scissors.

Manufacturing process:
- First, the balloon is inflated.
- Dip the threads into the glue, and then wrap them around the entire surface of the ball. It is better to arrange the threads evenly in four or five layers. Then they are fixed on the base of the ball.
- Next, cover the surface with a good layer of glue. It is better to use a foam brush.
- The ball should dry well while hanging.
- When the threads are dry, you can pierce the ball and remove its remains from the ball, which is now completely composed of threads.
- At the very top of the ball, in the place where the threads were tied, cut a hole. Dimensions are selected so that you can put a light bulb inside. Light fittings are attached inside.
- In order to fasten, wrap the wire with brushes, then thread them inside the sphere.
That's all, you just need to look around and turn on your imagination to see the potential in any improvised thing from which you can make a truly beautiful product. An idea can come from looking at any object. Good luck in creativity.
Photo examples of unusual shades made from improvised materials


Problems with the choice of fixtures are familiar to many. Lamps are purchased last, so combining them with all other interior elements can be difficult. But you should not despair. After all, spectacular lamps can be made independently, without spending a lot of time and money.
1. New Year's decor on the chandelier

Plastic beads, which can be purchased in the department New Year's decor, you can decorate the finished lampshade. Bright colors and shine will turn the lamp into a real decoration of any interior.
2. Urban landscape

The outlines of city roofs, cut out of dark paper, are glued onto a light lampshade. Such an application will easily transform a boring plain lamp.
3. The whole world at a glance

In every house there are old cards that lie unused for years. From them you can make a lamp with your own hands. Just wrap the old lampshade with a piece of the appropriately sized card. For a neater look, the paper can be coated acrylic varnish.
4. From papier-mâché

To make an original lamp with your own hands, you will have to remember the papier-mâché technique, familiar to everyone since childhood. The paper must be torn into small pieces and left for a couple of hours in an aqueous PVA solution. Then the object is covered with paper pulp layer by layer. desired shape For example, an inflated balloon. After the papier-mâché has dried, the lampshade is ready.
5. The second life of old newspapers

Just pasting a lampshade with a newspaper artificially aged with tea or coffee is too simple a solution. Cut out circles from it and glue them so that they partially cover each other. An interesting play of light and shadow is guaranteed. Additionally, it is better to varnish the lampshade.
6. Eternal lampshade

From an old metal basket or ordinary wire, you can make a lamp with your own hands, which will become a champion in strength and durability. In addition, such a lampshade is also completely fireproof.
7. From bright cocktail tubes

A lamp made of cocktail tubes looks democratic, but at the same time spectacular. Just glue the tubes of one of the sides onto the old lampshade with silicone glue. If you cut the tubes in half, the lamp will turn out to be smaller.
8. Chic and shine

Beads that have not been used can be used to decorate the lamp. Thread them onto thin jewelry wire (available at craft stores) and attach it to the metal base of the lampshade.
9. Clear geometry

Cocktail tubes, painted in gold or silver, will become the material for making a lamp with your own hands. Between themselves they are fastened with a threaded thread.
10. Lace patterns

Just cover or glue a plain lampshade with contrasting lace. In the first case, it is better to use elastic lace: they will fit snugly against the surface of the lampshade and look neater.
11. Paper Chaos

Ordinary white paper rolled into tubes becomes the raw material for original lampshade. Glue them together in a chaotic manner, moving from bottom to top.

12. A cozy lamp for needlewomen
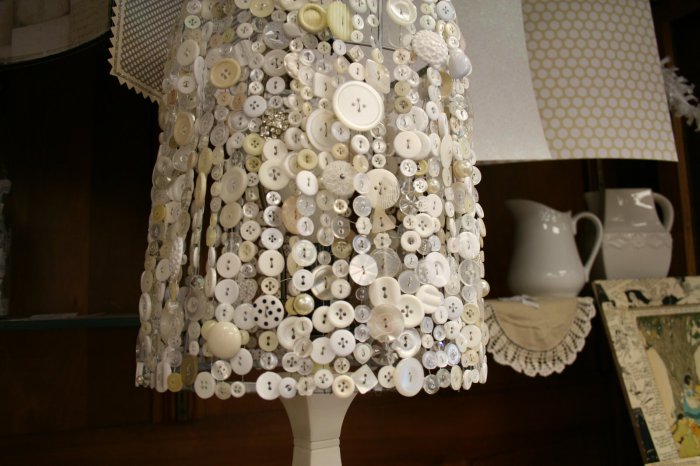
All buttons that do not find a use for themselves can be used to make a cute lamp. String the buttons on strong threads, and fasten them to the top of the lampshade.
13. In harmony with nature

A branch of an intricate shape will be an excellent basis for an unusual lamp. In addition to it, you will need several light bulbs in cartridges. Just wrap the wires around the branch.
14. Almost edible chandelier

The base from an old lampshade, decorated with cutlery, looks quite brutal. Such a lamp will perfectly fit into the interior of a country-style kitchen or loft.
15. Delicate textile petals

For the manufacture of such a lamp, a fabric is selected whose edges do not crumble. The petals cut out of it are attached to the lampshade with glue.
16. From decorative rope

Generously smear the base for the future lampshade with a thick one and wrap it tightly with a rope with a rough texture. It is not necessary to use as a basis old lamp. Suitable even old crockery such as glasses or bowls.
17. Lamp in a skirt

Translucent textiles, for example, tulle from old curtains, can find a second life. Having collected it in the upper part in folds, fix it on a boring lampshade.
18. Patchwork

A lot of multi-colored shreds are tied on the basis of an old lampshade. The more of them, the better.
19. From favorite postcards

Often postcards and photos, even those that you like, lie idle for years. Paste them over a boring lamp, and it will instantly change.
20. Our whole life is a game

A deck that is missing a few cards should not be thrown away. Thick glossy paper with a contrasting pattern is an excellent material for decorating a lampshade, practical and beautiful.
So, the lighting problem is solved. It's time to familiarize yourself with
Lighting is the most important component of the interior. The coziness and comfort level of our home depends on the lighting. The play of light and shadow allows you to beat the winning moments of the interior and divert attention from bad moments. And also - lamps, floor lamps, chandeliers and lamps create the atmosphere that we call "home". Unique lamps and The best way- make a lampshade with your own hands. Homemade plafonds and lampshades are the thing that will make your home stand out from the rest.
A few words about security
In the manufacture of lamps, floor lamps and chandeliers in industrial conditions, the minimum distance from the "body" of the lamp to the materials is preliminarily calculated. This distance depends on the power and thermal radiation of the lamp and on the type (combustibility) of the material from which the ceiling / lampshade is made. At home, hardly anyone will bother with such calculations. And in order not to create a dangerous situation, it is worth adhering to certain rules.
And in general, having made a lampshade and installing it, in the first few days, pay attention to whether the ceiling heats up. Heating is any increase in temperature above environment. If the lampshade feels “warm”, change the light bulb to a less powerful one. Check again. So until the homemade lampshade warms up.
Where to get a frame
If you want to remake an old lamp, floor lamp, sconces in which the old lampshade has become unusable, you can simply use the existing base by peeling off the old material. Before starting work, inspect the frame well, if there is rust or a damaged coating somewhere, maybe it’s worth stripping everything off and painting it again? At the same time, the color can be changed. If there are no old frames, you can buy an inexpensive lamp (in a store or at a flea market) and do the same operations with it. Good lampshades can, by the way, be made from waste baskets. They are wire, there are plastic. The main thing is to find a suitable shape and size. Then make a hole in the bottom for the cartridge. Further - it's up to decoration / plating, and here there are a lot of options.

If this method is also not available, you can make a lampshade without a frame (there are some) or make a frame yourself. The material for making a frame for a lampshade with your own hands is: wire, wood (wooden or bamboo sticks, specially cut elements), plastic bottles.
How to make a frame for a homemade wire lampshade
The wire for the lamp frame needs aluminum or steel. Aluminum is easy to work with, but wrinkle easily. This is not very important when the lampshade is already in use, but this fact must be taken into account during operation: you can ruin the shape. On the other hand, such plasticity allows easy and simple changes in the shape during operation. So that's a good option. Aluminum wire can be "mined" from electrical cables. You will have to remove the protective shell and you can use it.
Steel wire is more elastic, so it retains its shape well. It can be found in the construction market. It's harder to work with her. It is desirable that there were strong male hands nearby.

In addition to the wire, you will need powerful wire cutters and pliers to work. The frame of the lampshade usually consists of two rings and racks connecting them. The shape of the future lampshade depends on the size of the rings and the shape of the racks. Questions may arise regarding the number of racks and how they are attached. The number of posts depends on the size of the rings and how "round" you want the lampshade to be. The more posts, the more “smoothly” the fabric will lie. So it's up to you to choose, but the optimal distance between the racks in the lower circle is about 5-6 cm.

Techniques for creating a frame for a wire lampshade
Methods for attaching the stack to the lampshade rings depend on the thickness and type of wire, as well as the tools you have. The easiest is to make a small hook at the end, then clamp it tightly. And so that the ring does not slide left and right, pre-process the wire at the attachment point sandpaper with large grains. This is an option for thick aluminum wire. If the wire is steel, and with a diameter of 1.2-2 mm or more, the best way is. Thinner wire can be bent and wrapped around the ring or also made a hook.
If you make hooks, wind the wire, the appearance is far from being as ideal as that of factory frames. But this imperfection will be covered by the lampshade itself. If she still worries you, find the tape suitable color(usually matched to the color of the lampshade) and carefully wrap the resulting frame. It will get much better. The tape can be smeared with PVA glue and, wet, tightly, turn by turn, wrap the frame around.
wire mesh
If you can find a fine wire mesh, you can quickly make an almost perfect cylindrical ceiling for a floor lamp, table lamp, night lamp, lampshade for installing candles, etc. All you need is to cut off a piece of mesh desired length and width, roll into a ring and fasten the wires by wrapping them around the racks.

To prevent the mesh from straightening when cutting off a piece, cut so that long free ends remain on both sides. They will fasten the ceiling cylindrical shape. And the imperfection of the upper and lower ring can be masked with a tape of the desired color.
From a five-liter plastic bottle
An interesting shape lampshade can be obtained from a large plastic bottle. There are bottles of 5-6 liters and even 10. Here they can be used. From the container we cut off the top or the bottom - depending on what you like best. In the cut off part we make a ring for the cartridge. If the top is cut off, a neck can be used for some cartridges. For those who larger diameter, it will have to be cut.

Then we cut out the excess plastic, form the rims and racks of the ceiling. In order not to be mistaken, you can first draw all the lines with a marker. Cutting will be easier. Everything is elementary. Then we just decorate. And yes, it is necessary to cut the plastic, otherwise warm air there will be nowhere to go.
We make lampshades on the frame
There are enough options on how to make a lampshade cover:

From tapes
The simplest and fast way transform an old lampshade for a floor lamp or table lamp - use ribbons. You need a frame or lampshade in the form of a cylinder. He may be naked or cloth-covered. If you use a "bare" frame, the light will break through the cracks, which will create interesting lighting effects, but the lighting will not be uniform. Reading in this light is inconvenient interior solution. If you need even lighting, cover the frame with fabric first. It can be the same color as the ribbon, a couple of tones darker or lighter, it can be contrasting. Everything depends on your desire. And remember that the darker the fabric, the less light the lampshade lets through.
We take a tape 1-2.5 cm wide. We fix it with wrong side lampshade with PVA glue, additionally fixing with a pin. If you took a wire frame without fabric, we attach it to the upper or lower rim (you can sew it on with your hands, you can use glue). Then we begin to wrap the entire frame, from top to bottom, placing the turns of the tape close to each other, but without overlap.

Having finished the circle, we unfold the tape 90 °. We fix it in this position (with a needle and thread or PVA glue, glue from a gun, temporarily fixing it with a pin, pressing it with a clothespin). Then we skip the tape under the first tape, pull it out, lay it on top of the second one, then pull it down again, pull it up through one tape. So, gradually, we create an interlacing, filling the entire lampshade.
Alternatively, you can skip two vertical tapes. But then you need to make sure that each next row moves one crossbar. Then you get a different type of weave. Such a lampshade is ideal for floor lamps, since it will direct the light downwards, scattering through the walls will be small.

IN this option ribbons can be the same, they can be the same color, but different texture, can - differ by a couple of tones or be contrasting. In a circle, the tapes can be started all the way, or you can - after a certain distance. If you find a wide tape and apply it with an overlap, then horizontal ones will not be needed at all. And if you use a braided or twisted cord (in the lower photo on the right), we get a completely different lampshade in appearance. So only this technique of finishing the lampshade gives a lot of options.
Let's briefly present the ideas. There are many options for how you can design standard frames for lampshades in a non-standard way. The first method has already been voiced: you can knit a lampshade cover on knitting needles or crochet. Several options in the photo.

Not everyone knows how to knit. It is easier to work with beads, especially if you glue them. You can decorate an old fabric with beads, sequins, beads of various shapes and sizes. You can make such a “new-old” lampshade with your own hands in a couple of hours. You select the decorations that match the color, coat the fabric with PVA glue, stick the decorations. To complete the look, you can assemble pendants from beads and beads that are attached to the lower rim, but this is already painstaking work. Although the effect is interesting.

You can sew a new lampshade out of fabric. But it is not necessary to make it an updated copy of the old one. Fantasy must be turned on! If the lamp or floor lamp is in the girls' room, a new cover for the lampshade can be made in the form of a skirt. The style of the skirt is up to you. Interesting look in the fold. With and without ruffles.

In the boy's room, you can use an old geographical map. They are on thick paper. If the paper is not thick enough, first you need to stick the card on cardboard, and then glue the lampshade from such a blank.

Original shades are obtained if the finished frame is braided with threads or ropes. Ropes can be natural. In this case, they are gray, brown beige. You can find thin synthetic colored cords. Of these, more "fun" in color products will turn out. The situation is even simpler with knitting threads. They are thin, thick, textured, with a smoothly changing color. In general, there are a lot of options.
We take the frame and braid it according to a certain pattern. You can start with racks. Braid each rack with a pigtail (the length of the threads should be 3 times the height of the rack). When this work is finished, we begin to stretch the threads / ropes between the racks. They will need to be passed through pigtails, so it is more convenient to do this with threads with a needle, and the ropes can be pushed through like that.

The second option is to first entangle the entire frame horizontally, and then braid the racks. A pigtail will no longer work here, you just need to fix the turns on the rack with oblique stitches with a certain slope. This version is somewhat simpler in execution, but the “pigtails” look more decorative.
Homemade ceiling lamps without a frame
Many materials are rigid enough to hold their shape on their own, yet malleable enough to be made into something interesting. Such homemade lampshades well, a lot. And almost all of them are worth your attention. We give here only a part, the other part will go in the photo section (see below).
From knitted lace doilies
Many people have crocheted napkins and they lie in the “stash”, because it’s a pity to throw it away and they don’t know how to use it. There are very interesting idea- make them a lampshade for a chandelier on a suspension. In addition to napkins, you will need a large balloon or an inflatable ball, glue for heavy wallpaper (vinyl, silkscreen, etc.), a brush.

We soak the glue according to the instructions, wait until it swells. Inflate a balloon or take a ball, hang it up. When the glue is ready, lay out a napkin on some clean surface, coat it with glue, put it on a ball.

It is necessary to lay out with such a condition that in the center there will be a hole for the cartridge. Glue the napkins one by one. They need to be laid out so that the edges overlap slightly. When all the napkins are laid, once again coat them with glue and leave to dry. When the glue is dry, blow off the ball or ball (the ball can be pierced if you don't mind) and take it out through the hole. That's all, the lace lampshade is ready.

In some cases, there are problems with how to hang the finished lampshade on the cartridge. The problem is solved simply - take a transparent plastic bottle, cut off her neck, if necessary, expand the hole to the right sizes(to fit tightly on the cartridge), then cut off the plastic so that you get a ring 5-7 cm wide. Coat this ring with PVA glue, and glue it to the lampshade from the inside of the ball.
Round plafonds made of threads
Almost the same technology can be used to make round and semicircular stylish shades. Choose the thread of the right color. Their composition is absolutely unimportant - the color, thickness and texture are important. They can be shaggy, smooth, twisted, thinner and thicker. It depends on the appearance. It is most convenient to work with cotton threads of medium thickness. They absorb glue well and then, after drying, keep their shape perfectly.

You will also need a ball or ball. This will be the base of the lampshade, which sets the shape. Choose the size of the base as you wish. The threads will need to be glued, for this you need PVA glue. It is poured into a container, diluted with water in a ratio of 1: 1.
You can use other glue. It is important that it becomes transparent after drying. These are WB-29 from TYTAN Professional and D2 joinery adhesive. If you use any of these types of glue, read the instructions.
On the ball or ball, draw a circle, which will be slightly smaller in size than the lamp socket. On the opposite side, draw a larger circle - this will be the lower edge of the ceiling. Now everything is ready, we can start.

We coat the threads with glue and wind them around the ball in a chaotic manner. It is more convenient to do this if the glue is poured into a container - you can lower the entire skein there, and just pull the thread slowly. With glue in a tube, everything is not so comfortable: you have to coat sections up to a meter long, rewind, coat again. Time goes much longer. This is if you do not use PVA. But on the other hand, the products turn out to be more rigid and do not sag, do not change shape over time, as can happen with filament lampshades on PVA.
When winding threads around the ball, we carefully go around the drawn circles. If you accidentally climbed into the "forbidden territory", we simply move the threads, forming an even (more or less even) edge. When the threads run out or you decide that there is enough density, the process can be stopped. We fill the edge of the thread between others. All. Then we coat the ball with wound threads again with glue (PVA can be watered) and leave to dry (at least 2 days). To prevent the ball from rolling, we find a bowl or pan and use it as a stand.

The last stage is to blow off the ball or ball. If the ball has a nipple, press it with a thin wire, releasing air. Take out the dropped ball. That's all, you can thread the lamp inside and test the lampshade.
The technology is the same, but the appearance is very different…
According to the technology described above, it is possible to make not only round shades. Rectangular, triangular, trapezoidal. Choose a base that is easy to remove, wrap threads soaked in glue, braid, even sticks, newspaper tubes, etc. After drying, remove the base and, behold, you have made a lampshade with your own hands. A couple of examples in the photo below.


You can also use chopsticks... Just wrap the ball with cling film too and use not PVA glue, but transparent carpentry

It's pasty polymer clay in a tube, which was applied to a milk bag, then dried and the bag was removed ...
Creative homemade shades for lamps, floor lamps and chandeliers
You just wonder what people don’t make beautiful and unusual things from. Plafond from a cup, grater, bottle, beer or glass jar, metal parts and rings from beer cans ... It seems that everything can be used ...

Do you have old slides and cameras? Make a unique lamp for the photographer!


Candlesticks turn into lamps ... without lampshades


You can’t tell in life, but these shades are made of hooks used to open metal cans for drinks and canned food… if they are painted, it will be even more interesting


Don't know what to do with grandma's crystal? Make plafonds out of it ...


