greetings to all brain artisans! We worked with lumber and there were scraps left, but is it a pity to throw them away? Or are the pallets gathering dust uselessly in the workshop? Then read this brainguide how do it yourself make a table out of scrap wood.

Table- homemade described in this master class is 245x76cm in size and the amount of materials described below is selected for these dimensions.
Step 1: Materials
Pallets or cutting boards
plywood 245x76 and 1.5 cm thick
timber 5x5cm for framing the tabletop, about 680cm
wood glue
nails
gearbox for drill - a device that allows you to drill holes at an angle
self-tapping screws 3.3 cm and decorative plugs for them
self-tapping screws 6.25cm and 2cm
epoxy resin, about 6 liters - but it depends on the desired layer thickness
oilcloth
mixing bowl, stirring sticks
masking tape
metal profile 50x50mm, about 9m
metal strip 50mm, about 1.2m
metal pipe with a diameter of 5cm, about 5m
metal spray paint
Step 2: Material preparation


We start with sorting lumber and selecting the right brain board, or from parsing pallets. I collected the pallets I had and chose different textures and colors.
So, we disassemble the pallets, select the boards, remove nails, staples, etc. from them, which can damage the tool when processing the boards.
Step 3: Cut to size


We cut the selected boards into boards of equal width, the length does not matter. I cut my boards 4 cm wide. The length is not important because when gluing we will lay out the boards, filling the space on the countertop, one after another and simply cut off the excess.
Step 4: Plywood Base


Cut plywood sheet the right size table and gradually glue the prepared boards to it. We try to alternate the color and length of the boards so that the pattern crafts became more interesting.
I first smeared the board with glue, applied it in the chosen place, pressed it with a clamp and nailed it with finishing nails so that it would be held by them while the glue was drying.
Step 5: Frame around the perimeter


After the boards are glued and cut around the perimeter brain crafts, along this very perimeter we mount a frame made of timber, which is greater in height than the glued boards. This frame will serve as the sides when pouring epoxy.
For the frame, we take a bar 50x50cm, cut it to the size of the table, cut the ends at an angle of 45 degrees and connect them into a frame. To make the connections between the beam and the plywood base better, I used a reducer for a drill, which I attached to plywood and drilled holes for self-tapping screws on it. And then he simply applied the beam of the frame and fastened it with self-tapping screws through the drilled holes, then filled the holes themselves with putty for wood and cleaned them, so they became invisible. I installed plugs on the screws in the corners of the frame, and then also putty.
Step 6: Table Legs


The tabletop is assembled, so let's move on to the supports, that is, the legs. There are many options for creating table legs, I decided to weld them from a metal profile.
First of all, we determine the dimensions medulla, I decided that mine would be 180x60x30cm. Next, cut the profile to size and proceed to welding.
First, we weld the profile with the letter “U”, then we weld the strips to the ends, we make two such elements. Then we combine these elements with a profile into a support, and strengthen its spans metal pipes. We clean the welds and paint the entire support homemade metal paint.
Step 7: Attaching the Tabletop


Before mounting the table top on the support, holes for fasteners must be drilled in the support itself. To do this, along the perimeter of the support, we drill holes for self-tapping screws in it, and we also countersink the holes in the support strips to drown the heads of the screws.
Next, turn the tabletop over and put it on the floor, back side up. We mark on it the place of attachment of the support so that it is brain center. We install the support, also upside down, and fasten it to the countertop with screws.
Step 8: Pouring Resin


We bring the table into working condition, that is, turn it over and put it on a support, and then proceed to the crucial step - pouring epoxy resin.
We spread oilcloth on the floor under the table, as you can stain the floor itself. To avoid resin leaks, seal seams, cracks, holes, etc. with masking tape. Cooking according to instructions epoxy resin and, observing TB, fill the countertop. It is desirable that the room where the pouring is carried out is warm, ventilated and well lit, and the table is on a flat surface. This important points to get perfect smooth surface table.
When pouring, fill in all voids and corners of the tabletop, and do not pour in large layers, more than 6mm, let each layer cure for about 6 hours. Thoroughly mix the epoxy, pour slowly to avoid air bubbles, if they do form, then “drive” them with a burner.
After the resin base layer has completely cured, remove the masking tape and fill in the finishing layer, which will turn the countertop into a seamless monolith. After the finish layer has hardened, we clean and polish the smudges that could have formed on the sides and on the bottom surface crafts.
Step 9: Enjoy Your Creation!


Homemade from recycled materials is ready, we rejoice in the fruits of our waste-free brain-building!
The original idea of using an abundance of wood scraps.


If you are like me and love to work with heat treated wood, the chances are that you probably have tons of wood scraps left over from past projects. After moving to New England, I noticed that pallets seemed to be everywhere, so I started using them as a means to get more woodworking experience. Naturally, my garage turned out to be more and more like a pile of scrap metal, a wooden pallet (some remnants of scraps from past projects, some from a dismantled pallet that cracked during disassembly). If you are still at the stage of trying to assemble a refundable pallet board or would like more information on how to find, inspect and dismantle pallets, check out my Instructable Bible Pallet.
I have seen and been inspired by mikeasaurus' scrap table finishes earlier, but due to the type of tare plank that I have lying around, its design and process didn't fit what I wanted or was able to do. So I set out with the intention of building something that was hopefully as beautiful as the table that Mike put together. Let's see if it worked...
Required Tools:
Saws: a miter saw the key is here and you will find that puzzles and a table saw or a circular saw can come in handy as well
Thicknessers (I'll cover this in more detail in step 2, but planer type will save you or mix with potential headaches)
Sander (I prefer Random Orbit Sander, but that's up to you)
Clamps (clamps and more... pipe and/or bar clamps are very handy during the gluing stage - make sure they are long enough to accommodate the width of the top of the table)
Protective Equipment (Always use proper protective equipment, including safety goggles, respirator or dust mask, gloves, and hearing protection if necessary)
—————————————-
Necessary materials:
Wood Scrap!! (I used about 20-25 pallet board pieces, some cracked or damaged, and a few other scrap items)
Wood Glue
Finishing nails (I used 2 1/2″)
Stains and oils (depending on how you want the final product to look) and rags to apply them
Step 1: Collect the Scraps


So I became plushkin pallet over the past 6 months, I'm not only dozens good quality The dismantled pallet boards are sitting in my garage, but there are also tons of crushed, cracked, or other damage to the boards from dismantling the pallets. No matter how good you get at stripping pallets, you're bound to crack a few here and there, and most of the time they become unusable for the average project. But they are perfect for it!
I'm going to give a standard disclaimer to the tare board that I put in all my pallet fuel projects, how much valuable information I've learned the hard way... pallets are easy to find (and usually free), have character and are fun to work with. Always ask before taking pallets out of business (even if they're sitting in the back near the trash can), also many companies have pallet suppliers refund them for used pallets, and take them without permission to "technically" steal. I'm not saying I haven't done this before, just being safe and courteous. I prefer to use a circular or reciprocating saw to cut off the end of the stringers (the perpendicular posts that hold the pallet of boards up and down) and finally using the tool to patiently separate the boards from the middle stringer. The key word here is patience - go for nails from all angles to avoid cracking and ruining your tare board. If you have not attended business trainings for a long time, we recommend that you might be interested.
But this project is in no way limited to pallets. Any piece of scrap wood that is in play here. It's good to have a general idea of what you want your countertop dimensions to be, as this will help you determine exactly how much wood you need to put together. Based on the dimensions of my scrap of various pieces, I went with 17″...x17″. Keep in mind that you can put together short boards to make the length you desire for your table.
Since you will be assembling this table from the board in an upright position, as opposed to flat, the only real stipulation for cutting wood here is that one of the long, thin edges must be level enough - this will become part of the top of the table. You can always use a table or circular saw to level the edge of the board, but all this must be considered when choosing wood.
- Simple pallet bedside table (0)
For a long time we did not pick up pallet checkers. There are plenty of pallet beds on the internet, and bedside table caught in my net […] - Wooden pallet coffee table (0)
Haven't added my favorite pallet crafts for a long time. I saw this: ... and could not pass by. Outrageously simple and festive. Author […]
Recycling wood hard rock , you can save a lot. Take a look around and you can't help but notice recyclable wood. However, be prepared to give up your ego and roll up your sleeves.
To be eligible to reuse this valuable material, you will soon have to ask favors from strangers, rummage through places that are hardly clean, and work hard.

Slow down near construction sites
Do not drive past buildings under renovation or demolition. If you do not intervene, most likely the materials will go straight to the construction waste dump. Find the site supervisor or building owner and politely ask permission to take some of the material. The older the building being refurbished or demolished, the more likely you are to come across excellent seasoned wood with a fine texture.
Valuable finds: wooden floors hardwood, wide plinths, massive doors of residential buildings, wooden beams administrative buildings.
Avoid: houses built in the last 60-70 years; standardized Construction Materials, which the growth of housing construction required, is of little use for carpentry projects.

Old barn - new life
The gold mine of old barns
Wooden sheds are another promising source of recycled wood.
Valuable finds: classic design with wooden frame with long beams contain a significant amount of straight-grained wood.
Avoid: wood with signs of damage by carpenter beetles or termites; these insects can easily spread throughout your lumber yard and throughout your home.
Bargain with merchants
A few minutes spent scrolling through the Yellow Pages will provide you with contact information for many hardwood companies. From furniture shops and veneer manufacturers to door and boat makers, any shop that cuts boards has waste.
Valuable finds: Red tree; this popular material is still often used today in the manufacture of doors, boats and expensive furniture.
Avoid: companies that use resources efficiently; tiny scraps can only replenish your wastebasket.
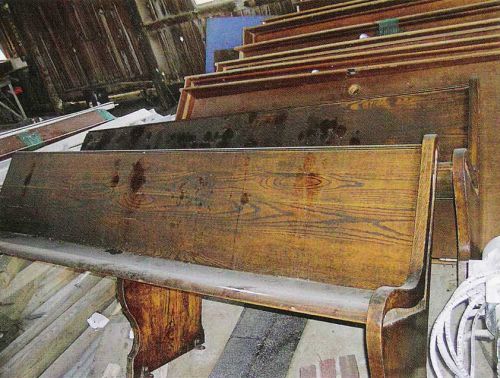
Don't Ignore Old Furniture
Discarded furniture can be recognized as one of the most underestimated sources of material for carpentry projects. Although old furniture not very similar in shape to boards, this does not mean that it does not have suitable wood. Pay close attention to "garage" sales, where real gems are found. When the trade draws to a close, instead of trying on shoes and shirts, ask if you can borrow shelves. Even without finding suitable material, you can purchase cabinets, shelving or shelves with compartments for your workshop. Finally, if your city is undergoing spring cleaning, go hunting early (perhaps even the previous evening) - the prey can be large.
Valuable finds: wooden countertops, headboards, broken pianos and pews are real treasures for a carpenter.
Avoid: veneered furniture masquerading as solid wood furniture.

The ubiquitous pallets
You can find pallets (pallets) for the transport of goods in almost any company where there is loading platform. However, before you reap the benefits, you will have to pull out a lot of nails and clean the dirt from the pallets. Therefore, be discerning; do not waste time and effort on ordinary pallets from pine boards. Instead, look for hardwoods (after getting management approval, of course). The most severe or expensive goods usually delivered on pallets made of thick oak planks.
Valuable finds: international shipping companies oversized cargo; what is considered common cheap wood in one country may be exotic in other countries.
Avoid: pallets from companies supplying pesticides, fertilizers and other chemicals; their traces can be hazardous to health.
Reducing the size, open up new possibilities
Are your wood supplies running out? So it's time to downsize your products. Explore the scrap bin and make some miniature projects. They will not only serve as a good gift or decorate your home, but will raise questions from curious friends. When you tell them about the project, be sure to include a story about how the material was obtained. After that, get ready to write down phone numbers, as someone will definitely remember an acquaintance of his friend, whose garage is bursting with unnecessary boards.
Valuable finds: acquaintances promising visits to various outbuildings and rich booty.
Avoid: become the most arboreal miser; set a limit on minimum size scraps and free the workshop from everything that is smaller.
How to work with old wood
Unless luck really smiled at you, the wood you managed to get will require a little more work than purchased lumber. You have to be very careful to avoid metal fasteners and dirt that dull the cutting tool. Concentrate on how much money you have saved, and the time spent on the following six procedures will fly by.
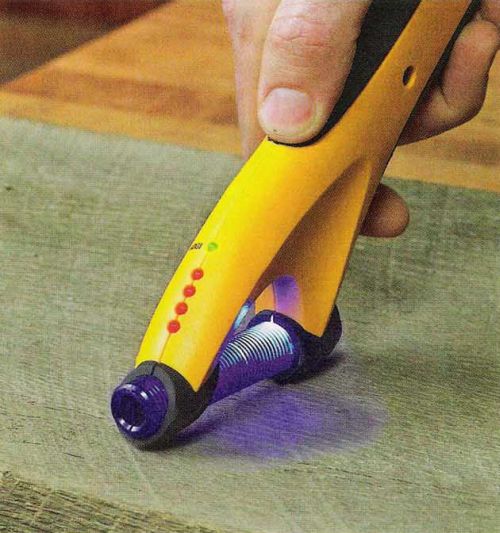
1. Don't Forget the Metal
Metal is enemy number one for milling cutters and saw blades. Remove any visible nails and screws from the boards. To find hidden metal fasteners, spend some of the money you save on an inexpensive metal detector or an all-in-one detector. Circle the dangerous areas with chalk and avoid them when sawing.

2. A clean board is a happy board
On the list of things that can dull your tools, dirt comes right next to metal. Scrape loose dirt with a stiff plastic or brass bristled brush. Avoid steel brushes, the use of which may result in the need for repeated metal removal.

3. Bring out the texture
The last step before the cutting tool touches the wood: remove the last layer of dirt or old finishing coating. This isn't the time to stand on ceremony. Get out your belt sander with 80 grit sanding belt and clean the boards quickly. Move the power tool constantly. Belt sanders remove material very quickly and can create a dent in the surface in an instant.
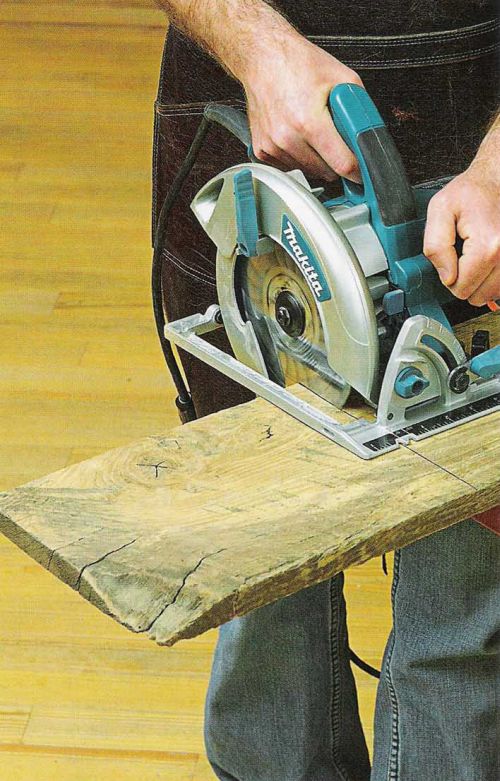
4. Sacrifice the ends by saving the saw blade
Porous end cuts collect dirt like a tabloid press. This is especially true for boards taken from old sheds or dragged along the ground, for example, pallets. Saw off the ends of each board a few centimeters. By doing this, you will not only alleviate the fate of your cutting tool, but also remove small cracks that are always on old boards.
5. Is it possible to process boards now?
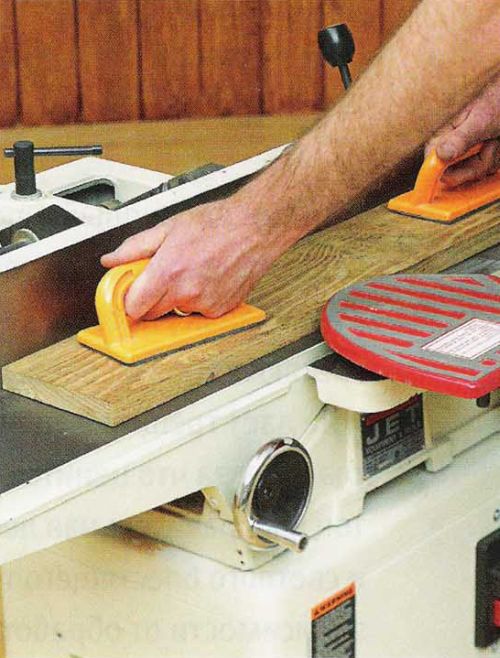
Yes. The time has come to cut the wood and get a usable material out of it. But first, remove an expensive and high-quality saw blade and replace it with a cheap or old one that is not a pity to blunt. Make a straight cut along one of the edges of the board using saw machine or a circular saw with a guide. Turn the board over and file the second edge parallel to the first, removing just enough material to remove any rot or stains. Before processing old boards on planer and thicknesser machines, also install old knives.

6. Highlight the story
When dealing with family furniture, its origin is almost as important as design features. A reused tree adds its own history to the history of the item. Highlight it by showing off. Rough edges, nail holes, worm marks, and faded finishes can all become design elements of the finished product.
If you want to diversify your leisure somehow, then we advise you, dear friends, to do carpentry. This an exciting activity it will drag you in so much that time will simply slip away imperceptibly, and in that case you will learn how to make all kinds of decorations for your home, cottage, garden and, of course, the yard. In addition to all this, you will not be tormented by the age-old question of what to give relatives, friends and work colleagues for their name day and other holidays. Moreover, at least a dime a dozen improvised materials for creativity, at your disposal are all the old trees that are on your personal plot. Even from nondescript stumps and snags, when you turn on your own imagination, you can create incredible masterpieces of art that will be admired by everyone without exception. So, we strongly recommend that you visit our article, which will provide you with 10 photos of beautiful and interesting DIY wood craft ideas for prepared beginners. They will serve as a vivid example for you and an impetus for your own unusually cool work. Videos from step by step wizard classes will complement and consolidate your acquired knowledge in the field of carpentry.
Original log feeder
If your child is 11-12 years old at a labor lesson, they were given homework at school or in kindergarten, to make a bird feeder, then you should like this wooden craft. You will not spend a lot of time on its manufacture, and the result will please you and surprise others. let's consider step by step instructions and we will understand how to make an interesting log feeder with your own hands. 
You will need:
- Log,
- Chainsaw,
- jigsaw,
- chisel semicircular,
- Hammer,
- Chain - 1 m,
- Carbine,
- Mounting loop - 2 pcs.,
- Self-tapping screws.
Progress:
- Even a novice carpenter, through our master class, will be able to build a simple and original log feeder with his own hands. From the log we saw off two circles on both sides, of small thickness with a chainsaw.
- We cut a wedge along the length of the log at approximately 45 degrees.
- We take out the wedge from the log.
- We make longitudinal and transverse cuts inside the log, without cutting about 5 centimeters to the contour.
- With the help of a chisel and a hammer, we hollow out the middle of our log. Align the chips by doing inner part log is smooth.
- From 2 sawn off circles we cut out side plugs. To do this, we apply a circle to the log and outline the size of the plug along the inner contour, and cut it out with a jigsaw.
- We insert the plugs along the edges of our feeder and fasten with self-tapping screws.
- Our craft in the form of a feeder is ready, now we will make fasteners for it.
- To do this, we screw the mounting loops on the sides into the upper part. We put a chain on them.
- It remains to attach a carabiner to the chain and hang it on a tree.
Video: interesting do-it-yourself bird feeder
Frame made of tree branches
Photography is a preserved piece of happiness captured in different periods of life. Having made an unusual wooden photo frame with your own hands, you will bring zest to the interior and surprise your guests. This frame will be especially relevant for a gift to loved ones. Even a novice carpenter can easily and quickly cope with such a simple task. The result will be amazing craft to the joy of all! 
You will need:
- Branches of various thicknesses,
- Frame,
- glue gun,
- Electric jigsaw.
Progress:
- Saw the branches into wheels, about 5 mm thick. The more varied the thickness of the branches, the more interesting the finished frame will look.
- Now glue the frame with the resulting rings using glue, placing them in a chaotic manner.
- The edges may be uneven, but this will add a special charm to your handmade wood craft.
swedish candle
Such a candle will be indispensable in any campaign. You can cook food or heat water on it, it burns for a very long time. This useful craft, made by hand, will save you on any hike, travel, fishing, and even in the country. It's insanely easy to make. Let's see step by step description and the principle of its implementation. 
You will need:
- piece of log,
- Chainsaw,
- Ignition fluid.
Progress:
- In order to make this interesting DIY wood craft for beginners at home, you will need to use a chainsaw to make 4 intersecting cuts along the log in the center. We do not make cuts to the end so that the structure does not fall apart, but a little more than half the length.
- Now pour the ignition fluid into the middle.
- When you find yourself on a hike, just set fire to the log in the center. The flame will be strong.
- In order for oxygen to flow to the place of ignition, take 2 branches, preferably raw, and lay them parallel to each other. Now you can put dishes with food or water on them.
Video: manufacturing master class swedish candle do it yourself
Owl made of wood
To decorate the garden or as an interesting craft for school, an owl made of wood will look good. It is done quite simply with your own hands, so with your help even a novice carpenter - a schoolboy can easily cope with such an owl. Before starting, let's see how to make an owl with your own hands in step-by-step instructions. 
You will need:
- Round cuts from wood of different diameters (1 large, 2 small and 1 medium),
- Saw,
- self-tapping screws,
- Lid with plastic bottle- 2 pcs.,
- felt-tip pen,
- Sackcloth,
- Scissors,
- Glue.
Progress:
- A large saw cut will serve as the body of an owl.
- On the flat side on top we fasten two small saw cuts with self-tapping screws. These will be the eyes.
- Cut a medium-sized piece in half and fasten on the sides large cut. Sawn sides in different directions.
- Make a beak with your own hands from a small piece of log, cut it out. Place from below between the eyes, attaching with a self-tapping screw.
- We need to make ears out of burlap, placing them above the eyes. Take a small piece, roll it into a tube, making one tip sharp. Flatten and glue over one eye with the sharp part to the side with glue. We do the second eye in the same way.
- We make eyes from caps. We attach covers to the logs for the eyes with a self-tapping screw, and paint over the pupils with a black felt-tip pen.
- The owl is ready. It can be hung on the wall, as it has a flat side, or fixed on a tree branch in the garden, decorating it with another interesting DIY craft.
This interesting wooden stool will be an excellent decoration. suburban area, bath or garden. You will not spend a lot of effort and energy on making it yourself. Such a stool is distinguished by originality in manufacturing, since by and large it turns out by itself. You will need several actions at the beginning and at the end of the work. For beginners, this is just a great way to hone your skills. 
You will need:
- Log,
- lighter fluid,
- Saw,
- Round seat blank
- metal brush,
- grinder,
- Nails,
- Hammer.
Progress:
- We take a log and make 2 cuts, perpendicular to each other, along the log.
- Pour ignition fluid into the middle and set it on fire.
- We wait until the fire itself makes legs for the stool and extinguish it.
- Using a metal brush, remove the remains of coal and burning.
- Then sand the surface of the stool with your own hands.
- Attach the seat to the top of the stool with nails.
- The stool is ready! A great and useful craft made of wood for the whole family.
Video: do-it-yourself stool making master class
Do-it-yourself swing for a child
If you want to please your child with a swing, it is not necessary to buy them. You can make very beautiful and beautiful wooden planks with your own hands. safe swing for small children. They are safe because on all sides there is protection against falling out in the form of crossbars. So, let's start the process of doing our homemade interesting crafts at home. 
You will need:
- Bar 3 × 4 × 37 cm - 11 pieces,
- Board 4.5 × 1.5 × 37 cm,
- self-tapping screws,
- Rope,
- Hacksaw,
- Pencil,
- Ruler,
- Drill,
- Screwdriver.
Progress:
- To make our wood wonderful craft, put two bars parallel to each other. From above we lay out 6 boards with the same distance between them and fasten them with self-tapping screws.
- We drill holes for fastening the rope on four sides at the corners.
- Next, take a hacksaw and cut off two pieces of 15 centimeters from the bar.
- Then we drill holes in the center of the resulting blocks, so we get the front pillars of our homemade crafts.
- We cut the seven-centimeter cut in half and drill it vertically.
- We take a new bar and put small bars with holes along the edges. We drill holes in the bar.
- We repeat the same action with two more bars and three planks.
- At the new bar, we cut off two bars, 7.5 cm long, and drill vertical holes in them.
- We take the rope and begin to assemble our swing. We pass two different ends along the sides of the seat so that the middle of the rope is under it. So we do the swing on both sides.
- We put 15 cm racks on the rope on the front of the swing.
- Racks of 3.5 cm are put on the back ropes. Then we put a bar with holes on the rear racks, so we will do it ourselves back wall our swing.
- We put bars on the rear racks, 7.5 cm long.
- Install armrests. We put planks on the side ropes.
- We put on the two remaining drilled bars on the back ropes.
- We put on a board on the front ropes, which will serve as a side for the child.
- Now you can hang the swing in any doorway or in the hallway.
Video: an interesting do-it-yourself wood craft
Wooden cutting board
Each of us uses cutting boards in the kitchen, so I want to talk about how to make a cutting board with your own hands for beginners. Such an interesting craft can be used in your kitchen, presented to friends and relatives, or used as a basis for wood burning or other works. 
You will need:
- Board 20 × 70 × 40 mm,
- Glue,
- Clamp - 2 pcs.,
- Plane,
- jigsaw,
- Drill with drill,
- Sandpaper,
- Creosote.
Progress:
- In order for the craft to turn out the way it is required, the boards need to be glued together so that one is obtained wide board. To do this, we smear the sides of the boards with glue and, using two clamps, tightly tighten them together.
- After the glue dries, remove the clamps and work the board with a planer so that it becomes smooth and even.
- Now draw the desired shape of the board and cut it out with a jigsaw.
- Drill a hole in the top of the board so that our craft can be hung in the future.
- We process all sides of our board with sandpaper so that it becomes perfectly smooth and without burrs.
- After sanding, treat your board with creosote. Wait for it to dry.
- The board, made in a short time with your own hands from wood, is ready for use!
Tic-tac-toe game made of wood
From wood, you can create not only decorative and useful crafts, but you can also make a game of tic-tac-toe with your own hands. Such an interesting work will delight both adults and children with its unusual design. This game can take time at home and in the country. 
You will need:
- Sawn circle, diameter 20 - 25 cm,
- Branch, 3 cm in diameter,
- Cautery on wood,
- Hacksaw,
- Sandpaper.
Progress:
- In order to make an interesting do-it-yourself wooden craft for beginners without any problems, you first need to cut the branch into circles, up to 1 cm thick. We need 12 of these blanks.
- With sandpaper, process all sides of the circles, as well as our playing field.
- Now burn the field for the game, 3 × 3 cells in size, on a large circle.
- On small circles, we need to burn 6 zeros and 6 crosses.
- The craft is ready to play!
snowman made of wood

Such an interesting and cute children's craft will become a real decoration. room interior on New Year 2018 or a gift for school friends. Children can easily make such a creation with their own hands, only you need to devote a little time and effort to creativity, as well as prepare a few cuts of a tree. Parental help and support, of course, will also be useful for beginners. So, let's get to work.
To create you will need:
- a piece of wood, 5 X 10 cm in size;
- sandpaper;
- white acrylic paint;
- materials for decorating the Snowman: buttons, fabric and anything else you like;
- drill;
- black marker;
- pink paints;
- paper;
- compass;
- orange polymer clay;
- brush and sponge for applying paints.
Work process:
- To make this craft, you will need to distinguish between work for children and adults. To begin with, a child of 11 - 12 years old will be able to freely draw a Snowman template on a piece of paper, and then cut it out with adults.
- Dad or grandfather, in turn, transfers these sketches to the tree, circling the lines with a black marker.
- With a carpentry tool, you will need to cut out a fairy-tale hero, and then grind all the bumps and roughness.
- After that, you need to bring the Snowman closer to the natural color. To do this, you need white acrylic paint. We cover the entire product with it and take time to dry.
- Cheeks are created by means of pink paint. With an elementary touch of a finger, we apply a blush to our craft.
- Draw the eyes and mouth with a black marker.
- Nose - we make carrots with our own hands from polymer clay. Give this part of the work to your child. After drying, attach it to the product with an all-purpose adhesive. In the same way, attach the buttons to the body of the Snowman.
- We make pens from tree branches, a hat from colored cardboard gray or Brown, and a scarf from any piece of fabric. Here is our fun New Year's craft handmade quickly and easily. For students, you can come up with a lot similar products which they will create on their own at home. Perhaps this creativity will develop into a real hobby of your child, and later into something more serious.
Wooden flower vase

Another one creative work for beginner carpenters, which will be subject to schoolchildren 11 - 12 years old, is a vase from wooden cuts and a metal can. You can give this handmade craft to your mother, grandmother or girlfriend. Take a close look at the photo and start making this interesting product.
For work you will need:
- metal can;
- universal glue;
- small cuts of wood.
Manufacturing process:
- Adults need to prepare small wooden saw cuts in advance.
- Clean the metal jar from dust and dirt.
- In a chaotic manner, we glue saw cuts made of wood onto a prepared container, starting from the bottom to the top. Slots should not be in principle. They need to be masked with small circles. natural material. That's all! Our interesting craft can become a gift, and very valuable, because it is made by hand.
Finally
So our article has come to an end, which has provided you with some of the simplest and also interesting do-it-yourself wood crafts for beginner joinery masters. The photo ideas and videos offered by us are quite diverse and colorful, informative and meaningful. This material is quite enough for beginners who want to open up in the field of this carved art. Take some time for this information, study and apply your knowledge in practice at home to create best work for beauty and benefit. By the way, if your children are also not indifferent to this type of needlework, then feel free to introduce them to your creative company. Together, as they say, work is more fun. For kids, you can find some simple crafts that they can create lightly with their own hands. Fantasy, make your dreams come true, decorate everything around with your creations, please yourself and your loved ones.
Good afternoon. Today we start uploading articles on the topic of wood crafts with their own hands. In this first article, I want to show you which simple crafts can be made of wood - both for children and adults. Many ideas fit for school work- for boys. Some ideas will work for school competition crafts made from natural materials. Some wooden crafts can become decoration of your cottage or yard. Here you will find a storehouse of inspiration and joy from the anticipation of such an interesting and simple work. In this article I will show you what to do beautiful crafts wooden can anyone. Because here you will find simple and feasible tasks. Even a fragile woman with a manicure can do half of the crafts from this article. So - let's fall in love with wooden art.
Let's start with simple magic.
tree + sun
Crafts that glow with love.
Here are the simplest and cutest country crafts from wood. For crafts, you need a saw cut of a log (ask when you are sawing firewood with a grinder to make a few thin cuts). Or you can do it without sawing - just take a board of any size.
In a tree, we drill holes of such a thickness that a glass pebble bought in a store enters it. Such sets of multi-colored decorative glass stones are sold - in the gifts department, and in the department where candles, vases and everything for holiday decor.

You can drill such holes with glass just in the board - and hang it on the apple tree. You can drill such holes in the fence - if the sun at least once a day shines into it at a low angle.
That's very beautiful. Magically. Like in the land of fairies. Your kids will love this wood craft.

simple wooden crafts
from saw cut logs.
If you are sawing logs for firewood in your yard, you are in luck. You can get priceless craft material for free. Ask the men to cut flat cuts for you, both from small logs and large ones. Lovingly stack them away from the woodpile and start inventing future wood crafts. For example, let it be wooden owls. It's easy to make and looks beautiful. Saw cuts can be nailed to each other with nails. You can plant them on liquid nails (like glue).

The surface of the saw cuts can be rough, unskinned (as in the photo with the bunny craft). And you can sand it with sandpaper and even varnish such an ornamental material. Or paint in the color you want.

From large saw cuts, you can make large country crafts from wood. And small log cabins (from thinner branches and logs) are suitable for miniature crafts - for example, these birds. You can cut branches of this thickness yourself with a hacksaw - manually, without a chainsaw.

Log saw cuts can become a canvas for art installations. Such wooden crafts-pictures can be made from any natural material. Go to the river and find smooth flat pebbles. They will become a source of interesting crafts. The stones are easily painted with felt-tip pens, office bold markers or just gouache (after work, fix the gouache with hairspray or nail polish).

And here is another way to make beautiful AIR crafts from wooden cuts. Openwork through cutting with an electric jigsaw (photo with crafts Maple Leaf) looks amazing.

Here is a small master class, from which you can see how the process of cutting openwork patterns on a thick saw cut of a tree takes place.
First, trace the stencil with a pencil. Then we drill holes in the key nodes of the picture with a drill. And then with a jigsaw we go from one holey node to another.

You can create your own device which will help you cut wood products using a conventional drill. Make an electric jigsaw with your own hands. Holding hands on comfortable handles, you simply move the device - following the lines of your drawing. The thinner the drill, the more small parts you can cut out a picture for them. Well thought out.

Or maybe buy a jigsaw It costs an average of $100. You can find it for 50, but we don’t work on an industrial scale, so it’s not necessary to buy a very powerful expensive tool.
Mosaic Crafts
From saw cuts of thick branches.
If you have country yard the boring barn wall is staring right at you. That needs to be made boring. Let's make a shed positive with the help of wooden crafts. Let's do mosaic applique from small saw cuts. Such cuts are obtained by sawing thick branches or thin logs with a hacksaw (or chainsaw).
basis for such a wood craft, we cut it out of a sheet of plywood. First, draw on it the silhouette of the future crafts. We cut out plywood base manual jigsaw or special power tools. And we stick wooden roundels on it - on liquid nails, on wood glue or on hot glue from a gun.


And even at home you can make saw cuts decorative wooden mirror frame(master class in the photo below).
- Also buy a round mirror. Put it on a sheet of plywood - circle it with a pencil.
- Around the resulting circle, retreat a few centimeters (to the width you want for the frame). And with this indent draw a second circle.
- Cut out a large circle from plywood. And glue the outer ring with saw cuts of wood. It will turn out a beautiful wooden craft frame - it remains to glue a mirror into the middle on liquid nails.

PUFF CRAFTS
from wood.
This is probably my favorite kind of wood crafts. Here, the swollen shields lie on top of each other, creating a LAYER VOLUME of crafts.
Here is a cow craft made from three layers of wooden shield. The first layer is the body, the second is the head, the third is the bangs and nose.

You can paint all the layers of your craft the same color (as craft polar bear wood) or in different colors (as a craft mouse on the moon- photo below).

Or you can leave the textured wood pattern (as in the crafts from the photo below).
wood fox It has a two-layer construction - the back layer, and the head and tail are laid on it.
craft duck has 5 layers central layer with the head, and two layers on both sides (tummy + wing).

The more layers you will impose on each other, the more voluminous and convex your craft will be. Here is an example with the craft "Lions made of wood" you can see how the muzzle of the beast moves forward, thanks to four layers of thick wooden board.

If you color your crafts. Draw facial expressions, add small details - folds, spots, and more. You can get very realistic and expensive wood crafts. Your little hobby can become your business. Such works can be safely put up for sale.

You can invent your own characters. Draw their layers on a sheet of paper. Enlarge the craft first in a paper template - transfer the contours to wooden shield and cut out. Or find pictures in a children's coloring book- and redraw them in an enlarged size.

Wooden craft
For school
At the lesson of labor.
Such Puff wood crafts can be cut NOT FROM THICK SHIELD, but from thin plywood sheet . And then such work can be carried out in labor classes as part of the school curriculum. On the topic "cutting with a jigsaw on plywood."
Here's an idea for you - how from 3 plywood boards make a two-color puppy craft. The first posterior layer of WHITE PLYWOOD peeks out only with the tips of the ears, tail and one hind leg. We will cover the second layer with a stain (so that it darkens). Eyes, nose and lines can be drawn with a marker, or burned out with a special wood burning device.

In the same technique of shields with different shade colors, you can make a lot of voluminous wood crafts at labor lessons at school or in a circle of wooden creativity.

wood crafts
as an APPLICATION.
In a very similar technique, you can make an appliqué out of wood. Here, too, wooden solid wood board(that is, not a glued shield, but a solid board). Because we will grind it, and the glued sanding shield can exfoliate and the glue seams will be visible.

- On paper the whole future craft is drawn. Divided by lines into details. Each detail is numbered. And it is photographed (so that later on the photo to check the location of each element).
- Next, the drawing is cut along the lines into elements. We trace each element on the board with a pencil. We cut out an element from a flat board. All elements are flat on top, rough on the edges of the cut and with sharp sawing edges.
- Now our task smooth all edges of each part, round. We grind the sharp edges of the cuts with a chisel. And we grind it on a grinding machine (if you have one) or do it by hand with sandpaper of varying degrees of hardness-roughness.
- After sanding all the details painted in tinted stain(sold in construction stores). Depending on how many times you wipe the part with a stain, you will get a lighter or darker tone. Very light details can be wiped off simply vegetable oil. You can check in advance shades of color on the scraps of wood left after sawing the crafts.

You can also paint the details of wood crafts in watercolor or gouache(using not a brush, but a foam rubber sponge). After painting, so that the part does not get your hands dirty, you can sprinkle it with hairspray or impregnate the craft with another wood finish (only check what color it will be on the scraps beforehand).

It only seems that the cow (pictured in the woodwork above) is behind the moon. In fact, all the details are in the same plane. On a piece of paper. But thanks to the streamlined edges of the details, everything looks voluminous, soft and, as it were, PUSHED into each other. In fact, nothing is pressed in - everything just lies next to each other.
Ideas for such flat wood crafts can be taken inside children's coloring books. There are just pictures with large details. Children's coloring picture can be found in Google - enlarge and print. Or redraw directly from the monitor screen by placing a sheet of paper on the glowing screen.

Methods for grinding parts
for wood crafts
(instructions to help).
To make it easier to sand smooth edges of parts without rubbing calluses on my hands, I want to give some useful tips.
You can pinch the sandpaper sanding belt in a special vice, also hammered together from wood. Here's how it's done in the left photo below. Or come up with your own version of the device.

Here on the left photo - sandpaper wraps around a thick plank with a semicircular edge. And the edges of the sandpaper are wrapped in a groove, and clamped with a bolt twisted through a round cylindrical piece of wood-clamp.

There are also grinding nozzles for a drill. And then you can do the shlivovka parts using the rotational power of the drill and the magical power of electricity.
Below we see grinding attachments for drill- cymbal and drum shape.

There are drill grinders where you can change sandpaper- remove the old worn sanding-skin and fill in a new one.

By the way, on Aliexpress you can buy immediately in bulk grinding drums on a drill for 3-4 dollars for a batch of 100 pieces. If you look you can find it cheaper.

And so that the drill does not spin in your hand during operation, you can create a special FASTENING STRUCTURE, which will fix your homemade grinding machine in one place, and all you have to do is bring the parts to the grinding drum.

The design of the mounting tray can be different - with a wooden clamp (photo above), or with a lock in the form of a metal bracket (as in the photo below).

With such an assistant, making wood crafts with your own hands is a pleasure. Quickly pleasant and immediately beautiful results. Such work can be put on stream - and a whole production of beautiful wooden (smooth and safe) toys for children, gift wooden paintings can be set up.
You can become a successful master. Completely unexpected. It's as simple as looking at this article and falling in love with the idea.

Fantasy wooden crafts- unlimited. Remember the formula for success - everything can be made from wood. The main thing is to start ... then continue ... and finish.
For example, knocker toys. Beautiful fun for children and for decorating the cottage. Such a hammer or woodpecker can knock on your door, reporting guests on the porch. Like in a fairy tale - pull the rope, and the door will be opened for you.

You can make decorations for the children's room with your own hands. In fact, reincarnate and become a designer of interesting interior wood crafts. Any boy will be happy if his children's room sparkles with motives from the Jungle.

You know ... I'll probably continue the theme of wooden crafts for design children's room in one of the following articles. I would like to see what ideas are hidden here. And falling in love with someone is a good thing.
And perhaps we need to create an article with wooden toys for children - self made. You also need to write. And then it will work here link.
And while we continue...
Crafts FROM WOOD
and WASTE material.
Where do future crafts live? …. Old decayed boards. For example, from the grandmother's fence. Which usually go for firewood or are taken out of the yard as excess garbage. Stop. Let's not throw them away. Let's dig through this pile and create something wonderful - with our own hands from wood.
A wooden mop-brush, if cut in half, turns into the mouth of an evil dog. A little imagination and work. And now the service dog bristles and grins at you.
Gorgeous piece of art. tree and waste material.

Any junk material (pieces of iron, plastic) and old pieces of wood can populate your house with fairy-tale characters. They are alive. They have a soul and their own story.


wood crafts
Imperishable beauty.
Peeled veneer , from old furniture panels, quietly damp in your shed - can also become a source for handicrafts, applications made of wood.
From this thin wood material you can cut out the details of the future crafts directly with scissors and stick them on hot glue from a gun (or on wood glue).


And instead of veneer, you can use thin birch bark. And also make interesting flat wood crafts.

wood crafts
(logs, firewood and bark)
Ordinary firewood from your woodpile can be a source of inspiration for wooden crafts for the country.
If a round log is cut obliquely, then you get a figure with a face turned towards you. It remains only to draw this face, add elements of eyes, ears, nose to it.

You can fold the body of an animal from logs and round blocks. The logs will be the legs and the logs will be the back. The head can be made from a round cut of a small log. Or chop off with an ax snout up desired shape from the same log as the body of your four-legged wood craft.

Show your imagination, do not stop before a difficult task. A squirrel made of wood or a snail made of logs - there is nothing complicated. We turn on the head and sense of humor - it will tell you the most ridiculous, but effective ways convey the gentle image of the animal using rough wood and other natural material.

YOU can work with a chainsaw or an ax - sawing or cutting off the face of your wood craft. Here you can make such cute pigs with your own hands as a fun wood craft for the country house.

And in the bushes you can put a beautiful proud deer - also a simple and quick craft made of wood and branches.

wooden crafts
from chips from a log.
It happens that when you chop wood, curly large chips break off from the log. This chip often has a bizarre shape - already similar to something (a bird, a panther, a face profile). It is necessary to carefully put such a gift of fate aside, in order to return to it later and complete the craft begun by nature. Cut something with a knife, highlight something with paint, glue something as an additional detail. And you get a craft made of wood with your own hands - beautiful and original.


These are the ideas I managed to find for the masters of wooden art.
Now you can also make beautiful wood crafts with your own hands. Moreover, this article is only the first of a cycle on the topic of wooden crafts which are clear and easy to make at home. You have probably already fallen in love with some ideas and are determined to implement them - I keep my fingers crossed for you - let everything work out in the best way. And your whole family bunch will love your wood craft.


