OSB (OSB) or OSB (oriented strand board) is a modern construction material that has become a serious alternative to plywood, chipboard and is widely used in construction frame houses and finishing of buildings and structures. OSB boards are used to cover interior and exterior walls, floors and roofs. Wall cladding with OSB boards takes place in frame construction, when the slab acts as a structural material and serves to strengthen the walls of a building, or when it acts as a facade material for concrete, brick or wooden houses, which is caused by the low price and high strength and durability of the material. In this article we will look at the question: how to attach OSB boards to the wall from the outside.
For cladding external walls, it is necessary to use OSB-3 boards, specially made for environments with high humidity.
When installing OSB boards to external walls, sheathing is used for the following purposes:
- leveling the wall plane;
- creating a ventilation gap for insulation under the OSB board;
- preventing slab deformation caused by base movements, especially important for OSB slabs with a thickness of 9 mm or less.
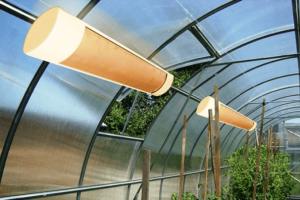
Fastening OSB boards to the wall over insulation using lathing
Fastening the slab to the wall is carried out using lathing, which is made from wooden block, or metal profile. Technologies for installing OSB boards on a wall with wooden sheathing and metal profile sheathing are not fundamentally different. When choosing a block, it is advisable to choose a dry, planed block of 40-50 mm, then it will not twist or move after drying, which will have a positive effect on the evenness of the entire wall.
To attach the bar and profile to the wall, special metal plates (hangers) are used. Before attaching the hangers, it is necessary to draw vertical stripes on the wall, the distance between which should be half the width of the sheet, which will subsequently ensure the joint of the slabs right in the middle of the bar or profile and will make it possible to fix the OSB slab in the center along its entire length. After the lines are drawn, hangers are attached along them in increments of 30-40 cm.
A metal hanger is used to secure the sheathing.
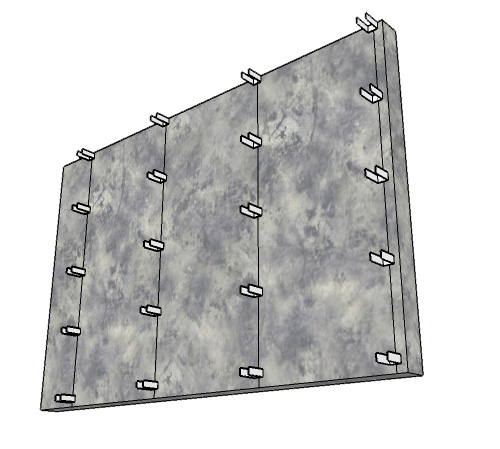 Suspensions are attached along the marked lines. Hangers allow you to secure the sheathing over the insulation.
After this, the insulation is laid and covered with a membrane that protects the insulation from moisture, after which the sheathing is installed.
It should be noted that a vapor barrier is not needed on the outside of the building, since it prevents moist air from entering the insulation from inside the room, and from the outside of the building, excess moisture should freely escape outside.
 Wall with sheathing. Insulation is laid between the sheathing and the wall.
 After fixing the sheathing, you can begin installation. OSB boards. For wall cladding, a slab with a thickness of 9 to 12 mm is most often used. If a facade is not mounted on top of the slab, then the slab must be moisture resistant. OSB slabs are attached to the wooden beam sheathing with nails at least 2.5 times longer than the thickness of the OSB sheet. For metal profile sheathing - use metal screws 10-15 mm longer than the thickness of the OSB sheet.
With this installation, the sheathing weighs above the insulation and does not create cold bridges in the insulation between the wall and the OSB boards. Thanks to this solution it is achieved maximum efficiency insulation performance. In addition, between the beams of the sheathing there is an air gap through which moisture is removed from the insulation, which also improves its characteristics. More detailed information about the technology of ventilated facades is in the article: ventilated facades, types of ventilated facades.
Fastening OSB boards to a wooden frame
When building frame houses with a wooden frame, two main approaches are used: fastening OSB sheets to the frame through the sheathing and fastening OSB sheets directly to the frame without sheathing. Let's consider the case of fastening OSB boards using sheathing.
When with inside strong slabs are attached to the walls to the frame, ensuring good rigidity of the wall structure, then a sheathing can be made on the outside between the frame and the OSB board. The sheathing forms air cavities for ventilation of the insulation and reduces the deformation loads from the frame to the OSB board.
Insulation is placed between the frame posts. A wind and waterproofing membrane is attached over the studs and insulation, which easily allows moisture to pass through. Next, the sheathing and OSB boards are attached to it.
 Installation of OSB boards on wooden frame with sheathing.
 With this design, the slabs can be left without finishing; you can paint them, plaster them, or attach almost any material to them. facade material.
When fastening OSB boards without using sheathing, maximum rigidity of the wall structure is achieved. In this case, it is recommended to attach the wind and waterproof membrane behind the OSB board, then install the sheathing to create a ventilation gap and install façade material on it, such as siding, boards or decorative panels. OSB boards are attached to a wooden frame with nails at least 2.5 times longer than the thickness of the OSB sheet.
The advantage of using nails over self-tapping screws when fastening OSB on the outside of a house is justified by the fact that nails better tolerate deformation of OSB sheets under atmospheric influences.
 Technology for attaching OSB sheets to a wooden frame without using sheathing.
 Fastening OSB boards to a metal frame
Fastening is carried out similarly to the option with a wooden frame. When attaching slabs directly to metal frame use metal screws 10-15 mm longer than the thickness of the OSB sheet.
General rules for installing OSB boards to the wall
Regardless of the chosen method of fastening OSB sheets, there is general rules, compliance with which will ensure maximum strength, reliability and durability of the cladding structure.
- Self-tapping screws should be screwed in at a distance of 10-15 cm from each other and at least 1 cm from the edge of the slab.
- A 10 mm gap is required between the bottom slab and the foundation to prevent water accumulation.
- The slabs cannot be joined closely to each other; a gap of 2-3 mm is required between them so that the slab can expand freely due to changes in humidity.
- All door and window openings are cut with a jigsaw or circular saw, but if you need perfectly even joints and cuts, then you can take ready-made sizes and OSB sheets to a furniture shop, where for a small fee they will cut your sheets on a format-cutting machine evenly and precisely to size.
Usage sheet materials in construction and home decoration – this has long been known. But if in the past it was necessary to make do only with chipboard, fiberboard or plywood, today the ranks of traditional samples have been replenished with new analogues with improved properties, which makes them more suitable for certain types of work.
One example of such products is OSB boards for interior decoration, which will be discussed below.
What is OSB board?
OSB is an oriented strand board. The material is panels made from pressed coniferous shavings And hardwood trees. Chip sizes can range from 60 to 150 mm.
OSB boards have high strength and density, thanks to the combination of several layers. In the middle the chips are located across the sheet, and in the lower and upper layers- along.
All layers of material are pressed under high temperature and pressure and are impregnated with waterproof resins and paraffin. Used as a binder phenol and formaldehyde resins. The finished slabs have a uniform structure - without cracks, chips or cavities.
Read more about the characteristics of OSB in our article.
Is it harmful to use slabs for interior decoration?
The possibility of using OSB for finishing depends on the labeling of the product, which in turn is determined by the amount of synthetic resins in the material that emit during operation harmful fumes.
Largest quantity toxic substances(from 10 to 30 mg per 100 g of dry matter) is contained in slabs of class E2 and E3. OSB panels marked E0 and E1 contain a minimum proportion of harmful components - from 6.5 to 10 mg. These are, as a rule, products of foreign manufacturers: Glunz (Germany), Norbord (Canada), Egger (Austria).
Thus, the products of the last two brands are most suitable for use for interior decoration.
Materials of class E2 and E3 can only be used for outdoor work.
To protect yourself from purchasing “hazardous” material, it is worth considering some points that partially determine right choice OSB:
- the smell of stoves. At high content harmful substances the material smells strongly of formaldehyde and cheap plastic;
- products must have a certificate certified by a seal from the manufacturer or supplier. A copy of the document can be requested from the seller;
- It would also be a good idea to inspect the packaging, if available. Products from serious manufacturers are usually labeled and equipped with information inserts.
How to make a partition from OSB inside a house and what screws to use?
OSP – quite suitable material for construction internal partitions rooms. The strength and light weight of the sheets are clear evidence in favor of this product. OSB boards can be mounted on (like gypsum board) or on a wooden frame.
If the second option is used, the wood should be treated protective materials against mold and mildew, as well as fire retardants.
Now as for partition installation diagrams, which will be considered using the example of a wooden frame:
- Markings are made at the installation site of the structure. Lines are drawn along the floor and ceiling, which will serve as guidelines for installing horizontal guides.
- Beams with a cross section of 4x6 cm are attached along the marking lines. If the wall will be subjected to serious loads (for example, you plan to hang furniture on it), it is better to use thicker bars - 5-8 cm. The guides are attached using dowels.
- Install vertical racks, which are fixed to horizontal bars using metal corners and self-tapping screws.
- After installing the racks, OSB panels are installed.
The pitch between the racks depends on the width of the slab, which varies. So, if the transverse size of the OSB sheet is 125 cm (the value characteristic of European brands), then the optimal distance between the axes vertical bars– 62.5 cm. In this case, it will be possible to screw the edges and middle of the slab to the frame.
They are attached using self-tapping screws, the length of which depends on the thickness of the sheets and should be 45-50 mm greater than this value. For example, when using material with a thickness of 12 mm, the recommended length of screws will be 60-65 mm.
Screws are screwed into the middle of the slab in increments of 30 cm, along the edges - every 15 cm. The distance from the edge is 1 cm. A gap of 1 cm is left between the slabs and the floor. The same gap should remain between the OSB and the ceiling.
Also, the panels should not be installed closely, but at a distance of 3 mm from each other. This will protect the sheets from deformation due to changes in humidity.
Making a partition from bars and OSB - watch the video:
Internal wall cladding
 This process, just like the procedure described above, requires the preliminary construction of a frame, for which the same wooden beams or profile. Now an example for arranging the sheathing will serve metal version
, since the wooden frame was discussed earlier.
This process, just like the procedure described above, requires the preliminary construction of a frame, for which the same wooden beams or profile. Now an example for arranging the sheathing will serve metal version
, since the wooden frame was discussed earlier.
Finishing walls with OSB boards consists of the following steps:
- The first step is, as always, marking.
- Next, vertical CD profiles are inserted into the installed guides and also fixed - to the wall using self-tapping screws and metal hangers, to the horizontal guides - with drilling screws. The pitch between the posts is the same as in the case of a wooden frame.
- To give rigidity to the sheathing, the vertical posts are reinforced with transverse profiles. At standard height For ceilings (2.5 m), it will be enough to install two elements for each span.
If the wall is uneven, you should find the part that sticks out the most, from which you should start. Lines are drawn along the wall, after which the starting UD profile is attached to the floor and ceiling using self-tapping screws or dowels.
The installation of the slabs is carried out in accordance with the rules mentioned in the instructions for the construction of partitions.
How to finish the slab indoors?
Wooden interior finishing country houses as in the photo it can be completely different in cost and design. For surface finishing OSB sheets are used various materials. Let's consider them further.

Is it possible to attach drywall to OSB?
Can. Moreover, for this it is not necessary to use metallic profile, but just screw the material to the base with self-tapping screws.
The main thing here is that The humidity level in the room was not high, since otherwise this may lead to deformation of the OSB and, consequently, the plasterboard sheathing. Self-tapping screws are screwed in around the perimeter and in the center of the gypsum board in increments of 10-15 cm.
Painting with varnish and acrylic paint
 Varnish increases moisture resistance OSB boards. This finishing method is good for use in damp rooms. The slabs can be painted with any varnish intended for natural wood. The surface is cleaned of dirt, degreased, sanded and treated with a primer. Varnished OSB has a smooth surface, but retains its texture.
Also a good option for finishing OSB is. It rolls well on the surface with a roller and forms a durable and breathable coating.
To get the best effect, it is advisable to paint in two layers.
Puttying with gypsum putty
Putty materials do not adhere well to wood. Therefore, it is best to use formulations that have maximum adhesion to wooden surfaces. These can be dry mixtures “Rodband” or “Goldband”, containing polymer additives and most suitable for working with wood. You can use Vitonit KR as a finishing coat.
Before puttying OSB primed with a special composition, where glue, interlining and a little putty mixture are added. If this measure is neglected, the base impregnation may bleed onto the finished surface, causing the finish to become stained.
How to plaster a surface made of OSB boards?
 For plastering OSB, it is best to use a special mixture. Eg, Knauf Sevener. The plaster finishing technology itself includes the following steps:
- The joints between the slabs are puttied and covered with sickle tape.
- The surface is treated with a primer (you can take Knauf Tifengrund).
- Apply the first layer of plaster and embed the reinforcing mesh into it.
- A covering and leveling layer is applied on top.
Glass wallpaper sticker
If the slabs smooth (polished), wallpaper can be glued directly onto them. Otherwise, you will have to plaster and putty the surface, doing this using the technology described above.
Fiberglass wallpaper is glued to special compounds. In this case, the dry mixture “Methylane Fiberglass Premium” and the granular composition “Methylane Granulate Premium” are suitable.
Find out how to hang wallpaper on OSB from the video:
How to glue ceramic tiles?
There are several ways to stick this on:
- fix the expanded mesh to the surface and lay the cladding on any adhesive for ceramic tiles;
- perform installation directly on the OSB board using glue for deformable surfaces;
- use epoxy grout instead of adhesive.
Liquid wallpaper
 This type of finishing is applied to OSB in the same way as to a regular wall. All you need is prepare the foundation, sealing the joints and treating the surface with a primer.
Behind 12 hours before work starts the composition is kneaded and left in a plastic bag. Ready material Apply using a spatula in an even layer from 3 to 7 mm.
One of the advantages of such a material is that it is not afraid of small surface defects. They simply smooth out when the mixture is applied.
Is it possible to sheathe a bathhouse and a garage inside with an OSB board?
OSB sheets are a material that is suitable not only for finishing residential premises. It can also be successfully used for siding or garages.
In the first case, of course, you need to use only environmentally friendly brands of material.
OSB should be treated in the bath 2-3 layers of water-soluble varnish, which will add shine to the surface and protect it from moisture.
As for the plating, here Suitable for OSB of any marking, since in non-residential premises, concern for the environment is the tenth thing and the harmfulness of the material does not matter.
From all of the above, we can conclude that OSB boards are a universal product suitable for use under different kinds finishing. This quality, combined with the strength of the panels, makes OSB a worthy representative of the category of sheet materials.
How to putty OSB with your own hands - a detailed course for beginners:
Very convenient and multifunctional material for different construction work– oriented strand boards. Since the production technology of these plates is not complicated, for internal finishing works the master can choose a specific option from four types OSB boards or consider special types of these boards.
What are the sheets of these products made of? Everything is simple - wood chips are used (flat fragments are used), shavings: these materials are glued together and the result is really excellent finishing material. Three or four layers of chips or shavings – these are the indicators that can be called optimal. Installing OSB on walls is more preferable than using the same chipboard.
However, oriented strand boards are a kind of modification of wood-fiber material, some of its modern analogue. If finances allow, it is better to choose OSB for facing work (plywood or chipboard are increasingly being abandoned today).
Scope of OSB, classification of boards
Before considering the classification of slabs and deciding which is the best OSB for finishing walls, it is important to pay attention to the characteristics of such a material.
Types of OSB boards
Here everything is as follows:
- OSB boards of the first class - they are usually chosen for such premises where low level humidity;
- Type two - the material can be safely chosen for dry rooms; it is even used as structural element during construction work;
- Type 3 OSB – these boards are used in rooms where there is a high level of humidity;
- The fourth type of such products is used for cladding structures that can cope even with significant mechanical loads. Moreover, we are talking about conditions where there is a high level of humidity.
Application area

One thing can be said about the scope of application - installation of OSB is a truly urgent task, since such boards are used in many construction aspects.
It’s just that this material has such a manufacturing technology, due to which all internal defects are simply eliminated (at the same time, Chipboard sheets they appear very often - voids, uneven fillings). Due to all this, OSB is a more preferable option - it does not deform and does not shrink.

And now in detail - where exactly can this material be used??
- OSB cladding is often a very profitable solution for walls. Due to this approach, the house receives reliable protection from dampness, and also acquires additional insulation. What's best here: there is no need for additional finishing work after installing OSB;
- Under construction frame-panel houses OSB boards are usually used, which have high level moisture resistance;
- Since the material has such valuable quality, it makes a decent reusable formwork;
- It is used as a base when making external cladding walls, as well as internal works– if finishing of wooden country houses, cottages (made of timber, rounded logs) is carried out;
- OSB boards are your faithful assistant if you are making sheathing or rafters for the roof. This material can work even under serious load - it will definitely withstand the weight of not only the roof itself, but also all accompanying loads (wind, snow) - even if natural tiles (a material that weighs nothing) are laid on the roof;
- If you need to level the floors in your house or lay them from scratch, here again you can pay attention to the installation of OSB. Just such a slab - perfect option to create a very strong, even base. It’s better not to find it under plank floorboards, carpets or other coverings;
- Pay special attention to the process when you need to adjust the joints of the slabs to a plane. If necessary, they must be equalized - without this there is no way.
An interesting point - not every manufacturer can use OSB boards as underlying layers - in the case of floor coverings. And the panels are laid so that the smooth side is facing up.
What else does a master need to know?? Following:
- There is no need to apply an additional protective coating in the form of paint or varnish to the slabs - the material initially has excellent protection in the form of a special impregnation;
- Processing slabs is not that difficult - about the same as regular wood. Screws and nails adhere perfectly to the surface. OSB boards are not afraid of rotting, fungal influences, the decorative qualities of such material are excellent;
- OSB panels today are often used in furniture production– after all, this is an excellent alternative to natural solid wood (but in terms of cost, it is significantly more profitable);
- The material does not weigh that much - therefore it is perfect for finishing, construction, painting works and not only.
How to finish a house faster

It is quite logical that any owner wants to move into his home faster - especially if the construction is carried out independently. Private cottages are located separately from neighboring buildings - so in this design you don’t have to worry about neighbors.
Here a completely reasonable question may arise: maybe not to do rough sheathing - but to immediately attach the OSB finishing materials directly to the frame racks?
Is this approach to the matter allowed, or is it excluded?
If you pay attention to the instructions compiled by professionals, it will immediately become clear: you cannot do this. There will also be reasons for this conclusion. Simply, it is important to insulate the house - only in this situation will it be comfortable (especially since winters in the Russian Federation are cold - almost throughout the entire territory).
Why are frame bevels required at all - lower and upper? Everything is simple here: they form spatial rigidity - together with the cladding. They can also be called mandatory elements if we consider the design of any frame structure.
A frame that does not have slopes will retain its mobility even with cladding - as is the case when there are any. However, if there is no cladding, you can imagine what the consequences may be.
External rough wall cladding

A lot is used today for rough cladding. different materials. There is definitely a choice here - everyone will agree with this. Pay attention to at least these options:
- Board;
- OSB boards.
Any of these surfaces needs finishing: this could be facing with plaster - with a mesh or a layer of polystyrene foam. There is an opinion that even the boarding can be left as a finishing touch - but in this case the wood will need to be processed additionally. Hydro-wind protection of the walls is also installed under the boards.

You must take into account the following: it is not recommended to finish the frame with boards - without rough, preliminary covering with OSB boards. Otherwise, there is a risk that the boards will come loose in the fall or spring. In addition, this is important for the spatial rigidity of the frame.
You will get fewer joints due to the area of OSB sheets - which cannot be said about working with other materials. OSB finishing is usually made with a material whose thickness is 11-13 mm.
Let's take a closer look:
- The OSB boards are fastened to the racks so that there is a joint in the middle. And there should be a small gap between the plates - three to five millimeters is enough;
- The sheet completely covers the lower trim;
- The top frame is closely related to the number of storeys of the house. It will be completely hidden - and the edge of the OSB slab will be aligned with the edge of the trim if the structure has only one floor;
- When the building consists of two floors, the sheet is positioned as follows: it must fit onto the racks of both floors at once. But somewhere in the middle of the sheet the top trim overlaps. This condition cannot be called mandatory, but if it is met, the rigidity of the structure increases noticeably, which benefits the structure;
- Sheathing with OSB boards when fastening to a window opening is carried out in two-story houses, should be produced in a single sheet - this is exactly what the professionals advise. Then all the joints can be moved to adjacent racks outside the racks of the opening. They simply cut through the slab window hole– there is nothing complicated in such work;
- When horizontal or vertical jumpers are made in the frame, a very convenient joining of the slabs is obtained. In the event that these jumpers have the same cross-section as the racks - and this often happens;
- Spiral nails are selected for fastening. Self-tapping screws are also suitable - 0.5 or 0.45 cm long. You should also not refuse combined fasteners (both nails and self-tapping screws) - such a solution is considered to be of very high quality.
Remember that basic rules for performing fastening work must be observed.
Namely:
- It is customary to fix the finishing of OSB slabs in intermediate areas every 300 mm;
- After 150 mm, fix the places where the slabs are joined;
- After 100 mm it is necessary to sew the outer edge.

To prevent cracks in the material due to too zealous fastening, a distance of 1 cm is maintained from the edge of the slab to the place of fixation (a little less is possible).
- A gap of 4-5 millimeters is left between the plates so that they do not warp. The fasteners are driven 4-5 cm into the rack;
- The part of the OSB board that is vulnerable (one might say this is the “Achilles heel” of the finishing material) is the ends. To ensure the protection of these areas, there are gaps called expansion gaps (between the crown beam and the top edge, also between foundation wall and bottom edge). Here the gap will be 10 mm. And between those slabs where there is no tongue-groove, 3 mm is quite enough;
- To seal these expansion gaps, an acrylic-based sealant is used. It is important that it carefully fills all the cavities - and that this work is done evenly;
- Wind protection, waterproofing - all these tasks will be performed by a superdiffusion membrane, which also has the property of vapor permeability (this indicator is 750 g/m² or more).
Craftsmen do not recommend using polyethylene, various films, glassine. It’s just that these materials have a low level of vapor permeability; all excess moisture must be reliably ventilated.
Also, you should know:
- The superdiffusion membrane is installed depending on the rough lining with materials, what it is fine finishing. For example, the membrane is often attached closely to the insulation - to the frame studs;
- They make a sheathing (here they use wooden slats, the cross-section of which is 2 by 5 or 3 by 5 cm. Thanks to this design, the required gap will be achieved. Then you can finish the surface with OSB boards, SML, DSP or sheathe it with boards;
- From the inside of the room, you can use film to create a vapor barrier for the walls. The material is installed in such a way that it fits tightly enough to the insulation. A construction stapler is used for fastening. The joints are overlapped - 150-200 mm; the joints must be taped.

For such work, you can choose the simplest adhesive tape - there is no need to use construction material. Vapor barrier adhesive tape will also work.
- To perform a vapor barrier, you can use foiled polyethylene, which will not thicken the wall thermal insulation (basic). Foam material is also often used for this task - this practice is common in our time.
Finishing the structure inside

Which is better: OSB sheathing or plasterboard cladding? Many are clearly inclined to favor option number one - when it comes to interior finishing work in the house. It is quite difficult to keep the frame posts in a completely level state - when work is underway, the same applies to drywall.
It’s just that the sheets of this material are softer when compared with osb boards. They will easily repeat all the irregularities - so then you will have to work hard to get a completely flat surface - more layers will need to be applied to level them.
OSB board is an order of magnitude stiffer in structure than plasterboard sheets, so all flaws can be smoothed out to a certain extent. Afterwards they begin to carry out work related to finishing.
Watch a video about how OSB boards are used for interior decoration. This material will definitely be useful if you do not have much construction experience.
OSB-3 boards and roofing work

Roofing work is a very popular way to use materials such as OSB boards. By the way, to cover the roof with OSB-3 slabs, a material thickness of 0.18 cm is sufficient.
In order:
- Products can have both a locking edge and a straight edge. The first option is more preferable;
- The distance between the load-bearing beams should not be more than 609 mm - this applies to both the organization of sloping and flat roofs;
- Whether the slabs are capable of expanding is of great importance. For each linear meter It is customary to leave a gap: 2 mm is quite enough (believe me, this is enough);
- When laying slabs with smooth edges, the gap is made a little larger - 3 mm. Leave it around the perimeter of each slab - this is the only way to achieve optimal results;
- Nails are used to attach OSB to the roof. Attached to supporting supports. There should be a distance between them: 10 cm or even more;
- The finishing of OSB boards is attached with nails - they should have a length that exceeds the thickness of the board by two to two and a half times (or even more) - this is quite normal.

If the interior decoration is done using OSB panels, the following can be noted: a slab made of polished panels will look better if it is very important in your space appearance. It is better not to use such slabs for finishing. ceramic tiles or wallpaper - this is what the manufacturers themselves recommend. And it’s best to listen to their opinion!
OSB - oriented strand board. The material is relatively new, but is already actively used in construction and decoration.
finishing with OSB slabs Photo
Pros and cons of OSB boards
As advantages This material has the following features:

There are some negative aspects, but they are much smaller:
- some manufacturers do not comply with environmental requirements, which leads to increased release of harmful substances;
- the material has low moisture permeability and vapor permeability, so rooms with such finishing require good ventilation.
OSB board. Video
Process of finishing with OSB boards
Often, rough cladding of walls with OSB boards is required. This choice of material is explained by the fact that the significant dimensions of the sheets make it possible to reduce the number of joints. When installing OSB boards on a wall, a number of details must be taken into account.
The slabs are secured in such a way that joint was located in the middle. A gap of approximately four millimeters is left between adjacent elements, which will compensate for the expansion of the material.

The OSB sheet hides the bottom harness frame structure. The top trim is also hidden, and the top side of the slab is aligned with the edge of the trim. In the case of a two-story building, it would be useful to install OSB slabs on the wall so that they overlap the racks of both the lower and upper floors. This will make the structure more rigid.
It is better to design a window opening in a building with two floors as a whole sheet, i.e. cut a hole in it for the window. As a result, the joints are transferred to adjacent racks.
To make rough cladding with OSB boards more convenient and reliable, it is worth creating additional jumpers in the frame. They can be located both horizontally and vertically.
For fastening, self-tapping screws or spiral nails are used, having a length of five centimeters and a diameter of four and a half millimeters. These two mounting options can be easily combined.

Basic rules for OSB fastening:

finishing OSB walls slabs. Photo
It is also possible to decorate the walls internally with OSB boards. Since they are quite rigid, it becomes possible to smooth out unevenness. Drywall is a more flexible material and often repeats such irregularities.
OSB for internal partitions
The popular option for interior wall decoration with OSB slabs is complemented by the arrangement interior walls and partitions made of this material. Since it is durable and easy to install, there are many possibilities for transforming the space.

You can attach the sheets to a wooden frame or on metal profile like drywall. But OSB differs in this case from drywall, since it does not deform under its own weight. This weight is very small, so it does not exert a significant load on the frame. Due to the strength and density of the slabs, cracks or pushing through of fasteners can be avoided during installation.
How to finish OSB walls?
The structure of oriented strand panels is distinctly wooden, which makes them especially decorative. The surface of such walls can be finished with a variety of materials.
The peculiarity of OSB panels is that they are impregnated with wax, paraffin or some kind of resin. The result is smooth surface. The difficulty of finishing lies in the fact that the finishing material is difficult to adhere to such a slippery surface. In addition, impregnating substances are able to reach the surface through the finishing layer. It will help you avoid such troubles primer layer. After the primer has dried, you can continue finishing with the selected material.

How to finish an OSB floor?
To finish an OSB floor, you can use varnish, paint or any floor covering.
Varnishing
The OSB surface should be as smooth as possible. If there is roughness, it should be sanded. An unpolished slab will not be easy to use and will quickly lose its aesthetics. After the leveling process, the floor surface is cleaned of dust and dirt, degreased and primed.

Sanding is not necessary if laminated OSB sheets were used for flooring.
The varnish is applied in stages, in several layers. Can be used colorless transparent compositions or having a color tint.
The disadvantage of varnished coating is its sensitivity to synthetic detergents. For cleaning you will need to use special compounds. In addition, scratches often appear on such a surface.
Painting OSB floors
Paint is one of the most budget options OSB floor finishing. Often for such purposes it is chosen Oil paint, creating a reliable and environmentally friendly coating, permeable to steam and air.

First, the surface of the slabs is puttied, which makes it possible to hide unevenness. After applying the putty, sanding is performed to obtain a smooth surface.
The next step is to apply a primer, which ensures a more even application of the paint. The paint is applied directly with a roller in two layers. In order not to make a mistake with the shade and to check the interaction of the paint with the base, it is first applied to a small area.
Laying decorative coverings on OSB floors
The third option for finishing an OSB floor is laying flooring. This could be parquet or laminate, linoleum, tiles or other finishing options. The base needs to be prepared. To do this, all expansion joints are filled with sealant and sanded.
If only one sufficiently thick OSB board is used as the base, then the logs are laid at a distance of thirty or forty centimeters.

More rational option creating a base for coating is the use of relatively thin sheets, about a centimeter thick. They are placed in two layers, the top perpendicular to the bottom. Gluing with parquet glue or fixing the sheets with self-tapping screws will help to avoid horizontal displacements.
(OSB, OSB) - this is the installation of various structures of the room - finishing of walls, floors, roofs. Fastening the panels has its own characteristics, thanks to which the cladding will be durable and of high quality. First of all, it is necessary to determine the fastening elements (hardware), which play a dominant role in the reliability of wall cladding with OSB panels.
Fastening tools
The selection of elements for fastening OSB boards is carried out based on the weight of the panel and its location:
- for finishing - fastening elements, in this case, are combined with an adhesive, and also those that will not need to be removed are selected, where their masking is necessary;
- without a cap (round) - used for arranging floor coverings, as well as for installing structures with frame base and for fastening slabs with a shunt connection;
- with a cap - used when masking of the fastener is required;
- Other fasteners are used a little less frequently, for example, nails with a special ring or screw thread - they hold the panel well, but are difficult to remove if dismantling is necessary;
- one of the best is considered to be covering OSB boards with screws, which are used when working with wooden products, they need less in comparison with other parts for fastening, but at the same time they show high reliability of retention.
Features of the cladding process
Installation of OSB panels on the wall is carried out using two methods - horizontal and vertical. At the same time, when covering wall surfaces where there are openings - windows and doors, a gap of 3 mm should be left.
It is also necessary to take into account the distance between the supporting elements of the wall. Often they are no more than 40-60 cm - in this case they are used with a thickness of up to 1.2 cm.
When additional thermal insulation is required between the wall and the slab, preference is given to mineral wool and of course it is carried out before fixing the OSB boards.
If spiral nails or ring-type nails were chosen for covering wood panel panels, then they should be fastened every 30 cm, using intermediate supports. Where the slabs are connected, nails are placed every 15 cm. Along the edges they are driven in every 10 cm, but make sure that the driving step does not exceed 1 cm from the edge of the slab.
It is also very important to observe dilatation gaps:
- from the top edge of the panel to the crown beam - 1 cm;
- from the bottom edge of the panel to the fundamental surface – 1 cm;
- from a panel that does not have a ridge connecting groove - 0.3 cm.
Finishing
OSB wall slabs have gained popularity due to their relatively low cost. of this material among others similar. In addition, the ease with which the panels accept finishing, further determines their use for repair and finishing work.
The wood-based material itself is made from wood chips and binder resins, and is water-resistant. The pressing of the chips is carried out using special equipment, and in order for the material to be strong, the method of arranging the layers perpendicular to each other is used.
Finishing methods and preparation of slabs
For interior finishing work, I often choose a panel specially designed for this type of work - OSB-3. The panels can be varnished or painted, taking into account the preparation of the surface of the slab for one or another type of finishing. If the surface of the panel was initially coated with a paraffin or wax substance to improve its waterproof qualities, then additional treatment will be required, otherwise the paint will simply run off.
The panels are processed before installing them on the walls. To do this, do:
- Leveling - grinding surface layer, to remove the external processing of the slab and remove all irregularities and defects. This process can be done manually, emery cloth or use a special tool.
- Edge treatment - this must be done to prevent dyes or varnish from being absorbed into its porous structure. The untreated edge often absorbs the most paint. The corners should also be slightly rounded to prevent liquids from spreading.
- Seam finishing – this stage is also of no small importance, so it is worth treating the gaps between the panels with sealant (acrylic). But silicone-based filler should not be used; paint does not adhere well to it. Also, after installation, decorative panels are manually applied to the joints for camouflage.
- Primer the surface – before painting, a primer is always used to ensure better and even application of paint or varnish to the surface. This also allows you to save the amount of consumable dye. Gypsum and acrylic primers are best suited for processing OSB panels, but water-based ones should not be used, as the board may warp.
The paint for OSB boards is selected according to the type of chips that were used to produce the panels. You can also stick wallpaper onto the surface of this material, and the processing will be the same as in the case of painting, but more attention should be paid to sanding.
OSB boards are easy to process, easy to install on walls and are not expensive. All these qualities ensure the great popularity of this material in construction.