Proper installation of a passage through the roof for a stove or ventilation pipe ensures not only the safety of the stove, pipe and building, but is also the key to the safety of residents. At first glance the design roof penetration for a chimney seems to be a simple matter. However, here it will be necessary to ensure impeccable hydro- and thermal insulation of the passage unit, select best place to bring the pipe to the roof without destroying the aesthetic design of the building.
There is an opinion that the effectiveness and safety of individual heating system depends on the design of the stove and the skill of the stove maker. Few people think that complete combustion of fuel depends more on chimney and traction forces. And only specialists know how important it is to install a high-quality passage through the roof.
When building a furnace, the main attention is paid to the temperature stability of the materials. But the fire brick of the chimney and mineral insulation Sandwich pipes are defenseless against systematic humidification.
Poor design of the pipe outlet to the roof entails serious consequences affecting the operation of the chimney. Violation of the norms for thermal insulation of pipes from flammable roofing materials and attic floors can lead to:
- to fire in places where the pipe and flammable materials of the house structure come into contact;
- to education large quantity condensation in the pipe, which will lead to its rapid destruction;
- to the formation of a thick coating of soot on the inner wall of the chimney and a decrease in its working clearance;
- to a decrease in furnace draft and the formation carbon monoxide, dangerous to human life.
Poor quality waterproofing of a roof penetration assembly threatens:
- penetration of atmospheric moisture into the attic, which provokes the formation of fungus and mold;
- getting the rafters wet leads to the initiation of wood rotting processes, no matter how well it is treated with an antiseptic;
- destruction of the brickwork of the chimney;
- increased corrosion of the metal pipe;
- by getting the thermal insulation (mineral wool) wet, after which this material becomes completely unusable and loses its thermal insulation properties.
Folding a stove is not an easy task, but when it comes to arranging the correct passage of the chimney pipe through the roof, this is an equally important procedure.
Chimney passage through a tiled roof
Fire safety, as well as waterproofing of the stove and attic floor. An incorrectly installed system for removing gases released during fuel combustion can cause fire! These gases are also hazardous to health and life human, their accumulation under the roof of residential premises creates a dangerous layer, which, reaching a critical mass, can cause irreparable damage to human health and even death!
The consequences of poorly carried out work on sealing the chimney when it exits through the roof can be as follows:
- If the pipe is not protected from moisture, dampness will easily destroy the chimney masonry over time, penetrating the seams and corroding the mortar, which can also lead to smoke in the attic, and in the worst case, a fire.
- Moisture that appears in unsealed holes around the pipe flows down the masonry, penetrating inside the chimney, and can lead to the formation of fungus. You will have to reinstall the pipe, and perhaps even part of the furnace.
- Overmoistening not only the pipe, but also the vapor barrier and insulation materials can lead to their rupture.
- As a result of the loss of thermal insulation tightness, the heat loss of the building will increase.
- There may be a disruption in air circulation in the attic, which will lead to a decrease in moisture exchange.
- Moisture entering cracks during temperature changes forms ice, which widens the cracks, and destructive processes are activated.
- Due to moisture, the entire structure of the roof can be damaged - if it gets on truss structure and will begin to eat away at it.
This picture can occur in a pipe if the cracks around it are poorly sealed. To avoid such a problem, the installation of the pipe outlet through the roof must be carried out carefully and competently.
When starting this process, you need to know and follow established rules SNiP 41— 03— 01— 2003. Chimney installation work will be needed in the following cases:
- during roof construction;
- when repairing the roof;
- when installing a heating device or constructing a furnace.
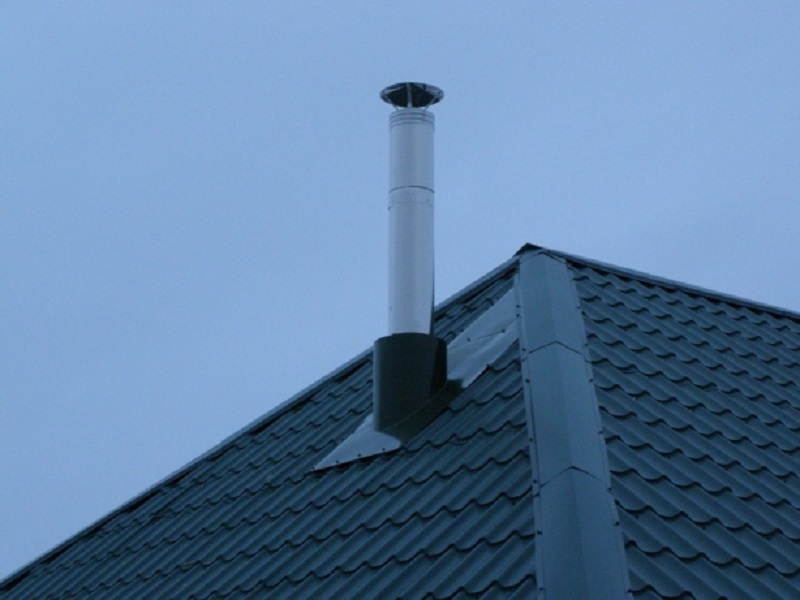
The optimal location of the chimney on the roof is 1.5 m from the ridge
Experienced stove makers advise placing the pipe outlet closer to the highest point of the roof, the ridge, and it should rise above it by at least half a meter. This is convenient because less snow will accumulate in the area above the pipe, and when it melts, the risk of leakage is reduced.
If the head of the pipe is located lower along the roof slope, it should also be raised above the covering by at least half a meter.
It should be noted that the type of chimney and its finishing are very important when carrying out this process, since there are several options for designing this unit, which is important for the entire house. The removal of the head has different designs, and depends on the shape and material from which the chimney is made, its exit location and size. Chimney pipes can be made of metal, brick, asbestos cement or ceramics. For each type of pipe, the passage is arranged in a certain way.
The design of brick pipes leading through the roof has its own type of installation. The plastered head of the pipe is sealed in a completely different way, and a ceramic or metal chimney has several methods for sealing the seams between it and the roof.
The roofing material also plays an important role in the design of seams around the chimney.
For different types roofing materials, it is easy to find a special element that will help make the chimney waterproofing more reliable. The main thing is to choose the correct slope of this element. It is very important that the pipe is located in the roof opening so that the distance between it and the roof, as well as the rafters, is at least 5-7 cm. These gaps are filled with non-flammable insulating material, for example, asbestos.
Elements for insulating round pipes
For withdrawal round pipe, which can be made of metal or ceramics, you need to properly make a hole in the roof. Around the hole, from the inside of the roof, it is recommended to fasten a metal sheet or a specially made metal panel with a hole for the pipe. If necessary, you need to add additional bars to the sheathing to secure them.
The roof can have different slopes, and these will determine which insulating element, called roof penetration, should be chosen for waterproofing. IN construction stores large selection of different auxiliary elements, designed specifically for this procedure, of different shapes and diameters.
Elastic roof penetration
A pipe leading through a roof that has a slope will accordingly require a special penetration slope. Also, we can say that its choice will depend on the material with which the roof is covered. This is taken into account in order to achieve best effect sealing.
The roof penetration is a pyramid consisting of several steps. The pyramid is located on a flexible square or round flange. The entire element is made of silicone or durable types of rubber, although sometimes one of its parts can be made of aluminum. Due to the elasticity of these materials, the penetration fits well with any roof and does not react to the effects of wind or snow melting.
To the positive characteristics similar products can be attributed:
- resistance to chemical and ultraviolet influences;
- resistance to temperature changes, from - 50 to + 130 degrees;
- flexibility;
- wide range of colors - they can be matched to any roof color;
- aesthetics, the ability to complete the coating;
- due to its good fit to the roof, the penetration guarantees excellent tightness;
- The flexibility of the part makes it possible to install it on any roof slope.
Since penetrations are released different sizes, they need to be selected correctly according to the diameter of the chimney and the slope of the roof. The dimensions are indicated on the body of the element itself.
- Direct penetration is used mainly on roofs that have a slight slope, about 25 degrees, and on flat roofs.
- Corner penetrations, the flange of which must be fixed at a certain angle, for example, 20 degrees, are used to seal pipes installed on roofs with a slope of more than 25 degrees.
- A universal penetration, which can be adjusted to any pipe diameter, looks like this: on each of the steps of the penetration pyramid, the diameter for which it is intended is indicated. The craftsman just has to cut off the excess top and install it on the pipe.
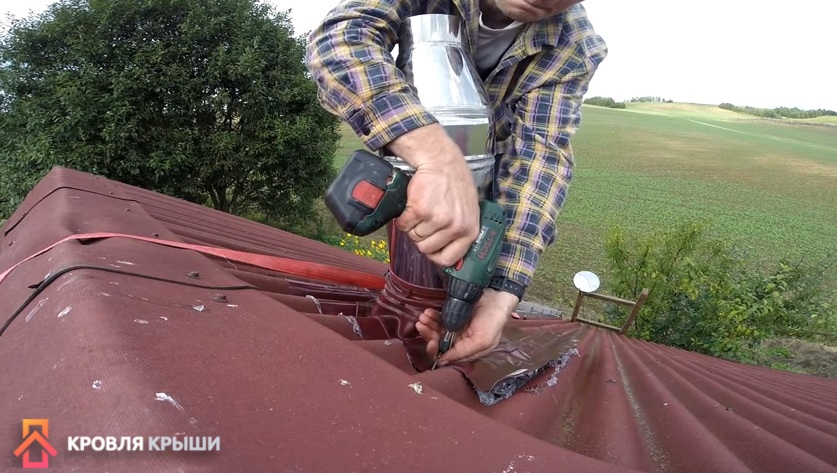
Installation of a soft roof penetration for a chimney pipe
Installation of this waterproofing element is quite simple:
The installation process is simple and straightforward
After waterproofing - attached to the roof with self-tapping screws
- if purchased universal option, the excess part is cut off;
- Then the penetration is put on the pipe and pressed against the roof. If the roof is ribbed, the waterproofing should take the shape of the ribs of the covering;
- then a sealant is used, which coats the edges of the flange and presses it tightly to the roof;
- The last step is to fix the penetration along the flange to the roof using self-tapping screws or rivets.
The presented photos clearly show the process of installing waterproofing.
Metal penetration
Another option for waterproofing a metal pipe can be a metal penetration, which is also sold in finished form. It has excellent characteristics, but can only be installed on a roof that does not have a relief pattern, for example, a soft one. Another condition necessary for a tight installation of the flange to the roofing is the ideal angle of the element to the slope of the roof.
- Exist different models metal penetrations. On some of them, the pipe is fixed and soldered from the inside, and the top cap of the chimney is put on and welded from the outside.
- There may be another option, when the pipe passes through the penetration and a detachable metal part is fixed on top of it, which does not allow moisture to penetrate inside.
- The flange is glued to the roof using sealant and then screwed with self-tapping screws.
Square, rectangular pipe
A brick chimney is almost always square or rectangular in shape. Passing through the attic, it is brought to the roof. Next, a hole is made in the roof, which should be decorated from the inside. metal sheet with a hole made in the middle in the shape of a pipe. Through this window the head is brought out onto the roof surface. This option is convenient when venting a chimney through thick sheathing in the roof, for example, when installing a soft roof.
If the sheathing is installed at a certain distance (for example, slate roofing), it is good if the pipe runs between the rafters. But it also happens that the pipe rests on one of the beams supporting the roof or they are too far from the walls of the pipe. In this case, it is necessary to arrange additional parts of the rafter-beam system, which will allow the heat-resistant insulation and waterproofing to be secured around the chimney.
When a square pipe is passed through the roof, the seams around it are sealed with non-combustible materials, and a penetration-casing made of metal cut in a special way is installed on top.
The picture shows an apron consisting of four parts, which is assembled in a simple way. This penetration is installed under the roof covering, and the roofing material is laid on top of it. The cracks formed in the area where the metal joins the pipe and when connecting to the roof are sealed with sealant.
If sealing is carried out on top of the roofing material, then it is made with a layer of soft waterproofing, consisting of special tape, which is produced on the basis of aluminum and lead. It is well fixed with sealant on any flat surface or having a certain relief.
On the pipe itself, soft waterproofing is also placed on a sealant and secured with special metal strips. The photo clearly shows the design of such protection.
One of the options for passing a chimney pipe through the roof - video tutorial
Chimney pipe passage through a tile roof
Separately, I would like to say about the passage of the pipe through the tiled roof. Manufacturers have thought of a special element that repeats the relief pattern of the tiles and has a hole for the pipe. A pipe made of the same material is also matched to it.
These tile roofing elements are made from highly resistant plastics. They are available in the same colors as tiles, and you can always choose the right shade suitable for a particular building. But such plastic parts roofs are installed only for ventilation outlets, since they are unlikely to withstand high temperatures, which accompany the smoke emanating from any stove.
Safety criteria for the passage of a chimney pipe through the roof
It is impossible in the scale of one publication to both cover all the options for installing chimneys through the roof and talk about all important tricks during these works. But there are points that are extremely necessary to know.
- In the structure of some roofs there are layers of different materials, which do not have pronounced fire-resistant properties. Therefore, it is very important to provide fire safety rules.
In order to secure wooden floors and other flammable materials, special boxes are built around a chimney of any shape.
The pipe is placed in a special fireproof box
This option is very convenient for roofs covered with slate, tiles or other materials with a three-dimensional pattern, as well as for soft roof. The box is lined up flush with the sheathing, on which the roofing covering is laid. It must have a certain thickness in order to reliably protect the entire layer of sheathing and the vapor barrier and insulation installed on it from possible overheating and fire. It’s not bad if between the chimney and fire-resistant materials there will also be a distance of about 5-7 cm.
- When purchasing a penetration, you must make sure of its reliability and resistance to temperature changes and increased heating, and only then check its waterproofing qualities.
- Very important correct installation pipe and its passage through the roof, since this is not only decorative element, but also functional. We must not forget that the safety of your health and property will depend on the correct installation of this unit.
- Materials used in such work must comply necessary requirements specifically for this device. For example, ventilation pipes must not be used to remove smoke from heating appliances. You definitely need to know the characteristics of the materials you are purchasing, and it is better to consult with a specialist if anything is in doubt.
In any case, if you have never dealt with this type of work, it is not worth the risk. The best option will invite a master who has performed this process more than once. It will cope with the task faster and will not spoil general form roofs.
The appearance of chimneys made from sandwich pipes raised many questions among inexperienced developers, especially the elderly. They constantly react with great caution to new technologies, give preference to traditional solutions and consider only them to be the most correct, time-tested and with numerous users. But this is not always the case, new Construction Materials and technologies can significantly simplify the process of building a house, improve its performance, reduce costs, increase safety, etc. Such technologies also include chimneys made from sandwich pipes.
In order to better understand the installation technology, you need to become a little familiar with the operational parameters and technical characteristics modern chimneys.

The chimney must meet two main requirements: guarantee the necessary draft and be safe from a fire point of view. The installation of any chimney, including those made from sandwich pipes, must necessarily meet these requirements; it is with their implementation that work should begin.
How to choose the diameter and location of the chimney
The amount of thrust depends on several factors.

These are the main regulatory requirements, but there are also fire safety standards. All of them are based on the fact that wooden structures located next to pipes cannot heat above +400°C. It is at this temperature that wood ignites. Specific distances are not regulated; it all depends on the temperature of the exhaust gases. The distance is influenced by the power and efficiency of the boiler, the thickness of the thermal insulation layer, the height of the ceiling and attic, the temperature outside, etc. The science that describes these dependencies is called heat engineering and belongs to one of the most complex branches of physics.
What to consider when choosing a chimney
As mentioned above, the task of the chimney is to safely heat residential premises. Pipe parameters depend on many factors and must be taken into account. Otherwise, no matter how the chimney is installed, use stove heating It will be impossible, you will have to buy new sandwich pipes and redo everything. What to look for when choosing a specific chimney?
| Parameter | Short description |
|---|---|
| High-quality sandwich pipes for chimneys should be made only from alloyed, heat-resistant and of stainless steel. The steel grade is selected taking into account the gas temperature; the higher it is, the more heat-resistant the steel should be. For gas temperatures within +1000°C, AISI 304 steel is used, for a wood-burning boiler (gas temperature up to +600°C) AISI321 steel is needed. Practical advice. Never buy pipes made from AISI 409 or AISI 430 steel. They are not only susceptible to high temperatures, but are also corroded by acids very quickly. And in smoke there are quite a lot of chemical elements that, when combined with condensate, form sulfuric and hydrochloric acids. Such low-quality pipes are sold by counterfeit Chinese companies and some domestic ones. |
| Heating boilers can be wood, coal or gas fired. The temperature of the gases and the concentration of acids depend on the type of fuel. A coal boiler produces the most acid, and it also has the highest gas temperature. For this boiler you need to select a sandwich pipe made of the highest quality alloy steel. Practical advice. Modern boilers have high efficiency, which means that they produce maximum amount thermal energy to the coolant. As a result, the gas temperature is relatively low; in all modern boilers it does not exceed +400–500°C. The main problem for pipes is acids. |
| Pressed material is used as thermal insulation. mineral wool. The thickness of the thermal insulation is within 2–5 cm, the thicker it is, the lower the heating temperature external pipe. And this is of great importance when arranging passages through the wooden structures of the house. |


A wide variety of manufactured pipes and additional elements for them allows you to create chimneys of varying complexity. To increase traction, a deflector can be additionally mounted, fire safety provides a spark arrestor, the outlet hole is covered by a thermal fungus, etc.

Every additional element The device has its own purpose and performs a specific function, thereby increasing the reliability of using chimneys made from sandwich pipes.
The lining of the pipes on the roof is done using conical elements and aprons; they support the chimneys in a vertical position unloading platforms and metal brackets.

Various manufacturers may slightly expand or reduce the list of additional elements, change their appearance or design features, but these differences hardly change the installation technology.
For example, we will take the option of installing a chimney on the roof of a gazebo, the chimney is connected to a stationary barbecue. The technology for performing work on a residential building, gazebo, bathhouse or other outbuilding is no different. We specifically chose a gazebo; using this example, it is possible to talk about all the nuances of installation. You can skip some operations at home, it all depends on the specific architectural features buildings.
But they indicate only the minimum height, and there is also the concept of air flow speed. This parameter has a huge impact on the efficiency of boilers. If it is too big then thermal energy does not have time to be transferred to the heat exchanger, which significantly reduces the efficiency of the boiler. Another problem is that too strong a draft can completely extinguish the burners of gas boilers. Such unpleasant situations arise in large cottages, when the boiler is installed in the basement technical room or on the first floor, and the building itself has two or more floors.

In these cases, only a professional heating engineer can help; he will select the optimal chimney diameter depending on the specific conditions. The fact is that the parameters of SNiPs are outdated; they are used for brickwork, and there are completely different air flow resistance coefficients than ideal smooth pipes made of stainless steel.
Sandwich chimney prices
Step-by-step instructions for installing a chimney made of sandwich pipes
The gazebo does not have a ceiling, so we will not consider this operation. The installation is done in two stages: preparatory and installation. The roof of the gazebo is flat, covered with flexible tiles. The sheathing is continuous, made of moisture-resistant OSB.
Preparing for chimney installation
Our barbecue has two chimneys: one from the stove and the second directly from the canopy of the barbecue, it is technologically impossible to combine them into one, you will have to make two. Another problem is that the chimney from the stove is located exactly opposite the rafter, it needs to be sawed. To ensure that the roof structure does not lose its original stability, the sawn rafters should be connected with metal corners, and a circle should be welded in the middle. The diameter of the circle should be a few millimeters larger diameter external pipe sandwich chimney.

If such a problem arises during the installation of a chimney in a residential building, then rafter leg cutting is strictly prohibited. You should try to move the boiler a little. If for some reason this is not possible, then you will have to bend the chimney; special additional elements are sold for this.
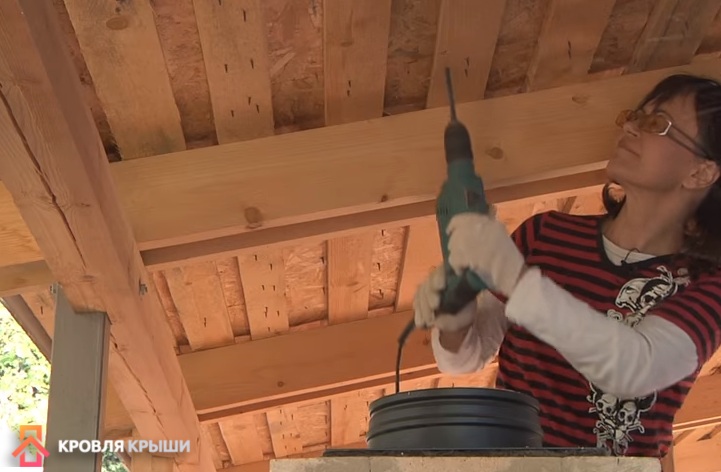
Step 1. Locate the center of the chimney on the roof. This will require a long building level or an ordinary plumb line. If it is not there, then tie a nut or bolt to a rope, this will be an elementary plumb line; the accuracy of such a tool is quite sufficient for the measurements being taken. Place a plumb line against the roof and move it until the weight is in the center of the chimney. You can control the position by eye. If in doubt, find the center of the chimney pipe by placing two sticks along the diameter at an angle of 90°. The point where the sticks intersect will be the center of the pipe. Draw a dot on the roof with a pencil.

Step 2. Drill at the marked location through hole, make sure that the drill does not move during operation. The hole will indicate on the roof the center of the location of the hole for the chimney pipe.
Step 3. Now you need to go to the roof of the building. Due to the fact that the soft tiles have already been laid, some of them will have to be dismantled. Using a thin metal putty knife, carefully lift the shingles soft tiles.

By the way, you will immediately see that the adhesive strength of the shingles is not as reliable as the manufacturers of mastics and bitumen shingles advertise.
Step 4. Lift the sheets of tiles a little and use a screwdriver to unscrew the screw.

If the tiles are fixed with nails, then pulling them out is much easier with a special nail puller. Remove the first shingle. Using the same procedure, remove all shingles from the area of the roof where the chimneys will exit.
On this preparatory work finished, you can begin to install the chimney pipe.
Installation of a chimney on the roof
Prices for popular models of screwdrivers
Screwdrivers
A few words need to be said about the fire distance between the pipe and wooden elements roofs. Nobody makes accurate calculations in each specific case; it is very difficult and time-consuming. Practitioners say that if the height of the attic space is at least 1.5 meters and it is unheated, then the sandwich chimney pipe does not need to be further insulated from the sheathing or rafters. The outer surfaces of the chimney never heat up more than two hundred degrees, and this temperature is safe for wood. But for insurance purposes and to avoid problems with firefighters, it is recommended to deviate from wooden structures at least 20 cm around the entire perimeter. This is not very difficult and will eliminate possible claims from the commission during the commissioning of the building.
Step 1. Open the packaging of the pass-through element. The passage element is made of polypropylene; modified heat-resistant rubber is used to seal the pipe.
Step 2. Cut a hole in the rubber to match the diameter of the pipe. It has concentric rings indicating the different diameters. Find the one you need and remove the extra part. You can cut with an ordinary sharp knife, try to make the cut as even as possible. If you have large scissors, that’s great; working with them is much easier and safer.


Step 3. There are circles on the walkway indicating the slope of the roof. This is done to ensure that the chimney pipe on any roof is strictly vertical. It is necessary to cut off the circle that corresponds to the angle of inclination of the roof slope. The penetration is made of polypropylene; it cannot be cut with ordinary scissors; you must use special ones for metal or pruning shears.

Cutting the penetration with pruning shears
Step 4. Locate the hole that was drilled from the inside of the gazebo, this hole indicates the location of the center of the chimney. Place the penetration on the continuous sheathing so that it is in the middle of the element. Draw a line with a pencil or felt-tip pen to create a circle for cutting. If you have several chimney outlets on your roof, then such actions must be done for each.
Step 5. Electric jigsaw cut out the hole. To do this, you should first drill holes for the nail file with a drill, and only then insert the tool into it and work. Be careful that the saw does not come into contact with metal hardware; they should be pulled out or bypassed.


Step 6. Attach the passage element and secure it to the plate with self-tapping screws. If you wish, then for peace of mind you can place the passage element on any sealant; the squeezed-out excess must be carefully removed with your finger.

Step 7 Reinstall the chimney. Individual pipes can be additionally tightened together with clamps.


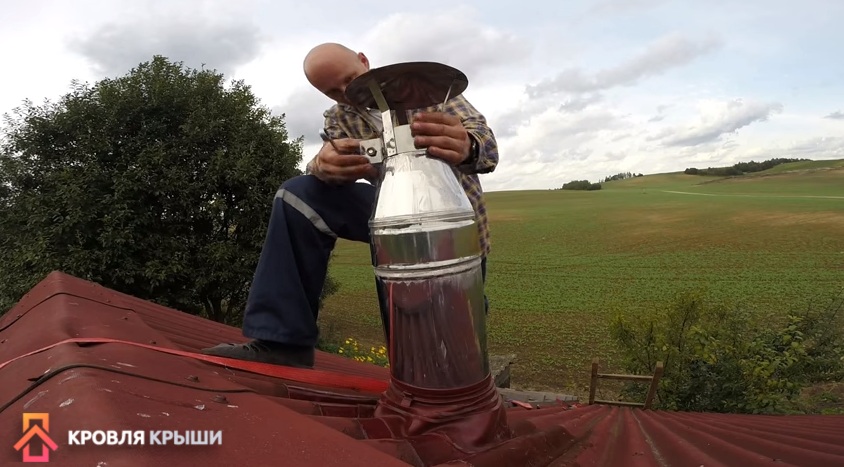
It is recommended that on soft, flammable roofs, be sure to cover the pipe with a tip with a spark arrestor. This is especially important for a wood-burning boiler. If the top has a deflector, great; with a side wind, the draft will increase, which eliminates the formation of reverse draft.


Step 8 Replace the rubber weather stripping to prevent rain from flowing through the pipes and under the roof. The casing has a special mark indicating in which position to put it on. The mark should face forward towards the roof ridge.
Step 9 Tighten the casing tightly to the pipe with a clamp, using sealant as desired.
At this point, the installation of the chimney is completed; the previously dismantled roof can be returned to its place.
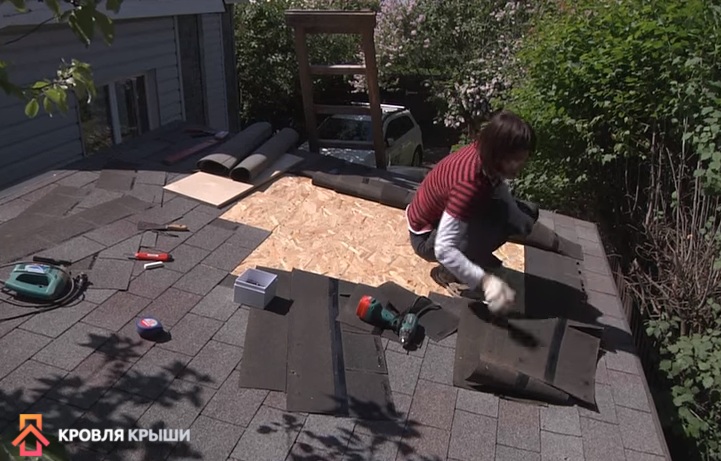
Step 1. Install the underlayment strips. It is pushed around the perimeter into a special slot in the passage element.

Step 2. Start putting the previously removed shingles back in place. flexible tiles. In places adjacent to the passage element, cut the tiles so that they overlap the contour of the element by 2–3 cm.
Laying soft tiles is done in the usual way using bitumen mastic for sealing joints.


Installing master flash
Prices for roofing master flash
This device has a perimeter edging made of aluminum sheet, the edging is hermetically sealed into a rubber gasket. Due to this technological features the element copies the profile with maximum accuracy roofing covering, the likelihood of leaks is minimized.

How to install Master Flash correctly?
Step 1. Coat the perimeter of the outer chimney pipe soap solution. This is done in order to tightly place the rubber apron on the chimney.

But this can only be done if the diameter of the hole on the apron is 2–3 cm smaller than the diameter of the pipe. If the parameters differ more, then you will have to cut the rubber a little. For this purpose, manufacturers made special rings on it indicating the diameters. There is no need to try to stretch the apron too much. Rubber can't long time be in such a tense state, over time it will definitely begin to tear. As a result, leaks will appear, and they will be so strong that to eliminate them you will have to completely change the master flush.
Step 2. Give aluminum the profile of the roof roof. You can do this with your hands, rubber mallet go with a mallet. Start bending from the middle, and then move symmetrically to the edges. If you do the opposite, the last waves will be stretched out, and you will have to start all over again.

Step 3. Apply silicone or other sealant to the area of the roof that is located under the master flush. Do not spare the material, especially carefully coat the upper part of the element and those places where water drains.

Practical advice. If the house is located in the southern regions of our country, and the penetration is black, then you need to use special sealants. The fact is that on bright sunny days the surface of the master flush heats up to a temperature exceeding +100°C, and ordinary sealants can withstand no more than +80°C.
The lower part of the element does not need to be coated with sealant; water will not flow upward. But for guarantee and personal peace of mind, it is recommended to apply a silent sealant.
Step 4. Screw the element to the roof. To do this, use special screws. Make sure that the sealant protrudes from under the aluminum plate along the entire perimeter. Screw the screws into the lower waves first, and only then into the upper ones. This fixation technology increases the tightness of the connection of elements.
Step 5. Gently remove any excess sealant with your finger. There is no need to leave it on a lot or spread it in a thin layer over a large surface of the roofing, this will not help increase the service life of the joint. The fact is that after 3-4 years, the smeared thin layer of sealant will definitely peel off from the roof, and water will begin to get into the gap. Ensures the tightness of the connection only the material that is located between aluminum plate and roof covering.
It is important to know that tightness does not depend on the thickness of the protruding material; durability is affected only by its quality and degree of adhesion. As for resistance to ultraviolet rays, these are non-critical indicators, the sealant is protected aluminum sheet. It is more important to look at frost resistance.
Step 6. Apply sealant around the perimeter of the pipe between the wall and the rubber cap.

Applying sealant between the wall and the rubber cap
Replace the pipe cap and tighten the clamp.
If all work is done correctly and used quality materials, then there will be no problems with the chimney for many years of operation.
Video – Flash Master. Installation
The chimney is one of the most important parts heating structures. Its correct functioning is the key to safety. Most of fires and poisoning by combustion products are associated precisely with errors in the selection of materials for the chimney and its installation. On this moment Sandwich pipes for chimneys are the most popular. They have good fire resistance and are quite easy to install. However, such a chimney also has a number of disadvantages.
Sandwich - this type of pipe received this name for its layering by analogy with the named product. The inner and outer layers of such pipes are represented by metal cylinders, and the middle one is a layer of thermal insulation.
Metal for chimneys began to be used quite a long time ago. A simple example is the pipe of an ordinary potbelly stove. However, soon after commissioning it became clear that metal pipes have a number of disadvantages. The problem was that metals, having good thermal conductivity, quickly heat up and transfer heat to environment, and there is always a danger of fire.
The solution turned out to be simple - the metal pipe was wrapped in a layer of thermal protective material. However, such material does not tolerate environmental conditions well and is not very attractive from an aesthetic point of view.
Sandwich pipes are the next solution in the evolution of metal chimneys. Another layer of thermal insulation is placed on top metal pipe, which protects the inner two layers from external influences and does not spoil the appearance of the building.
It is important! Sandwich pipes can be purchased ready-made, but you can make them yourself by selecting the materials with the required parameters. It is worth remembering that the inner pipe should be more expensive and better quality than the outer one, but smaller in diameter, and the thicker the thermal insulation layer is, the higher the combustion temperature of the fuel in the heating device.
The inner cylinder is made of stainless steel. This material is less susceptible to corrosion by combustion products. The steel must be high quality and high-tech. Preference is given to those options whose seams are welded using the TIG method - the most reliable and wear-resistant, but also the most expensive.
Heating devices are an essential element of every residential building. They are designed to provide a comfortable indoor temperature during cold seasons. In the regions of Russia, this period averages 6 months, in some places - up to 10 or more. Gaining additional comfort comes with a certain risk of fire.
For this reason, increased attention must be paid to chimneys that carry smoke and combustion products from heating devices outside the room. This article will look at how to remove a chimney through the roof safely and in accordance with all modern standards and regulations.
The chimney pipe is used in devices where heat is generated by burning various fuels. This fuel is wood, coal, gas or other flammable substances. The removal of combustion products through a pipe through the roof is regulated by the requirements of SNiP 41-01-2003. Some points are considered partially outdated, but most supervisory services rely on this document. Therefore, the requirements and standards contained in it are mandatory.
What can result from poor installation?
Often, the list of works of a stove maker or installer of a gas or electric heating boiler does not include work on installing a chimney. It is assumed that the passage of the chimney pipe through the roof is laid at the construction stage, or the homeowner will install the chimney on his own. The apparent simplicity of such work provokes owners to refuse to use professional roofers. They don’t think about what serious negative consequences a poor-quality chimney outlet to the roof can lead to. Frequently encountered problems:


Not only chimneys from stoves, fireplaces and other solid fuel devices are raised above the roof. The exhaust pipes from the gas heaters, as well as ventilation pipes. When installing them, exactly the same methods are used as for chimneys.
The height of the pipe and the location of its passage in the roof
A chimney on the roof can only be placed correctly if the outlet for the pipe through the roof is chosen correctly. This factor may affect the proper functioning of the heating system. To prevent installation errors, it is necessary to be guided by existing requirements fire safety, and building regulations and standards. Key points of arrangement:


The main problem with installing a pipe through the roof lies in the fact that when smoke or combustion products pass through, the temperature of the structure increases, and this can lead to a fire of the materials from which the roofing elements or rafter system.
Flexible passage for round chimney
Usually, in private residential construction one has to deal with the arrangement of smoke exhaust and ventilation pipes round section. How can you install a chimney through the roof elements to also ensure sealing of the passage? For this purpose, a special design is used - an elastic roof passage element. This product is made of special durable silicone or rubber. The shape resembles a funnel with wide brim round or square shape. These fields are called an apron. The elastic passage element, due to the flexibility of the material, can take any configuration. This allows it to be used on roofs with any slope angle and any final coatings. The material from which it is made must withstand the lowest and highest temperatures possible, and also be resistant to the external environment. Elastic penetrations are available in various colors and configurations.

When choosing which penetration to purchase, you need to focus on the diameter of the chimney and color finishing coating roofs. Universal products are produced, similar to a stepped pyramid, they are suitable for any pipe diameter. The size is adjusted using scissors, which are used to trim the penetration to the required level.
Installing an elastic apron on the roof is quite simple. To do this, you need to attach it to the chimney passage, press it on top with a metal circle in which there are holes for self-tapping screws, apply fire-resistant sealant to the place of contact with the roof and screw it in with a screwdriver or screwdriver.
For roofs with extremely steep angles, it is necessary to use a special type of penetration with a fixed mounting angle of the pressure flange.
Rigid metal feedthrough
For the installation of chimneys, you can use another type of passage products for pipes of a round configuration - a passage pipe made of metal. It is used in cases where it is necessary to arrange the passage of a chimney pipe through a roof without relief. Such finished goods made of galvanized or painted steel to a fixed roof slope angle.

To purchase, you need to measure this angle at your roof. The installation of such a product is carried out in the following order:

In some cases, it is recommended to use another method. Its essence is that it is necessary to remove the chimney pipe in the passage box in advance, cover it with a special insulating material, for example basalt wool, and after that the entire structure is laid in the roof.
Arrangement of rectangular chimneys
The chimney pipe of a stove or fireplace is usually made of brick and has a square or rectangular shape. In this case, a different method must be used to arrange the roof passage. When the chimney pipe masonry approaches the roof, you need to cut a hole in it of the calculated size with a tolerance of about 6 cm. Using it, the pipe will be brought out above the roof. Despite the fact that heat-resistant brick perfectly retains heat inside the chimney, the outside of this pipe must be lined with asbestos sheets. This measure will protect the rafters from exposure to high temperatures.
On the protruding part of a brick pipe metal profile The waterproofing is attached to an aluminum base, and its lower edge is secured to the roof using sealant. Next, the unsightly waterproofing of the chimney on the roof is covered with a special decorative apron. It consists of four parts and is mounted on the roof, making the transition aesthetic and protected from influences.

A properly arranged pipe outlet will not spoil appearance roof, will not allow moisture penetration and is completely safe according to fire safety requirements. The finishing of the chimney on the roof is carried out depending on the design of the roof and the desires of the homeowner.
Installing a chimney is quite a responsible and complex job. It is necessary to think through all stages of installation in advance and get advice from a specialist.

Sergey Novozhilov - expert on roofing materials with 9 years experience practical work in the field of engineering solutions in construction.