It may seem that handles are an insignificant element and are not even worth talking about. But designers have a completely different opinion on this matter. They argue that it is the small details that play a rather large role in the overall image - they give the furniture a finished look and emphasize the style. If the kitchen set as a whole is well preserved, has not cracked, but the handles have faded and peeled off, then the interior of the kitchen will look sloppy.
That is why urgently replace the old handles with new ones! Now you can find a huge variety various options: these are modern staples of various colors, wooden, or transparent plastic.

Want to brighten up your kitchen? Get colored pens, they will certainly bring a fresh touch to the interior of the room. Experiment not only with the material, but also with the shape. Now there is a huge selection of different pens for furniture facades, for example, in the form of animals or plants, from which your child will simply delight.

Range door handles so diverse that it can satisfy the needs of any, even the most demanding customer.

Going to the store for new fittings for kitchen cabinets, be sure to take as a sample old pen, otherwise you can make a mistake with the size, as a result, you will have to make new holes in the doors, and this is just a waste of time.

Decorative inserts
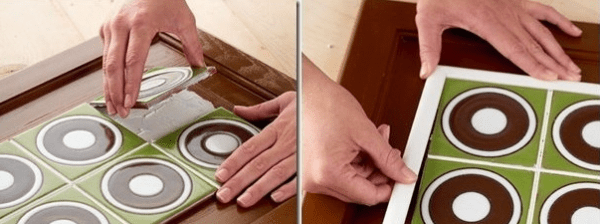
Another one interesting idea how to update a kitchen set with your own hands - a sticker on the facade of cabinets (including doors) decorative inserts. For this you can use the most different materials- the remains of ceramic tiles, for example.

This will require the following materials and tools:
- ceramic tiles (you can take leftovers for this purpose and even buy scrap at a bargain price);
- tile adhesive;
- overlay strips.
Special skills are not required. You should not abandon this method for the reason that you have never had to lay out a tile before. Believe me, everything is much easier than it seems. First you need to unscrew the doors of the cabinets, remove the fittings. Wash them thoroughly and let dry. It does not hurt to treat the pollution with some kind of alcohol-containing solution. If you want to radically update the facades, then it is worth pre-painting. Dilute the tile adhesive. Lubricate the surface of the facade. And start gluing the tiles according to a pre-created sketch.

To add aesthetics to the facade, make a frame of decorative or plastic strips around the tiled mosaic. Glue them also on glue, but pick up a universal one, one that fits both surfaces without any problems and leaves no marks.

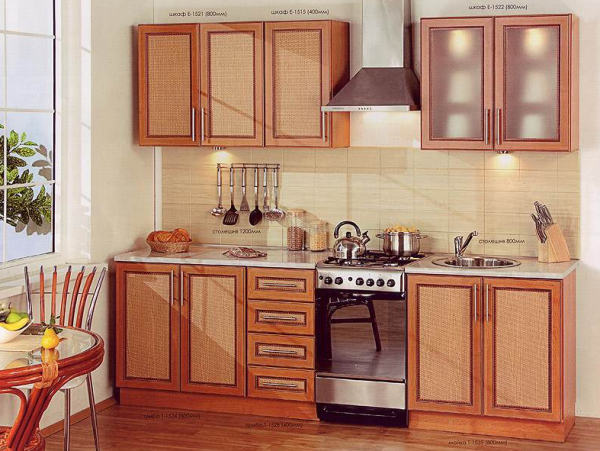
By the way, inserts can be not only ceramic, but also made of rattan fabric - they are most suitable for kitchens whose interior is designed for eco-style or for some kind of country style.
That's all - facade decoration at kitchen set completed. Home master it remains only to install them in their places and screw the unscrewed fittings.

Let there be color!
Colored boxes will instantly transform the interior of the kitchen space. Colored blotches, disproportionately located on the surface, are very fashionable now. If the kitchen is made of wood, just paint a few of the drawers in different colors. For example, if a white kitchen needs updating, then paint the drawers green or blue. Do not be afraid to create, there are no restrictions, it can be red or yellow, to your taste.

Although white is considered the color of purity and neatness, in general it is rather boring and monotonous. And it is the bright color blotches that can make the furniture colorful and cheerful. If the kitchen is made of plastic, then the boxes can be pasted over with colored self-adhesive film, which is sold both in construction markets and in stores. Remove boredom and despondency from the family hearth!

wooden decor
Wooden stickers on kitchen doors look original. You can buy them ready-made - kits for children's creativity. Can you cut? Amazing! Then make wooden blanks with your own hands! Cover them with varnish and glue to the doors.


What shape the sticker will be, it's up to you - small flowers or stars, geometric figures or fences glued across or along the door panels. If you have a child, invite him to participate in this interesting business, he will decorate kitchen furniture with great pleasure under your guidance.
Chintz accent
Chintz facades look non-trivial. In order to decorate the kitchen in this way, you will need a piece of chintz, which you can buy in a store or find in your closet, measure the doors of kitchen furniture, cut the fabric according to the measurements and stick it on the panel (be sure to remove the handles before this!).

After drying, paint over the chintz with a colorless varnish - this should be done five to seven times. Along the perimeter of the glued fabric, you can attach wooden slats that will complement the innovation and make the decoration more accurate. And if you manage to make a lampshade from the same fabric, sew chair covers, then you will get an unusually beautiful kitchen.

Decoupage
Decoupage is one of the most spectacular and cheap ways to update a kitchen set. The works of the masters turn out to be so interesting that even after looking not very high quality photos, is still breathtaking and I want to try with my own hands to transform beyond recognition the furniture in the kitchen that has become incredibly annoying.

To make such beauty, nothing expensive is required. All you need is an artistic flair, an understanding of how the transformed furniture will look after the decoupage work comes to an end.

What will be required:
- dye;
- large drawings of a kitchen theme (for example, fruits, beautiful jars of spices or cereals);
- acrylic lacquer;
- primer;
- craquelure varnish (provided that you want to achieve the effect of aging - as a result, the furniture will be covered with artistic cracks);
- PVA glue (or special decoupage);
- sandpaper;
- a set of brushes.
Again, you can not do without parsing the kitchen. Unscrew the panels, remove the fittings. Thoroughly wash the surface to be decoupage. If necessary, sand, remove bumps.
Carefully inspect the surface, if there are large cracks on it that spoil the appearance, then you will first have to putty them. After that, go through the panel sandpaper.
To make the surface look even and the applied decor then look natural, it is better not to be too lazy and primed.
If you plan to do decoupage on glass inserts, then you must definitely degrease the glass. Special detergents will help you deal with this.
Prepare the pattern you want to place on the furniture. Consider the surface area, the size of the pattern will depend on it. Do not paste too small images. But, of course, it all depends on the idea being implemented. It is better to use special three-layer napkins for decoupage. Which drawing to choose is up to you, but keep in mind that they should be good quality and approach the overall interior of the kitchen. If the main decor of the room is made in the Provence style, then pictures depicting lavender, olives, climbing roses will do.
By the way, you can print pictures for decoupage yourself if you have a laser printer available.
You can go the other way - decorate kitchen cabinets with pieces of wallpaper with a suitable pattern. Perhaps this is the easiest decor option.
If you decide to decorate an old set with wallpaper, then in this case standard decoupage glue or PVA will not work. In this case, the adhesive is selected from the type of wallpaper.

The final touch is to completely cover the entire part with acrylic varnish. This must be done 5-6 times.
It is necessary that each previous coat of varnish dry well.

We assemble the kitchen set and admire the transformation. Don't forget to take a photo and post it in social networks- so you will wait for your friends to visit faster, they will probably want to learn the secrets of updating kitchen furniture with their own hands and see how the set looks live.

Imitation of fabric on old kitchen furniture
There is another way to update a kitchen set - fabric imitation. If you do not want to mess with the real material, use this method. First you need to remove the doors from the hinges. Paint the front with white paint and let dry completely. Next, apply a thin layer of paint in any other color of your choice, but be careful not to White color did not shine through the new layer. If desired, you can leave a white border around the edges. Now start creating. Take a spatula with large teeth and draw straight lines from top to bottom. The result is smooth tracks. Move a little distance and look at the door - it seems that it is covered with a striped fabric. If you also draw horizontal lines, there will be a feeling that the fabric is in a cage. There is one important circumstance - be sure to make sure that the hand does not tremble, the lines are even. It is also impossible to tear off your hand when drawing lines, otherwise the tracks will look sloppy.

Self-adhesive film
One of the simplest and inexpensive ways update the kitchen set - paste over the facades and internal shelves with self-adhesive film. The assortment of this material in stores is impressive - you can easily pick up a vinyl film with the desired pattern. The image on the film imitates different surfaces: a natural stone, leather, wooden texture.

Self-adhesive film is ideal for the restoration of old kitchen furniture:
- It tolerates high humidity;
- Resistant to sudden temperature changes;
- Washes well;
- If necessary, it is easy to replace the damaged fragment.
Materials and tools:
- vinyl self-adhesive film with the desired pattern;
- accessories;
- roulette;
- marker knife / scissors;
- rubber roller;
- sponge.
Before starting restoration work to improve the appearance of kitchen furniture, it is necessary to completely free it from the contents, remove shelves, drawers, remove facades from hinges, and remove fittings.

Place the unscrewed fronts on a hard horizontal surface. Now take measurements - the height and width of the boxes, facades that you are going to paste over with self-adhesive film. Record this data.
Unscrew the handles, corners and other fittings, if any, on the facades.
Now arm yourself with sponges, detergents- Thoroughly wash the surface on which you plan to stick the self-adhesive. Make sure there is no residue left on the panels and shelves greasy spots. Be sure to dry the headset with a clean, soft, lint-free cloth.
Self-adhesive film is easy to work with, and even a novice furniture restorer can handle it without any problems. Please note that a paper centimeter grid is applied on the reverse side of the film. She will help you cut out the details. right size.
Do not forget to add 4-5 cm to the pattern in those places where the film will be bent. This margin is necessary in order for the film to stretch well. When you start cutting the film, control the location of the pattern, if it is there.
Cut out with a marker knife required amount parts according to predetermined dimensions (taking into account the margin for bending).
Start decorating the headset. Apply the film to the surface of the facade, carefully peel off the protective paper base, on which a centimeter layout is made. After the film has adhered evenly, pass over it with a rubber roller. Make sure that the self-adhesive film lies evenly, there are no air bubbles under it.

In such a simple way, paste over all the facades, shelves, drawers. Replace hardware if necessary. Screw the fronts into place.
Now enjoy your work! The set has changed, will last a few more years or until you want to radically replace all the furniture in the kitchen. In the meantime, get ready to listen to compliments from friends who have come to the light that they were able to transform their old headset so cheaply beyond recognition.

Facade replacement
There is another cardinal way to update the kitchen set - a complete replacement of doors. But we must say right away that this method cannot be classified as economical. Having made measurements of old doors, you can order new ones, at your discretion, both in color and in material.

You can varnish or paint new doors. And do not be upset that, apart from the doors, everything remains old, no one, believe me, will notice this. And if the base of the kitchen is in good condition, then it will be able to please you for many more years. There are many more important detail– you did not overpay for the upgrade, because almost all wooden kitchens they are basically made of chipboard, and they only have front panels made of wood. Think for yourself why you need new costs when the “skeleton” of furniture is already good. If the shelves over the past years have become so dirty that it is almost impossible to wipe them off, paste over the surface with self-adhesive wood-like film - inexpensive and beautiful!

Glass replacement
If your kitchen cabinets have glass doors and shelves, replace them with new, more modern ones. Now at the peak of popularity frosted and colored glass. The updated facade of kitchen furniture, as well as new shelves - and we can assume that you have fashionable furniture in your kitchen.

It is best to order glass in a store, but if you do not have the means, you can use the method that our grandfathers invented - apply a mixture of powdered chalk with silicate glue with a brush on the glass in two layers.

You can put beautiful bright dishes on the shelves, which will give the kitchen a “cheerful mood”, and under the shelves you can make a backlight. The result is a kitchen set that will not yield to expensive Italian furniture.
Moidodyr
If our advice and examples with photos did not convince you to update the old kitchen set, then try to at least just wash it thoroughly. Over the years, a huge amount of soot and grease eats into the surface of the furniture, and with high-quality cleaning, it can even change color. Furniture that is finished with plastic and enameled is easily cleaned with ordinary washing powder at the rate of one tablespoon per liter of water. Wash the surface of enameled furniture with water above fifty degrees using soda or laundry soap, not worth it. These funds lead to tarnishing of the enamel. It is enough to wipe the wood with a well-wrung out cloth, and then dry the surface of the furniture with a linen napkin.
If there are many small cracks and scratches on the surface of the furniture, purchase from the store special remedy which masks them. In case your table top has a stain from a hot pot once placed, you can easily wipe it off with a mixture of alcohol and vegetable oil.
Metal parts of the kitchen that have darkened or faded from time to time can be updated with a self-prepared tool - ammonia(30 g), chalk or tooth powder (15 g) and water (50 g). All this mixture must be shaken well, and then applied with a flannel napkin to the darkened surface and rub it to a shine. After such processing, furniture handles will be better than new ones.
In a word, choose the method that you like and go! Everything that you do for the sake of your favorite cuisine, she, believe me, will appreciate it and will delight you with its new look for a long time to come. We will be glad to see in the photo how the furniture has changed, thanks to our advice and your skillful hands.
Over time, all elements of furniture, unfortunately, lose their visual appeal or simply become unusable. There is an urgent need to update the situation. New furniture today is worth a lot of money, and budget options they just look terrible. Many people have a question about how to update a kitchen set without any special financial costs.
In fact, this is not at all difficult, since the modern market offers a huge list of various finishing materials. Any designer who knows at least a little about furniture will advise updating the countertop, buying new facades, repainting the old ones in a different color, or using a special self-adhesive film for finishing. Using the simplest tools at hand, everyone can visually transform their kitchen furniture.
Read this article:
One of the easiest ways to update a kitchen set is to stick a film on the facades. At the same time, everyone has the choice of a variety of textures that mimic the appearance of almost all types of finishing materials. Such a film does not allow moisture to pass through and has a very impressive heat resistance index. When finishing, you will have to be patient and show maximum care so as not to spoil the appearance of the updated kitchen facade.

Necessary materials:
- Roulette;
- Knife for cutting cardboard;
- Ruler;
- plastic scraper;
- The film itself.
First, you need to specify the dimensions of the updated surfaces. To make pasting more convenient, it is recommended to first dismantle each facade and remove all fittings. Each surface must be thoroughly cleaned of accumulated dust and dirt.
On the reverse side of the self-adhesive film there is a special grid, thanks to which the upcoming cutting will not be so difficult. It is necessary to make marks corresponding to the dimensions of each facade. It is recommended to leave a margin, even if the accuracy of each measurement taken has been verified. If a film with repeating patterns is selected, it is necessary to monitor the accuracy of their location before starting cutting. After that, the material can be cut along the ruler with an ordinary knife for cutting cardboard.
Several centimeters protective coating removed and the film is glued to the surface of the facade. After that, it is necessary to remove all irregularities on the surface and the resulting air bubbles with a plastic scraper. A plain surface will not hide a single flaw, so special care is needed. The remaining air bubbles can be pierced with a needle or cut with a sharp knife. The self-adhesive film will adhere properly only after 2-3 hours. Therefore, you do not need to panic if the material could not be evenly applied to the facade the first time.
Facade replacement
Replacing facades is one of the easiest and most expensive ways to update a kitchen set. Therefore, the design must be chosen in accordance with their financial capabilities. When a mass-produced set is installed in the kitchen, which is still in demand, choosing the right facade will be very simple. If installed model long outdated and out of fashion, you will have to make an individual order. It is possible to choose suitable material and design changes.

The cheapest option is MDF facade boards covered with a plain PVC film. One of the best options is paint coating. This method of finishing MDF facades is more expensive, but the surface looks better and the choice of colors is much wider. The most expensive option is to buy solid wood facades. Many companies are engaged in the production of such products, so there should be no problems with the choice.

Installation of new facades begins with the dismantling of old ones. After that, the response mechanisms of the loops are twisted from the body and new fittings are installed. Installation of facades is not difficult. Any person who has dealt with repair work will easily be able to figure it out.
Molding and painting
Another way to update an old kitchen set is to paint the facades. Outdated furniture can be easily and quickly transformed into new stylish product. Molding is a set of original decorative elements used in the visual finishing of a variety of surfaces.
To finish the facades you will need:
- Marker;
- Joiner's glue;
- Semicircular molding;
- Self-tapping screws, hinges, handles for facades;
- Trimming saw;
- Dye;
- Spray.
Before dismantling the facades, it is necessary to make appropriate marks on them so as not to confuse the attachment points to the body when the restored products are being installed. The doors are removed, the drawers are pulled out, all the hinges and handles are twisted. After that, each surface is wiped with a damp cloth from dust and dirt. Painting work is recommended to be carried out outdoors, making sure that foreign objects or materials do not get on the surface of the facades. Working surface wrapped with a film, and only after that the door rests on it.

The decorative molding is cut into parts of suitable length and sawn on each side at an angle of 45 °. All planks are glued in the form of a frame in the center of the facade using wood glue.
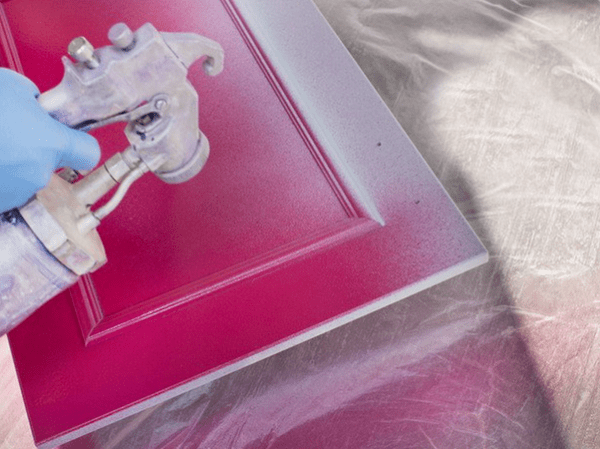
Before updating old kitchen furniture, the spray gun is filled with a special primer, which must be applied from a distance of 15-20 cm. When the mixture is completely dry, deck paint is poured into the spray gun. When processing, you can use stencils. After the paint has dried, the facades can be hung in place in accordance with the previously made marks.
Rearrangement of sections
Many are wondering how to update a kitchen set with their own hands without any financial outlay? Rearranging sections is a fairly effective way. The visual design of the interior of the room will change, and the wallet will not be empty.

But this method can be used in a kitchen with a large number of sections, since the sink and hob must remain in place. With a small number of facades in the kitchen set, there is nothing special to move, the feeling of novelty after such a rearrangement can be very doubtful. It is also recommended to pick up some element for decoration. kitchen interior from items in another room. In enough spacious kitchen can accommodate a small sofa, coffee table or some shelving.
Textile update
To change the image of any room, it is enough to hang textile elements in the form of small curtains in several places. Usually in the kitchen, such materials are little used, so there is a real opportunity to give the room a special touch. A curtain instead of a facade can be hung on any locker, but you need to use a similar decorative element where it is convenient.
Glass facades
Not the cheapest, but very effective way to change your kitchen beyond recognition. You can choose the appropriate type of aluminum frame. Then order the visual design to taste. The most expensive type of glass finish will be equal in cost to painted MDF facades. A mirror can be inserted into the frame, on which the pattern is engraved by sandblasting. Many order photo printing from the back of the glass. In this way, you can print any image, such as family photos. Glass painting is also very popular, but this option in the kitchen may not look the best. Typically, this type of facade is installed on wardrobes.

open shelves
There is another recommendation on how to update an outdated kitchen set without financial costs with your own hands. More lightness and a sense of spaciousness will give each kitchen open shelves in the upper sections. With such a design decision, it is important to pay attention to what items are placed on these shelves. Transparent jars with bright contents, beautiful flowers, dishes are perfect for staying in sight all the time.

Various ways to change colors
Some of the kitchen cabinets sometimes wear out the old paint. Many designers purposefully achieve this aged vintage effect. If white sections of the kitchen unit are installed, you can choose some suitable new shade for painting the wall. Modern Orange color, for example, will help to achieve a radical transformation of any kitchen.
Buying a kitchen set is not always advisable due to financial costs. For any person who owns minimal skills repair work, the problem is how to update facades old kitchen with your own hands, will not arise. This will allow not only to save on the work of the masters, but also to create your own personal design, which will decorate your house or apartment. To do this, you should know several methods for transforming an old kitchen and choose the most practical among them. 
Similar articles:
If the kitchen set itself is durable, but there are significant deformations or chips on the outside, you can change the doors and countertop, leaving the "skeleton" of the kitchen unchanged. When ordering new facades, it is possible to change the style of the entire kitchen: classic rectangular doors to smooth shapes protruding along the edges, which will give the room exclusivity and chic. To correctly place an order, you should measure the facades, sides and drawers. This is done with a ruler and a centimeter, laying the elements in a horizontal position.
But the disadvantage of this method is its cost. It is necessary not only to pay for the production of new facades, but also to buy the appropriate Consumables. You will also have to drill holes for the hinges yourself. A 35 mm drill bit is used to screw in the screws.
Use of decorative inserts
If it was decided to paint the doors or even completely replace them, decorative patch inserts made of wallpaper, self-adhesive film, ceramic tiles and rattan will help to give individuality to the decor. As with gluing and painting, the canvas is laid horizontally and any surface contaminants are removed.
It should be noted that ceramics are fixed to the facade with tile adhesive, and not with paper-based materials.
A feature of the installation of rattan is that it must first be wetted, then cut and fixed on the facade of the door with framing wooden or plastic planks. Planks that will fix the rattan should be prepared in advance. Attention is paid to the edges, they need to be cut at an angle of 45 °. For work, you will need furniture nails without hats, a hammer and acrylic varnish. Rattan looks beautiful if it is placed not across the entire width, but only in the center of the door facade.
Self-adhesive film as a budget kitchen makeover
- a simple and economical option. For this you will need:
- the film itself;
- centimeter and ruler;
- pointed scissors and a construction knife;
- plastic scraper for smoothing the film.
The doors should be freed from fittings. They take measurements and make marks on the centimeter grid on the back of the self-adhesive film. The required size is carefully cut out with a gap of 2 cm. It is necessary to start gluing from the center, gradually applying 5-10 mm to the edges of the facade surface. If it was not possible to level the formation of irregularities, the folds are cut, and the air bulges are pierced with a needle.
How to update the wooden parts of the kitchen
For decoration various surfaces varnishes can be used. This is an easy upgrade method. small parts. From expensive look wood kitchen facades are expensive, but they will also wear out. You can touch up, but this will significantly change the appearance, especially if it is oak, and not cheap pine material.
To do this, remove the selected parts by unscrewing the screws with a screwdriver, but they must be marked. Update doors or individual elements The kitchen set will succeed with the help of inserts, if they do not violate the overall design composition. You need to use the decor thoughtfully so that it is not clumsy.
Moldings, fittings and other decorations for the kitchen facade
Moldings and paint can significantly change the style of a kitchen set. To do this, use all the tools, as when painting the facade. Moldings are cut with a miter saw to the required length. At the same time, the edges of the planks can either touch or be of different abstract lengths on each door. To fix it, you need wood glue. Then the surface is primed and painted. For both cases, a spray gun is used.
Decoupage has become a popular method of upgrading the kitchen. A drawing, ornament or picture is placed on the facade, fixing it with varnish.
Thanks to the decoupage technique, you can decorate walls, tiles near the sink, and other surfaces in the kitchen to make the decor whole and complete.
What do you do with old furniture?
For those who want to update their kitchen furniture with least cost family budget, great solution there will be a replacement or restoration of the doors of the cabinets of the old headset. There are following ways to update kitchen facades:
- pasting with self-adhesive film or photo wallpaper on a laminated basis;
- painting;
- molding decoration, ceramic tiles or rattan inserts;
- varnishing;
- replacement.
Pasting of facades
The simplest and most economical, in terms of time, money and effort, way to update the kitchen is pasting the facades with self-adhesive film or photo wallpaper. By using vinyl film, with imitation natural wood, stone, ceramic tiles, marble or using wallpaper, with various images appropriate for the kitchen, you can achieve an excellent result.
In order to update kitchen furniture, they use: self-adhesive film, knife, scissors, ruler, centimeter, plastic scraper, fittings (handles and hinges), tape measure, square, rubber roller, sponge.

Work order
Step 1. Measure and dismantle facades.
Step 2. Remove handles and fittings (hinges).
Step 3. Remove all types of dirt from the parts to be restored, especially grease stains.
Advice ! Irregularities and cracks can be eliminated with fine sandpaper and filled with putty or filler primer.
Step 4. Cut the film. On its reverse side there is a centimeter grid, which allows you to accurately mark the fragments corresponding to the dimensions of the restored facades. It is necessary to leave a margin of 2 cm for bending. If there is a pattern, it is important to observe the symmetry and coincidence of the pattern on adjacent elements of the headset.
Step 5. Glue the film fragments to the facades. To do this, approximately 2 cm of protective paper is separated from the film. Then the adhesive side of the piece is applied to the surface and glued. With a scraper, you need to carefully level the glued part, “driving out” all air bubbles. Further, glue the film not completely, but in parts, 5 cm each, each time carefully smoothing the glued part from the center to the edges.
Advice ! If small air bubbles have formed, they can be removed with a needle, larger bubbles are removed with a knife.
Step 6. Install the restored parts in place. If necessary, you can change the handles, which will also “refresh” the headset.
In exactly the same way, kitchen facades are pasted over with photo wallpapers.

Facade painting
To update the kitchen set, they use: a primer, brushes, paint, an airbrush, a screwdriver, a plastic film.
Painting procedure
- Dismantle facades.
- Remove handles and fittings.
- Prepare surfaces for painting - thoroughly wipe and degrease.
- Lay the floor polyethylene film. Lay the parts to be painted on the floor.
Important! The room in which the work is carried out must be perfectly ventilated.
- Apply primer to parts. Wait until dry.
- Using brushes or an airbrush, apply paint in several layers to the surface of the parts. Wait for complete drying.
- Put the fronts in place.
- Screw on the handles.
Decorating facades with moldings and ceramic tile inserts
This method of restoration involves the decoration of facades with decorative details. You can use ceramic wall tiles or molding separately, or complement the tile pattern with molding.
For decoration, you should use: glue for wood, silicone sealant or cement glue, decorative elements(molding, tiles), miter saw, airbrush, glossy deck paint, drill, furniture fittings, screwdriver, marker.
The procedure for updating the kitchen set with overlays
Step 1. Number the parts and headset cabinets, remove them, thoroughly clean them with a damp cloth from all dirt, wipe dry. Remove handles and fasteners.
Step 2. Prepare the room. If possible, work with paint coatings is best done in the air. If the restoration of the kitchen has to be carried out indoors, it is necessary to ensure good ventilation. Cover the floor with foil.
Step 3. Mark the location of the decorative overlays.
Step 4. Prepare lining or tiles. Molding cut into pieces with a miter saw desired length, sawing the joints at an angle of 45 degrees.
Step 5. Glue the tile or molding according to the markup.
Step 6. Coat the surfaces with a primer using a spray gun.
Attention ! The primer is applied from a distance of 15-20 cm and dries for approximately one hour.
Step 7 Apply deck paint. You can use various stencils to create an original drawing. To achieve the perfect result, apply another coat of paint.
Step 8. Install the handles and the restored facades themselves.
Facade decoration with rattan inserts
To update the kitchen with rattan inserts, the following materials are used: rattan cloth, wood lining, brushes, scissors, furniture nails, varnish, sandpaper, a hammer.
The procedure for updating the kitchen set
Step 1. Measure the height and width of the facades. Based on the results of the measurement, purchase a rattan fabric in a roll.
Step 2. Soak the canvas for about half an hour. This is necessary so that after drying the canvas stretches well on the surfaces of cabinet doors.
Step 3. Match the color of the decorative wooden lining to the rattan fabric. If you could not find the perfect shade of wood, you can achieve the desired result by applying acrylic lacquer. Lacquer applied in 4 layers, allowing to dry and sanding with sandpaper. The edges of the fragments of wooden planks need to be cut down at an angle of 45 degrees.
Step 4. Spread the rattan cloth on the floor covered with polyethylene film.
Step 5. Mark the details of the desired size on the canvas. Cut with scissors. If desired, the entire facade can be covered with a canvas.
Step 6. Attach the details of the canvas to the doors with a stapler, making sure that the staples are at the edges. In this case, they will be closed with wooden linings.
Step 7 Sand the edges with sandpaper. Cover with acrylic varnish.
Step 8. Nail the wooden planks with furniture nails so that they hide the brackets that attach the rattan inserts.
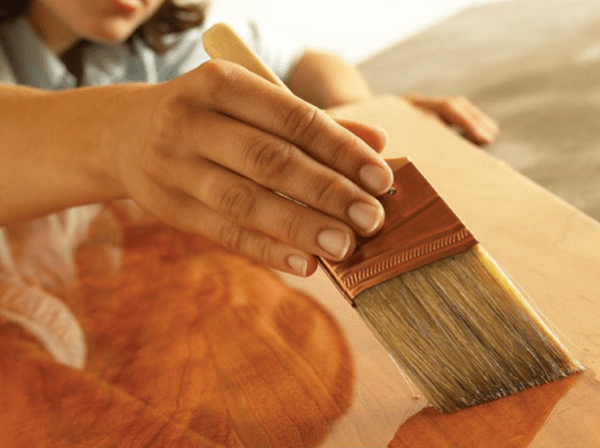
Lacquering of wooden facades
Another budget way to restore the kitchen is varnishing. wooden surfaces. For the procedure for updating a kitchen set using varnishing, they use: varnish, brush, sandpaper, primer, sponge.
Procedure for varnishing
Step 1. Dismantle the facades and take them outside.
Attention ! Due to the high toxicity of varnishes, such work must be done outdoors.
Step 2. Carefully remove old varnish or paint from the parts being restored with sandpaper.
Step 3. Rinse the cleaned surfaces with a damp sponge and allow to dry.
Step 4. Apply a primer. Also leave for a while until completely dry.
Step 5. Apply varnish in several layers.
Step 6. After the varnish has dried, return all the restored parts to their places.
Facade replacement
The most radical, but at the same time the most costly way to update a kitchen set is the complete replacement of all doors with new ones. Savings in this case will be no more than 50% of the cost new kitchen, if we take into account the costs of measuring, dismantling old facades, delivery and installation of new ones.
Facades are delivered to the buyer without holes for handles and hinges. You can drill holes yourself or contact specialists from furniture showroom who will do the work for a fee.
Facade replacement process
- Dismantle old facades.
- Get accurate measurements.
- Buy or order new ones.
- Drill holes for handles and hinges.
- Screw on the loops.
- Install the facades in place of the dismantled ones.
- Screw on the handles.
- Delete protective film, if available (usually on plastic or enamel coated parts).
- If the purchased facades are made of acrylic plastic, treat with a special composition (to be ordered together with the facades).

Conclusion
In order to determine the most suitable way renovation of kitchen furniture, it is necessary, first of all, to take into account the availability of free time and the possibilities of the family budget.
How to paste over kitchen furniture with self-adhesive film can be found in more detail from the following video
Changes in the house are always for the better. Especially if it happens in the kitchen. It is so nice to cook breakfasts, lunches and dinners in a comfortable kitchen. But how, without spending a lot of money on this?
We will give a few useful tips how to update the interior of your space without repair.
So, how can you transform the kitchen without ruining the family budget?
Old facades of kitchen furniture can be repainted in any color. If you want to get matte facades, use furniture paint, and if varnished, use car enamel in spray cans. Old facades can also be pasted over with self-adhesive film, especially since the choice of such films is now huge. You can stick a decorative profile on old facades, including if you like this style. You can add to the new decor and new fittings, for example, replace the handles.
Old facades can also be pasted over with a self-adhesive film. Photo: thinkstockphotos.com The original design move is the contrast of the facades. Do not make all facades the same color. For example, you can recolor a part to Blue colour and some are white. You can remove one or two small wall cabinets and replace them hanging shelves. Paint the shelves in the color of the furniture or in contrast with it. If you have cabinets with glass, glue with inside Velcro doors. Then you can attach rectangles of beautiful fabric, also providing them with Velcro. And you will have bright inserts. Finally, old facades can be additionally “aged” and then decorated.

You can repaint some of the cabinets in white. Photo: thinkstockphotos.com
An old countertop can be laid out with ceramic tiles, and it will simply not be recognized. You can repaint the old countertop, and attach it on top strained glass. And finally, you can replace it with a modern countertop made of composite materials. However, we must remember that the countertop should always be in harmony with the furniture, in uniform style. A change in one entails a change in the other.
The old countertop can be decorated with a special film. Photo: thinkstockphotos.com Kitchen "apron", of course, is difficult to change. Well, it is not necessary. To update it, it is enough to close it with something. For example, you can make a plexiglass overlay panel decorated with reverse side self-adhesive film. You can build a two-layer Plexiglas panel, between the layers of which there are herbs, painted feathers, etc. This option is suitable if your “apron” is very light and will not distort the color of the panel filling. If the "apron" is without a pattern, individual tiles can be repainted in the desired color with paints for ceramics.
On sale there is a novelty - a self-adhesive mosaic. Some tiles can be pasted over with such a mosaic. And there is also slate paint in various colors. By painting several tiles with it, you can turn part of the “apron” into a chalkboard.
Railing can help change the kitchen "apron". In this case, you need to hang on it not only the “technical” items you need in the kitchen, but choose the most decorative of them: bright mugs, hot coasters, cutlery with painted handles, pots with herbs. In addition to railing, some tiles can be equipped with separate self-adhesive hooks and beautiful accessories can also be hung.
If you don’t have a certain style in your kitchen, try to create it. This will immediately create the impression of a new kitchen. For example, to repaint the facades in blue and white colors or hang wooden ones, cover the countertop with colorful blue and white tiles, place wicker baskets and galvanized pots of herbs on it, lay a white tablecloth on the table. Hang tulle curtains in combination with wooden blinds.

Equip the kitchen in such a way that it is pleasant and fun for you to be there. Photo: thinkstockphotos.com Appearance windows can change new curtains. In the kitchen it is better to use. It happens that a new bright curtain completely transforms the kitchen. But, of course, it needs to be supported with appropriate dishes, tablecloths, and accessories. You can sew a composite curtain from individual lambrequins, it will turn out very stylish. Or you can duplicate an existing homemade roller blind " curtain-rain” made of felt flowers on ribbons. The cornice can be decorated with a large beautiful tree branch if you like eco style.

In the kitchen it is better to use short roller blinds. Photo: thinkstockphotos.com The appearance of the table, and this is an important detail of the kitchen furnishing, will completely change the new tablecloth. Sometimes you can decorate an old one too - for example, it is easy to transform a white tablecloth by printing pictures on it with halves of vegetables and fruits cut lengthwise with paint applied to them. A bright panel will complete the transformation of your kitchen. It can be a wallpaper collage, a large painted dish or an appliqué on burlap - the main thing is that the panel matches the style of your new kitchen.


