After acquiring a private house, first of all, you should think about a bathroom on the street, even if there is one in the house itself. outdoor toilet- This is a very profitable building in the warm season. At the same time, when working in the garden, you do not need to go into the house in dirty clothes. It is built quite quickly and the construction will cost quite inexpensively. Walls can be built from various materials: boards, slate, brick, cinder block, etc., but do not forget about external beauty bathroom.
We bring to your attention the option of building an outdoor bathroom from cinder block.
Necessary materials
1. Red brick (depending on the size of the cesspool).
2. Old boards.
3. Fittings.
4. Sand, crushed stone, cement.
5. Hatch for a cesspool.
6. concrete blocks(12 cm thick).
7. Frame for doorway.
8. Window frame.
9. Door.
10. Window.
11. Plastic (for interior decoration).
12. Tiles (for interior decoration).
13. Toilet bowl with a cistern.
14. Decorative mesh (for vent).
15. Decorative rock.
16. Slate or other roofing material.
17. Decorative stone for exterior finish walls.
To begin with, it is worth deciding on the place of the future bathroom. It must be removed from the recreation area, but the path to it should not be difficult.
It is necessary to dig a hole 2x2.5 with a depth of 1.5 m.

The bottom is not concreted, and the walls are laid out of red brick. Why from red? Because it is more resistant to moisture. At the same time, do not forget about the gaps between the bricks, which should be quite a lot. They are needed so that moisture goes into the ground.
Along the upper perimeter of the walls of the pit, formwork should be laid and a hole of 150 mm should be left for mounting the drain. At the back of the pit, provide a hole with a diameter of 50 cm for the hatch.
Reinforcement, old boards should be laid on the formwork and poured with pre-prepared cement mortar(cement, sand, gravel and water). This is the future floor of the summer bathroom. For reliability, it should be 10 cm high.
The floor freezes for several days. If the weather is hot, then to prevent cracks, it should be watered periodically.

Then the concrete block walls are laid out, but first you need to install and secure the frame for the doorway. If desired, you can also consider a window.
On top of the walls, it is necessary to install logs and formwork for the future ceiling with a slope to drain water.
Pour the ceiling with cement mortar and, after complete hardening, cover with any roofing material at your discretion.

A door is hung and a window is installed.

Begins interior decoration. The walls and floor can be tiled, and the ceiling can be sewn up with plastic.

A toilet with a cistern is installed. An outlet should be made in the wall and covered with a decorative mesh.
Then water and light are supplied. plastic or metal-plastic pipes for water, it is necessary to lay through the air in order to drain water for the winter period.

An exhaust pipe is installed from the cesspool so that unpleasant odors do not get into the bathroom.
It is necessary to install a sewer hatch.
Foam concrete is an excellent heat and sound insulating material, blocks made of it are light, malleable in processing, and easy to install. Internal partitions in the house can be built from blocks with your own hands without much effort and financial costs.
A bathroom and a toilet made of foam blocks will be no worse than a cast sanitary cabin made of asbestos cement, brick or drywall partitions, but the performance of the premises in terms of sound insulation will far exceed that of other materials.
In the article we will talk about the brands of foam blocks for internal works, about the technology of erecting partitions and ways to protect the walls in the bathroom from moisture.
Advantages of foam concrete blocks
You can build partitions in the house (see), separate the bathroom from the living area, and properly organize the space in the apartment using various materials. But foam blocks are in special demand, thanks to their unique technical and operational properties(cm. ).

What attracts builders so much in this material:
- light weight in comparison with other materials does not high pressure on the cover.
- The dimensions of the blocks can significantly reduce the time of the construction process.
- Due to the ease of processing foam concrete, it becomes possible to perform architectural forms of various configurations (niches, arches, etc.).
- Partitions from foam concrete easily give in to redevelopment.
- High soundproof qualities.
- Complete fire safety.
- Affordable price.
The disadvantages include:
- High moisture absorption of the material, in connection with this, a number of measures will have to be taken in the bathroom to protect the walls from moisture.
- Due to the porosity and softness, the foam blocks have some load restrictions, that is, it is rather problematic to hang heavy cabinets on the walls. But this issue is easily solved using a special one.
How to choose the right material
In order for the laying of the foam block in the apartment to be of high quality, even and reliable, you need to choose the appropriate material.
For partitions, blocks of the following sizes are used (length x height x width):
- 600 x 300 x 150 mm.
- 600 x 300 x 100 mm.
- 600 x 200 x 75 mm.
- 600 x 200 x 50 mm.
Since the partition for the bathroom is self-supporting, that is, it is not subjected to any loads from above (ceiling, roofing, etc.) and holds only its own pressure, foam concrete of the D400-D500 grade with strength class B2.5 is usually used for such structures.
Important! The thickness of the blocks is taken equal to or greater than the width door frame, later it will be easier to get door slope than to think about how to ennoble the jamb protruding from the wall.
It is believed that for internal partitions the best value for money is a block with a thickness of 100 mm, this will be enough to ensure that the noise of the washing machine in the bathroom or the sound of pouring water does not come from the room. A 75 mm thick partition can be laid between the bathroom and the toilet.

The foam block must meet the following characteristics:
- Accurate geometric and linear dimensions.
- Homogeneous surface without dark spots, various inclusions and so on.
- No cracks or chips, dents or bumps.
- Light gray color, partial or complete change of which indicates violations in the technological process.
It must be remembered that the smoother the surface and the more accurate the dimensions, the easier it will be to finish the walls (see), so high-quality blocks should be selected.
Glue for foam blocks
Since the amount of work is not large, it will be better if the laying of foam blocks in the apartment is not carried out on cement-sand mortar, and on special adhesive mixtures (see), which include:
- Cement.
- Fine sand.
- A modifier that keeps the mixture from premature cracking.
- A plasticizer that penetrates deep into the pores of foam concrete and ensures reliable adhesion of the blocks to each other.

The composition of the mixtures is similar to the structure of foam concrete, and after the adhesive has completely set, the wall acquires strength and solidity.
The seam between the blocks is made up to 3 mm thick, no more, therefore, per 1 m2 of masonry, depending on the brand of mixture used, the glue consumption will be approximately from 2 to 6 kg, which is 4–6 times less than when using a cement-sand mortar.
Important! When mixing the adhesive, the instructions for preparation must be strictly observed, otherwise the adhesive properties of the solution will be violated, which can lead to a weakening of the strength of the partition.
The main points of the technology of laying partitions
Before starting work, it is necessary to mark the location of the partition on the floor and wall, then, for laying the first row, install beacons along the marking to prevent the blocks from shifting during work.
Can be used as guides metallic profile for drywall:

- First row of blocks.
If the wall is placed on a cement base, then it is enough to cover it with a primer and lay a layer of mortar under the blocks, when the floor is wooden, then it is recommended to screw in anchors or pins to firmly fix the first row. It must be remembered that how accurately the first row lies, the partition will look so even and aesthetically pleasing.
- subsequent rows.
Since the thickness of the partition is relatively small, the foam block masonry in the bathroom every 2-3 rows should be reinforced with masonry mesh or separate rods (see), the ends of which should be drilled into bearing wall not less than 100 mm. In addition, fixing the reinforcement will bind existing wall and a new partition into a single structure and eliminate the risk of reeling, shifting or, in the worst case, collapse of the partition due to possible mechanical impact.
The doorway is also blocked with two reinforcement rods or a corner, on which blocks are then laid. If possible, you can use a standard jumper.

- The last row.
If a small gap remains when laying the masonry to the ceiling, then it is monolithic mounting foam.
- The junction of two partitions.
If a separate bathroom is planned, then the partition separating the bathroom and toilet is also reinforced and the ends of the rods are laid between the blocks of the first partition and drilled into the load-bearing wall, thus creating a reliable bond.
It's all about technological process partition walls. But there are a few subtleties that you need to know when working with foam concrete:
- The laying of foam blocks in the bathroom should be carried out with mandatory dressing of the seams, that is, the seams of each subsequent row should not coincide with the underlying ones, the shift is made by about half a block.
- Foam concrete absorbs moisture well, therefore, in order to avoid moisture absorption and premature drying of the adhesive mixture, blocks must be moistened with water before laying it.
- Due to the thinness of the partition, when laying several rows in a row, a shift of the wall in the plane may occur, therefore it is recommended to let the glue stick after each row.
- After finishing work, you need to putty the seams, various defects that have arisen during the laying process, clean the surfaces of excess glue and allow the partition to dry well. After that, cover the wall with two layers of waterproof deep penetration primer, wait until it dries completely and proceed with further finishing work.
- All work on electrical and plumbing is performed after the adhesive has completely set, the curing time should be viewed on the packaging with the mixture. Since foam concrete lends itself perfectly to drilling, it will not be difficult to bring pipes or throw wiring.
Protection of foam concrete from moisture

The bathroom is considered the dampest room in the house, so the foam block masonry must be reliably protected from moisture penetration into the concrete body.
This is done in several ways:
- Wall plastering with subsequent coating with waterproof compounds (paint, varnish, etc.).
Since foam concrete is quite soft material, then before applying the plaster, it is recommended to fix a reinforcing fiberglass mesh on the walls. This is necessary for better adhesion of the solution to the surface of the foam blocks and to obtain a better coating.
- Sheathing moisture resistant decorative panels or slabs (siding, PVC panels And so on).
It is produced by frame or frameless method. In the first case, a frame is mounted under the panels, on which the panels are hung, in the second version, the plates are glued directly to the wall.
With this finish, the foam block masonry in the bathroom will be especially susceptible to dampness, so it is necessary under the frame or facing material fix a vapor barrier membrane on the walls, which will not allow moisture to penetrate inside the masonry, but will bring it out.
In a separate toilet, it is not necessary to take such measures, but nevertheless, experts recommend laying a vapor barrier at least pointwise, in problem areas - around pipes, ventilation holes, doorways where condensation may occur.

- Facing with decorative ceramic tiles.
In this case, the tile will perfectly protect the foam concrete from moisture, only it is advisable to make the tile joints as thin as possible and caulk them with a special grout containing moisture-resistant components. When using a simple mixture, mold or mildew may occur. But for perfect laying of wall tiles, it is desirable to level and impregnate with special deep penetration compounds.
In conclusion, it must be said that the use of foam blocks for laying bathroom and toilet partitions is the fastest and most profitable option that even a non-professional can handle. And with proper protection from moisture, a foam concrete bathroom will last more than one year without repair.
If something remains unclear, then we suggest that you look at the photos and videos in this article, which will give a more complete picture of this topic.
About the need to build a toilet on suburban area can not argue. Installation summer shower in the country is also an equally important and necessary part of comfort. But buildings built separately take up a lot of space, and if the summer cottage is small, then they try to build them small size. This option is inconvenient and uncomfortable. To solve this problem, you can build a toilet and shower combined in one building with your own hands.
Features of design and operation
The main feature of the design of the toilet with a shower is a single building and a common dividing wall. Each room is equipped with a separate door.
The design of the toilet, separated from the shower room, is equipped with a tank for storing and supplying water. Plastic pipes supplying water are connected to this tank. In the shower room, the tube is connected to a watering can. Adjustment of water supply is carried out using a tap. It enters the toilet room through pipes that are connected to the washbasin and toilet bowl. In the latter case, it is supplied when installing the appropriate plumbing.
Such a construction saves the territory of the cottage
The cesspool should be located no closer than 15 m from a well or water well. The most acceptable distance is 25 m. This is necessary to avoid the possibility of foreign impurities entering the water used.
When choosing a site for the construction of this structure, it is necessary to take into account the possibility of access for sewers to pump out sewage. If the cesspool is deep and wide, it will take longer to fill. We must not forget to equip it with a hatch to drain the contents.
If the pit is located closer than 15 m from a well or water supply station, its walls and bottom must be carefully sealed.
Advantages and disadvantages over separate structures
The following criteria should be included in the parity property:
- It is more expedient to design the construction of a toilet and a summer shower in one building. Each meter of land in a summer cottage is fertile soil on which you can grow vegetables, plant a tree or break a flower bed. The construction of separate structures will take up much more space than a single frame.
- During the construction of individual structures, a larger amount of material is needed, since each of them requires an individual foundation, a roof and the construction of additional walls (in the combined version, only a partition wall is needed). This will also affect financial costs.
- The construction of a combined toilet and shower will reduce the construction time, since in this case, work is being done for both structures at the same time.
- If you build everything separately, then for both structures you need to equip your own drain hole. In addition, the walls of each of them must be reinforced with bricks, roofing felt, slate or concrete, which will additionally entail financial waste.
The disadvantages include the following points:
- Unpleasant smell from the cesspool, the risk of contamination of soil and groundwater with sewage, as well as the high cost of pumping out its contents.
- If you do not connect a pump to the summer shower tank, then in order to swim, you will have to carry water in buckets and pour it with your hands into a container on the roof.
- In the absence of sunlight, water will not heat up well in all seasons. And in order for it to become warm on hot days, it must be prepared in advance.
Preparation of a project for a shower room combined with a bathroom
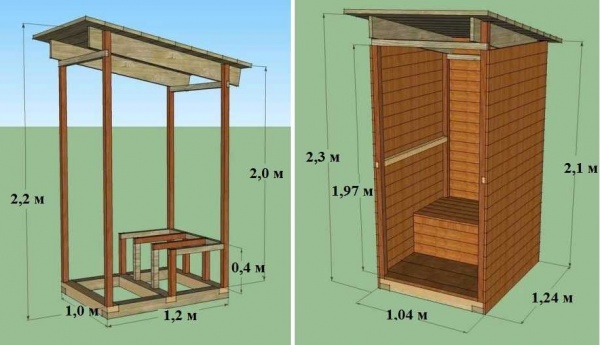
The design of a combined toilet with a shower should, above all, be functional and comfortable. It is designed in any shape, size and color. Comfortable to use will be a house with a size of 2750x200x2520 mm. In such rooms it is convenient to install rectangular benches and shelves. It is not difficult to build a frame of this form. The diagram and drawing below show optimal parameters to build this building.
Optimal parameters presented
Presented here separate toilet with shower in one building. The structure is located on a columnar foundation. Its dimensions make it convenient to use the structure for its intended purpose. The shower and toilet rooms are large enough to accommodate additional furniture and plumbing. In the toilet, you can place a washbasin and shelves, and in the shower room - benches and a bathing cabin. With a width of 130 cm and a length of 200 cm, each room will not be crowded. The height of 2.5 m makes it possible to use this building even for a very tall person.
The length and width of the structure is selected individually
If the door opens as shown in the drawing, then it is better to place the washbasin on the right side. In this case, when entering and leaving the toilet room, the sink will not interfere. The bench in the shower room can be installed in the same way.
Material selection
For the construction of a toilet with a shower, various materials are used. In our case, it will be a frame structure on a columnar foundation with a gable roof. For frame construction, a deep foundation is not needed, since it has a relatively small weight. Thanks to the pillars, the structure will rise above the ground. It will secure bottom harness structures from dampness and fungus. Water will not linger under the base. The gable roof will allow you to equip cold attic for business needs. Water from such a roof flows faster than from a shed.
When purchasing bars and boards, you need to take into account their humidity, the degree of which should not exceed 22%. To determine this, use a needle moisture meter.
To build a country toilet with a shower, you need to prepare the following materials:
- For the lower and upper strapping: four beams 2750 mm long and the same number - 2000 mm each, all with a section of 100x100 mm;
- For vertical supports, bars with a section of 50x100 mm are needed, in the amount of 24 pieces, each of which is 200 cm long;
- Wooden edged boards with a section of 10x100 mm, for lathing;
- Bars with a section of 50x100 mm, 200 cm long, in the amount of 12 pcs. - for the roof frame;
- For flooring (in the toilet), boards with a section of 40x150 mm are required in the amount of (minimum) 20 pieces. OSB sheets are used as a finishing floor;
- If the floors in the shower room will be covered with tiles, then an amount equal to 2 m² is required;
- Plastic pipes and sewer drain;
- Concrete mix (M-200) in the amount of one and a half cube;
- Plywood sheets for the manufacture of formwork;
- Sand and gravel;
- Metal tile.
All wooden elements must be free of knots, cracks, mold and insect damage.
- Sheets of plywood, chipboard, fiberboard or OSB boards are used as a draft ceiling.
- For the convenience of fastening the bars, metal corners and plates are used.
Required Tools
During construction country toilet with a shower you will need the following tools:
- Shovel bayonet and shovel;
- Electric jigsaw or hacksaw;
- Concrete mixer;
- Electric welding machine;
- Large container with water;
- Buckets or a wheelbarrow for carrying concrete mix, gravel and sand;
- Pliers and cutters.
- Screwdriver or Phillips screwdriver.
- Axe.
- Hammer.
- Building level.
- Square.
- Yardstick.
- Cord.
- Self-tapping screws and nails.
- Plane.
- Pencil.
Do-it-yourself step-by-step instructions for building
When all necessary materials purchased, and the tools are prepared for work, you can start building a country toilet with a shower:
- First you need to choose the right place for this structure. The site should not be in a lowland or pit.
- For this building, a columnar foundation will be used. To install it, you need to make markings on the ground with a tape measure and a cord.
- After that, it is necessary to dig a pit for a cesspool. Its depth should be from 1.5 to 2 meters or more. The width and length of the pit can be different. Usually these values \u200b\u200bare equal to 100x150 cm.
The cesspool can be either round or square.
- Once the hole is dug, it needs to be reinforced. To do this, we lay out the walls of the pit with bricks. We use cement mortar as an adhesive.
- When the walls are ready, cover the bottom of the pit with a mixture of sand and gravel, and then concrete. The result is a concrete container that does not let the contents through its walls.
Brickwork will prevent soil and groundwater pollution
- Next, you need to install a columnar foundation. To do this, we dig holes 80 cm deep and 20 cm in diameter.
- Their bottom should first be covered with a 10-centimeter layer of sand, which must be compacted.
- On top of the sand, pour a layer of gravel 10 cm thick, which must also be carefully compressed.
The correct foundation device will create a rigid foundation for the structure.
- After that, from plywood sheets or boards, you need to make a formwork for the pillars, which should rise 30 cm above the ground.
- Insert 3 to 5 rebars in the middle of the hole to strengthen the concrete. Elements metal frame connect with wire.
- Mix concrete and pour it into the formwork. In case of construction works in hot weather, formwork with uncured concrete must be covered with something. If this is not done, the concrete may crack.
- Leave the future foundation for a couple of days to solidify.
- After the specified time, remove the formwork.
The formwork gave the column a square shape, and the metal reinforcement - strength
- Next, you need to install drain pipe under the shower. Place the drain in the specified place, and bring the other end of the pipe out.
Thanks to the withdrawal Wastewater, moisture will not accumulate under the shower
- For the lower strapping, use bars with a section of 100x100 mm. Connect wooden elements in a half-tree way. Lay two layers of roofing material between the wood and the concrete pillar. Connect the frame with a concrete base to metal studs with nuts.
- As a framework for cesspool use a metal channel.
- Now you can move on to building frame walls. To do this, you need to install bars with a section of 50x100 mm in the corners. Check their vertical position using the building level. As connections, vertical supports and bottom strapping, use metal corners and plates.
The ends of the beams are connected in a way in half a tree
- In the frame, install two pillars 1960 mm high in place of the doors. Make the distance between them 770 mm.
- After all the vertical supports are installed, it is necessary to make the upper harness from the bars with a section of 100x100 mm. Fix it to metal plates and corners with self-tapping screws.
Wooden braces temporarily strengthen the structure
- On the upper harness, in the middle, install three vertical racks, on top of which to fix the ridge board.
The height of the pillars will determine the angle of the roof
- From boards with a section of 10x40 mm, make rafters for gable roof in increments of 65 cm. Length rafter legs should be 20 cm larger than the edges of the walls of the structure. Fix all elements with self-tapping screws.
- Then from edged board make a crate in increments of 20 to 30 cm. Connect it to each other on the ridge element. The length of the boards should be selected so that they protrude by 20 cm.
The protruding parts of the crate will serve as a visor for the construction
- Nail the wind boards. Cover the roof with sheets of metal tiles, which are fixed to the crate with self-tapping screws. A vapor barrier layer is not provided for this design, since it will not be heated.
- Now move on to installing the floor in the toilet. cut the bars desired length from boards 40 mm thick, which are fixed on the bottom trim with self-tapping screws. The length of the floor from the entrance to the pedestal with the seat is 100 cm.
- Cut 5 bars 40 cm long, and use metal corners and self-tapping screws to screw them to the floorboard. Parallel to them on the channel also install 5 vertical bars by connecting them with the same boards. Attach the same bars to the side supports (of the future toilet room) and the back ones. As a result, you should get a frame that looks like a large step. This design from wooden beams intended for a pedestal.
This design is reinforced with metal corners, which make it more durable.
- Sheathe it with a board 20 mm thick. Then you need to insulate the walls of the toilet and shower. For this inside upholster the frame of the structure with boards 20 mm thick. Then, between each vertical support, firmly insert foam plates 10 mm thick. Fill the gaps between them with mounting foam. It is also necessary to insulate the ceiling.
Styrofoam will reliably protect the walls from cold and heat
- Then you need to upholster the outer walls and the inside of the ceiling with boards 20 mm thick.
- Now you can start building the soul. In order for the water to go into the ground not under the building, you need to do drain system. To do this, dig a small ditch into which to lay the usual sewer pipe with a diameter of 10 cm. One end of this pipe should lead to a right-angled outlet, for connection to the sewer drain.
- Cover it with polyethylene and attach to the pipe.
- In the shower room, fill the floors with a layer of rubble. This is necessary in order to spend less concrete. Crushed stone must be positioned so that its level around the drain is less than along the perimeter.
- Top with concrete and level it. As a result, the surface along the entire perimeter will have a uniform descent to the water drain. This base should be without pits and protrusions so that it flows freely.
Slope of the floor towards the drain
- wait until concrete base harden, and then cover it with a layer of bitumen-rubber mastic. Before use, it must be heated to a liquid mass. Then, using a brush, apply to a dry and dust-free concrete floor. In the same way, it is necessary to process the lower trim of the structure.
- When the mastic hardens and cools, you can proceed to install the wooden floor in the shower. To do this, it is necessary to cut boards 40 mm thick into fragments 137 cm long.
- Lay the indicated boards on the strapping and fasten with self-tapping screws. In order for water to leave through the floor, it is necessary to leave a distance of 15 to 20 mm between the wood.
The gaps between the boards contribute to a better outflow of water.
- Upholster the inside of the shower room with boards 20 mm thick. Treat everything with a moisture barrier. Cover the entire shower with yacht varnish in two layers. After the first time, let it dry and only then proceed to the second application. Beat everything with the same boards external walls the buildings.
- By using grinder clean up wooden surfaces shower and toilet.
- Then you need to secure the foundation from water flows. To do this, you need to install a drainage system. Attach drain channels to the edges of the rafters, to which drain pipes are installed on each side.
Thanks to pipes and gutters, water will not accumulate near the walls of the structure
- Now you need to pay attention to ventilation in the toilet and its pit. To do this, you need to make a hole with a diameter of 10 cm in the lid of the cesspool section, into which to insert plastic pipe. Its height must be made 70–100 cm higher than the ridge part of the roof.
- For ventilation in the toilet room, it is necessary to drill a hole in its wall with a diameter of also 10 cm. Insert a plastic pipe into it and lead it parallel to the previous one. On top of each pipe, fix umbrellas from precipitation.
Installing a ventilation system will create conditions for the release of methane
- For use country shower and the toilet in the dark, it is necessary to conduct electricity. To do this, drill a hole in the partition between the toilet and the shower, into which to lead the wires and connect them to the junction box. Attach the lamp to the ceiling and screw the cover of the closed type. Put the switch on the wall. Do this in both rooms.
Wiring connections must be carefully insulated from moisture.
- Now we need to install the doors. They must be treated with the same compounds and varnish as the shower room.
Installation and nuances of use in the country
When the design of the country toilet and shower has been erected, you can proceed to the direct installation of a water barrel, attaching a tube with a shower head to it. It is also necessary to install a place for a seat in the toilet.
Most suitable for installing a water barrel flat roof. Since in our case it is gable, it is necessary to build a stand for this container. It must be made from metal pipes, channel or corner, using electric welding. In our case, a metal corner with sides of 50 mm and a thickness of 3 mm was used. To strengthen the structure, it is necessary to weld the amplifiers perpendicularly, every 100 cm. The total length of the frame is 4 m. The result should be a solid stand in the form of a tripod. Then, near the shower wall, drill three holes 1 m deep. Lower the tripod into them and pour concrete.
In order to save material, the frame is made of three metal corners
A plastic container 20 cm high, 100 cm long and 100 cm wide was used as a barrel for water. Due to the small height, the water in such a container heats up quite quickly from the sun's rays. Under it, you need to make a wooden frame. In our case, it is made of bars with a section of 50x50 cm, 100 cm each. It is necessary to connect their ends in a half-tree way and secure with self-tapping screws.
The shape of this tank holds a lot of water, which quickly heats up in the sun.
The wooden frame must be attached to the rack with self-tapping screws.
Now you can proceed to the installation of pipes for the shower. For this, it is better to use plastic ones with a diameter of 25 mm. Carefully drill a similar hole in the barrel, into which, using locknuts and rubber seals, install the fitting. Attach a pipe to it, in which, after 50–60 cm, connect a ball valve. It is necessary to shut off the water in case of any repair or construction work. Then drill a hole in the ceiling and stick a pipe into it. Using tees and fittings, place it in the shower. Install a watering can with a tap in the tube under the ceiling.
Now you need to install a seat in the toilet. To do smooth hole, you need to attach a bucket to the middle of the pedestal and circle it with a pencil. Using a jigsaw, cut a hole in the marked area.
The bucket will hide the edges of the hole
Insert a bucket into it and fix it with self-tapping screws. In the case of using the toilet in winter, it is necessary to purchase a foam seat. In any weather, it will be warm, which is important for health.
The appearance of the finished building will fit well into the territory of the suburban area
Video: stages of construction of a country toilet with a shower under one roof
With little effort, you will build the necessary and convenient building with your own hands. Rest and living in the country will become much more comfortable. To swim after working in the garden on a hot day, you do not need to heat water and waste electricity. Thanks to various materials exterior decoration, a toilet and a shower combined in one building will not violate the architectural ensemble of summer cottages.
Do not deny yourself comfort even in the country. There are a huge number of projects for country toilets that every person can bring to life. But first you need to decide on the drawing and, according to it, build the future structure.
A huge amount of materials and all kinds of projects for country toilets leads to the fact that people are simply lost in the background of all this diversity. That is why the theoretical part is so important. Based on the information in this article, you will be able to choose optimal design for your cottage.
Typical projects of country toilets
Basically, to create a country toilet project, the following types of structures are used:
- toilet house with a cesspool,
- dry closet,
- closet powder.
Each of these designs has its own advantages. That is why it is so important to determine the type before starting construction.
Country toilet with a cesspool
In the project, it is imperative to provide for a pit. You also need to take care of its arrangement. For this it can be used plastic barrel or brickwork reinforced with reinforcement.
In the project, you must provide the right amount of brick and cement, and do not forget about the fittings. The walls you created are subsequently covered with plaster. It is the pit that sets the character of the ground building. This is usually small wooden house, created from improvised materials. It can be in the form of a hut, a miniature house and even a tower.
According to this country toilet project, all waste will accumulate in the pit. For its further cleaning you will need a sewer. The main disadvantage of the project is bad smell. That is why it is very important to provide ventilation at the planning stage.
Ventilation can be either natural or forced. In the first case, two holes are made in the design from below and from above. Their purpose is extremely simple - to create air disturbances. Thus, the unpleasant smell will not linger inside for a long time.
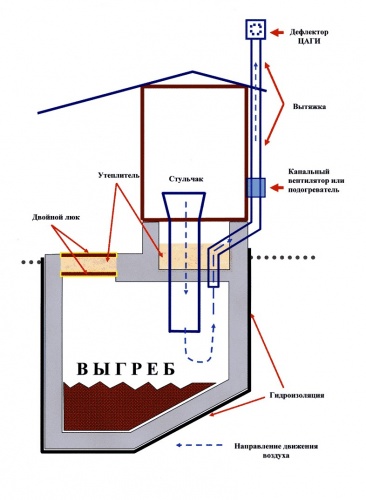
Forced ventilation is a simple fan that blows all the bad smells out of the toilet. When installing it, you need to think about a compensation hole through which air will penetrate inside. Its diameter should not be less than the diameter of the fan. All this is written in the project.
Important ! Don't forget the cesspool. It also needs air circulation. For this, a ventilation pipe is installed.
Powder closet
When creating this project country house cesspool is not provided. All waste is collected in a tank under the toilet seat. It is best to include two containers in the design different sizes. In a smaller one, you need to make several different-sized holes and insert it into a large container, on the side of which there will be round exit. A drain hose is connected to it.
Through the hose, the liquid goes into the ground or drainage system. The main role in this country toilet project is played by the container for the filler. Peat is most often used as a mixture. The filler helps to contain unpleasant smells. As soon as the tank is full, it should be taken out to the compost heap.
When you make a drawing, it is important to take into account the convenience of removing the container. There are two possible options solutions to this problem. In the first of these, the tank is removed when the seat is raised. In the second, a small door is cut out at the back of the building. It allows you to easily remove the filled container.
dry closet
You don't even need to build anything here. In fact, you are buying finished project country toilet. All you need to do is install the product in convenient location. In this case, you can purchase both a finished design and a whole booth.
Advice ! The finished structure is easy to install even in the house. All you need to do is take care of the drainage.
Shower and toilet under one roof
Now projects of a country toilet combined with a shower are very popular. This is especially beneficial from a financial point of view. In addition, such a project allows you to significantly save free space on the site.
In the project, a toilet with a shower will have one common wall. The result is savings building materials. At the same time, the bathroom can work both on the basis of a tank with a mixture, and on the basis of a cesspool.
How a drawing is created
The main task of the drawing when creating a project for a country toilet is to detail the design. The size, shape and type of building are clearly indicated on the paper. At the same time, there are a number of standards that must be observed.

Firstly, the distance of the country toilet for the place of water supply cannot be less than 30 meters. This must be specified in the project. Secondly, a residential or commercial building should not be closer than 15 meters. Of course, there are exceptions in the form of the same septic tank with biological system cleaning.
Dimensions are of particular importance in the drawing. You are free to ask them yourself. But there are certain standards that allow you to create a beautiful and comfortable building with a high guarantee.
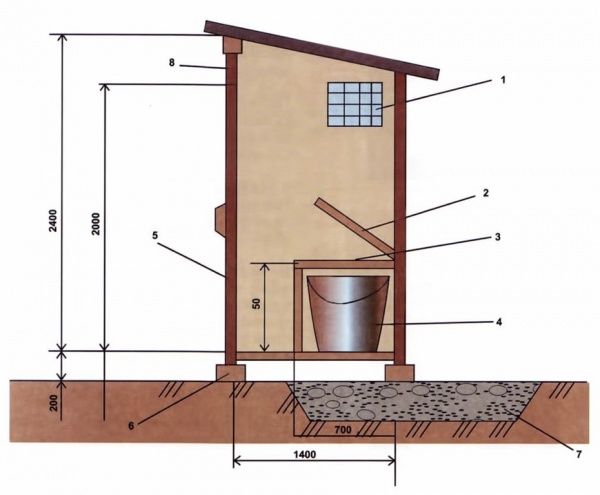
The height of the future dacha building should not exceed two and a half meters. In this case, the minimum indicator is at the level of 2 meters. The length of the building is from 1.2 to 1.8 m. The width is in the range from 1 to 1.2 m.

Many novice builders do not attach sufficient importance to the parameters of the cesspool. It is unacceptable. After all, it must also be included in the drawings. The estimated depth is 1.5–2 m, the diameter is from 2 to 2.5 m. If ground water lie close to the surface, then the pit will have to be abandoned.
Projects of superstructures for a country toilet
When choosing a suitable project for a country toilet, the selection of material is of particular importance. It is he who sets the parameters of the future building to the greatest extent. There are several typical options, which will be discussed further.
Brick toilet
Advantages this material can be listed ad infinitum. It is resistant to atmospheric influences, retains heat and cool equally well, and is environmentally friendly. Moreover, it allows you to give the structure any shape.
The basis of this project is the foundation. Without it, the creation of a country toilet made of bricks is simply impossible. Separately, it is necessary to mention the quality of the masonry. This is the real art of laying bricks for centuries. From above, the structure is covered with a roof, a material for which, in most cases, slate serves.

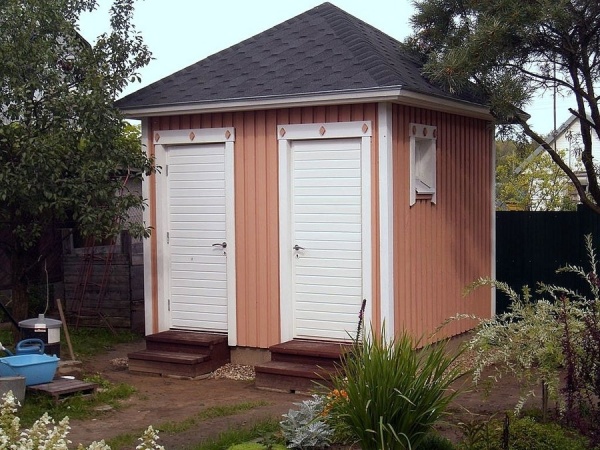
In the picture you see an example of a related project. In one design, a toilet and a shower are combined. This is not only practical, but also allows you to save a lot on the cost of building materials.
wooden toilet
The project of a wooden country toilet is a classic. Its construction takes a minimum of time, but in order for the structure to serve you faithfully, it is necessary to strictly follow the plan in the process of work.
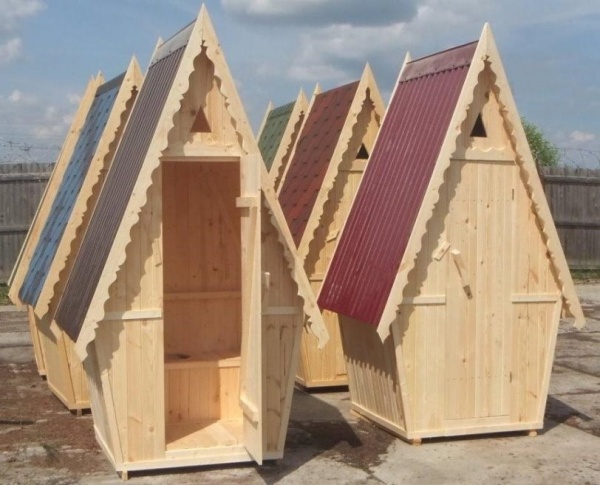
The picture shows one of the most popular options among summer residents - a teremok. As you can see, it has a small internal space and small dimensions. This allows you to install it anywhere. Also worth noting is the aesthetic appearance.
metal toilet
This version of the project will appeal to those who want to save time and money. When building, you can use sheets of metal left over from building a house. The only thing to take care of is inner lining. Of course, you can do without it, but in winter it will be very problematic to be in such a structure.

The main advantage of the project is the absence of the need for any knowledge. Almost anyone can build such a country toilet. This is the most cost effective option imaginable. The only thing you need to pay attention to is the toilet seat. It is best made of wood so that it is comfortable to sit on.
Types of wooden cabins
Exactly wooden cabins are the most popular among gardeners. This is explained quite simply. The beam is inexpensive, but provides good thermal insulation and has a pleasing appearance. During construction, the following projects are most often used:

Results
As you can see, there are many different projects for country toilets. During construction, you yourself choose the material, type of construction and internal organization. Any of the above options has its own advantages and disadvantages. Therefore, it is very important to weigh all the pros and cons of each project and make a choice in favor of the optimal one.
Device outdoor sewerage in a summer cottage often does not require special knowledge, the main thing is to choose the right place and draw up a simple drawing. It will not be difficult to build a toilet in the country with your own hands according to the drawing, if you adhere to the technology and perform each process with high quality. There are several types of country toilets, so before starting construction, you should familiarize yourself with the features of their construction.
Their design is extremely simple: a hole dug in the ground, a solid ceiling with a hole in the center on top, and a frame with doors sheathed with boards or iron. You can put such a toilet in a few hours. More durable structures made of brick, but the principle remains the same.

The next option is backlash closet. This type of toilet has an absolutely airtight pit, the contents of which are removed using a sump truck. The toilet cabin is not always located above the pit and can be built into the wall of the house. Pros: no need to look for a plot for the building, it is convenient to use in any weather. Minus: for cleaning it is necessary to hire special equipment, which is very expensive.

Another type of country toilet - powder closet. This structure is being built on a flat area, without a cesspool. For feces, a small container is installed under the toilet seat, which is taken out after filling. This option is convenient for those who visit the country house only periodically, because regular emptying of the tank will still require the arrangement of a cesspool.

Choosing a place for a toilet
When choosing a site for construction, it is necessary to take into account the distance to residential buildings and neighboring areas, the height of groundwater, the location of wells with drinking water, and the relief of the site.
Even with proper care from the toilet, unpleasant odors can come out, and the contents of the cesspool will seep into the ground. According to sanitary rules, the distance between a household well and a country toilet should be at least 25 m. This includes not only wells located on the site, but also those belonging to neighbors.
It is necessary to retreat at least 12 m from a residential building, and 1-1.5 m from the borders of neighboring plots. It is allowed to equip a cesspool only if the height of the groundwater is not more than 2.5 m. plot.

And the last thing: the toilet should have easy access not only to household members, but also to special equipment, which will periodically have to be hired for cleaning. These rules apply only to pit latrines, there are fewer requirements for the construction of other types.
Closet construction technology
The most labor intensive is pit toilet construction, therefore, it is recommended to study technology from it. The construction process includes the following steps:
- pit preparation;
- strengthening the walls;
- construction of a toilet house;
- ventilation device.

You can complete each step yourself using the most simple tools. After choosing a site for construction, you should decide how to strengthen the walls of the pit, as well as what the house will be assembled from.
For wooden frame any base will do, but if the house is planned to be built of brick or stone, the walls of the pit must be reinforced very securely. For convenience, first draw up a drawing of the future toilet and calculate the amount of material from it. When everything is ready, you can get to work.

To dig and strengthen the hole you will need:
- roulette;
- pegs and cord for marking;
- ladder;
- bayonet and pick-up shovels;
- sand and gravel;
- tamper;
- concrete mortar;
- brick, stone or concrete rings.
On the prepared site, markings are made in the form of a square with a side of 1 m. The soil is selected with shovels to a depth of 2 m, trying to leave the walls even so that the pit does not lose its shape. If the foundation pit is strengthened with concrete rings, the pit is made round; its diameter should be 7-10 cm larger than the diameter of the ring.
It is not worth digging a pit of greater depth: this will require additional material costs, and the time to fill the pit will increase quite a bit. But saving and making the pit too small is also not necessary, because then the toilet will have to be cleaned very often.
All the soil taken out of the pit does not need to be removed immediately - it will still be needed to backfill the floor. If groundwater is close, and the soil in the area is not dense enough, the pit should be sealed to avoid soil contamination. To do this, the bottom is covered with a layer of sand and fine gravel, carefully compacted, poured with concrete.
The concrete solution is prepared in the following ratio:
- 1 part of cement M 400;
- 4 parts of sand;
- 6 parts of small gravel.
Crushed stone can be replaced with medium fraction slag, reducing the amount to 4 parts. Water is added after mixing the dry ingredients in small portions. The finished solution should easily slide off the shovel, but not spread. After pouring concrete, work is suspended for at least 7 days: during this time, the bottom will harden enough, and subsequently it will not be washed away by the contents of the pit. To avoid cracking, during drying, the bottom should be periodically moistened with water and covered with a film from sunlight.

Most practical option strengthening the walls of the pit is brickwork. You can lay out the walls with bricks yourself, even without the appropriate experience. It is not recommended to use silicate brick, it is better to take burnt red. Masonry is done in half a brick in a checkerboard pattern, on a sand-cement mortar. The wall thickness should be about 20-25 cm, then the reinforcement will be quite reliable and durable. Top row brick wall usually rise above the soil level by 10-15 cm.
In order for the masonry to remain vertical and not deform during work, it is recommended to lay out no more than 6 rows of bricks at a time and continue work no earlier than after 7-8 hours. During this time, the solution will have time to grab and dry a little, so the walls will remain smooth. Every 3 rows you need to check the verticality of the masonry building level. Finished walls are plastered with the same mortar and covered bituminous mastic.
If concrete rings are chosen for strengthening, you will not be able to do the work yourself. To facilitate the installation process, the hole is first dug to a depth corresponding to the height of the ring. With the help of technology, the concrete product is lifted above the pit and carefully lowered down, and then they dig in with a shovel and select the ground from under the base.
The soil must be chosen evenly so that the ring settling under its own weight is located horizontally. Any, even minor, distortions will complicate the sealing of the pit.

After installing the first, proceed to the installation of the second ring. The concrete is again lifted on cables and leveled above the pit, after which it is gently lowered. Now, in the same way, they dig the ground below until the concrete sinks to the desired depth. The last ring should rise about 10 cm above the soil. All joints are sealed with mortar and covered with bituminous mastic. When the walls are strengthened, the bottom is covered with rubble and sand, rammed and poured. concrete mix.
In areas with dense soil and low level groundwater sealing the pit is not needed. After excavation of the earth, the bottom of the pit is covered with sand and tamped, and then the red brick walls are laid out. The laying of the lower rows is made with gaps in a checkerboard pattern, which provide additional drainage. As the walls rise, the gaps between the bricks are reduced, and, starting from the middle and to the top of the pit, the masonry should be solid.
Such reinforcement will protect the walls from destruction by the roots of trees that may grow nearby. Finally, the bottom is covered with a layer of large pebbles or gravel for filtering.
Floor construction

Overlappings for a country toilet must be strong enough to withstand the weight of the house and the person. For wooden structure a simple columnar foundation and floors made of thick timber are suitable. At each corner of the cesspool, stepping back from the walls by 15-20 cm, they make a square recess, fill it with crushed stone and sand and concrete.
Brick pillars up to 20 cm high are laid out on top of the concrete and covered with a piece of roofing material for waterproofing. While the foundation is standing, the floor beams are being prepared. Strong, even beams of dense wood are selected, cut to the desired length, impregnated with an antiseptic primer and dried.

Dry beams must be covered with two coats of paint to prolong the life of the wood. After that, a rectangular frame 1x1.2 m is assembled, fixing the beams with bolts. In the middle, the frame is fastened with a bar, and then one of the halves formed is once again blocked by a piece of the bar.
Now the frame is mounted on poles so that a whole half of the frame is located above the pit. The part with the partition will be under your feet. The frame fixed with bolts is sheathed with boards 3 cm thick.

If the toilet will be made of brick, it is necessary to make strip foundation. A shallow trench 25-30 cm wide is dug from three sides of the pit. The fourth side of the pit should protrude 20 cm beyond the perimeter of the foundation. Crushed stone is poured into the bottom of the trench, a reinforcing cage is laid, and the foundation is poured with concrete.
The resulting box is covered with metal channels or concrete columns every 30 cm, the rest of the space is closed with reinforcement or a chain-link mesh. A spacious hole is left above the pit itself, and a plastic pipe with a diameter of 15 cm is attached to the side. One end of the pipe is lowered into the pit by 10 cm, the other end is brought out.
After that, the ceiling is poured with concrete.
Construction of a wooden house

To build a wooden house you will need:
- dry timber with a section of 100x100 mm;
- 4 wooden beams;
- boards for sheathing;
- level and tape measure;
- hammer, nails;
- hacksaw or jigsaw;
- primer for wood;
- slate;
- loops and hook.
First, the front and back of the frame are assembled from the timber. The height of the front part is approximately 2.1 m, the height of the back is 2 m. Both frames are about 1 m wide. From the inside, the frames are reinforced with spacers made of timber, while in the front part the spacers should not block the passage. 4 beams are installed on the floor base at the corners and fixed with metal plates and anchor bolts. All elements of the frame are treated with a primer and proceed with the installation of the frame.
A front frame is inserted between the front beams and aligned vertically with a level. Having fixed it with nails, insert the rear frame and align it too. The frames are fastened together with transverse bars on the sides of the building.

The upper bars, on which the roof will be attached, are located at an angle, since one frame is lower; the bars should protrude 30 cm in front, 15 cm in the back.
The next step is to install the frame for the pedestal. To do this, another beam is nailed inside the box at a height of 45 cm, which will divide the toilet into 2 parts. Parallel to it, the same beam is attached to the rear frame and 2 more on the sides. When the frame is ready, you can sheathe it. Boards, thick plywood, timber imitation, corrugated board are suitable for sheathing. Inside, the pedestal is sheathed with boards in which a hole is cut.
Above the doors, you can insert glass or just cut a small rhombus.

A ventilation pipe is attached to the back wall with the help of special clamps and its upper end is led out through the roof. Then boards are stuffed onto the frame bars at regular intervals, and slate is laid on them. It remains to assemble the door, fasten the hinges and hook, hang door leaf. Many people spend a light in the toilet so that it is more convenient to use it in the dark. For greater decorativeness, the house can be painted or painted.
brick house
To build a brick house for a toilet, you need to have at least minimal skills. Such a structure is more reliable and durable, besides it has an attractive appearance.
It is very important to lay out the corners correctly, otherwise the structure will be skewed.
After laying the first two rows of bricks, install wooden frame for doors; it must be strengthened with spacers from beams or timber installed outside. At a level of 40 cm from the floor, metal corners are inserted between the bricks of the back wall for attaching the podium. Having reached the top, 1-2 more rows of bricks are made in front to raise the roof. If wiring is planned in the toilet, a piece of hollow tube is concreted between the bricks, through which it will be easy to stretch the wire.

For the podium, boards 30 mm thick are attached to the corners, and the vertical part is laid with bricks. You can sheathe the entire podium with boards by cutting a hole from the top.
The next step is fastening ventilation pipe. Not yet roofing, a plastic pipe mounted in the base of the toilet from the side of the pit is lifted and fixed on the back wall with clamps. The upper end is passed through the floor beams and raised above the building by 20 cm. After that, the roof is mounted, the door is hung, the light bulb and switch are hung.

Such a toilet is equipped directly in country house or next to it. A wide pipe departs from the toilet bowl, the second end of which is built into the septic tank. The construction of a septic tank begins with digging a pit, the depth of which is about 1 m. The bottom is covered with rubble, formwork is installed along the walls, and then everything is poured with concrete mixture. When the concrete gets stronger, the formwork is removed, and after complete drying, the surface is treated with mastic.
Outside, around the perimeter of the pit, clay is poured with a layer of about 50 cm. From above, the septic tank is covered with shields, covered with clay, and only a small hole is left for the hatch. The hatch is tightly closed first with cast-iron and then with wooden covers, laying a heater between them.


