Despite the attractiveness, wooden structures have a significant drawback - the material from which they are built belongs to the category of fire hazardous (it ignites quite easily and also burns out quickly). Therefore, special requirements are imposed on the electrical wiring in such houses. Especially when it comes to internal communications. What kind of wire do you need to buy for wiring in wooden house? Let's consider this question in as much detail as possible and clarify important points.
Core material
There are no restrictions on this item. But experts note that for house wiring in wooden buildings it is advisable to choose products with copper conductors. It is much more preferable than analogues based on aluminum.
- El / conductivity is much higher. Therefore, line losses will be less.
- Both designated metals undergo corrosion (oxidation). But copper is not so strong. Why is oxide dangerous? In this layer, the conductivity drops sharply, the resistance increases, as a result, the wire heats up.
- Copper is stronger than aluminum, including bending. Consequently, with breaks in the veins, the risk of possible sparking is practically reduced to zero.
- Screw clamps hold the copper wire more securely. Therefore, during operation, the quality of the connections does not decrease. It is more difficult with aluminum wires - you will have to regularly check the line and do “braces”, since the contacts (the metal is soft) weaken over time.
Note
An intermediate option is found on sale - wires with composite conductors, made of aluminum-copper. This alloy optimally combines all the advantages of both metals, but the indicators are, of course, averaged. When choosing such products, professional advice will not be superfluous, since you will have to take into account many factors and decide on priorities based on the specifics of the line and the general scheme of house wiring.
Insulation

Wire examples and prices
It is hardly worth listing the entire assortment. Moreover, the prices of the same type of wires differ depending on the region. For intra-house electrical / wiring, the most "running" products are products with a core cross section of 2.5 "square". They are used to connect switches, sockets and a range of medium power household appliances – washing machines, air conditioning equipment and the like. In this example, it is easy to get an idea of \u200b\u200bthe cost various kinds wires.
*Price in Russian rubles per linear meter.
- VVGng and its modifications - from 38.6;

- RKGM - from 25.9;

- NYM - from 42.

What not to buy
PUNP. This wire is still found on sale, and is even still produced by individual firms. It attracts with a low price and is often used to connect sockets and household appliances. Unfortunately, not everyone knows, and dealers are silent, that this wire is forbidden to be used for in-house electrical wiring, since according to its characteristics it no longer corresponds to the latest GOST.
These wires have copper conductors, and their insulation fully complies with all requirements for cable products for installation inside wooden house.
Wood Vacation home is the dream of almost any person who loves to be close to nature and spend time outdoors. The traditions of building houses made of wood have their roots in ancient times - this is especially true for those countries in which, like in Russia, forests have always been abundant.
Many houses from a log house can not afford, today it is fun for people with high incomes. But no less environmentally friendly frame structures come to the rescue.
The cornerstone of all these buildings was and is the possibility of a fire. Today, in the age of electrification, when the number of electrical appliances is only growing, people who are planning to build or buy such a house should first of all make sure that electrical wiring in a wooden house was made according to all safety standards.
Under no circumstances should you take given material as a guide to action. All electrification work must be carried out only by qualified specialists who have permission to access electrical networks.
But this knowledge will be useful to any person who is engaged in construction, if only in order to control the work of the masters and prevent "hack-work". If you decide to do the wiring yourself, you must realize that all responsibility falls on your shoulders.

Due to the fact that wooden buildings have an increased fire hazard, the requirements for laying power lines are completely different.
- Ignition is unacceptable power cable and transmission of an open fire to a wooden structure due to a short circuit. If it is not possible, for some reason, to exclude such an option completely, then the probability should be reduced as much as possible.
- The operational and physical-technical properties of the wires you use must correspond to the power consumption, taking into account peak loads, in all areas of electrical wiring. Any manifestation of heating of the cable or terminal connections is not allowed.
- The condition of the wires must exclude the risk of electric shock both humans and animals.
From the foregoing, it follows that the issue of beauty and aesthetics in a wooden house fades into the background. For the sake of the visual design of the room, the level of security cannot be reduced even slightly. In the course of the article, some methods will be mentioned to solve this problem.

The lack of a single regulation is another reason why such work is complicated. It is not so easy to independently select the information contained in the PUE, SNiPs and GOSTs, because due to the specialized nature of the information, only a person with a specialized education can understand them.
Entering the electric line into the building
This area is one of the most responsible - it needs to be given special attention. If the wiring has been in operation for many years, then most likely it is outdated and does not meet modern requirements.
Do not forget that due to exposure to the sun and a sharp temperature drop, in these places, the insulation of wires becomes unusable over time, exposing current-carrying cores. That is why it is important to periodically monitor not only the house wiring, but especially the places where it is entered.

The photo above is a little out of focus, but it does a great job of showing how not to arrange. At the entry point, it is clearly visible that the insulation is broken, and the tree is in direct contact with the wire. This place is the most vulnerable.
Previously, in the form of a gasket, the wire was passed through a piece of rubber hose, but one can hardly say that this is more secure. The reason is that over time, the rubber dries out, and the soot in its composition forms conductive bridges, since it is carbon in nature.
Attention! If you have a similar scheme in your house, then keep in mind that this is a time bomb. The sooner action is taken to correct the problem, the better.
Underground wiring entry
There are two ways to draw a power line into the building - underground and air. The second method is the safest, since the wires are not exposed to any influences. The price of underground cable laying will be much higher, as it will require additional costs for earthworks.
The cable must be buried to a depth of at least 80 cm, and the entire secured territory should be labelled. In places of entry into the soil, entry into the building and passage through the foundation, metal sleeves made of thick-walled pipes must be installed.

For sealed cable entry through concrete floors and foundation, there are special modern systems. Also for this purpose, MGKP (Sealing mastic for cable penetrations), plaster compositions and special seals for sleeves are used. The diagrams of these devices are shown in the following pictures.


Such a connection has another significant plus - it will allow you to install hidden electrical wiring in a wooden house. This refers to a structure made of solid timber or a log house, if your house frame type, then this installation method is also possible with air inlet.
As a rule, this connection is made during the construction of a new house. If the structure has already been erected, then it is advisable to use the following method.
Air cable entry
The following diagram shows the air connection method. For the last section from the pole to the house, a wire with a cross section of 16 mm or more must be used, which belongs to the SIP category (self-supporting insulated wire).
The sheath of this cable consists of cross-linked high-strength polyethylene, which is resistant to temperature extremes and infrared radiation. The average service life is up to 25 years.

This wire never runs inside the house, since according to safety rules, it is strictly forbidden to lay aluminum cables along combustible parts of the structure. This means that inside wooden structures, only wires with copper conductors are allowed.
Instead, a cable of the VVGng type is used from the line to the switchboard. It does not support combustion, which is indicated by the appropriate marking: "ng".
Due to its characteristics, this wire is great for laying, both outdoors and indoors. However, it will be better if it is additionally placed in a polymer corrugated tube. This additional insulation has self-extinguishing properties.

The transition from one type of wire to another is always done from the outside. Today, for these purposes, special mounts and connections (compresses), which provide reliable fixation and contact, without the possibility of sparking and oxidation.
As in the case of underground laying, in places of passage through the walls of the house (including internal ones), a metal sleeve must be installed that performs the following tasks.
- Protecting the cable from damage caused by structural movement, such as ground motion or house settling.
- The pipe, acting as a heat sink, prevents the spread of flame to the walls in the event of a short circuit inside it.
- One more problem frame houses- These are rodents that like to build nests in the cavities of the walls. The metal sleeve will not give them the opportunity to damage the wires.

The thickness of the pipe must strictly correspond to the cross section of the cable. So, if the cable has a cross section of up to 4 mm2, then the minimum wall thickness is 2.8 mm. For more powerful cables, a 3.2 mm pipe is used.
house wiring
The next unsafe place is the part of the line from the entry into the room to the switchboard (VUR). The problem is that the shield responds to short circuits that occur in the part electrical circuit, laid from it, and the specified area remains unprotected.
There are three methods to secure this place:
- First- consists in placing the entire cable inside the pipe, as in the case of passages through the wall.
- Second way much easier. Outside the building, directly in front of the entrance, an additional circuit breaker is installed, located in a sealed box. The operating threshold of the additional AZ should be higher by a step of the main one located in the shield.
- Third Method the most reliable, but also the most inconvenient. Employees of the energy company take out electricity metering devices and ASUs for outer wall or on a power pole.


Installing the ASU shield
The next step is to install the switchboard. Let us briefly describe its constituent elements.

So:
- The housing of the ASU is metal or plastic. It is a box, inside of which there are places for attaching an electricity meter, a bar (DIN) for installing circuit breakers, tires - zero and a ground loop. You should not save on the size of the shield, always take it with a margin, so that if you need to install additional equipment, there is a place for it.
- Electricity consumption meter sealed in the energy company.
- Main introductory AZ. It can be two- or three-pole. It also has a seal from the power supply company.
- The next in the chain are single-pole circuit breakers. Their capacity should correspond to each area allocated for them inside the house. The breakdown into zones is very convenient and safer, since if necessary, you can de-energize not the entire circuit, but only the desired part.
Attention: The power of each machine is calculated separately and should ensure operation when the network is overloaded in its weakest section. That is, if the socket rating is 16 A, then the AZ power should not exceed this value.
Of the optional additional devices, it is recommended to install an RCD. This device reacts to current leakage and automatically turns off the electricity. This device is especially relevant in the presence of electrical lines in wet rooms - baths, bathrooms.
Further wiring
There are two methods to spread wires to power points - hidden and open. The first one is easier to do during the construction of the house, otherwise you will encounter large-scale alterations. To fully ensure fire safety, all wires will have to be placed in a fireproof sheath - ideally a metal pipe made of steel or copper.
Many use corrugation, but it is less reliable. Great difficulties will arise even after many years, when it is necessary to replace the wiring. We will not describe this method in detail, since this is a topic for a separate article.

Select montage open wiring in a wooden house, it is technically and economically much more expedient, not to mention safety (see). There are several ways to do this installation.


So:
- The retro method, which consists in the fact that the wires are carried from a wooden wall to a safe distance of 1 cm. Today it has become fashionable and many manufacturers offer special twisted wires. Due to the huge number of devices in modern house, we will not consider it as a serious decision of electrification.
- Separate sections of the cable, whose cross section does not exceed 6 mm2, can be placed directly on the wall. If your wire does not have double or triple insulation, then a fireproof gasket must be placed under it, which is also installed under sockets and switches. Metal plates or paranit are perfect as gaskets.
- The wiring can be placed in a corrugated polymer tube, which will give a more attractive look, since several wires can easily fit inside. This method is ideal for technical rooms and places with inconspicuous wiring.
- The next and most common way is to use PVC cable channels. They come in a variety of sizes and colors so you can easily fit all the wires and close the removable cover for a finished look.
- The last, most aesthetic and expensive method is the use of electrical skirting boards. They are prefabricated and equipped with all necessary elements for climbing to switches, junction boxes and sockets, laying corners, turns and straight sections.
Electrical wiring in a wooden house is a matter that should be given attention. Approaching the issue professionally, you protect yourself from unnecessary risks. For a better understanding of the topic, we suggest that you additionally familiarize yourself with the video presented in this article.
But the resinous array of dried wood - dangerous object for the appearance of an accidental spark: can turn into a tragedy with technological errors or negligence during installation.
Therefore, for the installation of electricians in a wooden house in a hidden way, you can only take on having basic technical training and having thoroughly studied the rather tough current regulatory documents:
- GOST R 50572.1-93;
- SNiP 3/01/01-85;
- SNiP III-4-80;
- SNiP 2.08.01(6.17).
- "Rules for the installation of electrical installations" (PUE).
Wouldn't it be better to entrust this crucial stage of construction professionals?
Why is hidden wiring in a wooden house so attractive?
Surely aesthetics of walls and ceilings:
- there are no wiring elements that violate the design of the room;
- sockets and switches recessed into the wall do not cause inconvenience when arranging furniture;
- the surface of the wall is easier to use for wallpapering;
- properly executed wiring increases the degree fire safety buildings;
- ease of replacing the cable in the pipe;
- less risk of mechanical damage to the wiring;
- protruding electrical fittings do not collect dust and do not become a support for the web.
What makes hidden wiring an object of increased danger
- Inaccessibility for constant revision of the state of insulation and replacement of areas subjected to aging and destruction (microdamages can cause a short circuit);
- complications in the work on supplementing the electrical circuit with new points after the expiration of time;
- the technical complexity of installation, effective only during the construction of the house;
- the need to create false structures that can hide insulating pipes;
- the high cost of work, materials;
- the cost of a special tool.
What are the features of installing hidden wiring in a wooden house?
- You must be prepared for the fact that, according to the wiring diagram, you will pull not only wires and cables, but also meters of steel or copper pipes is a prerequisite for isolation. In a wooden house, even a centimeter of wire should not come into contact with wood. Pulling a cable or wire through a tube is a troublesome task that requires patience.
- To introduce insulating pipes into the body of the wall, you will have to ditch, drill, cut down a place for wiring. This work is dusty, dirty, laborious.
- Vertical channels are drilled during the laying of the crowns of the log house, horizontal (with a special drill) - after the completion of the walls.
- A conductor is laid in the holes - a wire with which the cable will be pulled.
- All places for installing wiring elements and transitions from one room to another must be well insulated with metal boxes, sleeves, "glasses", linings, asbestos wrapping or insulation with alabaster plaster.
- The number of main channels acquires significant importance: for a large number you will need, as insulation, a corrugated pipe quite large diameter, which is difficult to hide in a log wall.
- The importance of the residual current device (RCD) is increasing, several such devices can be installed with hidden wiring: to turn off the external circuit, the internal circuit and the circuit with the highest power load.
Rules for performing internal wiring in a wooden house
- Electrical wiring is carried out only on the basis of a scheme agreed with specialists, with the minimum amount twists and turns.
- The electric main is laid exclusively in non-combustible materials.
- During installation, priority is given to fire safety tasks, not so important - to aesthetic wishes.
- It is advisable to lay channels in the structural recesses of door and window openings, under skirting boards, false ceiling cladding.
- Corrugated pipes used as channel insulation are protected from all sides with asbestos gaskets during installation. For the same purposes, taking into account the estimated power of the wiring, alabaster or cement plaster, concreting is used.
- Galvanized insulating pipes and boxes are connected by threading, welding. Sharp edges are protected by plastic plugs. Copper protective elements in the connection are flared.
- The wall thickness of the pipe is selected taking into account the cross-section of the conductors of the wire (example: 2.8 mm - for an aluminum conductor of 10 mm2, or a copper conductor of 4 mm2).
- The cable (together with the insulating layer) inside the insulating pipe must occupy up to 40% of the internal volume.
- The insulation resistance is measured twice: before and after pulling through the pipe.
- Distribution boxes must remain freely accessible.
- For concealed wiring wires and cables with a triple insulating coating and marking "ng" are used.
Wiring in the ceiling of a wooden house
To the virtues wooden floors can be attributed:
- high bearing capacity;
- resistance to vibration;
- preservation of the geometry of the structure;
- reducing the overall weight of the structure;
- erection speed;
- versatility of use;
- suitability for floor screeding.
Flaw there will be one, and it will be revealed during the fire:
- wooden floors quickly pick up an open fire;
- are prone to collapse.
How to be?
- Cable protection with pipes.
- Metal tray for complex layouts by overlap.
- Risk is not always a noble cause.
Therefore, there are no concessions for electrical wiring along floors: only the placement of cables in pipes. By the way, electrical wiring on floors is the most convenient way to install hidden wiring. Gates for pipes to switches and sockets, in this case, descend from the main cables.
True, if the change in the direction of the wires is very frequent and at different angles, then it is more rational to use blind copper trays with lids instead of pipes. They can lay out several wires at once and in any direction. They perfectly isolate the wiring from the wood of the floors, and are attached to each other by riveting. Such trays, in order to reduce the cost of work, are also made of galvanized steel.
The process of stacking trays is complicated by the need to take into account and circumvent structural elements at home or cut them with subsequent reinforcement. In this case, you can not do without the skills of performing tin work.
Mandatory grounding of each tray separately will be required. At the turn, the trays can form an angle that is dangerous for the integrity of the cable, therefore, in this place, corrugated insulation is put on it.
Tray insulation with hidden wiring can also be used with inside overlappings, subsequently closing the entire false ceiling structure with drywall or tongue-and-groove board treated with fire retardants.
The most primitive installation method is electrical wiring on ceilings in layers of alabaster or cement plaster, when one layer is laid down, and after laying the wires, 2-3 cm of a new layer are thrown. This method is very risky for fire safety (due to the likelihood of cracking) and is rarely used.

- The type of cable for a wooden house will differ from that used in urban development.
- The most suitable cable is NYM, it has triple insulation and a sheath made of non-combustible material (polyvinyl chloride).
- The greatest reliability in protection electrical network from emergency failures have difautomatic devices that combine 2 protective devices - automatic switch and RCD (residual current device).
- It is worth remembering: grounding each junction box and each pipe will not be superfluous.
- The connection of pipes must be reliable: use welding or soldering.
- When choosing pipes, give preference to pipes made of copper: they bend better and easily take the shape of a prepared gutter.
- To protect the cable from damage when pulling it is necessary to use end sleeves made of plastic.
- Settlement of the house should be taken into account to prevent pinching of the highway.
- When lining walls with clapboard or wooden wallpaper, you can do without drilling the walls, skipping main pipes wiring on slotted grooves.
- You can combine hidden wiring with open: in places where wires are connected to sockets or switches.
The technology of electrical wiring in wooden houses has its own characteristics. Not only that, to connect to the network, it will be necessary to pull the cable from the nearest substation, but the wiring inside the premises must be carried out in compliance with special safety standards.
Wiring Requirements
Wood is the most popular material used in the construction of private housing. Despite its merits, wood is a fire hazardous and highly flammable material.
Regardless of the material - brick, gas silicate blocks, concrete, timber in the event of a fire, an open fire spreads to the furniture and interior decoration of the room. First, everything inside the room burns down, and only after that the load-bearing walls, partitions and roofing begin to burn.
Basic requirements for electrical wiring in wooden buildings:
- Safety - wiring must be routed in such a way as to minimize the possibility of overheating and ignition of the cable, and to prevent the transmission of open flames to adjacent wooden structures.
- Design - specifications and the performance of the wires and components used must correspond to the calculated peak load in a particular section of the electrical network. To prevent heating, the cable cross-section is selected with a margin of 20–30%.
- Laying method - electrification wooden buildings it is preferable to perform open way. This allows you to easily and at regular intervals to diagnose the state of the power grid.
- Isolation - the location of the input node (electric panel) must be isolated from the interface with wooden structures. Ideally, if the electrical panel is installed in a room with a partition made of non-combustible materials.
- Conductor - as a conductor, it is better to use a three-core copper cable with insulation from non-combustible materials. Laying the cable in PVC corrugation is strictly prohibited.
- Automation - an automatic switch must be installed for each group in the electrical network. The circuit breaker current rating is selected in accordance with the load on the site. It is highly not recommended to overestimate the current rating, as this will lead to overheating of the conductor.
It is not recommended to carry out independent laying of a power cable and installation of an electrical network without appropriate experience - this should be done by specialists. But every owner of a private house must know the basic rules of electrification. This will allow him to diagnose the existing wiring, and also make it possible to control the quality of work of hired electricians.
Regulations

Rules for the installation of electrical installations is the main document for the design of electrical wiring
General requirements and rules for electrical wiring are described in the following documents:
- PUE, edition 7 - the main document used in the design of the electrical network. It describes in detail the choice of conductor, switchgears, automation and lighting.
- SNiP 3.05–06–85 - electrical wiring in old and new houses. Connection methods and rules for entering a power cable into a dwelling.
- SNiP 31–02 - requirements for the design of a power supply system in residential buildings. The document complies with the rules and regulations described in the PUE.
The information contained in these sources is described in technical language and may be incomprehensible to an unqualified specialist. At self-study we recommend relying on the "Electrical Installation Rules", since this document most clearly articulates the meanings and concepts necessary for wiring in private homes.
Preparation of a power supply project

An example of two electrical network device diagrams in a wooden house
After consideration of the application by the managing body, an agreement will be prepared and specifications required for connection to the local electrical network. Then you can proceed to the design of the power supply, which is performed in the following sequence:

When drawing up a project, one should be guided by the EMP. According to this document, electrical wiring is laid strictly in a vertical or horizontal direction. The optimal angle of rotation is 90 o .
The socket group, switches and junction boxes must be located on open areas with free access. Usually, switches are mounted 80–150 cm from the floor level, and a socket or socket group - 50–80 cm. The number of sockets varies from 1–6 pieces. The exact amount depends on the size of the room, but not less than one piece per 6m 2.
When designing a cable route, it should be taken into account that the minimum distance from the openings should not be less than 10 cm. If the cable can come into contact with metal elements along the route, then it is removed by 15–30 cm in any convenient direction.
Choice of wire and devices

The cross section of the electrical wiring, taking into account the total power of the electrical network
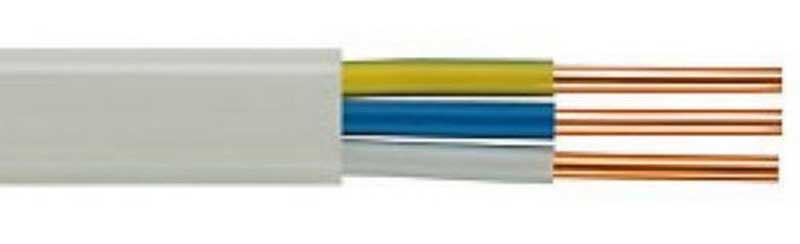
When arranging private power networks, two types of cables are used: NYM and VVGng. The NYM type cable is a power cable that meets the European standard and is used for laying electrical networks with a rated voltage not exceeding 660 V. VVGng cable is a bare power cable, in a double vinyl braid, operating in networks with constant voltage no more than 1 kW.
The cross section of the cable for laying electrical networks is determined in "mm 2". For designation, the marking is applied to the cable insulation and is indicated by two numbers. The first digit indicates the number of wires inside the single insulation. The second digit is the cross-sectional area of the conductor. For example, when an electrician says that a three-core copper cable is needed one and a half squares, this means - NYM cable 3x1.5 mm.
The easiest way to determine the minimum cross-section of the power cable core for a particular section of the network is a special table. This method is proven, as it is used in the design of electrical networks in apartment buildings. The table for selecting the cross section of the core can be found in the photo above.
As a rule, a copper cable with a cross section of 2.5–4 mm is used for socket groups, and an aluminum cable with a cross section of 1.5–2.5 mm is used for lighting. In the case of wooden houses, it is recommended to use only copper wiring, as this will protect the electrical network from overheating.

Wire of various sections for wiring in a wooden house
According to the PUE, each section of the electrical network is equipped with a residual current device and a circuit breaker designed for the corresponding current indicators. To calculate the current strength, the standard formula is used -I \u003d P / U cosφ, where:
- I - current strength;
- P is the total power of electrical appliances connected to one section of the power grid;
- U - voltage in the mains;
- cosφ - constant factor. In household networks, it is almost always equal to 1.
For example, it is required to determine the current strength for the network section to which household equipment with a total power of 3 kW will be connected. I \u003d 3000 / 220 \u003d 13.64 A. Taking into account a small margin and rounding, it turns out that this section will require an RCD and a diphatomat, designed for a rated current of 16A.

To determine the type of circuit breaker, it is necessary to calculate the minimum short-circuit current strength: I short circuit = 3260 x S / L, where S is the conductor cross-section in mm2, L is the conductor length in m. As a rule, in networks with a mixed load, which will be presented in most private houses, type “C” machines are used.
Sockets are selected taking into account the power of electrical appliances. Usually, these are sockets with grounding, rated for 16 A current. It is worth remembering that if it is planned to use several electrical appliances in a particular room, then it is better to install a socket group for 2-3 products than to use a “tee” in the future.
Selection of input cable and automation

On the left - an electric meter, on the left - an RCD with a lead-in cable
Do-it-yourself installation of electrical wiring in a wooden house - step by step instructions

It is optimal if the switchboard is installed in a special room with a concrete partition or wall
The technology for installing electrical wiring in a wooden house will consist of several stages: supplying a power cable to the house, installing a switchboard, laying a cable route, connecting contacts and checking performance.
To carry out the work, you will need to prepare an electric drill with a crown nozzle, a screwdriver, a Phillips and slotted screwdriver, an indicator screwdriver and protective rubberized gloves.
Switchboard installation

Switchboard for a private house for 12-24 modules
The switchboard is a device for entering the power cable and distributing the incoming electrical energy. Inside the shield there is electrical equipment responsible for the connection, accounting, safety and correct operation of the power supply system.
Ready-made switchboards from the manufacturer are a plastic, metal or combined box with a door, DIN rail, zero and ground bus. The shield dimensions are selected according to the number of modules used. For wooden houses enough shield for 12-15 modules.
The installation of the shield consists of several stages:

When using a shield for 16–24 modules, as a rule, there are two DIN rails in it. It is better to install an introductory machine, a counter and an RCD on the upper rail in the required quantity.
On the bottom din-rail will be located circuit breakers. This type of distribution of modules will allow faster and more convenient connection. After mounting all the elements, it is recommended to mark the modules according to their group. The shield assembly sequence is shown in the video below.
Related video: switchboard assembly and layout
Cable entry into the room

Laying a power cable to a residential building by air
The input of a power cable into a residential building can be performed in two ways: underground and by air. The first method is more reliable, since an armored cable protected by a corrugated pipe will be used. In this case, the wiring itself will be located under a 30-40 cm layer of earth.
A trench 70–80 cm deep is dug to lay the cable. A 15–20 cm layer of fine-grained sand is poured into the bottom of the trench and it is well compacted. Further, a protective corrugation is laid on the sand cushion, through which an armored cable is passed. Then the corrugated pipe is covered with a 10–15 cm layer of sand. At the end, the pipe is completely walled up in the ground.

Laying a power cable to a residential building underground
Cable routing through the air is carried out in cases where the distance between the house and the substation is too large. For this, a cable with a carrying cable is used, which is pulled between the supporting and residential buildings. If the distance from the post to the house exceeds 20 m, then an intermediate support is installed between them.
When entering the power cable through bearing wall a sleeve made of non-combustible materials is installed at the interface. It is optimal if the cable is introduced in the immediate vicinity of the location of the switchboard.
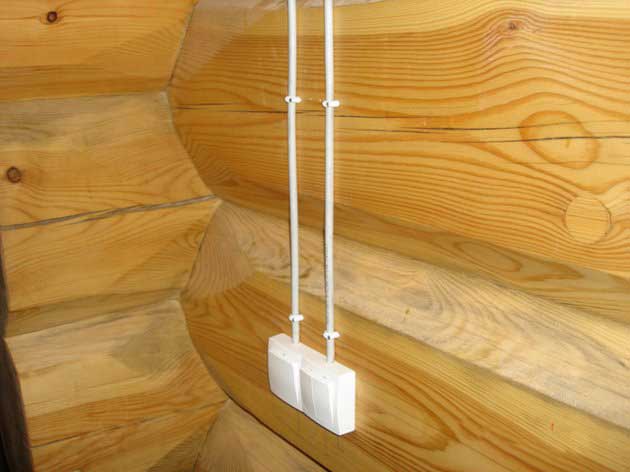
Installation of overhead switches and sockets

Removing the button and the face of the socket before installation
Overhead switches and sockets are used for both open and hidden wiring. The technology for installing a switch and a socket is similar, so let's take the process of installing a switch from Schneider Electric as an example.
The installation process consists of the following:

In conclusion, the operability of the switch is checked and carried out final assembly. The installation technology of the surface outlet is similar. As a rule, a three-core cable is used to connect sockets, therefore, when connecting, a yellow-green cable (ground) is present, which is connected to the central terminal.
Connection of wires and contacts

When installing electrical wiring in a wooden house, the use of "twists" is not allowed. Ideally, if part of the cable from the difavtomat to the point of consumption is made from a single piece of wire.
To do this, before cutting the cable, it is required to mark the wall surface. Next, using a tape measure, you will need to measure the cable route and only then cut the cable with a margin of 20 cm.

Wago terminal blocks for wiring connection
If a cable connection is unavoidable, then it is better to use:
- Terminal block - divided into products with a tightening screw and clamping plates. The latter are more optimal, since a plate is used to contact the cable and the bus, which does not damage the conductive core.
- Spring terminal - the most simple and effective method connection in which the core is held and in contact with the plate due to the spring clip. Can be used to connect both aluminum and copper cables.
When installing electrical wiring in a wooden house, we recommend using terminal blocks from Wago. Products are distinguished by high build quality and have a wide range of products for cables of various sections. To connect, it is enough to strip the cable by 10 mm, lift the clamping levers up and lead the cable into the terminal hole.
Methods for open wiring

Exposed retro wiring using ceramic sockets and insulators
Opening wiring is the best solution for wiring in a wooden house. The open method of laying the cable from the switchboard to the point of consumption has been used for a long time - previously the cable was located on ceramic insulators. Thus, the wiring did not have direct contact with the wooden wall.
Now this technology is called retro-wiring and is used in rooms where the total peak power is quite small and does not exceed 4 kW. In residential buildings with high peak load, this technology has a lot of disadvantages and limitations.

Open wiring in a wooden house without additional insulation
For an open wiring device, it is customary to use:

Some homeowners use a combination approach. For cable laying in straight sections, a steel straight pipe is used, and metal corrugation is used as rotary elements. This approach is not aesthetically pleasing, but it is quite reliable. For safety reasons, all metal pipes and other elements must be connected to the ground loop.
Hidden wiring in a wooden house is a good combination modern technologies electrical wiring and a healthy microclimate created by natural materials. However, it is not an easy task to correctly perform the hidden installation of conductors in a house made of logs; only specialists with the appropriate qualifications can carry out such work. Otherwise, you will have to do with installing the cable in an open way.
Advantages and disadvantages of hidden wiring
Why do many people want to make hidden wiring in a country or city log house, and not a simpler open one? Due to a range of benefits.
If the wiring in a wooden house is installed correctly with your own hands, then:
- getting better appearance walls and ceilings, wiring elements do not violate the design of the room;
- sockets and switches do not protrude above the wall surface and do not cause inconvenience when rearranging furniture;
- the fire safety of the structure is increased due to the absence of cables on the surface of the walls, the risk of mechanical damage to conductors is reduced;
- simplifies the process decorative processing walls, in particular, wallpapering;
- protruding electrical wiring is not going to dust and dirt.
But the installation of hidden wires in log houses is associated with certain difficulties and dangers:
- it is not possible to regularly check the condition of the insulation of electrical cables and replace damaged sections (and damage, even microscopic, can cause a short circuit);
- the complexity of supplementing the system with new connection points;
- high cost of materials used and installation work;
- the possibility of laying concealed wiring only at the stage of construction of wooden houses.
Since a fire can occur in a room from a bar even if a small spark appears, the installation of hidden electrical wiring in a wooden house must be carried out in strict accordance with a number of regulatory documents: PUE, GOST R 50572.1-93, SNiP III-4-80, SNiP 3/01 /01-85 and SNiP 2.08.01(6.17). Following the above requirements is not a whim or reinsurance, but necessary condition home security.
Features of installing hidden wiring
Installation of hidden wiring in a wooden house has whole line features, and the owner of a timber residential structure needs to be prepared for them. So, you can proceed to the installation process only after compiling and recording the wiring diagram, as well as after agreeing this diagram with specialists. The circuit must be drawn up in such a way that the number of turns and bends of the electrical cable is minimal. At the same time, priority should always be given to fire safety, and not to aesthetic issues.
Electrical wiring is not carried out inside logs without reliable protection. The main is laid only on non-combustible surfaces (in most cases, the cable is placed in a copper or steel pipe). Access to junction boxes must always remain free.
Contact of the conductor with the bar is not allowed. This means that channels must be formed in the walls for wiring, and then pipes should be inserted into these channels. After that, the cable must be pulled through the pipes. To facilitate this process, an additional conductor wire is used. Vertical channels for wiring are made during the laying of the log house, and horizontal channels - after the completion of the construction of the walls. The measurement of insulation resistance is performed twice: before and after pulling the cable through the pipe.

In the places where electrical elements are installed, as well as in the areas where the wire passes from one room to another, it is necessary to install insulating structures: metal boxes, sleeves, linings, etc. Asbestos plaster can also be used as insulation.
The connection of the insulating pipe and the box is carried out by threading or welding. The sharp edges of the structure are closed with plastic plugs. To protect the wire from damage while pulling through the pipeline, it is recommended to use plastic end sleeves.
Of great importance is the number of channels laid. If there are a lot of them, then a large diameter protective pipe must be used, and it can be difficult to fit it into the timber walls. The importance of residual current devices (RCDs) or difavtomatov (devices that combine circuit breakers and RCDs) is increasing. With hidden wiring, there should be several of them: to turn off the external and internal circuits, as well as the circuit with maximum load. It will not be superfluous to ground each pipe and junction box.
To facilitate the installation process of the highway, masters often combine hidden wiring with open wiring. For example, cable entry to switches and sockets can be carried out in an open way. The use of combined wiring is considered acceptable from the point of view of safety standards.
What should not be done?
Many craftsmen (especially beginners) who install wiring in a wooden house make a serious and dangerous mistake - they lay the wire directly through wooden structures. The reasons for this error are the hope for the strength of the insulating coating of the conductor, as well as reliance on foreign (American, Finnish) experience.
In a number of Western countries, hidden wiring in the house is pulled directly through the holes in the logs. However, in these cases, double grounding is provided, minimizing the risk of fire. In addition, in the west, ground wires without a braid are used, due to which the RCD is triggered if the insulation is damaged on any section of the route. Our ground cable is insulated and provides effective protection only the end user.
Various unpredictable processes occur inside the wiring channels: temperature and humidity changes, dust accumulation, various deformations (especially when the house shrinks). These processes can cause microdamage to the wire insulation. Also, a breakdown often occurs between parallel cables at increased loads. All this can cause a short circuit and fire. If the wiring is not fenced off from the wooden covering, then a fire occurs.
It should be remembered that when performing flush mounting, the cable must not be laid along wooden bases without any protective structures, as well as in corrugated pipes, plastic boxes and metal sleeves located directly on combustible surfaces.
By hiding the cable in smooth or corrugated plastic pipes, the master puts the electric line at risk of damage by rodents. In addition, such coatings are unstable to possible mechanical damage (for example, a person decided to hang a picture on the wall and forgot where the wiring was, as a result of which he pierced the pipe with a nail).
But main reason, according to which plastic pipes, as well as steel corrugated hoses are not used to protect the electric line - this is the inability to withstand the temperature that occurs when the conductors are shorted (it can reach 5000 degrees).
The walls of steel corrugated sleeves, in contrast to the walls steel pipes, very thin and not designed for this level of heat. The channels through which hidden wiring can be laid in a wooden house must have localization ability, that is, the ability to withstand the short circuit process for the time it takes for the fire to self-extinguish.
However, there are cases when the use of a corrugated pipe or a box made of non-combustible polyvinyl chloride (PVC-ng) is still possible. For example, if the pipe is closed on all sides with gaskets made of fireproof and non-heat-conducting materials, which include alabaster, concrete, cement plaster. The thickness of the protective pad depends on the power of the wiring.
Some craftsmen try to simplify their work by resorting to the most primitive installation method - laying a track in layers of cement or alabaster plaster. In this case, one layer of material is laid down, and then, after laying the cable, two or three more layers are applied. This method does not meet fire safety requirements, because the plaster absorbs moisture and may crack over time, losing its insulating properties.
Track design
Work on the installation of hidden electrical wiring begins with the preparation of a diagram of the future route of electrical cable lines. The drawing up of the scheme should be carried out in strict accordance with the requirements of the PUE and taking into account the future shrinkage of the house (the route should be designed in such a way that when the house shrinks, the main line does not get pinched).

The number of twists and turns should be kept to a minimum. If wiring is difficult architectural features buildings or the presence of communications inside the walls, then special steel or copper junction boxes are mounted in difficult areas. At the same time, it is necessary to make sure that there are as few such boxes on the highway as possible, because each extra link weakens the stability of the chain. In addition, the boxes must not be closed with ceilings and decorative elements, as they impede access to devices during maintenance, control, and measurements.
The installation depth of the pipeline for the electric cable must be such that the strength of walls and ceilings is not violated. The location of junction boxes and bends must be calculated so that, if necessary, it is possible to replace wires in a faulty area without dismantling or damaging wooden structures.
Selection of protective pipes
How to make hidden wiring in log houses Right? Only using steel or copper boxes and pipes. Steel products are easily cut into fragments of the required length, and are also connected in many ways: by soldering, welding, tees, threaded couplings. Sustainability similar products corrosion is increased by coating them with a protective paint.
The price of a steel pipe is comparable to the cost of a high-quality corrugated hose. Copper pipes are more expensive, but they are easier to install and are almost not subject to negative environmental influences. They are used if you need to carry out a complex branched electrical main, because they can be bent in any direction without the use of special tools.
The wall thickness of the pipes depends on the cross-section of the conductors of the wire used. If the diameter of the core of the copper conductor does not exceed 2.5 mm 2, then the wall thickness of the pipe should be 2.5 mm or more. For a core with a diameter of 4 mm 2, the wall thickness should reach 2.8 mm, 6-10 mm 2 - 3.2 mm, 16 mm 2 - 3.5 mm, 25-35 mm 2 - 4 mm. The thickness of the cable used (including insulation) must not exceed 40% of the inside diameter of the protective tube.

Conductor selection
For laying hidden electrical routes through wooden houses, conductors marked VVGng (A) and VVGng-P (A) are intended. These are cables with solid copper conductors (the number of conductors is from 3 to 5). These products are double insulated:
- PVC inner layer that insulates each core and is color coded as standard.
- External non-combustible protective shell made of composite plastic. It is characterized by high strength and flexibility, it allows you to pull a long conductor through the pipe using a special steel cable.
These wires can be used at temperatures environment from -50 to +50 degrees. The insulation has anti-corrosion properties, it is resistant to chemical substances and to temperature fluctuations. The characteristics of these products are determined by GOST R IEC 60332-3-22.
Conductors VVGng LS, VVGng-P LS are not inferior to the above-described cables in their properties. In addition, they do not emit hydrogen chloride and opaque substances harmful to humans (this is evidenced by the LS index).
hide in wooden wall you can also use the NYM cable, manufactured in accordance with GOST 22483. It consists of 3-5 copper conductors and triple insulation:
- Each core has a PVC sheath with standard color coding.
- All conductors together are covered with a protective polyolefin composite.
- The structure is encased in non-combustible PVC.
This electrical conductor is manufactured according to the German VDE technology. In wooden houses, the use of cables intended for use in urban areas is prohibited.
Laying wiring on ceilings
Many residents of wooden houses are wondering if it is possible to avoid such a complex process as installing pipes inside walls when laying hidden wiring? There is one option that greatly simplifies the installation process. This is the arrangement of hidden electrical wiring along the ceilings in the attic. However, the same requirements must be met. fire safety, as well as when laying the highway inside the walls. Wiring in the attic is isolated with metal pipes or trays. Through the strobes, only the descent of the wiring to the sockets and switches is carried out.

In most cases, the master makes wiring over the floors using steel or copper pipes, but if the wires are often under different angles change direction, it is advisable to use copper or steel galvanized trays with lids. They can accommodate several wires at the same time in any direction. They perfectly isolate the electrical cable from the wood from which the ceilings are made.
Trays are connected to each other with riveting. In this case, it is necessary to ensure the grounding of each tray separately. At bends, the trays often form corners that can damage the cable insulation, so corrugated insulation must be put on the cable in appropriate areas. Trays can be used when laying wiring both from the outside and from the inside of the ceiling. In the second case, the structure can be closed with drywall or grooved board.
Installation of switches and sockets
If the material from which the house is built is wood, then Special attention should be given to the installation of sockets and switches. In the places of their installation, special sockets should be drilled, into which protective metal boxes and securely connected to the pipes through which the cable is supplied. Then, the devices to be installed are placed in the boxes.
It is very important to ensure a reliable connection of the pipe and the box into a single whole, only in this case it will be possible to properly ground the structure. It is possible to connect boxes and pipes by welding or soldering, in this case the most reliable contact of the main parts is ensured, the joints are resistant to mechanical stress and corrosion.
Another method that is used for steel pipes is the connection to the box by screwing nuts. In this case, threads must be present at the ends of the pipe, and the nuts, after tight tightening, must be additionally fixed and protected from corrosion.
Recommended protection class for technological and junction boxes– not lower than IP-54. Such structures are protected from the penetration of household and industrial dust, as well as water splashes.


