Every little girl dreams of her own dollhouse. Nowadays, you can find a lot of them in stores, but they are all of the same type and expensive. From this article you will learn how you can make an original dollhouse without spending a lot of money. Such a house will be unique, the child will be able to furnish it the way he wants. Your whole family can have a great time creating their own masterpiece.


Popular master classes
There are many different workshops for making dollhouses. At the same time, a variety of materials are taken: wood, plywood, drywall, laminate, boxes, bookshelves, folders for documents. This is not yet a complete list of the proposed materials.
The front wall of the house is either not made at all, or made in the form of an opening door. This is necessary for the convenience of the game. We suggest you choose what is right for you and get to work.
plywood, laminate
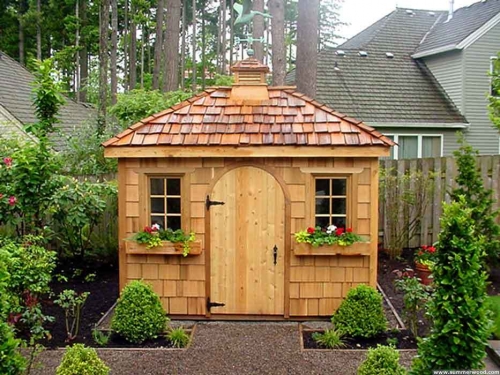
Manufacturing option dollhouse for girls made of wood - one of the most popular. The undoubted advantages of such a house are its strength and durability. It is easy to decorate both from the outside and from inside. However, for the manufacture of a wooden house, men's help is required.


If the house is built with high quality, it will not be distinguished from the purchased one. You can make drawings for building such a house yourself, or you can use ready-made ones. You can attach wheels to such a house and then it will become mobile.

What will be needed:
- Laminate or plywood, it is better to choose a thickness of at least 7 mm;
- jigsaw;
- glue - carpentry, PVA;
- self-adhesive film, which we will paste over the floor in our house;
- wallpaper, they are useful for pasting walls in rooms;
- simple pencil;
- roulette.
 Approximate drawing of a plywood house
Step-by-step instruction:
- We cut out the walls of the house from plywood sheets, according to the dimensions in the drawing.
- We mark where the windows and doors will be located, and cut them out.
- Using wood glue, we assemble the structure as shown in the figure. You can use small nails for the reliability of the design.
- Make a roof. Paste it with corrugated cardboard and paint it, imitating tiles.
- Glue the finished house onto a piece of plywood that is larger than the floors in the house. This will give it more stability. On the plywood that remains on the sides of the house, you can make a lawn.
- Now we paste over the walls in the rooms with wallpaper, the floors with film.
- We arrange furniture.
- We decorate the interior with the help of textiles: curtains for windows, rugs, tablecloths for furniture.


Mastur class for making a plywood dollhouse, see the following video.
See the required drawings from the video below.


From drywall
Many of us after repair have pieces of drywall that are no longer needed. Why not use them to please your little princess? From it you can make a wonderful house for dolls.
A drywall house has a lot of advantages, including: ease of working with it, its lightness. Even if you do not paint the walls of the house after assembly, they will still look neat thanks to its white color. A significant disadvantage of such a house is its fragility. It is worth a little pressure on any part of the house, as it will immediately break.
In order to make a drywall house, you can use the diagram above, or you can simply make cruciform partitions to save space in the nursery. These partitions will divide the rooms among themselves, external walls and there will be no roof.


From large sheets of drywall you can make a full-fledged beautiful house. Watch the master class in the next video.
Styrofoam
If you have sheets of packing foam lying around your house, you can build a house from them. For work you will need:
- foam sheets;
- glue gun;
- toothpicks;
- wooden rulers;
- bamboo sticks;
- corrugated cardboard;
- wallpaper pieces;
- acrylic paint;
- foam sponge;
- pieces of ceiling plinths;
- necessary accessories for the interior: pieces of carpet, curtains, furniture and everything that your imagination is capable of.
 Thin foam house frame
Step-by-step instruction:
- First you need to think about what your house will be like and make a drawing. To save space in the apartment, the house can be built in height.
- We cut the foam in accordance with the drawing. It is convenient to do this with a hot knife, so the foam does not crumble.
- Considering where you will windows and doors, you can make a staircase between floors. Cut out the necessary openings.
- Let's start building the house. W we break the cleaning pieces in half. We need them to create more solid construction. We glue the foam sheets with glue gun, having previously connected them with the help of halves of toothpicks.
- We use bamboo sticks to strengthen the floor and ceiling. from Chinese napkins. We glue the sticks to the foam sheets as beams. After that, the sheets intended for the floor-ceiling can be glued to the side walls.
- We glue the interfloor stairs separately. It can be made from foam or wooden rulers. We use toothpicks as a railing. After that, we glue the finished staircase.
- The roof can be glued with foam or corrugated cardboard. Tiles can be imitated by cutting cardboard into small pieces and gluing it, and then painting it.
- On outer wall you can make a balcony. We glue it from polystyrene foam, we use bamboo sticks as railings
- Outside coloring the house acrylic paints with a regular sponge.
- We cover the walls of the rooms with wallpaper, we cover the floors with carpet. From ceiling plinth cut out skirting boards and window sills, and glue them. We create coziness with the help of curtains on the windows.
- We arrange furniture which can also be glued from foam, and we invite new tenants.
 Design interior decoration At home, you can offer to come up with a daughter
Home decoration can be very diverse. You can use a transparent plastic box, make printouts of the underwater world and put an aquarium in your house. You can print pictures, lay tablecloths on tables, add toys to dolls. Let your imagination run wild and you will get the most wonderful dollhouse for girls.
From a bookshelf / rack
You can make a great dollhouse out of a bookshelf or shelving unit. Making it is very simple, because you already have a ready-made base. To decorate the house, use cardboard, wallpaper, self-adhesive paper, and wrapping paper is also suitable.

Include your daughter in this creative process as well. She will be able to act as a designer for her dollhouse.
If the house is located permanently against the wall, then you can make the roof of the house with black electrical tape, gluing the contours. Glue the chimney in the same way. If necessary, rearrange the house to another place, the electrical tape can be safely peeled off without damaging the wallpaper in the room. You can buy ready-made furniture for dolls or show your imagination and make it yourself.
 By placing the house against the wall, the free space in the nursery will increase.
From an old locker or chest of drawers
Your daughter asks for a dollhouse, but the garage is gathering dust old chest of drawers? You can breathe a second life into old, already unnecessary furniture. Treat your child by making a dollhouse out of an old locker or chest of drawers . Such houses are very convenient for those whose children play with large or tall dolls.
First of all, you need to know the height of the dolls. This is necessary so that the dolls can be placed in rooms in full height. You may have to combine 2 shelves by removing unnecessary partitions. Work carefully, trying not to break the inner walls of the cabinet or chest of drawers. In place of the partitions that we removed, a void that we do not need will appear. It can be glued with thin slats that fit in size.
After waiting for the glue to dry completely, treat the walls of the chest of drawers with a thin layer of putty. After that, the chest of drawers must be sanded, then it will become even and smooth. Using a jigsaw, you can cut windows.
 house from old furniture will look very solid reliable
The last step will be the decoration of your house. The outside can be painted. You will most likely have to paint it in several layers in order to cover up the old color of the chest of drawers. The walls inside can be pasted over with wallpaper, colored, packaging or self-adhesive paper. And you can also just paint them. We arrange furniture, hang pictures and mirrors on the walls, curtains, spread carpets and invite dolls to housewarming. Now the dolls in your daughter's room will always be tidied up!
From cardboard
Budget option Making the dollhouse is corrugated cardboard. With it, you can create a wonderful toy that will delight your girl for a long time.
We will need:
- corrugated cardboard for the frame of the house;
- decorative cardboard for decorating a house;
- detail templates that will depend on the size of your future house; sweep;
- stationery: pencil, ruler, eraser, scissors;
- knife, paints, brushes, felt-tip pens;
- glue gun;
- colored, packaging and self-adhesive paper;
- textile;
- decorative elements - beads, rhinestones, stones, artificial flowers.
 The girl can independently "make repairs" in the new house of her dolls

Let's start making a house:
- If you have a large sheet of corrugated cardboard, then you can apply a scan on it. Choose the dimensions based on the size of the house. If there are no large sheets, then each part must be cut out separately. The front wall does not need to be done.
- In order to make it convenient to bend the cardboard, it is necessary to make a groove at the place of the fold by drawing a ruler along it. If all the details are cut out, glue them at the joints of the cardboard.
- Cut and paste interior partitions. In such a house, they are simply necessary. They will perform a supporting function.
The structure is assembled. You can start decorating.
It is better to paste over the walls inside decorative paper or cloth. So you hide the seams in the places of gluing. Outside, the walls can be decorated to your taste: paint, paste over. Decorate your home with beads, rhinestones, pebbles or other items of your choice. Pay attention to the fact that the decor elements hold well on the cardboard, otherwise the house will lose its attractiveness during the games.
Arrange the furniture and invite the child to play.
 In a house made of cardboard, it will be possible to re-paste the wallpaper without any problems if the old ones get bored
Master classes on making a cardboard dollhouse, see below.
Out of the boxes
Very easy to make dollhouse out of boxes. For him, you will need to choose the right size boxes. The size will depend on the height of the dolls for which this house is made. The number of boxes will depend on the number of rooms you are going to make. One box, one room. Such a house can be made multi-storey by gluing the boxes one on top of the other. This will save space in the room.
It is necessary to fasten the boxes together so that its top is on its side, opening the interior of the room to the eye. It can be done different ways: using a stapler, glue, double-sided tape. Cut out windows. We decorate the house according to your taste. We furnish the furniture and delight the girl with a new toy, for which you spent a minimum of money and effort.

 Cardboard house - one of the most simple options to please the daughter
Watch the following master class, which shows in detail the process of making a beautiful dollhouse out of a box.
A great box house is easy to make! See the following videos for more details.
From document folders
If there is very little space in the children's room, you can make a folding dollhouse.
For such a house, we need 4 folders for documents. We glue each folder inside beautiful paper- this will be wallpaper for the walls. Decorate the clip of the folder with a cloth, making a kind of curtain out of it. Print out interior items on the printer and stick on the walls. The house is ready. It remains to open the folders and put them vertically. Add the necessary furniture.
You can make a separate room from each folder of folders.


Perhaps it is difficult to meet a child who would not dream of his own little house. It can be anything - a textile tent, a wooden hut, a plastic house, and even a hut or wigwam. And it does not matter where such structures are installed - on suburban area, or in an ordinary apartment - it is important that this is a personal place for the baby to play and spend free time. Such a space is very necessary for children, anyone will tell you about it. child psychologist, especially if the house does not provide a separate children's room. This article will talk about how to make children's house with your own hands.
It is important to satisfy the need for a personal “corner”, because only this will lead to the full development of the growing personality. Here the child should feel like a master, he himself arranges furniture or brings toys, cleans up inside, brings cleanliness and beauty. This helps to foster responsibility and also makes the baby feel safe. In addition, it is also perfect place for educational games.
Children's house photo

That is, as experts say, any child needs a secluded place where he could feel confident, protected, could play, or be creative, or just relax from everything and everyone. Of course, today manufacturers of children's toys offer a wide variety of options for children's playhouses or tents. But it’s so nice to make a house on your own, all the more you can involve the future owner of this property in this work.
It remains only to create a project for a children's house and choose the materials from which the idea will be implemented.
Variety of children's playhouses
Wooden children's houses
- To date, the choice of materials is very large. Of course, wood remains in the first place. It is a natural product, environmentally safe and readily available. Enough to work with wood simple tools- hammer, saw, screws and nails.
- Of course, if you want to build real masterpiece, you will need a more serious set of equipment, but in principle there is nothing complicated here and you can always do it yourself. This category also includes products such as MDF, WPV, plywood, lining and other wood-based materials. They can be combined with each other, or used independently. It all depends on where the structure is planned to be installed and how it will be used.
House made of cardboard or cardboard box
- Easy and simple to build a house out of cardboard or cardboard box even kids can do it. As a basis, packaging from household appliances e.g. from a refrigerator, washing machine, TV, etc. It is advisable to take thick and dense cardboard, then its strength will be higher. All structural elements- doors, windows and others are easily cut with a regular clerical knife and scissors. To do this procedure more accurately, it is advisable to first draw the borders.

- The roof is made from glued pieces of cardboard or one large piece, depending on the design of the house. You can glue the parts together with PVA glue or adhesive tape (it is especially important to strengthen the joints in this way so that the product does not quickly become unusable). After the design is assembled, it should be brightly and beautifully decorated. This is easy to do with ordinary gouache and a brush. If there are pieces of wallpaper left in the house, then you can beautifully paste over the walls and roof with this material.
- It is recommended to entrust the child to decorate the inner and outer parts so that he feels like a master here. True, such a structure will not differ in durability. Therefore, such a house is best kept indoors (in an apartment or house), and if used outdoors, then only in dry, calm weather. This rule also applies to the next category of materials - textiles.
Fabric children's house
- From fabric, you can build a variety of shapes for children's houses. Most simple view is a hut or tent. To create them, it is enough to come up with a base (frame) and cover it with a piece of fabric, an old bedspread or a sheet. This structure can be both stationary and collapsible, it all depends on the imagination of the master.
- Ideal for frame plastic pipes(PVC), which are used for plumbing, or thin blocks of wood. It is quite easy to buy these products in hardware store, their price is low. In cases of creation wooden frame, all parts should be sanded and painted. This procedure will prevent the appearance of splinters and scratches in the child.

- It will not take much effort to make a hut, it is enough to tie 3-5 guides together by the tops (from one end), and install the structure on a solid support with the free end, spreading the guides in different directions. Then fasten fabric to them to form walls. Since the floor is not provided for in the design, it is necessary to lay a thick carpet so that children do not catch a cold when playing on the cold floor. In the summer, such a children's house can be taken out into the garden. This is a fairly mobile design that the child can move at will.
- Another option to simply build a hut is to take a gymnastic hoop as a basis or build a wire frame. Such a product should be fixed to the ceiling, or, if there is such an opportunity on the street, by a tree branch. Here it is important to cut the material correctly; with the proper approach, it is easy to make windows and doors from separate pieces of fabric. If you can’t build a frame, then you can take an ordinary table as a basis and tighten it with a cloth, like a cover, leave a place for entry, that is, make a folding canopy and the playhouse is ready. Children will be happy to spend time in such a place, especially if the table is large and there is room to turn around.
Drywall children's house
- Another material that is successfully used in the construction of structures of varying complexity is drywall. Such a house can become an adornment of any apartment, the main thing is to create a project so that it fits well into the interior. Used as a frame aluminum profiles, and wooden bars. screw drywall sheets to the base follows with the help of self-tapping screws and a screwdriver, it is important to ensure that the sharp ends of the hardware do not come out inside the structure, otherwise the child may accidentally get hurt.

- If a second floor and a staircase are planned in the house, then the floors should be made as strong as possible, and the steps are best done from boards, since drywall easily breaks under weight. A drywall children's house will already look like a whole room, it is allowed to put real furniture here and even hold the light. That's just on the street such a design is better not to use. Especially if the drywall is not moisture resistant and is not additionally untreated. Otherwise, all beauty will disappear literally in one season and the next one will have to build a new one. cozy house, and this is a waste of effort, time and money.
- These materials are the most common for the construction of children's playhouses, but this does not mean that this is the only possible options. Some craftsmen manage to create buildings from any improvised means, for example, from plastic bottles or build a house out of sandbags. In general, there would be a desire, but there will be opportunities.
DIY wooden children's house
Since it is wood structures that are the most durable, durable and safe, it is worth considering in more detail the stages of building wooden houses, and learning about the necessary set of materials and tools.
Choosing a place to build a children's house
- So, first of all, you should decide on a place for the future structure. This is especially important if a stationary house is planned, which will be located on one site for a long time. The dream of every child is to have a tree house, but if there is no way to completely secure this option, then it is better to avoid such a construction. Children cannot sit still, they need to move, and outdoor games at high altitude can lead to injuries, which is why it is recommended to stop at a hut built on the ground. Moreover, it is this option that can be easily supplemented with a wide variety of designs, including a sandbox, a swing and even a slide.

- On personal plot the location of the future house should be indicated. It is best if it is a quiet place where there is a slight shade from the midday sun. It is also important to keep in mind that around it is necessary to allocate additional territory for games. Such a place should not be occupied by beds or other household needs, but completely given over to children for games. This must be taken into account, first of all, not for the children themselves, but for the peace of mind of their parents, because noisy games can lead to the fact that precious plantings will simply be destroyed.
Foundation and floor preparation
- The dimensions of the building are chosen arbitrarily, for a small children's house, a length and width of 140-160 cm is sufficient, and a height of about 1-1.5 meters. The first thing to do is prepare the foundation. The base can be a platform covered with rubble, or well-packed sand and even ordinary earth.
- There are several styling options floor boards. Can be removed upper layer sod, fill the formed place with rubble, level and lay the support bars on the prepared site. Another option assumes that only the corners of the building will be on special support blocks, for example, made of cellular concrete. Such supports are laid on prepared sand cushions. That is, marking the corners future construction, in each of them a depression of 30-50 cm is dug. All the earth is pulled out of the pits, and sand is poured into the vacated space, which is carefully compacted. To most accurately mark the corners, you can put together the main floor frame in advance.

- Blocks are placed on the prepared sand layers at the same level. Horizontalness should be measured using a level and floor frame timber. Further, it is important to take care of the waterproofing layer, this will help the house to stand for more than one season in integrity and safety. As an insulator, roofing felt or roofing felt, as well as more expensive materials, including various mastics, are used. In addition, you can use the option in which there is free space under the floor to blow through the boards.
- The next step is to mount the frame. Blocks of the required length are laid on foundation blocks, or on support bars (if the option with a rammed platform was chosen), and connected into a rectangular box using corners and self-tapping screws. Metal corners will make the structure durable, but for greater reliability, additional transverse bars should be installed. If a large house is planned, then there will be 3-5 such struts, if the building is of modest size, then one more board in the middle is enough.

- Further, on the frame prepared in this way, the floor is laid. Separate boards can be used for the floor, wooden shields or chipboard sheets, MDF or HDF. The main thing is that they can safely withstand the weight of not only a child, but also an adult. It is recommended to apply floorboard with parameters: length 6 m, width 13.5 cm and thickness 28 mm. As a rule, 4 boards are enough for floor installation.
- Another rule in the construction of any structures made of wood is to protect the surface of the wood from moisture, as well as from damage by insects. And the orphanage will not be an exception here. It is advisable to impregnate the boards on both sides with a special composition, which contains both water-repellent components and antiseptics.
Installation of walls and roof
- When the floor is sorted out, you can start creating walls. To mount this element, you should create a frame of bars, which will later be sheathed with clapboard or shields. The main thing is not to forget about the doors and windows. First of all, a bar is installed in every corner of the future children's house. For these purposes, you can choose products with a cross section of 60x40 mm, a length of 3 m is enough. Each element is cut into three parts, 1 m high, or into two parts 1.5 m each. Next, bars are installed under windows and doors.

- To fix the main bar, you should nail it to the floor, but in such a way that in the future these nails can be easily pulled out. This is due to the fact that the most durable fastening of building parts can only be done on special mounting corners, which are installed a little later. Between the rafters (approximately at half the height), be sure to install additional spacers, which will also serve as a fastening system. It is unforgettable that the beams are connected from above by a frame, which will be the basis for the roof. When the base for the walls is ready, the nails are pulled out one by one and metal corners are mounted in their place. It is important to fix all corners and butt elements with corner fasteners, only then the house will really be strong.
- Bars that are installed horizontally mark windows and doors. We need to calculate their height in advance. The calculation is carried out from the width of the sheathing boards, such parameters should be laid down so that when sheathing does not have to cut the board along its width or close the floor of the window. That is, we consider how many full boards will fit into the remaining opening from above and below and at such a height and fix the horizontal struts.
- And the last thing to do to complete the frame is to put the bars for the roof. To do this, we knock down two bars between each other at an angle (in the form of an unfinished triangle, the base of which will be one of the walls), and we strengthen the free ends on the upper bars of the walls. There can be from 2 to 4 such triangles. Without fail, one is installed on opposite walls of the house, opposite each other, and one or two can be installed between them, it all depends on the size of the structure. Also, these bars must be fixed with corners.

Drawing of a children's house

Sheathing of a children's playhouse and its design
- Now you should start covering the building. To create walls, you can use lining, shields or boards. The clapboard option suggests faster sheathing, since the elements do not have to be adjusted, and they are quite easily connected to each other. The roof is closed with edged boards and roofing material, tile or ondulin can be laid on top, everything depends on the builders' ability.
- Since we have a children's house in front of us, it is advisable to decorate it in bright colors. This can be done with children. In addition, windows can additionally be decorated with carved platbands, which are commercially available, or you can make them yourself. Inside the building, it is recommended to install benches and a table, but, of course, this is far from the only option for decorating the interior. A porch is often made in front of the house, which was either originally included in the plan, or it can be easily completed separately.
- It is important that the house for children is completely safe. This concerns its stability and reliability of the connection of elements to each other. Also, so that during the game the kids do not get hurt and scratched, all boards must be jointed and well protected with a layer of paint, varnish or stain. Metal corners, screws and nails must be properly sealed so that they do not bulge or stick out.
Today, choosing an option for building a playhouse for children is not difficult, because there are a lot of photos and videos on the Internet on this topic. The approximate cost of the building is 5000-15000 rubles, this cost includes the purchase of boards, hardware, paints and other materials. But often, many parents can build a children's house for their child's games with their own hands for free, using only improvised materials.
play house video
Do not deny your child such pleasure as small house. This will help the child to fully develop and feel happier. If it is not possible to arrange a place for games on the street, then this can always be done right in the apartment. Do not forget to please the children, and they will certainly please you with their successes.
As children, each of us tried to build a separate housing for ourselves - a toy house. Despite the simplicity of the design, it was the best shelter for games.
A shaky structure made of a box, cardboard or branches in the form of a hut bore the proud name of a house and seemed to be the best.
Having matured, we think about creating a more durable and functional house for children.
Most often built children's playhouse from wood. The choice of material for the house is due to rational considerations - wood is an environmentally friendly and durable material. A small house made of coniferous wood will have a positive effect on the health of the child. In addition, it will enable the child to feel independent. Having built a full-fledged developing house for the baby, you will provide him with his own play area, where he can play in it in any weather.
For parents, the main thing is that it be safe, inexpensive and fit into general style dacha or suburban area. Another advantage of the house is that it can be used as an outbuilding, so to speak, a beautiful storage shed garden tools, unnecessary things or firewood.
How to make a children's house out of wood
This article will describe step-by-step instruction how to build a children's wooden house with your own hands.
1. Ideas for a children's house
First, think about how the house will look like, what type, type and dimensions will be. To do this, you need to define:
- Type. Open or closed;
- Dimensions. Occupied area and height;
- Place of installation / location. A house installed on the ground and on a tree have a different principle of constructive device;
- The material from which the building will be made;
- Availability of windows, doors and material for them;
- The presence of additional components - extensions, a fence (fencing), a terrace, a slide, a sandbox, a swing, a ladder.
- The presence of interior decoration.
Pictures of a house for children


The photo below shows how to do children's wigwam for Indians, a hut for Robinsons and a yurt for nomads made of wood, fabric, branches and shrubs.


A hut for fairy-tale heroes and forest dwellers.


A pirate frigate for young robbers and a sailing schooner for cheerful sailors.


When developing a plan for a house, it is worth considering the following:
- mobility or stationarity. Both the size of the house and the technology of its construction will depend on this;
- At least two windows are required. First, it's lighting. Secondly, the hut must be clearly visible for control;
- the height of windows from the floor should be 500-600 mm;
- door height. At 200-300 mm. taller than a child. But it is better to make them to the ceiling, because sooner or later you will be invited to the house;
- walls. Should be smooth to avoid injury;
- roof. In no case should it be flat. In order not to attract the child to climb on it.
You can sketch your own sketch or use ready-made drawings. The schematic drawings below show projects of children's houses that you can build with your own hands.


The scheme of the children's house with all the indicated dimensions will help to properly prepare materials for construction.
3. Tool and material for manufacturing
Tool:
- hacksaw;
- plane;
- roulette;
- chisel;
- metal corner;
- building level;
- drill;
- screwdriver or hammer and nails;
- sandpaper (for sanding wood);
- brushes and paint for painting the house or any finishing material type of lining or siding.
Material:
- beam for the manufacture of the frame. Recommended section 50x50;
- lumber for sheathing. Boards or timber will create a beautiful house;
- plywood (thickness not less than 8 mm) or OSB for sheathing. Cheaper, but also less durable material that requires additional processing;
- roofing material;
- brick;
- glass for windows (if necessary and only for children over 7 years old, and even then in doubt - it is better to exclude any presence of glass).
4. Building a wooden children's house with your own hands
4.1 Foundation
Of course, a strong foundation for a children's playhouse made of wood should not be poured. But here to take out the soil with a depth of 80-100 mm. and lay out a brick over the entire area of \u200b\u200bthe building does not fit. So the hut will last much longer.
As an option it can be used terrace board. But its acquisition is very costly.
The most budgetary and fastest option is to make a foundation of several bricks and a timber strapping installed on it. This approach to the foundation device is usually used in greenhouses.


4.2 Floor for the house
It is better to equip the floor according to all the rules of the genre. Namely, lay the logs and stuff the floorboard on them. Or lay OSB or plywood in two layers, so that the next layer overlaps the seams of the previous one.


4.3 Walls and frame of the children's house
Holes are dug in the corners of the foundation for the installation of timber. This is a wall support. Before placing the timber in the ground, it must be processed. Additionally, a bar is also installed in the places where windows and doors are installed. For rigidity, the frame bars can be fastened together with a metal corner. Next, the frame is sewn up with boards or plywood.


A wooden children's house, the drawing of which is given below, can only be built with the installation of supports.

For an ordinary house, there is an easier option - knock down the shields from the boards. And fill a bar along their perimeter. Then knock down wooden shields among themselves.


The material was prepared for the site www.site
4.4 Roof for a children's house
The roof device begins with the manufacture of gables. For them, the same timber is used as for the frame. Two triangles are installed on opposite walls. If necessary, several more are installed between them.


A beam is stuffed between them. One or more depends on what the roof will be covered with.


Or we knock them into a shield, which will then be attached to the gables.
The bottom line is the difference in ease of use. One slope or two, the main thing is that the roof is not used by the child as a playground. If the boards fit well, it is enough to treat them with an antiseptic and paint.
5. Finishing a children's house made of wood
In order to please you with a wooden house for children made with your own hands, you need to take care of protecting the wood for as long as possible. To do this, it must be treated with solutions against bugs and decay. And then open with stain, varnish or paint.
Install benches inside the house or make a table and chairs of appropriate sizes.


6. Baby house safety
Separately, I want to focus on how to make the house safe. For this you need:
- choose a flat area for the installation of the house. Or a reliable tree;
- check the quality of wood processing. Mechanical to prevent splinters from entering. And antiseptic - wood should be environmentally friendly;
- screw the screws correctly;
- best for roofing soft materials or polycarbonate. Because, for example, metal tiles have sharp edges and can cause injury.
Treehouse for kids
If you have already grown from a small children's house on the ground, then it's time to move higher, for example, to the crown of a tree (canopy, uvei, i.e. the upper / middle branched part of the tree). In addition, we will describe how to make a tree house for children with your own hands.
1. Tree selection
 Pay attention to the crown of the tree, the trunk, the location of the branches, the age of the tree and its size. Coniferous trees not very suitable for this kind of construction, since the needles transmit little light.
In addition, it is important to remember that as it grows, the tree will change its shape. Therefore, build on the lower branches or try to take this fact into account.
2. Choice of design option (shape)
It is necessary to work out the idea, again, taking into account the configuration of the tree.


 A schematic drawing with dimensions will help you develop your project and imagine what the finished product will look like.
4. Installation of the house
All work on the construction of the walls and roof of the house is best done on the ground. But, the device of the floor - supports, belongs to the category of high-altitude work.
To make a floor in a house on branches, you need to install a platform that will be the basis of the whole structure. It can be supported by additional supports placed on the ground, or by supports placed on the trunk of a tree.

Fixing the platform on the trunk will allow you to adjust its height over time.


5. Finishing work
Installing a ladder is a mandatory step in building a treehouse. The ladder can be wooden or rope. The first one is more reliable. In addition to the stairs for the house, you can fix a rope along which the descent will be faster.
6. Security
- comfortable stairs (straight, spiral), preferably with railings;
- the optimal height of the house. Preferably up to 3 meters;
- a reliable platform, necessarily fenced with walls or handrails;
- the technology for building a children's wooden treehouse does not provide for nailing. It is safer to use bolts and nuts;
- In addition, the wood and all connections of the house must be periodically checked and tightened.
Conclusion
As you can see, making a wooden house for children with your own hands is not difficult. In fact, according to the same principle, modules are manufactured and wooden houses for the playground, and even cardboard houses to play in the apartment.
Wooden children's houses - photos and pictures for ideas


Tools and materials for making a children's playhouse
Dimensions of my playhouse: 160x160x140cm on the walls. The height of the skate is 90cm. The consumption of materials is indicated based on these parameters.
Frame and floor:
- foundation block 20×20×40 - 4 pieces
- reinforced mounting bracket 70×55 - 20pcs
- mounting bracket 90×40 - 22pcs
- corner connector 145×35 - 11 pcs
- bar 60 × 40 × 3.0 - 11 pieces
- floor board 135×28×6 - 4 pieces
Walls:
- lining 12.5 × 90 × 3.0 - 4 packs of 10 pieces
- paint "Veres ulta" "pine" - 2.7l
- paint "Veres ultra" "nut" - 0.9l
- carved platband 90 1.8m - 2 pieces
- carved front 90 3.0m - 1pc
- corner 60 × 60 figs / smooth 20.5 m - 4 pieces
- furniture board 140 × 20 × 1.8 - 2 pcs (for window sills)
Roof:
- bar 50 × 50 × 3.0 - 5 pieces
- edged board 25×130 - 0.17m3
- ondulin - 5 sheets
- horse ondulin - 3 sheets
- beam holder 210 - 6pcs
You will also need nails, screws and some roofing material for work. the total cost necessary materials I personally had about 17,000 rubles.
How to make a children's playhouse with your own hands
We begin the work on building a playhouse with a floor frame. We mount the base, align it diagonally, reinforce it with an average beam and metal corners.

We choose a flat place for the house and, using the frame, mark 4 corner points necessary for an impromptu foundation.

To give the house greater stability, the floor frame is laid on 4 foundation blocks. We set the blocks according to the level with a sandy bed in the recesses for 1 bayonet of a shovel. Between the frame and the foundation we lay a layer of waterproofing.

We sew up the floor frame with boards to get a strong, even floor.

When the floor is ready, we process it from the side of the ground, proceed to the installation of the wall frame with windows and an entrance.

Important: so that children do not get splinters and cuts, only jointed material should be used and all chamfers should be removed at open corners: on frame bars - with a planer, on metal reinforcement corners - with a grinder.

On working surface mark the rafter template. We bait the rafter bars to the working surface (nail with 2 nails, but not completely, leaving a gap to remove the nails). After that, we sew in the rafter and cut it according to the template, reinforcing all corners and joints with metal corners, and only after that we remove temporary nails.

Ready-made rafters (3 pieces) are baited to the frame with a temporary strut (an inclined support beam), set along a plumb line, and then connected to the wall frame with metal beam holders.

When the frame is ready, you can start lining it with clapboard.

Following the walls, sheathe the roof edged board- we sew the boards from the ridge on both sides, remove the temporary jibs and then sew the entire roof further. We cut the crush with ondulin and mount the ondulin skate. By the way, it is very convenient to cut ondulin with a grinder with a cutting disc.


Since our house should be childish, smart and positive, we decorate the end of the roof and window openings carved platbands which can be purchased at ready-made, we cut in the window sills, we sew the corners of the house with a curly smooth corner.


Inside the house, do not forget the organizer of several tables and benches for children.

In general, the house is ready, it remains only to paint it in bright colors and show it to the children!
In the summer, children often travel with their parents from a stuffy city apartment to the country, but they usually have nothing to do with themselves, so a children's house will help solve this problem.
Not everyone can afford the price of a ready-made one, but building your own, with your own hands, will not take a lot of money.
How to make a play house? Ideas, drawings, construction steps and photos can be found in this article. The house will become a favorite place for children to relax.
Introduction

It is important to know: if the child is small, does not go to school yet, then it is better to do it small sizes, approximately 1.8x1.8 meters, and about 2-2.5 m high. For schoolchildren, it is better to complete the construction in two levels.
Types and ideas of designs with a description of the features
 The design features of the future building may depend on the imagination of parents and their children. True, there are several options that are often built on the site:
- The design is in the form of a hut, which is made of wood. One of the most simple houses, and it does not require much space to install. The hut is great if there is no large area;
- Green house perfect solution for nature lovers. All that is needed is to build a frame from the grid and choose the right greenery, which will become the walls and roof of the building;
- The building in the form of a hut is a great place to study. Suitable for schoolchildren;
- The 2-level construction is not just a playhouse, but a separate housing. On the first floor you can make a bench and a table for studying, and on the second floor there is only a place for games. On such a building, you can install a swing or a slide;
- A house on chicken legs - differs from others in that it is placed on supports, and not on the ground. Ideal Solution for girls;
- A tree house is an interesting design, but it must be secured to avoid injury to the child.
The design is difficult to build with your own hands without proper experience.
Material selection
 When the drawing and project of the house are made, you need to choose the right construction material. For this you can use:
- Plastic - the main advantage is safety, hygiene and low weight. In addition, a large abundance of flowers will allow you to build beautiful building . From such material, houses are sold in stores;
- Plywood - light weight and low cost. Can be applied for small building, for preschool children;
- Wood is a natural, inexpensive and easy-to-work material. From wood, you can build a building of any size.
For children's design it is better to use natural materials, environmentally friendly and safe.
Phased description of construction
At the very beginning, you need to choose a place where the building will be installed in the future. After that, you should draw a design on a sheet, indicating all the necessary dimensions. The next step is preparing the materials.

Consider phased construction house for example wooden house on pile foundation with a hill. For work, you will need to use the following materials:

- Beam for roof and wall frame;
- Metal pillars;
- Board;
- Roofing material;
- Paint or varnish;
- Self-tapping screws and corners;
- Concrete.
To build a foundation you need:
- On the selected site, you need to make markings in the form of pegs that are hammered into the ground. There should be 4 of them;
- A fishing line is stretched around the perimeter to mark the line of the future home;
- At 4 corners, holes should be dug to a depth of 1 m. This will fix the piles;
- You will also need to make holes for poles in the places of future windows and doors;
Note: each pole or bar must be treated with enamel and other materials to protect against natural phenomena and increase the service life.

- Crushed stone is laid in the dug pits to a height of 15 cm, after which the pillars are placed;
- All piles must be poured with concrete and wait until everything sets. Often this depth dries up in about 7 days.
- Fasten 4 strong wooden beams to the supports, which will be the basis of the future floor. As a result, it should be frame structure, in which there will be pillars in the corners and at the places of installation of doors and windows, as well as a bar fixed around the perimeter in a horizontal level;
- Sew up the resulting crate with boards or a block house. You can also use sheets of OSB panels. Sheathing is made according to the drawing.
 When the flooring is ready, walls should be erected. In the process of building walls, you need to make windows and doors:
- It is necessary to make markings in the wall and cut out windows and doors of the required sizes along it;
- The decor of openings should be made so that there are no cracks or sharp edges of wood at the corners;
- As a material for the walls, you can use sheets of chipboard or OSB-plates. For the frame, a beam is used, which is fastened with bolts and corners.
Good to know: when building walls and floors, you must constantly use the level so that the structure is even.
 Upon completion of the construction of the walls, it remains to make the roof. It can be of different shapes, both flat and high. To create a high roof you will need:
- Cut 4 beams at an angle of 45 degrees;
- Then the resulting parts are fastened in pairs with screws. The result should be a right angle inside;
- A pair of timber will serve as the basis for the roof of the future gaming house. It is necessary to further strengthen the structure with the help of corners, placing them inside each pair;
- Further, one base is applied to the wall using triangular boards and metal corners. The second base is put by analogy;
- The installed roof sheathing is fastened with one horizontal beam;
- As a roofing material, you can use slate, laminate, corrugated board and other types.
Advice: roofing material for orphanage it is better to use soft or polycarbonate.
When the house is built, you should take care of the stairs. To do this, you can use a simple straight staircase design or a spiral staircase. It is recommended to make additional railings for safety. Optimal Height for a house on stilts with a slide is no more than 3 meters.

Along with the stairs, you need to fix the purchased slide. To do this, in the house itself, you can take a small platform on which the child can stand and slide down the surface of the slide. As a rule, in the kit to the slide there is fixing material for fixation.
The last step is to finish the building inside and out. The outer part is recommended to be painted or varnished. In the photo you can see how you can additionally use the space under the house.
As you can see, building a house for your child is not difficult, and using the video instruction below, the construction is greatly simplified. The instructions show the main points and stages of construction, according to which the construction is done without errors and is completely safe for children.
How to build a house in the country with your own hands, see the following video:


