Reading time ≈ 12 minutes
Polyvinyl chloride (PVC) is currently very popular - it is affordable, holds heat well and does not lose geometric parameters. Against the backdrop of rising energy prices, such materials are almost a panacea, so installing a plastic window in wooden house do-it-yourself interests many people. In the article, in addition to installation instructions, you will find photo and video materials that will help you cope with the task.
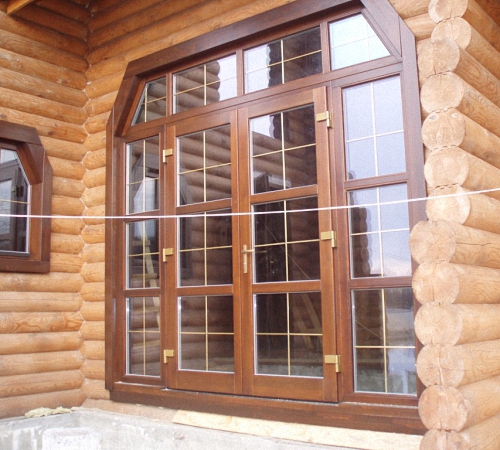
Log house with an attic in the process of glazing with PVC windows
Choice of plastic windows
In order to choose a good plastic window that is right for your case, you will have to pay attention to several parameters. Do not neglect these indicators so that during operation you will not have any complaints about the manufacturer or even force majeure.
Features of double-glazed windows

Single-chamber (left) and triple-chamber (right) double-glazed window
The production of double-glazed windows means not only different technologies manufacturing, but also different glass - this directly affects their performance. Below you will see what they are:
- The usual option with float glass. Such glass has high light transparency and is devoid of any shortcomings.
- Multifunctional double-glazed windows. It has UV protection sun rays), has a low thermal conductivity. These features directly affect the maintenance of the microclimate in the room - they do not let in the cold in winter, and the heat in summer.
- Self-cleaning designs. Such double-glazed windows help to significantly save time on cleaning, since the windows do not have to be washed from the outside. The special composition with which the glass is coated, when exposed to ultraviolet (sunlight), destroys the dirt that the first rain will wash away. Leaks and stains do not remain.
- Soundproof options. In this case, thickened glasses and a scientific approach to the distance between them are used. Thanks to the high-quality profile, seal and glazing bead, vibration, as such, is completely eliminated. Such windows do not absorb, but reflect airborne noise, which affects densely populated and industrial areas, as well as houses located near railways and airfields.
- Reflective glazing. They are also called specular because they are shiny and reflective with a reflectance of about 4%. Such options are ideal for hot climatic conditions - they do not allow heat to pass through, they do not heat up themselves, but at the same time they freely transmit photons (light).
- Colored glass panes. Such glasses soften bright light and poorly transmit heat, although transparency does not suffer from this. Properties (retention of light and heat) change with the hues.
- Tinted windows. They have the same characteristics as colored ones, but at the same time, no coloring pigments are used in the composition. The shade changes due to the gluing of a special film.
- Energy saving options with k-glass. This is an ordinary float glass, on which a k-coating (a thin metal film) is applied by the pyrolysis method during its manufacture (in the hot state). This significantly reduces thermal conductivity and increases mechanical strength (glass is placed on the outside).
- Energy saving options with i-glass. It has a reduced thermal conductivity inherent in k-glass. But the i-coating is a thin layer of silver and the glass can easily be deformed, so it is installed inside a double-glazed window.
- Constructions from smart glasses. These are, as it were, “living” windows that change their parameters (transparency and thermal conductivity) when they change from the outside. This category includes energy-saving and self-cleaning windows.
- Triplex glass. It is a multilayer sheet, where a transparent polymer is in the interlayer. This factor does not reduce translucency, but fire resistance and mechanical strength increase (this does not affect thermal conductivity and sound insulation). If such glass is broken, it will not shatter into small fragments, but will be held on the polymer.
Note. Double-glazed windows are also distinguished by the number of chambers. For regions with a temperate climate, one- and two-chamber packages are popular, in cold zones - three-chamber packages.
Video: Insulating glass formula determines the choice
Plastic profile

Five-chamber profile made of metal-plastic
The functionality of the PVC profile for windows can be determined by six parameters, including:
- number of cameras. According to the building standard, 3, 4 and 5-chamber PVC profiles are produced. In this case, the thickness of the first two options is 60 mm, and the third - 70 mm.
- The width of the outer wall can be of three classes:
- A - 3 mm ± 0.2 mm;
- B - 2.7 mm ± 0.2 mm;
- C - 2.5 mm ± 0.2 mm.
- Reinforcing or guiding profile. It determines the rigidity of the frame and its service life. When installing a plastic window in a wooden house, pay attention to its cross section - it should be a galvanized square with a wall of at least 1.2 mm. L-shaped perforated or ferrous metal, especially of smaller thickness, indicates poor quality.
- Rubber seals. High-quality seals are made of rubber and have a guarantee from the manufacturer for at least 10 years. But if at least once a year the inserts are lubricated with special silicone, then the service life will double.
- A high-quality PVC profile does not fade in the sun, does not turn yellow and does not emit a smell, but this depends on its composition:
- TiO2 is titanium dioxide. An effective white dye, which is practically absent in budget profiles.
- Mel is his allowable rate in cheap profiles, it is limited to 6%, but unscrupulous manufacturers exceed this parameter by 2-3 times. From this, the plastic burns out, turns yellow, and there is no perfectly smooth surface.
- The manufacturer largely determines the quality. So, Chinese windows are much cheaper, but they will not last long. In the countries of the European Union and in Russia, a law has been introduced on laser marker marks, which are applied every 30-50 cm from the end side. It displays the date of manufacture and the country of origin. If such a marking is present, then there is no doubt about the quality of PVC, reinforcement and seals - they will comply with GOST and SNiP.
PVC window installation process
Below you will find step by step instructions for the installation of metal-plastic windows in a wooden house. This is not difficult, but it will require the presence of certain carpentry tools - I will not write them out separately and you will learn about them in the process of reading.
Removing old windows

Removing old windows
I offer special instructions for dismantling old windows from the opening so as not to damage those elements that will remain in operation. But this applies only to old houses, where there are already window openings with a pigtail and they meet your needs - this item is irrelevant in a new building.
First of all, all glass should be removed - for this, the glazing bead and all the carnations that did not come out during the elimination of this profile are removed. Sometimes the studs are invisible, so to make sure they are present or absent, run a knife or screwdriver at the installation site of the glazing beads, slightly resting on the glass. If there remained fixing material, then the blade will definitely stumble on it, and then, as they say, it’s a matter of technology.
In some cases, in order to clog windows to the maximum and get rid of drafts, the glass is glued to the frame with silicone or silicone sealant. In such situations, all attempts to pick up the glass with a knife to tear it off the frame are doomed to failure. There is only one way out - to break the glass, but it can shatter and injure you. To avoid this, a wet newspaper is glued to the glass and broken - all the fragments will fall nearby and not scatter.
The frame rests on nails, which are also very difficult to pull out - it is much easier to cut vertical frame profiles with a hacksaw, as shown in the top photo. After that, pick up a part of the cut vertical with a nail puller and tear it off. Perform a similar operation on the opposite side, and then tear off the diameters with a nail puller. The opening is ready and you can insert a plastic window.
Window casing in a wooden house

So they make a groove for the casing spike in the mortgage bar
First of all, window openings should be cut out and there are two options here. If the plastic windows are already ready, then, of course, you will have to focus on their sizes, but this is more an exception than a rule. Usually, first of all, window (door) openings are cut out and only after that they measure the windows or invite a representative of the company where the windows will be made (this is a free service).

Casing in a mortgage bar (left) and in a deck (right)
To begin with, let's look at the features of the installation of casing (pigtails). Casing into a deck clearly implies cutting a spike along the verticals of the opening, and in the box making a groove for this spike, as shown in the image at the top right. But we will focus on a pigtail with a mortgage bar - it is more popular.
With embedded bar more options. The groove is cut out in the opening according to the size of the bar (usually it is 50 × 50 mm) and the bar is driven into it without nailing it, and a distance of 3 cm is left at the top to shrink the house. But sometimes they make the so-called stud-monolith, this is when the stud is one piece with the vertical of the casing. In both cases, when the wall shrinks, logs or beams will simply slide along the spike without deforming the window frame.
On both sides of the inserted bar, a jute or felt tape is nailed with a stapler - this is necessary for sealing and. Now you can screw a draft box to the bar, which is most often assembled from a 50 × 100 mm pine board. In this case, it is best to use wood screws with a length of 75 mm - they are guaranteed not to pass through the bar and will not reach the edge of the opening. If this happens, then a log or beam may hang on the screw, which will lead to the formation of a gap between the logs.
Now the upper and lower crossbars are inserted, but if it is placed below between the vertical boards, then it is placed on top of them. The gap left should be 3 cm, which means that the distance from the end of the vertical to the top of the opening is 8 cm, that is, the jumper, having a 5-centimeter thickness, after installation will leave 3 cm of free space. The boards of the draft box are best fastened together with metal corners. Now we are talking about installing a plastic window in a wooden house with our own hands, so below you can watch a video on how a pigtail is made.
Important! Usage polyurethane foam in this case is unacceptable! The foam will glue the box to the opening, which will prevent the logs from sliding freely along the bar during shrinkage.
Video: Okosyachka or casing of the opening - protection against shrinkage of the building
Installation of PVC window sill

PVC window sill
After installing the draft frame (casing), you can proceed with the installation of the window sill - this is the first step to assemble the window within the opening. The fact is that the window sill does not adjoin the transverse profile on the side, but the frame is placed on top - there is a special recess there. But for strength on the sides of the box, you should make a cut of 5-8 mm and insert the window sill there - this way it will hold much better. Use to level the horizontal level. plastic plates, as coasters (mention about them when ordering a window if you insert it yourself).

Self-tapping screws with a press washer
The window sill element must be attached to the bottom of the window opening with self-tapping screws, stepping back from the edge plastic panel 20-25 mm, and subsequently the heads will be covered with a frame profile. To prevent the screw head from pushing through the plastic, you need a version with a press washer without a rubber gasket, as in the top photo.

Installing a plastic window in a wooden house
PVC frames are always glued protective film, but according to the installation technology, it is removed only when the window is finally inserted - this protects the plastic from scratches and contamination. To prevent the sashes from opening (this interferes with installation), screw the window handles and put them in the “closed” position (vertically down).
On vertical and horizontal window profiles drill holes on the installation line of the double-glazed window with a diameter of 1 mm larger than the diameter of the fixing screw. Most often, the screw is 5 mm, and the hole is made 6 mm. The hats must be recessed into the plastic, so with a 10 mm drill they make a hole deep to the metal profile. Three holes are needed on the sides, and two at the top and bottom, indented from the corner by 50-60 mm.
At the bottom, the frame is placed directly on the windowsill, but at the top and sides there should be a gap of about 10 mm or a little less. Therefore, to screw the frame evenly, use wooden spacers (they are easy to make yourself). When everything is screwed on, check the vertical and horizontal levels, as well as the opening-closing function of the valves, so that there is no skew.
If the sash closes normally (there is no friction anywhere, and there is a tight fit), then close the window and insert double-glazed windows. It is unlikely that it will be possible to press the glazing bead with your hands, therefore, in order for this profile to fit tightly into the mounting groove, it is finished off rubber mallet. Now it remains to blow out the gap between the frame and the draft box with mounting foam, and it will be possible to open the sash the very next day (a precautionary measure against distorting the profile). It remains to make slopes inside and out, as well as install trim, but this is after the final shrinkage of the house.
Conclusion
In fact, the installation of a plastic window in a wooden house, except for the device and installation of the casing, is done in the same way as in a brick, block or monolithic building. But care is needed in any case, so try to remember all your actions and, if necessary, read the article again. You can also print the installation process on a printer and keep it in your pocket while you work, to use when needed.
You can do a lot with your own hands. For example, install window systems. Doing this will save you a lot of money. If the work is carried out in accordance with all the rules, then the windows will serve for a long time, delighting the owners with their functionality. Installing windows in wooden houses has a number of features that must be taken into account in advance.
Instructions for installing a window in a wooden house - how to replace an old window with a new one, standard errors during fastening and installation.

Design features

The most common slopes today are considered to be made of drywall. To do this, the opening is plastered, then painted in the desired shade. This type of finish is easy to perform and affordable, but it can only be installed inside the building. However, the durability will be low, they will last no more than three years.
It is more profitable to make slopes from polyvinyl chloride, they are placed inside and outside the building. These panels are practical, can serve for a long time. Plastic slopes have a width of 25 cm, when the depth of the opening is greater, it is necessary to dock them, which can reduce the aesthetics of the appearance.
Wooden slopes are in great demand, they have the following advantages:
- high aesthetics;
- environmental Safety;
- strong fixation;
- high quality;
- the ability to create any forms, parameters;
- application of paintwork.
Slopes made of wood perform the following functions:
- insulation of joints, cracks from the penetration of cold air, noise;
- protection against moisture penetration from the outside, which prevents the occurrence of mold, fungus;
- decoration of space, the ability to create a single style;
- masking flaws that arose during the installation process.
The choice of wooden slopes

Wood slopes are recommended to be made from the breed from which the frame is created. This will give unity to the pattern and colors. Slopes can differ in length (up to 2.8 m) and width (about a meter), the thickness is 12 and 15 cm. This factor should also be taken into account.
Some panels are made of plywood, the material is quite resistant to moisture, it is durable and wear-resistant. The base here is covered with wood veneer, and a primer mixture is applied to the surface. This coating facilitates the application of paint, varnish.
It is desirable that the outer slopes be made of larch. This type of wood is durable, resilient, resistant to mechanical or atmospheric damage. Such products will not have a very high price.
Preparatory stage
Before finishing the slopes, several preparatory measures should be carried out:
- check the correct installation of the unit;
- check with a plumb line the probability of vertical deviations;
- check the horizontal position with a level;
- measure the diagonals to determine the presence of distortions, deformations;
- inspect the profiles in order to detect damage, chips, scratches;
- examine the double-glazed window, clarify if there are any cracks or air bubbles on it.
Installation of wooden slopes

Installation work is carried out 12 hours after installation, this period is necessary for the foam to dry and take its final shape. This process should not be delayed too much, the foam may begin to collapse under the influence of external factors.
Slope installation methods are different.
With the help of foam, the strips are fixed as follows:
- panels are measured and cut to size;
- corners are made as even as possible;
- fasten the panels with self-tapping screws on the corner joints;
- the remaining space is filled with foam (considering that after drying, its volume will become 3 times higher).
The second installation method goes like this:
- trim panels to fit existing parameters;
- attach a heater (mineral wool, pre-cut into strips of the desired size);
- cover with insulation film made of polyethylene, fix with double-sided tape;
- fix the panels with a self-tapping screw;
- install the frame in the grooves of the window block.
How to make window slopes in a wooden house

exterior finish are made using materials that are resistant to moisture. Any kind of materials can be used inside the house.
You can make slopes inside the house using:
- lining;
- wood panels;
- plastic.
Work order:
- install a crate;
- prepare the bars, taking into account the parameters of the slopes, the chosen method of installation;
- attach the crate with screws;
- insulate the opening with heat-insulating material (styrofoam);
- attach the car with self-tapping screws;
- vertical installation involves fixing the slopes from the frame, horizontal - work from the bottom;
- first fix the slopes in the opening, then with each other;
- put corners (external, internal) to mask defects and increase the tightness of the structure.
How to make wooden slopes on plastic windows

Slopes in a wooden house with PVC windows are often made of wood.
The opening process goes like this:
- guides are placed around the perimeter;
- fasten parts to the walls with self-tapping screws (the holes are prepared in advance);
- track verticality by level;
- adjust the slopes according to the parameters;
- insert the strips into the starting guides;
- close the gaps with a hermetic composition;
- seal the sealing area with adhesive tape for painting;
- decorative corners are attached at the joints;
- remove excess foam.
Every reader of the site knows that no matter what material the windows are made of, they help keep the heat in the house and emphasize the individuality of any home. Therefore, the installation process should be treated with special attention. After all, even the most expensive and energy-efficient window design loses all its advantages if it is installed incorrectly. In this article, our experts tell you how to properly install windows in a wooden, frame and stone house.
Wooden, stone and frame houses And country houses have a number design features. Since they affect the technology of window installation, any developer should be aware of them.
From our article you will learn:
- How to prepare for the installation of a window structure;
- What stages of work precede the installation process;
- What features should you be aware of in order to install windows in wooden, frame and stone houses;
- How to install a wooden window with your own hands - how different is its installation from installing a plastic window;
- How is the protection of mounting joints;
- How to control the installation process.
Preliminary preparation
Despite the seeming simplicity, installing windows at home is a process that requires a serious and responsible approach. After all, the quality of installation directly affects the level of comfort in the house. Here's where the process starts:

Anton Karyavkin Head of the technical center of the REHAU company, Moscow.
First of all, you need to carefully prepare: read the instructions and existing regulations installation, get the right tools.

A set of a professional installer has about a hundred different "tools". It is not necessary to have all of them, but without a basic kit, it will not be possible to install a translucent structure. It includes: puncher, screwdriver, foam gun, chisel, hammer and screwdrivers.
When choosing tools, it should also be borne in mind that window installation involves a wide range of additional work.
These include:
- Plastering slopes in stone buildings;
- Seam and thermal insulation device;
- Installation of a window sill and additional accessories.
The main thing to remember is that the installation technology directly depends on the material of the walls of the building.

Anatoly Gavrysh Head of the design bureau of the company "Fabrika Okon"
The type of house significantly affects the procedure for window installation. In houses where there is significant shrinkage (most often in wooden ones), a casing floating box with compensation gaps is used. In other types of houses window mounting has the same schema.
 Installation of wooden windows in frame house with your own hands.
We install wooden windows with our own hands
Developers believe that PVC installation And wooden window exists a big difference but experts disagree.

Anatoly Gavrysh:
There is practically no difference between the installation of a plastic and a wooden window. The only slight difference is different elements fasteners.

Do-it-yourself installation of a wooden window should be carried out more carefully. And in each case, an individual approach is required.

Alexander KorpachevHead of the installation department of the company "Business-M"
Even windows in the same house can have their own characteristics. Therefore, in the work it is necessary to adhere to the recommendations of GOSTs, namely:
- Mounting window seams - with vapor-permeable self-expanding tapes;
- Specifications, GOST R 52749-2007;
- Assembly seams of knots and adjunctions of window blocks to wall apertures;
- Are common specifications, GOST 30971-2002;
- Window blocks - from polyvinylchloride (PVC) profiles. GOST 30674-99.

In general terms, the installation consists of the following steps:
- Opening preparation;
- window preparation;
- Installation;
- Finishing work;
- Finishing.

Anatoly Gavrysh
I would like to dispel the illusions about the ease of installation of both plastic and. To do it yourself, you definitely need certain skills and special equipment, since correct installation is of decisive importance in how well and how long the new window structures will last.

In detail, the installation of both plastic and wooden windows is done as follows:
1. Window openings are cleaned of dust and dirt.
2. Windows are installed in the opening and wedged with small plastic or wooden corners strictly according to the level.

Corners are necessary to form a clearance (reserve) between the frame and the opening. Along the perimeter - between the window and the opening, it is recommended to lay technological gap for foaming with a width of 20 mm. At the bottom of the window - under the window sill, it is recommended to lay a margin of 35 mm.
3. The design is fixed.

Fixation is carried out using dowels or special mounting gear plates. If the window is fastened through with self-tapping screws, then before that, holes for the anchor are marked and drilled in the opening. The number of attachment points depends on the size of the window and on average ranges from 40 to 70 cm. An indent of 12-15 cm must be laid from the corners of the frame.
4. Foaming of the seams between the window structure and the opening is carried out.

To save foam, if the gap exceeds 40 mm, it can be filled with insulation - polystyrene foam, etc.
5. The foam is closed with vapor and waterproofing tapes.

The vapor barrier is glued around the entire perimeter of the window structure with inside(from the side of the room), and the waterproofing film - from the outside, from the side of the street. After foaming, the protective strip is removed from the tape, and the foamed seam is closed.
6. Additional elements are installed in their place from the outside - flashings and platbands (if the installation takes place in wooden houses).

7. The fittings are being adjusted.
Features of installing windows in a wooden, frame and stone house

Anton Karyavkin
Installing windows in buildings made of rounded timber is the most difficult. This is due to a change in the design wooden houses from manufacturer to manufacturer.
If developers, when installing windows in a wooden house, use different breeds wood, it is almost impossible to predict the behavior of the material - every time you have to study everything from scratch. The deformation of logs in such buildings can be quite large: from 8 to 15 cm. The house shrinks, so not a single window in such conditions can remain operational for a long time.
 Proper windows in a wooden house.
Here is what we can do to protect structures from possible deformations caused by wall shrinkage using the old carpentry method:

Anton Karyavkin
The most responsible builders start cutting an opening in the timber walls only a year or even two after the construction of the house. During this time, it is possible to track all deformations, taking into account the characteristics of the material and the climatic features of the region.
After the opening is cut, a rough box is inserted into it, also known as a "pit" or "casing", into which the window structure can then be laid.


Alexander Korpachev
In all wooden houses, when installing windows, it is necessary to use casing or pigtails - a wooden box that levels the load on the frame.
Between the upper part of the window opening and the box, a technological margin of 30 to 70 mm is usually left. After installation, the stock is filled with insulation and closed with platbands on both sides.

Anton Karyavkin
The box is made of wooden blocks 50-80 mm thick.

Despite the fact that the box quite effectively perceives the deformation of logs, the assembly joints in this type of building still remain movable. Here it is important to choose the right mounting foam - it should not collapse when the walls shrink. Such correct foam can be found on the market, but it is relatively expensive. Therefore, experts often replace it with other materials, mainly plant origin(tow). Of course, the tape and coating materials needed to protect the assembly joints must also have a high class of deformation resistance.

Glued laminated timber shrinks much less than solid logs. Eventually glued laminated timber less deformed than a conventional log.
But installing windows in a wooden house with your own hands is still difficult.
How to lay a window in a frame house
Wooden windows can also be installed in a frame house, but plastic windows are most often used. The control of the installation of any windows at all stages should be checked using a level or plumb line, and the horizontal and vertical deviation should not exceed 1.5 mm per meter.


Anton Karyavkin
The process of installing windows in a frame house is much simpler than in a wooden one. You will still have to face the deformations of the window opening, but they are no longer so significant.
Better to use as fastener anchor plates. Mounting on building screws is not recommended: they fix the box, and the deformation of the tree, in turn, can cause damage to the windows.
 How to install a window in a frame house
It is important to remember that when installing a plastic window in a frame from a room, it must be wrapped into a window opening. This is necessary in order to connect the window vapor barrier circuit with the room vapor barrier circuit.
Brick different types, concrete, aerated concrete blocks are standard building materials. The technique in stone houses has been worked out for years. Fastening is carried out using dowels and construction screws, the use of anchor plates is also allowed.

Anton Karyavkin
In some cases, the installation technology may be influenced by design decisions that require taking into account the linear dimensions of structures and wind load in the region.

Protection of mounting joints and stages of control of installation work
Regardless of the material of the walls, it is necessary to protect the mounting foam from ultraviolet radiation and atmospheric moisture. Otherwise, it will become loose and lose its properties over time. To protect it, special insulating tapes and sealants are used. The latter are good because they allow you to close any gaps and irregularities, unlike mounting tape, which requires perfect flat surface no dust.
Wooden houses, baths, saunas and cottages have important advantage- they are completely environmentally friendly, because they are made of natural material. A wooden frame is “alive”, it “breathes”, it shrinks and grows old, that is, it lives its own life. A house made of natural wood circulates air, purifies it and gives it healing properties, thanks to phytoncides and resinous substances natural array pines. These same features of buildings made of lightly processed wood create some difficulties. For example, when it is required to install windows in a log house and doorways, as well as when finishing sagging walls, but if the installation technology is followed, all these problems can be solved.
Which windows are suitable for wooden walls
The walls of solid wood houses tend to be in some movement. This is influenced by the time of year, seasonal changes, air humidity and environment- the frame swells or shrinks, sitting down. Some conventional window and door installation standards are acceptable for log cabins, so a different frame recess design, known as casing, is needed here. It allows you to minimize movement wooden walls houses, bathhouses and other residential buildings made of logs.
However, not everything is so complicated, since the main shrinkage occurs during the first 3 years - under its own weight, the space between the logs is compacted and the wood naturally dries. Sometimes during this time the log cabin sags by 10-15 cm, respectively, the window and door opening decreases. Therefore, it is natural that wooden windows in a log house are more suitable for a new structure made of natural wood, and plastic windows for older houses, then they will be less susceptible to overpressure and deformation.
If the construction of a house has been going on for more than one year, stage by stage, then even unprepared "live" wood will sit down during this time, and installing windows in a wooden log house will not be a problem. In extreme cases, you can install temporary frames with a film that prevent the penetration of precipitation into the window opening. And after a while, window frames with double-glazed windows can be placed in a wooden log house to protect against adverse weather factors. These can be frames made of specially prepared dry wood, or made of plastic that is familiar to city dwellers.
laminated under natural wood modern plastic windows will organically fit into the design of the log house, increasing the thermal insulation of the house. The experience of installers from Finland shows that a plastic window in a log house or double wooden frames can be inserted into a pigtail without any problems, while it is possible to combine different materials for window frames.

What is important to know about installation technology
Today they make prestigious two-storey houses different type. They are built in an eco-style according to the traditions of their ancestors and according to the projects of modern architects and designers. Increasingly, they began to offer wooden houses and saunas similar to Finnish ones, also in fashion stylization country houses under the Russian tower. No less interesting are the large estates in scandinavian style- made of wood and glass. It doesn’t matter if the building is pompous or small cottage do it yourself from wood - the technology for installing wooden windows in a log house is approximately the same.
Of course, damp wood is not very suitable for building walls. wooden house. The Finns use only dried and specially prepared wood for export houses, and also develop a special technology for houses that are quickly assembled. According to the technology, window frames are not placed in a log house for at least six months after the assembly of prepared structures, and even later in "live" wood. But even in this case, some shrinkage is taken into account - do not leave the building without windows.

The exposure time is required for the shrinkage of the log house and the final formation of wooden walls, and in about a year the log house will acquire shrinkage close to the maximum parameters. However, it is not possible to accurately specifications shrinkage (as a percentage or in millimeters), since everything depends on the type of wood and its degree of moisture.
Today, several options for installing windows in a log house have been worked out:
1. Most reliable method- installation of the casing (casing), where the window is inserted. The casing is a one-piece rectangular structure made of solid wood up to 40 mm thick, in which the lower bar forms a window sill, and platbands are attached to the ends. For a long time they were made from solid wood, giving the required shape, where the grooves for the window frame were formed. Today, the casing is being made much more technologically advanced and looks more aesthetically pleasing, and a glue beam is used for its manufacture. The finished casing design is quite expensive, so they often use a more affordable technology for installing a window in a log house, that is, fastening to cranial bars.
2. There is another option - the window frame is attached directly to the beam with special fastening strips. Simple Methods are used, most often, in log cabins of baths and saunas, and in residential buildings- more complex and reliable. Using building level, window frame set in compliance with distances and foamed with sealant. However, the installation method with sealing in the new walls of houses is not used. Foam is recommended to be used to seal the lower part of the frame and window sill - this plane is less susceptible to deformation when a wooden window shrinks in a log house.
3. Often, special (cranial) strips are used, inserted into the grooves, which move freely at the ends of the window opening. This counteracts jamming during shrinkage without the formation of gaps. The cranial planks are able to slide in the grooves due to the design, so the window will not experience pressure when it shrinks. The difference of the method is in attaching the casing to the cranial bar, and not directly in the opening.

Tip: Remember that even after the initial shrinkage of the log house, the compaction of wooden walls will continue for some time. With significant precipitation and in a climate with a high level of air humidity, the base of the log house will continue to absorb water, increasing the log house in volume. In hot and dry summers, the tree gives off moisture, giving a significant shrinkage. That is, natural changes in the size of a log house, for example, from pine, will be noticeable up to 5 cm, but this figure also varies depending on the time of the log house. Installing windows using special technology reduces the likelihood of warping, displacement of the base and jamming of the sashes and reducing heat loss.
Basic conditions for the use of casing
1. Log house casing makes it possible to prepare the installation of the window in a formed frame, which minimizes the pressure of the log house on the window frame through the natural drying process of the wood.
2. Properly made log house casing prevents distortions in the form of shrinkage consequences.
3. There should be a small gap above the frame, approximately 50 mm, and it is insulated along with side gaps.
4. A simplified casing can be made of boards of a smaller thickness of about 20 mm, where the forming slopes will be attached, and the bottom board forms a window sill.
5. The casing is fixed with self-tapping screws on the cranial beam, and the gap is insulated under the platbands.
6. Casing from the outside looks quite compact and neat, and inside you can put another frame.
7. Competent use casing installation technology helps to counteract window depressurization.
8. Fastening of external architraves allows the use of synthetic seals, including rubber, to prevent moisture from penetrating into the window space.
9. In case of difficulties and questions - how to insert windows into a log house, it is recommended to contact specialists.

The main problems when installing doors and windows in a log house
1. According to the experience of installing houses made of natural wood, even a structure made of specially prepared and well-dried material will shrink up to 5 cm in the 1st year. In steady rainy weather, the house will swell again. "Live" or non-dried wood with a high percentage of moisture gives a much greater amplitude per year.
2. Installation of windows or doors in wooden frame- technologically simple process, and specialists have no problems. However, difficulties and problems with an unprofessional approach arise much later, when the windows in the bathhouse or in the house begin to warp due to pressure during the natural drying of the wood. That is, it is much worse when problems emerge during the operation of the building.
3. high humidity air can lead to the fact that window sashes or vents do not open due to swelling of the wood with increased pressure from the shrinking logs. Sometimes it is enough to trim the adjacent planes of the sashes a little, and it is worse if the window cannot be opened for the entire period of operation. It is for this that a small clearance in the casing or the correct sliding structure is important - in order to avoid such troubles.
Tip: It is important to use dry and high-quality timber, preferably from conifers wood. Before cutting window openings, it is important to strengthen the boards on its sides so that they do not part.

Instructions for processing a window opening
To perform the work, you will need a chainsaw, nails, studs, timber, edged board, square, plumb and polyurethane foam.
1. On the wall of the log house, the contours of the window (door) opening are marked using 4 strips. It is important to correctly mark the lower part of the window - about 80 cm from the floor.
2. Boards are selected a little more than the height of the opening to secure the studs with washers.
3. We make holes in the uncut crowns at the corners of the planned opening, similarly in the fixing boards.
4. We mark the vertical with a level and attach boards along it, which we connect to the logs with the help of studs and tighten the boards.
5. We put metal washers under the nuts to prevent the nuts from cutting into the boards, we fix the boards on both sides of the marking.
7. We turn to the processing of sawn logs and fasten the edges together with jumpers.
8. We form a window block from lintels and jambs in pairs, and outside we form grooves for the size of the spikes.
9. We begin to form the window block with the installation of jambs, with nails we connect the jumpers with the sticking of the logs.
10. To check right angles, use a square, which can be formed before the final fixing of the block.
Tip: To dispel doubts, it is advisable to watch a video about installing a pigtail, and only after that proceed to the installation.
Step by step installation of windows
Today, there are several ways to install window frames in a log house, but we will look at the simplest example.
First you need to visually imagine in a section what a window in a log house looks like - the scheme for installing a window in a log house is shown in the figure below.

These are a casing with grooves, a shrinkage gap with a sealant, an outer and inner casing, a spike with a sealant, a window with a tide, a lower interventional sealant.
The pigtail is made after the formation of the opening:
- prepare a beam 150x40 under the top of the window opening, it should be the width of the opening, cut out 2 rectangular cutouts from both ends for a pre-formed comb;
- install the board on top of the carriage bar, securing it with self-tapping screws;
- we make an opening of 3-5 cm more than the height of the inserted window, for filling with a sealant or foaming from below;
- the gap between the log and the salary board in window opening should be about 5 cm (for shrinkage), which is filled with insulation;
- when the window is inserted and fixed, a platband is attached to the pigtail so that the structure has an aesthetic appearance;
- do not forget to check before installing the platbands and the final installation both vertical lines of the window frame along the plumb line and horizontal lines along the level, since this will not be possible to fix later;
- it is necessary to impregnate everything with an antiseptic wooden surfaces to counteract wood decay.
The process of installing plastic windows in a log house
The step-by-step process of installing PVC windows looks about the same as in the example with natural wood:
- we form a window opening;
- install a pigtail;
- we are completing the installation of a plastic window in a pigtail according to the technology.

The optimal distance of the window sill from the floor is 80-90 cm, and if the design in the interior plans to use a window sill in the form of a tabletop, for example, in the kitchen or in a teenager's room, then it is better to think over its design and installation in advance.
Tip: Remember that wooden frames partial shrinkage is also characteristic, and PVC windows have a rigid and stable base - they cannot be placed in a fresh frame, and it is imperative to use a pigtail. It will make it possible to maintain sufficient autonomy of the double-glazed window from the log house, so installation on foam and without a joint is unacceptable in this case!
Two types of pigtails:
1. Simple design - a 50x50 mm groove for a bar is formed at the end of the opening (not suitable for installing a PVC window).
2. A more reliable option is when in the end logs on window openings a crest is formed, on which a frame with a groove is subsequently placed, otherwise called a “carriage”, and here, during shrinkage, movement along the guides without deformation will be ensured. This is a construction of a bar 100x150 mm, which exceeds the size of the window by 5-6 cm, in the center of which a groove of 50x50 mm is selected, the carriage is attached to the ridge.
Next, we assemble a pigtail from a 150x40 board, as described above, respectively, cut grooves in it that are put on a comb - this is the upper part of the opening where we put the PVC window. Be sure to overlay the planks with tow (in rolls) and fix the gun carriages, and top bar fix the pigtails with self-tapping screws to the gun carriage.

After the right angles, vertical and horizontal lines in the openings are verified, the pigtail is framed, proceed to the installation plastic windows. Monitor the quality of fastening and tightness so as not to disturb the thermal insulation of windows in a log house. Do all the steps according to the instructions attached to the PVC windows. When buying plastic windows, pay attention to the mounts that are mounted at the end. The frame is leveled and mounted with fasteners to the pigtail, do not forget about the place for mounting foam under the window sill. It remains to hang the sashes and cash out.
Tip: Pay attention to how the window is screwed to the board - in no case to the ridge, otherwise the meaning of the movable fastening of the window to counteract shrinkage is lost.
The installation of plastic windows in wooden houses has its own characteristics, unlike installation in a conventional panel house, the technology of which is described in the main section of this site. For example, the openings of log (timbered) houses, as a rule, do not have quarters. But the most important difference is that wooden houses in the first few years after construction (does not apply to frame-panel houses) tend to shrink as a result of drying of the wall material (logs, beams). And this factor cannot be neglected, because a plastic window installed in the usual way (into a bare opening) in the first year will be pressed down and deformed by the overlying crowns. As you know, in the first two years (the most active period of wood drying) after the construction of the house, the shrinkage of the walls per 1 meter of height can be:
- round log - about 30 - 60 mm;
- timber - about 20 - 40 mm;
- glued laminated timber - about 10 - 30 mm.
There are other more frightening figures about the shrinkage of log cabins: 10 - 15% of the original height. At one of the construction forums I somehow saw the following information: from the original wall height of 2.3 m, after shrinkage, 2 meters remained. In general, the amount of shrinkage depends on several factors:
- from the material (log, rounded log, timber, glued timber);
- on the dimensions of the material - both its length and thickness;
- from the moisture content of the material;
- on the size of the building;
- on construction technology (nagel, type of felling, etc.);
- from the type of wood;
- from the time of year when construction is underway.
Log cabins made of ordinary logs sit most strongly, then rounded logs, timber (2 times less than ordinary logs), profiled timber, glued timber (about 10 times less than a log) go to the smaller side.
Even if the house survived, i.e. was in operation for more than 5 years, experts still recommend taking into account the possibility of vertical movement of the walls as a result of seasonal changes in humidity and air temperature when installing windows and doors. Figuratively speaking, a wooden house is a more living structure, compared to urban buildings made of stone and concrete. Therefore, the installation of plastic windows in such cases is carried out not in the opening itself, but in a special wooden box acting as a link between the window and the wall. They call this box differently: casing, salary, deck, pigtail. In this article, we will use the term casing .
To begin with, let's figure out how the casing is arranged and what is the point of using it.
As you can see from the picture (click to enlarge the picture), the casing is an ordinary window box made of four, sometimes three (sides and top) thick boards, installed inside the opening. The meaning of this design lies in the fact that it is independent of the vertical movements of the wall and moves freely in the opening, since it is not attached to the logs (beam) with nails, screws, or other fasteners, but is held with the help of grooves in the side posts, planted on the spikes at the ends of the logs. Even foam is not used to seal the gaps around the casing - only tow, jute (lnovatin) and others soft insulation. Please note: a large gap is specially left above the casing, the size of which is designed for the maximum possible shrinkage of logs (beams). During the first years after the construction of the house, this compensation gap will gradually decrease to a minimum, but the upper log (beam) of the opening, with the correct calculation, will not press down or deform the casing. Thus, the shrinkage of the house will not affect the size and shape of the casing in any way, and, accordingly, will not damage the plastic window inside it.

If you decide to install plastic windows in an old wooden house, which has long gone through the shrinkage process, then, disassembling window blocks, you will surely notice: they are made according to the same principle as the casing design described here, i.e. not nailed to the beams of the opening, but fixed in it using a simple "groove-thorn" system on the sides. This suggests that the technology of installing windows and doors in the casing was invented a very long time ago, and is used with success to this day. We will not invent anything new and will go the same way.
There are several ways to install the casing:
- in a mortgage bar- a groove is made at the ends of the logs of the opening, a bar is laid into it, into which self-tapping screws are screwed through the side posts of the casing;
- into the thorn- when the spike is on the side posts of the casing, and the groove is made at the ends of the opening logs;
- into the deck- the spike is cut out at the ends of the opening logs, and the groove is made in the side posts of the casing).
We will use the last option - into the deck, as it determines the maximum strength and stability of the opening, because the casing not only protects the window from shrinkage of the walls, but also ensures the stability of the wall at the place where the opening is cut.
Briefly, the sequence of our actions will be as follows:
- we cut an opening in the wall, the dimensions of which significantly exceed the dimensions of the inserted plastic window;
- we manufacture and install casing in the opening;
- we install a plastic window into the casing, aligning it flush along the front edge, or slightly deepening it inside (we fasten it with self-tapping screws of such a length that they do not break through the casing and enter the logs (timber);
- we foam the gap between the plastic window frame and the casing, not forgetting about the waterproofing device (outside) and vapor barrier (inside) of the foam joint;
- we install external platbands (we fasten to the casing);
- we carry out the interior decoration of the window (window sill, slopes).
We use foam only inside the casing. We insulate the gaps around it with traditional tow. For the next 5 years (if the house is freshly built), we will have to periodically remove the casing and re-caulk the upper gap above the casing, gradually reducing the amount of insulation invested there. Only after complete shrinkage of the house, the gaps around the casing, if desired, can be sealed with foam from the outside.
Opening preparation

Before sawing, we mark the window opening with the help of a level, because the plastic window will be installed strictly according to the level in all planes, therefore, the casing should also be installed in the opening as accurately as possible according to the level initially. The lower crown in the opening must be sawn, as shown in the figure, to get a flat horizontal platform.
The dimensions of the opening are determined based on the dimensions of the plastic window, the thickness of the casing bars and the size of the required gaps. I propose to take the thickness of the bars 100 mm.
opening width ( W opening) will be equal to the width of the plastic window frame ( W frame) plus 40 mm (two side gaps of 20 mm to the right and left of the frame) plus 200 mm (thickness of two side casing posts of 100 mm each) + 30 mm (insulation thickness on the sides of the casing and correction for uneven side walls of the opening) minus 50 mm (the ends of the spikes recessed into the grooves of the racks on the ends of the logs are 25 mm on the right and left):
W aperture = W frame + 220 (mm)opening height ( H opening) will be equal to the height of the plastic window frame ( H frame) plus 30 mm (clearance under the frame) plus 20 mm (clearance above the frame) plus 180 mm (thickness of two casing rungs 100 mm each minus two docking grooves 10 mm each) + 15 mm (insulation thickness under the casing and correction for irregularities lower cut of the opening) plus the upper shrinkage gap ( H farmstead):
H aperture = H frames + H shrinkage + 245 (mm).Shrink gap size ( H usad) is not easy to determine, since the amount of shrinkage at home, as mentioned above, depends on many factors. If we, for example, calculate roughly, taking everything to the maximum, then for the window standard height 1400mm (plus the thickness of the casing bars, plus mounting clearances ~ 245mm) with 15% shrinkage, the top clearance will be 24.5cm - a huge hole, which will most likely end up being unnecessarily large in the end. To simplify the task and avoid mistakes, you should not rack your brains over GOSTs that regulate the shrinkage values of building materials of various tree species, comparing this with local climatic conditions, etc. You can do it easier, namely:
- if you are building new house, then start glazing it no earlier than six months after the construction of the roof in order to wait out the period of the most active shrinkage. Then, during the manufacture and installation of the casing, the size of the shrinkage gap (H shrinkage) can be safely made 120 mm for log house, 80 mm for timber and 50 mm for a house made of glued laminated timber;
- if your house has stood for more than five years, then the shrinkage gap (H shrinkage) can be made minimal - 30 - 40 millimeters, only to compensate for possible seasonal changes in the geometric dimensions of the opening;
- if the house is old and long-established, you can generally abandon the casing, but it is still desirable to strengthen the opening after dismantling the old blocks by nailing a couple of boards to the ends of the logs on the sides of the opening.
So, we calculated the size of the opening, marked it out and cut it out. Now you need to cut a spike at the ends of the logs (beams) on the sides of the opening. The spike is also marked with a level in the center of the log (beam). We make the size of the spike 40x40 mm. We sew the side and lower part of the opening with linen or jute using a stapler.


Casing manufacturing

First, you need to decide on the width of the casing bars: it should either be equal to the thickness of the wall, or be slightly larger, so that later, when installing the outer casing, they (the casing) fit tightly on the casing, and not on the wall. Secondly, for the manufacture of casing, it is necessary to take well-dried material, otherwise assembled structure It will deform on its own as it dries.
First we cut out the upper (top) and lower (sill) crossbars, making them 30 mm shorter than the width of the opening (excluding spikes). At the ends of the top and window sill, we cut a groove for a spike 50 mm wide and 40 mm deep. Also, at the ends of both crossbars, we make small indentations of 10 mm each for joining the crossbars with the side racks.
We make side racks with a height exceeding the height of the plastic window frame by 70 mm. On reverse sides racks with the help of a circular cut out a groove for a spike 50 mm wide and 40 mm deep.


Casing installation
We start the installation of the casing in the opening from the lower crossbar (window sill). Then, an apex is inserted into the opening, under which we alternately substitute the side racks, putting them in grooves on the spikes. We fasten the casing elements together with self-tapping screws and coat the joints with sealant. The gaps around the casing are caulked with ordinary tow. We plug the upper shrinkage gap with a roller of tow wrapped in linen (jute). Now you can start installing the window.


We install a plastic window, aligning it with the front edge of the casing or slightly deepening it into the house. Bring the window inward by a third of the thickness of the wall, as is done in a panel or brick house, there is no need here due to the lower coefficient of thermal conductivity of wood (smaller freezing depth). Especially with the small thickness of the walls of a wooden house, deepening the window into the opening, we will be forced to cut the already narrow window sill.
If you calculated the dimensions of the opening and casing as described above, then the mounting gaps around the window frame should be 20 mm on the sides, 20 mm on the top and 30 mm on the bottom (we make the lower gap larger so that it can later be brought under the frame plastic window sill, which is 20 mm thick).
It is more convenient to fasten the frame to the casing using self-tapping screws 6x100 or 6x120 mm in size, placing them in the same way as when fastening with anchors. We drill holes in the frame with a drill with a diameter of 6 mm. Using self-tapping screws with a length of more than 120 mm is dangerous because they will pass through the casing and screw into logs (beams), which is unacceptable.
Provided that all preparatory work were done using a level, the window frame should line up exactly with the casing, i.e. the front edge of the casing should be parallel to the plane of the window, without noticeable distortions.
Outdoor waterproofing
Before foaming the gap between the window and the casing, it is necessary to decide with what material we will waterproof the installation seam from the street side. As you know, the two main enemies of foam are sunlight and water. If we can simply close the mounting seam from the sun with platbands or flashings, then the situation with waterproofing is more complicated, because it must meet two basic conditions: do not let water in and at the same time not prevent moisture vapor from escaping from the inside to the outside. Well, and, of course, waterproofing must be resistant to prolonged weathering. All these conditions are met by materials such as, waterproof vapor permeable tape and special sealant.

Sealant "STIZ-A"- one-component vapor-permeable acrylic sealant white color for sealing the outer layer - it is characterized by good adhesion to the main building materials: plastic, concrete, polymer concrete, foam concrete, plaster, brick and wood including. It is also resistant to UV irradiation, precipitation, thermal deformation and can be applied even at negative temperature up to -20 degrees. The only disadvantage of this material is that it is difficult to find it in small containers, and buying a whole bucket makes sense when you install a lot of windows. If you choose as outdoor waterproofing"STIZ-A", then the procedure will be as follows: first we foam the window, then, after complete drying, cut off the foam sticking out from the outside and after that, using a spatula, apply sealant to the cut.

Waterproof vapor permeable tape(self-adhesive butyl rubber tape consisting of a vapor diffusion membrane with an adhesive layer of sealant on one or both sides) is sold in rolls of different widths. In our case, a tape with a width of 70 mm is suitable. When using this tape as waterproofing, orient it correctly when gluing. You can determine this by blowing into it from one side and the other (do not forget to remove the paper first). Since there is a membrane inside the tape, the passage of air is only possible in one direction. The side from which it is impossible to "blow through" the tape is the outer (street). The sequence of actions (first the tape, then the foam or first the foam, then the tape) does not matter much, but you need to take into account that the foam, expanding when it dries, not only pulls the tape with a bubble (it will interfere later when installing the trim), but in general it can tear it away from the window or casing. Therefore, if you stick the tape in the first place, then screw the platbands or hard flashings right on top of it, and only then foam it. Or foam first, wait for the foam to dry completely (24 hours), cut off its excess and straightaway In order not to expose the cut of the foam to prolonged atmospheric influences, stick the tape.
Pre-compressed self-expanding sealing tape (similar to foam rubber) impregnated with a special composition, due to which it is waterproof and vapor permeable. Supplied in a compressed state, rolled into rollers. If you opt for PSUL tape, then buy one that expands more than 30 mm. PSUL will have to be glued not to the outer side of the frame profile, but to the end near the front edge. This should be done after fixing the frame in the opening, but before foaming. Of course, it is more convenient to glue the frame with PSUL-ohm even before installation, when it lies on the floor, but then the installation will have to be done at an accelerated pace, because after a few minutes the tape will expand and interfere with work. The assembly seam should be foamed only after the PSUL has fully expanded and blocked the assembly gap. But here the same problem is quite possible as with the waterproofing tape: the foam expanding when it dries can squeeze the PSUL out. This can be avoided by pressing the PSUL from the street side with platbands or flashings.
Internal vapor barrier
From the inside, the foam should also not remain open in order to prevent moisture from entering it from the room air. For an internal vapor barrier device, you can apply vapor barrier tape, which has already been discussed in the main section of this site, or use an acrylic sealant SAZILAST-11("STIZ-B").

It is glued until foaming to the end of the frame with a thin adhesive strip. Immediately after foaming, the protective paper is removed from the wide adhesive strip, and the tape is glued to the casing. While the foam under the tape has not hardened, it is advisable to immediately install the window sill and screw the starting profile to the edges of the frame, otherwise the tape "inflated" with foam will interfere with this later.

It is applied to the hardened foam, more precisely, to its cut. In this case, it is no longer necessary to rush to install window sills and the starting profile, as when using a tape. Nothing will stop you from doing it later, when it's convenient.
Interior window trim
The interior decoration of a window in a wooden house (window sills, slopes) is not much different from the decoration in a panel or brick house. It’s even a little easier here: you don’t need to drill holes for installing slopes - we fix everything with self-tapping screws into a tree (into the casing). It is also not required to additionally insulate the slopes from the inside with foam or other material. To be safe, it is enough to foam before installing the slopes inner surface casing in a narrow strip next to the assembly seam. This will be enough, because the tree does not freeze through as deeply as concrete or brick.
Casing, window sill and slopes - three in one
This method of window installation allows you to save on slopes and window sills, gain time and achieve a greater, in my opinion, aesthetic effect, but for this you need a good woodworking machine to evenly cut the so-called reverse quarter on the casing elements, into which the plastic window will be installed .
What is a reverse quarter can be easily understood from the figure. This is the recess in which the window frame will be installed from the street side. Quarter depth - 25 mm. The width is made 3-5 mm more than the frame thickness, for example: for a 5-chamber VEKA, the profile thickness is 70 mm, therefore the width of the back quarter should be 73-75 mm. important exact calculation dimensions of the casing and the window, accurate assembly of the casing and installation of the casing in the opening exactly according to the level - the inner clearance should have the shape of a regular rectangle, and all the edges of the outer edge should be located in the same plane without distortion. In order not to be mistaken in size, it is better to first make and install the casing, and only then accurately measure and order a plastic window in place.


Consider how the window will be installed in the casing with a reverse quarter.
Assume that the casing is already installed in the opening. The size of the plastic window is made in such a way that it turns out to be slightly larger than the "clearance" of the casing, or rather: 14 mm more in width and the same in height. From the inside, such a window will not enter the casing, but it will easily enter the opposite quarter from the street side. In this case, the edges of the frame will “hide” behind a quarter of 7 mm on each side (it’s no longer possible - the hinges of the sashes will interfere), and an assembly gap will remain around the frame, which will later be filled with foam. The frame is attached to the casing with self-tapping screws, as already described above. To provide beautiful tight docking frames and casings from the side of the room, we use a D-shaped door seal. We glue it before installing the frame with the adhesive side on the edge of the quarter. When attaching the frame, we firmly press it to the quarter, compressing the seal, and screw in the screws, fixing the window in this position. Installed window foaming from the street. Then, after the foam has dried, its excess is cut off, the seam is sealed with a waterproofing tape or smeared with STIZ-A sealant, and platbands are installed.


Of course, since we are giving up interior decoration any additional elements, then they must ennoble it, i.e. give it a look that matches interior design premises.
First of all, you need to give the lower crossbar the shape of a window sill in order to inner edge it protruded slightly from the wall and was slightly wider than the opening.

Second - we make the "dawn" of the inner surfaces of the racks and the top, i.e. we abandon the primitive rectangular (in cross section) shape of these elements and cut out a large chamfer, simulating the turn of the slopes.

Next, we process the inner surface of the casing elements. There are many options: texture, color - the choice is yours. You can simply sand the surface and varnish it. It is possible to cover the wood with a stain of the desired color so that the surface of the casing is in harmony with the color of the window and / or the color of the walls.
There is also, in my opinion, an interesting, but more costly option - to brush the surface, i.e. process antique.

Artificial aging of antique wood is now very popular in various design styles. The essence of brushing technology is to remove soft fibers from the surface of wood using metal brush(along the fibers), while the surface turns from smooth to embossed. After giving the relief texture, the wood is cleaned of pile and fibers, then the final gloss is given. You can immediately cover the tree with varnish, but the "aged" wood will look much more effective after being treated with a stain of the color you need. However, there is an even more spectacular way of coloring - patting - creating a contrast between dark wood pores and a lighter surface. This is achieved with the help of paint of the desired color: it covers the entire front surface of the casing, and then upper layer removed with a cloth before the paint has dried. Final stage artificial aging- varnishing. It is applied in two or three layers. Then you can rub the surface soft cloth to add gloss.


