Interesting, Tips, Decor, Workshop, Furniture, Interior Click "Like" to read Make-Self.net's Garage is not only a sanctuary for storing your car, but also a multifunctional center for storing a variety of things: gardening equipment, sports items, tools and other little things. Organization of space in the garage ...
27 Lifehacks for organizing space in the garage
Interesting, Tips, Decor, Workshop, Furniture, Interior
The garage is not only a shelter for storing your car, but also a multifunctional storage center for a variety of things: gardening equipment, sports items, tools and other small things. Organizing your garage space can be a time-consuming process, but it will help bring order to the chaos forever.
INTERESTING:
INTERESTING: 70 ways to connect wooden parts
INTERESTING: What can be made from plywood. 24 Master classes
INTERESTING: Original and simple furniture designs TOP 20
Tired of the chaos and hours spent looking for a Phillips screwdriver? Take a look at these 27 life hacks, thanks to which you can easily and quickly put things in order. With a few things from hardware store or recycled materials, you can maximize the space of your space.
Your face when you see this chaos in the garage
Use magnetic holder for knives to place small items such as drills, keys, cue balls and other things. And you don't have to dig into the box.

With just a few pieces of wood, crates will no longer take up valuable garage space. It also allows for better access to each drawer.

Why didn't I think of this before? Use fasteners for paper towels to conveniently place trash bags.

Use cans for storing smaller items.

Make brackets out of wood to hang garden chairs on the wall. And they will no longer get in the way.

Jars with a screwed lid to the bottom of the shelf will help you conveniently store screws, screws, nuts and other small things.

Use a rubber cord to hold sports balls.

The tape is the thing that is always hard to find, it is never in place. If you have the materials and basic woodworking skills, then you can make this handy container that can be used both in the garage and in the workshop.
LEARN MORE

The plastic grate is great for storing pipes, skirting boards, profiles and other long materials.

Regardless of the size of the garage, there never seems to be enough space. Utilize ceiling space and add hanging shelving to store things you rarely use.
SourceIt's always nice to know where the tools are. This project will help you to place all screwdrivers in one place.
LEARN MORE

Use plywood panels with drilled holes to store tools. It is very comfortable.

Use pipes PVC miscellaneous diameter that organize tools in your workshop or garage.
A convenient option for storing brushes in the garage.

I think everyone who has a wheelbarrow faced the problem of storing it. We have a way out. Install two hecks on the wall and you won't have any more problems.

By making such rails from plywood and boards, you can free up a lot of space in your garage.
LEARN MORE
SourceOrganize separate storage areas in the garage. Separately for the garden, tools, spare parts and more.

Thanks to this design, you can conveniently place garden tools.
LEARN MORE
SourceMetal pots are perfect for storage detergents. You can also use them on shelves as drawers.

With this design, you can easily free up space in the garage and place the stairs under the ceiling.
LEARN MORE

Hoses and wires are the most thankless things in the garage that are difficult to store. A similar design of PVC pipes will help to cope with this problem.
LEARN MORE

On such a rack you can place a large number of tools. It is easily modified for any type of instrument.

When the season ends, where do you store your rods? You can buy a custom rack or make your own out of an iron grate.

Rack - book
From sheets of plywood or perforated board and sheds, you can make a convenient design with quick access to tools.
Use perforated pipes for easy instrument placement. This is the simplest and effective method organize your workspace.
Make a folding workbench that saves a lot of space in your garage or workshop.
LEARN MORE
SourceWith the help of a magnetic holder for knives and plastic containers, you can make this handy design.

FRESH ARTICLES

POPULAR ARTICLES

What can be done from the remains of the skin. 30 Ideas

30 Incredible Cat Houses You Can Make Your Own

30+ Ways to Use Leftover Paint Wisely

30 elements that can turn a garden into a heavenly place

25 Awesome Coffee Tables You Can Make Your Own

10+ Backyard Offices That Inspire Productive Work

25 Incredible Wood and Epoxy Creations

24 Incredible Plywood Furniture Options

70 Easy Ways to Join Wooden Parts

12 Easy Ways to Texture Wood

92 Useful Tricks for home craftsmen

99 Amazing Ways to Upgrade an Old Chest of Drawers

7 Examples - how to make a leather wallet

40 Fancy products wooden

20+ Toys for children from cardboard boxes

45 Ways to Update Your Closet with Wallpaper

20 Original and Simple Furniture Designs

26 gifts self made for the stronger sex

25 ways to make a cool interior pillow

25+ Amazing DIY Photo Frames You Can Make

50 Unusual wooden lamps

60 Wonderful Examples wall clock you want to make

40 simple sofas you can make yourself

30 Cool Handmade Wooden Gifts
blog comments powered by Disqus
 Practical storage systems for the garage or workshop.
For many, the garage is not only a place to store a car, but also a real car, locksmith and carpentry workshop. Therefore, it is important that everything is always at hand and in the right place. But sometimes it is so difficult to understand the variety of screwdrivers, pliers, scissors, drills and other utensils that are stored in the "male Eden". In this review, simple yet effective ideas will help you create almost perfect storage systems in your garage.
1. Magnetic tape

Magnetic tape for storing small metal parts.
Magnetic tape pasted on the wall in the garage can be used to store drills, scissors, bolts, nuts and other small metal parts. Such a magnetic holder is very convenient to use and will help prevent the loss of small but important spare parts.
2. Plastic containers

Rack made of plastic containers.
From large plastic containers and blocks of wood, you can build a large rack for storing tools, wires, spare parts and any other things. The organization of such a rack will allow you to put things in order and significantly save space in the workshop or garage.
3. Roof rails

Rails for trash bags and paper towels.
On one of the free walls of the garage, you can place several small roof rails, on which it will be convenient to place rolls of garbage bags, paper towels, sandpaper, adhesive tape, coils of rope and much more.
4. Furniture brackets

Brackets for furniture storage.
Many summer residents use the garage to store folding outdoor furniture. So that it does not stand in the corners and does not take up much space, make a vertical rack for it with wooden or metal brackets and screw it to one of the free walls.
5. Jars

Storage of nails, bolts, screws and other small things.
Bolts, nuts, nails, screws, screws and other little things do not take up much space, but it is extremely inconvenient to store them mixed. Putting things in order will help jars with lids screwed to the bottom of a wall cabinet or under the desktop top.
6. Grid under the ceiling

Lattice for storage of pipes and plinths.
A plastic grate screwed into the corner of the garage under the ceiling is ideal for storing leftovers. water pipes, skirting boards, profiles and other long things. Such a storage system will help to significantly save space in the garage and prevent possible breakdowns fragile building materials.
7. Organizer for screwdrivers

Wooden organizer for screwdrivers.
A small, practical screwdriver organizer that any man can make by simply drilling the right number of small holes in a block of wood. Such a product can be hung on one of the walls of the garage or workshop to keep all the screwdrivers in one place.
8. Vertical storage systems

Vertical panels for storage.
Several perforated panels made of metal or plywood under the table or in the cabinet will allow you to get an ergonomic and convenient place For vertical storage small hand tool.
9. Plastic pipes

PVC pipe storage systems.
The remains of PVC pipes of different diameters can be used to create the most different systems storage. For example, pieces of wide pipes screwed to the bottom of the cabinet are suitable for storing a screwdriver, drill and other tools of this type. From pieces of PVC pipes of medium diameter, you can make cells for storing various sprays, foam, paint tubes and other containers.
10. Tassels

Hanging brush storage.
It is very convenient to store paint brushes and spatulas suspended on a thin wire or on a thin steel rod.
11. Rack for garden tools

Wooden rack for garden tools.
So that garden tools do not take up a good third of the garage space, store them on a special rack screwed to one of the walls. Such a rack can be made with your own hands from wood bars, a wooden pallet or pieces plastic pipes.
12. Multifunctional rack

Pallet rack with shelves.
A wooden pallet, complemented by shelves made of pieces of wooden slats, will become a functional component of the garage and will help to place a huge amount of hand tools and small ones in one place.
13. Rod holder

A regular wire rack can be used to create a handy rod holder. Such a storage system can be fixed under the ceiling so that it does not take up space below and does not get underfoot in the autumn-winter season.
14. Pegboard

Perforated panel tool organizer.
Perforated galvanized metal panel can be used to create a multifunctional wall organizer for sundries. Using hooks and bolts on such a panel, you can fix small hand tools, containers and containers.

hinged wooden workbench.
A folding wooden workbench, which can be made from wood, is a great solution for a small garage or workshop. If necessary, such a workplace is folded and attached to the wall, making room for a car or other things.
16. Bracket for wheels

Bracket for wheels in the garage.
A purchased or home-made bracket will allow you to securely fix a set of wheels under the ceiling or on one of the walls.
Video bonus:
17. Wooden holders

Wooden organizers.
People who have at least minimal skills in working with a jigsaw can easily make a lot of convenient organizers and holders for a variety of things. A large number of such storage systems will allow you to put things in order in the workshop or garage and have a clear idea where this or that thing is located.
Also read:

Love has no days off
The main thing is not to be dead. Because death occurs much earlier than the heart stops. Death occurs when the spiritual life stops. Death comes then...

Orsini eggs! Very tasty and not beaten, just an egg pie
If you have long been bored with a traditional omelette or scrambled eggs for breakfast, then it's time to please yourself and your loved ones with another culinary find. With this dish...

10 Signs You've Met Your Soulmate
Not everyone believes that among 7 billion people there is only one destined for us by fate. Those who believe in a “soulmate” usually mean…

Cooking is an excellent activity not only for adults but also for children. By cooking, the child develops imagination and coordination. In addition, this is an occasion to spend a wonderful time with your baby. Sharing with you...

14 Signs of High Intelligence You Can't Fake
Maybe it's about you? People with high intelligence do not have to be the smartest, no matter how strange it may sound. Actually, this is…
One day you want to clean up the garage. But how to make this order practical, not decorative? 30 best ideas for you!

Order in the garage means convenient open storage all frequently used tools and compact storage of various small things "in reserve".
Often the garage and home workshop are combined, so all tools and supplies should have a convenient storage system.

As soon as the storage system becomes not very convenient for regular maintenance, the garage again turns into a spontaneous warehouse.

To store tools in the garage, it is better to use open shelves. It is very convenient if these shelves are removable.

In the garage of the workshop, it is necessary to place not only the usual set of tools for a car enthusiast and a home craftsman, but, sometimes, a garden tool and camping equipment.

Make the most of the entire height of the room. In plastic boxes under the ceiling and on the floor, you can put those things that you use from time to time.

The garage tool storage system uses the entire wall area as a stand. Separate sections-shelves for storing tools and Supplies.

Wooden guides are used here, but it is better to use metal pipes for these purposes. If over time the guide, which we see in the photo, crumbles, a box with a heavy tool may fall right on your leg. 
Such an organizer for storing consumables can be made by yourself from plywood sheets, which are connected by loops in the form of a book.

Lockable toolbox for the home craftsman will allow him to easily maintain correct order in the garage.

Cut plastic containers are convenient for storing nails, screws and other small things.


The hooks, made from plastic pipe scraps, not only guarantee the safe storage of the tool, but are easy enough to clean.

It is inconvenient to keep a working tool in a box; it is much more practical to make such an open storage stand.

The owner in the garage has a lot of necessary little things and each of them has its own way of storing.

Most of the ways to store a tool are simple, but still effective.

Very convenient design for storing tools and consumables! Everything is at hand, everything is in order.

Each owner has his own range of activities and a different number of tools. But a convenient organization of work always causes a desire to do something else. Take the time to tidy up the garage.

Sliding panels like extra bed for storing tools. Make sure they will work securely without getting stuck in the grooves, otherwise this storage method will not be practical.

Simple and convenient. Store your tool wisely! If you don’t have a garage and you keep all your tools at home, then even on the door of a small closet you can organize a small work organizer.

Let's continue for the happy owners of the garage. Before us is a convenient way to store metal tools on a magnetic panel.

But in our garage, not only tools. Plastic pipe cuts are a hit for homemade storage systems.

Another convenient way to store all kinds of accessories in the garage.
 A cluttered garden tool can also create clutter in the garage. Let's make a simple storage structure.

It is not difficult to assemble such a ceiling structure from pipes and in own garage for storage of lengthy materials.

Large sheets of plywood and drywall are best stored this way - in an upright position. And for cutting boards, etc. you can make such a rack from the stairs.

Everything that is rarely used can be put into large plastic containers, making such a simple design.

A small workbench can also serve as storage space.

Here is his diagram.

It is not necessary to clean up the garage in one day. All this can be done step by step.

WHAT IS YOUR OPINION?
Many car owners use the garage not only to protect the car from the weather, but also to store tools, garden tools and many things that do not fit in the house. As a result, the garage resembles a Bermuda triangle, in the bowels of which it is simply impossible to find anything. However, proper arrangement of the garage can turn this room into a comfortable and functional workshop, which, in addition to its main task, will help you save space. "Dream House" has collected the most amazing, beautiful, well-equipped garages in this review, in order to show the possibilities of the premises using the example of the owners of these photos and, of course, give practical advice on applying what they saw in practice.

Arrangement of the garage
How to equip a garage: draw up a plan
Before solving the problem of how to equip a garage, calculate its area and mentally divide it into three zones: a zone for a car, as well as a working and free zone. Since the main purpose of the garage is to keep a car or motorcycle, the place where the transport is located and the small area around this zone should always be free.

Garage design inside photo
Next, depending on the type of work you do, consider how many tools you need to store in your garage. Many car owners keep working tools in random order, placing them on makeshift shelves, in old chests of drawers, etc. Such storage, firstly, clutters up an already small area, and, secondly, creates a lot of inconvenience. It is optimal if you sort the tools, as well as other things stored in the garage, as they are needed, placing in the foreground only those items that you use regularly. However, even if you ruthlessly throw out all unnecessary rubbish from the garage, it may turn out that there is a catastrophic lack of space for its neat maintenance. But this problem can be easily solved by proper organization garage storage systems.

Hanging storage systems for a garage photo
Organize garage storage
1. Shelving
Shelves are the best helpers for putting things in order in the garage. On sale you can find ready-made metal or plastic structures, on which it is convenient to place tools, car accessories, garden paraphernalia, etc. When choosing shelving for the garage, first of all, pay attention to their size and the distance between the shelves. It is much more convenient to use designs in which you can adjust the height of the shelves, because. in this case, you can store even dimensional things on them.

Storage systems for garages

Shelving in the garage photo

Storage of bicycles and other things in the garage

Arrangement of a garage for a motorcycle and bicycles

How to clean up your garage

Metal shelving for a garage photo
2. Shelves
Garage shelves make a great alternative to shelving, especially since you can make them yourself. But before you make and hang shelves, check the strength of the walls. If the walls in the garage are uneven, it makes sense to pre-plaster them with a durable mortar. When choosing the height of the shelves, remember that you will not be able to comfortably use them if they are located above the level of the chin. To save space, you can place several shelves almost under the ceiling, but they are only useful for storing the most rarely used items.

Suspended metal shelves to the garage

DIY wooden shelves in the garage photo
If you store a lot of tools in the garage, purchase or make shelves with special holes in which you can place various screwdrivers, hammers, small garden tools etc. Such a simple product will allow you to organize the storage of the most necessary tools, so you will no longer waste time looking for them.


Do-it-yourself garage arrangement inside

Wooden shelves for the garage photo
Alternatively, you can equip the garage with closed shelves created from old hanging cabinets.

Hanging cabinets with shelves for garage

Beautiful arrangement of the garage photo

3. Tool shields and perforated plates
Perforated plates, equipped with holders of different lengths, will be useful to those car owners who store many different attributes in the garage. On such a plate, you can place garden tools, a stepladder, helmets, sports equipment and any other things that you use regularly.

Arrangement of the garage inside the photo

How to store inventory in the garage

Storage of garden tools in the garage
You can complete the plates with various hooks that will serve as holders for ropes or a hose, sliding shelves for storing change of clothes, etc.

Photos of garages inside

DIY garage ideas photo

Organization of order and storage in the garage
If necessary, durable brackets can be attached to the perforated plates, which will ensure reliable storage of wheels and bicycles in the garage.

Storage of bicycles, sports and tourist equipment in the garage

How to store a bike in a garage

How to hang a bike in the garage
4. Garage furniture
Many refuse to use furniture in the garage, believing that it will take up all the free space without bringing any visible benefit. This statement is true only in relation to the old large-sized furniture, which migrated to the garage as unnecessary. Modern metal furniture for the garage is both multifunctional and compact. As a rule, the furniture for this room is a set of cabinets and chests of drawers, but if you want to create a garage and a workshop, it makes sense to complement the furniture set with a comfortable worktop.

How to equip a garage inside with your own hands photo

Garage tool storage furniture with chalk signatures

Creative Garage Ideas
The furniture corner is best placed in the farthest corner of the garage. Set up your workplace for convenience hinged shelves, racks and drawers in which the tools will be located.

Garage and workshop furniture

Workshop in the garage photo

Garage furniture
5. Basement
If your garage is equipped with a basement, then before filling it with conservation, old car tires, unnecessary tools, etc., equip it with the same racks and shelves. Although these products will take up extra space, they will help you organize your stored things, which will ultimately save on the available space.

Tidy garage layout
Garage design is an important step towards proper arrangement
When creating your dream garage, don't forget about its interior. It so happened that few people pay attention to the design of this room, as a result, the garage looks gloomy and unpresentable. Often, the owners simply plaster the walls of the room, and the floor is covered with concrete, which enhances the already uncomfortable atmosphere. You can give your garage a more attractive look with the right finishes. For example, it is recommended to use ceramic tiles as wall decoration, as well as plastic or plasterboard panels in light shades.

DIY garage interior photo
In addition, when choosing furniture for the garage, try to stick to style unity. Despite the fact that this room belongs to the category of auxiliary ones, the more carefully you arrange it, the more pleasant it will be for you to be in it.

Do-it-yourself garage design inside photo

Ideas for a garage photo
Arranging a garage takes time and creativity. But with a little effort, you can debunk the myth that the garage is a place to store trash, turning it into a comfortable and functional workshop and additional space for convenient and compact storage.


Many car owners use the garage not only to protect the car from the weather, but also to store tools, garden tools and many things.
The article discusses the most convenient and practical do-it-yourself garage accessories that can improve the comfort of using this room. Here are detailed recommendations for the development and creation of structures designed for convenient storage of tools and automotive parts, tips for making furniture, as well as arranging a lighting and heating system.
The garage is designed not only for storage, but also for servicing the car. For this reason this room should be roomy, clean, comfortable and well-equipped.

To achieve all this, it is enough to take into account the basic requirements for the organization of space:
- The presence of shelves for tires and storage of tools significantly saves free space and allows you to optimize space.
- The quality of lighting is of great importance, since it affects not only productivity, but also the quality of minor repairs.
- Construction of a garage workbench, machine tools, viewing hole and other devices expand the range of opportunities for the owner of the car in relation to the repair and maintenance of the vehicle.
Helpful advice! All these elements should not occupy a space exceeding 10-20% of the garage area.

Do-it-yourself shelving options in the garage: photos and tips for arranging storage spaces
About 80% of the shelves in the garage are built with their own hands to store garage accessories, namely:
- tools and accessories;
- component parts for the car;
- accessories.
Often in the photo of the shelves in the garage with their own hands, they are combined with a rack, which can also be made independently. Most often, the rack is considered as the main place for storing tools. After its installation, the remaining space is filled with comfortable and roomy shelves.
Be sure to allocate a place where work clothes will be stored. It is not necessary to occupy a large area, you can get by with one shelf or even a hook (depending on your needs).

A garage is a place where hazardous and flammable substances are stored. These include oil, gasoline, solvents, paints, polishes. For them, it is necessary to provide a separate cabinet, hang a fire extinguisher and install a sand tank.
To protect against contamination during storage of wheels mounted on tire brackets, it is worth purchasing large bags or specialized covers to prevent dust from entering.
Brackets and shelves for wheels in the garage: design features
The most bulky vehicle spare parts include sets of tires, which can be winter or summer. When winter tires are used, summer tires are usually stored in the garage and vice versa. Therefore, you should organize shelves for storing tires or brackets.
The bracket design looks like this:
- Two triangular frames made on the basis of the corners. Jumpers made of any durable metal are installed between these frames.
- The triangular parts of the structure are fixed on the wall in a pre-selected location. Wheels must be installed perpendicular to bearing element stands. In this case, the tires should fall slightly between the jumpers, thus fixing on the shelf due to their own weight.

Helpful advice! Do-it-yourself wheel shelves in the garage are recommended to be placed as close to the ceiling as possible at the optimum height. Thanks to this, car tires will not occupy usable space in the garage.
For compact storage of wheels, a whole rack in the form of four wide shelves can be used. It is suitable for placing wheels with discs that can be placed one above the other in a horizontal position. The design can be made angular and raised to the wall.
- wooden beam;
- boards;
- chipboard sheets.
Installing tire brackets is the most efficient way to store wheels. Greater space savings can be achieved by hanging the rubber from the ceiling base along the garage wall. This option possible if the room has a large height and reinforced concrete floors in the form of tiles on the ceiling. They will be used as the basis for screwing in the dowels.

Tool storage: interesting DIY garage ideas
To organize a convenient area for placing things, you can independently make a home-made and very roomy rack or shelves. Of course, you can find hundreds of ready-made models in stores, nevertheless, making a shelf in the garage with your own hands is much cheaper than buying a similar product on the market.
Same issue with shelving. Taking up the independent production of a place to store tools, you can not only organize a convenient and practical rack, but also harmoniously fit it into the garage space.
Helpful advice! The minimum load that the structure must withstand is 150 kg or more. In this case, the maximum load limit per section is 500 kg.

Rules for the manufacture of wood products:
- Better to use wood hard rock e.g. beech, oak, hornbeam.
- Before assembly, wood treatment with antiseptic agents is required.
- Frame parts must be carefully sanded so that the operation of the rack is safe.
- For the manufacture of shelves, it is recommended to use chipboard or plywood sheets, OSB. DVL plates with a thickness of at least 4 mm are also suitable.
The thickness of the material is determined by the loads that will subsequently act on the rack.
Recommendations for making tool shelves in the garage with your own hands
Shelves are installed in cases where the garage does not allow you to put a rack. It is better if there are several designs.

The scheme for creating shelves for tools:
- Plan the placement of shelves, determine their size and markup.
- Prepare material in the form of boards and fasteners.
- Using a perforator, make holes in the wall, install dowels with hooks in them, which will provide enhanced fixation.
- Fasten hangers equipped with lugs on the boards. For metal hangers, it is recommended to use self-tapping screws or ordinary nails.
- To carry out the fixation of finished products using building level otherwise the instrument may fall from the shelves, making operation unsafe.
Helpful advice! When making shelves, it is better to give preference to several short designs, since one long product can break under the weight of the tool.
At the final stage, you can decorative trim products (paint or special film).

The technology of creating a rack for tools in the garage
To create a rack with your own hands, you will need boards 9 and 19 cm wide. The size of the structure can be adjusted.
Step technology:
- A 9 cm wide element is cut into several pieces 18 cm, 27.5 cm and 30 cm long. The resulting parts will be spacers.
- A board with a width of 19 cm should be cut into segments 36 cm long. Shelves will be made from these parts.
- On the board, which will become the base of the product, it is necessary to mark in those places where there will be spacers. It is recommended to indent on each side by 2.5 cm.
- The upper spacer is glued, then the upper shelf, which already has a spacer, is nailed to it. Other parts are mounted in the same way. Installation of the lower spacer is carried out at the end.
- The structure should be turned over and the struts should be coupled with screws together with the base of the product.
- The surface is carefully cleaned with sandpaper. After that, the product must be covered with two layers of oil-based varnish or another type of finish.
- The structure is fixed to the wall with anchor screws. Fixation should be done both under the top and under the bottom shelf.

Helpful advice! To strengthen the product, it is necessary to install wood bars between the sections. They will allow you to evenly distribute the load on the rack.
Organization of the lighting and heating system in the garage
In order for the operation of the garage to be comfortable, the lighting, ventilation and heating system should be properly organized in the room. Since cars are closely associated with the use of toxic and harmful substances, the problem of ventilation in a confined space is particularly acute. For a garage, products are suitable for brickwork. They are equipped with gratings.
Factors affecting the level of illumination:
- garage area, its height;
- the number and nature of the placement of work areas (the size of the workbench for the garage, the viewing hole, the number of machines);
- type of decoration on the walls, its colors;
- indicator of the specific power of the network per 1 m²;
- type of lamps for the garage.

To maintain the optimum temperature can be used different kinds heating:
- gas;
- based on used oil;
- air;
- electric ( infrared heater for a garage)
- furnace;
- water;
There are many alternative ways independently organize the heating system.
Features of halogen, fluorescent and LED garage lights
Technical indicators of halogen lamps are in many ways similar to incandescent lamps, however, their bulb is filled with bromine vapor, so the products emit more light. The advantages of such lamps include long terms service - 4 thousand hours.

Helpful advice! Products must be placed in plafonds. It is also worth thinking about stabilization aimed at protecting against power surges. It is not recommended to touch such lamps with your hands (the expiration date is reduced).
Fluorescent lamps are filled with inert gases inside. From the inside, the flasks are covered with a specialized composition that emits light in ultraviolet under the influence of an arc-type discharge. Recommended models include products with IP-65 class, protected from moisture and dust particles.
Installation led lighting in the garage is accompanied by the highest costs. Nevertheless, they pay off with 50 thousand working hours. In terms of efficiency, LEDs are 50% more profitable than fluorescent lamps. At the same time, they do not contain harmful components in their composition, and the light does not have an aggressive effect on the eyes, so there is no need to buy additional shades.
Installation of lighting in the garage: how to make a calculation
To calculate the power of conventional lamps, you can use the formula:
P = S x W/N.

Explanation of values:
- P - total required power, W/m².
- W is the power of one lamp, W.
- N is the number of lamps (luminaires), pcs.
- S is the area of the room, m².
For halogen and LED lamps the optimal indicator is 16-20 W / m². This value is suitable for rooms where the ceiling height is no more than 2.5 m. In garages with 3-meter ceilings, this figure should be multiplied by 1.5.
The calculation is affected interior decoration walls of the room. In dark garages, lighting should be brighter.
Light Reflection Level:
| Room area, m² | Ceiling height, m | Wall finish color | |
| Dark | Light | ||
| 20 | less than 3 | 0,6 | 0,75 |
| 50 | 0,75 | 0,9 | |
| 100 | 0,85 | 1 | |
| 20 | 3-5 | 0,4 | 0,55 |
| 50 | 0,6 | 0,75 | |
| 100 | 0,75 | 0,9 | |
| 50 | 5-7 | 0,4 | 0,55 |
| 100 | 0,6 | 0,75 | |
To illuminate the viewing hole in the garage, it is recommended to use low-power lamps with halogen or LED lamps, since moisture accumulating in this place can provoke an electric shock. Devices are mounted on the sides in pre-made recesses.
Helpful advice! So that an accidentally dropped tool does not break the lamp, the design of the lamps can be made retractable. When the pit is not in use, the appliances are securely hidden in the recesses.

Do-it-yourself autonomous lighting system in the garage
There are a number of principles on the basis of which an autonomous lighting system is implemented:
- LED strips are mounted inside the ceiling lamps (300 diodes per element).
- The output of the switch is carried out strictly on the shield.
- A suspended ceiling system is used for electrical wiring.
- The wires are powered by a battery connected to the network through a charger.
The multi-level lighting system for the garage is considered the most optimal. It involves the installation of a large lamp in the middle of the room and the installation of small lamps in work areas.
Height calculation for a multi-level system:
| Level | Height, m |
| 1 | ceiling base |
| 2 | 1,8 |
| 3 | 0,75 |
| 4 | 0,4 |
Lights are installed correctly if the machine does not cast a shadow on either side.
How to choose a heater for the garage
Garage heating is carried out using small portable devices that can warm up the room in a short time and maintain the optimum temperature in the future.
Thinking about which heaters are best for the garage, many mistakenly believe that a home-made device can be made exclusively from expensive components and requires a significant investment of time. For this reason, garage owners refuse this venture.

In fact, to make a garage heater with your own hands, it is enough to limit yourself to budget materials, for example, thermal film. The scheme for creating such a device is very simple and involves the use of the following materials and tools:
- a kit designed to assemble the heater;
- wire, equipped with a plug;
- paper laminate (the area of one element is 1 m²);
- graphite powder;
- epoxy adhesive.
Helpful advice! Be sure to have a multimeter with you. When assembling the device, this tool is useless, but it will be needed to check for performance.

Thermal, or - a common heating option in the garage
Recommendations for assembling a homemade heater for the garage
Step by step instructions on how to make a heater for the garage:
- A mixture of glue and graphite powder is made. The more powder in the composition, the stronger the heating of the device will be. The average temperature ranges from 60-65°C.
- Plastic sheets on the rough side are covered with a mixture of glue and graphite, which is applied in zigzag strokes, after which they are fastened front sides and are fixed with a frame made on the basis of wooden slats.
- The terminals are fixed to the graphite conductors and the structure is dried. Drying must be complete, otherwise moisture will ruin the device.
After the heater has dried, a resistance test should be performed. A garage heater is considered safe only after this test. Until this moment, it is strictly forbidden to connect the device to the mains.
Security restrictions:
- It is not recommended to leave the switched on device unattended or leave it near children.
- It is forbidden to use equipment that can provoke a fire.
- Flammable substances and materials must not be placed near the device.

Making useful DIY garage fixtures
To carry out repair and service work, you will need to build a viewing hole in the garage with your own hands, the dimensions of which will correspond to the dimensions of the car, as well as a workbench for convenient work, plus equip the room with machines.
The main set of tools and materials for creating homemade workbench for the garage includes:
- boards and wooden blocks;
- fasteners and ties;
- planer and other tools for woodworking;
- varnishing and carpentry adhesives;
- sandpaper and varnish.

Garage example useful gadgets: 1 - with manual machines, 2 - racks and cabinets, 3 - a table for various repairs, 4 - a shelf for storing tires, 5 - an inspection hole
Do-it-yourself workbench manufacturing technology in the garage: photos, drawings
The workbench consists of a tabletop and underframe, as well as several clamping devices. The height of the workbench in the garage should be selected taking into account your own height. You can take the height as a guide kitchen table in a home that is comfortable to work in. Be sure to draw up drawings to create.
Helpful advice! Ready-made drawings of a workbench for a garage, which can be found on the Internet, are suitable as a basis for self-production of the structure. If desired, it can be customized to your needs.
Arrangement of the garage: how to make a workbench indoors:
| Stage of work | Details, size in cm | Mount type |
| Table top assembly | 20 boards (5x10x200) with grooves 2.5x2.5 in the 5th and 16th element (step 25) | Adhesive composition metal ties |
| Drying | - | - |
| Production of legs (4 pcs.) | Bar (10x10x80) with grooves for brackets on the front supports | brackets |
| Assembling the underframe base | Frames (2 pcs.) from boards (5x10) | Spike connection to a depth of 2.5 cm and bolts |
| Fixation of side and rear support walls | Chipboard boards (thickness 10 mm) | screws |
| Fixing the table top to the top frame | - | bolts |
The final processing involves the impregnation of the finished product with drying oil and opening with varnish.
Recommendations for creating a viewing hole in the garage with your own hands
There are no specific sizes of a viewing hole in the garage. The dimensions of the car are taken as the basis.
How to make a viewing hole in the garage with optimal parameters:
- The width is chosen so that there is enough space inside to work. The size is limited by the distance at which the wheels of the car are planted. Every wheel needs small area to perform maneuvers. The average width of the pit is 0.8 m.
- The length of the pit is limited by the length of the machine. To this figure should be added 1 m.
- The height of the garage owner is used to calculate the depth. Another 10-15 cm is added to it.
How to make a viewing hole in the garage using different materials:
| Material | Wall thickness, cm |
| ceramic brick | 12-25 |
| Concrete | 15 |
| 20 |
The pit breaks out taking into account the optimal width of the pit, the material chosen for the walls, as well as the thickness of the waterproofing layer. Stages of creating a hole:
- markup;
- construction of a pit;
- arrangement of the pit;
- building walls;
- lighting pad.
For waterproofing walls, a specialized hydrophobic impregnation is used.
Helpful advice! With the help of formwork, it is possible to make reinforced recesses in the walls of the pit for placing tools and lighting fixtures.

Making a press for a garage with your own hands
To create a press, it should be made from 4 segments metal pipes frame size 178x80 cm. These elements are connected by welding. In the work it is recommended to be guided by drawings, pre-selected or compiled. After that you need to install:
- retainer;
- removable stop;
- bottle jack (hydraulic).
You can use video materials to consider the detailed technology for creating useful garage accessories with your own hands. Such visual recommendations help to navigate in size, master step by step instructions and imagine what appearance should have a finished design.

Manufacturing scheme: 1 - upper power platform, 2 - nuts, 3 - lower platform, 4 - studs with a diameter of 30 mm, 5 - lower thread of the studs, 6 - hydraulic jack bottle type; 7 - base 20 mm thick
You can do it yourself. The list of useful devices does not end there. It can always be supplemented with any interesting ideas. The main thing is that the garage fully meets personal requirements in terms of comfort and convenience.
Practical storage systems for the garage or workshop.
For many, the garage is not only a place to store a car, but also a real car, locksmith and carpentry workshop. Therefore, it is important that everything is always at hand and in the right place. But sometimes it is so difficult to understand the variety of screwdrivers, pliers, scissors, drills and other utensils that are stored in the "male Eden". In this review, simple yet effective ideas will help you create almost perfect storage systems in your garage.
1. Magnetic tape

Magnetic tape for storing small metal parts.
Magnetic tape pasted on the wall in the garage can be used to store drills, scissors, bolts, nuts and other small metal parts. Such a magnetic holder is very convenient to use and will help prevent the loss of small but important spare parts.
2. Plastic containers

Rack made of plastic containers.
From large plastic containers and blocks of wood, you can build a large rack for storing tools, wires, spare parts and any other things. The organization of such a rack will allow you to put things in order and significantly save space in the workshop or garage.
3. Roof rails

Rails for trash bags and paper towels.
On one of the free walls of the garage, you can place several small roof rails, on which it will be convenient to place rolls of garbage bags, paper towels, sandpaper, adhesive tape, coils of rope and much more.
4. Furniture brackets

Brackets for furniture storage.
Many summer residents use the garage to store folding outdoor furniture. So that it does not stand in the corners and does not take up much space, make a vertical rack for it with wooden or metal brackets and screw it to one of the free walls.
5. Jars

Storage of nails, bolts, screws and other small things.
Bolts, nuts, nails, screws, screws and other little things do not take up much space, but it is extremely inconvenient to store them mixed. Putting things in order will help jars with lids screwed to the bottom of a wall cabinet or under the desktop top.
6. Grid under the ceiling

Lattice for storage of pipes and plinths.
A plastic grate screwed into the corner of the garage under the ceiling is ideal for storing leftover water pipes, skirting boards, profiles and other long items. Such a storage system will help to significantly save space in the garage and prevent possible breakage of fragile building materials.
7. Organizer for screwdrivers

Wooden organizer for screwdrivers.
A small, practical screwdriver organizer that any man can make by simply drilling the right number of small holes in a block of wood. Such a product can be hung on one of the walls of the garage or workshop to keep all the screwdrivers in one place.
8. Vertical storage systems

Vertical panels for storage.
Several perforated panels of metal or plywood under a table or in a cabinet provide an ergonomic and comfortable place to vertically store small hand tools.
9. Plastic pipes

PVC pipe storage systems.
The remains of PVC pipes of different diameters can be used to create a variety of storage systems. For example, pieces of wide pipes screwed to the bottom of the cabinet are suitable for storing a screwdriver, drill and other tools of this type. From pieces of PVC pipes of medium diameter, you can make cells for storing various sprays, foam, paint tubes and other containers.
10. Tassels

Hanging brush storage.
It is very convenient to store paint brushes and spatulas suspended on a thin wire or on a thin steel rod.
11. Rack for garden tools

Wooden rack for garden tools.
So that garden tools do not take up a good third of the garage space, store them on a special rack screwed to one of the walls. Such a rack can be made with your own hands from wood bars, a wooden pallet or pieces of plastic pipes.
12. Multifunctional rack

Pallet rack with shelves.
A wooden pallet, complemented by shelves made of pieces of wooden slats, will become a functional component of the garage and will help to place a huge amount of hand tools and small ones in one place.
13. Rod holder

Rod storage.
A regular wire rack can be used to create a handy rod holder. Such a storage system can be fixed under the ceiling so that it does not take up space below and does not get underfoot in the autumn-winter season.
14. Pegboard

Garage tools are indispensable items for every car owner. Quickly unscrew the bolts that secure the wheel, and then change it, drain and fill in fresh oil and antifreeze, even just clean the car windows from snow or ice - all this will be done with a tool that should always be at hand.
It includes garden and construction equipment, often stored in such premises. This article offers recommendations on how to store tools in the garage competently, how to make some products with your own hands.
What tools are needed in the garage
Equipping the garage with everything necessary is made based on the preferences of its owner. Features of the performance of repair or other types of work determine the presence of various equipment and tools in the garage. Despite the wide variety of jobs, it is desirable to have some garage tools in every room.
These include:
- A set of keys, better with a special ratchet.
- Set of heads.
- Screwdriver set.
- Pliers.
- Wire cutters.
- Round nose pliers.
- torque wrench, which allows you to choose the right tightening torque and ensure high-quality wheel fastening, this is especially important when replacing it on a car.
- A set of mounts.
- Universal clamp.
- Retaining ring remover.
- Chisels.
- Set of magnets.
Various electric and pneumatic tools also facilitate the performance of repair work.
It can be:
- Electric drill.
- Impact wrench.
- Bulgarian.
- Grinder.
- Electric lift.
- Welding machine for complex repairs.
Motorists purchase many tools and devices at their own discretion, and some even make them themselves.
How to make a pipe bender
Homeowners often need to bend pipes or strips of metal, for example, when making their own greenhouses or laying a plumbing system. There are many solutions to this problem. One of the options is shown in the photo.

To make a pipe bender you will need:
- Tree.
- Three polyurethane keel rollers for a boat trailer, which are fixed with tougons on the shafts from scrolling.
- Steel angles that hold the rolled pipe in a perpendicular position and prevent it from bending into a spiral.
- Stud and nut or threaded plate. These elements are needed to tighten the roller from below. Each time the pipe is rolled, the nut or threaded plate is tightened by half a turn. In case you need to make a bend of not a large radius, but the circle turned out correct form, you may need to make 50 to 100 runs.
- Handle with bracket, to rotate the pressure roller.

Pipe bender - bottom view
The order of work has the following sequence:
- Wooden blanks are cut out.
- Holes are drilled for axles.
- Axles with rollers are assembled.
- IN vertical racks axle bearings are inserted.
- The assembled nodes are mounted on the base of the pipe bender, guide corners are attached.
- Guide plates are fixed on top of the base rack.
- The upper part of the tool is assembled. A shaft with a roller and a handle is inserted, a stud or a long bolt is installed from below for the clamping nut.
Particular attention in the manufacture of tools should be given to the distance between the rollers. Each pipe has a minimum bend radius. The greater the distance between the rollers, the larger it will be.
In this case, less bending force is required, and the end of the pipe will remain unrolled. The stroke of the pressure roller must be made as long as possible.
These points must be taken into account at the design stage and it is necessary to provide for the possibility for the rollers to change their position if necessary. Therefore, in order for the pipe bender to be used repeatedly, the dimensions of the tool must be taken with some margin.
How to make a screw clamp
To attach the pipe bender to the workbench, as well as to perform other work, you will need various clamps. Price a large number products of different sizes is quite high. Therefore, if there is a desire, such designs can be made independently.
To make a screw clamp you will need:
- Profile metal sheet, approximately 10 millimeters thick.
- Metal rod with a thread on one end M10.
- Several nuts M10.
The manufacturing process includes:
- A bracket is marked on a sheet of metal. For this you can use ready product or prepare a template yourself, at your own discretion, taking into account the requirements of the operating conditions and the required dimensions.
- The workpiece is cut out. In this case, it is better to use an acetylene torch or a gas cutter.
- The edges are cleaned with an angle grinder and the burrs are removed.
- On the smaller side of the bracket, several M10 nuts are welded or a hexagonal bar up to 50 mm long with an M10 thread for the entire length in the center of the part.
- An M10 thread of the required length is cut on a round bar with a diameter of 10 millimeters.
- Performed protective covering all elements with oil or nitro paint to protect against corrosion.

A homemade garage tool can also have a more complex manufacturing process that requires special equipment and skills.
Tip: Before using homemade tool for a garage, you need to make sure of its quality, and most importantly, of reliability when working with it.
How to properly store tools in the garage
If it is quite difficult to make a tool for a garage with your own hands, then each owner of the premises can perform the correct and convenient placement of the tool in the garage.
In this case:
- To properly organize the space where small parts will be placed, you can equip several rows of long shelves along the wall (see), where you can then place garage tools.

- Large items are placed in plastic containers, large-capacity boxes or special boxes.
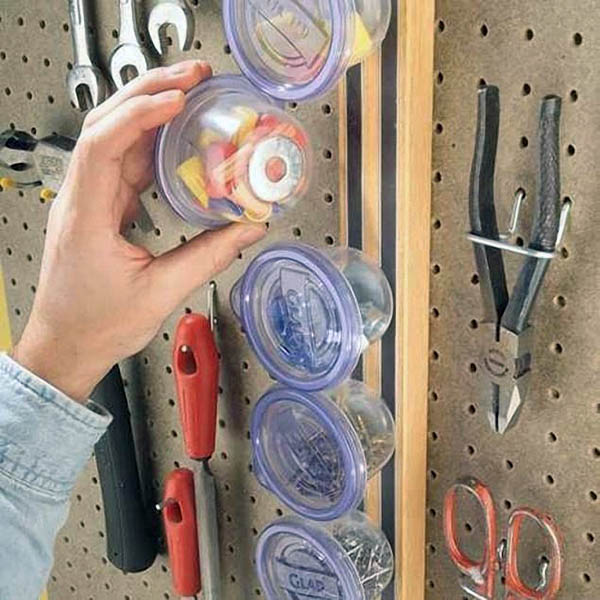
- Small fastening tools can be stored in makeshift blocks using small food containers. A metal washer is glued to the bottom of it with superglue, and attached to the wall through a rail with a magnetic strip.
- It is convenient to hang a small tool in the garage on hooks that are attached to a long wooden strip fixed on the wall.

- A special stand on the wall is perfect for storing frequently used tools.

- For hacksaws and bow saws, metal brackets are made that can be nailed to the doors or screwed with small screws.
- Power tools in the garage are perfectly stored on racks (see) or shelves.

Tip: Store power tools in the winter in the packaging in which they are sold, these can be portable plastic boxes with a handle, which will protect the product from the negative effects of moisture and mechanical damage.
- Garden tools with long handles can be attached to special metal hooks.
Tip: For mowers, wheelbarrows, concrete mixers and other large-sized equipment, special racks should not be made. And metal hooks should be placed closer to the garage door.

- It is convenient to store a semi-automatic welding machine or another type of apparatus on a special trolley. Its use has the following advantages:
- welding equipment is easy to deliver to the place of work;
- it is possible to fix a gas cylinder for welding, which does not have good stability;
- saving space in the room.

It is not at all difficult for a garage owner who knows how to handle welding to make such a design himself.
How to fix the tool in the garage, place different shelves, racks and other equipment correctly to ensure convenient use of it, the video will tell. Convenient, serviceable and always at hand the right tool - comfort in the garage for any car owner.
Garage for a man is the second home where he spends most of his free time. In order not to get lost in the amount of inventory that is stored in the garage, we will put everything in its place. We will analyze the issues of zoning and landscaping, learn how to make shelving, workbenches and practical holders for large and small things with your own hands.
Zoning the premises - we divide the garage into functional areas
Whether you're starting a project from scratch or thinking about remodeling your garage, good option for construction - two-tier zoning of space. On the top floor there will be a workshop, in the bottom - a basement and a pit. We will analyze an approximate plan for the location of zones in the upper part of the garage, taking into account the convenience and specifics of the room.
Zone No. 1 is transitional. Equip a place for items that you will need when you leave the room: racks for outerwear and shoes, a shelf for keys, a mobile phone, and bags. The transition area should be close to the door, not cluttered with the work platform, racks and other items.
Zone number 2 - for household items. This space can be organized to store items that you need in everyday life. If you have pets, construct a small rack for food, canned goods. for newspapers, coffee machines, electric kettles and microwaves. The site can also be used for storing things in bulk that do not fit in the cellar.
Zone No. 3 - shelving. There may be several sites for mounting high racks, depending on the area of \u200b\u200bthe workshop. We store garden tools, spare parts, equipment for work in them.
Zone number 4 - auxiliary. Here we store large items and things that you rarely use. For example, leisure equipment, holiday decor. Optionally, the corner can also be equipped with a rack for storing summer and winter tires.
Zone number 5 - a sports corner. Take a place for bicycles, roller skates, scooters, make a net for balls. Provide hooks, holders and nets for them so that nothing rolls and stays firmly in place.
Zone No. 6 - workspace. Equip this area with maximum comfort. Provide a universal workbench for gardening, woodworking and auto repair, convenient sliding cabinets, shelves for storing small items. And don't forget lighting. The window will be a big plus, in its absence, use artificial lighting by connecting several 60 and 80 watt lighting lamps.
Inspection pit and basement - we equip with comfort
Car repairs can be carried out without a viewing hole. However, an experienced car enthusiast knows that it is more difficult to get to the details of the bottom of the car in this case. The back and neck get tired quickly, you have to constantly take an uncomfortable position, search the right tool is also difficult. An observation pit with a basement helps the master get rid of all these problems. The first thing to start with is fitting the pit to the growth of the master. You should not touch the ceiling with your head and reach the details of the lower part of the car. We add 10 cm to your height, the final number will be the comfortable depth of the viewing hole. We select the length and width of the opening according to the dimensions of your car, starting from generally accepted standards. We strengthen the side parts of the recess with metal corners and sheathe with a board. This finish will extend the life of the walls and floors.

Do not forget about the lamps and storage niches in the side parts of the pit, in which you can put necessary tools and car repair parts. For ease of descent, provide a ladder or steps and a ceiling with which you can close the pit after completion of work. Make it from ordinary boards or automate it with a lifting mechanism. So you do not drop the tools into the pit and protect yourself from accidental slipping down.
An additional plus of arranging a viewing hole is. It can store canned food and vegetables for the winter. When building a cellar, do not forget about ventilation and a lamp at the entrance.
When building a pit from scratch, consider important point- ground water level. It should be below the floor of the pit and cellar. For the construction of walls, use durable materials (foam blocks, M400 concrete).
Basics of installation and design of shelving structures
Before placing, decide on its size. Its dimensions should not interfere with work, clutter up the garage space and interfere with the turn of the car. The best option is to install the rack against the wall. The height of the rack depends on the size and number of things. The lower shelves are reserved for storing large items (jacks, fuel cans, a welding machine). We also place the tires at the bottom or provide a separate shelf for them higher. So that the rack does not bend from the severity of the weight, we pay Special attention bottom of the structure. We make it from a thick board or sheet of metal. Depth, width and spacing between the shelves of the rack is selected individually. Given the average dimensions of equipment and parts, the dimensions vary from 0.5 to 1 m.

To strengthen the structure on the sides, we use vertical and transverse metal corners. After welding the corners, we assemble the frame according to the project, clean and prime the beams. If the frame is made of metal, cover it with an anti-corrosion compound. After assembling the supporting parts of the rack, we cut the boards of suitable length. We also treat them with impregnation and open them with enamel. We fasten the boards with screws, we monitor the tight fit of the shelves to the frame. To fix the rack to the wall, we use large anchor bolts. To make it more convenient for you to sort the tools, we bolt a container to the side of the rack, where we put screwdrivers, car testers and other little things for work.
Workbench - preparation of the workplace of the master
One of the main elements of arranging a garage is a workbench. This is the workplace of the master, which is given special attention. Before designing, we calculate the free space and draw the project according to it. We weld the frame of the workbench from profile pipes and metal corners. The average height of the workbench is 0.9–1 m. This parameter depends on the height of the master and preferences to work sitting or standing. After assembling the frame, we cover it with an anti-corrosion primer. We lay the base of the tabletop from a thick board 7.5 cm thick. If there are no boards, we fasten 7 sheets of thin plywood together, seating them on PVA construction glue. After fastening the sheets, we put them under the press so that they are finally fastened together. Covering the base of the table sheet metal 5-6 mm thick, cover it with an anti-corrosion primer.

We cut off the excess parts of the sheet with a grinder or a metal saw and finally attach it to the screws, drilling holes for fasteners in wooden base countertops. Such a surface is suitable for both carpentry and locksmith work. If desired, we equip the workbench with retractable or sliding cabinets with shelves. We hang a perforated screen on the wall above the workbench. Here you can hang the tools that you most often use in your work, providing shelves, hooks for them, as well as home-made designs for nuts, bolts, self-tapping screws.
A simple floor rack option for tires
It's hard to imagine a garage without a set of replacement tires. Most often they are stored in bulk. To solve this problem, consider a simple rack that does not require special carpentry skills. If you have space in your garage, a floor stand option is the way to go. As an example, consider a two-tier rack that holds two sets of tires with a tread width of 265 mm. Floor rack dimensions:
- width - 1.1 m;
- depth - 0.5 m;
- total height - 1.83 m.
- the distance between the shelves is 0.7 m.
If you store truck tires in the garage, the dimensions need to be recalculated. When choosing lumber widths, keep in mind that they can support a load of approximately 180-220 kg, depending on the weight of your tires. We recommend taking wooden bars with a section of 1.5x3.5 inches. To assemble the front of the rack, we saw off two beams 183 cm long. These will be the side parts of the frame. We cut out 3 front partitions 1.1 m long. To connect the front to the back, we saw off 6 planks of 0.5 m each.

Floor Tire Rack
We connect the side supports at the upper base with a longitudinal partition. Moving down in increments of 0.7 m, we attach two more longitudinal partitions to the supports. After that, we drill holes for 6 short strips and fasten them to the screws on the sides opposite the longitudinal partitions. The front frame is complete.
Similarly, we collect the back of the rack and fasten it to the front frame. For reliability, we tighten the structure with straps on the sides. The shelf is ready, we load it with tires. In order for the rack to serve for a long time, we cover it with impregnation for wood, paint it and open it with varnish.
Hanging shelf for cordless power tools
A practical and beautiful option for storing cordless tools is a hanging shelf with holders. At the bottom of the shelf there will be a drill, a screwdriver of different power, and on the top of the structure - devices for charging batteries. There is no need to store power tools in a case, everything is at hand. The shelf saves space and hangs on the wall. To assemble it, we prepare a board with a wall thickness of 2 cm. We measure the dimensions of power tools in order to select optimal size slots. We cut out short strips for attaching tools. For example, to hang 5 power tools, you will need 4 strips 2 cm thick. Such a gap will allow you to hook a drill, a screwdriver, securely fixing them in the support. We make vertical strips higher, we fasten them together with self-tapping screws.

The working height of the side parts of the structure is 23 cm. The part protruding beyond the upper edge of the shelf plays a decorative role and serves as a limiter for chargers and tools. We calculate it individually, starting from the height of the equipment. We saw off two shelves, connect them with T-shaped stands for power tools and sidewalls, not forgetting to first attach square strips of size 2x2 cm to the inner parts. We fix the top shelf in 11 cm increments from the bottom shelf. The structure is ready. It remains to cover the shelf with a primer for wood, if desired, paint and varnish. We hang a mini-rack on the wall, fill it with tools. Here is the order.
Simple designs for cutters, keys, files and fasteners
To make the workshop in the garage look neat and the master could find the tool and fasteners he needs at any time, we will construct several simple and convenient hanging structures. We prepare a thick foam and attach it to the wall on a plywood substrate 3 cm thick. We fasten both parts together with liquid nails or PL 500 mounting glue. We wait a few hours until the structure is firmly set. Due to the porous structure of the foam, sharp and rotating objects easily enter and are firmly fixed in the material. We insert bits, drills, cutters, crowns, keys, screwdrivers, awls, hubs, files into the foam. The ideal place for the foam panel would be the wall above the workbench. If a perforated screen does not hang above it, this is a good option to diversify the interior and concentrate cutting tools In one place.

At the wall next to the power saws, make a small stand for storing grinding wheels and cutting discs. Take ordinary disposable or old plastic plates, cut them lengthwise into two equal parts. You will get semicircular pockets. We seal the cut edge with tape, hiding and decorating sharp corners. We repaint the coasters with a spray can in the desired color and fasten them to the wall with bolts in three places, from below and on the sides. Pockets for storage are ready, insert them into them grinding wheels and saw blades.
So that containers with nuts, bolts and self-tapping screws do not clutter up the workspace, use the idea to create suspended structures. For the first option, prepare plastic jars. Remove the cover and attach it to wooden shelf for self-tapping screws. Fill the jars with fasteners and other small items for work, screw tightly to the lid attached to the shelf. The number of designs depends on your needs. Hanging storage jars can fill the entire bottom of the shelf. This design saves usable space and is very practical.
We make another original mini-rack for storing small things in the garage from food containers on a magnet. Using super glue, attach a round magnet in the form of a washer to the bottom of the container. We attach a wooden rail with magnetic stripes to the perforated screen. Inside the containers we store screws, nuts, bolts, self-tapping screws and other little things that are lying around in the drawer of the workbench. Hang the boxes on a magnet.


