IN different rooms loggia answers different requirements. Some people perceive it as an unnecessary addition to the apartment, for storing old things. Others rely on insulating the loggia as an opportunity to increase the area of the apartment.
The first type of people stops at finishing the inside of the loggia with clapboard. This slightly improves the appearance of the room, but no improvements are observed from the functional side. In order for a loggia to be fully used in our climatic conditions, it must be insulated. And in most cases, the cost of insulation is not much higher than the price finishing works, but the functionality of the room increases significantly.
Both professionals and simple people with your own hands, with a little effort. Independent work will require time investment, but will allow you to save quite a large amount of money.
Advantages of an insulated loggia
By thermally insulating your loggia, you get a number of benefits:
- additional space is created - in such a room you can have breakfast, replacing the window sill with a bar counter, you can place cabinets, a refrigerator, and create a relaxation area;
- noise insulation is increased - a glazed or upholstered loggia perfectly allows various street noises to pass through, but if insulation is done and combined with the room, then sounds from the street will not penetrate into the room;
- the adjacent room will be warmer;
- By getting rid of the partition between the room and the loggia, you can modernize the apartment by changing the layout in such a way that the room will not be similar to any other.
The option with insulation has quite a lot of advantages; the only argument against it, if you do the math, is the price, but it will be only 5-10% higher than upholstery or glazing. At the same time, it is not at all necessary to pay a specialist; following the algorithm indicated below, you can completely do everything yourself.
Selection of insulation
Today there is wide choose materials suitable for insulating a loggia. The most popular include the following:
Mineral wool
It is characterized by low cost, but this is the only positive side of the material. To lay this material, you will first need to perform lathing. In the process of getting wet, mineral wool loses its beneficial features, so before using it for a loggia, you need to think first.
Due to the presence of air between its fibers, mineral wool provides protection from the cold. But the installation of the material should be done extremely carefully, avoiding crushing, as this can negatively affect the heat-insulating properties.
Styrofoam
Polystyrene foam is one of the light and durable materials that can easily withstand exposure to moisture. The cost of the material is quite affordable.
Expanded polystyrene
Extruded polystyrene foam is presented in the form of slabs and has a fairly high price. The material is convenient to use, it retains heat well, and during a fire it goes out almost immediately.
Polyurethane foam
Polyurethane foam is a seamless spray-type coating. To save precious centimeters, its thickness can be changed.
Penofol
Penofol is a thermal insulation material made from foil and foamed polymer. The reflective layer is used as additional protection by cold. It is a rather thin material and is most often used as a complement to other thermal insulation products.
Expert opinion
Konstantin Alexandrovich
Ask a question to an expertTo reduce costs and achieve the desired effect, you can combine several materials. For example, covered with a layer of polystyrene foam, and the walls are covered with polystyrene foam boards. Other combinations are possible.
Typical mistakes when insulating
A serious drawback is the condensation that appears indoors on the surface of the walls and ceiling. As a result, moist areas are formed, which in a short time become covered with a layer of mold. This occurs due to poorly functioning ventilation and improper operation of heating systems.
When the ventilation in a room does not work well, air masses are transported almost at lightning speed from the warm part of the room to the cold part, that is, to the loggia. There, excess moisture settles on the coldest surfaces. You can avoid such a negative moment by using doors installed between rooms with different temperature conditions.
Many troubles arise with insulation systems. If the walls and floor were not properly insulated, then moisture will leave its mark on problem areas of the loggia.
If a decision was made to save on foam and cover the seams between the walls with putty, then there is a high probability of condensation forming in these areas. It is better to refrain from such mistakes, since eliminating them will lead to significant difficulties. That is why, when insulating a loggia, you need to strictly follow the technology.
A poor-quality heating system can also become a problem. If such a process occurs due to the arrival of warm air masses from the adjacent room, then mold will most likely form in the cold corners of the loggia. That is why the loggia must be insulated from the floor.
It is prohibited to install centralized water heating on balconies or loggias. A well-installed heated floor reacts to any temperature changes and eliminates the imbalance in a short time.
Work plan
Step-by-step instructions for proper insulation:
- Clear the room of unnecessary furniture.
- Remove old coating from the ceiling, floor and walls.
- Analyze the condition of the base, note cracks, chips, and significant irregularities.
- Correct any detected defects.
- Get rid of old glazing, even if it does not require updating.
- Treat all surfaces with any hydrophobic and antifungal composition.
- Seal the joints.
- Glaze the loggia.
- Place insulation material on the ceiling, floor and walls.
- Install electrical wiring.
- Install the TP system.
- Perform sheathing (plasterboard, etc.), install lighting.
It is especially important to evaluate the wear of fasteners. After installing double-glazed windows and thermal insulation materials, the weight of the structure increases significantly. To perform the necessary calculations and install reinforcing elements, you must contact companies that have the necessary licenses. Independent calculations can be fatal.
Insulating and finishing the loggia, Special attention should be given to sealing cracks and seams. In such areas, all crumbling elements are carefully removed to ensure a solid foundation. Gaps in concrete structures are filled with repair compounds; at this point you must strictly follow the instructions. If during the work a part of the reinforcement with traces of rust was discovered, then the rod is cleaned and treated with an anti-corrosion compound.
After completing the insulation and installation work electrical wiring, produced decorative finishing loggias with panels made of plastic or wood, use tiles, wallpaper or any other materials.
The vulnerable area is the filler near the window frame. The material used to fill the space loses its properties after 2-3 years. Before installing new glazing, the foam is completely removed. To insulate old window frames, the worn-out filler is removed from the grooves, and the resulting space is filled with a stable composition.
Waterproofing (vapor barrier)
The entire area of the balcony must be protected from external exposure to water; for this purpose, waterproofing works. The floor is covered with special impregnations, paint, bitumen, glassine or roofing felt. Roll insulation is used for walls and ceilings.
The next stage is the installation of wood or metal sheathing. The distance between the bars should be 1-2 cm less than the width of the insulation. The block should have a thickness one centimeter greater than the thickness of the mineral wool slab, this is necessary so that after installation a ventilation gap is formed.
Glazing
The loggia cannot be insulated if the correct glazing is not selected. If on simple balconies You can choose absolutely any glass, but to insulate a room you will need to pay attention to special parameters.
Ideal option There will be PVC structures, the thickness of the double-glazed windows is 3.2 cm. The windows are created according to the standards of the owners of the premises, and their installation is carried out both by one’s own efforts and with the help of services from the manufacturer.
On at this stage Savings should be abandoned, since regardless of the high cost of all further stages, poorly selected double-glazed windows will put an end to all repair work.
Warm floor on the balcony
This surface of the loggia is considered the most important space when combined with the living room. This is explained by the fact that the floor is the coldest part of the room. To keep it warm, insulation is done in 2 layers.
Basically, all operations related to the floor come down to cleaning it, leveling it, treating it with an antifungal agent, installing supports and insulating it. The “subfloor” is placed directly on the insulation, and then the selected coating. For maximum tightness of the floor, logs are installed, between which there is roll insulation.
Ceiling insulation
Algorithm for proper insulation:
- Cut from the ceiling construction foam, and parts of the solution are removed.
- The surface is cleaned of peeling paint and dirt.
- The walls and ceiling are treated with a deep action primer.
- Holes and grooves are created for cable installation. Install sockets and switches. Thus, it will be possible to connect lighting elements, a heater or a warm floor.
- The electrical cable must be routed inside PVC pipes, if the frame needs to be covered with wood.
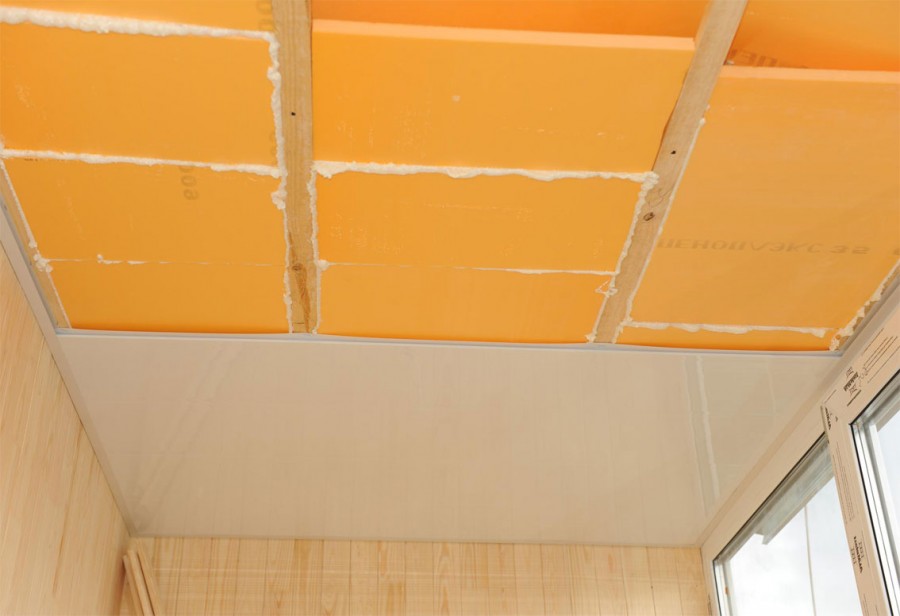
- The best insulation material would be foil-coated polystyrene foam.
- Using a level, measure the base, this is done in order to determine errors.
- A sheet of insulation is applied to the ceiling, and marks are made with a pen that interfere with the installation of the slab (pipe entry point). The marks are cut out using a cutter.
- The adhesive solution is mixed. You must follow the instructions on the packaging. Next, the solution is infused for about 5 minutes and mixed again. It should have a uniform consistency, fairly thick and liquid.
- The solution is applied to the insulation using a trowel. Then the sheet of polystyrene foam is tried on and pressed to the ceiling.
- Next, holes are made, nails are inserted into the ceiling, but not driven in completely.
- The remaining sheets are attached to the ceiling, and the surface is measured with a building level.
To adjust the surface plane, graters are used to erase the difference in differences. And the gaps between the insulation boards are filled with polyurethane foam (the excess is cut off).
Do-it-yourself insulation of loggia walls
If the loggia is presented in the form of an ordinary balcony where clothes are dried (there are not even window openings), then the insulation work looks like this:
- installation of a parapet from foam blocks or brick structures, in which window openings will then be created;
- all seams and holes present on the balcony from the outside and inside(typical for reinforced concrete structures) are covered with polyurethane foam, large holes are covered with polystyrene foam and the joints are filled with polyurethane foam;
- if foam plastic or polystyrene will act as insulation, then the sealing foam should not contain toluene, it corrodes the foam;
- Foamed polyethylene is attached on top, which is a vapor barrier, and all joints must be sealed with foil tape.
Now you can move on to the sheathing. Can act as a support wooden beam. It is attached to the wall horizontally or vertically (depending on finishing material). The bars are fastened along the edges of the wall, after which a fishing line is stretched at the top and bottom, along which intermediate (bearing) bars are installed, between which insulation and vapor barrier are laid.
Warm loggia in a panel house
By design panel houses cooler than brick buildings. This is explained by the fact that the thermal insulation properties of concrete are worse than bricks; in addition, cracks often form between the panels over time, which will let the cold in from the outside.
When connecting a loggia to a living room in such houses, do not forget about this factor and use thermal insulation material in several layers to avoid dew point, which destroys concrete. In this situation, it’s almost impossible to “overdo it,” but it’s easy to underdo it.
Izolon (foamed polyethylene with a reflector) is mounted on the main insulation with gluing of the seams.
Warm loggia in a brick house
Despite the fact that brick is more warm material than concrete, you shouldn’t give up insulation.
Initially, you need to pay attention to the masonry. Most often, construction companies do not fill the gaps between bricks well, so you will have to get rid of the gaps yourself using special means.
Further work is no different from actions in panel buildings. The only difference is that only one thermal insulation layer can be used.
Creating a favorable microclimate on the loggia involves not only insulating the walls, the entire space must be airtight. Floor and ceiling surfaces are also sheathed with material with a low degree of thermal conductivity. In our article you will learn how to properly insulate a balcony from the inside.
- self-insulation (personal experience)
- . The most useful things from youtube
- Using the example of Moscow
Selecting a thermal insulator
Advantages and disadvantages are inherent to each type of thermal insulation. In order to choose the most suitable insulation, you should compare the main characteristics of heat insulators.
The most common thermal insulator options:
- Extruded polystyrene foam (penoplex);
- Foamed polyethylene (penofol);
- Polyurethane foam (PPU);
- Styrofoam;
- Mineral wool.
Mineral wool
The thickness of the sheets varies from 2 to 20 cm. Mineral wool is divided into three types, depending on the components of the raw material:
- Stone;
- Slag;
- Glass.
An example of installing mineral wool on a loggia. The material is placed into the prepared structure. The mounting frame can be made of metal profiles or wooden blocks.
Manufacturers produce cotton wool in the form of mats and soft rolls. In some cases, one side is covered with foil. Aluminium foil allows you to improve the level of thermal insulation.
When laying mineral wool, the foil side should be directed inside the room. This principle allows heat to be reflected from the aluminum coating and returned to the room.
This method is quite common, despite the existence of cheaper heat insulators. The insulation is resistant to fire and does not contribute to its spread. When heating mineral wool, it does not release into the air harmful substances.
The main disadvantage is that moisture is destructive; a vapor barrier is required.
Please pay attention to the integrity of the mineral wool packaging before purchasing. Moisture negatively affects the properties of the heat insulator. For high-quality insulation, it is necessary that the loggia space be dry.
Polymer-based insulation
Penoplex, polyurethane foam, polystyrene foam, foamed polyethylene are polymers treated with foam compounds.
Advantages:
- The presence of gas bubbles provides not only good level thermal insulation, but also light weight of the slabs;
- High degree of moisture resistance;
- The materials are durable;
- Antifungal resistance;
- Simplicity and convenience when laying slabs or sheets, as well as rolls (foamed polyethylene);
- An economical repair option, provided you choose polystyrene foam as insulation.
Main disadvantage: support the spread of flame during a fire and release harmful substances during the combustion process.
When choosing polystyrene foam and other polymer-based materials, it is necessary to correctly select the thickness of the slabs and determine the density
If you plan to use the space in winter, then choose a thickness of 50 mm. The density is determined by further coating - for putty, a value of 25 kg/cube is suitable. m.
1. Foam sheets

Insulator slabs (expanded polystyrene) during installation.

Polystyrene foam is a low-cost method of insulating a loggia, but it is considered a fairly fragile material, so lathing is required for installation. A worthy replacement is extruded polystyrene foam; its installation does not require the creation of a special frame.
2. Penoplex

Extruded polystyrene foam boards (50 mm thick) are used as insulation. The seams between the elements are sealed with polyurethane foam. Penoplex is attached using special disc-shaped dowels (“fungi”).

3. Penofol
The material is used as a separate heat insulator; foam polystyrene foam can also be used to provide vapor barrier. Due to the foil side, warm air is reflected and retained in the room.
In order to speed up the insulation of the structure, you can use an alternative method of thermal insulation - spraying polyurethane foam (PPU).
4. Polyurethane foam
PPU is one of the most modern heat insulators. The cost of application services is considered high compared to other analogues, but many have managed to appreciate operational properties PPU. This insulation is characterized by high thermal insulation rates due to its fine-porous structure.
Spraying of polyurethane foam is carried out by specialists; one day is enough for installation work; complete drying also does not require much time.
The main stages of work on insulating the loggia space
In order to increase the usable space in your home and use the premises all year round, you need to:
1. Seal gaps, if any. Carefully examine the room to eliminate all design flaws. As a rule, cracks are filled with polyurethane foam, even if they are large.
After complete drying, it is necessary to trim off the excess.
2. Glazing with reliable double-glazed windows.
3. Organize a waterproofing layer. To protect against moisture, waterproofing with penetrating properties is used - “Penetron”, “Aquaton”, etc. The composition is applied with a roller, brush, or spray. This impregnation penetrates into the thickness, so the walls become as resistant to adverse weather as possible and their strength characteristics improve.
The installation of a waterproofing layer allows you to eliminate the most minor surface cracks that may not be visually visible.
4. Thermal insulation layer. To organize a warm structure, we use the selected material (polyurethane foam, penoplex, polyethylene foam, polystyrene foam, etc.).
5. Installation of a vapor barrier layer. In order to make a vapor barrier, you should use special polymer membranes (“breathable”), as well as Rockwool, Izospan, and penofol films.
When using penofol, lay the insulation so that the side covered with foil is directed into the room. If this condition is met, heat will constantly be reflected from the foil, lingering inside the space.
6. Final finishing of walls, floor surfaces and ceilings.
WITH detailed description Each stage can be found in the article: .
Balcony room decoration
Purposes of creation interior decoration:
- External masking of the heat insulator;
- Organization of a favorable indoor environment.
To create a balcony interior, you can choose various finishing options. Plaster, plastic panels, MDF, lining, plywood, gypsum board sheets and even a block house are perfect for the finishing layer.
Lining panels are environmentally friendly and reliable. One of the main advantages of the finishing material is rigidity. The lining is fixed to wooden frame- lathing.

The walls of the loggia are covered with clapboard, flooring- laminate.

Facing the balcony with a block house.

The plastic panels have grooves for connecting elements. Plastic version lining has less rigidity and strength than wood.

Installation of gypsum board sheets on metal profiles. Plasterboard slabs can be decorated with wallpaper, painted or veneered decorative plaster.

Decorating walls with wallpaper over gypsum board sheets.

Bamboo wallpaper. Reason for finishing- drywall.

Video
1. The result of insulating the loggia.
Glazed balcony. Demonstration of electrical terminals. Testing the strength of extruded polystyrene foam. Use of penoplex with a thickness of 30 and 50 mm, finishing the walls with putty. Concrete screed floor on top of insulation boards.
2. Stages of repair work on the balcony.
Consistent process of arranging a room. Scheme of thermal insulation of walls with polystyrene foam and foamed polyethylene, finishing - plastic panels. Floor: leveling, thermal insulation, cladding OSB board, installation of laminate lamellas.
.Read in the article
Three directions for insulating a loggia
- insulation of the loggia from the outside– the preferred option. In that
case, the freezing point shifts to the outside, i.e. V
side of the insulation installed outside the loggia. This will not only allow
insulate the wall surface, but also preserve the load-bearing properties of the material, from
which it was built. In addition, the internal space of the loggia is saved.The only drawback of insulation from the street is the cost.
high-altitude work (industrial mountaineering). Used for insulation from outside
rigid thermal insulation material (expanded polystyrene, polystyrene foam), which
covered with a polymer mesh and protected with a strong cement mortar
and/or decorative plaster;Note. In some cases, the decision as to whether
Insulation of the loggia from the outside is determined by the City Council. For example, if the house represents
constitutes architectural value, fulfills external works, changing the appearance of the building,
forbidden.
- double-sided insulation and finishing of the loggia. Involves installation
thermal insulation material outside and inside the loggia. This decision
inappropriate in principle, because from the point of view of thermal efficiency it does not matter
which side of the work was carried out.
- insulation of the loggia from the inside. Internal insulation is most
popular option because There is an opportunity to do the work yourself.
However, in this case, the usable space of the loggia is reduced. Nevertheless,
It is this option that we will dwell on in more detail.
The cost of insulating a loggia
To determine profitability, we compare the cost of work by
insulation of the loggia with the involvement of professionals and execution of work
on one's own.
For a loggia of 3 sq.m. (prices are approximate):
- purchase of materials – 10-12 thousand rubles;
- installation work – 10 thousand rubles;
- electrical work – 2-3 thousand rubles;
- glazing – 20-40 thousand (material and work);
- finishing work – 10-20 thousand rubles;
The cost of insulating a turnkey loggia (approximate prices):
- finishing work “standard” with insulation – 35-40 thousand rubles;
- “luxury” finishing work with insulation – 58-60 thousand rubles;
As you can see, the savings when insulating yourself is
from a quarter to half of the total budget for thermal insulation.
Tags: Loggia Balcony
Ceiling insulation
There are two options for ceiling insulation: with and without a frame. In the second option, it is necessary to use lightweight materials and this insulation is attached directly to the ceiling slab.
Action plan:
The cleaned ceiling surface is covered with an antiseptic. The insulation is attached using polyurethane foam or glue.

Beams are attached on top of the material to install the finishing. If you use mineral wool: first a frame is made, then insulation is laid and drywall is installed. The finishing coating is installed.

Insulating the balcony from the outside is more correct. This method of insulation allows you to save the balcony space, as well as prevent the formation of condensation from the inside.

But the problem is that it is almost impossible to produce it without specialists. Therefore, it is better to order insulation of a balcony from the outside from specialized organizations specializing in turnkey insulation of balconies.
Photo of the process of insulating a balcony with your own hands


- How to choose wallpaper
- Advantages of slate roofing
- Laying carpet on wooden stairs
- Drywall arch
- DIY podium
- Wallpaper on the ceiling
- Construction mixer
- Insulation of the walls of a foam concrete house
- How to make a partition from foam blocks
- Brick oven
- DIY partition
- DIY cardboard fireplace
- DIY putty
- DIY apartment renovation
- DIY slopes
- Plastering walls with your own hands
- DIY floor screed
- Do-it-yourself warm floor
- Laying tiles with your own hands
- DIY concrete
- DIY wooden fence
- DIY ways to level walls
- Installation suspended ceilings with your own hands
- Do-it-yourself dry plaster of walls
- DIY rack
- Soundproofing in the apartment
- Installation interior doors with your own hands
- DIY electrical wiring
- Wallpapering
How to insulate a balcony from the inside with your own hands, video and photo instructions for installing insulating materials
How to insulate a balcony inside is described in this video.
| Drawing | Sequencing |
 | Such a balcony, which has fallen into disrepair, is strengthened. Remove old parts. |
 | New frame elements are rigidly attached to the supporting structures of the building. |
 | A wall is erected, which will become a reliable support for the frames and other components of the window block. |
 | Shown here is an option with the window moving beyond the original contour of the balcony. The installation process is discussed in the previous section of the article. |
 | Before installing the insulation, check the condition of the surfaces, remove weak plaster, protrusions, and seal the cracks. Expanded polystyrene slabs are secured with dowels with umbrella overlays. An “envelope” pattern is used - holes in all corners and in the center. |
 | The slabs can be installed in the gaps between the wooden sheathing. |
| Their combination with penofol and other insulating materials is acceptable. With a density of foamed polystyrene above 40 kg. per cubic meter significant loads are permissible. A cable heater can be installed on top of a special substrate. It is poured with concrete so that there is at least 6-7 cm of mortar layer to the surface. |
Important! To insulate a loggia with your own hands, step-by-step instructions with thematic videos and photos are not enough. It is necessary to take into account the original condition of the balcony, the characteristics of the property in terms of permissible loads and requirements for appearance
The floor is not properly insulated
In order not to overload the floor slab (for example, with a concrete screed or leveling mixture), it is better to make the floor covering from lightweight modern materials. On top of a vapor barrier - foil or polyethylene film– laid in two layers of mats made of penoplex or mineral wool. On top is waterproofing, which can be used, for example, hydroglass insulation. The rolls are placed on top with an overlap of about 10-20 centimeters. With help blowtorch strips based on mastic are fused together, and if the use of open fire is for some reason impractical or dangerous, then the sheets are mechanically fastened. Then a layer of plywood, and only then carpet or laminate.
Finally, the “classic” method of insulating the floor is not bad: they lay wooden joists, between which modern insulating materials are located.
The spraying method stands apart in this group. A thermal insulation material such as polyurethane foam is applied to the wall by spraying. A relatively new material on the market, it is quickly gaining its fans among professionals and amateurs. Because it allows for insulation without additional preparation of the base. The high speed of work completion - less than one day - also speaks in favor of PPU. Disadvantages include high cost and the inability to do the work yourself without special equipment.
 Preparing the balcony for polyurethane foam insulation
  Spraying polyurethane foam on the balcony
  Insulation of balconies and loggias with polyurethane
Balcony insulation with polystyrene foam and polystyrene foam
Rigid insulation is also laid in sections of the frame and fixed with foam or special glue. The insulation is not laid close to the frame, but with a gap of 5-10 mm. The gap is subsequently filled with foam, and the foam sheet is additionally secured with a plastic dowel - an umbrella (fungus).
Fastening foam plastic using a frame method
 Fastening foam plastic when insulating a balcony
  Installation of polystyrene foam for insulating a balcony
Fastening polystyrene foam using a frame method
 Fastening polystyrene foam for insulating a balcony
  Installation of expanded polystyrene when insulating a balcony
The foam sheets are pressed tightly against each other, and the joints are blown with foam.
 Installation of foam plastic frameless way
 Fastening foam plastic using a frameless method
Expanded polystyrene sheets are joined using the tongue-and-groove principle.
 Installation of expanded polystyrene using a frameless methodFastening polystyrene foam using a frameless method
Outside parapet siding
The easiest way external cladding the balcony is made of vinyl siding.
Outside the parapet, vertical sheathing is assembled so that it forms a single, flat area (test with a stretched thread). The bars or metal profile of the sheathing are fixed at a distance of about 40 cm from each other. Next, siding guides (closing profile) are installed along the lower and upper perimeter, and the corners are decorated with a special vinyl profile - “outer corner”.
The siding starting strip is attached with its long side to the bottom guide using self-tapping screws. It’s better to start from the side wall - the panel is shorter and less visible from the street - you can practice. Between the siding and the balcony grille you can immediately lay soft mineral wool slabs. A drainage system must be installed at the top of the parapet.
A very short video about the main stages of cladding:
Insulation of balconies and loggias with mineral wool
The wool is laid so that it fits tightly to the frame elements, but is not “rammed”, i.e. there is no need to further compact it. This will change the structure of the mineral wool and some of the air will evaporate. This will reduce the thermal insulation properties of wool. In order for the wool to hold securely on the wall, and especially on the ceiling, it must be additionally fixed using wire or umbrellas (dowels with a wide head).
 Mineral wool fixed with wire on the ceiling
  Mineral wool fixed with wire on the wall
  Mineral wool fixed with “umbrellas”
Sometimes the cotton wool is placed behind the frame, as shown in the figure. Then the frame elements are held in place by cotton wool. However, professionals do not recommend using this approach for low-density wool (less than 50 kg/m3), since wool held in only a few places will settle over time, opening part of the wall to the movement of cold air.
 Balcony insulation - mineral wool in the frame
  Balcony insulation - mineral wool fixed by frame
The cotton wool is covered with a vapor barrier film. Then the counter-lattice is stuffed. It allows you to protect the cotton wool from touching the finishing material and avoid the appearance of a dew point in this place.
The stages of installation of wool are presented in more detail in the diagram.
- Subfloor
- Floor joists
- Frame
- Basalt wool
- Vapor barrier film
- Counter-lattice
- Finishing material
Scheme for insulating balconies and loggias with mineral wool
The choice of material or the best way to insulate the loggia from the inside
Initially, you need to select building materials
It is important to remember that not only thermal performance, but also the area of the room may depend on the selected components. If the building material is too thick, it will steal the usable area
Note! Any material for heat preservation must be environmentally friendly and also meet thermal and steam characteristics.
The room can be insulated with the following materials:
- Penofol . An excellent substitute for mineral wool. It has a multi-layer coating, which also has a reflective effect.

Penofol - material for insulation of new times
- Polyurethane foam . Ideally suited for balconies. It ignites very poorly and is made from environmentally friendly materials. Installation is done by pouring.

Cured polyurethane foam
- Penoplex . The material is mainly used for finishing external walls. Has poor thermal conductivity.

Using penoplex as insulation
- Expanded polystyrene . A fairly economical choice of material and also very effective for a balcony.

Expanded polystyrene is often called polystyrene foam
- Izover . Available in sheet form. Made from mineral wool with fiberglass particles.

A very common insulation material
As a rule, polystyrene foam is mounted on the walls and ceiling. It is good to use because its properties have a high thermal conductivity coefficient, as well as a small thickness. It cuts great kitchen knife. Alternative option can be considered polystyrene. For cold winters, sheets 10 cm thick are suitable; for mild weather it is better to use 5 cm.
Related article:
. Step-by-step guide to finishing balconies various materials in a separate review.
Where to insulate
It is necessary to insulate balconies and loggias in cases where a warm type of balcony is chosen in an apartment where they decided to attach it to a room or kitchen. Differences in insulation methods in panel house There are not many floors of any kind. In the "Khrushchev" balconies open type small and not very convenient for glazing, but the problem can be solved, and craftsmen can “revive” an old balcony. There are additional difficulties when glazing, insulating and finishing balconies on the top floor.
In Stalin-style houses with high ceilings or in apartments panel houses and “Khrushchev” buildings located on the top floor, it is necessary to solve the problem of glazing and installing a roof. It should reliably protect the balcony from snow loads, rain and other unwanted influences.

Finishing
To decorate the loggia from the inside, we prepare the material, read a little theory and, following the step-by-step instructions of many good articles, feel free to begin work. Let us remind you that the most popular material for finishing loggias and balconies is “lining”. This is a wooden board with a tongue-and-groove profile, 1.5 cm thick and 9 cm wide. There are also euro-linings and block houses for cylindrical logs. PVC panels of various colors and shades, width 25-30cm allow you to quickly cover large areas.


MDF panels are in the form of slabs pressed from wood fibers, covered with a PVC-based film. Strength is low, not resistant to moisture, only glazed loggias should be finished. Drywall speeds up the work, but still requires finishing touches. Very effective and beautiful view The loggia is finished with three types of decorative plaster: structural, textured and Venetian. The technology is voluminous, but quite accessible to a non-specialist.
Finishing features
In most cases, balconies are lined from the inside with clapboard or profile, but plasterboard is also used, followed by wallpapering. PVC panels are also used for cladding. As for the exterior finishing, it is better to entrust it to professionals, especially if your apartment is located higher than on the ground floor.

Interior decoration of balcony walls with clapboard

Balcony finishing with plastic panels

The process of finishing a balcony with plasterboard
Important information! It is prohibited to install central heating there, so if additional heating is required, you can lay a film “warm floor” under the linoleum.
You can also install an outlet on the balcony to which you can connect electric heater. The described room is small, so heating will take a minimum of time. We also note that the double-glazed window weighs quite a lot, so the remaining materials (including the insulator itself) must be of minimal weight. By the way, this is another reason why it is better to give preference to EPS or foam boards.
The photo shows a socket and a connected heater
Video - Instructions for insulating a balcony
Now you know about the strong and weaknesses materials suitable for insulating a balcony, as well as technologies for laying polystyrene foam and expanded clay. Therefore, it's time to get to work! Moreover, there is nothing complicated here if you are armed with step-by-step instructions and all necessary materials. If you do everything correctly, you will turn the balcony into a full-fledged living room with all the ensuing advantages.
Heating a loggia, which method to choose
A loggia usually has walls made of one layer of brick; the worst option is a balcony made of corrugated sheets. Therefore, to feel comfortable in this room during the cold season, a heater is needed.
There are two options for making your loggia warm. The first one is to open balcony door so that it is heated by the adjacent room. The second is to install electric “warm” floors or buy oil radiators.
I’ll tell you right away from our experience - one heater was not enough for us, and we decided to install a warm floor. Despite the fact that the walls of our loggia were insulated, there was cold from the neighbors above and below - after all, their balconies remained uninsulated.
Do-it-yourself insulation of a balcony
Correct installation of insulation material is a guarantee of longevity and quality. In order not to forget anything or make a mistake anywhere, you must initially prepare step-by-step instructions (plan) and strictly follow it point by point.

Insulation can be carried out both from the inside of the balcony and from the outside. But when insulating yourself, it is better to choose the option of insulating the balcony from the inside.


Preparatory work consist of:
- Checking the supporting structure;
- Removal of trim and frame;
- Patching tile cracks with concrete mortar;
- Clearing the balcony of unnecessary items;
- Balcony glazing. Choose 2- or 3-chamber double-glazed windows for better thermal and noise insulation;
- Electrical wiring;
- Preparation with insulation.
Glazing of the loggia

Obviously, insulating an open, unglazed loggia makes no sense, so the process should begin with the installation of windows.
Glazing of the room is carried out according to the standard algorithm, but using an additional (additional) profile to change the dimensions window opening. Framing the entire structure around the perimeter, it is intended to ensure that subsequently the surfaces thickened with insulation (walls and ceiling) do not cover the glass.
Important! Do not try to save money when choosing profiles and double-glazed windows: “cold” glazing using inexpensive structures can protect the loggia from precipitation, but will not cope with the drop in temperature outside.
Learn how to choose and install correctly plastic frame on the loggia, you can by watching this video.
Stage 5. Insulate the ceiling
This procedure is also performed using a similar technology, but some differences still occur.
- First, make a marking along which the hangers for attaching the guides will be installed.
- price match;
- the ability to reproduce techniques without the help of professionals;
- resistance to external influences, durability;
- compatibility with certain finishing options and engineering systems.
Install the hangers themselves necessary to fix the guides (for the latter, use a galvanized profile or timber).
Photo of direct suspension
Attaching hangers
In appropriate places, cut small holes in the insulator (foam or EPS) for hangers.
Insulating the ceiling with Penoplex from the inside
Step #5. Blow out all the resulting cracks with foam, then seal with mounting tape.
Step #6. Lay a waterproofing layer on top - for example, penofol, which will also serve as thermal insulation.

Attaching penofol to walls

The use of penofol for insulating a balcony
Step #7. Seal the seams at the joints with foil tape.
Step #8. Mount the counter-lattice on top of the foam foam and install the finishing material.
Counter-lattice for finishing
A lot needs to be studied to figure out how to insulate a balcony with your own hands. Step by step photo– this is only a small part of the necessary information. The optimal technology is selected taking into account several factors:
Only a comprehensive analysis will allow you to find out whether the option you like is suitable for the implementation of your plans. Remember that design development and some other parts of the project can be entrusted to qualified specialists.
A large balcony can make a good office
Has the day come when it's time to finally throw away your old ski and take all the cans from your balcony to the garage? Your head is full of ideas, and if not, then the global web will help you. You are ready to make all your brightest and craziest desires come true on a vacant piece of living space. There is one small problem left. These are harsh conditions that attack your hard-earned square footage.
Therefore, the first priority that needs to be solved before letting your imagination run wild is keeping warm. In order to minimize repair costs, let's figure it out how to insulate a balcony from the inside with your own hands.
If you decide to add the balcony area to the living area of the apartment, you need to carry out work to insulate it. To avoid unforeseen problems after the repair, the work must be carried out in compliance with established norms, rules and approvals.
Serious reconstruction will require permission from local executive authorities, architecture and the Ministry of Emergency Situations. You should not ignore this point in order not to be punished for violating the housing code. In addition, coordination will help avoid certain mistakes when changing structural elements. Experienced specialists will immediately notice inconsistencies in the project. Correcting errors at the design stage will avoid the costs of correcting errors after repairs.
The order of work and its volume depend on what tasks the reconstructed balcony will perform:
- It will continue to be a place to relax in the warm season, and insulation is carried out to protect it from wind, dust and precipitation. This is a less expensive method and easier to implement.
- It will be attached to the area of the apartment as a full-fledged living space, used all year round. Here the scope of work increases significantly, since it will be necessary to provide heating, steam and waterproofing, and change the power supply system.
Attention! Balcony With sliding windows it is almost pointless to insulate, since the windows themselves will let the cold in.
How to insulate a balcony from the inside with your own hands
First of all, it is necessary to take measurements and determine the quantity of materials, their composition and quality. Manufacturers offer a wide range of materials for insulation, insulation and finishing to suit every taste and material income. Of course, you shouldn’t skimp on quality. We need to take care of environmental friendliness and fire safety housing.
A balcony is an external structure that is located outside the building; its three sides and the ceiling require insulation, even if the neighbors have already carried out the work. The sequence of work should be structured in such a way as not to miss important nuances, which will then have to be corrected:
- Particular attention must be paid to the condition enclosing parapet. Most often, this thin plate made of metal, profile, or iron rods. This structure will have to be replaced with a brick wall or foam blocks. To construct the wall you need to choose light ones, hollow bricks so as not to create unnecessary load on the load-bearing slab.

Balcony parapet
- Glazing It's better to leave it to professionals. Depending on the chosen interior, the profile can be wooden or PVC with double glazed windows. The number of sashes is determined in advance to ensure ventilation and ease of maintenance. When installing windows, expansion profiles are installed, which will facilitate the installation of insulating boards.

Glazed balcony
- Sealing cracks, joints, holes, chips and cracks polyurethane foam, polyurethane sealants or mastic. They will protect against the penetration of moisture, dust, and negative environmental influences.

Sealing cracks on the balcony
- Let down energy supply in such a way that access to food is as practical as possible. Electrical work and heat supply installations must be carried out by specialists who have special permission to carry out such work.

Conducting electricity on the balcony
- Insulation carried out in the following sequence: walls and ceiling.
How to insulate walls on a balcony
To choose the right insulation, you need to know its technical characteristics, pros and cons.
The main parameters that determine the quality of a material are its thermal conductivity, environmental And Fire safety. It is very important that the insulation is lightweight and takes up less space.
- . Multilayer, consisting of foil and polyethylene foam, reflective material several millimeters thick. At the same time, it reflects at least 90% of heat, is durable, lightweight, and inexpensive. During installation, it easily takes the shape of the surface and is attached.

Balcony insulation with penofol
- Polyurethane foam. Provides fire and environmental safety. It is applied to the surface by pouring or spraying, closes all cracks, provides waterproofing, and does not require a frame or fastening.

Balcony insulation with polyurethane foam
- Penoplex. These are foamed polystyrene boards. The material practically does not absorb moisture, but it is voluminous and does not accept the parameters of the surface to which it is attached.

Balcony insulation with penoplex
- Expanded polystyrene. Has excellent sound, steam and thermal insulation properties. Due to its efficiency and environmental friendliness, it is well suited for insulating a balcony.

Balcony insulation with polystyrene foam
- Styrodur. A type of expanded polystyrene, extruded, green in color, with good characteristics.

Balcony insulation with styrodur
- Isover (mineral wool). Widespread insulation made from fiberglass. This is mineral wool, which will retain heat, provide sound insulation, and will not weigh down the structure. Has an affordable price. Used with additional hydro- and vapor barrier.

Balcony insulation with isover (mineral wool)
It is not advisable to use fiberglass, as it is a fire hazard and emits toxic substances.
Considering the temperature difference between the outside air and the room, it is necessary to provide a kind of hydrobarrier that will not allow warm air create condensation upon contact with a cold fence. The presence of condensation will lead, in the future, to formation and rotting.
Depending on the type, the insulation is attached using glue, special dowels with a wide head, expansion nails or spraying.
Using mineral wool the surface is pre-primed. After drying, mineral slabs coated with adhesive composition. Installation starts from the bottom and is carried out according to the type brickwork. Allow the glue to dry completely overnight. You can reinforce it in several places using dowels.
Often, a wooden frame is used to lay slabs, the design of which retains heat worse than insulation. Therefore, it is better to fasten the material end-to-end and seal them with aluminum tape or polyurethane foam.

It is better to attach layers of mineral wool end-to-end
The next layer is a vapor barrier. It could be foil polyethylene. It is placed with foil inside the building so that it reflects the heat coming from the house. Insulation materials for other insulation materials, may not be used, depending on the purpose of the room.
How to insulate the floor on the balcony
About a quarter of the heat loss on the balcony occurs through the floor, so work needs to be done to prevent these losses. This is not the most difficult operation and it is quite possible to do it yourself. When choosing a material, you need to take into account that the floor level on the balcony after installation should be at or below the floor level in the adjacent room.
There are several simple and accessible ways:
- with frame arrangement;
- monolithic;
- electric heated floor.
Only one thing may require professional skills - installing a heated floor.

Installation of heated floors on the balcony
The main point in choosing a method and material is the condition of the supporting slab. In older houses, the structures may be worn out and are not always ready to withstand heavy loads. Therefore, it is important to agree with the specialists of the architecture department what weight of materials can be used during repairs. This is especially important when installing monolithic concrete floors.
The frame floor, in turn, can be constructed using:
- mineral wool;
- expanded clay;
- pepoplast;
- penoplex or foamed polystyrene.
Floor insulation technology consists of several stages.
- Leveling the surface of the slab is carried out if necessary.
- Waterproofing with polyethylene film or roofing felt (for damp rooms).
- Installation of wooden sheathing. A timber with a height close to the thickness of the insulation is used. They are laid along the length of the balcony at a distance of 50 cm from each other or another convenient distance depending on the size of the insulation sheets. Leave a distance of 5-7 cm from the walls, and 5 cm from the ends, so that when high humidity the wood was not deformed. They are attached to the floor with anchors or self-tapping screws with a depth of at least 4 mm. This will ensure a stable fixation. If it is necessary to install transverse beams, it is necessary to make cuts at the joints to half the thickness and create recesses with the help of which the transverse logs are connected to the longitudinal ones. They control the level and prevent the bars from sagging. If necessary, place wooden wedges or dies, which are fixed to the floor with polyurethane foam. It is important to prevent foam from getting into the joint between the wedge and the beam.
- The sheathing is filled with the selected insulation.
Cheap and effective material - mineral wool. Available in rolls and slabs, light in weight, easy to install. The size of the canvas is chosen so as not to wrinkle or bend it. This reduces the protective properties due to a decrease in the amount of air between the fibers. The main disadvantage of mineral wool is its low moisture resistance, so it is necessary to use a vapor barrier as the next layer.

Popular, inexpensive Styrofoam due to its lightness and ease of installation, it is most often used as insulation. It is very hygroscopic and resistant to any environment. Disadvantages include deformation under load and poor sound insulation.

Insulating the balcony floor with foam plastic
Penoplex It is resistant to mold growth, mechanical stress, temperature changes and has excellent thermal insulation properties. The disadvantages include its flammability with the release of harmful substances and the thickness of the material.

Insulation of the floor and walls of the balcony with penoplex
Has high fire resistance and durability expanded clay. But it is not very good for insulating a balcony, since a thick layer is required for normal thermal insulation.

Insulating the balcony floor with expanded clay
- The gaps remaining after filling with insulation are foamed.
- On top of the insulation or vapor barrier (if used) as a rough flooring, after which the selected floor material will follow, chipboard or moisture-resistant plywood is attached.
Cement screed is used only when the balcony structure is fairly strong. In order not to exceed permissible load, use reinforced screed up to 50 mm thick.
The following methods will require special professional skills.
Implemented as insulation systems electric heating using special infrared film, cable, tapes. They are laid on a thin layer of insulation and installed in accordance with the manufacturer's instructions.
For water floors a special water circuit is required.

Water floor design diagram
How to insulate a ceiling on a balcony
Before starting work, you should carefully inspect the ceiling for signs of leakage, since even a small amount of moisture getting on top of the insulation can lead to the development of mold.
Given the complexity of working on the ceiling, it is necessary to protect your eyes and use glasses.
The already familiar penoplex, mineral wool, polystyrene foam (foiled polyethylene foam) are used as materials for work.
Penoplex with a density of 35-45 kg/cm² allows the use of panels from 20 mm, which will provide normal thermal protection. The only drawback is the high cost.

Insulating the balcony ceiling with penoplex
Thickness foam plastic can be within 50mm, and the density is 15kg/cm², then MDF, PVC or plasterboard panels are mounted on top. At a density of 25 kg/cm², putty can be used.

Insulating the balcony ceiling with polystyrene foam
For ease of installation, markings are carried out taking into account that the slabs or sheets of insulation fit well into the prepared sheathing, and the level of fastening is determined. It’s better to calculate everything below in advance, then the work at the top will take less time. The thickness of the insulation layers and finishing should be such as not to interfere with the opening of windows.
They use different sequences of work:
- Installation of sheathing → installation of insulation → cladding.
- Fastening the insulation over the entire area → vapor barrier → installing a wooden sheathing or frame made of a metal profile → cladding.
If the balcony is located Upstairs building, it is important to prevent moisture from getting from the roof onto the insulation; for this, an additional layer of insulation with polyethylene or foil polyethylene foam is provided under the roof.
The first layer for waterproofing may be a special composition based on bitumen mastic, applied to a concrete slab with a brush. The next step is to install sheet waterproofing.
How to insulate a balcony with penoplex
Penoplex is a cluster of polystyrene foam balls with air layers. Practically does not absorb moisture, has long term service, low thermal conductivity. Slabs with a thickness of 2-10 cm are produced.

Penoplex slabs
The lightness of the material does not create additional load on the load-bearing slab. It is resistant to deformation and does not emit harmful substances. To increase fire safety, choose a variety marked C. Since the balcony walls are thin, thick insulation boards are used, which will reduce the usable area of the room.
Under influence sun rays penoplex loses its properties, so it is used only as internal insulation.
The material is easy to cut, does not crumble, and does not create problems during installation. Used to insulate walls, floors and ceilings. The following types of fastening are used:
- Disc-type dowels with plastic cores. This mount is suitable for uneven surfaces, roofs made of metal profiles.
- With a special glue applied to a previously primed surface, it is enough to apply the glue in dots or in a zigzag pattern. Adheses well to smooth concrete bases.
- Glue, with additional fixation, dowels.

Methods for applying glue to penoplex
Penoplex slabs are laid in prepared sheathing cells or without it, over the entire surface. The use of lathing, especially on the facade, worsens thermal protection.
The slabs are fitted tightly, the joints are sealed with construction tape or filled with polyurethane foam. The insulation is covered with a layer of polyethylene with a foil layer. Depending on the purpose of the room, a vapor barrier may not be used.
Penoplex insulation is suitable for all types of interior finishing: special plaster, plasterboard, wood and finishing boards.
How to insulate a balcony with foam plastic
One of the most common ways to insulate a balcony (walls, floor, ceiling) is polystyrene foam. This material, at a relatively low cost, is capable of correct installation, provide excellent thermal insulation performance. From others positive qualities, it is worth noting the resistance to adverse weather conditions. It does not absorb moisture, does not collapse under its influence, and is resistant to the formation of rot and mold.
Polystyrene foam does not emit harmful substances and combines well with other materials.
To insulate a balcony, polystyrene foam is used both outside and inside. It is better to entrust external work for multi-storey buildings to specialized organizations for safety reasons.
For internal insulation A foam thickness of 4-6 cm is sufficient. If the front part is thinner than the side panels, a thickness of up to 10 cm can be used. When choosing a thickness for floor insulation, it is necessary to leave a headroom for the installation of the floor itself, and for the ceiling - for opening windows.
Insulation is carried out in two ways:
- Adhesive. On smooth surfaces, which do not require waterproofing, foam boards can be glued with special glue (Ceresit ST-85). This method is good for installing a floor under a subsequent screed or walls under plaster. In this case, when the foam sticks, glue is applied to its outer surface with a thickness of 2-3 mm. Without waiting for complete drying, apply a reinforcing mesh, but do not flood it and cover it with another layer of glue.

Adhesive method of foam insulation
- Frame. Since the use of other finishing materials requires additional fastening, they arrange wooden sheathing or a frame made of metal profile. This method is convenient for creating a multi-layer cake that provides waterproofing on the outside and vapor barrier on the inside. The layers can fill the cells of the frame or be located under the bars and along the top. The foam itself is cut to the size of the cells so as to fill them as tightly as possible. It is fastened with dowels or self-tapping screws with wide mushroom-shaped caps.

Frame method of foam insulation
Crevices , emptiness , uneven areas are filled with scraps, polyurethane foam or sealant. After drying, you can attach a layer of vapor barrier over the insulation and the cake is ready for finishing with plasterboard, plastic panels or other finishing.
How to insulate a plastic balcony
Plastic balconies or decorated with plastic panels, resistant to the external environment, sunlight, temperature changes. Guaranteed service life quality panels at least 50 years old. They are easy to install, have an affordable price, are easy to maintain and look aesthetically pleasing. Thanks to their positive characteristics, plastic balconies have gained popularity.
Plastic panels improve the aesthetic appearance and provide sufficient thermal protection for balconies with improved glazing.

Balcony with plastic panels
Sheathing a balcony with plastic is done on a mounted wooden frame or metal profile, which reacts poorly to temperature changes and changes in humidity. The frame structure creates free space between the walls and finishing panels. It would be stupid not to take advantage of this moment and add one of the common insulation materials to this space. If at the same time the seams and joints of the balcony structure are sealed, then even one layer foam plastic, penoplex or mineral wool, filling the cells of the sheathing, will significantly change the microclimate. And the use of an additional layer of vapor barrier will make it possible to use plastic balcony during all year round as a full-fledged living space.
How to insulate a wooden balcony
Lovers of wood in the interior also maintain style on the balcony. Main advantages wooden structures in their environmental purity, favorable microclimate created by breathable material. The texture of the wood, supported by modern finishing materials, creates a cozy atmosphere and an attractive appearance. However, without additional insulation, a wooden balcony can be fully used only in the warm season. In addition, under the influence of the external environment, wood quickly ages, absorbs moisture, cracks, and succumbs to rot. Requires ongoing costs to maintain open wooden balconies in an attractive way.

Wooden balcony
Insulation with installation will help improve consumer qualities glazing and a set of works on waterproofing.
The interior will be well supported by frames made of wood of the appropriate species with double glazing, which will allow you to use the balcony as a living space. After their installation, work is carried out to seal gaps, cracks and junctions using polyurethane foam. The insulation technology is similar to the work for structures made of other materials, however, wood requires mandatory hydro- and vapor barrier.
Work order:
- Wooden balcony structures are treated with agents to protect against rotting, insects and increase fire resistance. This also applies to bars for sheathing.
- The concrete base is primed.
- Waterproofing is laid on the prepared surfaces. Ruberoid or mastic is used for the floor, polyethylene or foil is used for the walls and ceiling.
- A wooden frame is prepared from bars that provide the possibility of laying insulation of the selected thickness.
- Insulation (mineral wool, polystyrene foam or polystyrene foam) is tightly placed in the cells of the sheathing. The remaining voids are filled with foam.
- A layer of vapor barrier made of foil polyethylene foam or penofol is attached on top of the insulation.
- Finishing with wooden panels, lining. It is necessary to ensure that the weight of the finishing material does not overload the supporting slab of the balcony. Part wooden materials can be replaced with lighter ones, without compromising functionality and attractiveness.
To make insulating a balcony with your own hands a pleasure and provide an excellent result, think through your goals and objectives in advance, and carry out the necessary approvals and measurements. Choose materials in accordance with the technical characteristics and your material capabilities. Carry out work in a comprehensive manner, without missing out on details. And success is guaranteed.
You can also watch several videos that will help you insulate your balcony with your own hands.
Video
Insulation of balconies and loggias with mineral wool
Balcony insulation technology with penoplex
Insulation and connection of the balcony
How to insulate a balcony? Choice of insulation
How to insulate a balcony? Step-by-step instruction
How to insulate a balcony with your own hands: how and how to insulate it + video
Having decided to carry out renovation work in the apartment, of course you cannot ignore the loggia or balcony, depending on what exactly is in the apartment. What is the difference between a balcony and a loggia? The balcony is a remote structure, which is based on a balcony slab fenced with a parapet. There is a balcony behind the outer walls of the main building.
The loggia, in fact, is an integral part of the apartment space, although there is a partition in the form of a wall between them. Another significant difference between a loggia and a balcony is their area - that on a loggia is an order of magnitude larger than on a balcony. For this reason, the loggia is insulated and finished, which makes it possible to turn the latter into an additional living room.
In fact, it can also come out of the balcony extra room, however, for these purposes it is imperative to involve specialists with a lift, since carry out external work in apartment buildings independently prohibited by the operating rules.
Since very often both a balcony and a loggia are called the same word “loggia”, for the convenience of the reader we will also combine these two concepts with one word, implying that the balcony is already glazed and can already be considered a loggia (a non-glazed balcony cannot be insulated).
First, you need to decide on the scope of the tasks assigned, the amount of materials purchased, and prepare necessary tools. And for this you need to know: in order to repair and insulate a balcony/loggia, you will have to do the following:
- Perform glazing (in the case of an open balcony);
- Perform hydro- and vapor barrier of the walls and floor;
- Install a frame for covering and insulating the ceiling, walls and floor;
- Install insulation material;
- Sew up the entire resulting structure with plasterboard or other covering material;
- Perform final cladding.
Step-by-step implementation of insulation work
Let's take a closer look at each of the above stages of the process, during which the finishing and insulation of loggias is carried out.
- Glazing. It is carried out by dismantling old and installing new and modern double-glazed windows. For greater reliability and guarantee of heat retention on the loggia even in severe frosts, it is recommended to install triple or, in extreme cases, double glazing with five-chamber profile. It is best to entrust the operations of dismantling and installing double-glazed windows to specialists rather than doing them yourself.
In the case of an open-type balcony, before glazing it, care should be taken to strengthen the balcony parapet with reinforcement and cement screed.
- Waterproofing and vapor barrier. You can protect the loggia from the penetration of moisture and steam using specialized membrane materials or the most ordinary polyethylene film. To do this, the walls, ceiling and floor are covered with these materials, securing the latter with paving stones.
Important: joints waterproofing material must be glued with reinforced construction tape. And the adhesion of the waterproofing material itself to the insulated surfaces must be tight. If foil material is used as such an insulator, then it should be laid with the shiny side inside the room.

Roofing felt seems to be the most suitable for waterproofing. It is relatively inexpensive, and its waterproofing qualities are more than enough to well insulate the loggia from moisture. In the case of roofing felt, the joints can be glued not with reinforced construction tape, but with specially designed bitumen glue. But in this case, this insulator must be overlapped.
- Installation of frame for insulation. We mentioned this frame a little higher when we indicated how to secure the waterproofing. It should be added that to create such a sheathing frame it is necessary to use timber with a cross-section of 50x50 millimeters. The distance between the bars must correspond to the width of the slabs of material with which it is planned to insulate the loggia. That is, if the width of, for example, a foam plastic board is 600 millimeters, then the distance between the sheathing bars should correspond to this indicator.
This frame-sheathing is fastened with self-tapping screws and dowels or with wooden caps. To do this, holes are drilled in the wall, dowels/caps are inserted into them, and after this the frame-sheathing is attached to the surfaces with self-tapping screws on top of the waterproofing. For greater reliability, you can lay a couple of reinforcing perpendicular jumpers between the bars from the same beam as the frame itself.

- Laying insulation material. This process is the main stage during which the insulation is laid into the cells of the sheathing. Insulation of balconies and loggias is carried out by the most different materials, however, the most popular of these are mineral wool and polystyrene foam. Their thermal insulation characteristics are approximately the same. But each of these materials has its own characteristics - both negative and positive.
Mineral wool, for example, is very afraid of moisture, requiring more serious vapor and waterproofing, but is absolutely indifferent to the effects of fire. Polystyrene foam, on the contrary, is not afraid of moisture, but fire and elevated temperatures are its number one enemy. However, there are no high temperatures on the loggia, and humidity is also minimized with good hydrophobic insulation. So, when repairing and insulating a loggia, it is quite acceptable to use one of them or both at once.

As for fastening methods, they are different for foam plastic and mineral wool. If the first one can be seated on silicone or polyurethane foam, then the second one is attached exclusively with special screws with a wide hat. General rule is that all gaps between the sheathing timber and the insulation must be minimized, otherwise the degree of insulation will be poor.
- Carrying out the cladding. When double glazed windows are installed, waterproofing and insulation materials securely laid, it’s time to think about how to sheathe, and most importantly, what to sheathe our loggia with. For some reason, many people believe that covering (also called finishing) a loggia is not as important a process as insulation. However, we hasten to assure you: this is not so.
Insulation and finishing of a balcony are two sequential, inseparable and complementary construction processes. If we do not insulate and do the sheathing, we will end up with just a cold and damp box, nothing more. If, on the contrary, we carry out insulation, but abandon the cladding, we will end up with not just another nice living room in an apartment, but a high-rise barn with new double-glazed windows.

It is for this very reason that insulating the balcony and finishing the balcony must be done one after the other. Many owners of loggias have a very reasonable question: what is the best way to sheathe this room? Many people use fiberboard, chipboard, plastic and other similar materials for these purposes. We recommend that when repairing a loggia, sheathing it with plasterboard.
Why them? There are several good reasons for this. Drywall is not too expensive, is lightweight, quite strong and durable. Finishing a loggia with plasterboard is done casually and easily, since a person who is even very far from construction and repairs can work with this material.
Sheets of plasterboard are attached either to a frame made of metal profiles, fixed to the wall or ceiling with self-tapping screws. A cobbled frame-sheathing, in the cells of which insulation was placed, is quite suitable. In both cases, fastening the plasterboard sheets is done with the same self-tapping screws.
Finishing the loggia with plasterboard, or rather its walls, should begin with the parapet. If installed metal profiles, then the starting profiles are attached to the bottom of the window sill using self-tapping screws, and appropriate level marks are made along them on the walls.

When installing plasterboard sheathing, you should decide in advance on the location of switches, lamps, sockets and other fittings and cut them in advance plasterboard sheets holes for these elements. After the final fastening of the casing, this will be very, very problematic.
- Final cladding. The final stage of repair work on a loggia or glazed balcony is the design of the appearance of this room, that is, the cladding of the ceiling and walls. This can be done using a wide variety of materials, from wallpaper and lining to tiles or decorative stone.
The only thing that can be noted is the following: if facing material If lining is selected, then thermal insulation in the form of foam plastic will not be suitable.

The combination of flammable wood paneling with polystyrene foam will give you very serious problems in the event of an accidental fire. Here, isolon or extruded polystyrene foam looks most suitable. By the way, they can be attached directly to the ceiling or wall using adhesives that do not contain toluene. Since both isolon and extruded polystyrene foam are destroyed under its influence.
In conclusion, we note that repairing and insulating loggias and balconies is not as labor-intensive and prohibitively expensive as some may think. The main thing is hardworking hands, a clear mind and, of course, desire.