During the construction and repair of baths, attention is paid primarily to structural materials, stoves, insulation and waterproofing. It is assumed that natural air circulation will be sufficient for high-quality ventilation of the premises in the bath. But this is absolutely not the case, and if you approach the matter superficially, you can face serious problems.

Peculiarities
Ventilation in the bath can be done in various ways.
Depends on her presence:
- distribution of heat flows inside;
- comfort and safety of washable;
- period of operation of the building.

Water and steam are continuously concentrated there, the tree actively absorbs them. Even if you dry the building periodically, without establishing a constant movement of air, the effect will not be strong enough. In order to avoid dampness, it is required to create a pair of ventilation windows - one serves to bring in clean air from the outside, and the other helps to exit the heated one, which has absorbed a lot of water. Choosing the location of the openings, they change areas that are especially intensively ventilated. The use of a pair of outlets in the steam room and dressing room sometimes improves the orientation of the air flow in the required direction.


Of course, the size of each window and the ability to adjust the clearance are of great importance. They put valves that open fully or partially. The calculation of the volume of ventilation openings is repelled, first of all, from the area of \u200b\u200bthe bath rooms. If you make them too large, mold will never appear on the floor and in the sink, but the steam room will heat up for a very long time, it will consume an unusually large amount of fuel, or electrical energy. Too narrow windows will not allow the air inside to cool or become dry.

All deviations from normal parameters are strictly unacceptable, which allow you to exclude the occurrence of powerful temperature changes - this not only creates discomfort, but can also provoke health problems. It is impossible to completely eliminate the difference in the temperature of the flows; it is only necessary to limit their magnitude. Normal ventilation systems are formed during the construction of the bath, while making channels and preparing openings. Windows are mounted only after the decorative cladding of the building has been completed. Therefore, you will have to enter information about the arrangement of ventilation ducts into the bath project.

In most cases, the ventilation openings are made strictly the same. The outlet can be made larger than the inlet, but according to safety rules, it cannot be smaller than the first. For the same reasons, sometimes they resort to paired exit windows. As control elements, it is worth using not doors, but valves, when closing which it is impossible to preserve the gaps. When the steam room is heated for the first time, the valves are closed 100% until the air reaches the desired temperature.


The use of elements with controlled position is also useful because the amount of air flow must be adjusted according to the season. When there are negative temperatures outside, even a very small trickle of air brings a lot of cold. Therefore, you should not open the ventilation windows completely. The cross sections of such windows should average 24 square meters. cm per 1 cu. m of internal volume. But these are only preliminary figures, and if in doubt about the result obtained, it is worth contacting qualified heat engineers for calculations.

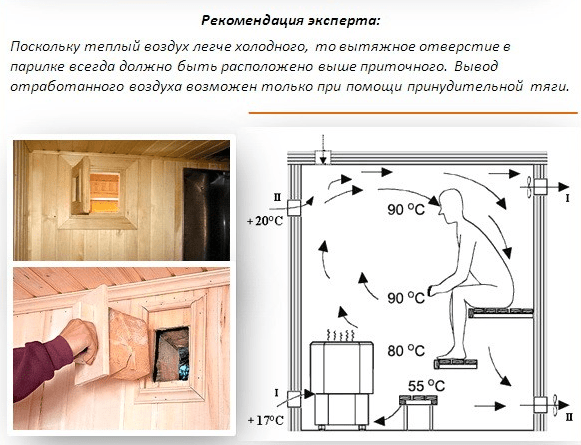
It is categorically impossible to place ventilation windows at the same height or even directly opposite each other, since this will not allow all the air in the bath to be heated sufficiently. In addition, such a design will not allow the air masses to be evenly mixed, which means that it will be necessary to thoroughly calculate the accuracy of the location of the ventilation elements. Exhaust windows are recommended to be placed just below the ceiling, because the air immediately rushes up after heating.


Types of ventilation systems
The ventilation device in the bath varies according to the design of the room and its total volume. Natural ventilation is based on the difference in temperature and pressure inside and outside. In order for it to work efficiently, the air inlet is organized near the stove, at a level of 25-35 cm from the floor. The outlet is made on opposite walls about 15-25 cm below the ceiling. But it is important to consider that such a scheme is not good enough for steam rooms, since it is relatively cold down there, and always hot upstairs.

The natural movement of air in such a situation is too difficult to organize, you will have to very carefully and accurately arrange the components of the ventilation system. A forced circuit does not always require the use of electronic control systems, with complex panels and so on. There are simpler options when ventilation windows, placed in a special way, are complemented by an exhaust fan. The combination of such components is especially effective when the bath is located inside the house, the windows are not placed inside the outer wall, but are connected to the exits by a long ventilation box. Duct fans it is required to select very carefully, because the conditions for their operation in baths differ from the usual parameters.


The peculiarity of such devices is increased waterproofing. electrical circuits and main mechanical parts, in adaptation to work under high temperature no technical implications. The state of supply ventilation and its device in each room is adapted to individual characteristics and under the type of bath. It follows that the time spent on calculations and thinking through the project is not wasted - it will save a lot of money and time, get the best result sooner.

As already known, the bulk of the projects involve the location of the introductory windows near the furnaces at 0.25-0.35 m from the floor. With this design, the stove transfers heat to the air coming from outside, and a flow occurs that moves in the direction of the hood. Having overcome the entire distance, hot and street flows eventually cover the entire volume of the steam room, and the area where the upper shelf is located is heated the most.

In the second option, by installing an exhaust fan, it is possible to mount the inlet and outlet openings on the same wall. The air flow is directed first in the direction of the heating device. Having received a thermal impulse, it begins to rise towards the ceiling and moves in a wide arc that covers the entire room. This approach will be effective if the bath is built into the house and has only one outer wall, while there is no need to arrange a ventilation duct.

If a bath with a leaking floor is created, the introductory window is placed in the same place as in the first case., right next to the oven. When the heated air gives off heat in the upper lobe of the steam room, it cools and descends to the floor, leaving through the holes in the flooring. This technique improves the evaporation of water accumulating below and allows you to delay the failure of the wooden floor. The hood is placed either in the next room, or in isolated channels that do not allow air to return to the steam room. The complexity of the flow path makes the use of a fan mandatory. This option is used very rarely, since it is not easy to calculate everything exactly, it is not easy to foresee the details properly.

Another type provides for a continuously operating furnace, the blower hole of which replaces the hood. For the inflow, a window is made under the shelf opposite the furnace itself and at the same level. Cold air displaces the heated mass upwards, and when the heat-releasing parts of the flow descend, they go into the blower channel. There are more complex systems when a pair of supply and a pair of outlet ventilation windows are placed (required with forced type circulation). It is quite difficult to adjust complicated complexes, but their effectiveness is higher than in the simplest cases.

The Bastu system is the placement of air inlets(with adjustable valves) behind or below the oven. The organization of vents under the stove is not required, although it is highly desirable. Through these openings, air from the underground part of the bath enters the room, which is connected to the external atmosphere by the foundation vents. When a bath is made in a previously finished room, you need to choose a room with a couple external walls; when preparing the basement, choose an angle that meets the same requirements. The dimensions of the inlet and outlet are calculated according to the general rules.

How to do it right?
Installation of ventilation implies that when the pipe is brought out, it is protected from the penetration of snow, dirt, rain and melt water. When this does not work out, you can organize a ventilation duct or direct the pipe up, passing it through the ceiling and roof. In the latter case, the channel is covered with an umbrella to prevent the penetration of the same precipitation and falling leaves. Arrange ventilation high level means to ventilate and dry all rooms, structural parts of walls, floors, attics and under roof spaces.

Walkthrough for the installation of ventilation in the bath is not difficult to find, however, the simplest option is the use of asbestos-cement pipes and gratings, selected according to the diameter of the channel. If we talk about technical performance, the most effective and convenient performance in the walls frame type the use of supply valves is recognized. First, the valve is disassembled and circled on the wall with a circle marker where future ventilation ducts will pass. To obtain holes in the skin, a drill is used, and large-diameter drills are taken, into which a jigsaw knife can easily pass.

- using the jigsaw itself, cut out a circle;
- remove wooden parts;
- take out the insulation and vapor barrier material;
- by using long drill pierce outer skin(this must be done in order to avoid mistakes when placing the outer share of the valve);
- mark a suitable hole outside and make it using long drills;
- saw off valve tubes along the thickness of the wall.

Then you need to mount the tube in the hole with your own hands and fix the inner segment of the valve with self-tapping screws, only after which you can put the outer part of the product. Installation of valves is recommended in the washing department and in the dressing room.
When preparing a new building, it is imperative to calculate both the size of the openings and the required fan power. It is possible to establish ventilation even when it was not originally done. A common mistake is to rely on burst ventilation and the use of stove draft to dry the air. In principle, this scheme works, but it has serious drawbacks. So, when opening windows and doors, instead of lowering the temperature, steam is released into adjacent rooms.

It does not go outside, but turns into condensate. The heating of the air is reduced only for a short time, and very soon it becomes uncomfortable again in the bath. To use the effect of stove draft for ventilation, holes are needed, but they should be made only at the bottom. This will ensure the flow of air from neighboring rooms, where fresh portions will come from outside. The damper and the doors of the furnace itself help to adjust the ventilation, to increase the inflow they are opened to the limit, and to weaken partially covered (to avoid the inflow carbon monoxide).

A simple calculation can only be made with respect to forced ventilation, and the natural flow of air is much more complicated and subject to a number of different factors. Among them Special attention it is worth paying attention to the strength and direction of the wind that blows in a particular area. If the outlet is on the side from which strong winds are directed, this can lead to the inflow of the supply mass into it (the so-called backdraft effect or its overturning).

Prevention of such a negative phenomenon seems simple - it is the lengthening of the channels output in the right direction or the use of turns in them. But each turn complicates the work and reduces the speed of exit or entry of air. The solution would be to orient the inlet to the side where the wind mostly blows, while placing the outlet on the opposite side or on the roof (with a tall chimney).

Use ventilation duct block wall not worth it, in such cases, mount it on the inner wall and partition. According to experts, the best air duct is the one built from galvanized pipes. Plastic structures can be mounted with care, carefully evaluating the temperature range allowed for them. The gap from the pipe to the walls of the hole is filled with mineral wool or more modern heaters. Mounting foam helps to eliminate gaps at the inlet and outlet.

The method of fastening the ventilation grilles is selected according to the material that serves as the base. Checking the quality of ventilation is very easy - a fire or a smoking object is brought to the hole. This will additionally find out how fast the air is moving. Most often, only an extractor hood is placed in the dressing room, supplemented by a fan.
When the furnace firebox is brought into the dressing room, it is necessary to make a special ventilation channel based on galvanized steel, passed under the finishing floors and supplying air directly to the furnace door. It is necessary to create a channel before the finishing floor is laid. One edge of the pipe is inserted into the hole and fixed in it with mounting foam, sealed with a grate. An adjustable plug is installed on the edge suitable for the furnace.

good ventilation- this is the one that avoids the occurrence of condensate on the surface of the ceiling. As for the subfloor, work on it begins with the preparation of a cement screed, which is tilted towards the sewer. The foundation is equipped with a pair of holes (in opposite walls, but not directly opposite each other). Air flows should go under the floor along the most intricate trajectories. The holes are closed with valves, which will allow you to adjust the rate of movement of the jet according to the current season.

In the bath, which was originally built without floor ventilation, it is required to drill a concrete base down to the ground. This will turn out to be a decent replacement for a full-fledged drainage when there is no desire to work on the installation. drain pipes. The ventilated floor must be decorated with jumpers, which are pipes or a wooden beam with a section of 11x6 or 15x8 cm. The logs are covered with processed and well-polished oak boards.

How to choose?
In the Russian bath, unlike the usual washing, it is necessary to provide with the help of ventilation the following conditions:
- temperature in the steam room - from 50 to 60 degrees;
- relative humidity - not lower than 70 and not higher than 90%;
- very fast drying of any wooden surface after washing;
- operational decrease in humidity while excluding drafts and opening doors;
- the same air quality in the steam room, as well as in the relaxation room, regardless of the season;
- preservation of all the traditional properties of the Russian bath.

No ventilation devices will help escape carbon monoxide, if there is constant inflow. You will have to continuously monitor the completeness of the combustion of firewood, and only after the attenuation of all the coals, close the chimney. The organization of air flow in a chopped log bath occurs through the crowns of the walls.

This approach, for obvious reasons, is not suitable for a brick building. When the walls are sheathed with boards or clapboard, you will definitely need to use ventilation holes, otherwise the negative effect of dampness will be excessively strong. In most cases, a hole of 200x200 mm will be enough to bring pipes outside. The choice of plastic or metal should be made in accordance with the specific project and operating conditions of the ventilation system.

A bath of foam blocks must be ventilated inside the walls. The layers of waterproofing and cladding are separated by a ventilation gap, for external cladding it is 40-50 mm, and inside the bath - 30-40 mm. A typical design involves the use of battens, which already help hold the wall cladding. In addition to in-wall ventilation, all rooms are equipped with an air intake at the bottom (most often behind stoves) and an outlet (near the ceiling). The advantage of an active air freshening system is that it can be placed anywhere.

In most cases, foam block baths are ventilated in a salvo way, that is, at the same time opening front door and the window furthest from it. Only a professional calculation is guaranteed to make it possible to find out whether artificial ventilation is needed or whether the natural circulation of air masses is enough.
Accessories and materials
A fan heater for a bath must have a certain level of thermal protection (not lower than IP44), its body is always made of heat-resistant materials. Modern devices have very high power and operate almost silently, the volume is no more than 35 dB.
As ventilation holes in attics, you can use:
- special windows;
- aerators;
- spotlights.

In the process of arranging the bath, special attention should be paid to the organization of high-quality ventilation. Without proper air exchange, the steam room simply cannot be used normally. If desired, all installation work necessary systems can be done by hand. It is enough just to figure out the order of laying and connecting the main units and do everything in accordance with the instructions.

Bath ventilation is very important. To avoid lengthy and not very interesting explanations, you can consider everything with a specific example.
The visitor to the bath stays in a room filled with a large amount of hot steam. The person inhales this vapor. We know that humans breathe in oxygen and exhale carbon dioxide. In the absence of sufficient air exchange, after a while a person will simply burn out.
That is why the ventilation in the bath should be as efficient as possible and made in full accordance with the technology. There are several types of ventilation systems. Explore the features of each option and choose the method that best suits your case.

Ventilation systems are installed to solve two main tasks, namely:
- ensuring the supply of clean air to the bath;
- removal of exhaust air from the steam room.
Additionally, ventilation provides faster and better drying of the steam room. It is necessary to study the features of existing ventilation systems and understand the order of their installation in order to obtain the most efficient and high-quality air exchange.
It is important that during the operation of the ventilation system the temperature regime characteristic of the bath is not violated. Air exchange should be organized in such a way that there are no disturbances in the distribution of temperature flows in the bath. Cool air in the steam room can only be near the floor. And the higher the ceiling, the higher the air temperature should be.
Ventilation should not take away from the bath fresh air. A properly equipped system supplies fresh air to the room and removes the exhaust air. Errors in the installation of the system will lead to extremely adverse consequences for both the bath and its visitors.

The main types of ventilation systems
There are several types of air exchange systems suitable for use in a bath, namely:

Exhaust air is removed from the bath through a special ventilation duct. The air exchange installation technology requires that the duct be installed diagonally to the inlet through which fresh air enters the bath.
Take care of the ventilation device in all areas of the bath, and not just in the steam room. The dressing room, rest room and other rooms of the bath should also be well ventilated.
What you need to know about floor ventilation?

Quite often, the owners of the baths forget that the floor of the steam room must also be well ventilated. Such forgetfulness leads to a very rapid deterioration of the structural elements of the floor and, in general, a deterioration in the characteristics of the bath.
Floors are constantly in contact with water. Without properly organized air exchange, the floor will collapse very quickly, and the floor covering will have to be changed after 2-3 years.
You need to think about floor ventilation even at the stage of bath construction, because. in an already finished room, it will be much more difficult to create high-quality air exchange.
First stage. Make small vents in opposite walls of the basement. It is best to provide these vents at the construction stage. concrete base baths. Creating any holes in an already finished structure will lead to some decrease in the strength of the building.

Second phase. Make one ventilation hole in opposite walls of the serviced room. Through them, clean air will flow into the room. Holes must be through. Ready channels are recommended to be closed with special ventilation grilles. Such protection will not allow all sorts of rodents and other pests to enter the bath.

Third stage. When building a furnace, make sure that its blower is slightly below the level of the finished floor. Thanks to this placement, the oven will also start working in the hood mode.
Fourth stage. Lay floor boards. When laying them, you need to leave gaps about 7-10 mm wide. Through these cracks, water can flow down. If the liquid lingers on the floor every time, the boards will rot very quickly.
Quite often, floor ventilation is arranged “according to Bast”. According to this technology, fresh air comes from under the stove, and exhaust oxygen is removed through a hole under the ceiling.
As required fire safety near sauna stove must lie a metal sheet. It is near this sheet that a hole is created to supply fresh air to the bath.
For the device of such air exchange, a special exhaust duct is required. You can buy a box ready-made or assemble it yourself from boards. The inner surface of the exhaust box must be covered with foil. The size of the box should be approximately 15-20% larger than the diameter of the chimney.
Ventilation "according to Bast" is the best option for those cases when the stove is located directly in the steam room. In such a situation, ventilation ducts can be equipped even directly in a brick podium.
Pay attention to the installation location of the sauna stove. If the stove is located directly in the steam room, then natural air exchange is present initially. You just don’t need to rely solely on it - such ventilation only works when the stove is running.

Most best option ventilation installation - arrangement of air exchange channels on opposite walls of the bath. They must be at different heights.
It is not recommended to place the ventilation holes too high. Although in most other cases it is recommended to make an exhaust hole directly under the ceiling, slightly different rules apply in baths. If you place the hood directly under the ceiling, hot air will leave the room very quickly.
For baths optimal height placement of ventilation holes is a level equal to 1-1.5 m.
Bath ventilation installation guide
There are several simple ways to organize effective air exchange in the bath. Study each of them and choose the best one for your steam room.
First way. Create an opening for fresh air. It should be behind the stove, about half a meter from the floor. Make a hole for exhaust air from the side opposite to the inlet, at a height of about 30 cm from the floor level. Install a fan in the outlet.

The lower you place the exhaust duct, the more intense the air exchange will be.
However, there is no need to be too zealous either. Try to make holes at the recommended height, as such values are the most optimal. Openings are recommended to be closed with ventilation grilles.
The second way. With this air exchange, both vents will be on the same wall. Work will be carried out with a wall parallel to the stove. The inlet duct is created at a level of about 30 cm from the floor, the exhaust duct is at the same distance from the ceiling of the bath. The exhaust opening is equipped with a fan. Close open channels with ventilation grilles.

The third way. Make a hole behind the sauna stove for air to enter. Position the intake duct about 20 cm from the floor surface. The exhaust channel is made at approximately the same height, but in the opposite wall. The exhaust opening is equipped with a fan. Close open channels with ventilation grilles.
Fourth way. This air exchange option is great for baths, the flooring of which is laid with slots to drain water. Make an inlet behind the stove unit at a distance of about 30 cm from the floor surface. An exhaust hole in the case of such ventilation is not made - the exhaust air will leave the bath through the cracks floor covering, and after that it is discharged to the street through a common ventilation pipe.

Fifth way. Such ventilation is ideal for baths with a constantly working furnace unit. Install the inlet channel opposite the stove, stepping back about 30 cm from the floor. The function of the hood will be performed by the oven.
Thus, the procedure for arranging ventilation is practically the same in all the considered methods. Each of them involves the creation of one or two holes, only the place and height of their placement change.
You can also make the holes yourself. Brick walls are easily traversed with a puncher, and log walls with any tool suitable for this, for example, a wood drill. It is recommended to put plastic pipes into the finished holes. Don't forget about protective ventilation grilles. In the future, you are unlikely to be happy with uninvited guests in the form of rodents.
Successful work!
Video - Do-it-yourself ventilation in the bath
Without good ventilation in the steam room, you won’t get real pleasure from the bath, and for people who cannot boast of good health, going to such a bath is completely dangerous. In this article, we tell you how to make ventilation in the bathhouse and analyze the “classics without ventilation ducts”: how our ancestors ventilated the steam room and how it might look in a modern solution.
- Volley ventilation in the Russian bath
- Do I need additional ventilation holes in the Russian bath
- The device for proper ventilation in the bath with their own hands on the experience of the participants of our portal
Volley ventilation: proper ventilation in the steam room
In a classic Russian bath, two ventilation schemes were commonly used:
- volley ventilation, providing a sufficient amount of air during soaring;
- ventilation to dry the steam room after use.
Volley ventilation is carried out through an open door and window. We emphasize: we are talking about a wet steam bath, not a sauna.
Building for myself FORUMHOUSE Member
I had to quarrel with the customer and insist that an opening for a window be cut in the 500 mm thick wall.
To obtain air to breathe in the steam room, a window next to the shelf and a door to the dressing room are enough. The window and the door must be opened between visits while we are resting. Then we return to the steam room, close the window and the door and steam again.

To dry the steam room, they make a small vent in it (there are different options: some make it in the far corner under the ceiling, others, on the contrary, under the shelf). After using the bath, open:
- this little breeze
- a window in a washing or dressing room.
This creates a stream of air that ventilates the room and removes moisture from it.


In the photo: the bathhouse of our user with the nickname Vasisdas.
For a FORUMHOUSE user with the nickname Nomadic, the ventilation in the bathhouse is done as follows: air inflow is under the furnace firebox, the exit is diagonally under the ceiling. Usually everyone steams with a closed hood, but sometimes it is opened, “if the steamer is not extreme”, and in this case natural ventilation works.
When you want to freshen the air in the steam room after several visits, the hood opens, a shock dose of boiling water splashes into the heater.
Nomad
All the old steam is blown out the hood window. After that, I wave the doors a little, creating an additional flow, put a new wormwood, close the window, and the steam room is as good as new, as if it had never been steamed there.
The way "from the grandfather"
There is also an interesting way of airing the bath, which came down from our ancestors, which EsKor, a member of our portal, saw in the bath “at one gray-haired grandfather”. In this bath, the only specially made means of ventilation was an outlet a meter from the floor, under the shelf. What is the meaning of such a breather? It turned out that the grey-haired grandfather "refreshed" the air in the steam room in almost the same way as Nomad, only he prepared a bucket of ice water in advance and poured it on the shelves either a moment before or immediately after a shock dose of water was charged into the heater.
EsKor
Grandpa explained that cold water, which falls on the floor from the shelf, pulls the steam down to itself, and it takes stale air with it and flies into the vent. No mysticism, physics explains this matter well.
Cold water cools the steam, condensation occurs, a decrease in pressure causes an increased flow of air above the steam layer, and the steam literally falls from the ceiling.
It is clear that this method is not suitable for dry-air baths and for steam rooms with a blank floor and no drain.
Different schemes of ventilation of the Russian bath
Let's consider how such a ventilation system works on the examples of several saunas of FORUMHOUSE participants.
Here is the bathhouse of our participant with the nickname Vasisdas.

Vasisdas
Everything ingenious is simple! Heater stove, door, window and solid wood. Learning how to use it is a matter of technology.
How the window in the steam room was made: a double-glazed window on the side of the facade of the bath, a ventilation gap in the thickness of the wall pie, on the side of the steam room there is a decorative window. This avoids unnecessary heat loss and is simply beautiful.

Our member with the nickname I build for myself a small combined steam room-washing room, 2.5 by 2.1 and 2.1 m high.

The ventilation system includes:
- the window at the shelf is 300x300mm along the frame, the opening itself is 200x200;
- air in the upper crown under the ceiling 150x150mm;
- airflow near the floor under the shelf 150x150 mm.
The upper air is always closed, it is opened only to dry the steam room after use. Also, our user sometimes opens it to create a softer mode for the wife and daughter.

While vaping, all openings are closed. The height of the window is chosen successfully, the heat from the steam room is not blown out.

During soaring, two types of ventilation are used:
- simple ventilation: you leave the steam room, open the window and leave the door ajar.
- quick ventilation through the window in the steam room and the window under the shelf.
To dry the steam room, all openings and windows are opened.

I build for myself
The air from the street through the dressing room window goes along the floor into the lower vent under the shelf (draft), partially heated by the still hot stove and rises above the shelf into the upper vent. There is a draft under the floor from the vents in the basement. In winter, I close them for soaring.
Such "old ways" of bath ventilation, without arranging ventilation ducts, our user considers justified and quite sufficient for a heat-intensive stove.
This is how ventilation is arranged in the bathhouse of our participant with the nickname Mikhalych Titov. The inflow is made through a half-brick hole in the side wall.


When viewed from the street, it looks like this.

The downward branch, into which condensate flows, is closed with a screw plug. The entrance from the sink is made under the oven.
When building a bath, a member of our portal with the nickname Chagav attached special importance to ventilation. In the rest room, he made forced ventilation (one inlet and two exhaust), and natural ventilation was made in the steam room.


If desired, air enters the steam room from the street - pipes are poured into the foundation, corrugated stainless steel passes through the stones of the stove. It opens and closes with a latch.
It is definitely impossible to answer the question of whether plastic ventilation is possible in a bathhouse. Such systems have proven their practicality and performance in domestic and industrial environments, but the bathing environment has its own specifics, which to a certain extent limits the use of plastic. When choosing plastic products for a bath in each case should be approached taking into account all the influencing factors and possible consequences.
In the bath, plastic pipes for ventilation in the bath can be used.
Reasons for the popularity of plastic
Ventilation structures made of plastic elements gained wide popularity in various areas of human life. This is facilitated by their attractive appearance and numerous advantages over traditional metal competitors.
Note! Parts made of polyvinyl chloride (PVC), polyurethane and polypropylene find the greatest application.
The following positive aspects of plastic ventilation stand out:
- No corrosion. This advantage most often determines the choice of plastic. Any metal (even stainless steel) in the conditions of ventilation systems, where steam condensate occurs, the aggressive effects of various substances that pollute the air, are subject to corrosion. Plastic, on the other hand, is absolutely resistant in this respect.
- Low cost. Plastic systems have a significantly lower price compared to metal, which provides increased resistance to corrosion.
- Ease and quality of installation. When installing metal boxes and pipes, there are always problems in the places of knocks, requiring rolling, welding, and other operations. Cutting and joining plastic elements does not cause difficulties, and the ends are easily processed and aligned. Thus, the sealing of plastic boxes is much easier to ensure.
- Light weight. This advantage is provided by the ease of fastening at the installation site and transportation when delivering the goods.
- Plastic elements are resistant to water, steam, aggressive media, ultraviolet rays. They comply with all sanitary standards under normal conditions.
 PVC device pipes for ventilation
 Features of the use in the bath
In order to decide whether plastic ventilation is suitable for a bath, it is necessary to note the disadvantages of such systems:
- Low heat resistance of plastic. Already at temperatures above 80-85 degrees, the release of harmful components from a substance that poisons the human body begins. When heated, the plastic loses its strength and rigidity, which leads to deformation.
- Low resistance to open fire. Despite the fact that PVC does not support combustion, it is easily melted, and its drops, falling on other structures, cause a fire. In general, plastic elements belong to the group of flammable materials, which requires great care when placing them near the sauna stove and chimney. Even with a small fire source, a large number of acrid smoke, very dangerous to humans.
- Reduced resistance to cutting, abrasion, scratching. Under impact and cutting loads, plastic is easily damaged or deformed.

Given the problems outlined, it can be concluded whether plastic ventilation is suitable for a bath. The most extreme conditions are noted in the steam room. In the Russian bath, a temperature of about 60-65 degrees is maintained here with saturated water vapor. Such temperatures seem to be below acceptable, but they are close to critical values, and at the slightest excess lead to the decomposition of plastic. Thus, the use of plastic ventilation in the steam room of a Russian bath is dangerous for human health. It is absolutely unacceptable to use it in the sauna steam room, where the temperature can reach 100 degrees.
 The smoke from burning plastic is very corrosive and can lead to poisoning.
 In other bath rooms ( washing department, dressing room, rest room) the air temperature does not have large values, and extreme conditions are associated with high humidity, which is absolutely not dangerous for plastic. Therefore, we can conclude that ventilation in a bath made of plastic pipes is quite acceptable in all rooms, except for the steam room.

Important! Particular attention should be paid to the location of the stove and its chimney, near which the air temperature can be critical. In addition, there are fire hazards.
 Particular care must be taken with the location of the plastic pipe for ventilation in the bath. It is better to place it behind a brick lining if it is near the stove.
 Design features
The standard set of bath forced ventilation includes the following main elements: fan (exhaust and supply); ventilation pipes and box; vents with plugs; connecting and accessories. Among the important components, the following stand out:
- turns: designed to change the direction of the ventilation duct;
- adapters: necessary when connecting route elements different size;
- bifurcations and tees: are installed if it is necessary to divide the incoming air flow into several rooms;
- couplings: connecting and holding elements;
- flanges and gearboxes.

Forced ventilation is based on exhaust-type fans installed on the outlet duct, or the supply version, designed to suck in fresh air from outside and form an air flow. The supply system is most often used, and the fan can be installed alone to service all rooms or several devices separately in each room. In the first case, a sufficiently powerful mechanism is mounted, usually with metal blades, and the flow distribution then goes through the plastic ventilation ducts. Each room can be installed small fans in a plastic case with plastic blades.
 In the bath for stretching are used plastic fans
 Plastic air ducts for ventilation of the bath of the type in question are an important part of the system. They distribute the incoming air flow and direct it to the desired zone.

Another option is to install an exhaust fan not in the outlet duct, but directly in the most stagnant area. In this case, it is mounted at the end of an exhaust duct, through which the polluted air is directed outside.
Plastic boxes and pipes are produced in various shapes and sizes. In cross section, they can be round and rectangular, and in design - smooth and corrugated. Most often, the input powerful air flow is directed into rectangular boxes, and then distributed through round pipes.
Nuance! The corrugated design is used in places where pipe movements in different directions are needed, or for fitting elements along the length.
 Composite types connecting elements ventilation system
 Air ducts have different sizes, which are selected depending on the required power of the system and the volume of incoming air. Round pipes for a bath have a standard diameter in the range of 56-160 mm. Among rectangular ducts, air ducts 6x12 and 6x20.5 cm in size are most common. Corrugated elements usually have a round shape, and the diameter of such a pipe ranges from 15-55 cm.
 Plastic air ducts for ventilation come in round and rectangular shapes
 Additional elements
In addition to these elements used in the installation of the ventilation system in the bath, plastic parts are used that perform protective and regulatory functions. These include various dampers, hatches and gratings.

Plastic grills can have different purposes. The following main varieties are distinguished:
- inertial type: for flow separation without pressurization;
- adjustable grilles: allow you to change the volume of incoming air and distribution in one direction while blocking the movement of air in the other;
- unregulated type: distribution or flow restrictions without the possibility of regulation;
- external protective grids: to prevent foreign bodies from entering the channel.
 Extraction grates can be of an adjustable type
 Plastic hatches can be installed in powerful, branched systems for access to the ventilation line for revision, cleaning, repair. They can be mounted on the ceiling or walls of the bath. Damper doors are designed to allow access to natural flow. They can be mounted on the natural ventilation vents in the window or door. Standard sizes are 10x10, 15x30 and 25x60 cm.
Arrangement features
Installation of plastic ventilation in the bath can be done by hand. The main stages of work: the manufacture of vents; installation of fans; installation and fixing of the input box; installation and fixing of the branching system of incoming air flows; arrangement of the outlet vent; installation of shutters and hatches.

When carrying out work, the following recommendations should be taken into account:
- The plastic elements are connected to each other by soldering. In the presence of threaded elements, sockets, flanges, adapters, couplings are used, which makes it possible to provide a collapsible system.
- A special sealant is used to seal the joints.
- Cutting elements or changing their shape is done with a knife or a special hacksaw.
 Connection diagram of the fan section in compulsory system ventilation
 For installation work you will need the following tools: an electric drill, a screwdriver, a grinder, a knife, a hacksaw, pliers and side cutters, a screwdriver, a paint brush, a tape measure, a metal ruler.
 Before use, it is necessary to check the ventilation system in the bath
 Plastic ventilation in the bath can be installed in all rooms, except for the steam room. Plastic cannot be used in it because of the risk harmful secretions when heated. You can easily install the system with your own hands.
A well-equipped ventilation system, ceteris paribus, guarantees, firstly, long term services of building and finishing materials involved in the arrangement of the serviced premises, and secondly, the comfort and safety of visiting the latter for the user. Particularly relevant is the issue of arranging a full and sufficient effective ventilation is in the bath, due to the characteristic temperature and humidity conditions and additional requirements for such buildings.

Prices for bath fans
bath fan
Video - Requirements for ventilation in the bath
The choice of the optimal type of ventilation system for servicing a bath is a topic for many hours of discussion. For example, there is natural ventilation. The cost of money, time and effort for its arrangement is minimal - work in literally comes down to drilling holes in the walls, installing boxes / pipes and valves / gratings.

 Ventilation damper and grille
  Ventilation grilles for baths and saunas

However, it is impossible to use natural ventilation to serve all the premises of the bath. Of course, one could save money, but the disadvantage of such a solution will become obvious with the arrival of the first winter: along with the influx of fresh air from the street, cold will come in, and everyone knows the combination of frosty air with humidity - everything around will simply freeze. Therefore, natural ventilation in some rooms must be combined with others. existing options in other bath rooms.
If the bath is equipped with a washing room or even a private pool, natural ventilation will definitely not cope with the maintenance of such premises - you will have to equip an exhaust system. And in general, the presence of a forced inflow / outflow of fresh air will be useful for both visitors to the bathhouse and its premises. Recommendations regarding the optimal composition of the air exchange system are given in the table.
Table. The choice of ventilation system for different rooms
| room | Recommended type of ventilation | Scheme | Description |
|---|---|---|---|
| Steam room, dressing room or rest room | Under aeration it is necessary to understand the organized natural air exchange. The option is most optimally suited for use in a bathhouse: air is supplied from the bottom of the furnace (for other rooms - 25-30 cm above the floor), exhaust air is removed through an opening in the upper part of the room. The work of air exchange is based on elementary physical laws: cold air from the street displaces warm air masses, having less weight, up the room. Aeration is ideal for use in rooms with high heat dissipation rates. The presence of additional moisture contributes to an even more pronounced increase in the efficiency of the system. |
||
| Wash room, bathroom, pool room | The system is equipped with a fan and, if necessary, cleaning filters. Mechanical exhaust ventilation is ideal for use in the washroom, pool room and other damp and high traffic areas of the bath. Mechanical hood provides effective removal bad odors and excess moisture, which makes the air in the served room safe and clean. It is impossible to use only exhaust ventilation - air rarefaction is formed. To compensate for the rarefaction, air is supplied from the street or other rooms. Along with this, the presence of forced ventilation will eliminate the likelihood of drafts. The supply ventilation system can be either natural or mechanical. In combination with mechanical exhaust ventilation, it is more expedient to use mechanical supply system, because the potential for natural inflow may ultimately be insufficient to compensate for the resulting rarefaction. At the heart of mechanical supply ventilation is a blower fan. Additionally, it can be equipped with an air heater, which will eliminate the inconvenience and solve the problems of ventilation of the serviced premises during the cold season. Additionally, the supplied air can be humidified or purified using appropriate devices. A mechanical system is more complex in arrangement compared to its analogue, which works according to the laws of physics: in addition to fans and air ducts, the system may include additional equipment and devices (diffusers, air distribution grilles, automation equipment, silencers, etc.). This gives an excellent opportunity to arrange an air exchange system that fully meets the wishes of the user. |
In vestibules, warehouses and other premises of a similar purpose, a natural hood is made.
Regardless of the type of ventilation system chosen, the bath must have conditions for simple ventilation. Install adjustable windows in all rooms, the location of which allows this.
Video - Types of ventilation systems
Instructions for self-calculation of air exchange
For the calculation, an elementary formula is used:
W (required volume of fresh / exhaust air) \u003d k (coefficient indicating the frequency of air exchange) x V (volume of the serviced room, determined by multiplying the width of the room by the length and height).
That is, first you must calculate the volume of each room and find for it the required indicator of the volume of clean air (in calculations it is customary to denote Wpr, i.e. inflow) and a similar indicator of exhaust air (indicated as Wvt, outflow). In this case, multiplicity factors must be taken into account. The calculated values are rounded up - the last digit in the number must be 0 or 5.
Next, the summation of all Wpr is performed. A similar action is carried out for the found Wvt. The amounts received are compared. If the total value of Wpr exceeds the total indicator Wpr, it is necessary to increase the exhaust volume for rooms with a minimum air exchange value, if vice versa, increase the inflow by the missing value. That is, at the output, the sum of all Wpr should be equal to the total value of the found Wvt.
The results of the calculations will allow you to determine the optimal cross-sections of the installed air ducts and choose the appropriate type of ventilation system. Thus, with the calculation of the volume of premises and other related data, there will be no particular problems. For greater convenience of subsequent processing, enter the found values in a simple table, as in the example presented.

In the given example, the total value of Wpr is less than the sum of all found Wvt by an indicator equal to 110 m3. In order for the balance to be maintained as a result, it is necessary to ensure the flow of clean air in the missing amount. This can only be done in the waiting room. Thus, the value of 55 m3 for the dressing room, given in the table, must be replaced with an indicator of 165 m3. Then the balance will be struck.
Proceed to the calculation of the installed air ducts and the drawing up of the structure of the equipped ventilation system.
The ventilation system is designed in such a way that the air moves through the installed air ducts with the following speed indicators:
- ≤ 5 m/s in main channels and ≤3 m/s in existing branches - for mechanical ventilation systems;
- ≤ 1 m/s - for air exchanges operating according to the natural principle;
- 2 m/s - for natural air exchange directly in the steam room.

When choosing the cross-section of air ducts, consider the above indicators. As for the profile of the box / pipe, this moment is determined by the design features of the air exchange and the bath itself. For example, air ducts with a circular cross section are easier to install than their rectangular counterparts, and it is much easier to select the required connecting fittings for round air ducts.
The relationship between the diameter of the air ducts and other significant indicators is shown in the following tables.

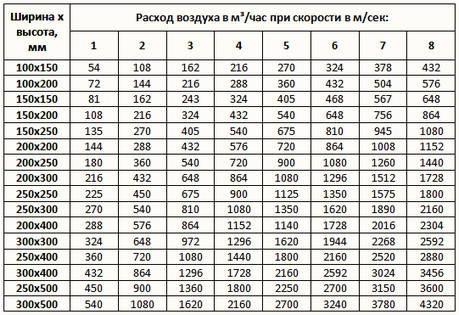
For example, we will work with round ducts. We select the necessary sections according to the corresponding table, focusing, at the same time, on the indicators of the table An example of calculating ventilation.
Estimated air consumption is 165 m3/hour. The air flow at this flow rate should not move faster than 5 m/s. In accordance with the table above for round ducts, we select the section according to the specified data. The tabular value closest to ours is 221 m3/h. Air duct cross section - 125 mm.
 Air duct with insulation
  Flexible ducts
In the same order, we determine the optimal sections for all branches of the system in the serviced premises, remembering that in them the air flow should move at a speed not exceeding 3 m / s (in vestibules and closets - 1 m / s, in the steam room - 2 m / s). sec):
- steam room: calculated Ww is 60 m3 / h, which requires the installation of an air duct with a cross section of 125 mm;
- shower room - Ww is 50 m3 / h, air moves at a speed of 3 m / s, a 100 mm air duct is suitable;
- toilet - the indicators are similar to the shower room;
- pantry, vestibule, etc. - indicators (except for the speed of air movement) are similar to the shower and toilet.
Important! In the shower room (washing room, room with a pool), an increased level of humidity is noted. When determining the cross-section of the duct for this room, it is necessary to make an upward adjustment (in this example, 125 mm).
For greater convenience, enter all the information received in the table. As an example, you can use the template below.

Important note! In the table above, the extract volume exceeds the clean air supply. This happened because the sections were determined by the nearest flow rate, and the diameter of the air duct in the washing room was deliberately increased. In practice, such an approach will only benefit - the margin for outflow and inflow will not be superfluous.

SNiP 2.08.01-89. Residential buildings. Download file
Sanitary and epidemiological requirements for residential buildings and premises. Sanitary and epidemiological rules and regulations SanPiN 2.1.2.1002-00. Download file
Building regulations Russian Federation heating, ventilation and conditioning heating, ventilation and conditioning SNiP 41-01-2003. Download file
The cross-sectional area of the ventilation window is determined in accordance with the volume of the served room: 24 cm 2 for every 1 m3.
It remains to figure out only the optimal height of the ventilation holes:
- for the influx of fresh air - an average of 25-30 cm above the floor (in the steam room - near the stove);
- for the outflow of exhaust air - about 15-20 cm below the ceiling, as a rule, on the wall opposite to the supply air.
Popular bath ventilation schemes
Separate consideration deserves only options for arranging ventilation in the steam room - in the rest of the rooms everything is done according to the standard scheme, for example, like this:

Air exchange in the steam room can be organized in accordance with 4 main schemes presented in the following image.
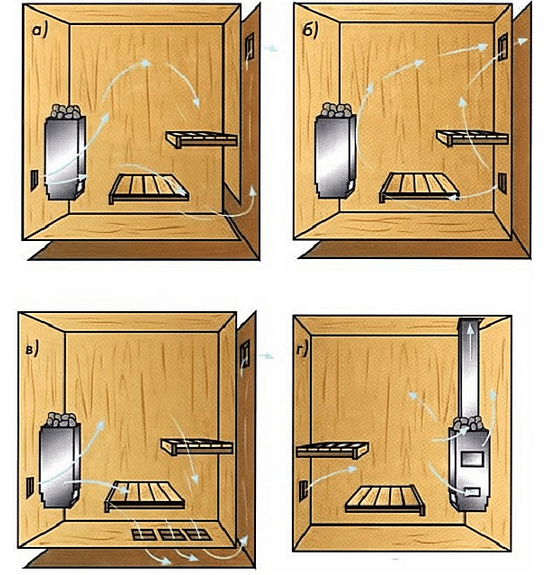
Scheme "a". The most popular option. The window for air flow is next to the stove, at a distance of about 25-30 cm from the floor. The incoming clean air gradually displaces the exhausted warm upwards to the opposite wall. On it, about 15-25 cm below the ceiling, there is an exhaust hole.
Scheme "b". Both holes are on the same wall. The circuit will only work if an exhaust fan is installed. Fresh air enters through the lower opening, equipped in the wall opposite to the stove. The air will rush in the direction of the stove, and then, covering the space of the steam room with an arc, move to the hood and be discharged outside the bath.
Scheme "in". The option is suitable for steam rooms with a leaking floor. The inlet opening is located as in scheme "a". Having warmed up in the upper part of the steam room, the air descends to the floor, passes through the gaps in the boardwalk, contributing to more efficient drying of the boards, and then is removed through the exhaust hole, usually equipped in another room. Also, the hood can be carried out through a separate insulated channel.
Scheme "g". Option for baths with a constantly working stove. In this case, the function of the hood is performed by the blower hole of the furnace. The supply window is arranged under the shelf, in the wall opposite to the furnace. The height of the inlet must correspond to the height of the furnace blower. Fresh air rushes to the stove, displacing the air masses heated by it to the ceiling. Cooling down there, the air descends and is removed from the bath through the blower.
In order for the operation of the air exchange system to be as efficient and high-quality as possible, before starting its installation, study and remember a few simple tips.
If your bathhouse has a bathroom or even a kitchen, equip them only with exhaust ventilation - this solution will eliminate the possibility of unpleasant odors spreading to other rooms. Alternatively, you can arrange in other rooms supply ventilation, and equip the bathrooms with a natural exhaust - in this case, the air will move to the bathrooms.

When calculating the performance of fans, it is recommended to reduce the total capacity of the supply units by 5-10% of the total performance of the exhaust units. In this case, the exhaust air will be completely displaced by the incoming air masses, and a 5-10% reserve will compensate for the inflow of air entering through windows, slots, etc., which will help to maintain a balance.

In rooms with only one natural ventilation it is recommended to definitely make opening vents - this will increase the efficiency of fresh air intake and reduce the risk of fungi, mold, rot, etc.

Important! If your bath has a non-standard configuration, the ventilation system project will also be individual. When compiling it, the features of the composition of the premises, their design, design features and so on.
The main stages of independent arrangement of the ventilation system
Any ventilation system in any room is equipped in approximately the same sequence. Differences are present only in the characteristics of the air vents and their locations, as well as the configuration of the system (mechanical, unlike natural ones, are supplemented by various kinds of devices).
For example, the following arrangement of ventilation elements can be used.

Or its somewhat modified counterpart, shown in the following image.

Recommendations regarding the choice of the location of each opening, the type of air exchange system for different rooms of the bath, as well as the procedure for determining the characteristics of ventilation elements, were discussed earlier.
Along with this, the procedure for arranging ventilation may vary depending on which design option you prefer. There are few solutions available:
- independent ventilation in each room. An easier option. Work is limited to the installation of transoms, vents, fans and other necessary elements if provided by the project. Fans can be mounted both in windows and in separate channels brought outside through the wall;
- centralized system. More difficult option. Requires ventilation ducts. Used mainly in private homes - in the case of a bath this option will be too costly and time consuming;
- "hybrid" option. Some rooms are ventilated individually, some are combined into a joint system.
An appropriate option for use in the bath is independent ventilation - the owner can choose the optimal characteristics of fans and other elements for each room, saving money, time and effort on the activities necessary to combine the channels into a single system.
Important! The location of some bath rooms may not allow to equip independent supply and exhaust ventilation. In this case, it will not be possible to avoid laying ventilation ducts. Alternatively, the boxes can be placed in the attic, and the ventilation holes can be arranged in the ceiling or connected to the channels equipped in the walls (the option is more complicated if the laying of such channels was not provided for by the project at the construction stage of the bath).
In most cases, the first option is used: ventilation pipes of the required length are led out through openings in the ceilings of the serviced premises and either equipped with their own fan, if necessary (easier to implement for an unprepared user, the procedure is similar to that given in the following table), or connected into a single circuit and connected to a common hood (may require the involvement of specialists).
Remember: the maximum efficiency of the ventilation system is ensured by using as short and straight air ducts as possible - up to 3 m with natural air exchange and up to 6 m with electric fans.


The procedure for arranging an independent ventilation system is given in the following table.
Important! The example considers instructions for arranging a mechanical ventilation system using fans. The order of installation of natural air exchange remains almost the same: only the stages of laying wires and installing fans are excluded.
Table. Arrangement of ventilation
| Stage of work | Explanations |
|---|---|
| The operating procedure remains the same for the supply and exhaust openings. Only the height of their arrangement and location changes ( possible options discussed earlier), as well as the type of fans used (supply or exhaust). The characteristics of the latter are selected on an individual basis, taking into account the volume of the serviced premises, the required air velocity in the air ducts, the required air exchange rate, etc. - all these moments were consecrated in the theoretical part. We equip the holes in the following order: - we outline the center and contours. We make the markup so that the diameter of the hole as a result is slightly (usually a 2-3 mm gap) exceeds the diameter of the installed pipe (recommendations for choosing the diameters of the ducts were given earlier); - Using a perforator, make a hole in accordance with the markings. We hold the working tool horizontally, but with a slight downward slope; - carefully take out the cut material (a hammer and a chisel will help us with this), after which we carefully clean the finished hole from dirt and dust. |
| The ventilation pipe (ventilation duct housing) is placed in the prepared hole, but before that it (if mechanical / forced ventilation is planned) must be equipped with a fan. Useful recommendation! Initially, buy ready-made kits for arranging ventilation, including, in addition to related accessories, a ventilation duct / pipe and a fan with an appropriately sized case - this way you will avoid difficulties during the assembly phase. The pipe with the fan is placed in the prepared hole, and the remaining gaps are filled with mounting foam. |
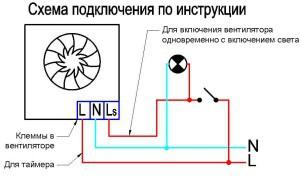
| The fan is an electrical appliance, therefore, it must be connected to the mains. Let's do this while the mounting foam dries (at least 10-12 hours). The procedure is standard: - the contours of the strobe for the cable are cut out in the wall using a grinder. Excess material is removed using a chipper; - a hole is prepared in the wall for installing the switch box (for example, you can use a puncher). The box is installed (pre-read the instructions specifically for your switch). The switch itself will be mounted after finishing; - the wire is laid in a strobe. We use alabaster to fix the cable; - connect the wire to the switch and fan. We must first study the connection diagram recommended by the fan manufacturer in the attached instructions, because. it may differ for different devices. For example, one of the most commonly used schemes is given. |
| It remains only to bring the whole structure into its proper form. To do this, we do the following: - get rid of excess dried polyurethane foam with a knife; - putty strobes; - we mount adjustable ventilation grilles on both sides of the pipe. For fastening we use self-tapping screws. If provided, we install additional elements at the appropriate stages of work (for example, an air heater, a filter, etc.). Each of these devices is mounted individually - we first clarify these points in the manufacturer's instructions. |


Video - Arrangement of ventilation holes
Video - Do-it-yourself ventilation in the bath - diagram


